

SpringBoot默认的消息发布与监听类是SimpleApplicationEventMulticaster,下面围绕该类来具体分析一下SpringBoot的消息机制。
从如下几个方面具体分析:
- 类图
- SpringBoot如何监听消息与发布消息
- 从源码分析ApplicationEventPublisher 如何发布消息
- 从源码分析消息监听器 ApplicationListener 如何注册
- 从源码分析如何根据消息类型获取对应的 ApplicationListener
- 从源码分析分析ApplicationListener是如何接收到事件的
1. 类图
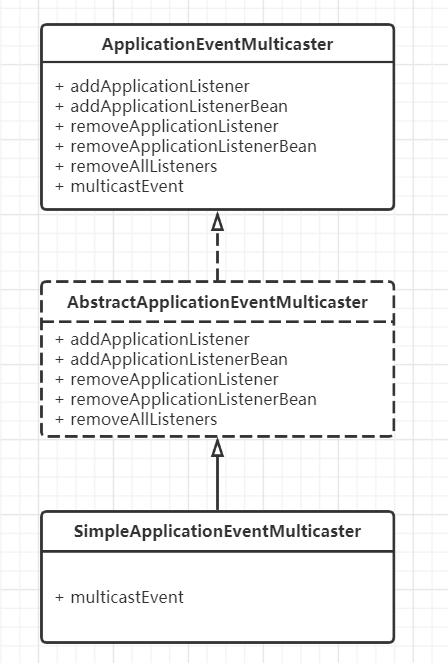
2. SpringBoot如何监听消息与发布消息
- 注册监听器方式一
@Component
public class TestListener implements ApplicationListener<TestEvent> {
    @Override
    public void onApplicationEvent(TestEvent event) {
        System.out.println("TestEvent");
    }
}
- 注册监听器方式二
@Configuration
public class TestListenerConfig {
    // 可以接收所有消息事件
    @EventListener
    public void handEvent(Object event) {
        System.out.println("EventListener hand " + event.getClass().getName());
    }
    // 可以接收TestEvent 类型的消息事件
    @EventListener
    public void handEvent(TestEvent event) {
        System.out.println("EventListener TestEvent");
    }
}
- 注册消息监听器方式三
@SpringBootApplication
public class DemoApplication {
    public static void main(String[] args) {
        SpringApplication application = new SpringApplication(DemoApplication.class);
        // 可以监听ApplicationStartingEvent、ApplicationEnvironmentPreparedEvent等启动消息事件
        application.addListeners(new ApplicationListener<ApplicationEvent>() {
            @Override
            public void onApplicationEvent(ApplicationEvent event) {
                System.out.println("startEvent " + event.getClass().getName());
            }
        });
        application.run(args);
    }
}
- 注册消息监听器方式四
在resources文件夹创建META-INF/spring.factories,在spring.factories中定义路径
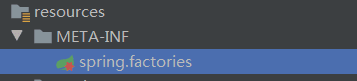
org.springframework.context.ApplicationListener=\
com.example.demo.listener.TestFactoriesListener
- 消息发布
@RestController
public class TestController {
    @Autowired
    ApplicationEventPublisher applicationEventPublisher;

    @GetMapping("test")
    public String Test() {
        // ApplicationContext实现了ApplicationEventPublisher
        // ApplicationContext中会初始化一个SimpleApplicationEventMulticaster,用来发送消息
        applicationEventPublisher.publishEvent(new TestEvent("null"));
        return "test";
    }
}
3. 从源码分析消息监听器 ApplicationListener 如何注册
AbstractApplicationEventMulticaster包含两个注册方法
- addApplicationListener,直接注册在SpringApplication中初始化的ApplicationListener
- addApplicationListenerBean,注册声明为EventListener的Bean对象
     // 使用默认的ListenerRetriever,作为互斥锁
    private Object retrievalMutex = this.defaultRetriever;
     // 创建了一个默认的ListenerRetriever,用来存放所有ApplicationListener
     // 对象和所有的Bean名称
    private final ListenerRetriever defaultRetriever = new ListenerRetriever(false);


    // 加载SpringApplication中初始化的ApplicationListener
    @Override
	public void addApplicationListener(ApplicationListener<?> listener) {

		synchronized (this.retrievalMutex) {
            // 返回代理的原始对象,如果原始对象是一个ApplicationListener
            // 把原始对象移除,然后添加代理对象。避免一个监听器重复调用
			Object singletonTarget = AopProxyUtils.getSingletonTarget(listener);
			if (singletonTarget instanceof ApplicationListener) {
				this.defaultRetriever.applicationListeners.remove(singletonTarget);
			}
			this.defaultRetriever.applicationListeners.add(listener);
			this.retrieverCache.clear();
		}
	}

        //  加载用户定义的Bean对象
	@Override
	public void addApplicationListenerBean(String listenerBeanName) {
		synchronized (this.retrievalMutex) {
			this.defaultRetriever.applicationListenerBeans.add(listenerBeanName);
			this.retrieverCache.clear();
		}
	}
4. 从源码分析如何根据消息类型获取对应的 ApplicationListener
@Override
public void multicastEvent(final ApplicationEvent event, @Nullable ResolvableType eventType) {
    // 解析事件类型
	ResolvableType type = (eventType != null ? eventType : resolveDefaultEventType(event));
    // 判断是否设置Executor
	Executor executor = getTaskExecutor();
    // 循环所有接收该ApplicationEvent的ApplicationListener调用onApplicationEvent
    // 这样ApplicationListener就可以接收到消息并处理
	for (ApplicationListener<?> listener : getApplicationListeners(event, type)) {
		if (executor != null) {
			executor.execute(() -> invokeListener(listener, event));
		}
		else {
			invokeListener(listener, event);
		}
	}
}

// 获取可以接收该消息的所有ApplicationListener
protected Collection<ApplicationListener<?>> getApplicationListeners(
		ApplicationEvent event, ResolvableType eventType) {
	Object source = event.getSource();
	Class<?> sourceType = (source != null ? source.getClass() : null);
    // 根据eventType和sourceType 创建一个ListenerCacheKey ,作为缓存的key
	ListenerCacheKey cacheKey = new ListenerCacheKey(eventType, sourceType);
	// 使用ConcurrentHashMap作为缓存载体,避免存在并发问题
	ListenerRetriever retriever = this.retrieverCache.get(cacheKey);
	if (retriever != null) {
		return retriever.getApplicationListeners();
	}
	if (this.beanClassLoader == null ||
			(ClassUtils.isCacheSafe(event.getClass(), this.beanClassLoader) &&
					(sourceType == null || ClassUtils.isCacheSafe(sourceType, this.beanClassLoader)))) {
		// 多重校验锁
		synchronized (this.retrievalMutex) {
			retriever = this.retrieverCache.get(cacheKey);
			if (retriever != null) {
				return retriever.getApplicationListeners();
			}
            // 创建一个缓存对象,并检索所有的ApplicationListener获取符合条件的
            // 保存到该对象中,然后添加到缓存,同时返回listeners
			retriever = new ListenerRetriever(true);
			Collection<ApplicationListener<?>> listeners =
					retrieveApplicationListeners(eventType, sourceType, retriever);
			this.retrieverCache.put(cacheKey, retriever);
			return listeners;
		}
	}
	else {
		// No ListenerRetriever caching -> no synchronization necessary
		return retrieveApplicationListeners(eventType, sourceType, null);
	}
}
5. 从源码分析分析ApplicationListener是如何接收到事件的
EventPublishingRunListener的构造器如下:
public EventPublishingRunListener(SpringApplication application, String[] args) {
   this.application = application;
   this.args = args;
   this.initialMulticaster = new SimpleApplicationEventMulticaster();
   for (ApplicationListener<?> listener : application.getListeners()) {
      this.initialMulticaster.addApplicationListener(listener);
   }
}
里面创建了一个SimpleApplicationEventMulticaster对象,并把SpringApplication构造器中初始化的ApplicationListener注册到SimpleApplicationEventMulticaster中,等待接收广播事件。如果不明白ApplicationListener初始化流程的,可以看前文。
EventPublishingRunListener发布一个广播,调用SimpleApplicationEventMulticaster 的 multicastEvent方法:
// 这里只是简单复制了SpringBoot启动事件的发布代码,详细的启动事件包括如下几个,也可看代码详细了解
// starting - ApplicationStartingEvent
// environmentPrepared - ApplicationEnvironmentPreparedEvent
// contextPrepared - ApplicationContextInitializedEvent
// contextLoaded - ApplicationPreparedEvent
// started - ApplicationStartedEvent
// running - ApplicationReadyEvent
// failed - ApplicationFailedEvent
@Override
public void starting() {
   this.initialMulticaster.multicastEvent(new ApplicationStartingEvent(this.application, this.args));
}
下面看一下SimpleApplicationEventMulticaster类 ,详细了解事件的发布与接收流程,主要方法是getApplicationListeners,根据ApplicationEvent类型,获取所有的ApplicationListener列表,然后循环调用onApplicationEvent方法:
public class SimpleApplicationEventMulticaster extends AbstractApplicationEventMulticaster {

    @Override
    public void multicastEvent(ApplicationEvent event) {
        multicastEvent(event, resolveDefaultEventType(event));
    }

    @Override
    public void multicastEvent(final ApplicationEvent event, @Nullable ResolvableType eventType) {
        // 如果eventType==null,创建一个ResolvableType对象,用于解析event类型
        ResolvableType type = (eventType != null ? eventType : resolveDefaultEventType(event));
        // 获得一个线程池,默认为null
        Executor executor = getTaskExecutor();
        // 获取接收ApplicationEvent实际类型的ApplicationListener,循环调用,下面详细解析该方法。
        for (ApplicationListener<?> listener : getApplicationListeners(event, type)) {
            // 如果设置了线程池,使用线程池异步调用
            if (executor != null) {
                executor.execute(() -> invokeListener(listener, event));
            }
            else {
                // 否则在当前线程执行,该方法中主要调用了ApplicationListener的onApplicationEvent方法:
                // listener.onApplicationEvent(event)
                invokeListener(listener, event);
            }
        }
    }
}
下面详细分析一下ApplicationListener的获取流程:
protected Collection<ApplicationListener<?>> getApplicationListeners(
      ApplicationEvent event, ResolvableType eventType) {
	// 获取source属性
    Object source = event.getSource();
    Class<?> sourceType = (source != null ? source.getClass() : null);
    // 根据eventType和sourceType构造一个缓存key
    ListenerCacheKey cacheKey = new ListenerCacheKey(eventType, sourceType);

    // 先从缓存中获取缓存对象
    ListenerRetriever retriever = this.retrieverCache.get(cacheKey);
    if (retriever != null) {
        return retriever.getApplicationListeners();
    }

    if (this.beanClassLoader == null ||
        (ClassUtils.isCacheSafe(event.getClass(), this.beanClassLoader) &&
         (sourceType == null || ClassUtils.isCacheSafe(sourceType, this.beanClassLoader)))) {
		// 以retrievalMutex作为锁
        synchronized (this.retrievalMutex) {
            // 防止多个等待获取锁的线程进入重复执行代码
            retriever = this.retrieverCache.get(cacheKey);
            if (retriever != null) {
                return retriever.getApplicationListeners();
            }
            // 创建一个ApplicationListener容器对象,里面包含两个属相
            // applicationListeners
            // applicationListenerBeans
            retriever = new ListenerRetriever(true);
            Collection<ApplicationListener<?>> listeners =
                retrieveApplicationListeners(eventType, sourceType, retriever);
            this.retrieverCache.put(cacheKey, retriever);
            return listeners;
        }
    }
    else {
        // No ListenerRetriever caching -> no synchronization necessary
        return retrieveApplicationListeners(eventType, sourceType, null);
    }
}
