

学习笔记,入门级别,了解webpack的基础配置,单页面css\js\html\图片资源涉及的loader、plugins的配置。本小节练习代码。后续会持续更新,目标是能够系统学习webpack,做到独立手写配置中小型项目。
webpack安装
前期环境准备:
- 安装node,新版node会自带npm,可查网上安装教程
- 新建项目文件夹(如:demo)
- 执行
npm init,效果如下图 npm init会生成一个pakeage.json文件,记录项目信息。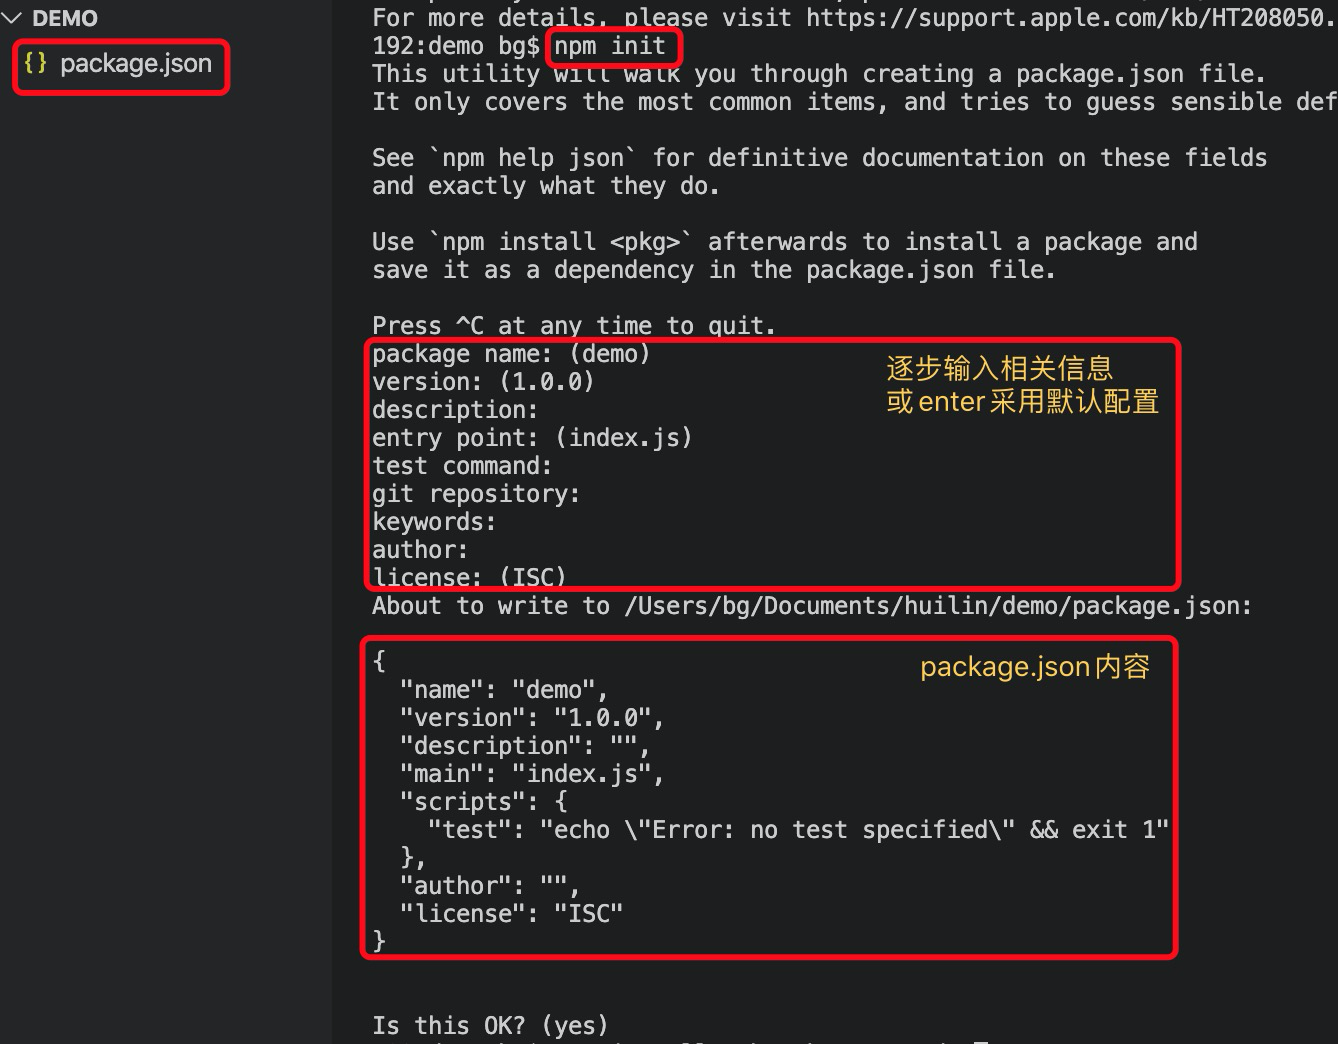
安装webpack
- npm install webpack --save-dev
- npm install webpack-cli --save-dev
- 在package.json 增加
  "scripts": {
    "webpack": "webpack"
  },
- npm run webpack -v,看到版本号,即成功
在webpack 3中,webpack本身和它的CLI以前都是在同一个包中,但在第4版中,他们已经将两者分开来更好地管理它们,所以需要同时安装这个两个包。
此实例中,没有全局安装(--save-dev换成-g), 所以没法执行
webpack -v,而是使用“npm 脚本”,也可以通过配置电脑的path实现。
webpack 它以入口文件为准,查找相关的依赖,打包成一个文件,打包后的js文件可以直接在浏览器运行
webpack 可以进行0配置打包
- 创建文件夹src,新建index.js
- npm run webpack
默认打包同级目录下的src/index.js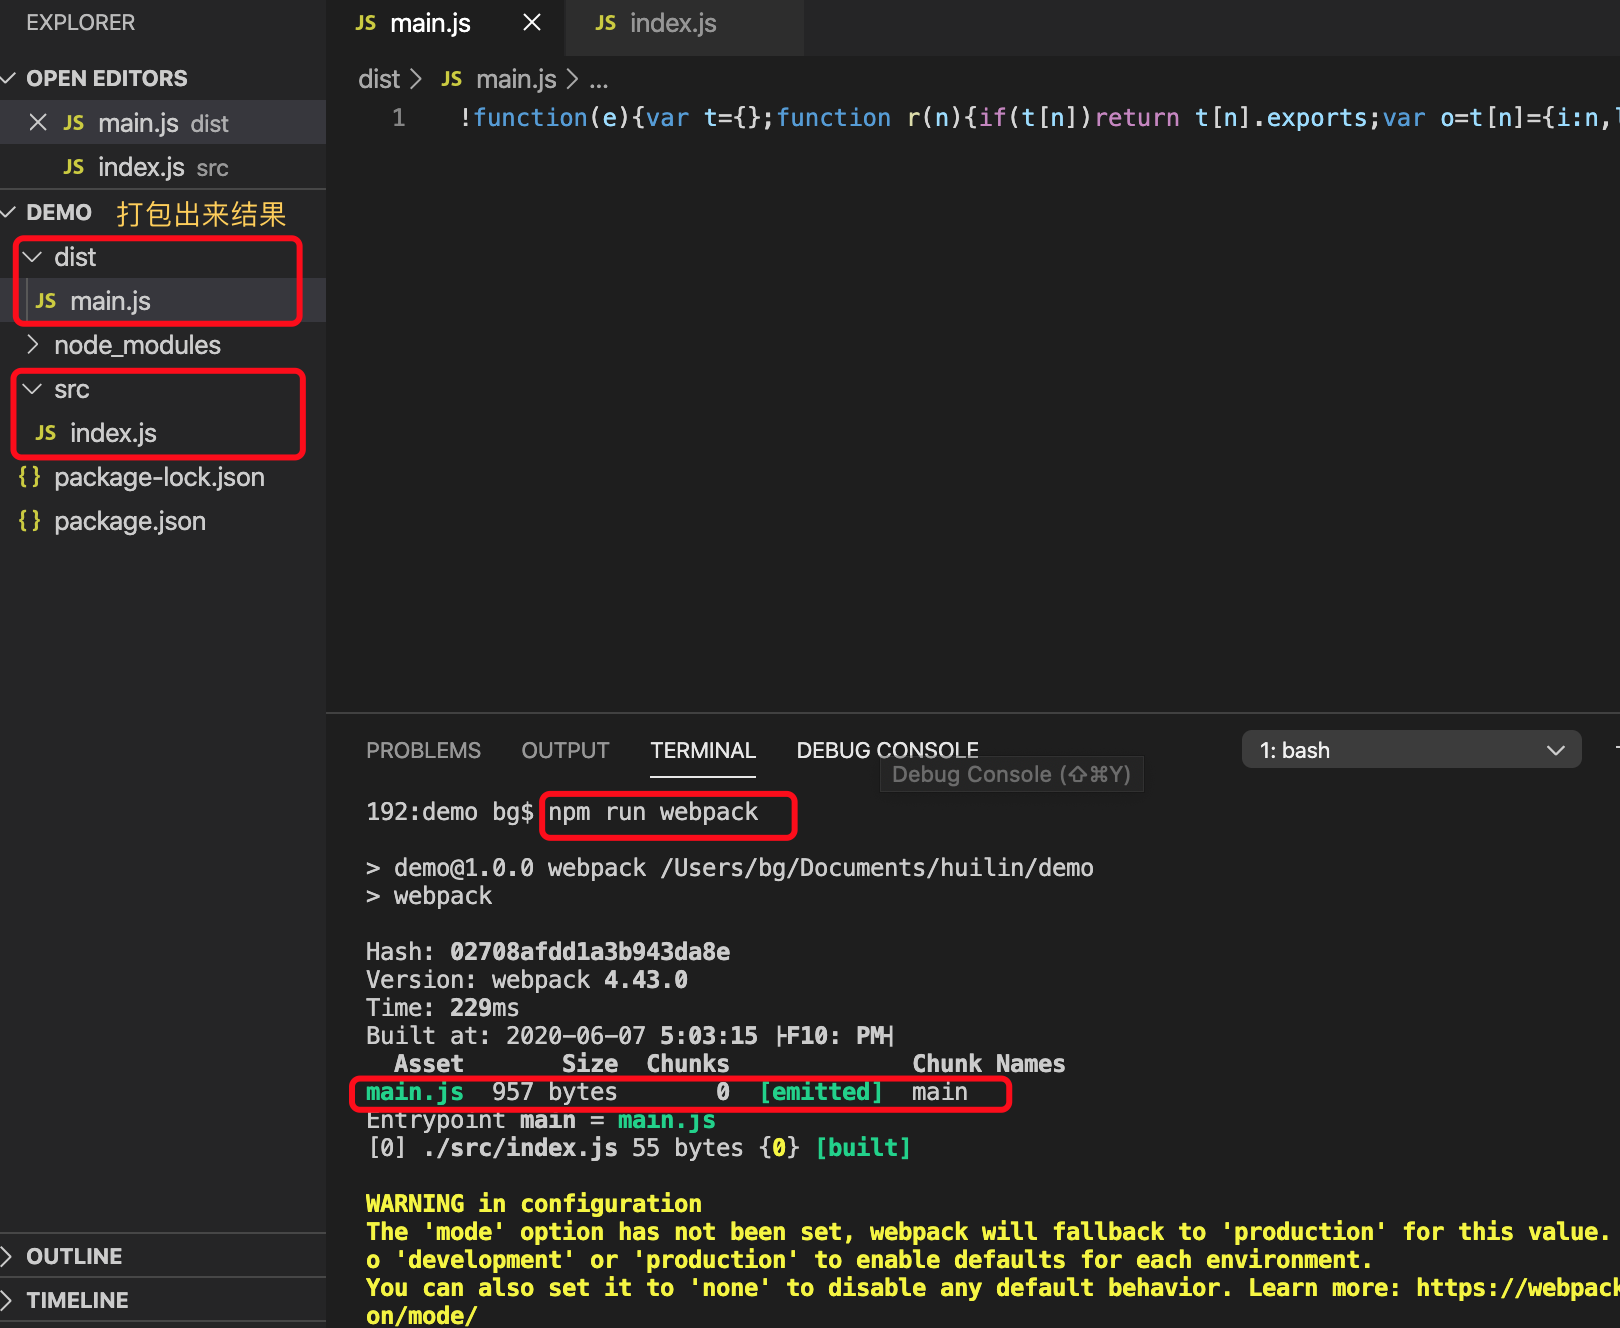
webpack零配置的灵活性低,下面我们进入
手动配置
手动配置,webpack.config.js
webpack默认读取的配置webpack.config.js,若要更改,如下:
-
npm run webpack --config webpack.config.my.js
-
package.json 配置脚本 scripts
{
    "scripts": {
        "dev": "webpack --config webpack.config.js"
    },
    ....
}
基础配置-打包js
打包出来文件解析大致: 以模块路径作为key,文件内容作为value,组成一个对象,传给一个__webpack_require__的自运行函数
/******/ 	function __webpack_require__(moduleId) {
/******/
/******/ 		// Check if module is in cache
/******/ 		if(installedModules[moduleId]) {
/******/ 			return installedModules[moduleId].exports;
/******/ 		}
/******/ 		// Create a new module (and put it into the cache)
/******/ 		var module = installedModules[moduleId] = {
/******/ 			i: moduleId,
/******/ 			l: false,
/******/ 			exports: {}
/******/ 		};
/******/
/******/ 		// Execute the module function
/******/ 		modules[moduleId].call(module.exports, module, module.exports, __webpack_require__);
/******/
/******/ 		// Flag the module as loaded
/******/ 		module.l = true;
/******/
/******/ 		// Return the exports of the module
/******/ 		return module.exports;
/******/ 	}
// webpack 是node写出来的,node 写法
let path = require('path') // node 自带,无需安装
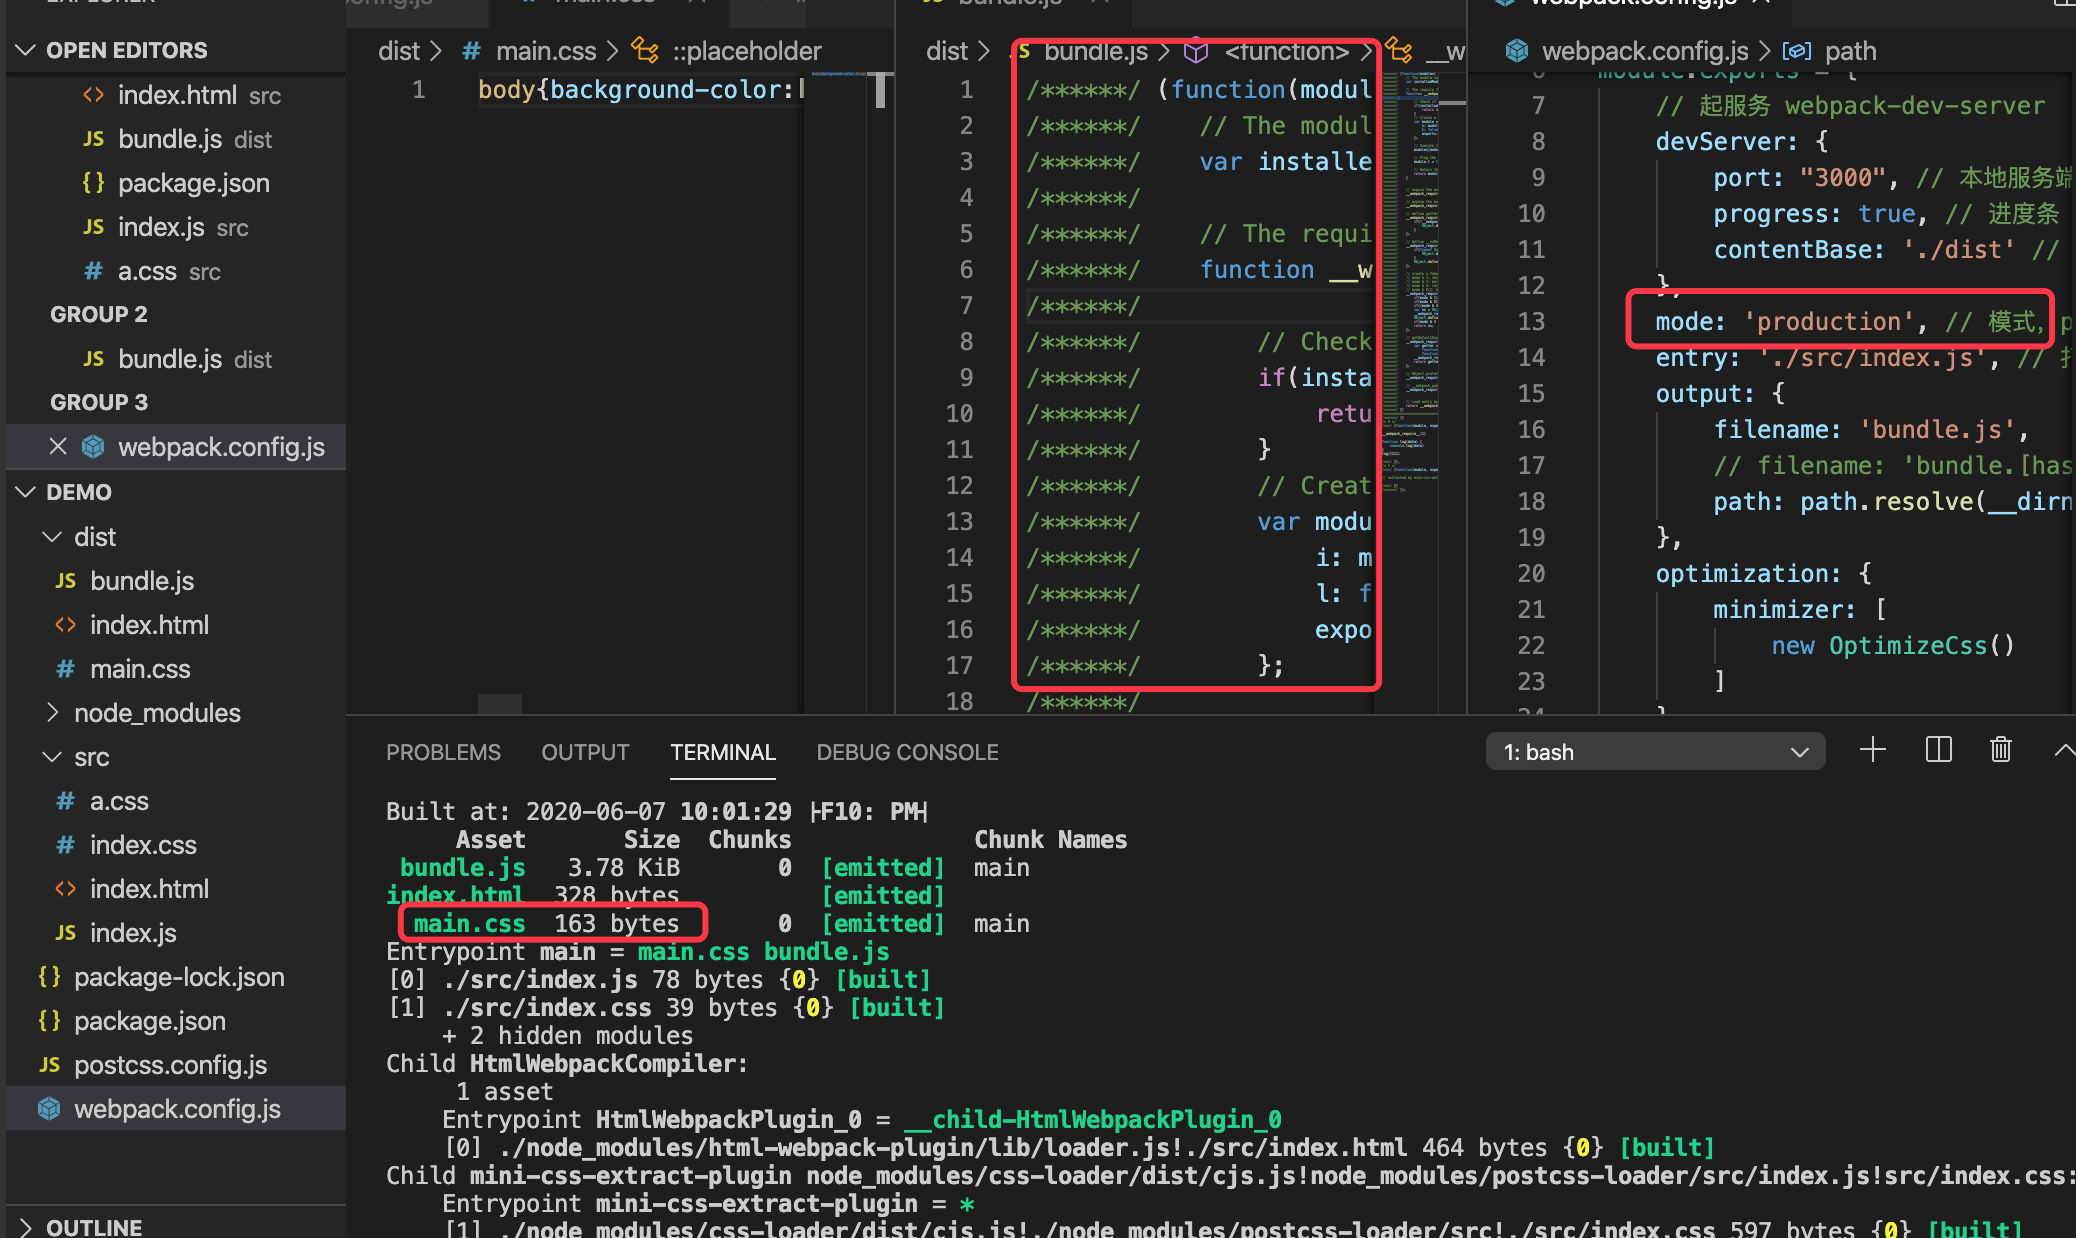
module.exports = {
mode: 'production', // production:生产模式 development开发模式
entry: './src/index.js', // 打包的入口
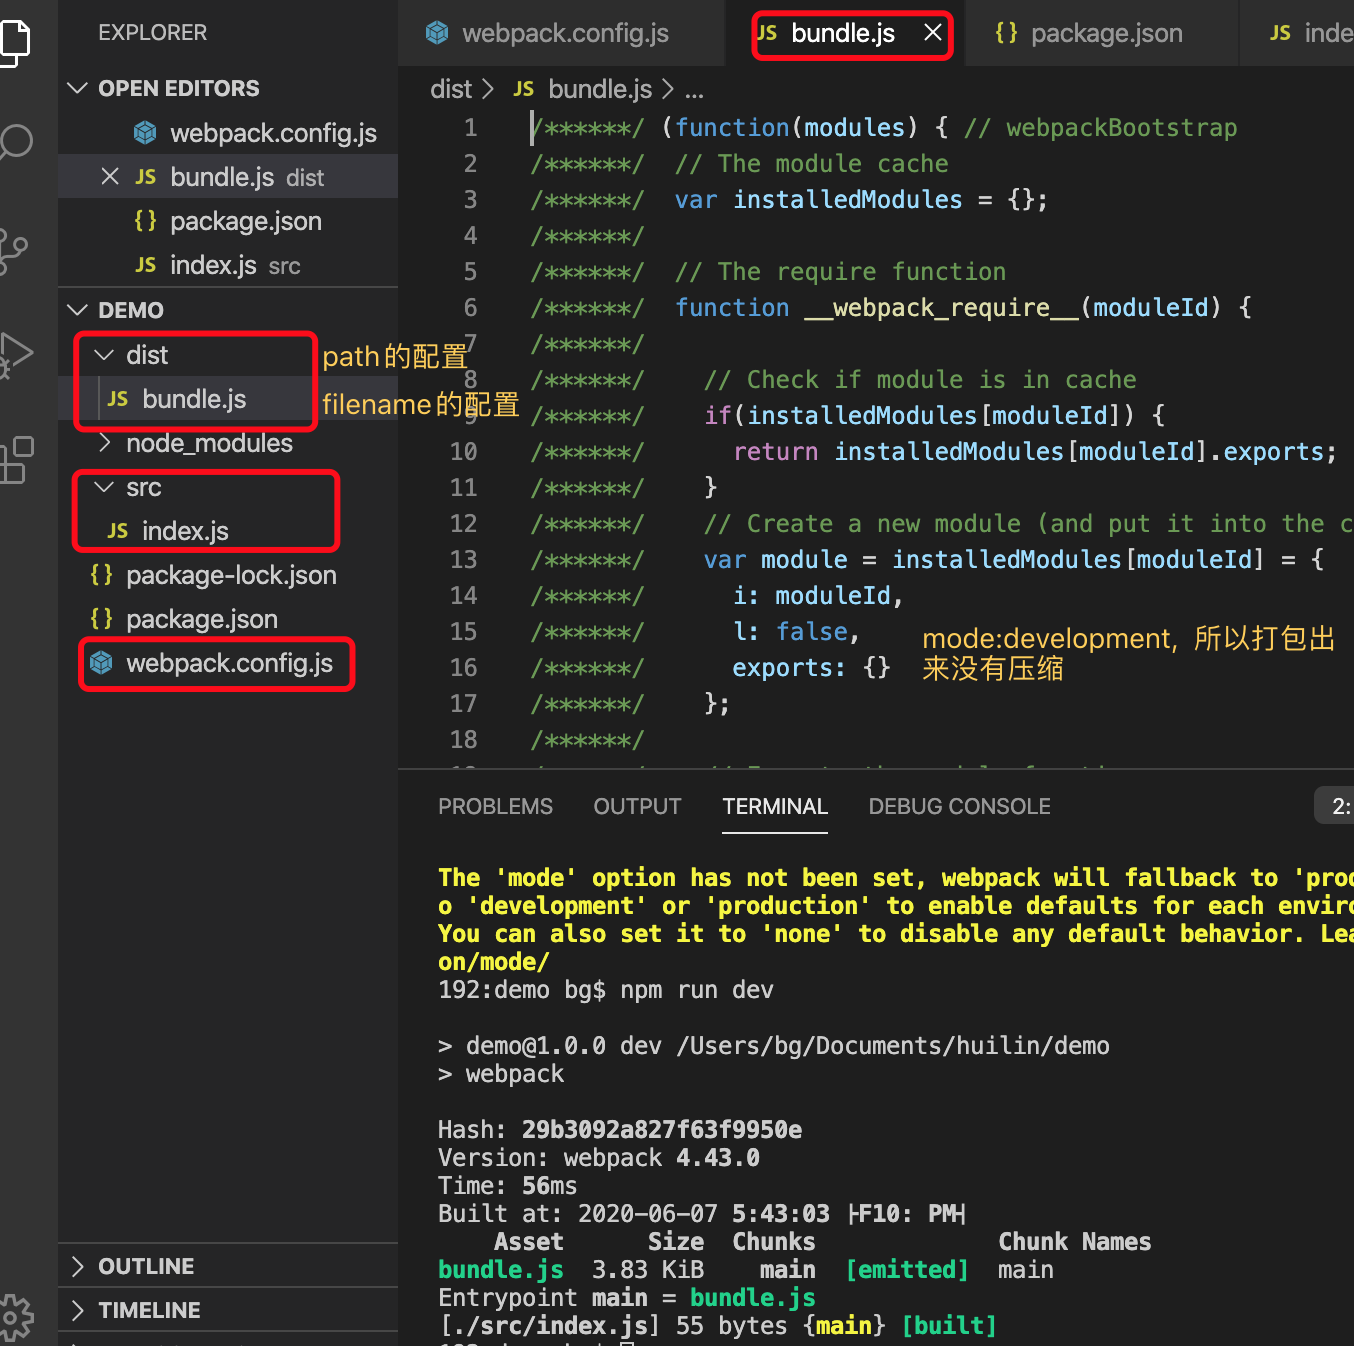
output: {
filename: 'bundle.js', // 以入口js为基础,解析所有模块,打包出来的js文件名
// filename: 'bundle.[hash:8].js', // hash:8 只显示8位,如果文件不变,hash不变
path: path.resolve(__dirname, 'dist') // __dirname以当前的路径作为主目录
}
}
mode=production时,打包出来的js是压缩的
本地起服务
目前我们只能手动到浏览器跑文件,webpack-dev-server可以自动在浏览器以loaclhost的方式访问我们的项目
前置准备
- 在src下新建index.html
  <!DOCTYPE html>
  <html lang="en">
  <head>
      <meta charset="UTF-8">
      <meta name="viewport" content="width=device-width, initial-scale=1.0">
      <title>Document</title>
  </head>
  <body>
  </body>
  </html>
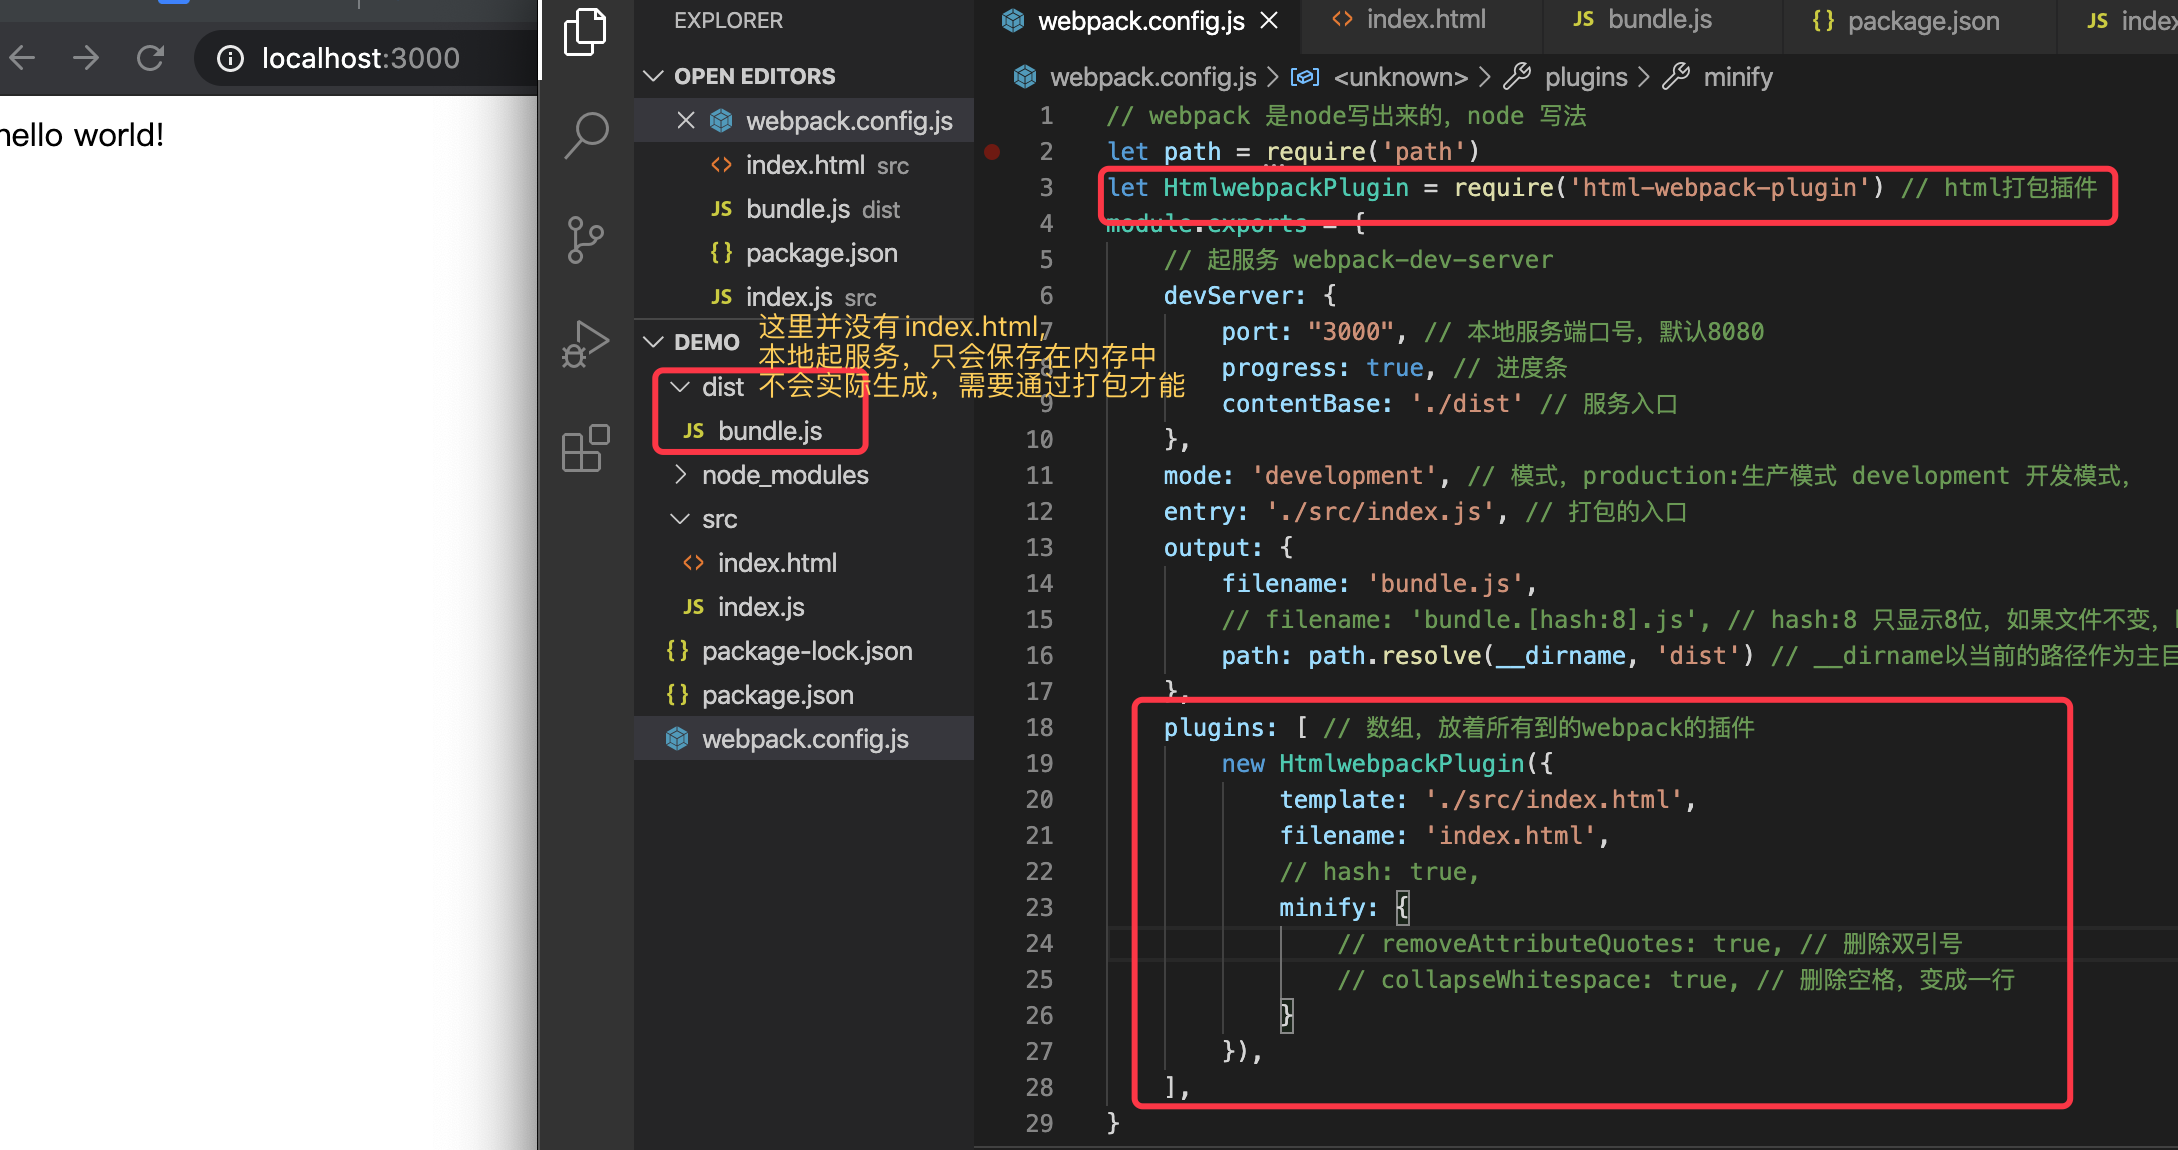
配置,在webpack-config.js原来的基础上,添加
// 开发服务的配置
devServer: {
    port: 3000, // 默认端口:8080
    progress: true, // 可以看起服务进度
    contentBase: './dist' // 默认访问根目录
},
安装webpack-dev-server
npm install webpack-dev-server --save-dev
起服务
npx webpack-dev-server
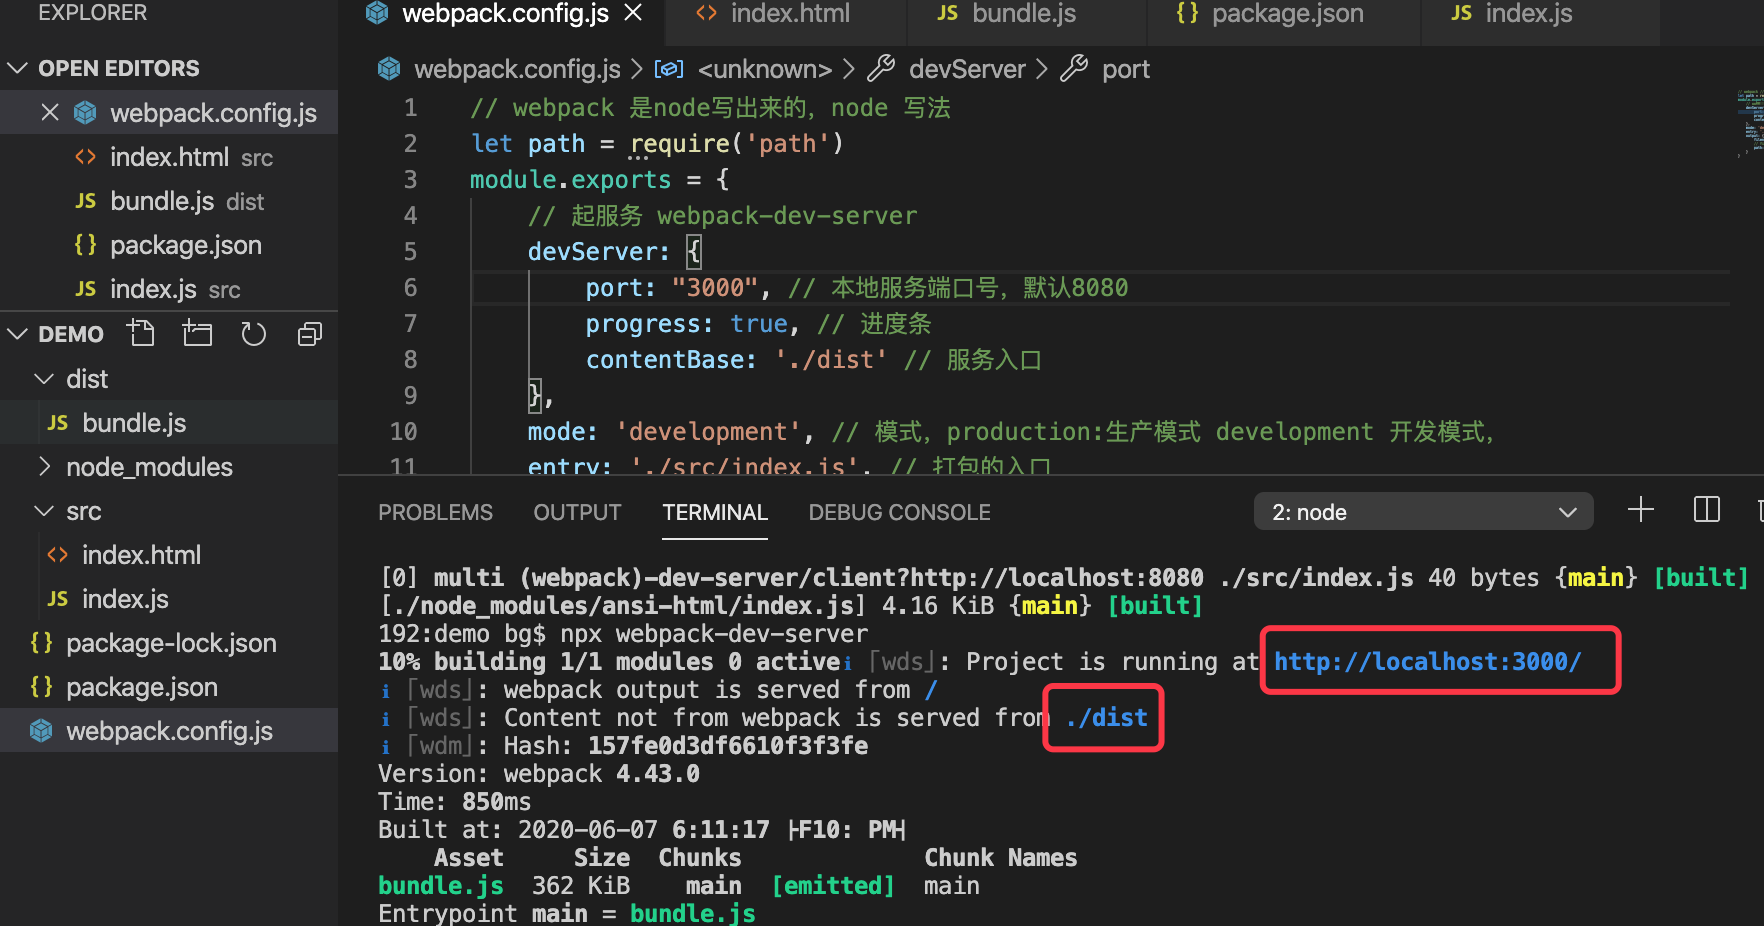
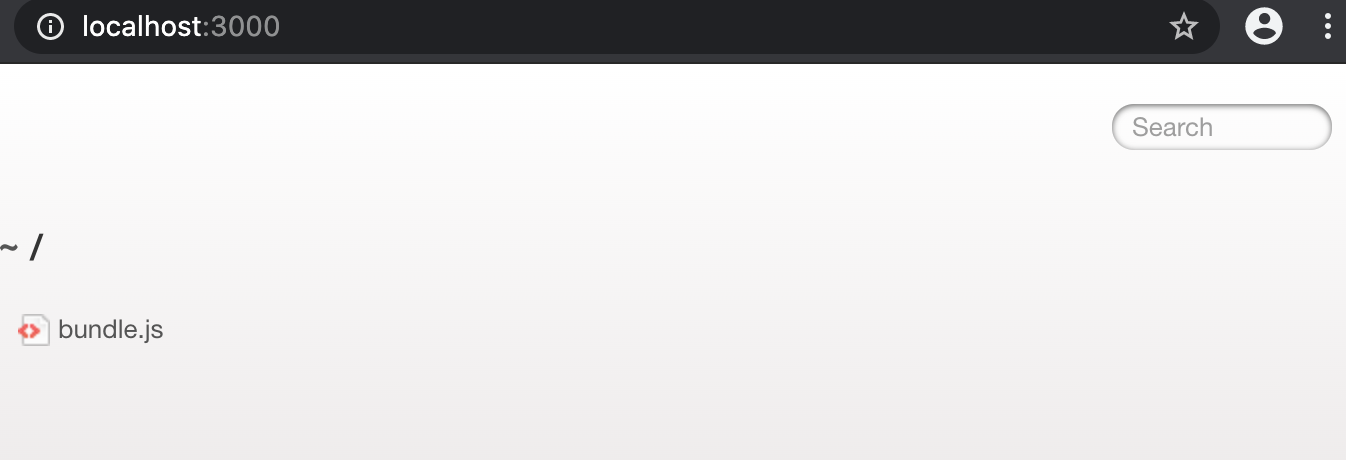
此时打开localhost:3000,是默认访问来我们的项目dist,但并没有把src的index.html也不会放到dist,那我们需要另一个插件html-webpack-plugin
如果安装失败,报json错误,可以用
npm cache clean --force
html插件 html-webpack-plugin
我们想要的结果是:能自动的在dist建html,打包到内存中,即可以把打包后的js文件插入到src/index.html 中,并把结果生成到dist/index.html
安装 html-webpack-plugin
npm install html-webpack-plugin --save-dev
配置
在webpack.config.js原来的基础上添加
    // webpack.config.js
    let HtmlWebpackPlugin = require('html-webpack-plugin')
    plugins:[
        new HtmlWebpackPlugin({
            template: "./src/index.html",// 打包模板入口地址
            filename: "index.html", // 打包后得到文件入口名
            hash: true,
            minify: {
                removeAttributeQuotes:true, //删除双引号
                collapseWhitespace: true, //删除空格,变成一行
            }
        })
    ]
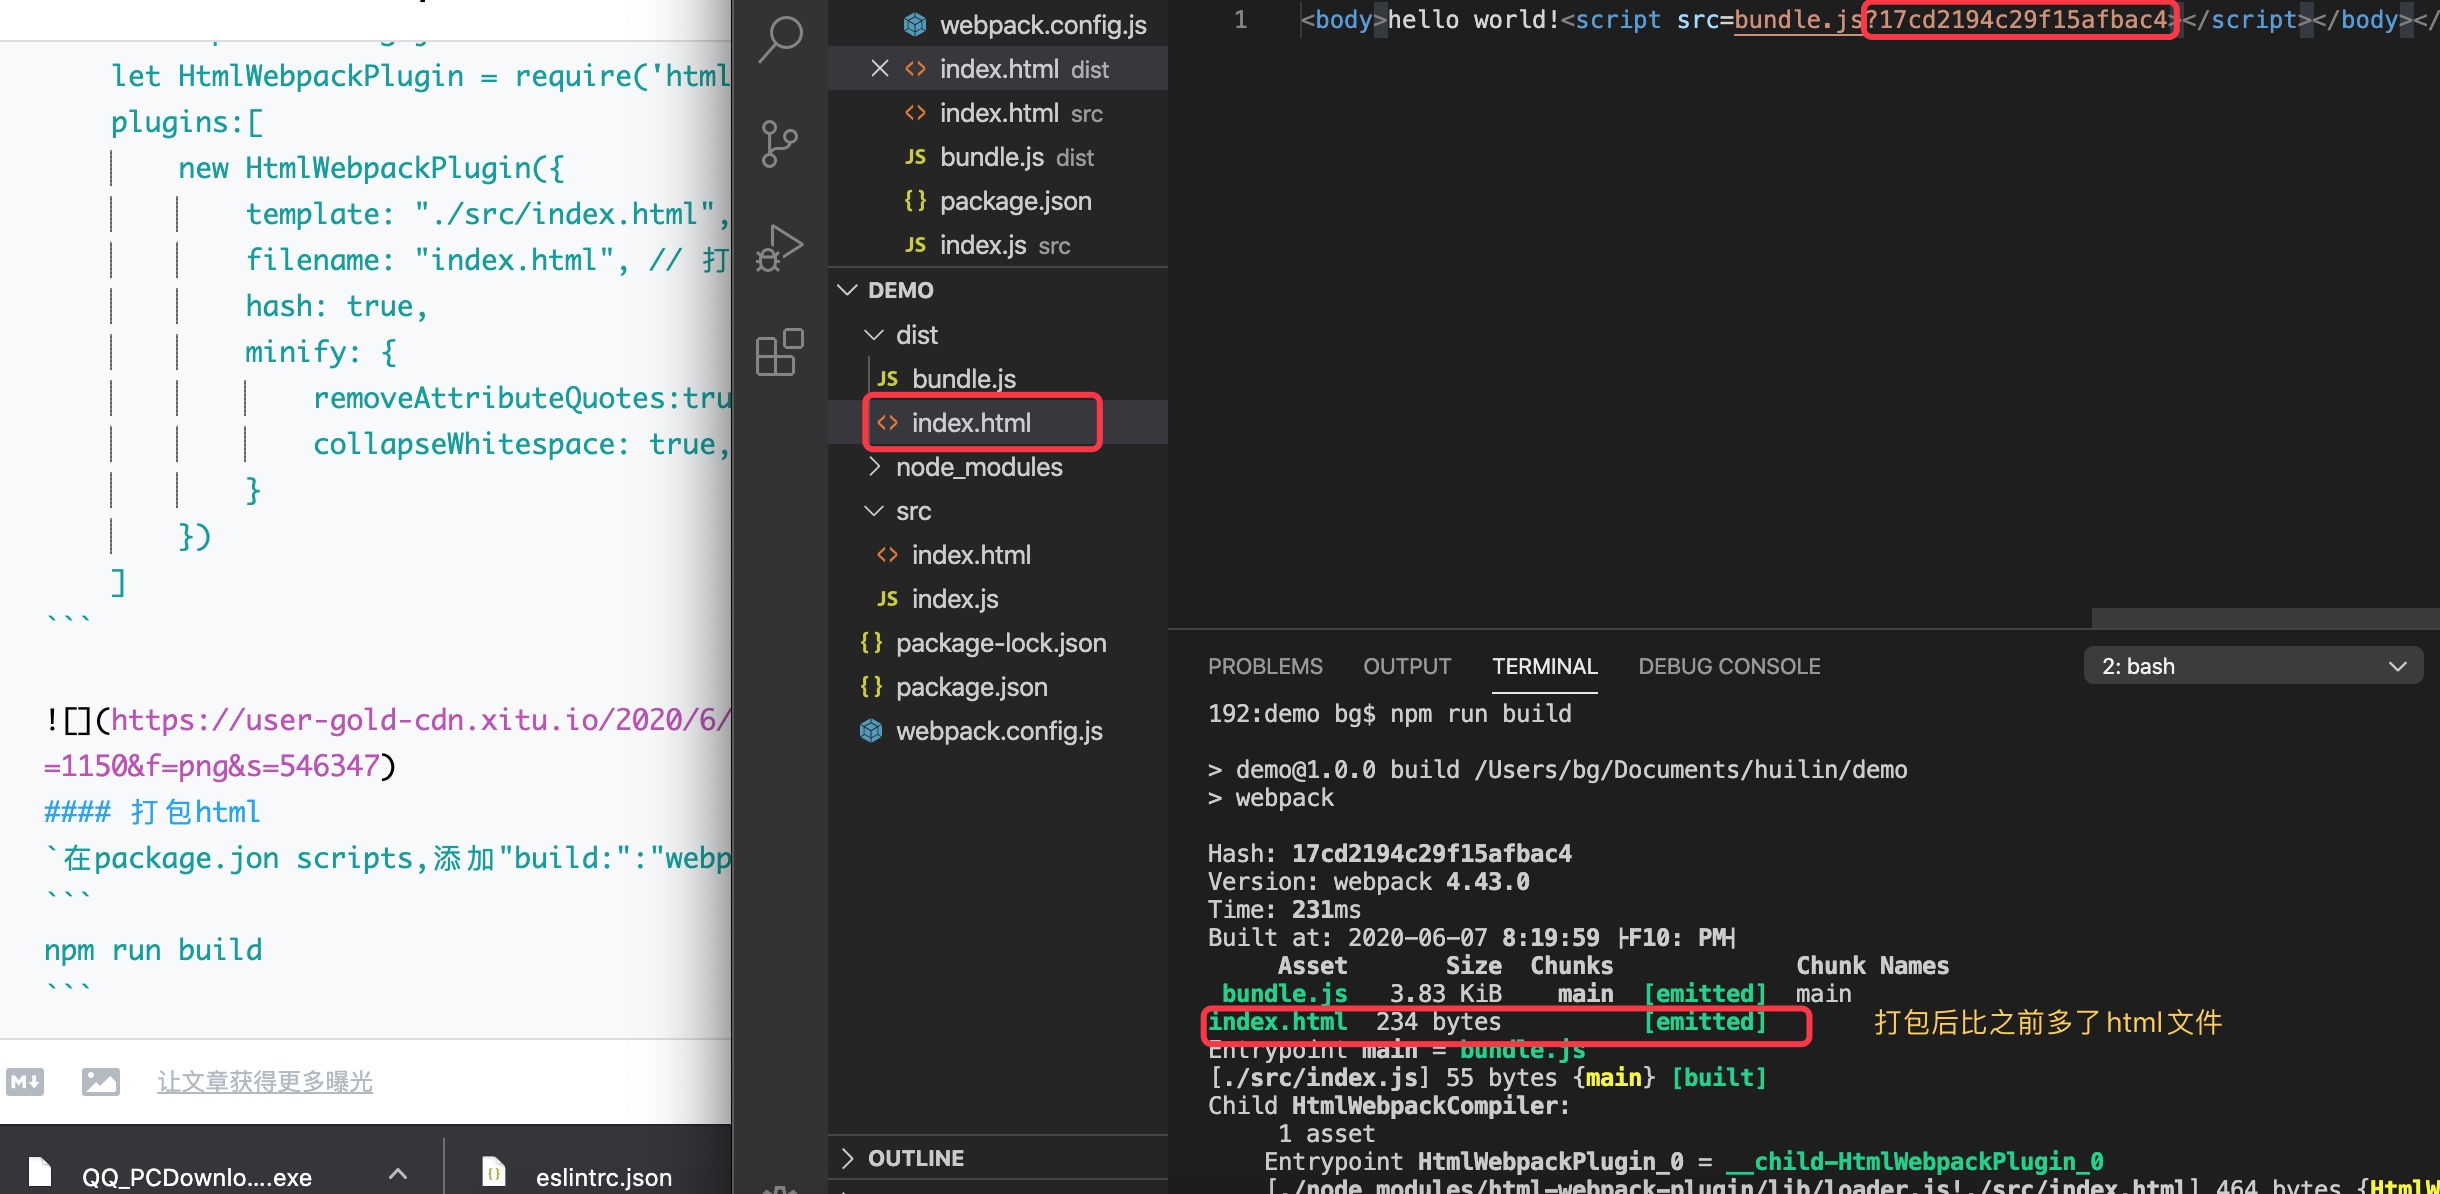
打包html
在package.jon scripts,添加"build:":"webpack"
npm run build
结果,会在dist目录下生成index.html
css - loader
Loader让webpack能够处理不同的文件。loader可以将所有类型的文件转换为webpack能够处理的有效模块。loader 不仅仅只是处理css。 loader是从下到上,从左到右的执行顺序
lodaer 有两个目的
- 识别出应该被对应的loader进行转换的文件。(使用test属性)
- 转换这些文件,从而使其能够被添加到依赖图中(并最终添加到bundle中)。(使用use属性)
文件准备
- 新增src/a.css
- 新增src/index.css
@import './a.css';
body {
    color: red;
}
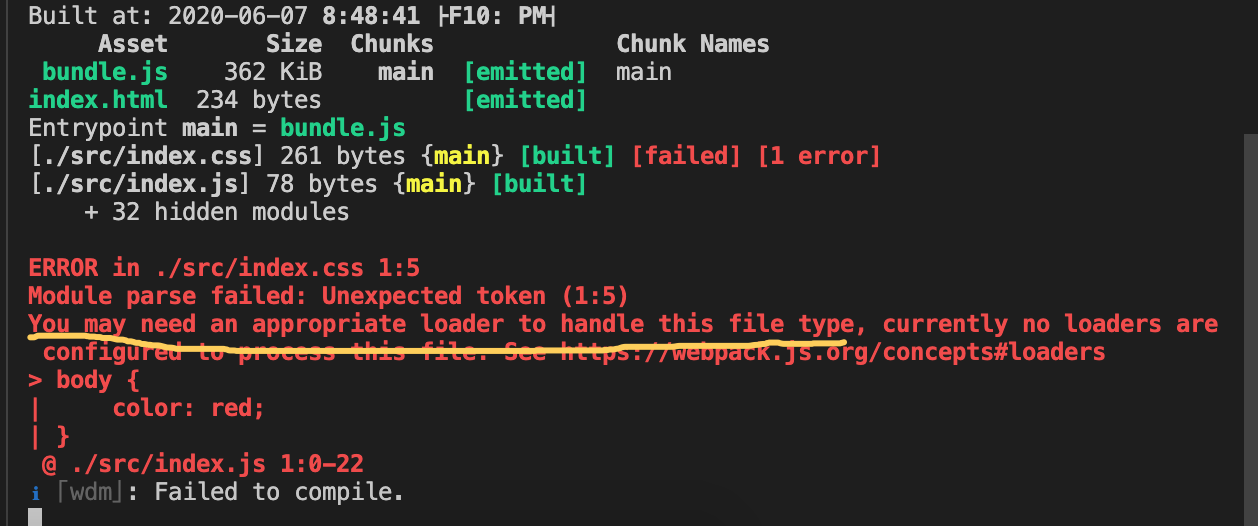
- 在index.js添加
require('./index.css')此时,你的服务就报错了,提示你“需要loader来处理这种类型的文件”
loader配置
- style-loader:处理import
- css-loader:跑服务时,将css直接出插入到html的head中,打包是不会生效的
- postcss-loader autoprefixer:css添加兼容浏览器的前缀
安装:
npm install style-loader css-loader postcss-loader autoprefixer --save-dev
module: {
    rules: [
            {
                test: /\.css$/,
                use: [
                    {loader: "style-loader"}, // 跑服务时,将css直接出插入到html的head中,打包是不会生效的
                    {loader: "css-loader"}, // 处理import
                    {loader: "postcss-loader"},
                ]
            }
    ]
}
css添加兼容浏览器的前缀 除了添加在module添加loader外,
- 在根目录下新建 postcss.config.js
// postcss.config.js
module.exports = {
    plugins:[
        require("autoprefixer")
    ]
}
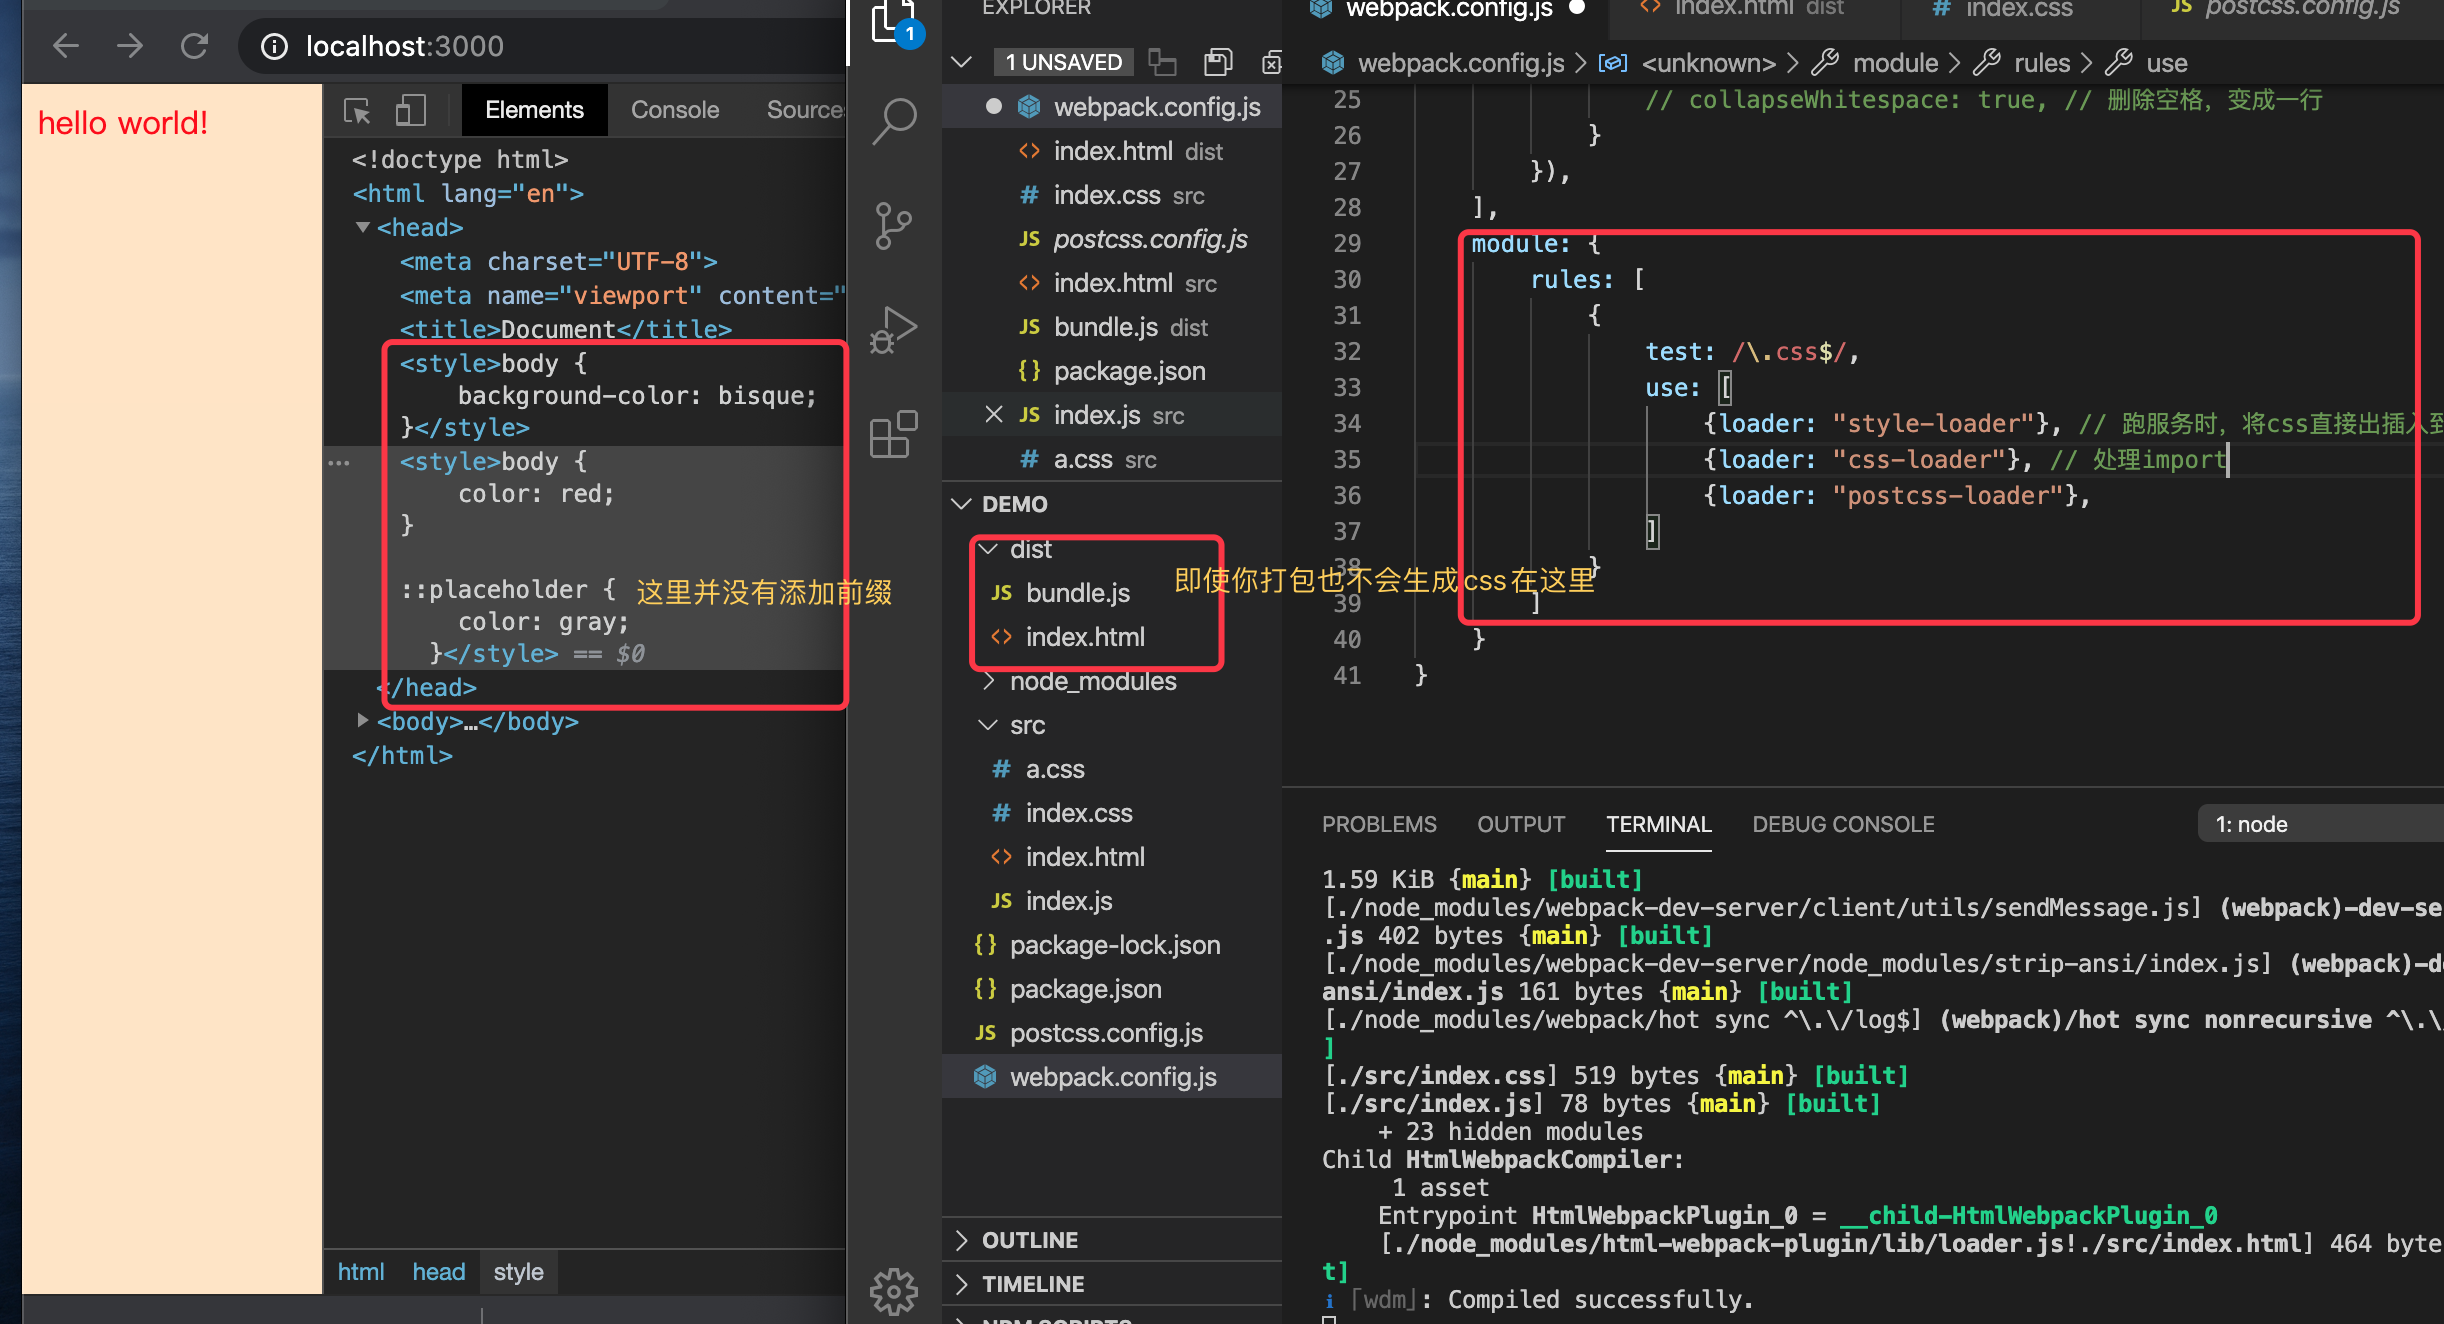
你会发现
- 样式在本地服务已成功插入生效
- 但说好的
css添加兼容浏览器的前缀并没有生效,需要把mode改成produtiion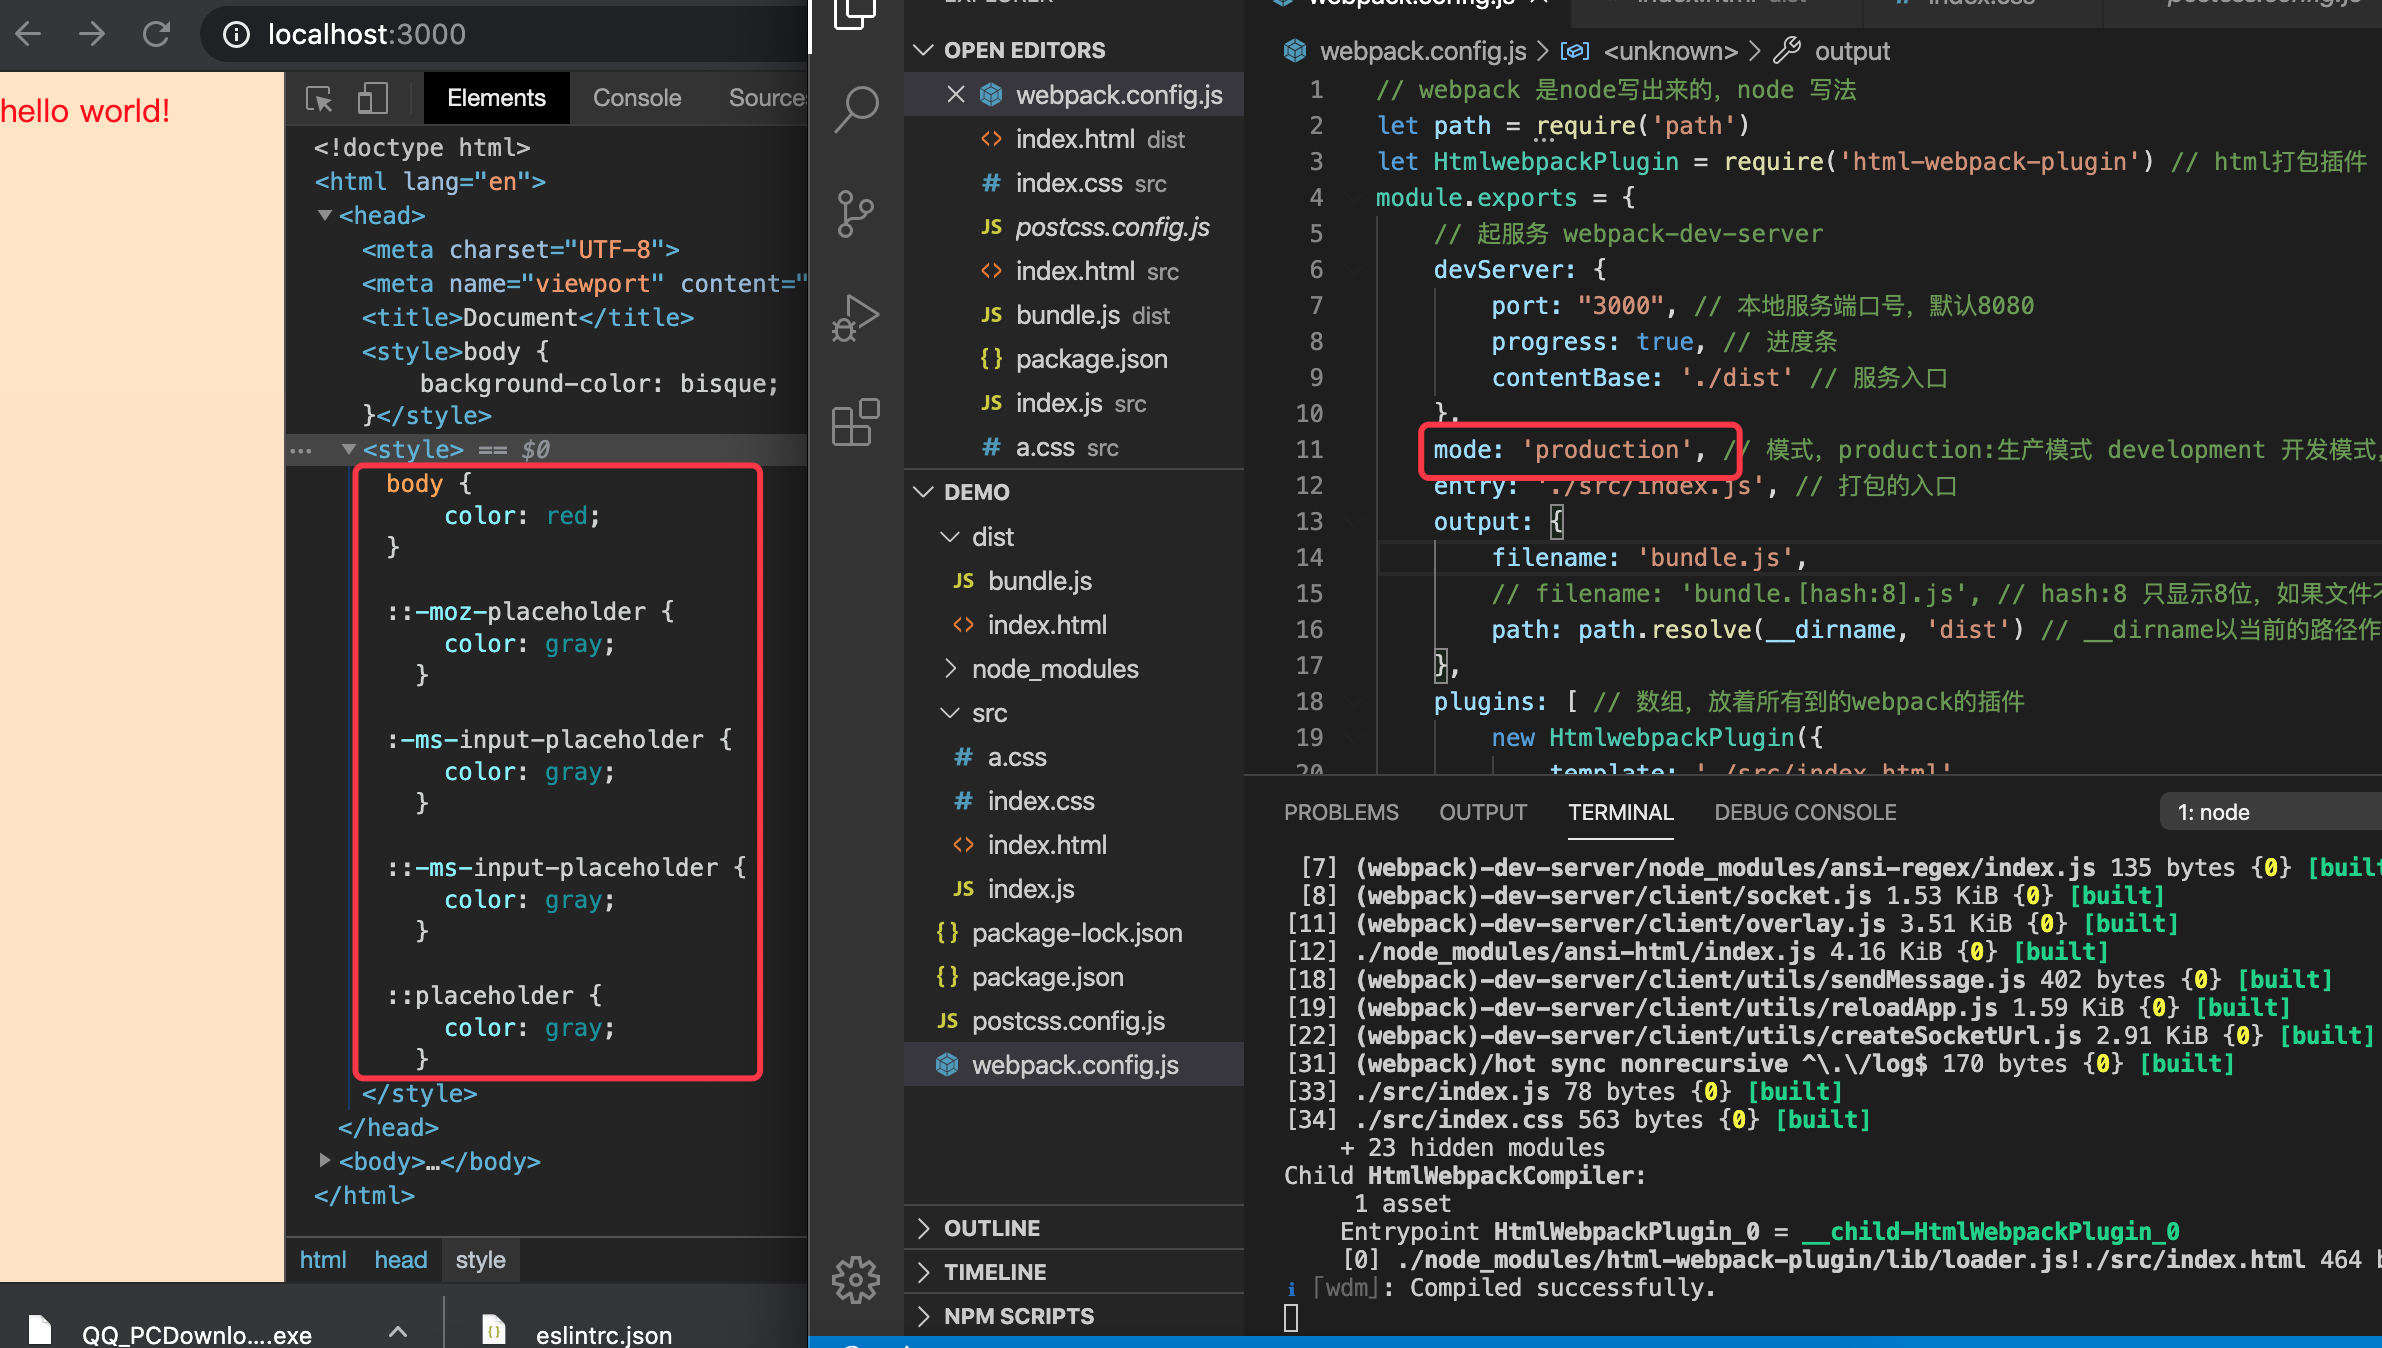
- 打包完来,dist里也没有css,那是因为style-loader没有这个处理能力,需要
mini-css-extract-plugin
css生成外联文件插件 mini-css-extract-plugin
可以直接代替style-loader
安装
npm install mini-css-extract-plugin --save-dev
配置,代替style.loader
// webpack.config.js
let MiniCssExtractPlugin = require('mini-css-extract-plugin')
plugins:[
    ...
    new MiniCssExtractPlugin({
        filename: 'main.css' // css抽离到文件名
    })
]
module: {
    rules:[
        {
            test:/\.css/,
            use:[
                MiniCssExtractPlugin.loader,
                'css-loader', // 解析@import
            ]
        }

        ...
    ]
}
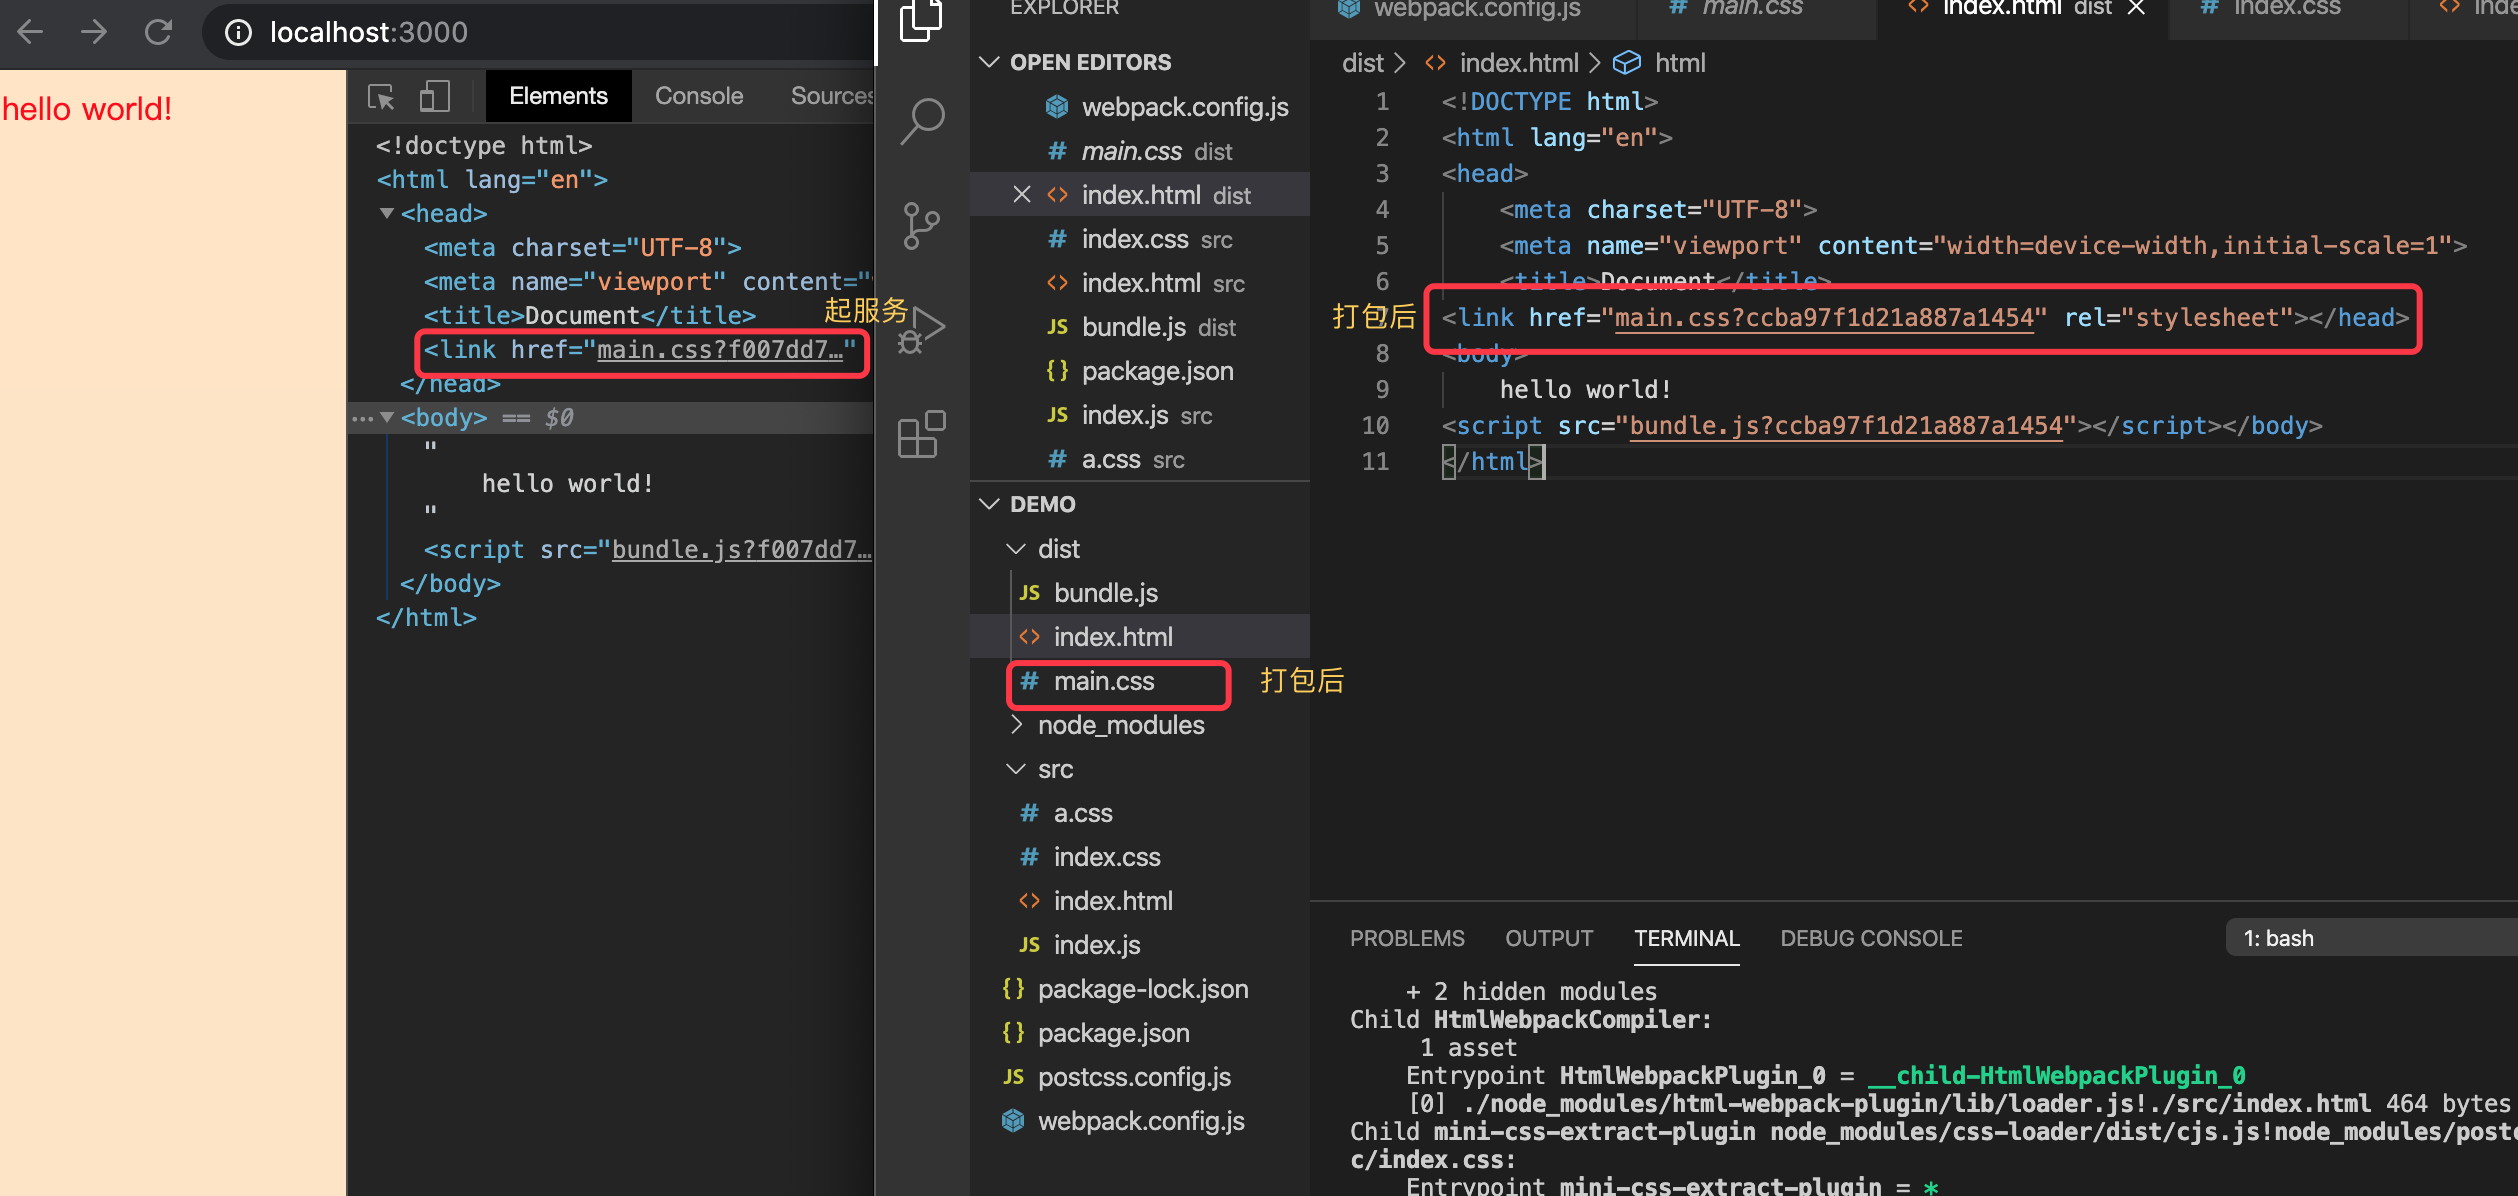
打包+重新刷服务,会看到
- css以外链的方式插入html
- 打包后生成index.css
- 但你打开main.css,你会发现没压缩,这就需要
optimize-css-assets-webpack-plugin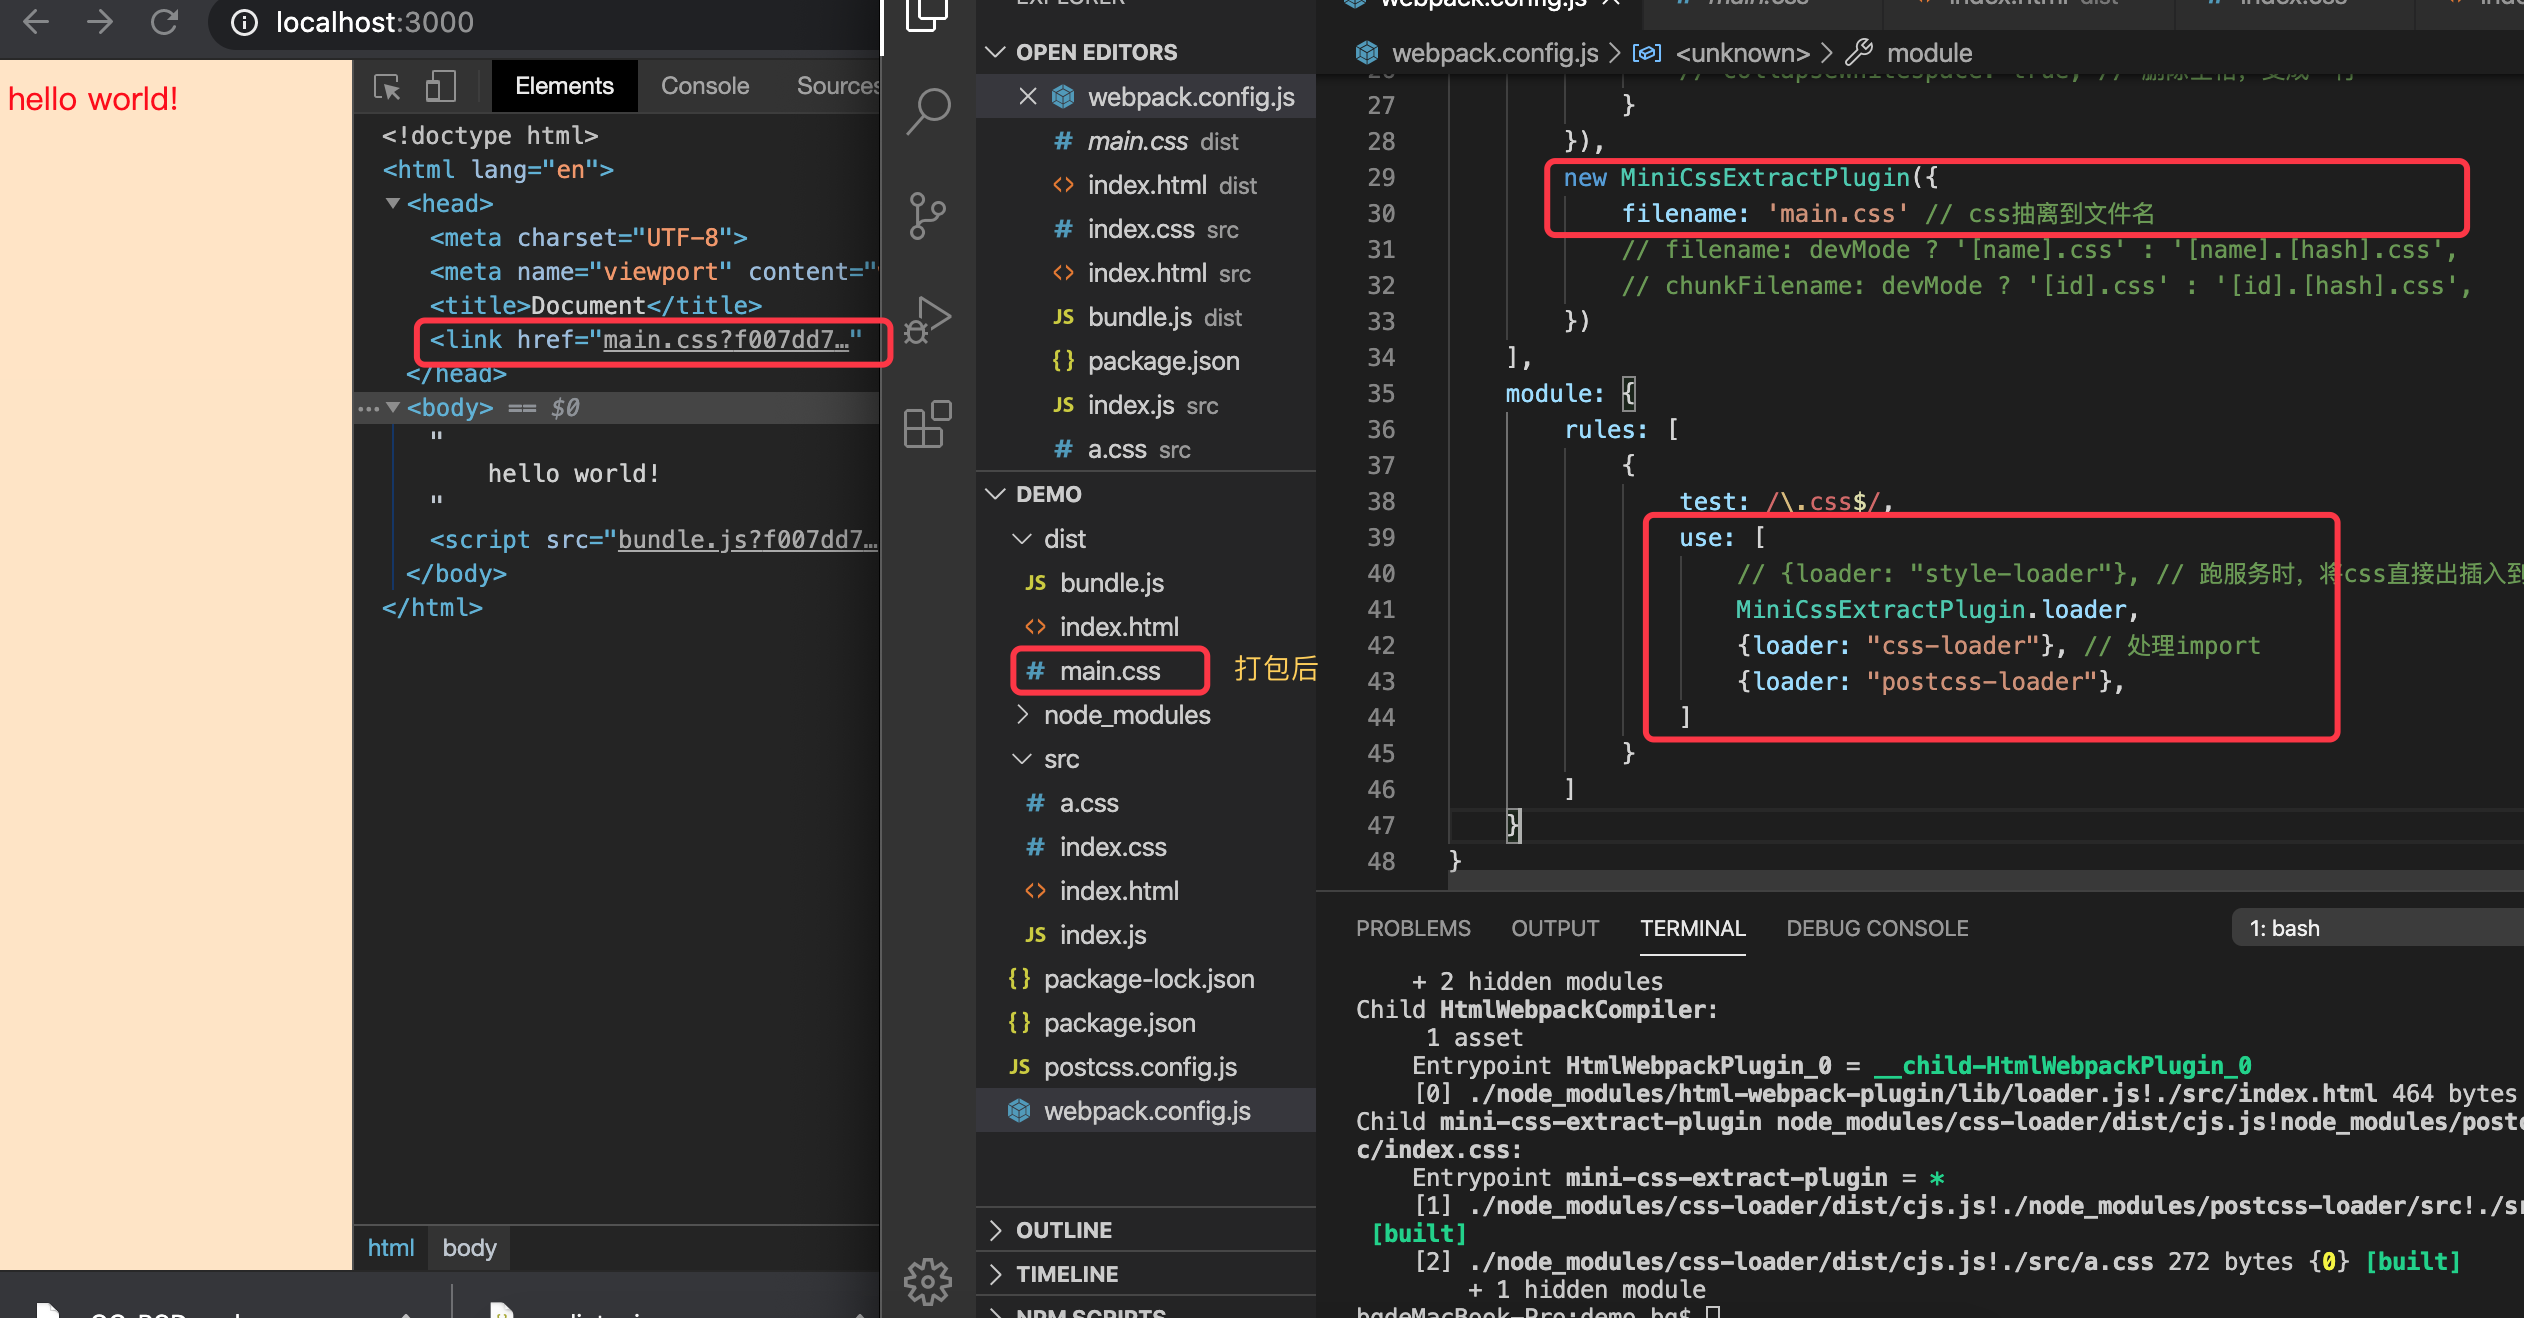
压缩css文件optimize-css-assets-webpack-plugin
安装
npm install optimize-css-assets-webpack-plugin --save-dev
配置
let OptimizeCss = require('optimize-css-assets-webpack-plugin')
...
optimization: {
    minimizer: [
        new OptimizeCSS()
    ]
}
optimize-css-assets-webpack-plugin 会让js默认压缩失效,需要手动插件压缩
压缩jsuglifyjs-webpack-plugin
- 安装
cnpm install uglifyjs-webpack-plugin --save-dev
- 配置
// webpack-config.js
let UglifyWebpackPlugin = require('uglifyjs-webpack-plugin')
...

optimization: {
    minimizer: [
        ...
        new UglufyjsWebapckPlugin({
            cache: true,
            sourceMap: true,
            parallel: true
        })
    ]
}
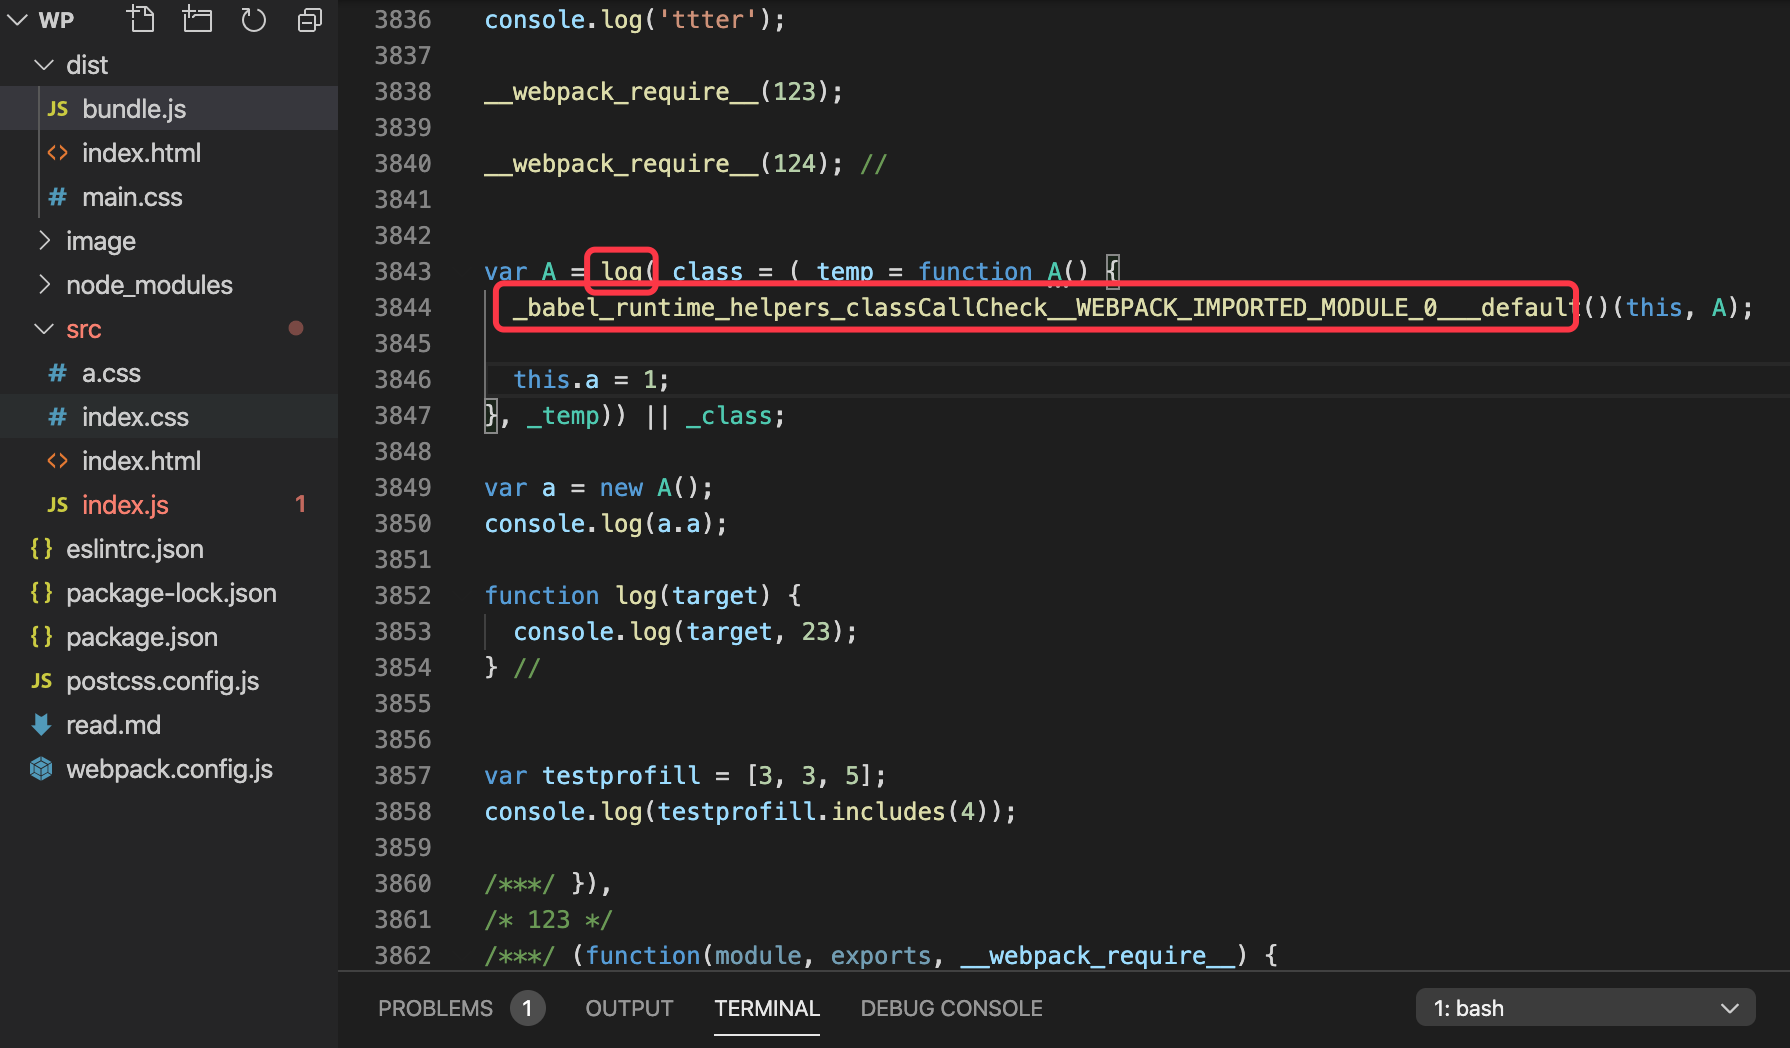
es6语法转换
- babel-loader:es6转es5
- @babel/preset-env:用最新的js,打包出最小的js,且可以指定浏览器
- @babel/plugin-proposal-decorators:@log语法
- @babel/plugin-proposal-class-properties: es7语法高级语法
- @babel/plugin-transform-runtime:抽离打包公共方法
- @babel/runtime:生产环境需要
文件准备:
// 往js添加代码
@log
class A {
    a = 1
}

let a = new A()
console.log(a.a)

function log(target) {
    console.log(target, 23)
}

var testprofill = [3,3,5]
console.log(testprofill.includes(4))
安装
npm install babel-loader @babel/core --save-dev
npm install @babel/preset-env @babel/plugin-proposal-decorators --save-dev
npm install @babel/plugin-proposal-class-properties @babel/plugin-transform-runtime --save-dev
module: {
    rules: [
        {
            test: /\.js$/,
            use: [{
                loader: 'babel-loader', // es6转es5
                options: {
                    presets: ['@babel/preset-env'], // 用最新的js,打包出最小的js,且可以指定浏览器
                    // plugins: ['@babel/plugin-proposal-class-properties', {"loose":true},
                    //     '@babel/plugin-transform-runtime' // 抽离打包公共方法
                    // ], // 解析class写法
                    plugins: [
                        ['@babel/plugin-proposal-decorators', { 'legacy': true } ], // @log语法
                        ['@babel/plugin-proposal-class-properties', { "loose" : true }], // es7语法
                        ['@babel/plugin-transform-runtime' ],// 抽离打包公共方法'
                        // ['@babel/runtime'],// 生产环境需要
                    ]

                }
            }],
            include: path.resolve(__dirname, 'src'), // 避免查找所有的js
            exclude: /node-modules/
        }
    ]
}
关于js的处理可额外看babel
全局变量引入问题
如jquery,安装
npm install jquery --save-dev
三种引入模块的方式:
1.expose-loader 暴露到window上
- 安装
npm install expose-loader --save-dev
- 配置
// webpack.config.js
module: {
    rules:[
        {
            test: require.resolve('juery'),
            use: [
                {
                    loader: 'expose-loader', // es6转es5
                    options: {
                        option: '$'
                    }
                }
            ]
            或者
            use: 'expose-loader?$'
        }
    ]
}

// index.js
import $ from 'jquery'
console.log($)
consle.log(window.$)
- providerPlugin 给每个人提供一个$ 配置
// webpack.config.js
// 引入webpack 模块
let webpack = require('webpack')
...

plugins:[
    new webpack.ProviderPlugin({
        $: 'jquery',
        'jquery': 'jquery'
    })
]
- script标签引入不打包 externals 配置
// webpack.config.js
externals: {
    jquery: "$"
}

// 页面手动移入js
<script src="XXX"></script>

// js
import $ from jquery

则打包时不会把jquery 打包进去
图片打包
- 在src 新增一张图片,1.jpg
- 在js中创建图片来引入
// index.js
let image = new Img();
image.src = './1.jpp'
document.body.appendChild(image)
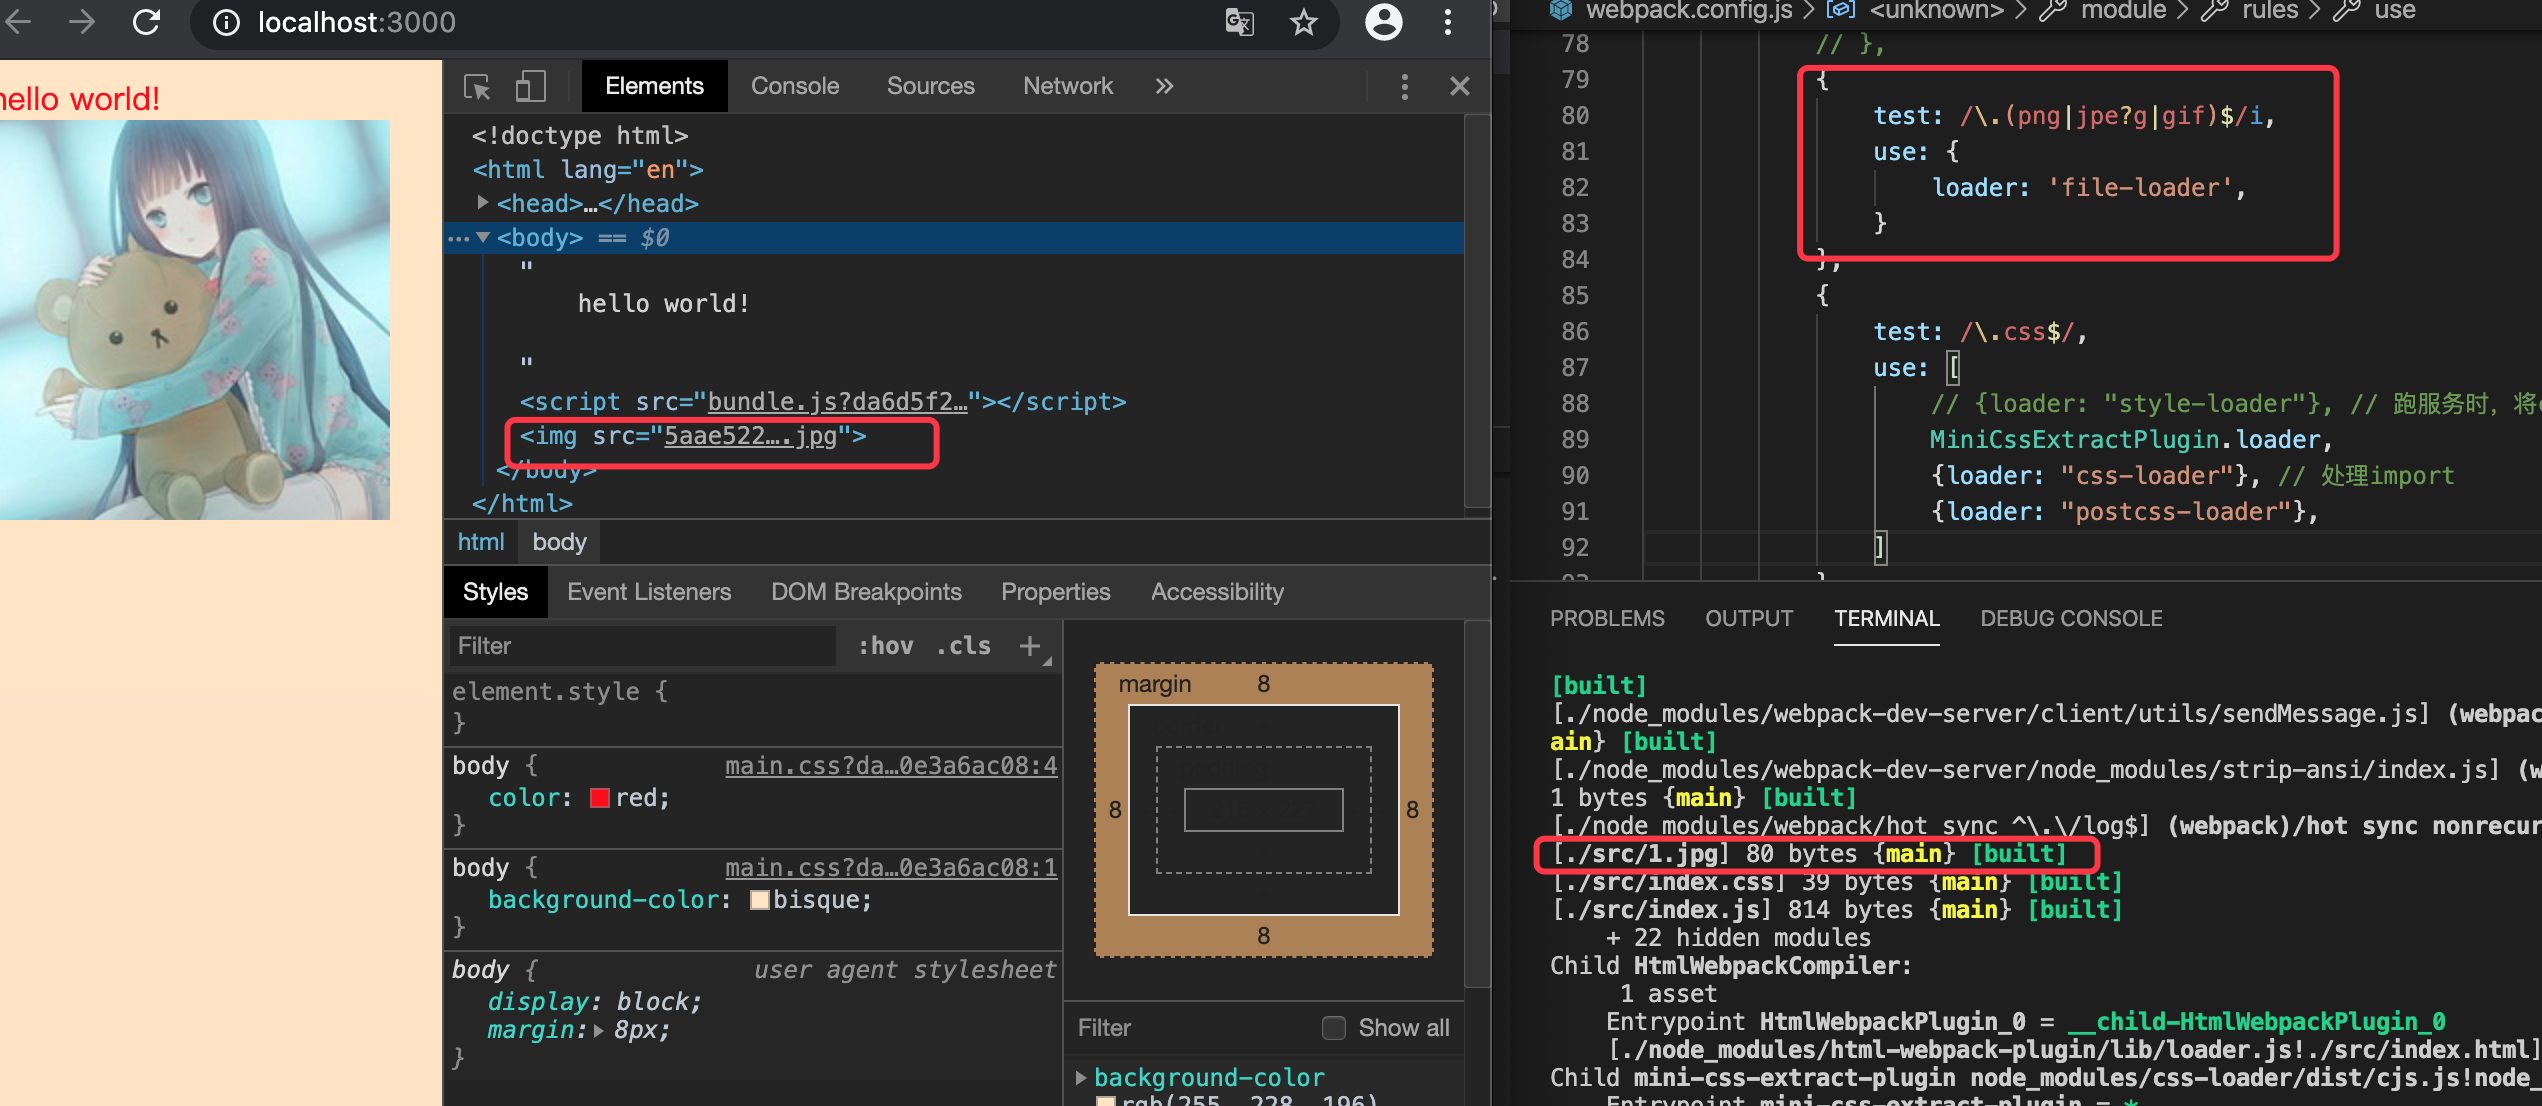
跑服务,同样报错,此时需要file-loader

file-loader能处理js/css引入的图片
npm install file-loader --save-dev
配置
// webpack.config.js
{
    test: /\.(png|jpe?g|gif)$/i,
    use: {
        loader: 'file-loader',
    }
},
- 在css里面引入图片
// index.css
body {
    color: red;
    background: url("./1.jpg") no-repeat;
}
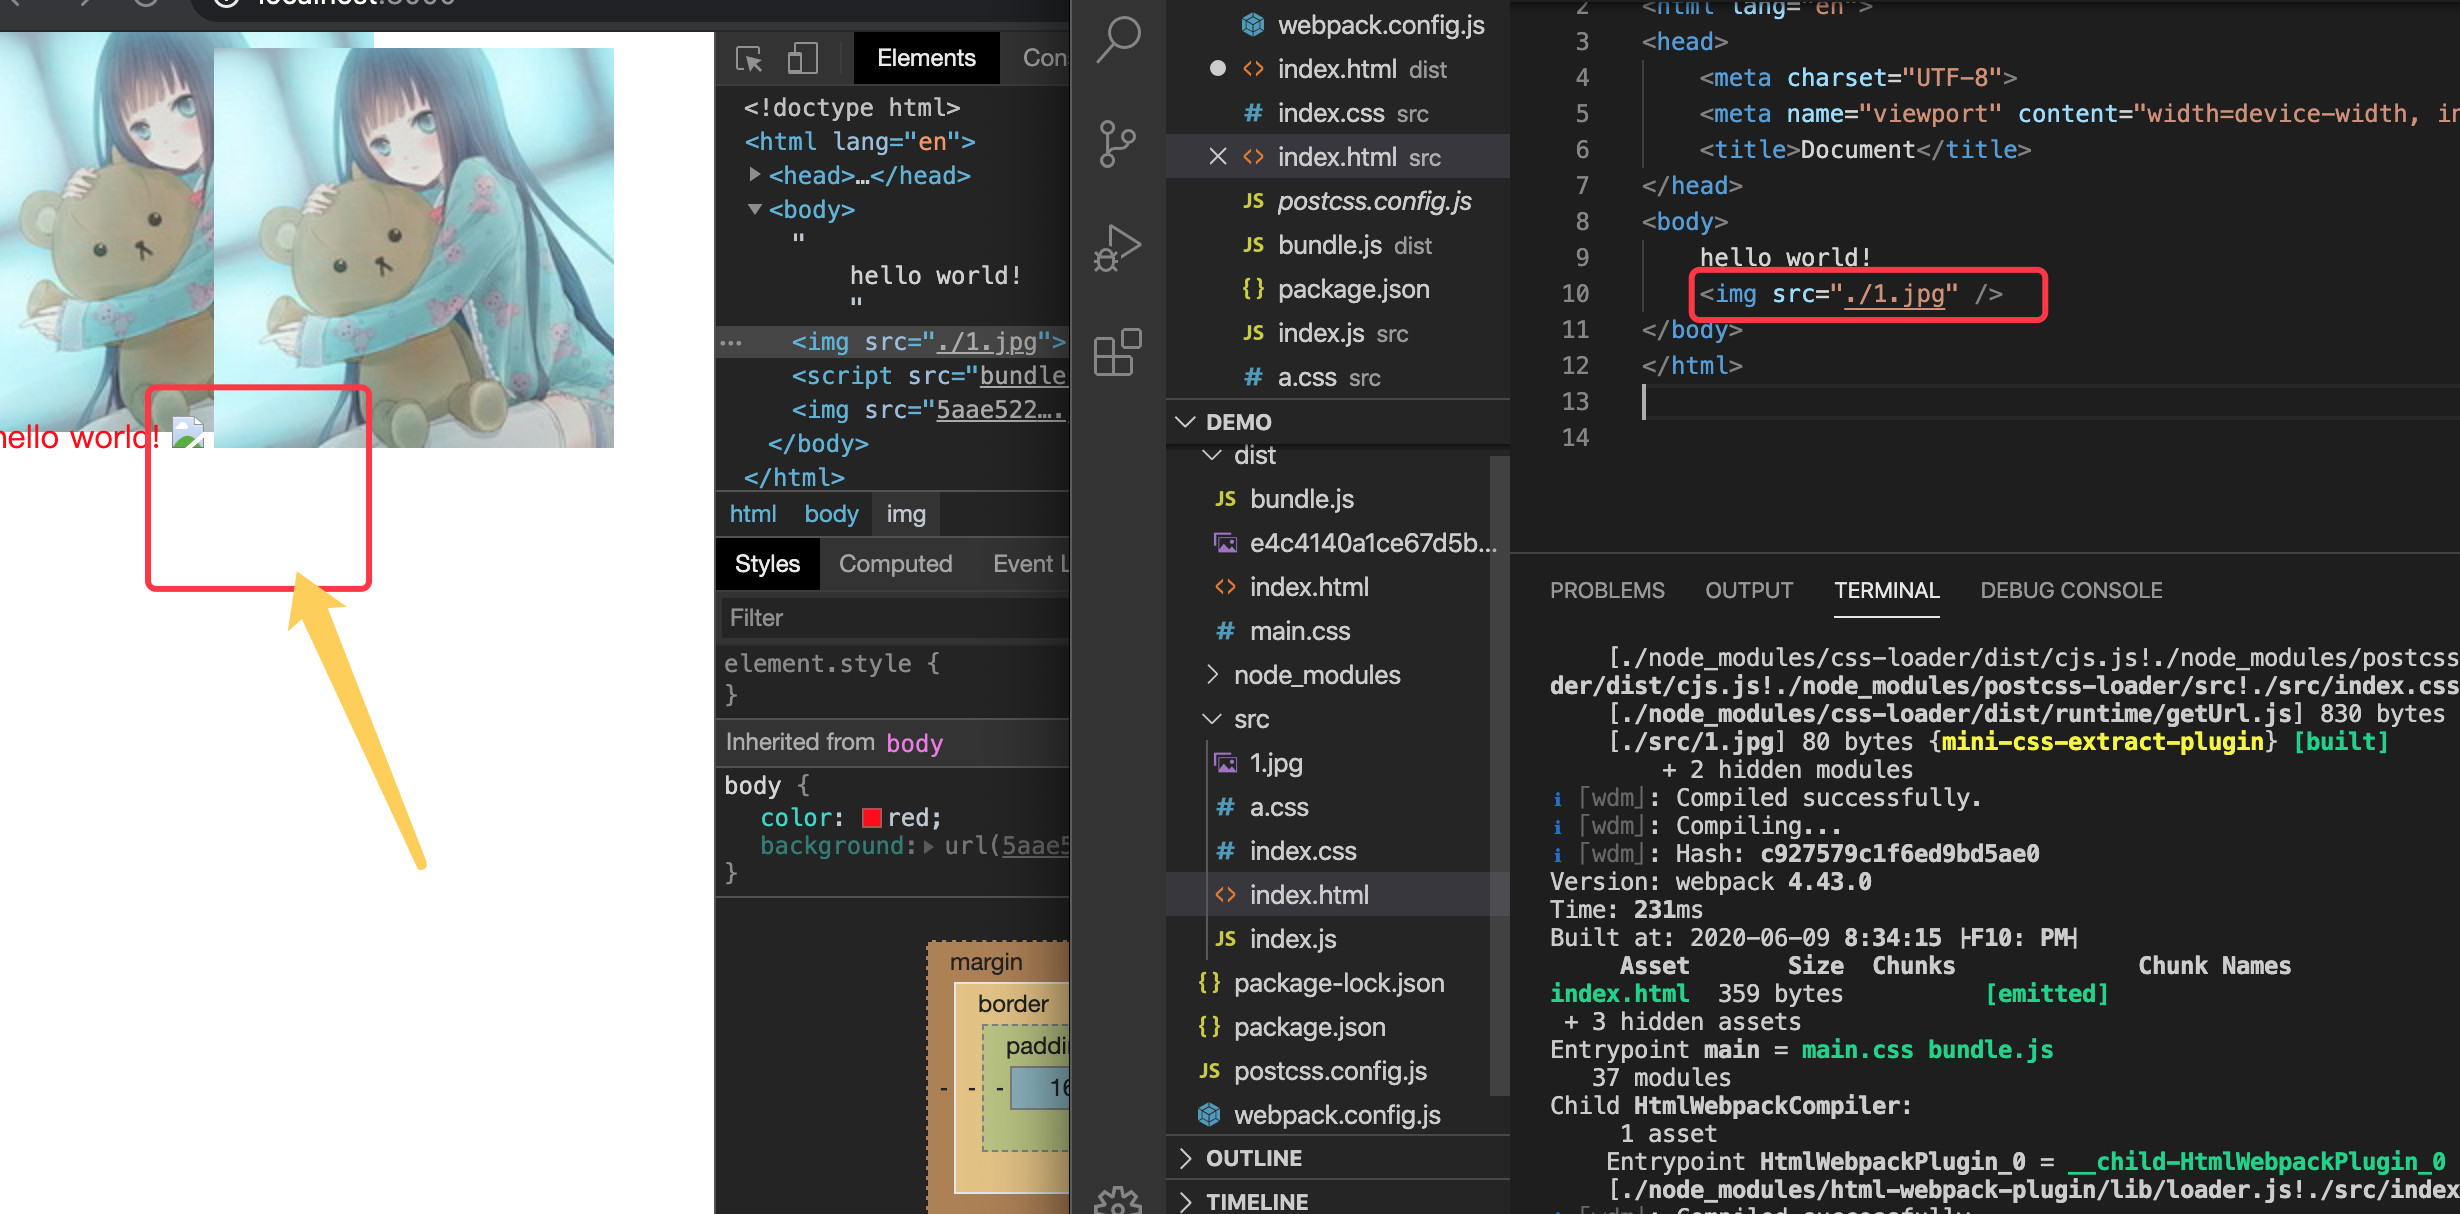
安装 html-withimg-loaser
npm install html-withimg-loader --save-dev
配置
// webapck.config.js
{
    test:/\.html$/,
    use: [
        {
            loader: 'html-withimg-loader'
        }
    ]
}
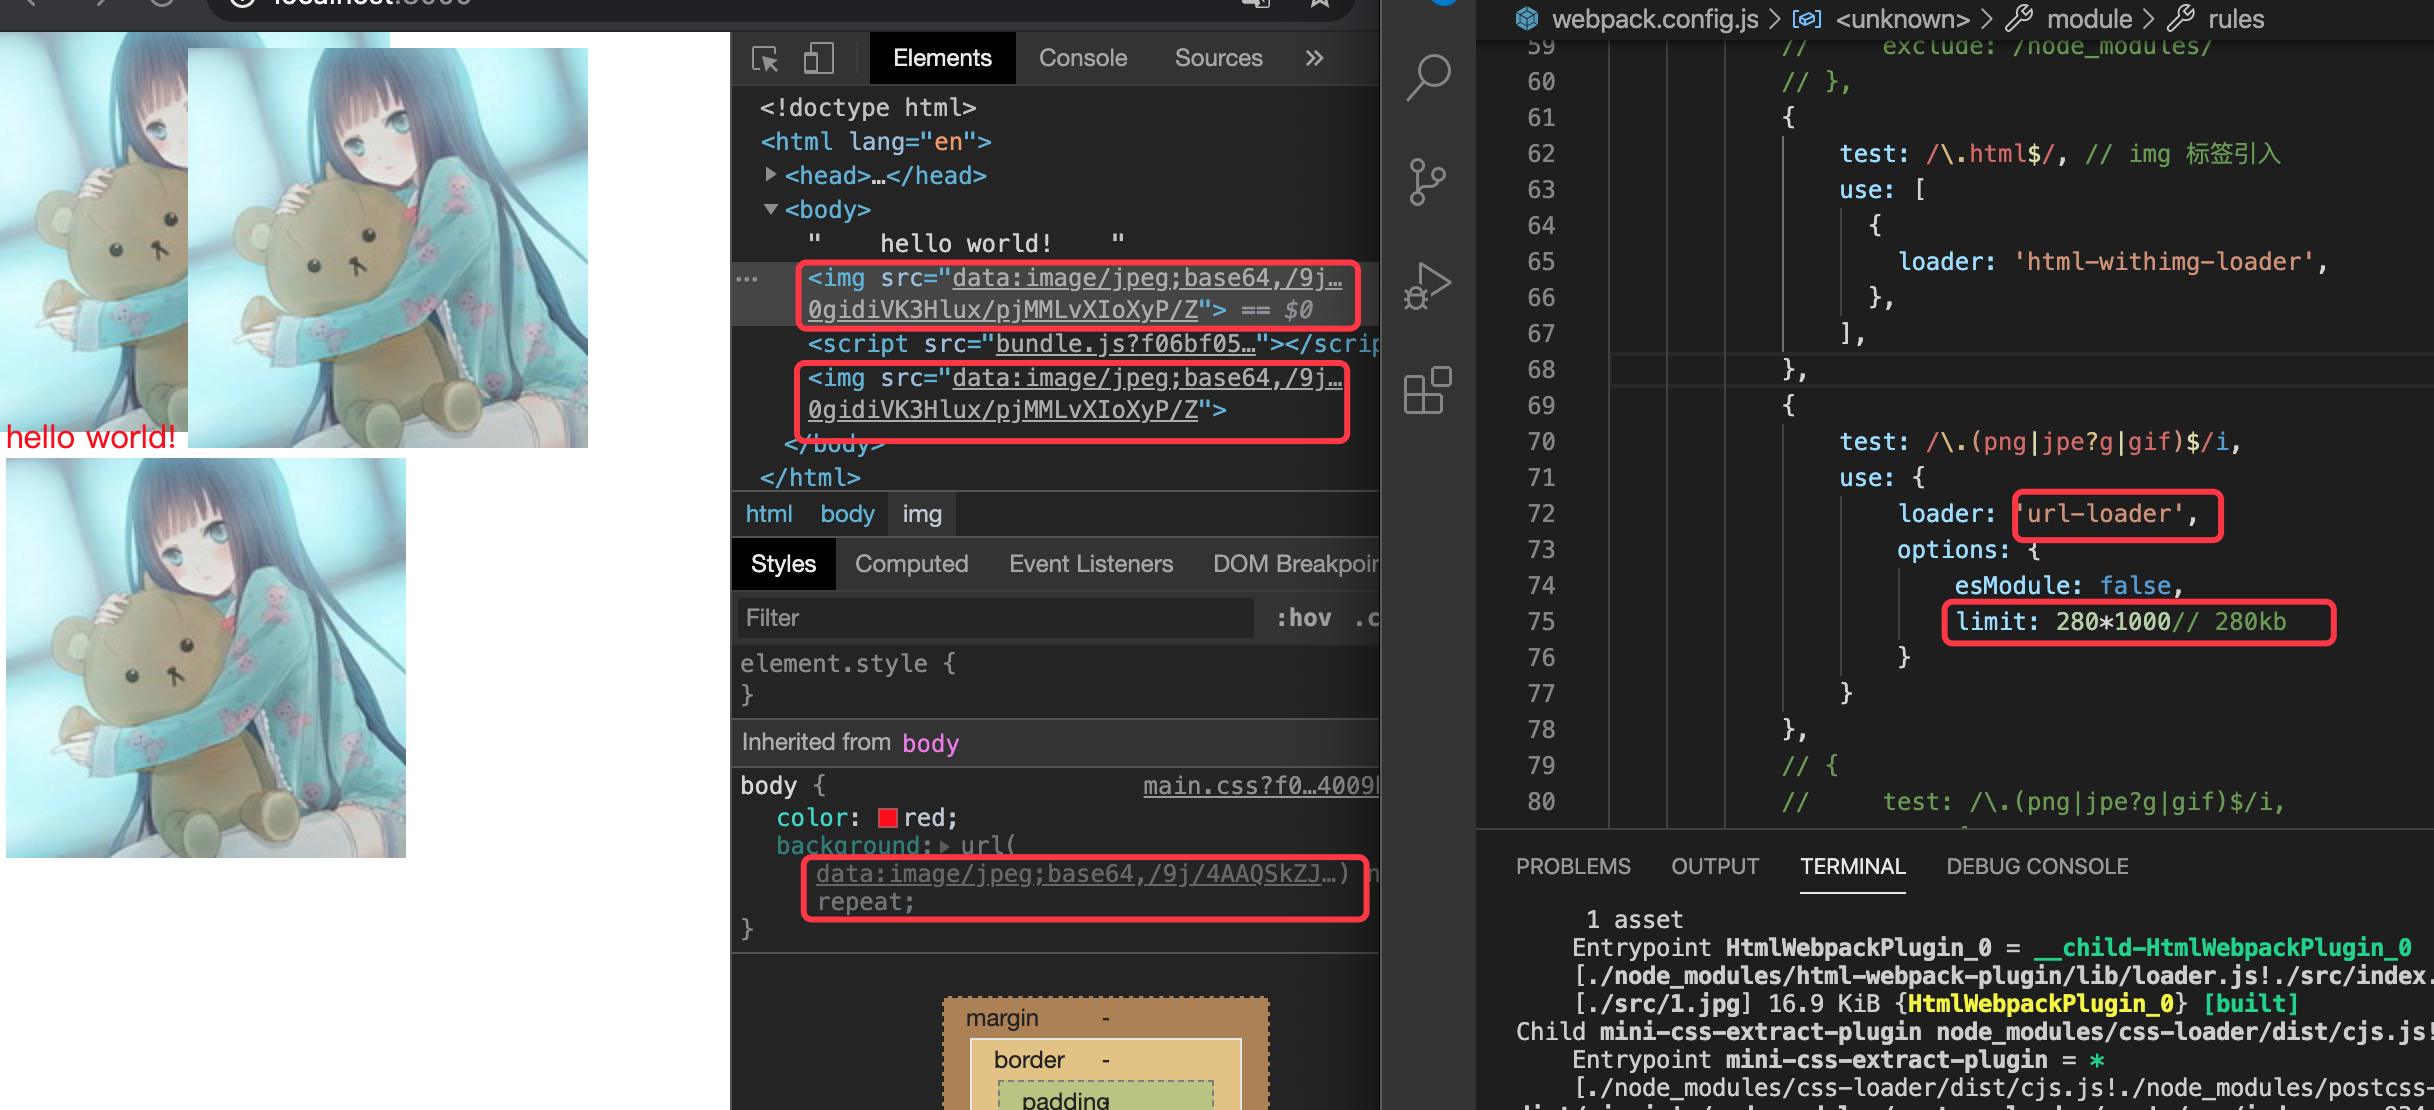
重新打包,你会发现,html的图片还是没显示, 但src还是有变来,不是原来的./1.jpg,是一个带default的对象,
<img src='{"default":"5aae522a0485ba2405faad74163971a5.jpg"}' />
只需要在flie-loader的配置添加esMoudle:true即可

安装 url-loader
npm install url-loader --save-dev
配置
url-loader根据options 的 limit,如果满足就压缩成base64,如果超过limit,则使用file-loader,注释掉file-loader
// 在 module.exports - module - rules 添加
{
    test: /\.(png|jpe?g|gif)$/i,
    use: {
        loader: 'url-loader',
        options: {
            esModule: false,
            limit: 1// 200kb
        }
    }
},
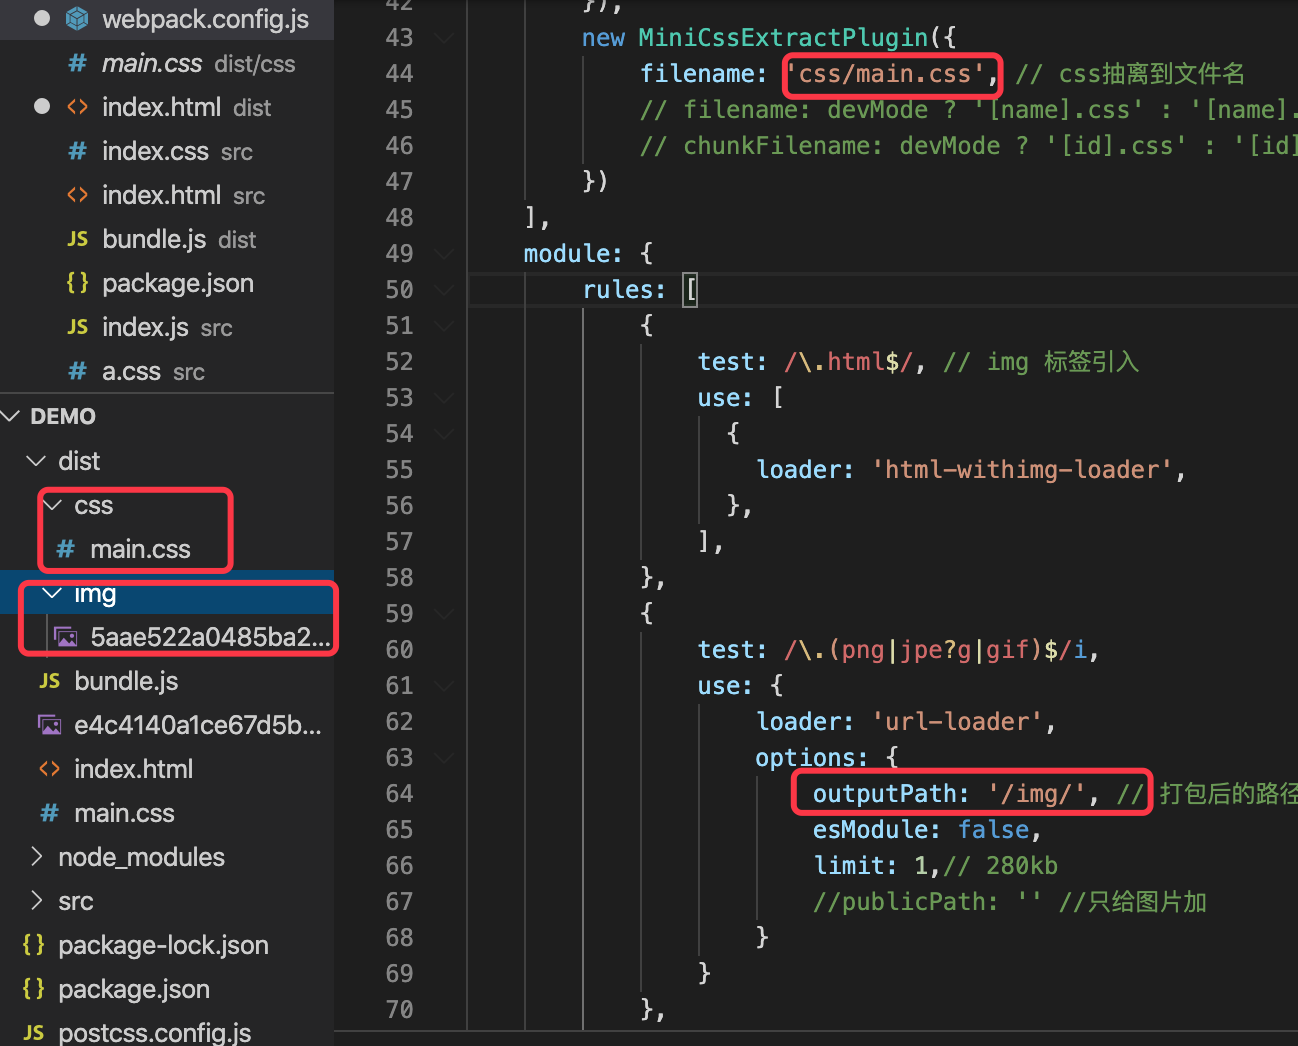
但目前打包出来的文件都直接在src 下面,如果想css/image都放独立的文件夹
文件分类打包
图片:在url-loader的配置添加outputPath
// 在
{
        test: /\.(png|jpe?g|gif)$/i,
        use: {
            loader: 'url-loader',
            options: {
                outputPath: '/img/', // 打包后的路径 dist/img
               ...
            }
        }
    },
css: 在mini-css-extract-plugin的filename前添加文件名
new MiniCssExtractPlugin({
    filename: 'css/main.css', // css抽离到文件名
})
打包后的结果
最后,真的是最后了
加一个eslint的校验的,这个东西对于代码规范,团队协作 有点重要,不用人为的遵循规范
eslint-loader
安装
npm install eslint-loader --save-dev
配置
我们之前说loader的执行顺序是由下往上,但如果,我就写在第一个,但是它需要第一个运行校验运行怎么办
enforce: 'pre' 说,是时候展现实力了
{
    test: /\.js$/,
    use: {
        loader: "eslint-loader",
        options: {
            enforce: 'pre' // 强制最先开始使用
        }
    },
    include: path.resolve(__dirname, 'src'),
    exclude: /node_modules/
},
还没完,你需要在项目根目录新建一个.eslintrc.json,
注意文件名前面是有"."
// .eslintrc.json
{
    "parserOptions": {
        "ecmaVersion": 5,
        "sourceType": "script",
        "ecmaFeatures": {}
    },
    "rules": {
        "constructor-super": 2,
        "for-direction": 2,
    },
    "env": {}
}
或者你又会问,里面的规则怎么知道怎么写?
可以到eslint,直接勾选想要配置,然后下载.eslintrc.json即可,自然还是得了解一下具体的校验项对应的规则。

多入口打包
JS 多入口打包
文件准备
- src下新建index.js、other.js,内容随意。
- 新建webpack.config.js
let path = require('path')
module.exports = {
    mode: "development",
    // 多入口 单入口是字符串 ‘./src/index.js’
    entry: {
        home: './src/index.js',
        other: './src/other.js'
    },
    output: {
        filename: 'bundle.js', // 打包后的文件名
        path: path.resolve(__dirname, 'dist')
    }
}
打包
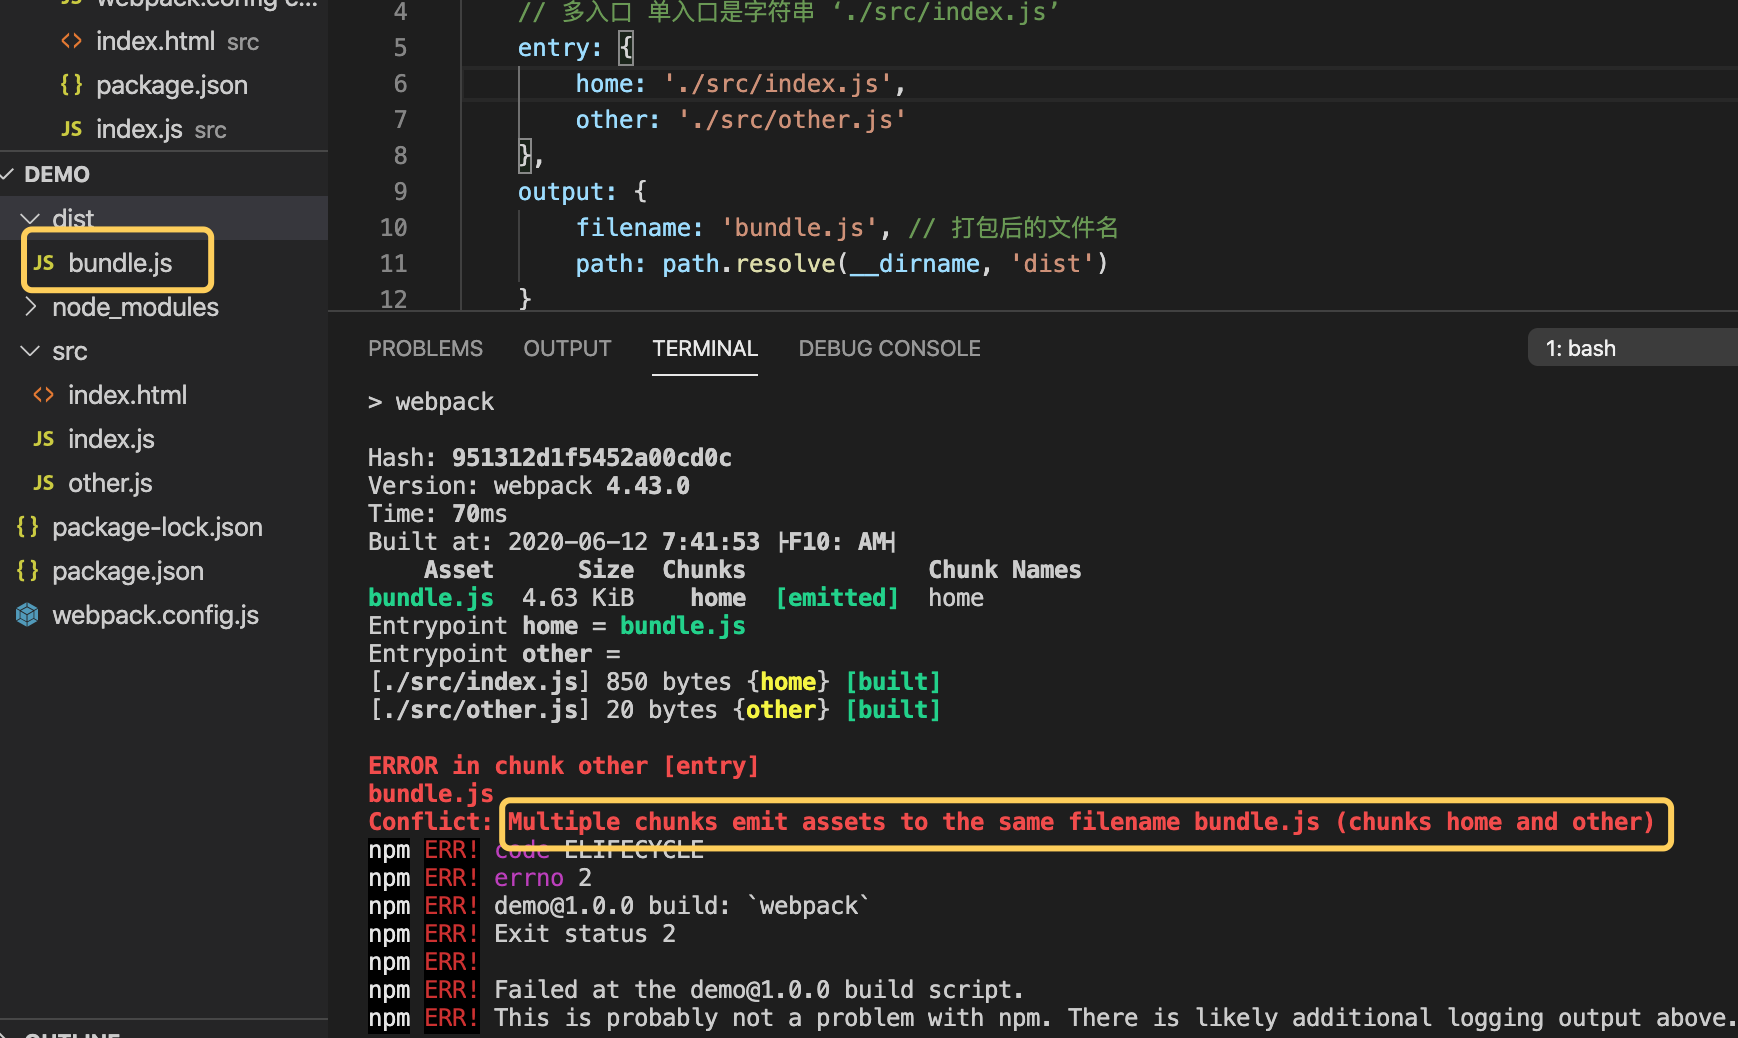
更改output的filename 配置,改成[name].js,打包后,就会有对应的js
let path = require('path')
module.exports = {
    mode: "development",
    // 多入口 单入口是字符串 ‘./src/index.js’
    entry: {
        home: './src/index.js',
        other: './src/other.js'
    },
    output: {
        filename: '[name].js', // 打包后的文件名
        path: path.resolve(__dirname, 'dist')
    }
}
html 多入口打包
文件准备
- src下新建index.html、other.html
// index.html、other.html
<!DOCTYPE html>
<html lang="en">
<head>
    <meta charset="UTF-8">
    <meta name="viewport" content="width=device-width, initial-scale=1.0">
    <title>Document</title>
</head>
<body>
    hello world! webpack 12
</body>
</html>
配置
这里我们就会想,我们引入两次html-webpack-plugin可以吗
let path = require('path')
let htmlWebpackPlugin = require('html-webpack-plugin')
module.exports = {
    ...
    plugin: [
        new htmlWebpackPlugin({
            template: './src/index.html',
            filename: 'index.html'
        }),
        new htmlWebpackPlugin({
            template: './src/other.html',
            filename: 'other.html'
        }),
    ]
}
打包
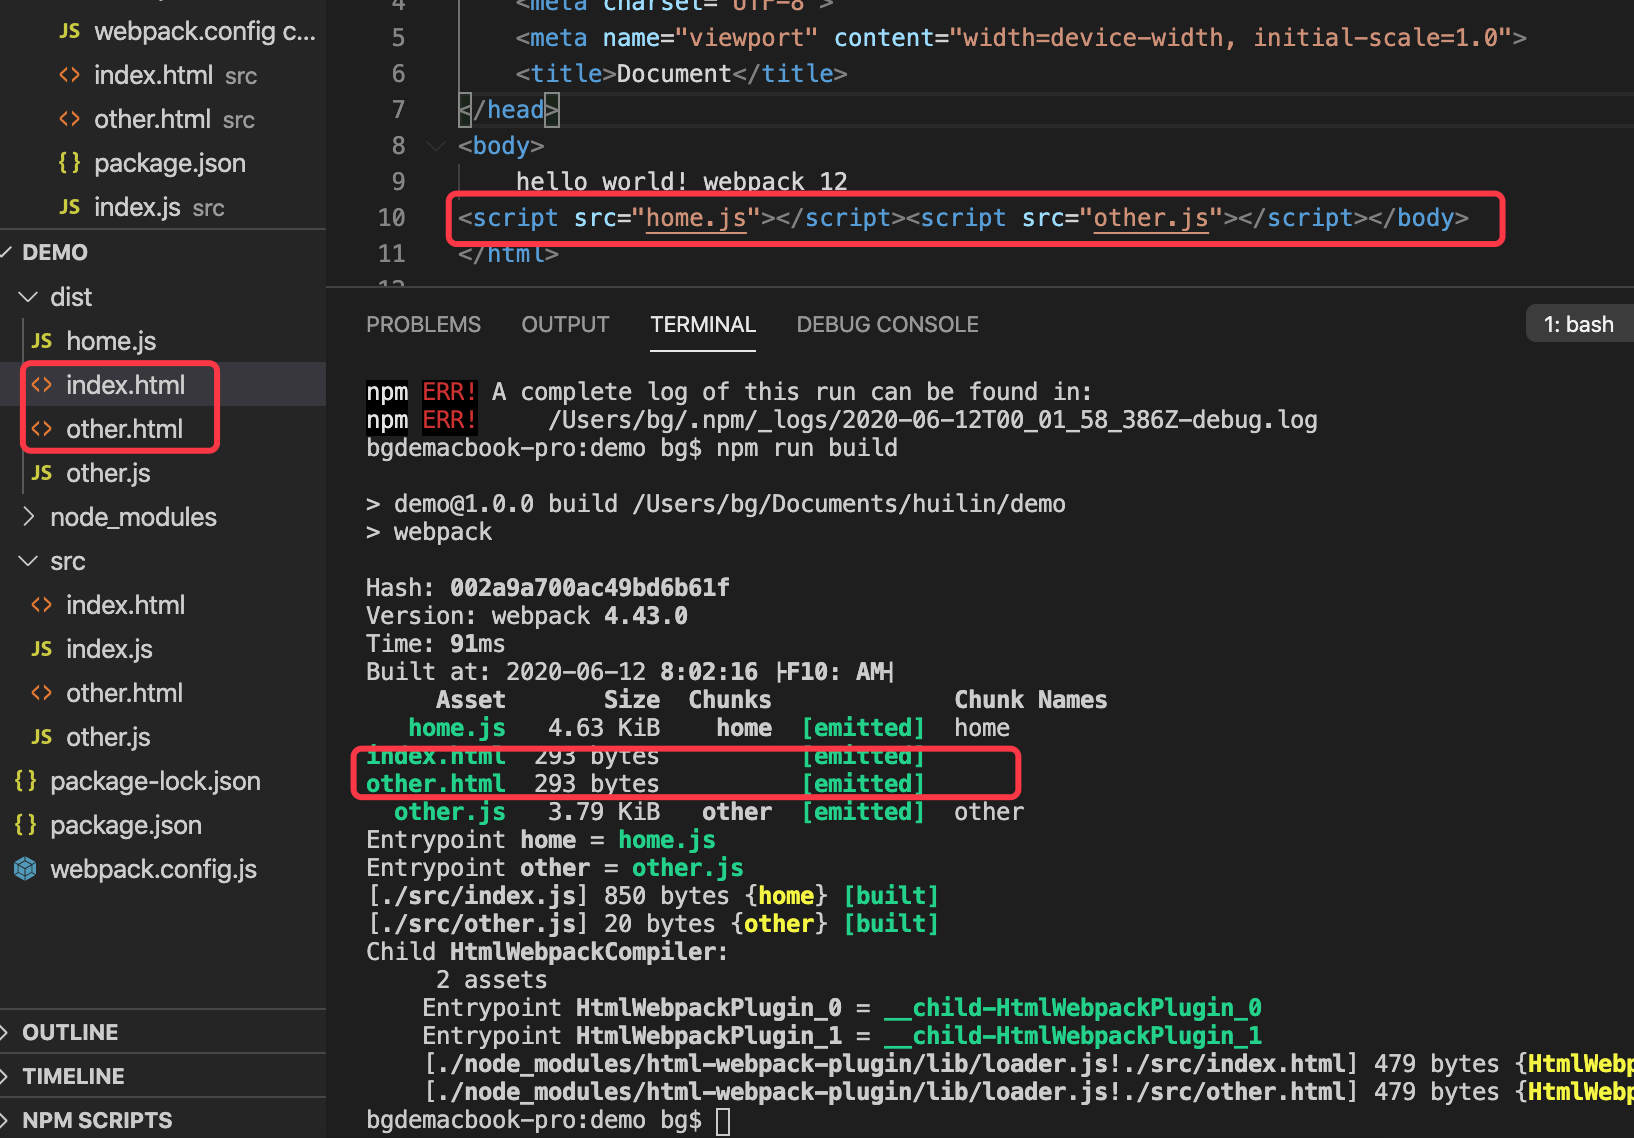
chunks,打包出来的效果,就能按你指定的js才会插入到html
...
module.exports = {
    ...
    plugins: [
        new htmlWebpackPlugin({
            template: './src/index.html',
            filename: 'home.html',
            chunks: ['home'] // 只会引入home 入口的js
        }),
        new htmlWebpackPlugin({
            template: './src/other.html',
            filename: 'other.html',
            chunks: ['other', 'home'] // 配置引入多个js
        }),
    ]
}
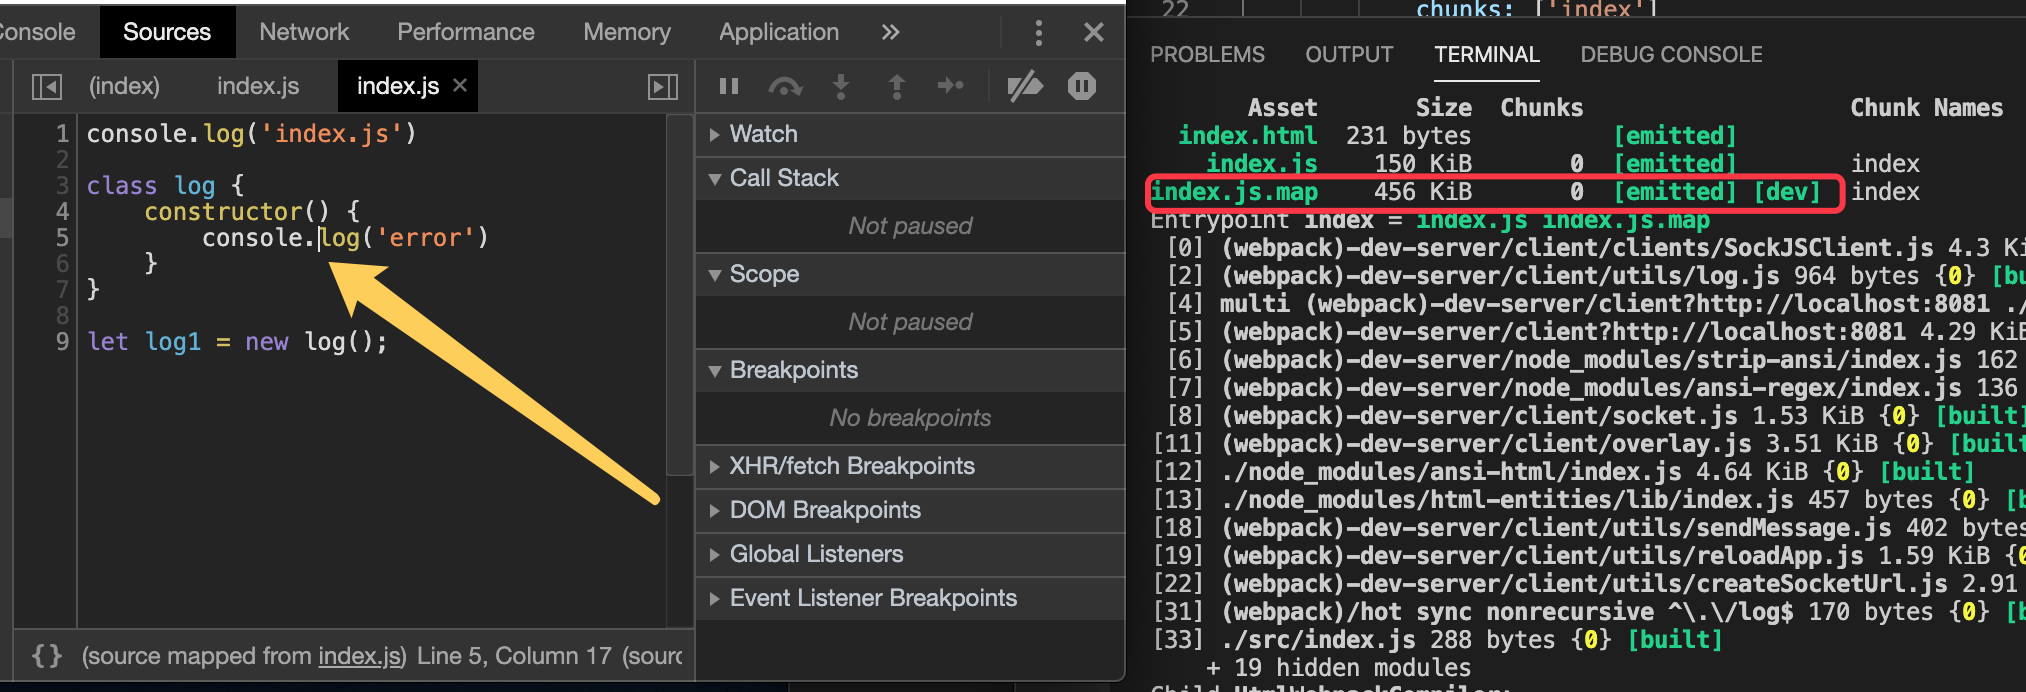
配置source-map
开发版本的代码跟线上运行的代码不完全一致的时候,都可以使用 source map技术,方便调试,能定位问题所在位置。
devtool值的类型
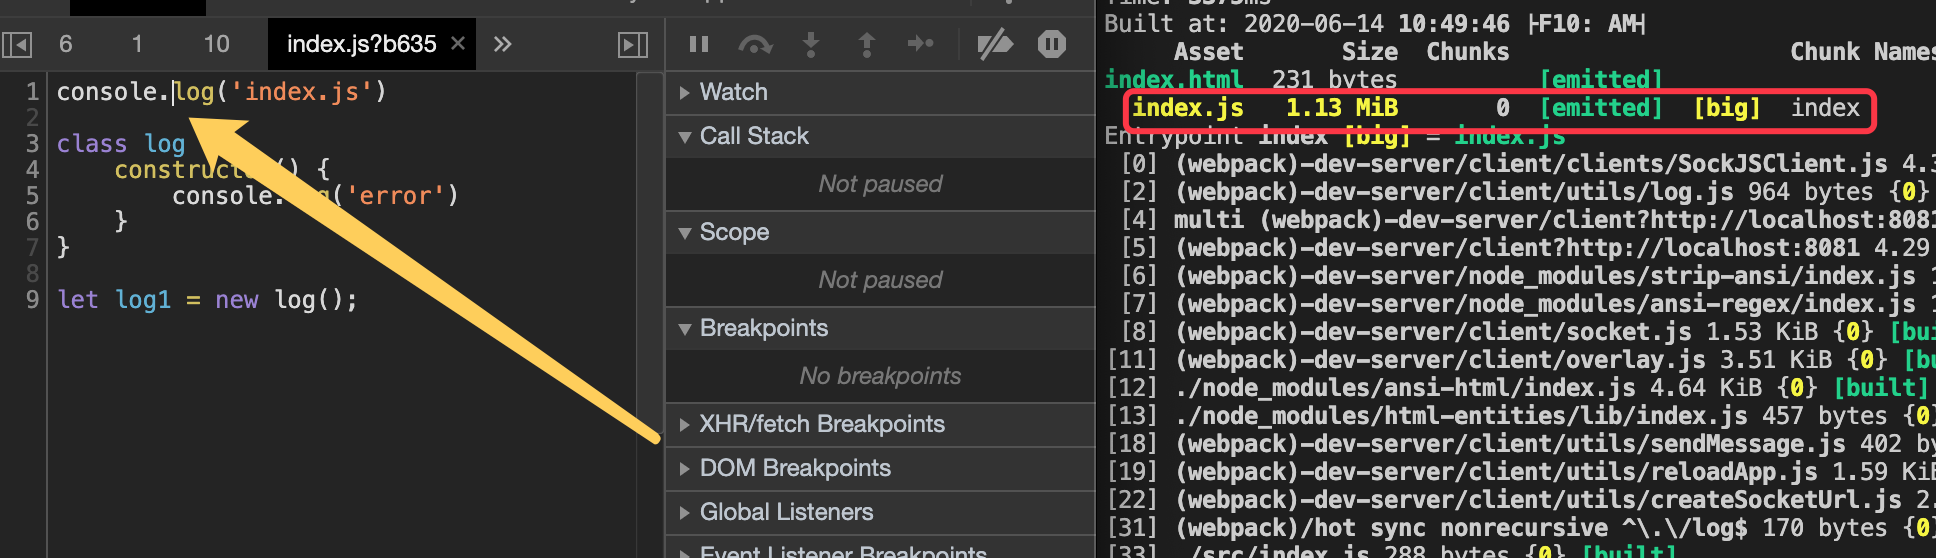
1)source-map:源码映射,会单独生成一个sourcemap的文件,定位能定为到行和列,代码跟源码一样。
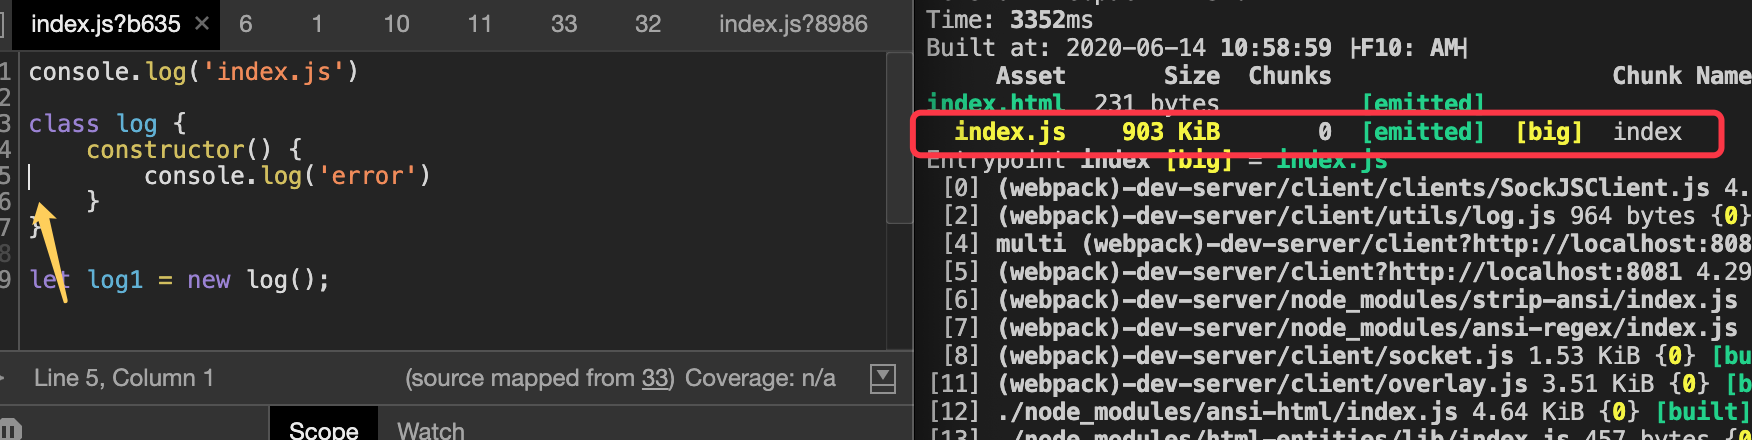
4)、 cheap-module-eval-source-map:不会生成单独的文件,定位只能定位行。
删掉多入口,把单页面跑起来
配置
let path = require('path')
let htmlWebpackPlugin = require('html-webpack-plugin')
module.exports = {
    mode: "production",
    // 多入口 单入口是字符串 ‘./src/index.js’
    entry: {
        index: './src/index.js',
    },
    output: {
        filename: '[name].js', // 打包后的文件名
        path: path.resolve(__dirname, 'dist')
    },
    devtool:'source-map', // 增加映射文件,可以帮我们调试代码
    plugins: [
        new htmlWebpackPlugin({
            template: './src/index.html',
            filename: 'index.html',
            chunks: ['index']
        }),
    ],
    module: {
        rules: [
            {
                test: /\.js$/,
                use: {
                    loader: 'babel-loader',
                    options: {
                        presets: ['@babel/preset-env']
                    }
                }
            }
        ]
    }
}
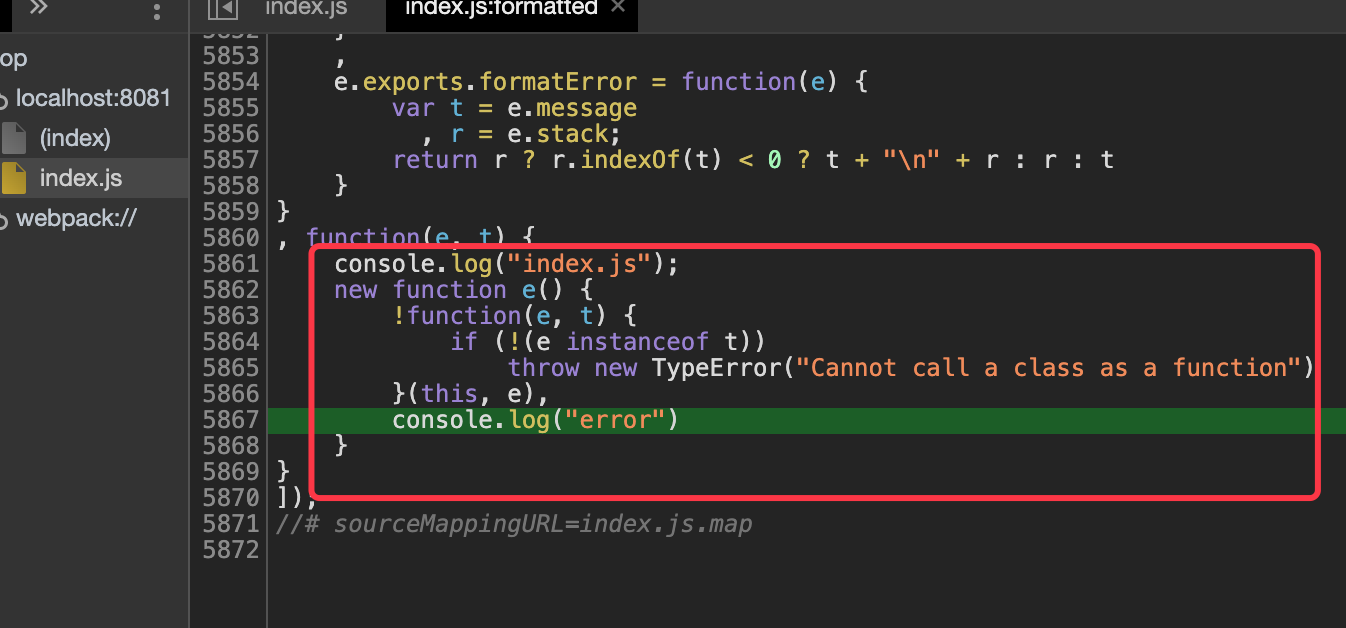
如果没有添加source-map,浏览器下的代码是打包后的
watch的用法
module.exports = {
    watch: true, // 监控变化
    watchOptions: {
        poll: 1000, // 每秒监控几次
        aggregateTimeout: 500, // 防抖,变动500毫秒后没在输入,就打包
        ignored:/node_modules/ // 不监控的文件
    },
}
webpack 小插件的应用
- cleanWebpackPlugin 在output.path路径下的文件都会被删除,4.0+的默认,不用写路径详细
- copyWebpackPlugin 复制文件/文件夹下的文件到指定到文件夹
- bannerPlugin webpack 内部插件无需重新安装,主要是把一句注释打包后放到所有的打包的文件中
安装
npm install copy-webpack-plugin clean-webpack-plugin --save-dev
配置
const { CleanWebpackPlugin }  = require('clean-webpack-plugin')
let copyWebpackPlugin = require('copy-webpack-plugin')
let webpack = require('webpack')

module.exports = {
    plugins:[
    ...
        new CleanWebpackPlugin(), // 默认清除output.path下的路径
        new copyWebpackPlugin({
            patterns: [
                {from: 'doc', to: './'}
            ]
        }),
        new webpack.BannerPlugin('2020') // 会在所有的打包的文件前面加上2020的注释
    ]
webpack 跨域问题
1)重写的方式,把请求代理到express的服务器上,如localhost:8080 请求localhost:3000的接口
文件准备
新建server.js
let express = require('express')
var app = new express()
// 注意:服务端的接口没有带/api
app.get('/user', (req, res) => {
    res.json({'name': 'hui lin4545?'})
})
app.listen(3000)
// index.js
var xml = new XMLHttpRequest()
// 注意:客户端的请求接口有带/api
xml.open('GET', '/api/user', true)
xml.onload = function() {
    console.log(xml.response)
}
xml.send()
此时就会出现跨域的情况,没法请求到数据,则需要配置代理
配置
module.exports = {
    devserver: {
        proxy: {
            '/api': {
                target: 'http://localhost:3000',
                pathRewrite: {'/api': ''} // 统一控制api开头的请求
            }
        }
    }
}
可以看到页面能拿到跨域外的数据

// server.js
app.get('/api/user', (req, res)=>{
    res.json({name: 'hui lin4545'})
})

// index.js
xhr.open('GET', '/api/user', true)

// webpack.config.js
devServer: {
    proxy: {
        '/api': 'http://localhost:3000/' //api开头的接口,都请求http://localhost:3000/
    }
},
2)单纯的模拟数据,直接在webpack 的配置里模拟接口
配置
devServer: {
    before(app) {
        app.get('/api/user',() = >(req, res){
            res.json({name: 'hui lin-before'})
        })
    }
}
3)直接在服务端在服务端启动webpack,则不会存在跨域的问题
安装
npm install webpack-dev-middleware --save-dev
let express = require('express')

let app = new express()
let webpack = require('webpack')
let webpackDevMiddleWare = require('webpack-dev-middleware')
let config = require('./webpack.config.js')

let compiler = webpack(config)

app.use(webpackDevMiddleWare(compiler))

app.get('/api/user', (req, res)=>{
    res.json({name: 'hui lin4545'})
})

app.listen(3000)
resolve
解析第三方包 common
如果我们直接import 'boostrap',不带任何后缀, 它直接去node_modules 里面找,node_modules/boostrap/package.json/ main的值
- 如果我们只想要单独引入boostrap.css import 'bootstrap/dist/css/bootstrap.css',则可以通过加别名
module.exports = {
    resolve: {
        modules: [path.resolve('node_modulse')],
        alias: { // 添加别名
            boostrap: 'bootstrap/dist/css/bootstrap.css'
        },
        mainFields: ['style, main'], //先找包下的package.json style,找不到再去找package.json main
        mainFiles: [], // 指定入口文件,默认是index.js
        extensions: ['.js', '.css', '.json'] // 当你不写后缀的华,找不到js,就去找css
    }
}
定义环境变量
webpack.DefinePlugin 在你需要在代码里面区别 当前环境
module.exports = {
    plugins: [
        new webpack.DefinePlugin({
            DEV: '"production"'
            DEV2: JSON.stringify('production'), // 字符串
            FLAG: 'true', // boolean 类型
            EXT: '1+1' // 表达式
        })
    ]
}

// index.js
if (DEV) console.log(DEV)
区分不同的环境
通过webpack-merge合并文件
安装
npm install webpack-merge --save-dev
配置
// webpack.prod.js
let {smart} = require('webpack-merge')

let base = require('webpack.base.js')

module.exports = smart(base, {
    mode: 'production'
})
把公共的放到webpack.base.js, 然后可以根据开发环境和生产环境配置不同的config 文件
