

一、前言
我还记得去年有一次接到一个电话面试,我在给面试官介绍完项目的技术栈后,他突然问了我一句:Springboot是怎么整合mybatis的?我当时就懵逼了,怎么整合?就引个starter配置一下?感觉他听了我的回答很无语。最近比较闲,忽然想起这个事情,那么我就研究一下这个问题吧。
传送门:
Mybatis源码分析(一)MapperProxy 的初始化
Mybatis源码分析(四)Mybatis执行sql的四大组件
二、Mybatis
2.1 架构设计
Mybatis真的是一款优秀的orm框架。其源码短小精悍,运用了大量的设计模式,很适合开发人员作为阅读源码的入门选择。同时Mybatis的分层也非常干净,这里我丢张网上的热图就不多深入讨论了。
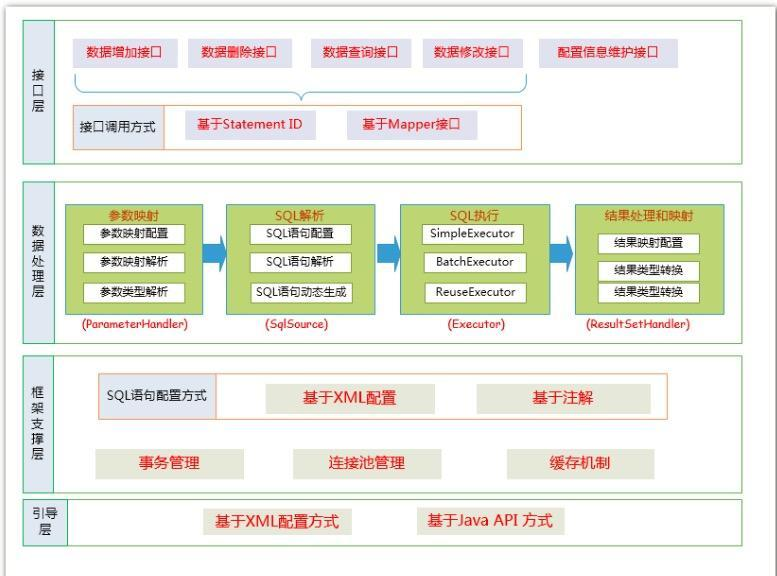
- API接口层,暴露给开发者使用,我们一般常用的是Mapper。
- 数据处理层,实现mybatis内部流程,包括SQL查找、解析、执行和实行结果映射处理等。
- 基础模块层,提供最基础的功能支撑,例如事务、缓存、日志等。
2.2 执行流程
2.2.1 初始化
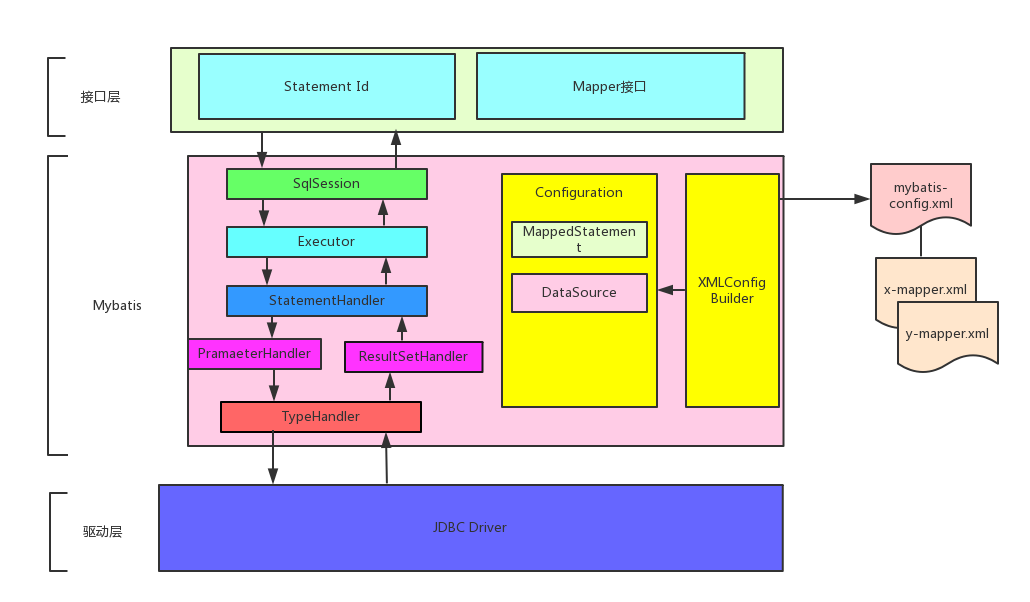
Mybatis在初始化的过程中,SqlSessionFactoryBuilder(bulider模式)会调用 XMLConfigBuilder (bulider模式)读取Mybatis-config.xml和所有的Mapper.xml文件,构建Mybatis运行的核心对象Configuration对象。然后将Configuration对象作为参数构建一个 SqlSessionFactory (工厂模式)用来创建 SqlSession 对象。
2.2.2 SqlSession
SqlSession对象的主要功能是完成一次数据库的访问和结果的映射,默认实现类是DefaultSqlSession,它有两个必须配置的属性:Configuration 和 Executor。Configuration就是前面说到的Mybatis运行的核心对象。SqlSession对数据库的操作都是通过Executor来完成的。
获取到 SqlSession 之后,我们还需要拿到映射器 Mapper 去执行sql方法。SqlSession 的 getMapper 方法是联系应用程序和Mybatis纽带,当然MyBatis 获取 Mapper 实例采用的方式是:动态代理。动态代理类就是MapperProxy 类,后面的章节我们会对这里进行详细分析。
此外,SqlSession是线程不安全的,所以SqlSession对象的作用域需限制方法内。但是Spring的 SqlSessionTemplate 帮我们解决了这个问题。 SqlSessionTemplate 是线程安全的,可以被多个 DAO 或映射器所共享使用。当调用 SQL 方法时(包括由 getMapper() 方法返回的映射器中的方法),SqlSessionTemplate 将会保证使用的 SqlSession 与当前 Spring 的事务相关。此外,它管理 session 的生命周期,包含必要的关闭、提交或回滚操作。另外,它也负责将 MyBatis 的异常翻译成 Spring 中的 DataAccessExceptions。具体可以去看下mybatis-spring的官方文档。
In MyBatis you use the
SqlSessionFactoryto create anSqlSession. Once you have a session, you use it to execute yourmapped statements, commit or rollback connections and finally, when it is no longer needed, you close the session. With MyBatis-Spring you don't need to use SqlSessionFactory directly because your beans can be injected witha thread safe SqlSessionthat automatically commits, rollbacks and closes the session based on Spring's transaction configuration.
2.2.3 Sql语句的执行
SQL语句的执行涉及各个组件,其中比较重要的是Executor,StatementHandler,ParameterHandler和ResultSetHandler。
Executor对象在创建Configuration对象的时候创建,并且缓存在Configuration对象里,负责一级缓存和二级缓存,并提供是事务管理的相关操作。Executor对象的主要功能是调用StatementHandler访问数据库,并将查询结果存入缓存中(如果配置了缓存的话。StatementHandler首先通过ParammeterHandler完成SQL的实参绑定,然后通过java.sql.Statement对象执行sql语句并得到结果集ResultSet,最后通过ResultSetHandler完成结果集的映射,得到对象并返回。

三、快速入门
3.1 Springboot整合Mybatis
Springboot整合Mybatis的准备工作非常简单,如果是maven工程只需要在pom.xml中完成引入即可快速上手。
<dependency>
    <groupId>org.mybatis.spring.boot</groupId>
    <artifactId>mybatis-spring-boot-starter</artifactId>
    <version>2.1.2</version>
</dependency>
<!-- 添加mysql驱动 -->
<dependency>
    <groupId>mysql</groupId>
    <artifactId>mysql-connector-java</artifactId>
    <version>5.1.12</version>
 </dependency>
那么mybatis-spring-boot-starter做了哪些事情呢,我们看下官方文档里是这么说的
As you may already know, to use MyBatis with Spring you need at least an SqlSessionFactory and at least one mapper interface.MyBatis-Spring-Boot-Starter will:
- Autodetect an existing DataSource
- Will create and register an instance of a SqlSessionFactory passing that DataSource as an input using the SqlSessionFactoryBean
- Will create and register an instance of a SqlSessionTemplate got out of the SqlSessionFactory
- Auto-scan your mappers, link them to the SqlSessionTemplate and register them to Spring context so they can be injected into your beans
- Springboot会自动检测我们配置的
数据源, - 创建并注册一个
SqlSessionFactory实例作用于SqlSessionFactoryBean(代理对象。BeanFactory中获取的实际上是FactoryBean的getObject()返回的对象) - 还会注册创建从
SqlSessionFactory中获取的SqlSessionTemplate的实例。 - 自动扫描
Mapper,(这里Springboot会默认扫描带有@Mapper 注解的映射器,必要时可通过@MapperScan定义扫描路径使用) 将它们链接到SqlSessionTemplate并将它们注册到Spring context中注入容器。
/**
   * If mapper registering configuration or mapper scanning configuration not present, this configuration allow to scan
   * mappers based on the same component-scanning path as Spring Boot itself.
   */
  @org.springframework.context.annotation.Configuration
  @Import(AutoConfiguredMapperScannerRegistrar.class)
  @ConditionalOnMissingBean({ MapperFactoryBean.class, MapperScannerConfigurer.class })
  public static class MapperScannerRegistrarNotFoundConfiguration implements InitializingBean {

    @Override
    public void afterPropertiesSet() {
      logger.debug(
          "Not found configuration for registering mapper bean using @MapperScan, MapperFactoryBean and MapperScannerConfigurer.");
    }

  }
这里说明一下,当Spring容器找不到MapperFactoryBean.class和MapperScannerConfigurer.class时,会import AutoConfiguredMapperScannerRegistrar.class 扫描@Mapper注解的映射器继续完成注入。
 @Override
    public void registerBeanDefinitions(AnnotationMetadata importingClassMetadata, BeanDefinitionRegistry registry) {

      if (!AutoConfigurationPackages.has(this.beanFactory)) {
        logger.debug("Could not determine auto-configuration package, automatic mapper scanning disabled.");
        return;
      }

      logger.debug("Searching for mappers annotated with @Mapper");

      List<String> packages = AutoConfigurationPackages.get(this.beanFactory);
      if (logger.isDebugEnabled()) {
        packages.forEach(pkg -> logger.debug("Using auto-configuration base package '{}'", pkg));
      }

      BeanDefinitionBuilder builder = BeanDefinitionBuilder.genericBeanDefinition(MapperScannerConfigurer.class);
      builder.addPropertyValue("processPropertyPlaceHolders", true);
      builder.addPropertyValue("annotationClass", Mapper.class);
      builder.addPropertyValue("basePackage", StringUtils.collectionToCommaDelimitedString(packages));
      BeanWrapper beanWrapper = new BeanWrapperImpl(MapperScannerConfigurer.class);
      Stream.of(beanWrapper.getPropertyDescriptors())
          // Need to mybatis-spring 2.0.2+
          .filter(x -> x.getName().equals("lazyInitialization")).findAny()
          .ifPresent(x -> builder.addPropertyValue("lazyInitialization", "${mybatis.lazy-initialization:false}"));
      registry.registerBeanDefinition(MapperScannerConfigurer.class.getName(), builder.getBeanDefinition());
    }
不过本着能省则省的原则,还是建议使用@MapperScan来完成映射器的注入。在Application主启动类上加上@MapperScan("mapper所在路径")即可完成mybatis的初始化。
@SpringBootApplication
@MapperScan("com.example.*")
public class MybatisApplication {

    public static void main(String[] args) {
        SpringApplication.run(MybatisApplication.class, args);
    }

}
3.2 编写mapper及xml
关于sql语句你也可以选择@select等注解的形式,mybatis同样是支持的。笔者个人比较钟情xml哈,可读性强便于维护。这里我实体和mapper我用generator自动生成的,挺方便的。感兴趣的小伙伴可以了解下哈。 实体:
package com.example.mybatis.model;

public class Role {
    private Long id;

    private String roleId;

    private String roleName;

    public Long getId() {
        return id;
    }

    public void setId(Long id) {
        this.id = id;
    }

    public String getRoleId() {
        return roleId;
    }

    public void setRoleId(String roleId) {
        this.roleId = roleId == null ? null : roleId.trim();
    }

    public String getRoleName() {
        return roleName;
    }

    public void setRoleName(String roleName) {
        this.roleName = roleName == null ? null : roleName.trim();
    }
}
mapper :映射器
package com.example.mybatis.mapper;

import com.example.mybatis.model.Role;
import org.apache.ibatis.annotations.Mapper;

//@Mapper
public interface RoleMapper {
    int deleteByPrimaryKey(Long id);

    int insert(Role record);

    int insertSelective(Role record);

    Role selectByPrimaryKey(Long id);

    int updateByPrimaryKeySelective(Role record);

    int updateByPrimaryKey(Role record);
}
xml:sql语句
<?xml version="1.0" encoding="UTF-8" ?>
<!DOCTYPE mapper PUBLIC "-//mybatis.org//DTD Mapper 3.0//EN" "http://mybatis.org/dtd/mybatis-3-mapper.dtd" >
<mapper namespace="com.example.mybatis.mapper.RoleMapper" >
  <resultMap id="BaseResultMap" type="com.example.mybatis.model.Role" >
    <id column="id" property="id" jdbcType="BIGINT" />
    <result column="role_id" property="roleId" jdbcType="VARCHAR" />
    <result column="role_name" property="roleName" jdbcType="VARCHAR" />
  </resultMap>
  <sql id="Base_Column_List" >
    id, role_id, role_name
  </sql>
  <select id="selectByPrimaryKey" resultMap="BaseResultMap" parameterType="java.lang.Long" >
    select
    <include refid="Base_Column_List" />
    from role
    where id = #{id,jdbcType=BIGINT}
  </select>
  <delete id="deleteByPrimaryKey" parameterType="java.lang.Long" >
    delete from role
    where id = #{id,jdbcType=BIGINT}
  </delete>
  <insert id="insert" parameterType="com.example.mybatis.model.Role" >
    insert into role (id, role_id, role_name
      )
    values (#{id,jdbcType=BIGINT}, #{roleId,jdbcType=VARCHAR}, #{roleName,jdbcType=VARCHAR}
      )
  </insert>
  <insert id="insertSelective" parameterType="com.example.mybatis.model.Role" >
    insert into role
    <trim prefix="(" suffix=")" suffixOverrides="," >
      <if test="id != null" >
        id,
      </if>
      <if test="roleId != null" >
        role_id,
      </if>
      <if test="roleName != null" >
        role_name,
      </if>
    </trim>
    <trim prefix="values (" suffix=")" suffixOverrides="," >
      <if test="id != null" >
        #{id,jdbcType=BIGINT},
      </if>
      <if test="roleId != null" >
        #{roleId,jdbcType=VARCHAR},
      </if>
      <if test="roleName != null" >
        #{roleName,jdbcType=VARCHAR},
      </if>
    </trim>
  </insert>
  <update id="updateByPrimaryKeySelective" parameterType="com.example.mybatis.model.Role" >
    update role
    <set >
      <if test="roleId != null" >
        role_id = #{roleId,jdbcType=VARCHAR},
      </if>
      <if test="roleName != null" >
        role_name = #{roleName,jdbcType=VARCHAR},
      </if>
    </set>
    where id = #{id,jdbcType=BIGINT}
  </update>
  <update id="updateByPrimaryKey" parameterType="com.example.mybatis.model.Role" >
    update role
    set role_id = #{roleId,jdbcType=VARCHAR},
      role_name = #{roleName,jdbcType=VARCHAR}
    where id = #{id,jdbcType=BIGINT}
  </update>
</mapper>
后面笔者会针对mybatis的执行流程陆续展开一些源码的分析,届时会不断把链接补充在这篇文章里。
