越来越多的公众号在图文消息中加入了SVG动画交互效果,SVG支持事件触发动画,相对于单独做一个H5而言,由于公众号消息依托于微信服务器,为广告主节约了服务器流量成本。这次我们以苹果公众号的一篇交互消息为例,剖析下里面的效果是怎样实现的。
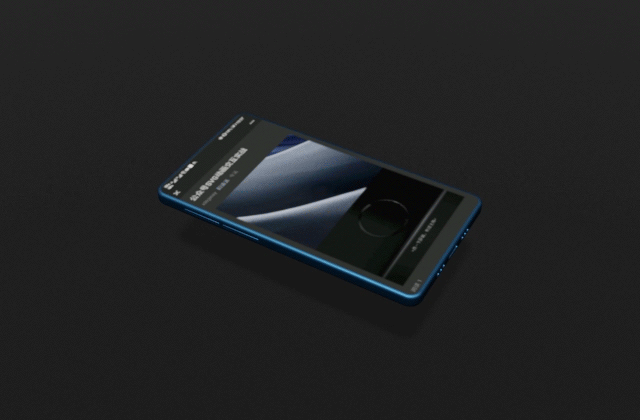
动画主要分为两屏,第一屏出现闪动文字提示用户点击交互,用户点击后第一屏动画消失接着播放第二屏的gif动画,最后画面停止在产品图片帧上。
1.首先构建第一屏动画:
1.1 SVG的基本结构
<svg viewBox="0 0 1080 620" width="100%" height="620px" preserveAspectRatio="xMinYMin meet" xmlns="http://www.w3.org/2000/svg"></svg>先来介绍viewBox属性
viewBox=”x, y, w, h”
x、y 控制SVG内所有元素的相对位置。w,h用来控制svg宽高,这里的宽高并不是svg元素的dom尺寸,而是svg的内分辨率,受svg的width,height和preserveAspectRatio等属性值影响。
preserveAspectRatio=”xMinYMin meet”
preserveAspectRatio属性用来设置viewBox的缩放和对齐方式,xMinYMin meet的意思是,根据视口的宽高进行等比例缩放,这里的视口就是指width和height值组成的矩形区域。
1.2 加入闪动文字
<svg viewBox="0 0 1080 620" width="100%" height="620px" preserveAspectRatio="xMinYMin meet" xmlns="http://www.w3.org/2000/svg">
  <text x="340" y="1750" fill="#fff" style="font-size:36px">>点一下屏幕,有请主角<</text>
</svg>
设置文字的位置和颜色属性。
1.3 为文字添加动画,这里需要用到 <g>和<animate>标签
<svg viewBox="0 0 1080 620" width="100%" height="620px" preserveAspectRatio="xMinYMin meet" xmlns="http://www.w3.org/2000/svg">
  <g>
     <animate attributeName="opacity" begin="0s" dur="1s" values="1;0;1" repeatCount="indefinite"></animate>
     <text x="340" y="1750" fill="#fff" style="font-size:36px">>点一下屏幕,有请主角<</text>
  </g>
</svg>- animate标签用来对元素的某个属性进行动画。
- attributeName指定属性名,这里是透明度opacity。
- begin指定动画开始的时间,可以是一组用分号分隔的值。
- dur指定动画的时长,值越小动画越快,反之亦然。
- values指定attributeName属性的变化值,可以是单值也可以是分号分隔的列表。这里的1;0;1指定是透明度在0->1->0之间变换,产生闪烁的效果。
- g标签即group的缩写,用来对元素进行组合, 这样animate效果就限制在组内。
1.4 加入首屏和动画图片
<svg style="transform:rotateZ(0deg);background-color:#000;background-size:100% auto;background-repeat:no-repeat;width:100%;height:620px;" version="1.1" viewBox="0 0 1080 620" preserveAspectRatio="xMinYMin meet" xmlns="http://www.w3.org/2000/svg">
  <g>
    <g>
      <foreignObject x="0" y="0" width="1080" height="1950">
        <svg style="background-image:url(https://mmbiz.qpic.cn/mmbiz_jpg/EuxhLFibtZGVfySiclAldZiczt0rl2iaYodU4BzCibiaZ4qxnNPJ0Xv8OTrREXGkNVseloVTpkSx1hAvliaAS8DgZEVYA/0?wx_fmt=jpeg);background-size:100% auto;background-repeat:no-repeat;width:100%;height:100%;"></svg>
      </foreignObject>
      <foreignObject x="0" y="0" width="1080" height="1950" transform="translate(1080, 0)">
        <svg xmlns="http://www.w3.org/2000/svg" style="background-image:url(https://mmbiz.qpic.cn/mmbiz_gif/EuxhLFibtZGVfySiclAldZiczt0rl2iaYodUxb1FiaX3Miaiaq6TIaxyHIicCEDgZAibgqHVTwG2Gxq2Pmt3GAwXibj7VOfA/0?wx_fmt=gif);background-size:100% auto;background-repeat:no-repeat;width:100%;height:100%;">
        </svg>
      </foreignObject>
      <g>
        <animate attributeName="opacity" begin="0s" dur="1s" values="1;0;1" repeatCount="indefinite"></animate>
        <text x="340" y="1750" fill="#fff" style="font-size:36px">>点一下屏幕,有请主角<</text>
      </g>
    </g>
  </g>
</svg>- 这里我们加入了两组foreignObject对象用来显示封面和gif动画图片。
- foreignObject可以理解成一个svg容器,支持x, y, width, height, transform位移等属性,这里我们将包含gif动画图片的foreignObject位移属性设置为 transform=”translate(1080, 0),使gif动画沿x轴向右移动自身宽度距离,使动画开始隐藏起来,等待事件触发显示。
- 我们将元素放在不同的分组里,方便后面添加事件。
1.5 加入事件触发
<svg style="transform:rotateZ(0deg);background-color:#000;background-size:100% auto;background-repeat:no-repeat;width:100%;height:620px;" version="1.1" viewBox="0 0 1080 620" preserveAspectRatio="xMinYMin meet" xmlns="http://www.w3.org/2000/svg">
  <animate attributeName="height" begin="click+3.5s" restart="never" dur="0.01s" from="620" to="0" fill="freeze"></animate>
  <animate attributeName="opacity" begin="click+3.5s" restart="never" dur="0.02s" from="1" to="0" fill="freeze"></animate>
  <g>
    <animateTransform attributeName="transform" type="translate" fill="freeze" calcMode="discrete" restart="never" keyTimes="0;0.000001;1" values="0 0;-1080 0;-1080 0" dur="1200s" begin="click"></animateTransform>
    <g>
      <foreignObject x="0" y="0" width="1080" height="1950">
        <svg style="background-image:url(https://mmbiz.qpic.cn/mmbiz_jpg/EuxhLFibtZGVfySiclAldZiczt0rl2iaYodU4BzCibiaZ4qxnNPJ0Xv8OTrREXGkNVseloVTpkSx1hAvliaAS8DgZEVYA/0?wx_fmt=jpeg);background-size:100% auto;background-repeat:no-repeat;width:100%;height:100%;"></svg>
      </foreignObject>
      <foreignObject x="0" y="0" width="1080" height="1950" transform="translate(1080, 0)">
        <svg xmlns="http://www.w3.org/2000/svg" style="background-image:url(https://mmbiz.qpic.cn/mmbiz_gif/EuxhLFibtZGVfySiclAldZiczt0rl2iaYodUxb1FiaX3Miaiaq6TIaxyHIicCEDgZAibgqHVTwG2Gxq2Pmt3GAwXibj7VOfA/0?wx_fmt=gif);background-size:100% auto;background-repeat:no-repeat;width:100%;height:100%;">
        </svg>
      </foreignObject>
      <g>
        <animate attributeName="opacity" begin="0s" dur="1s" values="1;0;1" repeatCount="indefinite"></animate>
        <text x="340" y="1750" fill="#fff" style="font-size:36px">>点一下屏幕,有请主角<</text>
      </g>
    </g>
  </g>
</svg>- animateTransform用来对元素进行位移,旋转,斜切等操作。
- transform,可以是 translate、scale、rotate、skewX、skewY 。
- fill,指定动画间隙的填充方式。支持参数有:freeze、remove。remove是默认值,表示动画结束直接回到开始的地方。freeze表示动画维持结束后的状态。
- restart, 支持的参数有always、whenNotActive、never。always是默认值,表示每点一次重新执行动画;whenNotActive表示动画正在进行的时候不能重启动画;never表示动画仅执行一次。
- begin, 延迟时间已经介绍过,这里补充下click,表示点击后立即触发, click+2表示点击后2秒触发。
<animateTransform attributeName="transform" type="translate" fill="freeze" calcMode="discrete" restart="never" keyTimes="0;0.000001;1" values="0 0;-1080 0;-1080 0" dur="1200s" begin="click"></animateTransform>这段代码的意思是,鼠标点击后,我们将gif动画所在组向左移动1080距离,使原来隐藏的动画暴露出来,还记得我们开始是怎么隐藏gif动画的么。
<animate attributeName="height" begin="click+3.5s" restart="never" dur="0.01s" from="620" to="0" fill="freeze"></animate>
  <animate attributeName="opacity" begin="click+3.5s" restart="never" dur="0.02s" from="1" to="0" fill="freeze"></animate>
这里添加了两组animate动画,我希望在动画播放结束后隐藏当前的svg层,这里设置在点击事件3.5秒后触发,正好是动画播放的时间。
2.构建第二屏动画:
第二屏动画是一张静态图片,用来显示gif动画最后一帧的产品图,没有什么新知识点,如有疑问可以参考本文的源码。
最后介绍一下两屏动画的组织方式,我将每屏动画放在一个单独的div标签中,并设置div标签的高度为0,由于svg元素的高度不受父容器高度影响,结果会产生类似层叠定位效果,就像设置父容器定位position:absolute一样。
<div style="height:0px">
  <svg></svg>
</div>
<div style="height:0px">
  <svg></svg>
</div>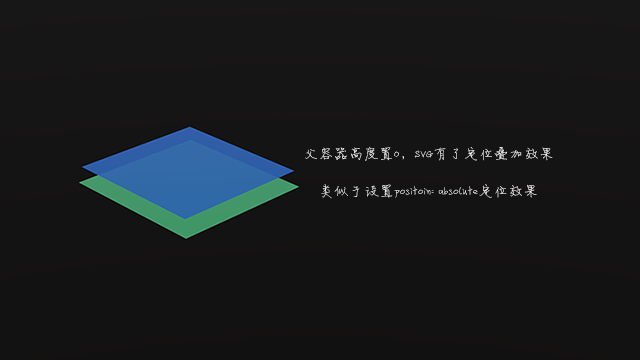
这样我们就可以将多组动画放在各自的div中,当使用animate动画隐藏了该组svg元素后,下面一层的svg就会展示出来等待交互。
3. 插入到公众号文章中
我们现在用到的图片都在本地,首先需要将用到的图片上传到公众号素材库中,提取url地址并替换掉本地图片地址。

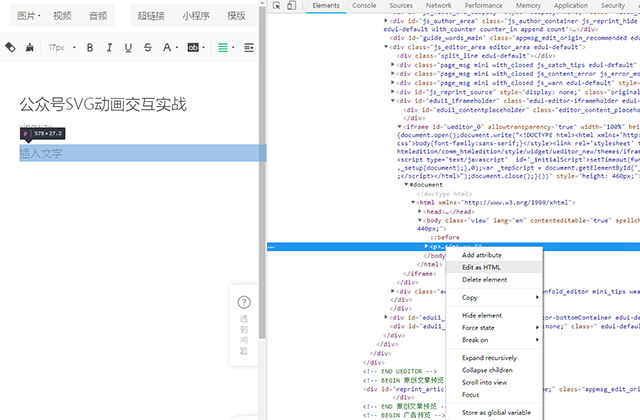
因为公众号图文编辑器本身并不支持代码编辑,我们需要借助chrome开发者工具,将代码插入到编辑器并保存。
大功告成,快看看效果吧!
源码和效果演示: