

- 前一篇介绍了 RabbitMQ 中的消息确认机制;
- 本篇主要介绍一下使用 SpringBoot + RabbitMQ 怎么实现 RPC,且详细记录了可能遇到的坑及解决办法;
- 在文末提供完整实例代码下载地址。
一. 什么是RPC
(RPC)Remote Procedure Call Protocol 远程过程调用协议。通俗一点解释就是允许一台计算机程序远程调用另外一台计算机的子程序,而不用去关心底层网络通信。
二. 使用RPC场景
在一个大型的公司,系统往往是由大大小小的服务构成,不同的团队维护不同的代码,且部署在不同的机器上; 但是在做开发时候往往需要调用其他团队开发的方法,由于这些服务部署在不同的机器上,想要调用就需要网络通信,而且效率优势将是需要考虑的非常重要的一块; 这个时候 RPC 的优势就比较明显了(RPC 主要是基于 TCP/IP 协议的,HTTP 服务主要是基于HTTP协议,在传输层协议 TCP 之上的)。
三. RabbitMQ实现RPC的流程
1. 流程
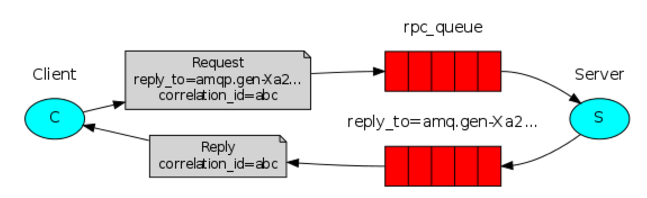
在 RabbitMQ 中实现 RPC 的流程很简单:
- 生产者(也称 RPC 客户端)发送一条带有标签(消息ID(correlation_id)+ 回调队列名称)的消息到发送队列;
- 消费者(也称 RPC 服务端)从发送队列获取消息并处理业务,解析标签的信息将业务结果发送到指定的回调队列;
- 生产者(也称 RPC 客户端)从回调队列中根据标签的信息(检查correlationId 属性,如果与request中匹配)获取发送消息的返回结果。
2. 实现RPC的好处
- MQ实现的RPC服务端高可用,只需要简单地启动多个RPC服务即可,不需要额外的服务注册发现以及负载均衡;
- 如果原有的MQ的普通消息需要知道执行结果,可以很方便地切换到RPC模式;
- RabbitMQ RPC的工作方式非常擅长处理异步回调式的任务。
四. SpringBoot中使用RabbitMQ的RPC功能
环境介绍
macOS Sierra + SpringBoot2.1.8.RELEASE + RabbitMQ 3.8.3 + Erlang 22.3.3
1. 客户端
1.1 application.properties
server.port=10420
spring.rabbitmq.host=127.0.0.1
spring.rabbitmq.username=guest
spring.rabbitmq.password=guest
# 开启发送确认
spring.rabbitmq.publisher-confirms=true
# 开启发送失败退回(消息有没有找到合适的队列)
spring.rabbitmq.publisher-returns=true
1.2 rabbitmqConfig配置类
/**
 * RabbitMQ配置
 *
 * @author lyf
 * @公众号 全栈在路上
 * @GitHub https://github.com/liuyongfei1
 * @date 2020-05-17 17:20
 */
@Slf4j
@Configuration
public class RabbitConfig {

    /**
     * 设置同步RPC队列
     */
    @Bean
    public Queue syncRPCQueue() {
        return new Queue(QueueConstants.RPC_QUEUE1);
    }

    /**
     * 设置返回队列
     */
    @Bean
    public Queue replyQueue() {
        return new Queue(QueueConstants.RPC_QUEUE2);
    }

    /**
     * 设置交换机
     */
    @Bean
    public TopicExchange exchange() {
        return new TopicExchange(QueueConstants.RPC_EXCHANGE);
    }

    /**
     * 请求队列和交换器绑定
     */
    @Bean
    public Binding tmpBinding() {
        return BindingBuilder.bind(syncRPCQueue()).to(exchange()).with(QueueConstants.RPC_QUEUE1);
    }

    /**
     * 返回队列和交换器绑定
     */
    @Bean
    public Binding replyBinding() {
        return BindingBuilder.bind(replyQueue()).to(exchange()).with(QueueConstants.RPC_QUEUE2);
    }


    /**
     * 使用 RabbitTemplate发送和接收消息
     * 并设置回调队列地址
     */
    @Bean
    public RabbitTemplate rabbitTemplate(ConnectionFactory connectionFactory) {
        RabbitTemplate template = new RabbitTemplate(connectionFactory);
        // 设置回调队列地址
        template.setReplyAddress(QueueConstants.RPC_QUEUE2);
        // 设置请求超时时间为6s
        template.setReplyTimeout(60000);
        return template;
    }


    /**
     * 给返回队列设置监听器
     */
    @Bean
    public SimpleMessageListenerContainer replyContainer(ConnectionFactory connectionFactory) {
        SimpleMessageListenerContainer container = new SimpleMessageListenerContainer();
        container.setConnectionFactory(connectionFactory);
        container.setQueueNames(QueueConstants.RPC_QUEUE2);
        container.setMessageListener(rabbitTemplate(connectionFactory));
        return container;
    }
}
备注:
- 这里的队列监听器必不可少,否则客户端是无法收到服务端回应的消息。
1.3 客户端
/**
 * RPC客户端
 *
 * @author lyf
 * @公众号 全栈在路上
 * @GitHub https://github.com/liuyongfei1
 * @date 2020-05-25 19:30
 */
@Slf4j
@RestController
public class RPCClient {

    @Autowired
    private RabbitTemplate rabbitTemplate;

    @GetMapping("/sendMessage")
    public String send(String message) {
        // 封装Message,直接发送message对象
        Message newMessage = convertMessage(message);

        log.info("客户端发送的消息:" + newMessage.toString());

        // 备注:使用sendAndReceive 这个方法发送消息时,消息的correlationId会变成系统动编制的 1,2,3 这种格式,因此通过手动set的方式没有用
        Message result = rabbitTemplate.sendAndReceive(QueueConstants.RPC_EXCHANGE, QueueConstants.RPC_QUEUE1,
                newMessage);

        String response = "";
        if (result != null) {
            // 获取已发送的消息的唯一消息id
            String correlationId = newMessage.getMessageProperties().getCorrelationId();

            // 提取RPC回应内容的header
            HashMap<String, Object> headers = (HashMap<String, Object>) result.getMessageProperties().getHeaders();

            // 获取RPC回应消息的消息id(备注:rabbitmq的配置参数里面必须开启spring.rabbitmq.publisher-confirms=true,否则headers里没有该项)
            String msgId = (String) headers.get("spring_returned_message_correlation");

            // 客户端从回调队列获取消息,匹配与发送消息correlationId相同的消息为应答结果
            if (msgId.equals(correlationId)) {
                // 提取RPC回应内容body
                response = new String(result.getBody());
                log.info("收到RPCServer返回的消息为:" + response);
            }
        }
        return response;
    }

    /**
     * 将发送消息封装成Message
     *
     * @param message
     * @return org.springframework.amqp.core.Message
     * @Author Liuyongfei
     * @Date 下午1:23 2020/5/27
     **/
    public Message convertMessage(String message) {
        MessageProperties mp = new MessageProperties();
        byte[] src = message.getBytes(Charset.forName("UTF-8"));
        // 注意:由于在发送消息的时候,系统会自动生成消息唯一id,因此在这里手动设置的方式是无效的
        // CorrelationData correlationId = new CorrelationData(UUID.randomUUID().toString());
        // mp.setCorrelationId("123456");
        mp.setContentType("application/json");
        mp.setContentEncoding("UTF-8");
        mp.setContentLength((long) message.length());
        return new Message(src, mp);
    }
}
你可能会遇到的坑1
- 使用 sendAndReceive 这个方法发送消息时,消息的 correlationId 会变成系统自动生成的 1,2,3 这种格式,因此通过手动 set 的方式没有用。
你可能会遇到的坑2
- 因此为了拿到当前已发送消息的 correlationId,只能在消息发送之后(注意这里必须在消息发送之后再获取)通过 getMessageProperties().getCorrelationId() 的方式来获取到;
2. 服务端
2.1 application.properties
server.port=10421
spring.rabbitmq.host=127.0.0.1
spring.rabbitmq.username=guest
spring.rabbitmq.password=guest

# 开启发送确认
spring.rabbitmq.publisher-confirms=true
# 开启发送失败退回(消息有没有找到合适的队列)
spring.rabbitmq.publisher-returns=true
2.2 rabbitmqConfig配置类
代码同 RPC 客户端的 rabbitmqConfig 配置类
2.3 服务端
/**
 * RPC服务端
 *
 * @author lyf
 * @公众号 全栈在路上
 * @GitHub https://github.com/liuyongfei1
 * @date 2020-05-25 22:00
 */
@Slf4j
@Component
public class RPCServer {
    @Autowired
    private RabbitTemplate rabbitTemplate;

    @RabbitListener(queues = QueueConstants.RPC_QUEUE1)
    public void process(Message msg) {
        log.info("Server收到发送的消息为: " + msg.toString());

        int millis = (int) (Math.random() * 2 * 1000);
        // 模拟处理业务逻辑
        try {
            Thread.sleep(millis);
        } catch (InterruptedException e) {
            e.printStackTrace();
        }

        // 数据处理,返回Message
        String msgBody = new String(msg.getBody());
        String newMessage = msgBody + ",sleep " + millis + " ms。";
        Message response = convertMessage(newMessage, msg.getMessageProperties().getCorrelationId());
        CorrelationData correlationData = new CorrelationData(msg.getMessageProperties().getCorrelationId());
        rabbitTemplate.sendAndReceive(QueueConstants.RPC_EXCHANGE, QueueConstants.RPC_QUEUE2, response, correlationData);
    }

    @RabbitListener(queues = QueueConstants.RPC_QUEUE2)
    public void receiveTopic2(Message msg) {
        System.out.println("...队列2:" + msg.toString());
    }

    /**
     * 封装消息
     *
     * @param s  消息
     * @param id 消息id
     * @return org.springframework.amqp.core.Message
     * @Author Liuyongfei
     * @Date 下午1:25 2020/5/27
     **/
    public Message convertMessage(String s, String id) {
        MessageProperties mp = new MessageProperties();
        byte[] src = s.getBytes(Charset.forName("UTF-8"));
        mp.setContentType("application/json");
        mp.setContentEncoding("UTF-8");
        mp.setCorrelationId(id);
        return new Message(src, mp);
    }
}
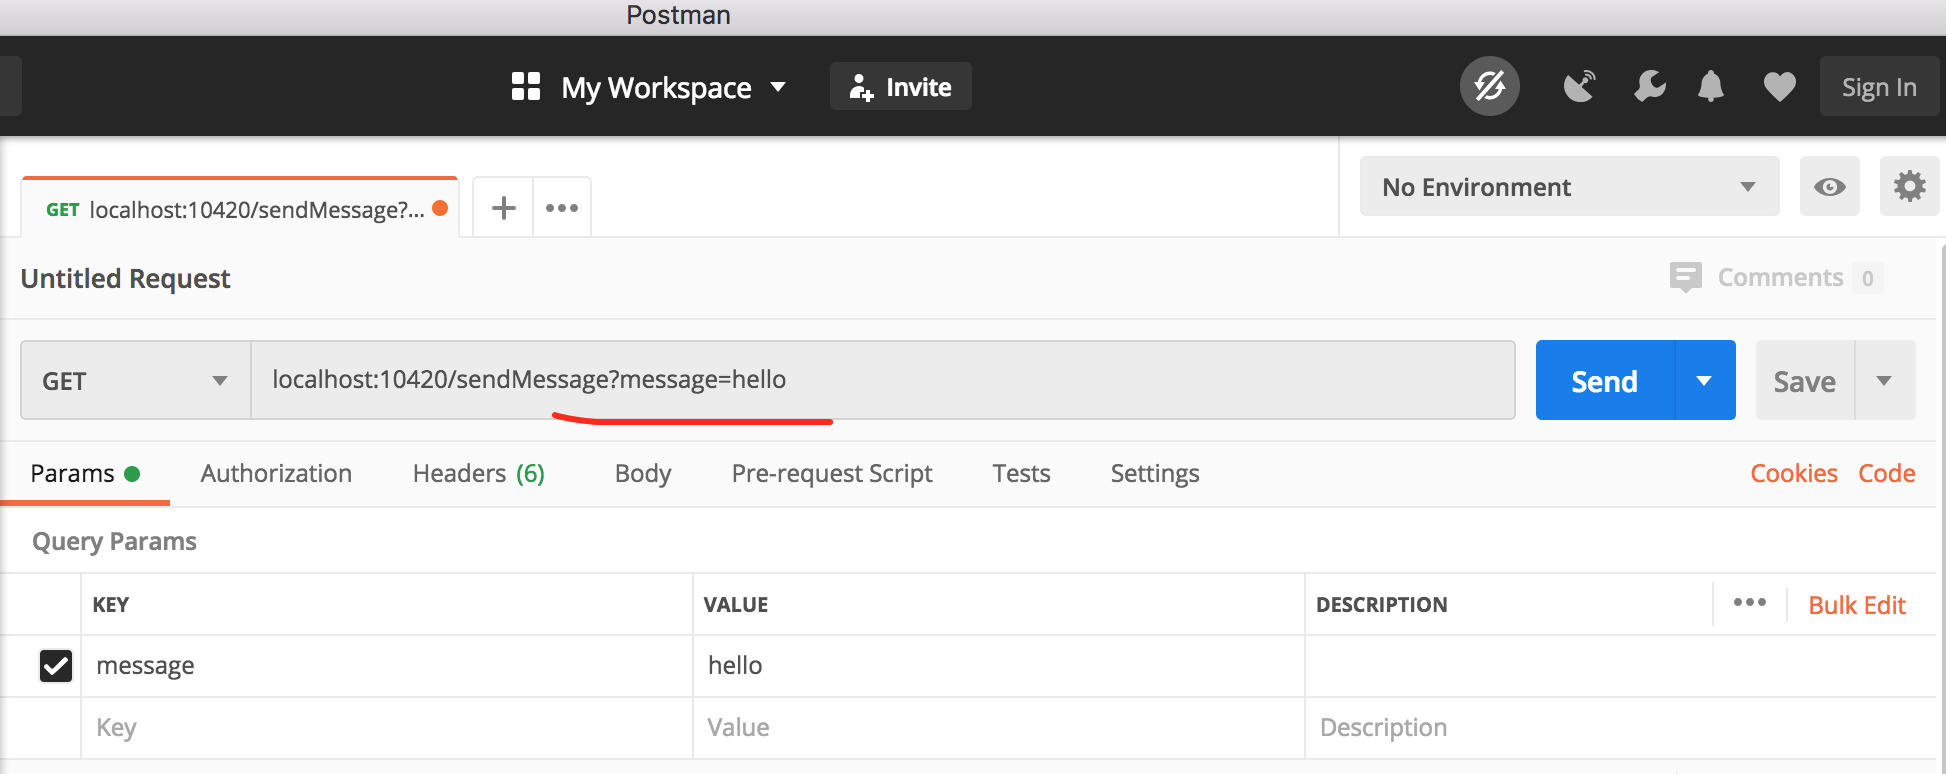
3. 客户端向服务端发送消息
启动 RPC 客户端服务,使用postman 请求发送消息接口,发送一个 hello字符串:
4. 服务端收到客户端的消息
启动 RPC 服务端服务,通过打断点,查看收到的消息格式:
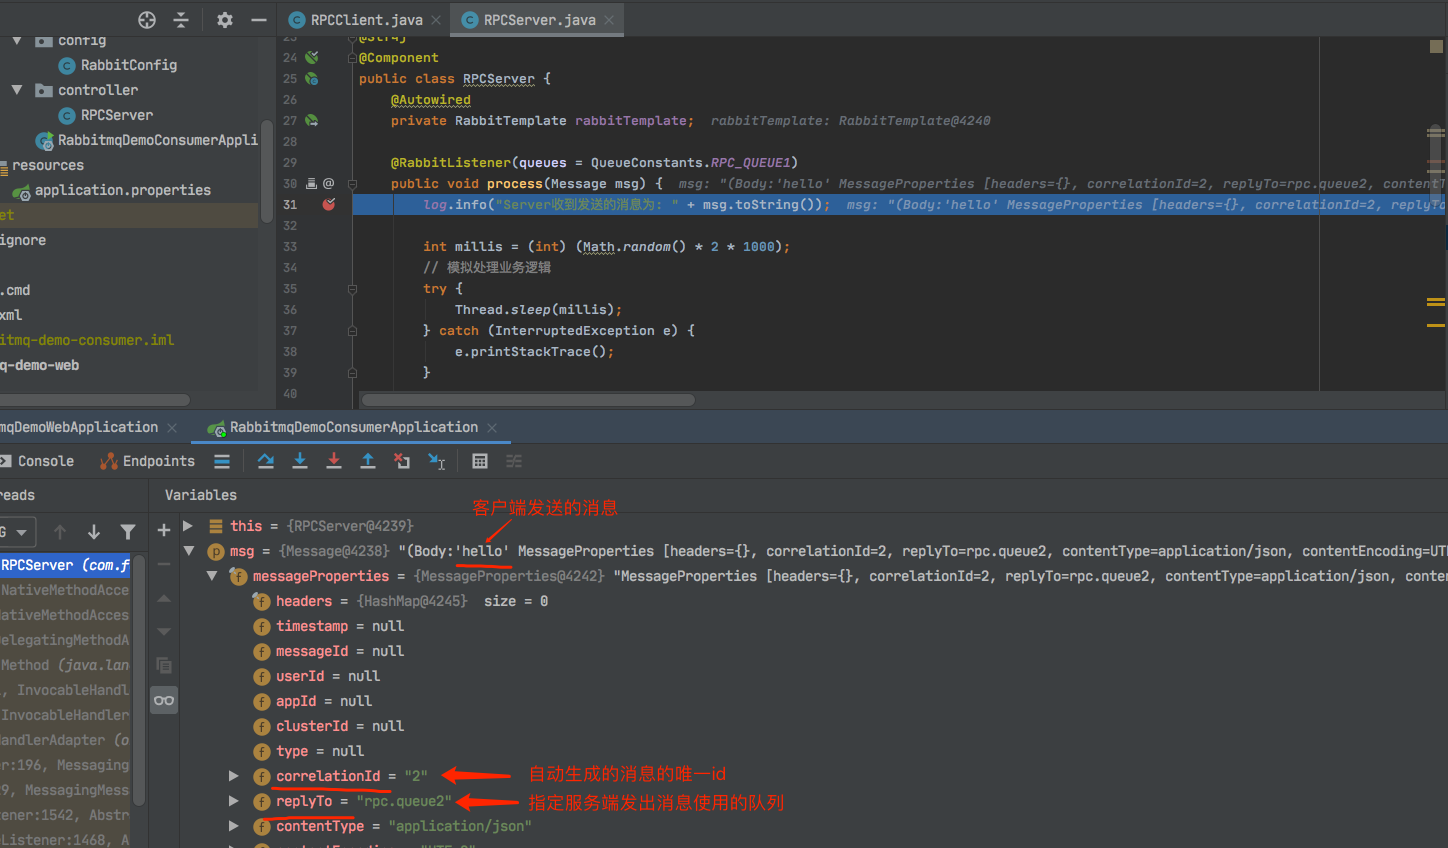
从图中我们可以看出:
- 生产者(RPC客户端)发出的这条消息包含了标签ID和回调队列名称,符合了 RPC 实现流程的第一步要求。
5. 服务端向指定的回调队列发送消息
在服务端,处理相关的业务逻辑后,需要将消息通过指定的回调队列发送给客户端。 同样是通过借助 sendAndReceive 来发送消息:
// 数据处理,返回Message
        String msgBody = new String(msg.getBody());
        String newMessage = msgBody + ",sleep " + millis + " ms。";
        Message response = convertMessage(newMessage, msg.getMessageProperties().getCorrelationId());
        CorrelationData correlationData = new CorrelationData(msg.getMessageProperties().getCorrelationId());
        rabbitTemplate.sendAndReceive(QueueConstants.RPC_EXCHANGE, QueueConstants.RPC_QUEUE2, response, correlationData);
你可能会遇到的坑3
- 一定要注意这里使用的队列为回调队列(
RPC_QUEUE2);
你可能会遇到的坑4
- 这里在发送消息的时候一定要使用第四个参数
correlationData,否则客户端有可能收不到数据; - 由于客户端在收到消息后要取 correlationId 与之前发出的消息的 correlationId 进行匹配,因此这里在发送消息的时候一定要使用第四个参数
correlationData;
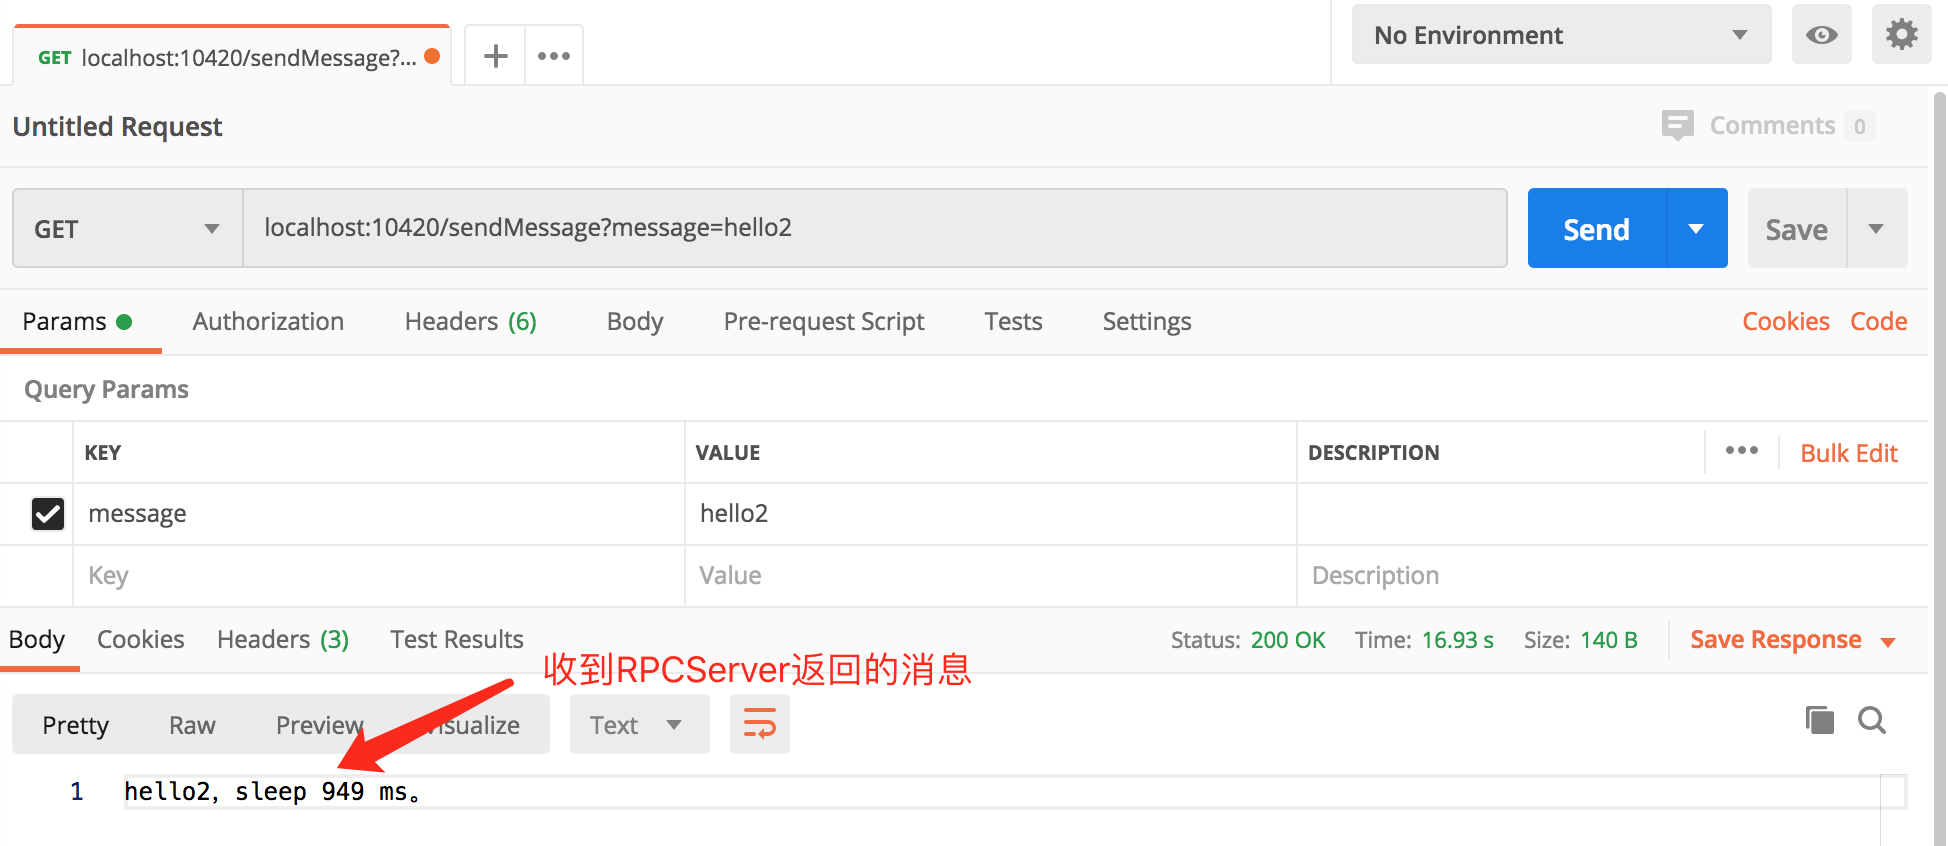
6. 客户端收到服务端回应的消息
由于客户端已经设置了回调队列监听器,因此可以监听到 RPC 服务端返回的消息:
6.1 客户端根据correlationId来匹配消息
RPC 客户端从回调队列中根据标签的信息(检查 correlationId 属性,如果与发送的消息 correlationId 匹配)获取发送消息的返回结果,主要代码如下:
// 获取已发送的消息的唯一消息id
            String correlationId = newMessage.getMessageProperties().getCorrelationId();

            // 提取RPC回应内容的header
            HashMap<String, Object> headers = (HashMap<String, Object>) result.getMessageProperties().getHeaders();

            // 获取RPC回应消息的消息id(备注:rabbitmq的配置参数里面必须开启spring.rabbitmq.publisher-confirms=true,否则headers里没有该项)
            String msgId = (String) headers.get("spring_returned_message_correlation");

            // 客户端从回调队列获取消息,匹配与发送消息correlationId相同的消息为应答结果
            if (msgId.equals(correlationId)) {
                // 提取RPC回应内容body
                response = new String(result.getBody());
                log.info("收到RPCServer返回的消息为:" + response);
            }
备注:
- 回调队列监听器详见 rabbitmqConfig 配置类;
你可能会遇到的坑5
- 在 RPC 服务端返回的消息 headers 里找不到 spring_returned_message_correlation 属性:

application.properties里是否开启了发送确认:
# 开启发送确认
spring.rabbitmq.publisher-confirms=true
# 开启发送失败退回(消息有没有找到合适的队列)
spring.rabbitmq.publisher-returns=true
demo下载地址
- github.com/liuyongfei1…
- 在本篇实例中,我将消息生产端和消费端部署为两个单独的服务,大家克隆完毕后请切换到
feature/rabbitmq-rpc分支进行启动测试。 - 欢迎大家关注微信公众号阅读更多文章:

