

1. 初始化项目
1.1 项目环境配置
- 创建一个空目录
node_fanyi - 初始化
yarn init -y - 全局安装 ts-node-dev
yarn global add ts-node-dev, 这个工具是用来支持typescript进行node开发 - 全局安装 typescript
yarn global add typescript,支持 ts 开发, 用于将 ts 编译成 js, 用于最后发布npm包 - 用 webstorm 或 vscode 打开
node_fanyi - 安装 node 声明文件
yarn add --dev @types/node
1.2 环境测试
-
在
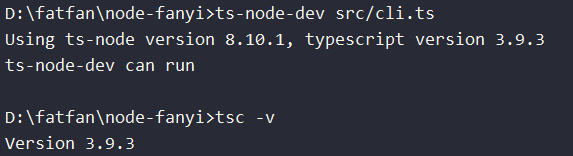
node_fanyi目录下 创建src/cli.ts并写入如下代码console.log("ts-node-dev can run") -
命令行运行
ts-node-dev src/cli.ts, 命令行打出ts-node-dev can run -
命令行运行
tsc -v打印出 ts 的版本号
2. 如何处理命令行参数
2.1 commander.js
commander.js , node.js 命令行接口的完整解决方案
使用 commander.js 来快速进行命令行工具开发
yarn add commander
2.2 用法简介
在 node_fanyi 下创建 src/cli.js, 引入 commander
import * as commander from "commander";
const program = new commander.Command();
program
.version("0.0.1")
.name("fy")
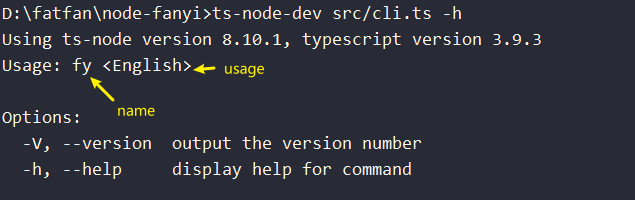
.usage("<English>")
.arguments("<English>")
.action(function (word) {
console.log(word);
});
program.parse(process.argv);
- version 参数-版本号
- name 参数-使用的命令
- usage 参数-可选/必选参数名
- arguments 参数-必传命令后的入参
- action 参数-回调函数
运行 ts-node-dev src/cli.ts -h
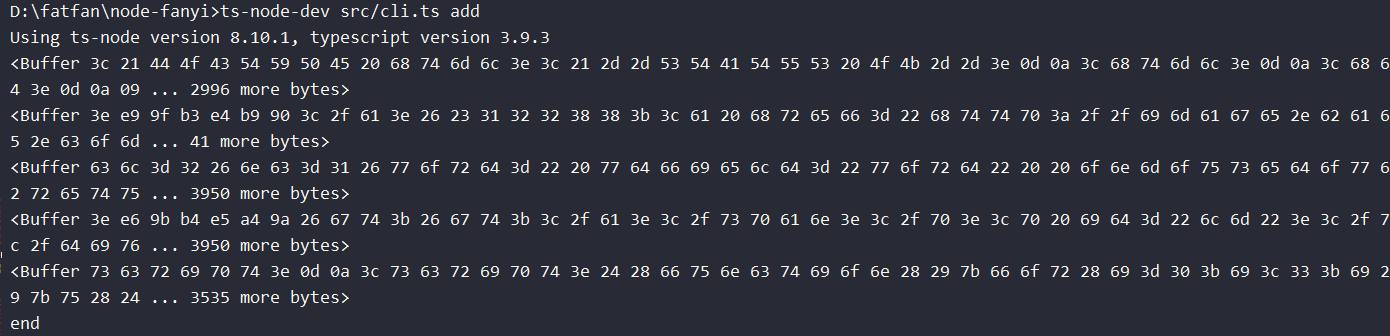
通过 action 可以拿到传入的参数, ts-node-dev src/cli.ts add
命令行打印出传入的参数

src 中新建 main.ts 写入下面的代码
export const translate = (word: string) => {
    console.log(word)
    // do something 这里用来将传入的 word 翻译之后打印出来
}
在 src/cli.ts 引入 , 在 action 的回调函数里调用 translate 函数
import { translate } from "./main";

program
  .version("0.0.1")
  .name("fy")
  .usage("<English||中文>")
  .arguments("<English||中文>")
  .action(function (word) {
    translate(word);
  });
下一步进行翻译函数的逻辑书写
3. 翻译
3.1 https.request 发送翻译请求
修改 main.js 代码如下,测试https.request能否发送 GET 请求
import * as https from "https";

export const translate = (word: string) => {
  const options = {
    hostname: "www.baidu.com",
    port: 443,
    method: "GET",
  };

  const request = https.request(options, (response) => {
    response.on("data", (chunk: Buffer) => {
      console.log(chunk);
    });
    response.on("end", () => {
      console.log("end");
    });
  });

  request.on("error", (e) => {
    console.error(e);
  });
  request.end();
};
命令行运行 ts-node-dev src/cli.ts add,正确运行,会打印出 chunk end
3.2 翻译 API 获取与使用
3.2.1 获取
你可以使用百度翻译或有道翻译的API,我选择了百度翻译的API,你可以自己选择使用哪个。
在官网进行登录过之后,点击产品服务,通用翻译 API, 点击立即使用,一般使用标准版就足够

点击接入文档,里面有接口、输入参数、返回值、语言列表、错误码、查看接入举例
注意 不要泄露你的 appid 以及 appSecret
查询参数
 /**
   * salt 随机数
   * sign 文档中生成签名的方式 appSecret 可以在开发者信息中看到
   * 使用 querystring.stringify() 把这些查询参数拼接成字符串
   * appid  在开发者信息里可以看到
   */
  const salt = Math.random();
  const sign = md5(appId + word + salt + appSecret);
  const query = querystring.stringify({
    q: word, // 需要查询的单词
    appid: appId,
    salt,  // 随机数
    sign, // 生成的签名
    from:"en", // 输入的语言
    to:"zh",  // 输出的语言
  });
接口 文档中的接口
  const options = {
    hostname: "api.fanyi.baidu.com",
    port: 443,
    path: "/api/trans/vip/translate?" + query,
    // query 即为上文的参训参数生成的 query
    method: "GET",
  };
3.2.2 使用 API
新建 src/private.ts 写入代码并将这个文件加入到 .gitignore
export const appId = ""; // 你申请的 appid
export const appSecret = ""; // 你申请的 appSecret
在 mian.js 中引入 private.ts
安装 md5 以及其声明文件 yarn add md5 yarn add --dev @types/md5
main.ts 完整代码
命令行翻译 源代码
import * as https from "https";
import * as querystring from "querystring";
import { appId, appSecret } from "./private";
import md5 from "md5";

type ErrorMap = {
  [key: string]: string;
};
const errorMap: ErrorMap = {
  52003: "用户认证失败",
  54001: "签名错误",
  54004: "账户余额不足",
};

type BaiduResult = {
  error_code?: string;
  error_msg?: string;
  from: string;
  to: string;
  trans_result: { src: string; dst: string }[];
};

export const translate = (word: string) => {
  const salt = Math.random();
  const sign = md5(appId + word + salt + appSecret);
  let from, to;
  // 判断输入的是中文/英文
  if (/[a-zA-Z]/.test(word[0])) {
    from = "en";
    to = "zh";
  } else {
    from = "zh";
    to = "en";
  }
  const query = querystring.stringify({
    q: word,
    appid: appId,
    salt,
    sign,
    from,
    to,
  });

  const options = {
    hostname: "api.fanyi.baidu.com",
    port: 443,
    path: "/api/trans/vip/translate?" + query,
    method: "GET",
  };

  const request = https.request(options, (response) => {
    //监听data 事件, 有返回值就放到 chunks 中
    let chunks: Buffer[] = [];
    response.on("data", (chunk: Buffer) => {
      chunks.push(chunk);
    });
    // end 之后,将获取到的 chunks 转换成 我们熟悉的 object
    // 然后对对象进行解析,判断成功或者失败
    // 失败打印出 errMsg
    // 成功就在命令行中打印出翻译后的结果
    response.on("end", () => {
      const string = Buffer.concat(chunks).toString();
      const object: BaiduResult = JSON.parse(string);
      if (object.error_code) {
        console.error(errorMap[object.error_code] || object.error_msg);
        process.exit(2);
      } else {
        object.trans_result.map((obj) => {
          console.log(obj.dst);
        });
        process.exit(0);
      }
    });
  });
  request.on("error", (e) => {
    console.error(e);
  });
  request.end();
};
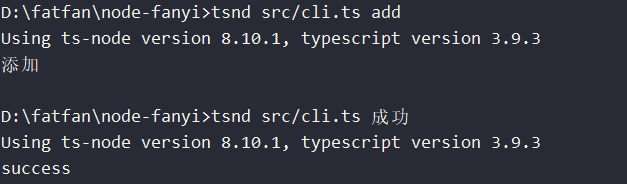
运行 ts-node-dev src/cli.ts add
ts-node-dev src/cli.ts 成功
示例如下
基本上到这里就结束了,如果你想发布到 npm ,请继续
4. 发布到 npm
4.1 注册 npm
npm 官网 自己去注册
4.2 将 ts 转换 js
- 命令行运行
tsc -- init生成tsconfig.json文件 - 修改 tsconfig.json 文件中的 "outDir": "dist/" // tsc 编译 ts 生成 js 的文件夹
- 运行
tsc生成 dist 目录以及 ts 文件对应的 js 文件 - 将
dist/private.js加入到.gitignore
4.3 修改 package.json
最终代码在最后的源码链接中
{
  "name": "node_fanyi",  // 你的 npm 包的名称 注意可能出现与别人的包重名 换一个就好了
  "version": "0.0.1",    // 你的包的版本 每次发布都要改版
  "main": "dist/main.js", // 加载的入口文件
  "bin": {               // 指定各个内部命令对应的可执行文件的位置
    "fy": "dist/cli.js"   // 默认的命令 fy
  },
  "files": [             // 要上传的文件
    "dist/**/*.js"
  ],
}
4.4 生成代码并发布
-
- 运行
tsc每次发布前都要运行tsc重新生成dist
- 运行
-
- npm 换成官方源,非官方源不能发布 依次运行
npm install nrm -gnrm use npm
- npm 换成官方源,非官方源不能发布 依次运行
-
- 运行
npm adduser登录 npm ,根据提示填写「 username password email 」
- 运行
-
- 运行
npm publish发布代码
- 运行
5. 可能出现的问题以及其他提示
-
你没用过 ts ?
把 ts 后缀改为 js 就好了,去掉声明
-
代码报错?
把源代码复制到你的代码中,看看能不能跑起来
-
发布不成功?
没换官方源
version 没修改版本号
name 跟别人已发布的相同
-
其他 ?
我也不知道了。。。有其他问题联系我吧
6. 安全问题以及其他
-
不要暴露 appid 以及 appSecret 不然别人可以用你的 appid 和 appSecret 干些其他的,尽量只开通标准版
-
目前只有简单的单个单词和中文句子的翻译,后续可能还会加功能。。。
-
体验我已经发布的命令行翻译工具 如果不行就是我已经停用我的百度翻译API 服务了
npm install fanyi-f -g
fy add
7. 源码
后记
文章为个人总结,不足之处还请留言或私信。
转载请注明出处。
以上。
