

list源码
首先介绍下本人学习观看源码的方法。分为以下几步。
- 首先查看网站上的开发者工具。然后查看其html的代码结构。看他是如何设计。自己是否也能实现该样式结构。
- 大概了解了组件实现的html结构后。再查看该组件的props,methods,event等可传入配置。自己思考如果是自己会怎么使用来实现组件。
- 大概看过一遍组件实现后查看其渲染函数。跟着渲染函数走一遍(vant 源码使用了tsx或者jsx来render组件实例)
- 最后运行官网的demo在需要深入理解的地方打上debugger断点单步调试。
解读
项目结构
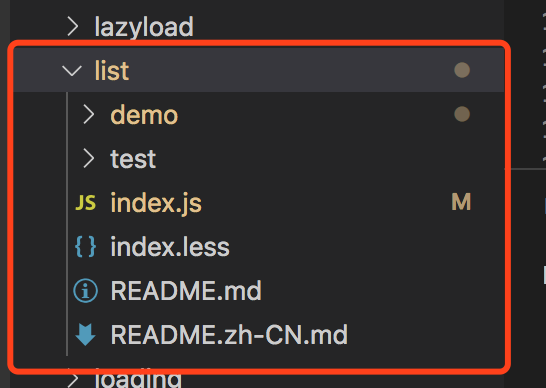
先来看看整个项目结构,主要就是index.js这个文件。我们可以试着在根目录运行**npm run dev。**此时此刻跑起来的就是整个项目。然后点到list组件去。就是当前这个demo实现的东东。
代码实现
import { createNamespace } from '../utils';
import { isHidden } from '../utils/dom/style';
import { BindEventMixin } from '../mixins/bind-event';
import { getScrollEventTarget } from '../utils/dom/scroll';
import Loading from '../loading';

const [createComponent, bem, t] = createNamespace('list');

export default createComponent({
  mixins: [
    BindEventMixin(function(bind) {
      if (!this.scroller) {
        this.scroller = getScrollEventTarget(this.$el);
      }

      bind(this.scroller, 'scroll', this.check);
    })
  ],

  model: {
    prop: 'loading'
  },

  props: {
    error: Boolean,
    loading: Boolean,
    finished: Boolean,
    errorText: String,
    loadingText: String,
    finishedText: String,
    immediateCheck: {
      type: Boolean,
      default: true
    },
    offset: {
      type: Number,
      default: 0
    },
    direction: {
      type: String,
      default: 'down'
    }
  },

  data() {
    return {
      // use sync innerLoading state to avoid repeated loading in some edge cases
      innerLoading: this.loading
    };
  },

  updated() {
    this.innerLoading = this.loading;
  },

  mounted() {
    if (this.immediateCheck) {
      this.check();
    }
  },

  watch: {
    loading: 'check',
    finished: 'check'
  },

  methods: {
    // @exposed-api
    check() {
      this.$nextTick(() => {
        if (this.innerLoading || this.finished || this.error) {
          return;
        }

        const { $el: el, scroller, offset, direction } = this;
        let scrollerRect;

        if (scroller.getBoundingClientRect) {
          scrollerRect = scroller.getBoundingClientRect();
          console.log('scrollerRect=', scrollerRect);
        } else {
          scrollerRect = {
            top: 0,
            bottom: scroller.innerHeight
          };
        }

        const scrollerHeight = scrollerRect.bottom - scrollerRect.top;
        console.log('scrollerHeight=', scrollerHeight);
        /* istanbul ignore next */
        if (!scrollerHeight || isHidden(el)) {
          return false;
        }

        let isReachEdge = false;
        const placeholderRect = this.$refs.placeholder.getBoundingClientRect();

        if (direction === 'up') {
          isReachEdge = placeholderRect.top - scrollerRect.top <= offset;
        } else {
          isReachEdge = placeholderRect.bottom - scrollerRect.bottom <= offset;
        }

        if (isReachEdge) {
          this.innerLoading = true;
          this.$emit('input', true);
          this.$emit('load');
        }
      });
    },

    clickErrorText() {
      this.$emit('update:error', false);
      this.check();
    },

    genLoading() {
      if (this.innerLoading && !this.finished) {
        return (
          <div class={bem('loading')} key="loading">
            {this.slots('loading') || (
              <Loading size="16">{this.loadingText || t('loading')}</Loading>
            )}
          </div>
        );
      }
    },

    genFinishedText() {
      if (this.finished && this.finishedText) {
        return (
          <div class={bem('finished-text')}>{this.finishedText}</div>
        );
      }
    },

    genErrorText() {
      if (this.error && this.errorText) {
        return (
          <div onClick={this.clickErrorText} class={bem('error-text')}>
            {this.errorText}
          </div>
        );
      }
    }
  },

  render() {
    const Placeholder = <div ref="placeholder" class={bem('placeholder')} />;

    return (
      <div class={bem()} role="feed" aria-busy={this.innerLoading}>
        {this.direction === 'down' ? this.slots() : Placeholder}
        {this.genLoading()}
        {this.genFinishedText()}
        {this.genErrorText()}
        {this.direction === 'up' ? this.slots() : Placeholder}
      </div>
    );
  }
});
来看看源码是如何实现的。我们可以看到这是一份用jsx写的代码,最开始调用了createNamespace('list')来获取组件的构造函数,class函数,国际化生成函数。这里是运用了一个函数柯里化的方法。通过初始值命名。来生成一系列的方法。在后期使用的时候都会有其初始值。在vue的源码里也大量使用了柯里化的方法。为什么vue可以有web版本weex版本等。就是因为在其初始化时传入了一个表示来决定后面的创建真实节点creatElement的方法是如何实现的。简单的来说就是。拿一个标识。告诉一个函数。你要什么样的东西。然后你得到这样的东西。至于你如何使用。后面随意。
这块具体如何实现我们今天暂且抛开不谈。主要来看看list的业务如何实现。
可以关注到**mixin **中有一个BindEventMixin。我们来看看他的代码是如何实现的。以及作用
export function BindEventMixin(handler: BindEventHandler) {
  function bind(this: BindEventMixinThis) {
    if (!this.binded) {
      handler.call(this, on, true);
      this.binded = true;
    }
  }

  function unbind(this: BindEventMixinThis) {
    if (this.binded) {
      handler.call(this, off, false);
      this.binded = false;
    }
  }

  return {
    mounted: bind,
    activated: bind,
    deactivated: unbind,
    beforeDestroy: unbind
  };
}
总的来说。是处理在组件的生命周期里事件绑定,和销毁的操作。个人觉得相对也还是比较好理解的。便不做过多陈述。简而言之。就剩生成mounted,activated,deactivated,beforeDestro四个生命周期函数,这四个生命周期函数进行了事件的绑定解绑,避免内存浪费。
绑定滚动
让我们继续看看这个时间监听做了什么操作。
BindEventMixin(function(bind) {
      if (!this.scroller) {
        this.scroller = getScrollEventTarget(this.$el);
      }

      bind(this.scroller, 'scroll', this.check);
    })
这里的getScrollEventTarget做了一个操作。持续寻找当前元素的父节点。直到找到一个可滚动的元素。
type ScrollElement = HTMLElement | Window;

// get nearest scroll element
// http://w3help.org/zh-cn/causes/SD9013
// http://stackoverflow.com/questions/17016740/onscroll-function-is-not-working-for-chrome
const overflowScrollReg = /scroll|auto/i;
export function getScrollEventTarget(element: HTMLElement, rootParent: ScrollElement = window) {
  let node = element;
  console.dir(node);
  // 这里的node.nodeType === 1必须是元素节点才可以
  while (
    node &&
    node.tagName !== 'HTML' &&
    node.nodeType === 1 &&
    node !== rootParent
  ) {
    // 获取元素的style
    const { overflowY } = window.getComputedStyle(node);
    // 判断元素的样式里是否可滚动
    if (overflowScrollReg.test(<string>overflowY)) {
      if (node.tagName !== 'BODY') {
        return node;
      }

      /**
      * 为什么这边还要找一层父级,这里有个小坑,可以看看下面的github issues也说的比较清楚。
      */
      // see: https://github.com/youzan/vant/issues/3823
      const { overflowY: htmlOverflowY } = window.getComputedStyle(<Element>node.parentNode);
      if (overflowScrollReg.test(<string>htmlOverflowY)) {
        return node;
      }
    }
    node = <HTMLElement>node.parentNode;
  }
  return rootParent;
}
node.nodeType
| 1 | Element | 代表元素 | Element, Text, Comment, ProcessingInstruction, CDATASection, EntityReference |
|---|---|---|---|
| 2 | Attr | 代表属性 | Text, EntityReference |
| 3 | Text | 代表元素或属性中的文本内容。 | None |
| 4 | CDATASection | 代表文档中的 CDATA 部分(不会由解析器解析的文本)。 | None |
| 5 | EntityReference | 代表实体引用。 | Element, ProcessingInstruction, Comment, Text, CDATASection, EntityReference |
| 6 | Entity | 代表实体。 | Element, ProcessingInstruction, Comment, Text, CDATASection, EntityReference |
| 7 | ProcessingInstruction | 代表处理指令。 | None |
| 8 | Comment | 代表注释。 | None |
| 9 | Document | 代表整个文档(DOM 树的根节点)。 | Element, ProcessingInstruction, Comment, DocumentType |
| 10 | DocumentType | 向为文档定义的实体提供接口 | None |
| 11 | DocumentFragment | 代表轻量级的 Document 对象,能够容纳文档的某个部分 | Element, ProcessingInstruction, Comment, Text, CDATASection, EntityReference |
| 12 | Notation | 代表 DTD 中声明的符号。 | None |
找到了我们该监听的元素。然后我们再看看监听滚动做了什么操作。
this.check
 // @exposed-api
    check() {
      this.$nextTick(() => {
        // 判断是否进行滚动检查
        if (this.innerLoading || this.finished || this.error) {
          return;
        }

        const { $el: el, scroller, offset, direction } = this;
        let scrollerRect;

        if (scroller.getBoundingClientRect) {
          scrollerRect = scroller.getBoundingClientRect();
          console.log('scrollerRect=', scrollerRect);
        } else {
          scrollerRect = {
            top: 0,
            bottom: scroller.innerHeight
          };
        }

        const scrollerHeight = scrollerRect.bottom - scrollerRect.top;
        console.log('scrollerHeight=', scrollerHeight);
        /* istanbul ignore next */
        if (!scrollerHeight || isHidden(el)) {
          return false;
        }

        let isReachEdge = false;
        const placeholderRect = this.$refs.placeholder.getBoundingClientRect();

        if (direction === 'up') {
          isReachEdge = placeholderRect.top - scrollerRect.top <= offset;
        } else {
          isReachEdge = placeholderRect.bottom - scrollerRect.bottom <= offset;
        }

        if (isReachEdge) {
          this.innerLoading = true;
          this.$emit('input', true);
          this.$emit('load');
        }
      });
    },
这里可以看到。源码中使用了**nextTick的情况下,官网里的普通列表没有任何异常情况。
然后我们再来看看错误的处理。当出现错误的情况下。list的组件的error会为false就不会进行check一下的操作。然后当你点击错误文字的时候。修改错误状态继续执行check。但是如果去掉$nextTick**你会发现load不会继续走下去。这是为什么呢。让我们看看点击错误文字后进行了什么操作。
clickErrorText() {
      this.$emit('update:error', false);
      this.check();
    },
这里修改了error的状态。然后继续执行check。但是vue的机制是父组件实例里的error会立马修改。但是修改子组件的props需要再下一个updated之后。那么再立马操作check error还是true
在进行check的时候
if (this.innerLoading || this.finished || this.error) {
** return;
}
这个判断就会为true就会直接return掉。那么久不会继续往下走流程。
然后让我们看看滚动监听都具体做了什么
主要是scroller.getBoundingClientRect**
这里的scroller.getBoundingClientRect可以获得以下几个信息
left,top,right,bottom,x,y,width, 和height这几个以像素为单位的只读属性用于描述整个边框。除了width和height以外的属性是相对于视图窗口的左上角来计算的。
let scrollerRect;

      if (scroller.getBoundingClientRect) {
        scrollerRect = scroller.getBoundingClientRect();
        // console.log('scrollerRect=', scrollerRect);
      } else {
        scrollerRect = {
          top: 0,
          bottom: scroller.innerHeight
        };
      }

      const scrollerHeight = scrollerRect.bottom - scrollerRect.top;
      console.log('scrollerHeight=', scrollerHeight);
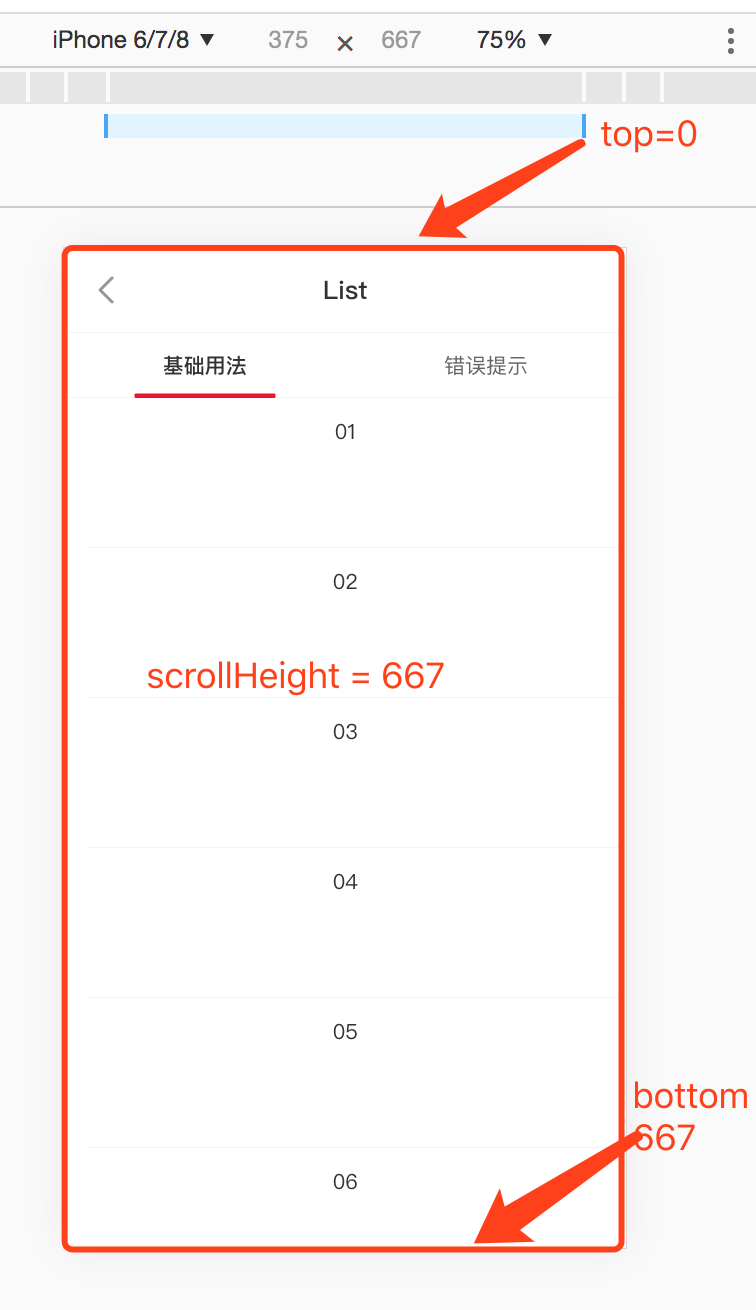
这里我们一开始拿到了需要滚动监听的对象scroller 在官网demo中就是整个window窗口(因为van-list组件不断向上找始终没找到可y轴滚动的元素),然后这边做了一个计算。在窗口内的显示高度。如下图做的演示
if (!scrollerHeight || isHidden(el)) {
return false;
}
当高度小于等于0时或者该滚动容器被影藏时。滚动监听的内容就不生效了。(毕竟容器都没有了还看什么)直接返回。
然后继续往下走
可看到获取了一个占位元素的位置信息。这个占位元素也主要是用作判断列表元素最底部距离该容器的距离
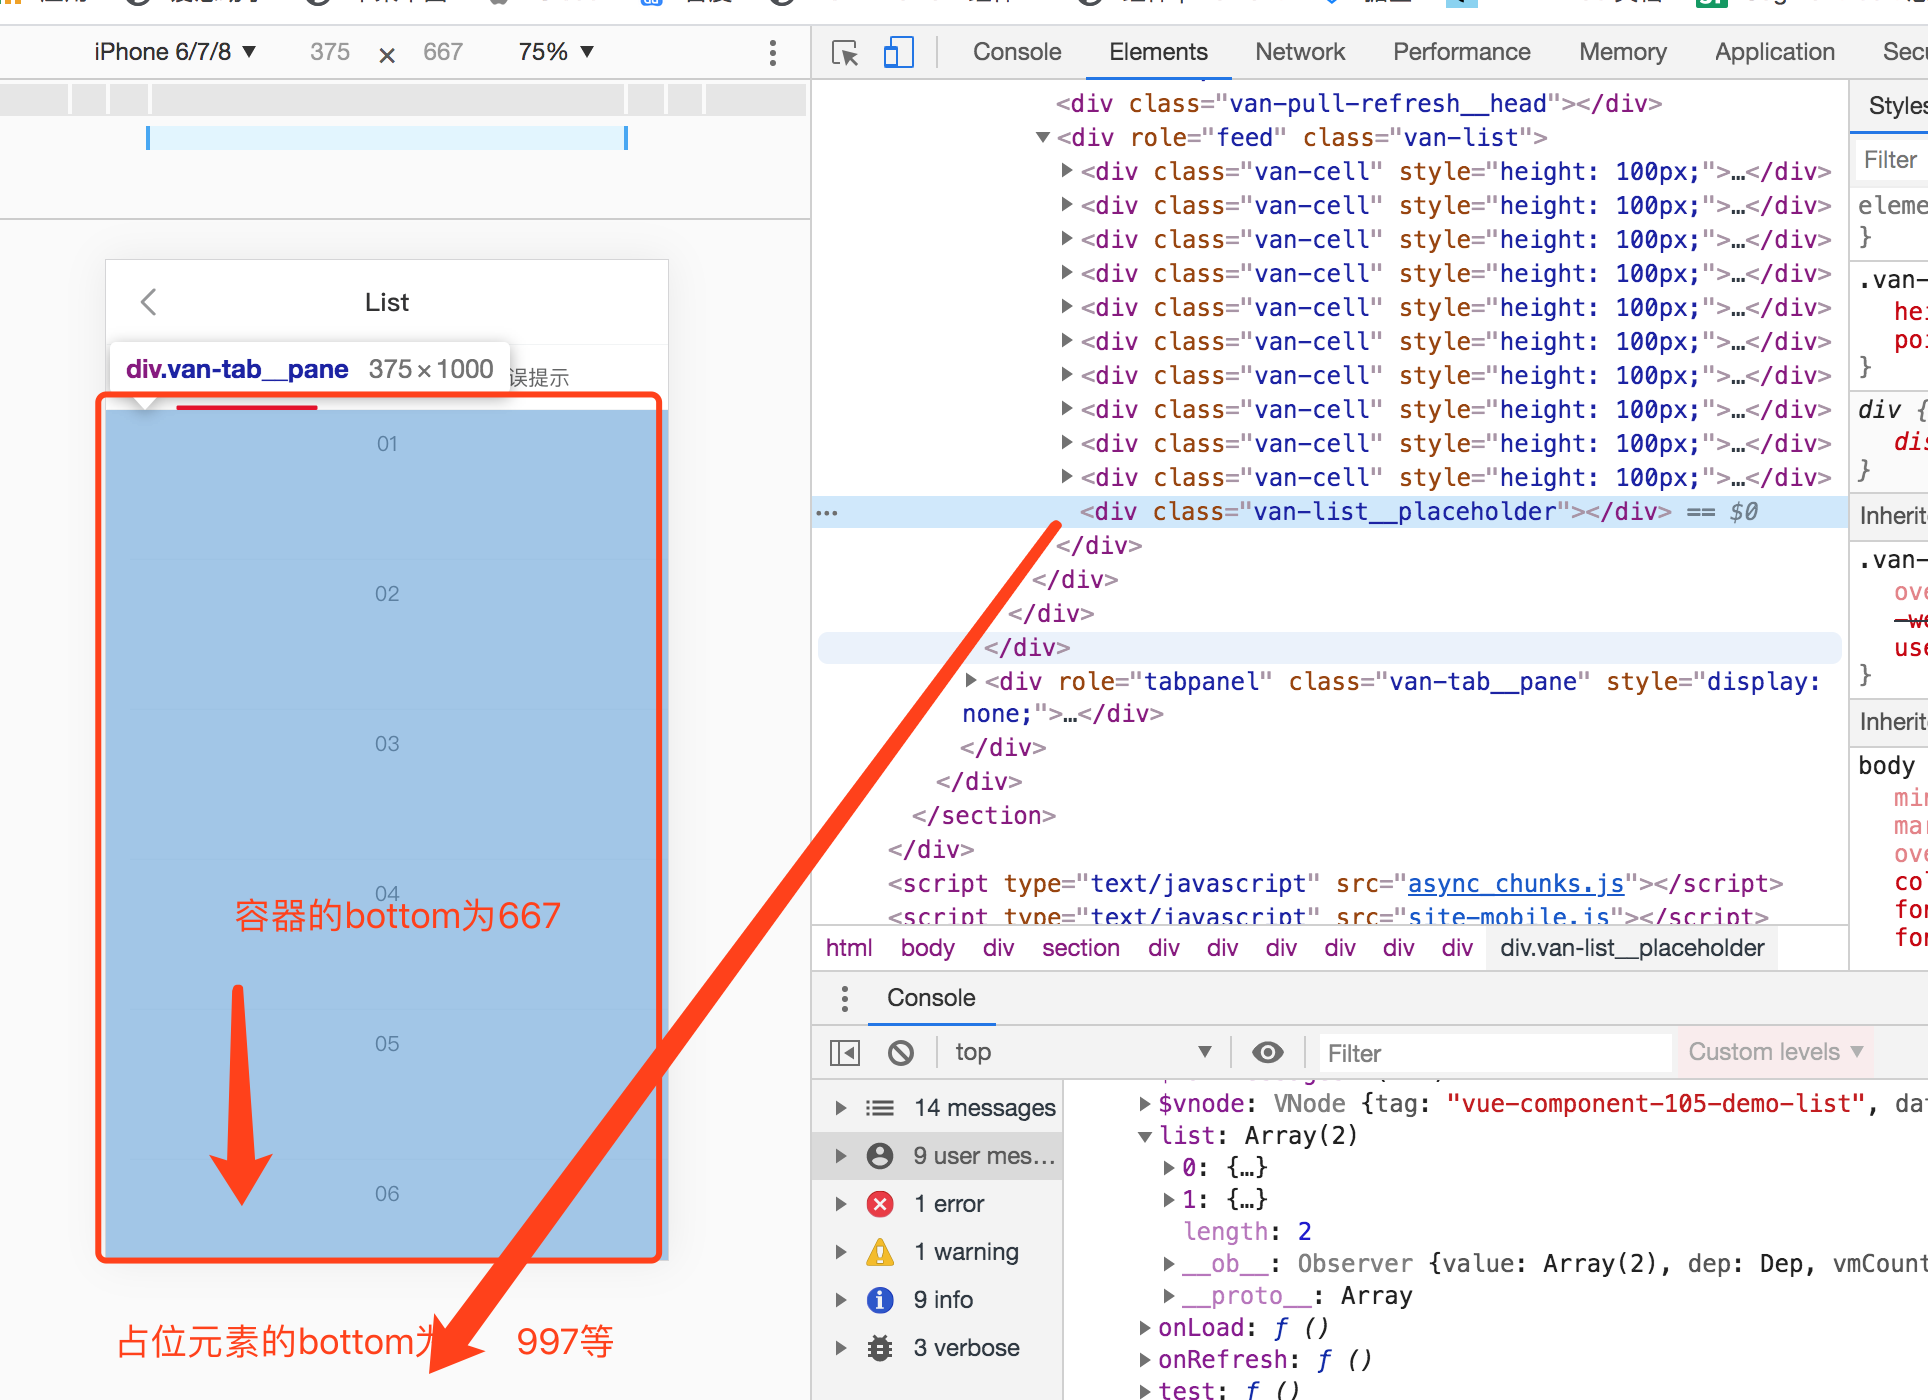
后面做一个计算
if (direction === 'up') {
isReachEdge = placeholderRect.top - scrollerRect.top <= offset;
} else {
isReachEdge = placeholderRect.bottom - scrollerRect.bottom <= offset;
}
if (isReachEdge) {
console.log('input');
this.innerLoading = true;
this.
}
这里的up判断就是一个方向判断。我们主要来看常见的down判断
当占位元素的底部和容器元素的底部相差小于300(默认是300)时。就会把是否达到边距的标识isReachEdge设为true 然后就会触发input 和load事件。
到此。van-list的主要业务功能已经都分析完毕。
还有其他props的使用后期有机会再和大家做分析。
笔者文笔差得很。若有描述不到位的地方或自己误解的地方请尽情的鞭挞我把。
