

一、前言
以前学了很多东西,但过一段时间不使用就很容易忘记。所以想现在开始,学习一个重要的知识点后,就写一篇总结性的博客。写这篇文章的原因,第一在工作中经常用到okhttp,第二这个库在市面上很流行,其主要原因是他的设计思想很优秀,而且使用方便。这样促使我想学一下okhtto内部的实现原理机制,这篇文章我第一部分会从okhttp的异步Get请求开始分析(其他几类请求原理都差不多)其流程和实现的原理,第二部分抛开其源码本身,介绍一些在读源码过程中学习和回顾到的小知识点,例如里面用到的设计模式—builder模式、责任连模式,还有对网络优化、http和https的一些学习等。
二、okhttp源码解析
1 okhttp的简单使用
1.1 okhttp的8种使用方式如下
- 1.同步Get请求
- 2.异步Get请求
- 3.同步Post请求
- 4.异步Post请求
- 5.Post提交文件
- 6.Post提交from表单
- 7.文件字符串复合提交
- 8.拦截器使用
1.2 使用
首先导入依赖库
implementation 'com.squareup.okhttp3:okhttp:3.10.0'
这里我分析的是3.10的版本,现在最新的版本是4.x,他的流程和3.x差不多只不过是用kotlin实现的,然后就是真正的使用。
  OkHttpClient okHttpClient = new OkHttpClient();

    /**
     * 同步Get请求
     */
    private void SyncGet() {
        try {
            Request request = new Request.Builder()
                    .url("https://www.baidu.com")
                    .build();
            Call call = okHttpClient.newCall(request);
            Response response = call.execute();
        } catch (Exception e) {

        }

    }

    /**
     * 异步Get请求
     */
    private void AsyncGet() {
        Request request = new Request.Builder()
                .url("https://www.baidu.com")
                .build();
        Call call = okHttpClient.newCall(request);
        call.enqueue(new Callback() {
            @Override
            public void onFailure(Call call, IOException e) {
                //请求失败
            }

            @Override
            public void onResponse(Call call, Response response) throws IOException {
                //请求成功
            }
        });

    }

    /**
     * 同步Post请求
     */
    private void SyncPost() {
        try {
            MediaType JSON = MediaType.parse("application/x-www-form-urlencoded; charset=utf-8");
            String str = "通信数据";
            Request request = new Request.Builder().url("https://www.baidu.com").post(RequestBody.create(JSON, str)).build();
            Call call = okHttpClient.newCall(request);
            Response response = call.execute();
        } catch (Exception e) {

        }

    }

    /**
     * 异步Post请求
     */
    private void AsyncPost() {
        MediaType JSON = MediaType.parse("application/x-www-form-urlencoded; charset=utf-8");
        String str = "通信数据";
        Request request = new Request.Builder().url("https://www.baidu.com").post(RequestBody.create(JSON, str)).build();
        Call call = okHttpClient.newCall(request);
        call.enqueue(new Callback() {
            @Override
            public void onFailure(Call call, IOException e) {
                //请求失败
            }

            @Override
            public void onResponse(Call call, Response response) throws IOException {
                //请求成功
            }
        });
    }

    /**
     * 使用拦截器
     */
    private void postAndInterceptor() {
        OkHttpClient okHttpClient = new OkHttpClient.Builder()
                .addInterceptor(new MyInterceptor())
                .build();
        MediaType fileMediaType = MediaType.parse("image/png");
        RequestBody requestBody = RequestBody.create(fileMediaType, new File("sd/mnt/1.png"));
        MultipartBody multipartBody = new MultipartBody.Builder()
                .setType(MultipartBody.FORM)
                .addFormDataPart("key", "value")//添加表单数据
                .addFormDataPart("file", "fileName", requestBody)
                .build();
        Request request = new Request.Builder()
                .url("https://www.baidu.com")
                .post(multipartBody)
                .build();
        Call call = okHttpClient.newCall(request);
        call.enqueue(new Callback() {
            @Override
            public void onFailure(Call call, IOException e) {
                //请求失败
            }

            @Override
            public void onResponse(Call call, Response response) throws IOException {
                //请求成功
            }
        });
    }

    /**
     * 拦截器
     */
    public class MyInterceptor implements Interceptor {
        @Override
        public Response intercept(Chain chain) throws IOException {
            Request request = chain.request();
            Response response = chain.proceed(request);
            Log.d("TAG", "请求返回数据为:" + response.body().string());

            return null;
        }
    }
2 源码-流程分析
这里以异步Get方法进行分析
    /**
     * 异步Get请求
     */
    private void AsyncGet() {
        OkHttpClient okHttpClient = new OkHttpClient.Builder().build();
        Request request = new Request.Builder()
                .url("https://www.baidu.com")
                .build();
        Call call = okHttpClient.newCall(request);
        call.enqueue(new Callback() {
            @Override
            public void onFailure(Call call, IOException e) {
                //请求失败
            }

            @Override
            public void onResponse(Call call, Response response) throws IOException {
                //请求成功
            }
        });

    }
这里分Request的初始化、OkHttpClient的初始化和enqueue()方法的的调用流程来讲。
2.1 Request
 Request request = new Request.Builder()
                .url("https://www.baidu.com")
                .build();
这是Request的初始化过程,这里采用的是builder模式,后面会详细介绍这个设计模式,在这里我只指定了url一个参数,其他参数都使用默认的值。下面看看这个类的build()方法,里面都有些什么参数。
/**
 * Request.java 源码:255行
 */
 public Request build() {
      if (url == null) throw new IllegalStateException("url == null");
      return new Request(this);
    }
  }
由此可见这里必须指定url不然会抛出异常。
  /**
   * Reguest.java 源码:107行
   */
  public Builder() {
      this.method = "GET";
      this.headers = new Headers.Builder();
    }
这里Request如果不指定方法就会默认为Get方法。
2.2 OkHttpClient
OkHttpClient okHttpClient = new OkHttpClient.Builder().build();
这里还是分析他的参数分别表示写啥
 /**
  *OkHttpClient.java 源码 475行
  */
 public Builder() {
      dispatcher = new Dispatcher();
      protocols = DEFAULT_PROTOCOLS;
      connectionSpecs = DEFAULT_CONNECTION_SPECS;
      eventListenerFactory = EventListener.factory(EventListener.NONE);
      proxySelector = ProxySelector.getDefault();
      cookieJar = CookieJar.NO_COOKIES;
      socketFactory = SocketFactory.getDefault();
      hostnameVerifier = OkHostnameVerifier.INSTANCE;
      certificatePinner = CertificatePinner.DEFAULT;
      proxyAuthenticator = Authenticator.NONE;
      authenticator = Authenticator.NONE;
      connectionPool = new ConnectionPool();
      dns = Dns.SYSTEM;
      followSslRedirects = true;
      followRedirects = true;
      retryOnConnectionFailure = true;
      connectTimeout = 10_000;
      readTimeout = 10_000;
      writeTimeout = 10_000;
      pingInterval = 0;
    }
- dispatcher:调度器,执行异步请求的调度策略
- protocols:支持协议的集合,这里默认支持的协议为http2和http1.1
/**
 * OkHttpClint.java 源码128行
 */
  static final List<Protocol> DEFAULT_PROTOCOLS = Util.immutableList(
      Protocol.HTTP_2, Protocol.HTTP_1_1);
- connectionSpecs:TLS支持的集合,特定的安全性和连接性决策由 这个类来实现,这里默认是MODERN_TLS和CLEARTEXT,moderni_tls是一种连接到现代HTTPS服务器的安全配置,CLEARTEXT是用于http:// url的不安全配置。
/**
 * OkHttpClint.java 源码131行
 */
    static final List<ConnectionSpec> DEFAULT_CONNECTION_SPECS = Util.immutableList(
      ConnectionSpec.MODERN_TLS, ConnectionSpec.CLEARTEXT);
- eventListenerFactory:监听事件的工厂类
- proxySelector:代理选择器
- cookieJar:Cookie管理,用来处理接收到的Cookie,和请求时携带的Cookie,如果不设置,则请求不验证Cookie,也不提供Cookie。
- socketFactory:socket工厂。
- hostnameVerifier:用于确认响应证书是否适用于 HTTPS 连接的请求主机名。
- certificatePinner:证书固定器,以限制受信任的证书。
- proxyAuthenticator:用于响应代理服务器质询的身份验证器。
- authenticator:用于响应原始服务器质询的身份验证器。
- connectionPool: HTTP、HTTPS 连接的连接池。这里默认的最多为5个连接,空闲保持5分钟。
/**
 * ConnectionPool.java 源码 85行
 */
 public ConnectionPool() {
    this(5, 5, TimeUnit.MINUTES);
  }

  public ConnectionPool(int maxIdleConnections, long keepAliveDuration, TimeUnit timeUnit) {
    this.maxIdleConnections = maxIdleConnections;
    this.keepAliveDurationNs = timeUnit.toNanos(keepAliveDuration);

    // Put a floor on the keep alive duration, otherwise cleanup will spin loop.
    if (keepAliveDuration <= 0) {
      throw new IllegalArgumentException("keepAliveDuration <= 0: " + keepAliveDuration);
    }
  }
- dns:用于查找主机名 IP 地址的 DNS 服务。这里默认是请求底层操作系统执行的DNS。
- followSslRedirects:是否遵循从HTTPS到HTTP和从HTTP到HTTPS的重定向,默认可以。
- followRedirects:是否可以重定向,默认可以。
- retryOnConnectionFailure:配置客户端连接出现问题时,是否重连。默认重连。
- connectTimeout:RealConnection的连接超时时间,默认值为10s。
- readTimeout:RealConnection的读取超时时间,默认值为10s。
- writeTimeout:RealConnection的写入超时时间,默认值为10s。
- pingInterval: HTTP/2和websocket ping之间的间隔。默认0表示客户端禁用客户端启动的ping。
2.3 Get异步方法工作流程
Call call = okHttpClient.newCall(request);
2.3.1 okhttpClient中的newCall方法换回的是一个call接口的实现类RealCall。
/**
 * OkHttpClient.java 源码 429行
 */
@Override public Call newCall(Request request) {
    return RealCall.newRealCall(this, request, false /* for web socket */);
  }

/**
 * RealCall.java 源码 57行
 */
static RealCall newRealCall(OkHttpClient client, Request originalRequest, boolean forWebSocket) {
    // Safely publish the Call instance to the EventListener.
    RealCall call = new RealCall(client, originalRequest, forWebSocket);
    call.eventListener = client.eventListenerFactory().create(call);
    return call;
  }
这里的newCall()方法的三个参数的意义:第一个参数为一个OkHttpClient对象,第二个参数为一个Request对象,第三个参数表示是否来自webSocket。
2.3.2 Call的enqueue()方法
call.enqueue(new Callback() {
            @Override
            public void onFailure(Call call, IOException e) {
                //请求失败
            }
            @Override
            public void onResponse(Call call, Response response) throws IOException {
                //请求成功
            }
        });
call.enqueue()等价于调用RealCall的enqueue方法,接下来计入enqueue()方法看看
/**
 * RealCall.java源码 93行
 */
@Override public void enqueue(Callback responseCallback) {
    synchronized (this) {
      if (executed) throw new IllegalStateException("Already Executed");
      executed = true;
    }
    captureCallStackTrace();
    eventListener.callStart(this);
    client.dispatcher().enqueue(new AsyncCall(responseCallback));
  }
上面代码的执行步骤: (1) 通过 synchronized 保证线程同步,确保当前的请求只有一个(对应的一个方法中的请求执行只有一个,但是有多个异步方法调用进来时则不受限制),判断是否已经执行过 ,如果是直接抛异常。 (2) captureCallStackTrace() 这个方法是捕获调用堆栈跟踪,在重试和重定向拦截器中有涉及。 (3) eventListener 回调 CallStart() (4) client.dispatcher().enqueue() 这个dispatcher()在OkHttpClient初始化的时候已经讲到过,接下来看 enqueue() 方法:
/**
 * Dispatcher.java 源码 129行
 */
 synchronized void enqueue(AsyncCall call) {
    if (runningAsyncCalls.size() < maxRequests && runningCallsForHost(call) < maxRequestsPerHost) {
      runningAsyncCalls.add(call);
      executorService().execute(call);
    } else {
      readyAsyncCalls.add(call);
    }
  }
(1) synchronized:是为了保持线程同步。
(2) maxRequests: 当前okhttpclient实例最大的并发请求数, 默认64,默认的64如何满足不了业务需要,可以通过client.dispatcher().setMaxRequests(maxRequests)去设置。这个值一般要大于maxRequestPerHost,如果这个值小于maxRequestPerHost会导致,请求单个主机的并发不可能超过maxRequest。
(3) maxRequestsPerHost:单个主机最大请求并发数,这里的主机指被请求方主机,一般可以理解对调用方有限流作用。注意:websocket请求不受这个限制。默认4,一般建议与maxRequest保持一致。 这个值设置可以通过client.dispatcher().setMaxRequestsPerHost(maxRequestsPerHost)来设置,但是需要有如下几个场景考虑:
- a 如果被调用方的并发能力只能支持200,那这个值最好不要超过200,否则对调用方有压力;
- b 如果当前okhttpclient实例只对一个调用方发起调用,那这个值与maxRequests保持一致;
- c 如果当前okhttpclient实例在一个事务中对n个调用方发起调用,n * maxReuestPerHost要接近maxRequest。
- e 另外还需要注意的是maxRequests和maxReuestsPerHost值的设置与executorService线程池的设置有关联。maxRequests 和maxRequestPerHost是okhttp内部维持的请求队列,而executorservice是实际发送请求的线程。如果maxRequests和maxReuestPerHost设置太大,executorService会因为线程太少而阻塞发送。
(4) runningAsyncCalls和readyAsyncCall一个为运行队列一个为等待队列,但两个都是ArrayDeque类型,。 ArrayDequeue为一个双端队列底层是通过循环数组实现的,不允许插入空值,是非线程安全的需要手动同步。这里不采用LinkedList的原因是,这两个队列主要是对两端进行操作,ArrayDeque底层是数组,LinkedList内部采用的是链表的结构,而采用数组更加高效,这里使用ArrayDeque能够高效的操作。
(5) 正在执行的总任务数及相同host下正在执行的任务数小于阈值时,直接执行任务,否则加入等待队列,等待线程池调度,接下来我们进入executorService这个线程池看看。
/**
 * Dispatcher.java 源码 63行
 */
public synchronized ExecutorService executorService() {
    if (executorService == null) {
      executorService = new ThreadPoolExecutor(0, Integer.MAX_VALUE, 60, TimeUnit.SECONDS,
          new SynchronousQueue<Runnable>(), Util.threadFactory("OkHttp Dispatcher", false));
    }
    return executorService;
  }
executorService这个线程池分别介绍一下每个参数的含义
- 参数一:corePoolSize 核心线程数,就是保持在线程池当中的线程数量,尽管这些线程可能空闲,但是这个线程数量就是我们关心的。为0就代表线程空闲之后不会被保留,就是说等待一段时间后就会停止。
- 参数二:maximumPoolSize 线程池非核心线程数 线程池规定大小
- 参数三/四:时间数值:keepAliveTime,单位:时分秒,60s作用:Runnable1执行完毕后 闲置60s,如果过了闲置60s,会回收掉Runnable1任务,,如果在闲置时间60s 复用此线程Runnable。(正在执行的任务Runnable数 > corePoolSize参数三/参数四才会起作用)
- 参数五:workQueue队列 :会把超出的任务加入到队列中缓存起来
- 参数六 线程工厂
/**
 * Util.java 源码 200行
 */
public static ThreadFactory threadFactory(final String name, final boolean daemon) {
    return new ThreadFactory() {
      @Override public Thread newThread(Runnable runnable) {
        Thread result = new Thread(runnable, name);
        result.setDaemon(daemon);//是否为守护线程
        return result;
      }
    };
  }
其实这里主要是给线程设置一个name,还设置是否为守护线程(是指在程序运行的时候在后台提供一种通用服务的线程,如gc)。
岂止为今就把任务(AsyncCall)放在线程池里面了 ,下面分析任务的执行;
2.3.3 AsyncCall的execute方法
 /**
  * RealCall.java 源码 124行
  */
 final class AsyncCall extends NamedRunnable {
    private final Callback responseCallback;

    AsyncCall(Callback responseCallback) {
      super("OkHttp %s", redactedUrl());
      this.responseCallback = responseCallback;
    }
    ...
 }

/**
 *NamedRunnable源码
 */
public abstract class NamedRunnable implements Runnable {
  protected final String name;

  public NamedRunnable(String format, Object... args) {
    this.name = Util.format(format, args);
  }

  @Override public final void run() {
    String oldName = Thread.currentThread().getName();
    Thread.currentThread().setName(name);
    try {
      execute();
    } finally {
      Thread.currentThread().setName(oldName);
    }
  }

  protected abstract void execute();
}
AsyncCall是RealCall的一个内部类继承自 NamedRunnable,NamedRunnable继承自Runnable,重写了Run方法,并为线程设置name然后执行抽象方法execute(),所以执行到这一步就是执行AsyncCall的execute()。
/**
 * RealCall.java 源码 144行
 */
@Override protected void execute() {
      boolean signalledCallback = false;
      try {
	//得到response
        Response response = getResponseWithInterceptorChain();
        if (retryAndFollowUpInterceptor.isCanceled()) {
          // 如果用户取消了请求,回调给用户,说失败了
          signalledCallback = true;
          responseCallback.onFailure(RealCall.this, new IOException("Canceled"));
        } else {
          signalledCallback = true;
          responseCallback.onResponse(RealCall.this, response);
        }
      } catch (IOException e) {
        //责任划分,用户操作失败
        if (signalledCallback) {
          // Do not signal the callback twice!
          Platform.get().log(INFO, "Callback failure for " + toLoggableString(), e);
        } else {
	  //okhttp 执行错误
          eventListener.callFailed(RealCall.this, e);
          responseCallback.onFailure(RealCall.this, e);
        }
      } finally {
        //最重要的是这个回收机制
        client.dispatcher().finished(this);
      }
    }
上面的大体流程就是通过getResponseWithInterceptorChain() 来得到 response,如果成功就返回成功信息,如果失败就要返回错误信息并且区分是用户操作失误还是okhttp内部的错误,最后都必须执行自定义的回收机制。对于getResponseWithInterceptorChain() 方法下一个小结介绍,下面我们分析这个回收机制。
  /**
   * DisPacher.java 源码189行
   */
  void finished(AsyncCall call) {
    finished(runningAsyncCalls, call, true);
  }

  /**
   * DisPacher.java 源码198行
   */
  private <T> void finished(Deque<T> calls, T call, boolean promoteCalls) {
    int runningCallsCount;
    Runnable idleCallback;
    synchronized (this) {
      if (!calls.remove(call)) throw new AssertionError("Call wasn't in-flight!");
      if (promoteCalls) promoteCalls();
      runningCallsCount = runningCallsCount();
      idleCallback = this.idleCallback;
    }

    if (runningCallsCount == 0 && idleCallback != null) {
      idleCallback.run();
    }
  }
首先finished()方法,同步和异步传入的参数不一样
- calls:同步请求时传入 **runningSyncCalls **,异步请求是传入的为 runningAsyncCalls
- promoteCalls:同步请求时传入false,异步时传入true
然后分析synchronized里面的执行流程:
(1) 将当前call请求从请求队列中删除,如果移除失败会抛出异常。 (2) 因为这里分析的是异步方法,则promoteCalls为true故而会调用promoteCalls()方法,这个方式遍历runningAsyncCalls接下来的call,并通过executorService执行。
  /**
   * DisPacher.java 源码156行
   */
  private void promoteCalls() {
    if (runningAsyncCalls.size() >= maxRequests) return; // Already running max capacity.
    if (readyAsyncCalls.isEmpty()) return; // No ready calls to promote.

    for (Iterator<AsyncCall> i = readyAsyncCalls.iterator(); i.hasNext(); ) {
      AsyncCall call = i.next();

      if (runningCallsForHost(call) < maxRequestsPerHost) {
        i.remove();
        runningAsyncCalls.add(call);
        executorService().execute(call);
      }

      if (runningAsyncCalls.size() >= maxRequests) return; // Reached max capacity.
    }
  }
- a、首先会判断我们当前正在运行的异步请求的数量是否允许超过他的最大数量,如果操作了就返回了就不要再做其他操作了。
- b、如果还能进行异步请求,就表示我们这个空闲还有余额的话他会直接返回
- c、接着会循环遍历这个等待的执行队列。然后会通过next迭代器去获取到AsyncCall实例。
- d、又接着会判断所有的运行的主机是否小于最大的限制,这是一个最大的前提条件。将call从等待队列中移到正在执行的请求队列当中,先移除,然后再把它添加到正在执行的异步请求队列当中。然后会开启一个线程池去执行我们的请求。 (3) 执行完上面的方法后会去执行runningCallsCount() 重新计算正在执行的线程数量
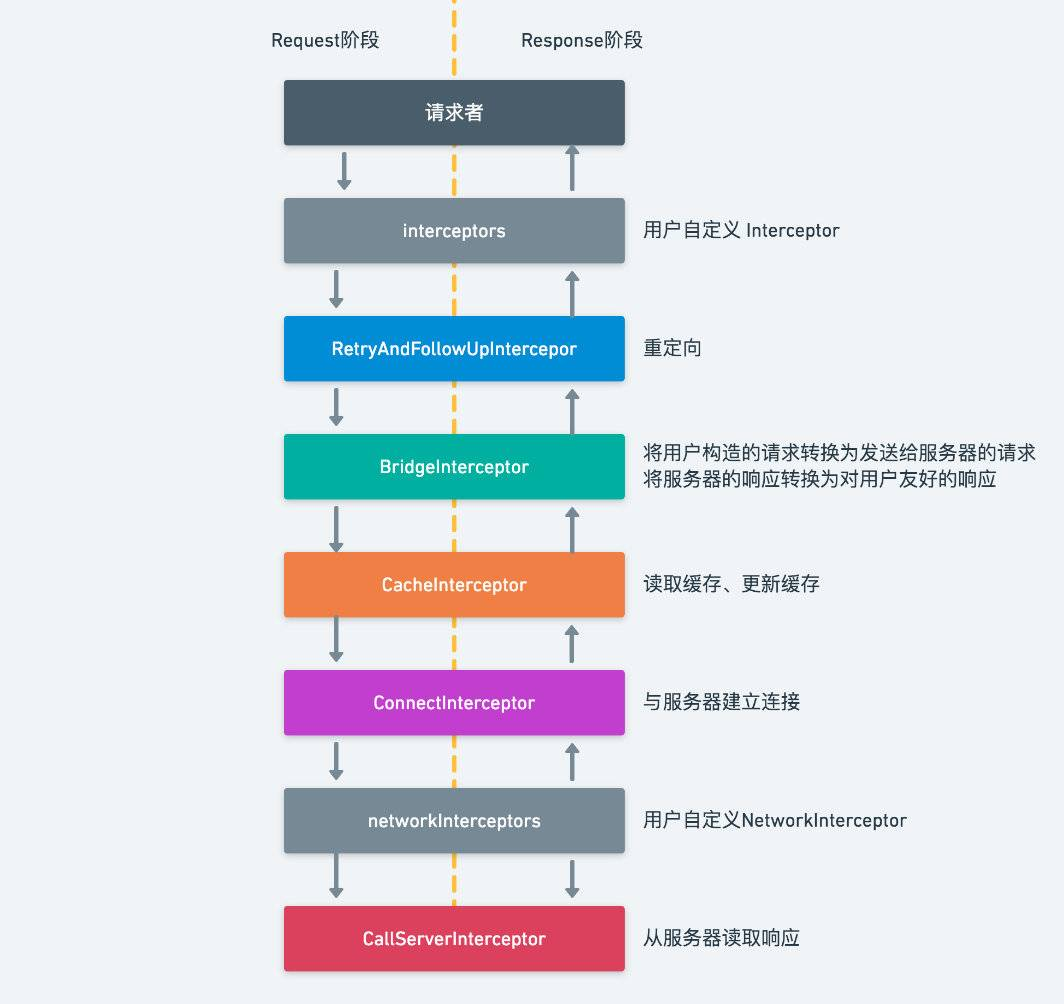
2.4 拦截器
okhttp真正的核心部分是通过getResponseWithInterceptorChain()方法得到Response的部分,这一部分就是拦截器起的作用,采用的是责任链的模式(在后面第三节详细介绍),下面看看源码。
/**
 * RealCall.java 源码183行
 */
Response getResponseWithInterceptorChain() throws IOException {
    // Build a full stack of interceptors.
    List<Interceptor> interceptors = new ArrayList<>();
    interceptors.addAll(client.interceptors());
    interceptors.add(retryAndFollowUpInterceptor);
    interceptors.add(new BridgeInterceptor(client.cookieJar()));
    interceptors.add(new CacheInterceptor(client.internalCache()));
    interceptors.add(new ConnectInterceptor(client));
    if (!forWebSocket) {
      interceptors.addAll(client.networkInterceptors());
    }
    interceptors.add(new CallServerInterceptor(forWebSocket));

    Interceptor.Chain chain = new RealInterceptorChain(interceptors, null, null, null, 0,
        originalRequest, this, eventListener, client.connectTimeoutMillis(),
        client.readTimeoutMillis(), client.writeTimeoutMillis());

    return chain.proceed(originalRequest);
  }
先谈谈拦截器
2.4.1 拦截器工作原理
拦截器都继承自Interceptor接口,里面只有一个方法intercept以及一个接口Chain。 其中,intercept方法往往是如下的结构:
@Override
public Response intercept(Chain chain) throws IOException {
	// Request阶段,该拦截器在Request阶段负责做的事情
        Request request = chain.request();

	// 调用RealInterceptorChain.proceed(),其实是在递归调用下一个拦截器的intercept()方法
        // response 阶段,完成了该拦截器在Response阶段负责做的事情,然后返回到上一层的拦截器。
	response = ((RealInterceptorChain) chain).proceed(request, streamAllocation, null, null);
	return response;
}
首先调用了 chain.request() 方法获取到了本次请求的 Request 对象,之后 调用了 chain.proceed() 方法递归调用下一个拦截器的 interceptor() 方法。最后返回了 chain.proceed() 方法所返回的 Response。 故可以将整个intercept过程分为了两个阶段:
- 请求阶段:执行一些该拦截器在在Request阶段负责做的事情
- 回应阶段:完成该拦截器在回应阶段所负责的事情
这其实是采用了一种递归的设计,类似我们计算机网络中的分层模型,将OkHttp的请求分为了几个阶段,分别代表了不同的拦截器,不同拦截器分别会在这个递归的过程中有两次该请求的处理的可能,一次是在Request之前,一次是在Response之后,中间的过程中若出现了错误,则通过引发异常来通知上层。
在okhttp中默认的有5个拦截器
- RetryAndFollowUpInterceptor:失败之后自动重链和重定向
- BridgeInterceptor:数据转换,将用户设置的Request转换成网络请求所需要的请求,传到下一个拦截器中,并将下一个拦截器返回的结果转换成RealResponseBody返回给上一个拦截器。
- CacheInterceptor:缓存。读取缓存直接返回和更新缓存,并将其下一个拦截器返回的结果返回给上一个拦截器。
- ConnectInterceptor:创建一个链接,并将其下一个拦截器返回的结果返回给上一个拦截器
- CallServerInterceptor:从服务器读取响应
用户插入拦截器可以分为两个时机,分别为
- 网络请求前后:通过OkHttpClient.addInterceptor方法添加
- 读取响应前后:通过OkHttpClient.addNetworkInterceptor方法添加
具体的流程如下:
下面介绍RealInterceptorChain是怎样将整个拦截器的调用过程连接起来的,,先构造RealInterceptorChain对象,然后调用其proceed() 方法,如下。
 /**
  *RealInterceptorChain.java 源码124行
  */
 public Response proceed(Request request, StreamAllocation streamAllocation, HttpCodec httpCodec,
      RealConnection connection) throws IOException {
    ...
    // Call the next interceptor in the chain.
    RealInterceptorChain next = new RealInterceptorChain(interceptors, streamAllocation, httpCodec,
        connection, index + 1, request, call, eventListener, connectTimeout, readTimeout,
        writeTimeout);
    Interceptor interceptor = interceptors.get(index);
    Response response = interceptor.intercept(next);
    ...
    return response;
  }
这里省略了一些异常处理,可以看到它首先构造了下一个拦截器对应的链,然后获取到了当前的拦截器并调用了其intercept方法获取其结果,在intercept方法的参数中取代的就是下一个拦截器对应的Chain。通过这种递归的设计,从而实现了从上到下,再从下到上这样一个递与归的过程,从而十分实现了HTTP请求的全过程。 下面我们开始分析几种默认的拦截器。
2.4.2 RetryAndFollowUpInterceptor简略分析
/**
 * RetryAndFollowUpInterceptor.java 源码105行
 */
@Override public Response intercept(Chain chain) throws IOException {
    Request request = chain.request();
    RealInterceptorChain realChain = (RealInterceptorChain) chain;
    Call call = realChain.call();
    EventListener eventListener = realChain.eventListener();
 // 1. 初始化一个socket连接对象
  streamAllocation = new StreamAllocation(
      client.connectionPool(), createAddress(request.url()), callStackTrace);

  int followUpCount = 0;
  Response priorResponse = null;
  while (true) {
     //
    if (canceled) {
      streamAllocation.release();
      throw new IOException("Canceled");
    }

    Response response = null;
    boolean releaseConnection = true;
    try {
       // 2. 执行下一个拦截器,即BridgeInterceptor
      response = ((RealInterceptorChain) chain).proceed(request, streamAllocation, null, null);
      releaseConnection = false;
    } catch (RouteException e) {
      // The attempt to connect via a route failed. The request will not have been sent.
       // 3. 如果有异常,判断是否要恢复
      if (!recover(e.getLastConnectException(), false, request)) {
        throw e.getLastConnectException();
      }
      releaseConnection = false;
      continue;
    } catch (IOException e) {
      // An attempt to communicate with a server failed. The request may have been sent.
      boolean requestSendStarted = !(e instanceof ConnectionShutdownException);
      if (!recover(e, requestSendStarted, request)) throw e;
      releaseConnection = false;
      continue;
    } finally {
      // We're throwing an unchecked exception. Release any resources.
      if (releaseConnection) {
        streamAllocation.streamFailed(null);
        streamAllocation.release();
      }
    }

    // Attach the prior response if it exists. Such responses never have a body.
    if (priorResponse != null) {
      response = response.newBuilder()
          .priorResponse(priorResponse.newBuilder()
                  .body(null)
                  .build())
          .build();
    }
 // 4. 检查是否符合要求
    Request followUp = followUpRequest(response);

    if (followUp == null) {
      if (!forWebSocket) {
        streamAllocation.release();
      }
      // 返回结果
      return response;
    }
 // 5. 不符合,关闭响应流
    closeQuietly(response.body());
 // 6. 是否超过最大限制
    if (++followUpCount > MAX_FOLLOW_UPS) {
      streamAllocation.release();
      throw new ProtocolException("Too many follow-up requests: " + followUpCount);
    }

    if (followUp.body() instanceof UnrepeatableRequestBody) {
      streamAllocation.release();
      throw new HttpRetryException("Cannot retry streamed HTTP body", response.code());
    }
 // 7. 是否有相同的连接
    if (!sameConnection(response, followUp.url())) {
      streamAllocation.release();
      streamAllocation = new StreamAllocation(
          client.connectionPool(), createAddress(followUp.url()), callStackTrace);
    } else if (streamAllocation.codec() != null) {
      throw new IllegalStateException("Closing the body of " + response
          + " didn't close its backing stream. Bad interceptor?");
    }

    request = followUp;
    priorResponse = response;
  }
}
其流程主要分为下面几个方面:
- 1、实例化StreamAllocation,初始化一个Socket连接对象,获取到输入/输出流()基于Okio
- 2、开启循环,执行下一个调用链(拦截器),等待返回结果(Response)
- 3、如果发生错误,判断是否继续请求,否:退出
- 4、检查响应是否符合要求,是:返回
- 5、关闭响应结果
- 6、判断是否达到最大限制数,是:退出
- 7、检查是否有相同连接,是:释放,重建连接
- 8、重复以上流程
初始化StreamAllcation对象
// 初始化一个Socket连接对象,此处是第一步,然后获取输入/输出流
streamAllocation = new StreamAllocation(
    client.connectionPool(), createAddress(request.url()), callStackTrace);
// 三个参数分别对应,全局的连接池仅对http/2有用,连接线路Address, 堆栈对象.
此处还没有真正的去建立连接,只是初始化一个连接对象
继续下一个拦截器
// 这里有个很重的信息,即会将初始化好的连接对象传递给下一个拦截器,也是贯穿整个请求的连击对象,
// 上文我们说过,在拦截器执行过程中,RealInterceptorChain的几个属性字段会一步一步赋值
response = ((RealInterceptorChain) chain).proceed(request, streamAllocation, null, null);
抛出异常
/**
* 不在继续连接的情况:
* 1. 应用层配置不在连接,默认为true
* 2. 请求Request出错不能继续使用
* 3. 是否可以恢复的
*   3.1、协议错误(ProtocolException)
    3.2、中断异常(InterruptedIOException)
    3.3、SSL握手错误(SSLHandshakeException && CertificateException)
    3.4、certificate pinning错误(SSLPeerUnverifiedException)
* 4. 没用更多线路可供选择
*/
private boolean recover(IOException e, boolean requestSendStarted, Request userRequest) {
  streamAllocation.streamFailed(e);
  // 1. 应用层配置不在连接,默认为true
  // The application layer has forbidden retries.
  if (!client.retryOnConnectionFailure()) return false;

  // 2. 请求Request出错不能继续使用
  // We can't send the request body again.
  if (requestSendStarted && userRequest.body() instanceof UnrepeatableRequestBody) return false;

  //  是否可以恢复的
  // This exception is fatal.
  if (!isRecoverable(e, requestSendStarted)) return false;

  // 4. 没用更多线路可供选择
  // No more routes to attempt.
  if (!streamAllocation.hasMoreRoutes()) return false;

  // For failure recovery, use the same route selector with a new connection.
  return true;
}
正常响应 根据响应码(code),处理响应头(header),比如重定向,超时等如果一切正常将直接返回Response停止循环。followUpRequest()方法对响应码进行处理,这里我们对函数进行分析:
/**
 * RetryAndFollowUpInterceptor.java 源码272行
 */
private Request followUpRequest(Response userResponse, @Nullable Route route) throws IOException {
    if (userResponse == null) throw new IllegalStateException();
    int responseCode = userResponse.code();
    final String method = userResponse.request().method();
    switch (responseCode) {
        case HTTP_PROXY_AUTH:		// 407
          	// ...
          	// 代理身份认证
        case HTTP_UNAUTHORIZED:		// 401
            // ...
            // 身份认证
        case HTTP_PERM_REDIRECT:	// 308
        case HTTP_TEMP_REDIRECT:	// 307
            // 307、308 两种状态码不对 GET、HEAD 以外的请求重定向
            if (!method.equals("GET") && !method.equals("HEAD")) {
                return null;
            }
        case HTTP_MULT_CHOICE:		// 300
        case HTTP_MOVED_PERM:		// 301
        case HTTP_MOVED_TEMP:		// 302
        case HTTP_SEE_OTHER:		// 303
            // 若客户端关闭了重定向,则直接返回 null
            if (!client.followRedirects()) return null;
            // 获取LocationHeader以获取重定向目标
            String location = userResponse.header("Location");
            if (location == null) return null;
            HttpUrl url = userResponse.request().url().resolve(location);
			// ...
            Request.Builder requestBuilder = userResponse.request().newBuilder();
            // 处理重定向使用的method
            if (HttpMethod.permitsRequestBody(method)) {
                final boolean maintainBody = HttpMethod.redirectsWithBody(method);
                if (HttpMethod.redirectsToGet(method)) {
                    requestBuilder.method("GET", null);
                } else {
                    RequestBody requestBody = maintainBody ? userResponse.request().body() : null;
                    requestBuilder.method(method, requestBody);
                }
                if (!maintainBody) {
                    requestBuilder.removeHeader("Transfer-Encoding");
                    requestBuilder.removeHeader("Content-Length");
                    requestBuilder.removeHeader("Content-Type");
                }
            }
            // 重新构建request
            return requestBuilder.url(url).build();
        case HTTP_CLIENT_TIMEOUT:	// 408
            // 408 说明需要重新发送一次相同的请求
			// ...
			return userResponse.request();
        case HTTP_UNAVAILABLE:		// 503
            // ...
            return null;
        default:
            return null;
    }
}
可以看到,主要是针对重定向的几个状态码进行特殊处理,从中取出 Location 字段,构造重定向后的 request。
响应不符合要求 如果响应不符合要求,将关闭响应,接续处理
...
closeQuietly(response.body());
 // 超过最大限制,抛出异常停止循环
if (++followUpCount > MAX_FOLLOW_UPS) {
  streamAllocation.release();
  throw new ProtocolException("Too many follow-up requests: " + followUpCount);
}
// 请求已破坏掉,抛出异常停止循环
if (followUp.body() instanceof UnrepeatableRequestBody) {
  streamAllocation.release();
  throw new HttpRetryException("Cannot retry streamed HTTP body", response.code());
}
// 如果响应线路,和请求相同,复用,否则,关闭重建响应
if (!sameConnection(response, followUp.url())) {
  streamAllocation.release();
  streamAllocation = new StreamAllocation(
      client.connectionPool(), createAddress(followUp.url()), callStackTrace);
} else if (streamAllocation.codec() != null) {
  throw new IllegalStateException("Closing the body of " + response
      + " didn't close its backing stream. Bad interceptor?");
}
...
最后总结这个拦截器的作用:
- 初始化一个连接对象
- 处理异常,判断是否需要继续发起请求
2.4.3 BridgeInterceptor简略分析
BridgeInterceptor,它是一个连接桥,它负责把用户构造的请求转换为发送给服务器的请求,把服务器返回的响应转换为对用户友好的响应。转换的过程就是添加一些服务端需要的header信息。在Request阶段配置用户信息,并添加一些请求头。在Response阶段,进行gzip解压。下面我们看看他的intercept() 方法。
/**
 * BridgeInterceptor.java 源码 48行
 */
@Override public Response intercept(Chain chain) throws IOException {
    Request userRequest = chain.request();
    Request.Builder requestBuilder = userRequest.newBuilder();
    RequestBody body = userRequest.body();
    // 将一些userRequest中的属性设置进builder中
    if (body != null) {
        MediaType contentType = body.contentType();
        if (contentType != null) {
            requestBuilder.header("Content-Type", contentType.toString());
        }
        long contentLength = body.contentLength();
        if (contentLength != -1) {
            requestBuilder.header("Content-Length", Long.toString(contentLength));
            requestBuilder.removeHeader("Transfer-Encoding");
        } else {
            requestBuilder.header("Transfer-Encoding", "chunked");
            requestBuilder.removeHeader("Content-Length");
        }
    }
    if (userRequest.header("Host") == null) {
        requestBuilder.header("Host", hostHeader(userRequest.url(), false));
    }
    if (userRequest.header("Connection") == null) {
        requestBuilder.header("Connection", "Keep-Alive");
    }
    boolean transparentGzip = false;
    // 若未设置Accept-Encoding,自动设置gzip
    if (userRequest.header("Accept-Encoding") == null && userRequest.header("Range") == null) {
        transparentGzip = true;
        requestBuilder.header("Accept-Encoding", "gzip");
    }
    // 将userRequest中的cookies设置进builder
    List<Cookie> cookies = cookieJar.loadForRequest(userRequest.url());
    if (!cookies.isEmpty()) {
        requestBuilder.header("Cookie", cookieHeader(cookies));
    }
    // 设置user-agent
    if (userRequest.header("User-Agent") == null) {
        requestBuilder.header("User-Agent", Version.userAgent());
    }
    // 读取服务端响应
    Response networkResponse = chain.proceed(requestBuilder.build());
    // 对响应的header进行处理
    HttpHeaders.receiveHeaders(cookieJar, userRequest.url(), networkResponse.headers());
   	// 根据服务端的响应构建新的Response,并将userRequest设置为其request
   	Response.Builder responseBuilder = networkResponse.newBuilder()
            .request(userRequest);
    // 若之前设置了gzip压缩且response中也包含了gzip压缩,则进行gzip解压
    if (transparentGzip
            && "gzip".equalsIgnoreCase(networkResponse.header("Content-Encoding"))
            && HttpHeaders.hasBody(networkResponse)) {
        GzipSource responseBody = new GzipSource(networkResponse.body().source());
        Headers strippedHeaders = networkResponse.headers().newBuilder()
                .removeAll("Content-Encoding")
                .removeAll("Content-Length")
                .build();
        responseBuilder.headers(strippedHeaders);
        String contentType = networkResponse.header("Content-Type");
        responseBuilder.body(new RealResponseBody(contentType, -1L, Okio.buffer(responseBody)));
    }
    return responseBuilder.build();
}
这里主要对Header进行处理,将一些原来request中的Header进行处理后设置进了新request,并用其进行请求。而在对response处理时,若之前设置了gzip,则进行gzip解压。针对Header做了一些处理,这里主要提一下Accept-Encoding, gzip,关于它有以下几点需要注意:
- 开发者没有添加Accept-Encoding时,自动添加Accept-Encoding: gzip
- 自动添加Accept-Encoding,会对request,response进行自动解压
- 手动添加Accept-Encoding,不负责解压缩
- 自动解压时移除Content-Length,所以上层Java代码想要contentLength时为 -1
- 自动解压时移除 Content-Encoding
- 自动解压时,如果是分块传输编码,Transfer-Encoding: chunked不受影响。
2.4.4 CacheInterceptor简略分析
Okhttp是有自己的一套缓存机制的,CacheInterceptor就是用来负责读取缓存以及更新缓存的。下面我们看看 intercept() 方法:
 /**
  * CacheInterceptor.java 源码 52行
  */
 @Override public Response intercept(Chain chain) throws IOException {

        //1.尝试获取缓存的cache。
        Response cacheCandidate = cache != null
            ? cache.get(chain.request())
            : null;

        long now = System.currentTimeMillis();

        //2. 创建缓存策略,强制缓存、对比缓存等。
        CacheStrategy strategy = new CacheStrategy.Factory(now, chain.request(), cacheCandidate).get();
        Request networkRequest = strategy.networkRequest;
        Response cacheResponse = strategy.cacheResponse;

        if (cache != null) {
          cache.trackResponse(strategy);
        }

        if (cacheCandidate != null && cacheResponse == null) {
          closeQuietly(cacheCandidate.body());
        }

        //3. 根据策略,不使用网络,又没有缓存的直接报错,并返回错误码504。
        if (networkRequest == null && cacheResponse == null) {
          return new Response.Builder()
              .request(chain.request())
              .protocol(Protocol.HTTP_1_1)
              .code(504)
              .message("Unsatisfiable Request (only-if-cached)")
              .body(Util.EMPTY_RESPONSE)
              .sentRequestAtMillis(-1L)
              .receivedResponseAtMillis(System.currentTimeMillis())
              .build();
        }

        //4. 根据策略,不使用网络,有缓存的直接返回。
        if (networkRequest == null) {
          return cacheResponse.newBuilder()
              .cacheResponse(stripBody(cacheResponse))
              .build();
        }

        Response networkResponse = null;
        try {
          //5. 前面两个都没有返回,继续执行下一个Interceptor,即ConnectInterceptor。
          networkResponse = chain.proceed(networkRequest);
        } finally {
          //如果发生IO异常,则释放掉缓存
          if (networkResponse == null && cacheCandidate != null) {
            closeQuietly(cacheCandidate.body());
          }
        }

        //6. 接收到网络结果,如果响应code式304,则使用缓存,返回缓存结果。
        if (cacheResponse != null) {
          if (networkResponse.code() == HTTP_NOT_MODIFIED) {
            Response response = cacheResponse.newBuilder()
                .headers(combine(cacheResponse.headers(), networkResponse.headers()))
                .sentRequestAtMillis(networkResponse.sentRequestAtMillis())
                .receivedResponseAtMillis(networkResponse.receivedResponseAtMillis())
                .cacheResponse(stripBody(cacheResponse))
                .networkResponse(stripBody(networkResponse))
                .build();
            networkResponse.body().close();

            cache.trackConditionalCacheHit();
            cache.update(cacheResponse, response);
            return response;
          } else {
            closeQuietly(cacheResponse.body());
          }
        }

        //7. 读取网络结果。
        Response response = networkResponse.newBuilder()
            .cacheResponse(stripBody(cacheResponse))
            .networkResponse(stripBody(networkResponse))
            .build();

        //8. 对数据进行缓存。
        if (cache != null) {
          if (HttpHeaders.hasBody(response) && CacheStrategy.isCacheable(response, networkRequest)) {
            // Offer this request to the cache.
            CacheRequest cacheRequest = cache.put(response);
            return cacheWritingResponse(cacheRequest, response);
          }

          if (HttpMethod.invalidatesCache(networkRequest.method())) {
            try {
              cache.remove(networkRequest);
            } catch (IOException ignored) {
              // The cache cannot be written.
            }
          }
        }

        //9. 返回网络读取的结果。
        return response;
      }
可以看出上面的大体流程如下:
- 尝试从缓存中获取了缓存的 response
- 根据 当前时间、request、缓存的 response 构建缓存策略。
- 若缓存策略不能使用网络(networkRequest == null),且无缓存(cacheResponse == null),则直接请求失败。
- 若缓存策略不能使用网络,由于前面有判断所以可以确定有缓存,直接构建缓存的 response并返回。
- 调用 chain.proceed 网络请求获取 response
- 对 code 304 作出处理,结合本地及网络返回数据构建 response并返回
- 构建网络请求的所获得的 response ,并且由于该网络请求并未进行过缓存,进行缓存并返回结果。
这里关于http的缓存策略他是依赖于请求和响应header里的参数类实现的。
2.4.5 ConnectInterceptor简略分析
ConnectInterceptor这个拦截器主要的作用就是负责的是与服务器的连接的建立,下面看看他的intercept()方法。
/**
 * ConnectInterceptor.java 源码 35行
 */
@Override public Response intercept(Chain chain) throws IOException {
    RealInterceptorChain realChain = (RealInterceptorChain) chain;
    Request request = realChain.request();
    StreamAllocation streamAllocation = realChain.streamAllocation();

    // We need the network to satisfy this request. Possibly for validating a conditional GET.
    boolean doExtensiveHealthChecks = !request.method().equals("GET");
   //创建输出流
    HttpCodec httpCodec = streamAllocation.newStream(client, chain, doExtensiveHealthChecks);
    //建立连接
    RealConnection connection = streamAllocation.connection();

    return realChain.proceed(request, streamAllocation, httpCodec, connection);
  }
这一个拦截器是一个比较复杂的层级,它实现了网络协议、内部的拦截器、安全性认证,连接与连接池等功能,但这一层还没有发起真正的连接,它只是做了连接器一些参数的处理。
2.4.6 CallServerInterceptor简略分析
CallServerInterceptor是整个网络请求链的最后一个拦截器,它才是真正实现了对服务器Response 的读取,然后返回回去,下面我们看看他的intercept() 方法。
 /**
  * CallServerInterceptor.java 源码40行
  */
 @Override public Response intercept(Chain chain) throws IOException {
    // 获取对象
    RealInterceptorChain realChain = (RealInterceptorChain) chain;
    HttpCodec httpCodec = realChain.httpStream();
    StreamAllocation streamAllocation = realChain.streamAllocation();
    RealConnection connection = (RealConnection) realChain.connection();
    Request request = realChain.request();

    long sentRequestMillis = System.currentTimeMillis();

    realChain.eventListener().requestHeadersStart(realChain.call());
    // 发送状态行和头部数据到服务端
    httpCodec.writeRequestHeaders(request);
    realChain.eventListener().requestHeadersEnd(realChain.call(), request);

    Response.Builder responseBuilder = null;
    // 判断是否有请求实体的请求(不是GET请求)
    if (HttpMethod.permitsRequestBody(request.method()) && request.body() != null) {
      // If there's a "Expect: 100-continue" header on the request, wait for a "HTTP/1.1 100
      // Continue" response before transmitting the request body. If we don't get that, return
      // what we did get (such as a 4xx response) without ever transmitting the request body.
      // 如果头部信息添加了"Expect: 100-continue",这个请求头字段的作用是在发送RequestBody前向服务器确认是否接受RequestBody,如果服务器不接受也就没有发送的必要了。
      // 有这个字段,相当于一次简单的握手操作,会等待拿到服务器返回的ResponseHeaders之后再继续,如果服务器接收RequestBody,会返回null。
      if ("100-continue".equalsIgnoreCase(request.header("Expect"))) {
        httpCodec.flushRequest();
        realChain.eventListener().responseHeadersStart(realChain.call());
        // 服务器返回
        responseBuilder = httpCodec.readResponseHeaders(true);
      }
      // 服务器同意接收,开始向流中写入RequestBody
      if (responseBuilder == null) {
        // Write the request body if the "Expect: 100-continue" expectation was met.
        realChain.eventListener().requestBodyStart(realChain.call());
        long contentLength = request.body().contentLength();
        CountingSink requestBodyOut =
            new CountingSink(httpCodec.createRequestBody(request, contentLength));
        BufferedSink bufferedRequestBody = Okio.buffer(requestBodyOut);
        // 写入数据
        request.body().writeTo(bufferedRequestBody);
        bufferedRequestBody.close();
        realChain.eventListener()
            .requestBodyEnd(realChain.call(), requestBodyOut.successfulCount);
      } else if (!connection.isMultiplexed()) {
        // If the "Expect: 100-continue" expectation wasn't met, prevent the HTTP/1 connection
        // from being reused. Otherwise we're still obligated to transmit the request body to
        // leave the connection in a consistent state.
        streamAllocation.noNewStreams();
      }
    }
    // 调用了sink.flush();
    httpCodec.finishRequest();
    // 读取头部信息、状态码等
    if (responseBuilder == null) {
      realChain.eventListener().responseHeadersStart(realChain.call());
      responseBuilder = httpCodec.readResponseHeaders(false);
    }
    // 构建Response, 写入原请求,握手情况,请求时间,得到的响应时间
    Response response = responseBuilder
        .request(request)
        .handshake(streamAllocation.connection().handshake())
        .sentRequestAtMillis(sentRequestMillis)
        .receivedResponseAtMillis(System.currentTimeMillis())
        .build();
    // 返回的状态码
    int code = response.code();
    if (code == 100) {// 再请求一次
      // server sent a 100-continue even though we did not request one.
      // try again to read the actual response
      responseBuilder = httpCodec.readResponseHeaders(false);

      response = responseBuilder
              .request(request)
              .handshake(streamAllocation.connection().handshake())
              .sentRequestAtMillis(sentRequestMillis)
              .receivedResponseAtMillis(System.currentTimeMillis())
              .build();

      code = response.code();
    }

    realChain.eventListener()
            .responseHeadersEnd(realChain.call(), response);

    if (forWebSocket && code == 101) {
      // Connection is upgrading, but we need to ensure interceptors see a non-null response body.
      // 设置一个空的Body
      response = response.newBuilder()
          .body(Util.EMPTY_RESPONSE)
          .build();
    } else {
      // 读取Body信息
      response = response.newBuilder()
          .body(httpCodec.openResponseBody(response))
          .build();
    }
    // 如果设置了连接关闭,则断开连接
    if ("close".equalsIgnoreCase(response.request().header("Connection"))
        || "close".equalsIgnoreCase(response.header("Connection"))) {
      streamAllocation.noNewStreams();
    }
    //HTTP 204(no content) 代表响应报文中包含若干首部和一个状态行,但是没有实体的主体内容。
    //HTTP 205(reset content) 表示响应执行成功,重置页面(Form表单),方便用户下次输入
    //这里做了同样的处理,就是抛出协议异常。
    if ((code == 204 || code == 205) && response.body().contentLength() > 0) {
      throw new ProtocolException(
          "HTTP " + code + " had non-zero Content-Length: " + response.body().contentLength());
    }

    return response;
  }
这里面的核心代码非常多下面简单描述一下大体流程:
- 获取request、httpCodec等对象。
- 通过httpCodec发送状态行和头部数据到服务端。
- 判断是否是有请求实体的请求,如果是,判断当前是否有设置Expect: 100-continue请求头。
- 往流中写入请求实体内容。
- 读取服务器返回的头部信息、状态码等,构建responseBuilder对象并返回。
- 通过responseBuilder对象来构建response对象。
- 判断当前状态码,如果是100,则重新请求一次,得到response对象。
- 给Response对象设置body。
- 判断是否需要断开连接。
2.4.7小节
上面只是初略的对拦截器进行了分析,里面还有些细节的东西,我想后面重新写一篇博客进行分析,大概会有CacheInterceptor拦截器里面用到的缓存机制,ConnectInterceptor拦截器里面的连接池机制,包括CallServerInterceptor里面的请求的详细过程。
三、番外小知识点和学习的一些总结
1 小知识点
1.1 首先谈谈源码中的两种设计模式-builder模式和责任连模式。
1.1.1 builder模式
builder模式他的适用性,主要满足下面两个场景:
- 当创建复杂对象的算法应该独立于该对象的组成部分以及它们的装配方式时。
- 当构造过程必须允许被构造的对象有不同的表示时。
Builder模式的优点
- 将一个复杂对象的构建算法与它的部件及组装方式分离,使得构建算法可以独立应对变化;
- 不同构件算法可以复用相同的部件和部件组装方式;
- 不同构件算法,可以生成不同表现的对象;
- 部件类型及其组装方式相对稳定,不随着构建算法改变而改变。
对于理论性的知识点网上有很多的博客说明这里就不过多的解释,下面通过一个建造房子的的例子来理解这个模式。
首先我们需要一个House的bean类
/**
 * 真实存在的房子
 */
public class House {

    private double height;
    private double width;
    private String color;

    public House(){

    }
    public House(double height,double width,String color){
        this.height = height;
        this.width = width;
        this.color = color;
    }
    //省略get、set和toString方法
    ...
}
然后我们需要一张House的图纸
/**
 * 房子的图纸
 */
public class HouseParam {

    private double height;
    private double width;
    private String color = "白色";

    public HouseParam(){

    }
    public HouseParam(double height,double width,String color){
        this.height = height;
        this.width = width;
        this.color = color;
    }
 //省略get、set和toString方法
 ...
}
紧接着我们需要一个工人根据图纸建造房子
/*
 * 工人
 */
public class Worker {
    //拿到图纸
    private HouseParam mHouseParam;
    public void setHouseParam(HouseParam houseParam){
        this.mHouseParam = houseParam;
    }
    //工作 盖房子
    //交互
    public House buildHouse(){
        //盖房子 实例
        House house = new House();
        house.setColor(mHouseParam.getColor());
        house.setHeight(mHouseParam.getHeight());
        house.setWidth(mHouseParam.getWidth());
        return house;
    }
}
最后我们需要一个设计师把图纸给工人建造房子
/**
 * 设计师
 */
public class DesignPerson {

    //画图纸
    private HouseParam mHouseParam;

    //员工
    private Worker mWorker;

    public DesignPerson(){
        mHouseParam = new HouseParam();
        mWorker = new Worker();
    }

    /**
     *增加楼层 -- 画图纸过程
     *
     * @param height
     * @return
     */
    public DesignPerson addHight(double height){
        mHouseParam.setHeight(height);
        return this;
    }

    /**
     * 增加面积 -- 画图纸过程
     *
     * @param width
     * @return
     */
    public DesignPerson addWidth(double width){
        mHouseParam.setWidth(width);
        return this;
    }

    public DesignPerson addColor(String color){
        mHouseParam.setColor(color);
        return this;
    }
    /**
     * 把图纸给工人
     * 员工说房子盖好了
     *
     * @return
     */
    public House build(){
        mWorker.setHouseParam(mHouseParam);
        return mWorker.buildHouse();
    }
}
这个模式的大体思路就是面例子的实现过程,在okhttp中OkHttpClient和Request的构建基于构造方法的复杂性,和链式调用的使用方便性,采用了Builder模式,另外Android源码中的AlertDialog就是采用了BUilder模式,实则可以根据不同的建造策略实现不同的Dialog。
1.1.2责任链模式
责任链模式的适用场景
- 多个对象可以处理同一个请求,但具体由哪个对象处理则在运行时动态决定。
- 在请求处理者不明确的情况下向对个对象中的一个提交一个请求。
- 需要动态处理一组对象处理请求。
对于责任链模式的基础知识点网上也有很多博客或者经典的设计模式的书籍都有详细的介绍,在这里我还是通过一个例子来实现一个简易的责任链:
首先我们需要为每个链条定义一个公有的接口,来执行真正的操作:
public interface IBaseTask {
    /**
     *
     * @param isTask 任务节点是否有能力执行
     * @param iBaseTask 下一个任务节点
     */
    public void doRunAction(String isTask,IBaseTask iBaseTask);
}
然后我们实例化几个链节点:
/*节点一*/
public class Task1 implements IBaseTask{
    @Override
    public void doRunAction(String isTask, IBaseTask iBaseTask) {
        if("no".equals(isTask)){
            System.out.println("拦截器 任务节点一处理了...");
            return;
        }else {
            //继续执行下一个链条的任务节点
            iBaseTask.doRunAction(isTask,iBaseTask);
        }
    }
}

/*节点二*/
public class Task2 implements IBaseTask{
    @Override
    public void doRunAction(String isTask, IBaseTask iBaseTask) {
        if("ok".equals(isTask)){
            System.out.println("拦截器 任务节点二 处理了...");
            return;
        }else {
            //继续执行下一个链条的节点
            iBaseTask.doRunAction(isTask,iBaseTask);
        }
    }
}

/*节点三*/
public class Task3 implements IBaseTask{
    @Override
    public void doRunAction(String isTask, IBaseTask iBaseTask) {
        if("no".equals(isTask)){
            System.out.println("拦截器 任务节点三 处理了");
        }else {
            //继续执行下一个链条的任务节点
            iBaseTask.doRunAction(isTask,iBaseTask);
        }
    }
}
最后我们需要一个管理类来把这个链条串起来
public class ChainManager implements IBaseTask{

    private List<IBaseTask> mIBaseTaskList = new ArrayList<>();

    public void addTask(IBaseTask iBaseTask){
        mIBaseTaskList.add(iBaseTask);
    }
    private int index = 0;
    @Override
    public void doRunAction(String isTask, IBaseTask iBaseTask) {
        if(mIBaseTaskList.isEmpty()){
            //todo 抛出异常
            return;
        }

        if(index == mIBaseTaskList.size() || index >mIBaseTaskList.size()){
            return;
        }
        IBaseTask iBaseTaskResult = mIBaseTaskList.get(index);
        //能调用下一个链条
        index++;
        iBaseTaskResult.doRunAction(isTask,iBaseTask);
    }
}
在这里我们通过一个List把每一个节点都存起来连成一条链,然后通过类似于遍历的形式去执行每个节点,但是可能被摸个节点给截获,执行不到下一个节点。
下面看看测试案例:
public static void main(String[] args) {
        ChainManager chainManager = new ChainManager();
        chainManager.addTask(new Task1());
        chainManager.addTask(new Task2());
        chainManager.addTask(new Task3());
        chainManager.doRunAction("ok",chainManager);
    }
其实责任链的使用很广泛的的,除了okhttp的拦截器使用到,例如还有SpringMVC的责任链注解,netty中的pipeline,android源码中的事件分发也是用到了责任链模式。
1.2 然后说说关于网络相关的知识点
这里主要谈谈http/https相关和网络优化相关的一些知识点。
1.2.1 http/https
首先看okhttp支持的http协议版本:
 /**
  * OkHttpClient.java 源码128行
  */
 static final List<Protocol> DEFAULT_PROTOCOLS = Util.immutableList(
      Protocol.HTTP_2, Protocol.HTTP_1_1);
这里默认支持的是http1.1和http2,下面我们看看他还支持什么协议。
 /**
  * Protocol.java 源码85行
  */
 public static Protocol get(String protocol) throws IOException {
    // Unroll the loop over values() to save an allocation.
    if (protocol.equals(HTTP_1_0.protocol)) return HTTP_1_0;
    if (protocol.equals(HTTP_1_1.protocol)) return HTTP_1_1;
    if (protocol.equals(HTTP_2.protocol)) return HTTP_2;
    if (protocol.equals(SPDY_3.protocol)) return SPDY_3;
    if (protocol.equals(QUIC.protocol)) return QUIC;
    throw new IOException("Unexpected protocol: " + protocol);
  }
可以看出okhttp还支持http1.0、SPDY和QUIC三个协议。后面两个协议是谷歌推推行的Web通信协议这里不做介绍。
下面介绍http三个版本的差异:
- HTTP/1.0:1996年,HTTP/1.0 版本发布,可以传输文字,图像、视频、二进制文件,它的特点是每次请求都需要建立一个单独的TCP连接,发送数据完毕,连接就关闭,如果还要请求其他资源,就必须再新建一个连接,上一次请求和下一次请求完全分离,这种非持续连接过程又叫做短连接。它的特点也是它的缺点,客户端和服务端每次请求都要建立TCP连接,而建立TCP连接和关闭TCP连接都是相对比较费时的过程,严重影响客户端和服务端的性能。
- HTTP/1.1:1997年,HTTP/1.1 版本发布,1999年广泛应用于各大浏览器网络请求中,直到现在HTTP/1.1也是使用最为广泛的HTTP协议,它进一步完善了HTTP/1.0,HTTP/1.1支持在一个TCP连接上传送多个HTTP请求和响应,即一个TCP连接可以被多个请求复用,减少了建立和关闭连接的消耗延迟,一定程度上弥补了HTTP/1.0每次请求都要创建连接的缺点,这种持续连接过程又叫做长连接,HTTP/1.1默认使用长连接。
- HTTP/2.0:2015年,HTTP/2 .0版本发布,前面的两个版本都是基于超文本的协议,HTTP 2.0把基于超文本的协议改成了基于二进制的,把HTTP请求和响应变成数据帧,这样易于实现多路复用,在一个TCP连接上可以同时“混合”发送多个HTTP的请求和响应,效率大大提高。
HTTPS的原理 Https其实就等于HTTP+加密+完整性保护+认证的方法解,在HTTP的应用层与运输层之间加了一层SSL/TLS。
- 加密:
1、首先服务端通过非对称加密算法生成一对密钥:公钥和私钥; 2、服务端把公钥发送给客户端,私钥自己保存; 3、客户端收到公钥后,利用公钥对对称加密使用的密钥S进行加密得到T,然后再发送给服务端; 4、服务端收到T后,利用私钥解密T,得到密钥S; 5、这样客户端和服务端都拥有了对称加密使用的密钥S,在之后的通信过程中就使用对称加密进行。
- 完整性保护(采用数字签名)
1、服务端在发送报文之前,先用散列值生成算法生成报文的消息摘要,然后再用私钥加密消息摘要生成数字签名,把数字签名与报文一起发送给客户端; 2、客户端接收到报文和数字签名后,先用相同的散列值生成算法重新计算报文的消息摘要,然后再用公钥解密数字签名得到报文的消息摘要,然后比较两份消息摘要是否相同,如果相同,说明报文在中途没有被篡改过,否则被篡改过;
-身份认证(采用数字证书)
1、服务端的运营人员向CA提交自己的公钥、组织信息、域名等信息,然后CA会通过各种渠道、各种手段来判断服务端的身份是否真实,是否合法等(在这里就可以杜绝中间人非法申请证书); 2、服务端的身份审核通过后,CA就会把服务端的公钥和证书的其他信息通过散列值算法生成一个消息摘要,然后用CA的私钥对消息摘要进行签名生成数字签名,然后把数字签名放入证书中,然后把这个证书颁发给服务端,所以数字证书最终包含服务端公钥 + 证书的数字签名 + 证书的其他信息。 3、现在服务端拿到了数字证书,客户端第一次请求服务端时,服务端就会把这个数字证书发送给客户端,客户端收到数字证书后,就会用CA的公钥对数字证书进行数字签名的验证,如果验证通过,说明数字证书中途没有被篡改过,是可靠的,从而知道数字证书中的公钥也是可靠的,所以客户端就放心的取出数字证书中的公钥进行以后的HTTPS通信。 4、在对数字证书的数字签名进行验证之前,必须先知道CA的公钥,因为数字证书的数字签名是由CA的私钥进行签名的,所以CA的公钥必须安全的转交给客户端,如何安全的转交又是一个困难的问题,所以,大多数浏览器开发商发布版本时,会事先在内部植入常用的CA机构的根证书, 这些根证书中会包含CA的公钥,也就是说CA的公钥已经内置在浏览器中了。
在okHttp中Http的连接采用的是Socket,而Https的连接采用的是SSLSocket(RealConnection.java类中)
1.2.2 网络优化
网络优化的方面也是一个难点,这里我看了一下百度公开的一个网络架构图如下:

可以看出他的核心是okhttp,然后对其进行了一系列的封装,主要包括如下几个方面。
- DNS优化
容灾策略、安全策略、任务调度策略、IP选择策略、缓存策略、命中策略,具体的可以看百度App网络深度优化系列《1》
- 连接优化
连接优化主要分两类:一类是TLS的连接优化,一类是TCP的连接优化。具体的可以看百度App网络深度优化系列《2》
- 弱网优化
百度APP主要是参照一系列参数指标通过网络探测来进行对比,进而确定是否为弱网,然后根据一系列情况对应的调度策略来进行网络通信。具体的可以看百度App网络深度优化系列《3》
关于网络优化的相关问题还可以参照微信开源的Mars框架,我在这个方面也是个小白,后面如果有机会,可以去深入的研究。
2 学习总结
这是建站以来写的第一篇文章,这是个开始但不会是一个结束。在写这篇文章的时候我认真的去阅读了okhttp的源码,也看了很多优秀的博客,即便如此我觉得我还是okhttp的设计精髓不能完全的吃透,例如一些设计上的小细节这些性能优化,异常处理等这些。包括他的几个拦截器,设计的非常巧妙,要理解里面的细节需要基础知识非常扎实,如对http/https协议的深刻理解,这些都是我现在所欠缺的。我写这篇文章的逻辑就是,在分析okhttp的运作的主干流程上向外部延伸分支知识点,包括他用到的设计模式,http的相关基础-重定向、缓存机制,https的加密解密机制-SSL/TLS,还有DNS的一些东西,但是发现要是把这么多的知识点写在这里面太臃肿了,等后面有机会来分模块的写这些方面的博客。另外在写这篇文章的时候,我也认识到了一些问题,例如:OkHttpClient的源码中有这么一段代码 connectTimeout = 10_000;最先我也猜到了"10_000"就是100000的意思,后来我去查了这是java7的新增加的一个特性,现在想想以前学习java的时候应该是5(2004年发布的)或者6(2006年发布的)的阶段,而去年12月份java 13都发布了。所以接下来还得去把遗漏下来的知识点补上,例如现在我使用的java8中的Lambda表达式和函数式接口等新特性,另外还有如java 9可以支持交互式编程 JShell等等。
四 参考资料
- juejin.cn/post/684490…
- juejin.cn/post/684490…
- www.jianshu.com/p/30400d059…
- juejin.cn/post/684490…
- 《Head first设计模式》
- 《大华设计模式》
原文地址(我的个人博客):浅谈okhttp源码及相关的小知识点
