

mybatis中的插件,也就是拦截器interceptor,也挺有意思的。
它的简单使用,就直接拿文档中的示例来简单说下
一、使用
使用方式很简单
Copy// 使用这个注解,表明这是一个拦截器
@Intercepts(
  // 方法签名
  {@Signature(
     // 被拦截方法所在的类
     type= Executor.class,
     // 被拦截方法名
     method = "update",
     // 被拦截方法参数列表类型
     args = {MappedStatement.class ,Object.class})}
)
 public class ExamplePlugin implements Interceptor {
     // 拦截时具体行为
     @Override
     public Object intercept(Invocation invocation) throws Throwable {
       // implement pre-processing if needed
       Object returnObject = invocation.proceed();
       // implement post-processing if needed
       return returnObject;
     }
 }
然后如果是xml配置的话
Copy<plugins>
  <plugin interceptor="org.mybatis.example.ExamplePlugin">
    <property name="someProperty" value="100"/>
  </plugin>
</plugins>
如果是 SpringBoot的话,应该是配合自动配置使用,将上面的类使用@Component注解,交由Spring容器管理,然后注册到mybatis的InterceptorChain
mybaits目前支持拦截的类和方法,有下面这些
- Executor (update, query, flushStatements, commit, rollback, getTransaction, close, isClosed)
- StatementHandler (prepare, parameterize, batch, update, query)
- ParameterHandler (getParameterObject, setParameters)
- ResultsetHandle (handleResultSets, handleOutputParameters)
二、实现原理
有可能从上面的使用猜出来它的拦截器的实现原理,那就是动态代理的方式,只不过mybatis这里并不是很直接的来使用代理,绕了个弯,于是给人感觉特别晕,也说不好这个实现是不是有些问题
就先从Executor说起吧
我们从SqlSessionFactory获取一个SqlSession时,会创建一个新的Executor实例,这个实际的创建动作在这里
org.apache.ibatis.session.Configuration#newExecutor
Copypublic Executor newExecutor(Transaction transaction, ExecutorType executorType) {
  // 根据设置的执行器类型,创建相应类型的执行器
  executorType = executorType == null ? defaultExecutorType : executorType;
  executorType = executorType == null ? ExecutorType.SIMPLE : executorType;
  Executor executor;
  if (ExecutorType.BATCH == executorType) {
    executor = new BatchExecutor(this, transaction);
  } else if (ExecutorType.REUSE == executorType) {
    executor = new ReuseExecutor(this, transaction);
  } else {
    executor = new SimpleExecutor(this, transaction);
  }
  // 如果开启了缓存,使用缓存,这里缓存执行器有点类似静态代理了
  if (cacheEnabled) {
    executor = new CachingExecutor(executor);
  }
  // 将原始执行器对象,包装下,生成一个新的执行器,代理后的对象
  executor = (Executor) interceptorChain.pluginAll(executor);
  return executor;
}
InterceptorChain是一个管家,有点类似于FilterChain,但是注意,其实差别非常的大
Copypublic class InterceptorChain {
	// 所有拦截器列表
  private final List<Interceptor> interceptors = new ArrayList<>();

  // 这里可能会是层层代理对象,一套又一套的,具体取决于拦截器的个数和被拦截的
  // 方法所在的类
  // 配置的拦截器数和每一次代理对象生成次数并不相同,会小于等于拦截器的个数
  public Object pluginAll(Object target) {
    for (Interceptor interceptor : interceptors) {
      target = interceptor.plugin(target);
    }
    // 返回最后一次创建的代理对象
    return target;
  }
  // 注册拦截器的
  public void addInterceptor(Interceptor interceptor) {
    interceptors.add(interceptor);
  }
}
Interceptor是一个接口,也就是mybatis直接暴露给用户使用的需要用户实现的拦截器接口
Copypublic interface Interceptor {
   // 实现类填充自己的逻辑,参数为Invocation,
  Object intercept(Invocation invocation) throws Throwable;

   // 默认方法,创建代理对象
  default Object plugin(Object target) {
    return Plugin.wrap(target, this);
  }
   // 实现类去做些事情
  default void setProperties(Properties properties) {
    // NOP
  }

}
着重看下一这个
Copy// 首先这是一个Jdk动态代理的InvocationHandler实现类
public class Plugin implements InvocationHandler {

  private final Object target;
  private final Interceptor interceptor;
  private final Map<Class<?>, Set<Method>> signatureMap;

  private Plugin(Object target, Interceptor interceptor, Map<Class<?>, Set<Method>> signatureMap) {
    this.target = target;
    this.interceptor = interceptor;
    this.signatureMap = signatureMap;
  }
  // 静态方法,用来直接创建代理对象
  public static Object wrap(Object target, Interceptor interceptor) {
    // 获取当前拦截器需要被拦截的所有的方法
    Map<Class<?>, Set<Method>> signatureMap = getSignatureMap(interceptor);
    // 获取被代理对象的Class
    Class<?> type = target.getClass();
    // 把被代理对象所有能在签名Map中找到的直接实现的接口和祖先接口,查找出来
    Class<?>[] interfaces = getAllInterfaces(type, signatureMap);
    // 找到了就创建代理对象
    if (interfaces.length > 0) {
      return Proxy.newProxyInstance(
          type.getClassLoader(),
          interfaces,
          // 创建一个InvocationHandler实例
          new Plugin(target, interceptor, signatureMap));
    }
    // 没找到 就返回
    // 这个对象不一定说一个未经代理过的对象,也可能是代理过的
    return target;
  }

  // 当调用这个代理对象的任何方法时,调用此方法
  @Override
  public Object invoke(Object proxy, Method method, Object[] args) throws Throwable {
    try {
      // 首先找下当前被调用的这个方法所在的类,被拦截的所有的方法
      Set<Method> methods = signatureMap.get(method.getDeclaringClass());
      if (methods != null && methods.contains(method)) {
        // 如果当前被调用的方法是需要被拦截的,那么就执行我们自定义的拦截逻辑
        // interceptor是我们自定义的拦截器,在我们自定义的拦截器里,需要获取到
        // 原委托对象,被调用的方法,以及参数,这里做了很好的封装,将用户的使用和
        // 具体的实现,做了一个完全的分离,用户感知不到任何具体的实现
        // Invocation#proceed 就做了一件事 method.invoke(target,args);
        return interceptor.intercept(new Invocation(target, method, args));
      }
      // 如果当前被调用的方法没有被拦截,那么直接调用原方法
      return method.invoke(target, args);
    } catch (Exception e) {
      throw ExceptionUtil.unwrapThrowable(e);
    }
  }

  // 获取拦截器指定的被拦截方法的方法签名
  // key是被拦截方法的返回值类型
  private static Map<Class<?>, Set<Method>> getSignatureMap(Interceptor interceptor) {
    // 获取注解 @Intercepts信息
    Intercepts interceptsAnnotation = interceptor.getClass().getAnnotation(Intercepts.class);
    // issue #251 避免出现没有具体的拦截信息的情况
    if (interceptsAnnotation == null) {
      throw new PluginException("No @Intercepts annotation was found in interceptor " + interceptor.getClass().getName());
    }
    // 获取配置的被拦截方法的签名信息
    Signature[] sigs = interceptsAnnotation.value();
    Map<Class<?>, Set<Method>> signatureMap = new HashMap<>();
    // 统统放到Map
    for (Signature sig : sigs) {
      Set<Method> methods = signatureMap.computeIfAbsent(sig.type(), k -> new HashSet<>());
      try {
        // 将定义构建成实际的Method对象
        Method method = sig.type().getMethod(sig.method(), sig.args());
        methods.add(method);
      } catch (NoSuchMethodException e) {
        throw new PluginException("Could not find method on " + sig.type() + " named " + sig.method() + ". Cause: " + e, e);
      }
    }
    return signatureMap;
  }
  // 获取被代理对象所有的接口信息
  private static Class<?>[] getAllInterfaces(Class<?> type, Map<Class<?>, Set<Method>> signatureMap) {
    Set<Class<?>> interfaces = new HashSet<>();
    while (type != null) {
      for (Class<?> c : type.getInterfaces()) {
        if (signatureMap.containsKey(c)) {
          // 如果被代理类接口和返回值类型一致,接口加进来
          interfaces.add(c);
        }
      }
      // 找到被代理类的父类,然后继续查找接口信息
      type = type.getSuperclass();
    }
    return interfaces.toArray(new Class<?>[interfaces.size()]);
  }
}
到这里就说完了mybatis插件的实现原理
整体实现其实也很简单,我们想给那个类的哪个方法拦截一下,把实现拦截器,然后配置下要拦截的信息,之后mybatis给我们生成一个动态代理对象,就可以了。
下面我们以具体案例来更加深刻的认识理解其实现原理
三、加强理解
我们使用具体的案例,来走一遍
1. Case 1
①. 单拦截器单拦截方法
Copy@Intercepts(
  {@Signature(
     type= Executor.class,
     method = "update",
     args = {MappedStatement.class ,Object.class})}
)
 public class ExamplePlugin implements Interceptor {
     @Override
     public Object intercept(Invocation invocation) throws Throwable {
       System.out.println("before execute update");
       Object returnObject = invocation.proceed();
       System.out.println("after  execute update");
       return returnObject;
     }
 }
假设目前我们就设置了这么一个拦截器
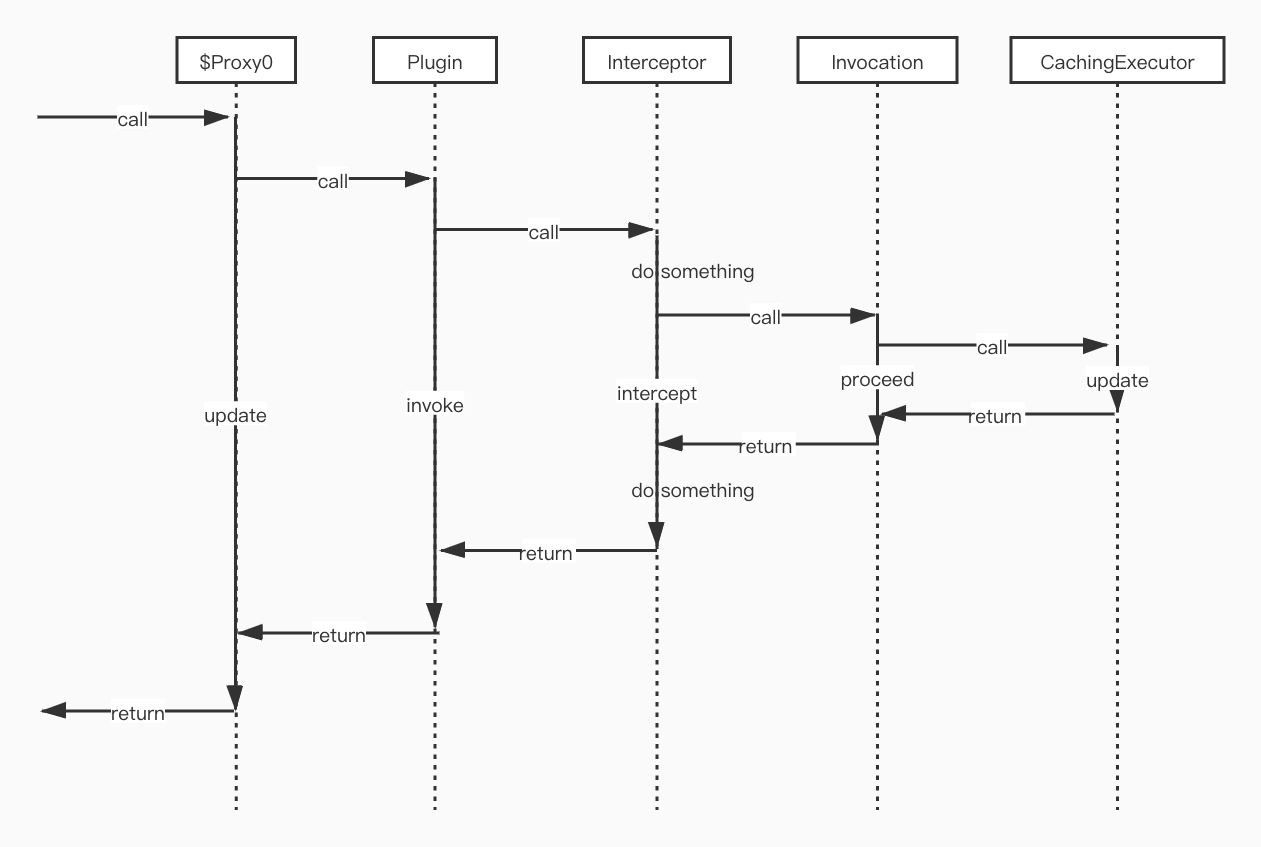
那么就会生成一个CachingExecutor的代理对象,我们假设代理对象的全限定名是com.sun.proxy.$Proxy0,并且这个对象对象是implements Executor的
这时调用代理对象的update方法调用栈如下
2. Case 2
①. 单拦截器多拦截方法
假设有个需求需要给StatementHandler的update增加点一样的拦截逻辑
Copy@Intercepts(
  {@Signature(
     type= Executor.class,
     method = "update",
     args = {MappedStatement.class ,Object.class})},
  {@Signature(
     type= StatementHandler.class,
     method = "update",
     args = {Statement.class})}
)
 public class ExamplePlugin implements Interceptor {
     @Override
     public Object intercept(Invocation invocation) throws Throwable {
       System.out.println("before execute update");
       Object returnObject = invocation.proceed();
       System.out.println("after  execute update");
       return returnObject;
     }
 }
同样是获取执行器的逻辑,这个时候我们得到的代理后的对象不会是同时实现了Executor 和StatementHandler接口的,只能实现Executor接口,因为这个
Copy// 这个时候type为 CachingExecutor
private static Class<?>[] getAllInterfaces(Class<?> type, Map<Class<?>, Set<Method>> signatureMap) {
  Set<Class<?>> interfaces = new HashSet<>();
  while (type != null) {
    // type的接口Executor显然是在Map中的
    for (Class<?> c : type.getInterfaces()) {
      // 仅允许对接口为Executor的实例做代理,因为代理后的类一定得是一个Executor的实现类
      if (signatureMap.containsKey(c)) {
        interfaces.add(c);
      }
    }
    type = type.getSuperclass();
  }
  // 最终也就只能找到Executor这么一个接口了
  return interfaces.toArray(new Class<?>[interfaces.size()]);
}
这种情况下就和上面一样了
区别在于,如果我们需要创建一个StatementHandler的实例时,代理对象就会变成StatementHandler的实现类实例了
Copypublic StatementHandler newStatementHandler(Executor executor, MappedStatement mappedStatement, Object parameterObject, RowBounds rowBounds, ResultHandler resultHandler, BoundSql boundSql) {
  StatementHandler statementHandler = new RoutingStatementHandler(executor, mappedStatement, parameterObject, rowBounds, resultHandler, boundSql);
  // 被拦截器增强后的代理对象StatementHandler
  statementHandler = (StatementHandler) interceptorChain.pluginAll(statementHandler);
  return statementHandler;
}
3. Case 3
多拦截器单拦截方法
如果有多个拦截器呢?
Copy@Intercepts(
  {@Signature(
     type= Executor.class,
     method = "update",
     args = {MappedStatement.class ,Object.class})}
)
 public class ExamplePluginA implements Interceptor {
     @Override
     public Object intercept(Invocation invocation) throws Throwable {
       System.out.println("before execute update");
       Object returnObject = invocation.proceed();
       System.out.println("after  execute update");
       return returnObject;
     }
 }

@Intercepts(
  {@Signature(
     type= Executor.class,
     method = "flushStatements",
     args = {})}
)
 public class ExamplePluginB implements Interceptor {
     @Override
     public Object intercept(Invocation invocation) throws Throwable {
       System.out.println("before execute flushStatements");
       Object returnObject = invocation.proceed();
       System.out.println("after  execute flushStatements");
       return returnObject;
     }
 }
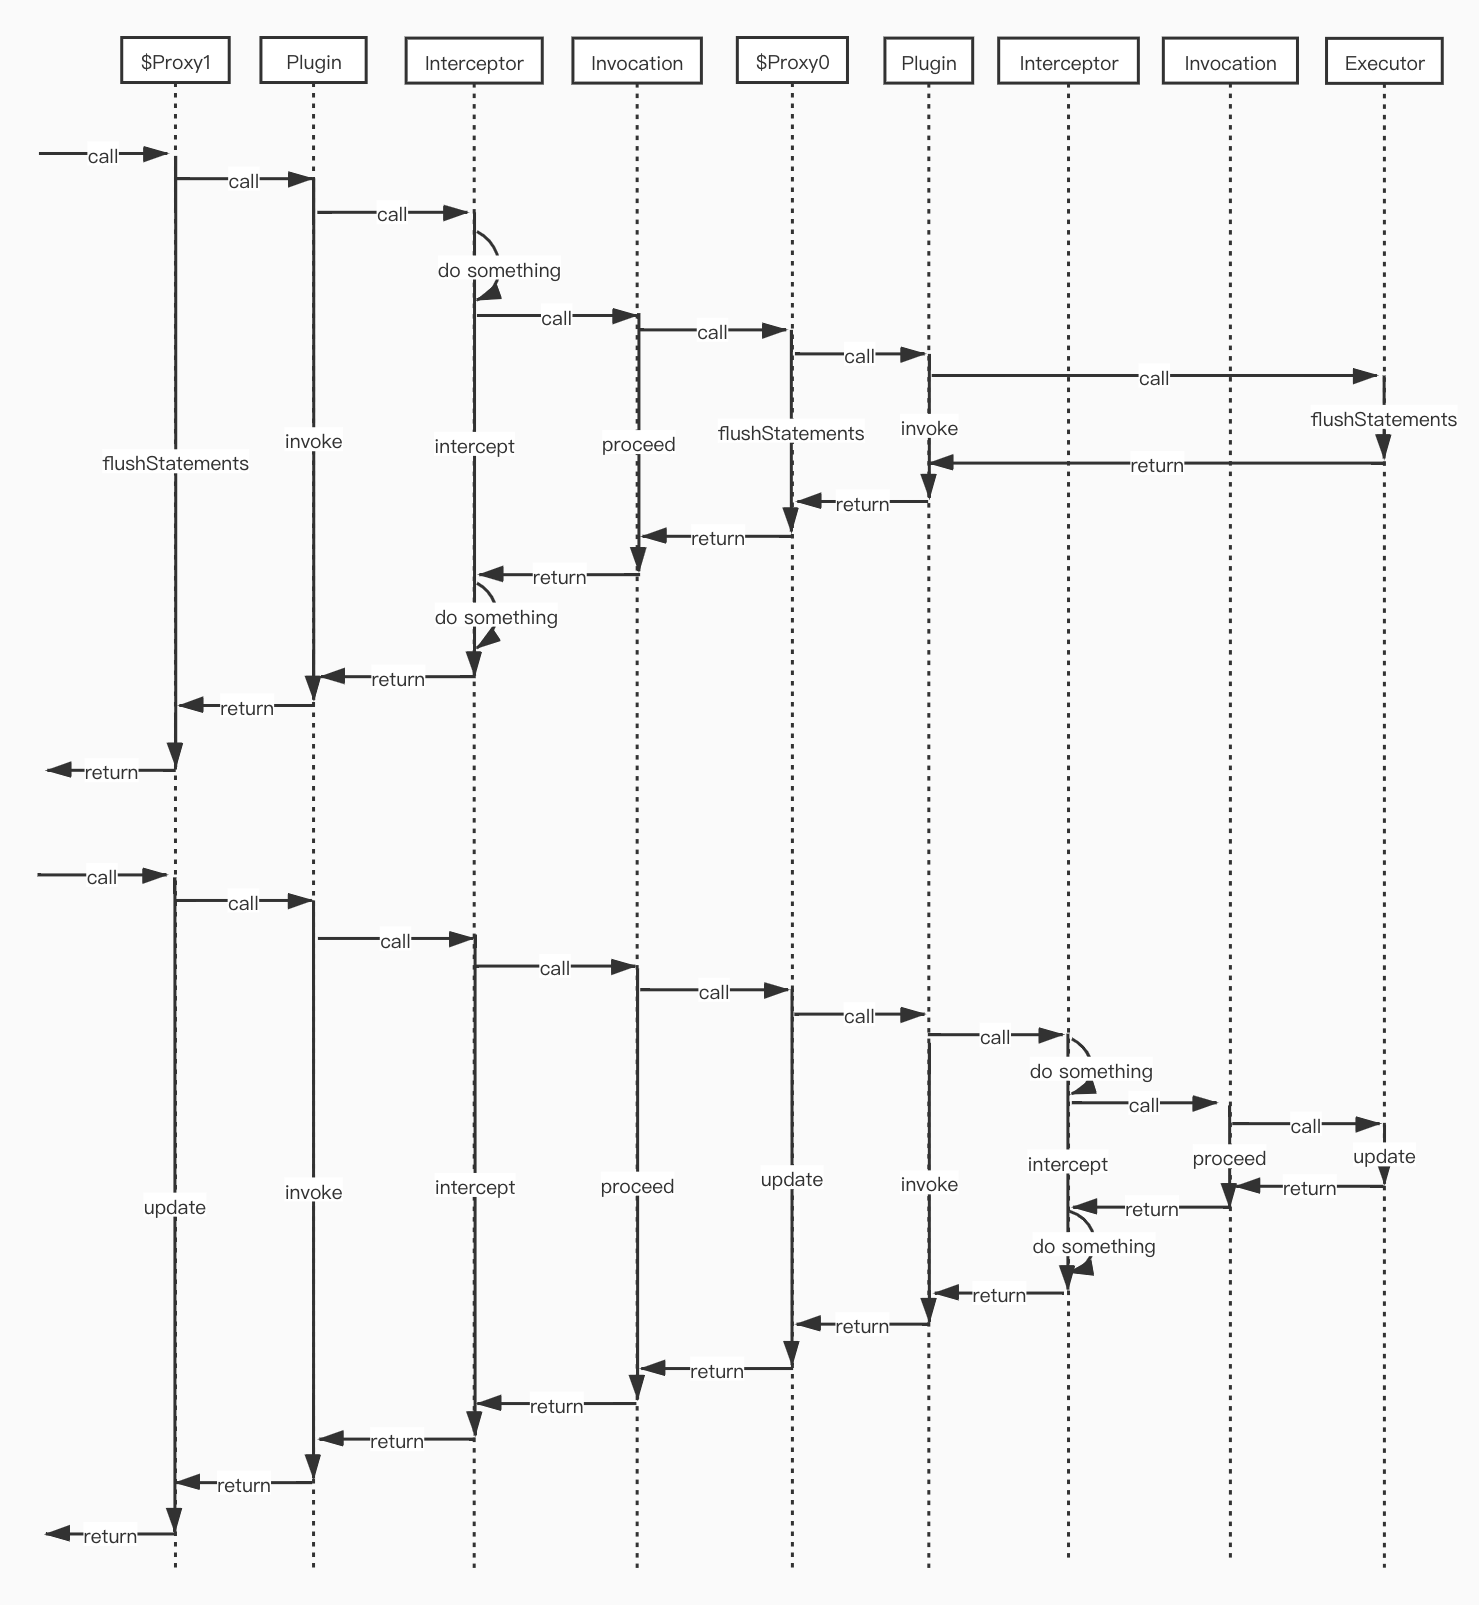
上面有两个拦截器,会出现代理对象成为委托对象的情况,也就是对一个已经是代理对象的对象,再去为它生成代理对象。
假设一开始生成了一个代理类类名为$Proxy0,在InterceptorChain#pluginAll方法中,会将这个代理类作为委托类继续生成一个新的代理类,第一个代理类会执行ExamplePluginA拦截逻辑,第二个代理类会执行ExamplePluginB的拦截逻辑。
从pluginAll方法中可以看到,位于拦截器链末尾的,也可以说是最后被创建的那个代理类,是最先被调用的,因为实际返回给客户端使用的,就是它。
假设第二个代理类类名为$Proxy1,那么看一下这种情况下方法的调用栈是啥样的
四、总结
这里主要说一下mybatis为什么这样实现?
-
为什么不采用过滤器链的实现方式?
过滤器链的方式,在这里并不怎么适用,虽然也许可以,个人观点觉得,过滤器链更多的是用于
过滤,它是对调用请求进行条件判断,是否满足某种条件进而是否具备某个继续执行的权限。它决定的是,调用是否可以继续进行下去。而拦截器,更多的是拦截调用请求,对拦截后的请求做一些额外的附加逻辑,代理其实就是这种方式,它是一种对原有逻辑的增强,不会改变最初调用的目的地,无论做了多少层的拦截处理,最终都会到达它的目的地(发生异常除外)
如果用过滤器,需要多个过滤器链,并且每个类中都需要持有对其过滤器链的引用等等,用我浅薄的知识稍微想了下,并非不可,实而太麻烦了。最优选择还是动态代理。
-
为什么要做封装?
回想一下我们直接使用Jdk的动态代理,自己动手实现
InvocationHandler,写完就没了,也就是说就做了一次增强。但是这里情况更加复杂,可能有多个类的多个方法需要被增强,以
Executor为例,如果我们每个方法都要增强,并且每个方法的增强逻辑都不一样,而实际上,最终也只生成一个代理对象,那我们就要在一个InvocationHandler的invoke方法中,大量的if-else判断(这里也可以优化if-else),当前调用的是哪个方法,应该执行什么样的逻辑。这样在实现上是没问题的,只不过对一个框架来说,易用性也是强有力的吸引力、竞争力。如果这些不优雅的或者用户实现起来比较麻烦的事,框架都给封装好,简单易用,那么肯定会更加受欢迎,这肯定也会是一个好的框架
