

上一篇文章了解了Service启动流程,本文接着分析Service绑定流程
服务绑定,使用AIDL进程间通信
- 这里不会过多的深究AIDL进程通信底层原理,而是通过简单Demo开启一个新的进程远程服务与Activity绑定来简单回顾 bindService 方式Service绑定。
编写AIDL文件,定义获取远程服务数据接口
- 远程服务接口描述
// IRemoteService.aidl
package mao.com.testaidl;
//注意引用的包名需要与 对应类路径一致
import mao.com.testaidl.Data;
// Declare any non-default types here with import statements

interface IRemoteService {
    /**
     * Demonstrates some basic types that you can use as parameters
     * and return values in AIDL.
     */
    int getPid();
    Data getData();
}
- 传输的自定义数据AIDL文件
// Data.aidl 注意包名路径
package mao.com.testaidl;

//定义 数据声明
parcelable Data;
远程服务
- 要开启一个进程运行,首先要在清单文件添加 process属性
<!--服务在新的进程中启动-->
        <service android:name=".RemoteService"
            />
- RemoteService 远程服务
/**
 * @author maoqitian
 * @Description: 远程服务
 */
public class RemoteService extends Service {

    private static final String TAG = "RemoteService";
    Data mData;

    @Nullable
    @Override
    public IBinder onBind(Intent intent) {
        Log.i(TAG, "[RemoteService] onBind");
        return mBinder;
    }

    @Override
    public boolean onUnbind(Intent intent) {
        return super.onUnbind(intent);
    }

    @Override
    public void onCreate() {
        super.onCreate();
        Log.i(TAG, "[RemoteService] onCreate");
        initData();
    }

    @Override
    public void onDestroy() {
        super.onDestroy();
        Log.i(TAG, "[RemoteService] onDestroy");
    }


    /** * 初始化Data数据 **/
    private void initData() {
        mData = new Data();
        mData.setData1(10);
        mData.setData2("远程服务返回数据");
    }

    /**实现IRemoteService.aidl中定义的方法 */

    IRemoteService.Stub mBinder = new IRemoteService.Stub() {

        @Override
        public int getPid() throws RemoteException {
            return android.os.Process.myPid();
        }
        //返回客户端需要获取的数据
        @Override
        public Data getData() throws RemoteException {
            return mData;
        }
        //该实现可以设置权限
        @Override
        public boolean onTransact(int code, Parcel data, Parcel reply, int flags) throws RemoteException {
            return super.onTransact(code, data, reply, flags);
        }
    };
}
Client 端绑定服务,实现ServiceConnection 接口
- 实现ServiceConnection 接口
//监听服务连接状态
    private ServiceConnection serviceConnection =new ServiceConnection() {
        @Override
        public void onServiceConnected(ComponentName name, IBinder service) {

            mRemoteService = IRemoteService.Stub.asInterface(service);
            String pidInfo = null;
            try {
                Data data = mRemoteService.getData();
                pidInfo = "pid="+ mRemoteService.getPid() +
                        ", data1 = "+ data.getData1() +
                        ", data2="+ data.getData2();
            } catch (RemoteException e) {
                e.printStackTrace();
            }
            Log.i(TAG, "[ClientActivity] ServiceConnection");
            Log.i(TAG, "绑定服务组件获取的远程服务数据:"+pidInfo);
            mCallBackTv.setText(pidInfo);
        }

        @Override
        public void onServiceDisconnected(ComponentName name) {
            Log.i(TAG, "[ClientActivity] onServiceDisconnected");
            mCallBackTv.setText("onServiceDisconnected");
            mRemoteService = null;
        }
    };
- 绑定服务
Log.i(TAG, "[ClientActivity] bindRemoteService");
Intent intent = new Intent(MainActivity.this, RemoteService.class);
bindService(intent, serviceConnection, Context.BIND_AUTO_CREATE);
- Demo 最终运行日志
2020-04-27 11:37:18.023 26445-26445/mao.com.testaidl I/ClientActivity: [ClientActivity] bindRemoteService
2020-04-27 11:37:18.204 26575-26575/? I/RemoteService: [RemoteService] onCreate
2020-04-27 11:37:18.205 26575-26575/? I/RemoteService: [RemoteService] onBind
2020-04-27 11:37:18.209 26445-26445/mao.com.testaidl I/ClientActivity: [ClientActivity] ServiceConnection
2020-04-27 11:37:18.210 26445-26445/mao.com.testaidl I/ClientActivity: 绑定服务组件获取的远程服务数据:pid=26575, data1 = 10, data2=远程服务返回数据
Activity 绑定服务到 ActivityManagerService 过程
- 经过上一小节的例子,根据打印结果,通过源码探究服务绑定过程。还是从Activity的 bindService 方法开始
frameworks/base/core/java/android/content/ContextWrapper.java
@Override
    public boolean bindService(Intent service, ServiceConnection conn,
            int flags) {
        return mBase.bindService(service, conn, flags);//1
    }
- 由以上源码注释1,通过上一篇文章深入理解Android 之Service启动流程第一小节分析,mBase指向的就是 ContextImpl 对象,接着看到它的bindService方法
frameworks/base/core/java/android/app/ContextImpl.java
@Override
    public boolean bindService(Intent service, ServiceConnection conn, int flags) {
        warnIfCallingFromSystemProcess();
        return bindServiceCommon(service, conn, flags, null, mMainThread.getHandler(), null,
                getUser());//1
    }

    private boolean bindServiceCommon(Intent service, ServiceConnection conn, int flags,
            String instanceName, Handler handler, Executor executor, UserHandle user) {
        // Keep this in sync with DevicePolicyManager.bindDeviceAdminServiceAsUser.
        IServiceConnection sd; //2

        ......

        if (mPackageInfo != null) {
            if (executor != null) {
                sd = mPackageInfo.getServiceDispatcher(conn, getOuterContext(), executor, flags);
            } else {
                sd = mPackageInfo.getServiceDispatcher(conn, getOuterContext(), handler, flags);//3
            }
        } else {
            .....
        }
        validateServiceIntent(service);
        try {
            .....
            service.prepareToLeaveProcess(this);
            int res = ActivityManager.getService().bindIsolatedService(
                mMainThread.getApplicationThread(), getActivityToken(), service,
                service.resolveTypeIfNeeded(getContentResolver()),
                sd, flags, instanceName, getOpPackageName(), user.getIdentifier());//4
            .....
            return res != 0;
        } catch (RemoteException e) {
            throw e.rethrowFromSystemServer();
        }
    }
- 由以上源码注释2和注释3,分为以下几点
- 首先声明了IServiceConnection对象,通过ContextImpl的LoadApk类型的mPackageInfo对象来封装获取IServiceConnection对象,由前面注释1处得知executor对象传入为null,所以调用的是注释2;
- 在构造IServiceConnection时,首先传入了开始绑定服务的ServiceConnection接口引用,其次是ContextImpl的mOuterContext,它是Context类型,指向的就是当前需要绑定服务的Activity组件;其次的一个参数为
- 其次第三个参数为Handler对象,它指向就是ActivityThread中代表应用程序主线程的H对象,方便后续将服务绑定完成回调到主线程中的ServiceConnection接口回调方法
- 第四个参数则是绑定服务的flag参数 BIND_AUTO_CREATE
- 接着看到LoadApk的getServiceDispatcher方法
frameworks/base/core/java/android/app/LoadedApk.java
@UnsupportedAppUsage
    public final IServiceConnection getServiceDispatcher(ServiceConnection c,
            Context context, Handler handler, int flags) {
        return getServiceDispatcherCommon(c, context, handler, null, flags);
    }

    private IServiceConnection getServiceDispatcherCommon(ServiceConnection c,
            Context context, Handler handler, Executor executor, int flags) {
        synchronized (mServices) {
            LoadedApk.ServiceDispatcher sd = null;
            ArrayMap<ServiceConnection, LoadedApk.ServiceDispatcher> map = mServices.get(context);//1
            if (map != null) {
                ....
                sd = map.get(c);
            }
            if (sd == null) {
                if (executor != null) {
                    sd = new ServiceDispatcher(c, context, executor, flags);
                } else {
                    sd = new ServiceDispatcher(c, context, handler, flags);//2
                }
                ....
                if (map == null) {
                    map = new ArrayMap<>();
                    mServices.put(context, map);
                }
                map.put(c, sd); //3
            } else {
                sd.validate(context, handler, executor);
            }
            return sd.getIServiceConnection();
        }
    }
- 由以上源码,注释1处通过ArrayMap(类似HashMap)类型的mServices获取与对应服务绑定Activity组件的ServiceDispatcher对象,不存在则注释2处新建ServiceDispatcher对象,并将刚刚传入的数据作为构造方法参数,最终通过ServiceDispatcher对象来获取IServiceConnection,继续看到LoadApk的内部静态类ServiceDispatcher
frameworks/base/core/java/android/app/LoadedApk.java
static final class ServiceDispatcher {
        private final ServiceDispatcher.InnerConnection mIServiceConnection;
        @UnsupportedAppUsage
        private final ServiceConnection mConnection;
        @UnsupportedAppUsage(maxTargetSdk = Build.VERSION_CODES.P, trackingBug = 115609023)
        private final Context mContext;
        private final Handler mActivityThread;
        private final Executor mActivityExecutor;
        private final ServiceConnectionLeaked mLocation;
        private final int mFlags;

       ......

        private static class InnerConnection extends IServiceConnection.Stub {
            @UnsupportedAppUsage
            final WeakReference<LoadedApk.ServiceDispatcher> mDispatcher;

            InnerConnection(LoadedApk.ServiceDispatcher sd) {
                mDispatcher = new WeakReference<LoadedApk.ServiceDispatcher>(sd);
            }

            .....
        }

        @UnsupportedAppUsage
        ServiceDispatcher(ServiceConnection conn,
                Context context, Handler activityThread, int flags) {
            mIServiceConnection = new InnerConnection(this);
            mConnection = conn;
            mContext = context;
            mActivityThread = activityThread;
            mActivityExecutor = null;
            mLocation = new ServiceConnectionLeaked(null);
            mLocation.fillInStackTrace();
            mFlags = flags;
        }
        ......
        @UnsupportedAppUsage
        IServiceConnection getIServiceConnection() {
            return mIServiceConnection;
        }
}
- 由以上源码,最终将ServiceConnection,指向Activity组件主线程Handlerd对象和Context包装到ServiceDispatcher对象中,并在内部实现了IServiceConnection接口的InnerConnection,最终通过getIServiceConnection方法返回将其赋值给最开始创建的sd对象,也就是可以和远程服务进行Binder通信的本地引用
- 接着我们回到bindServiceCommon方法的注释4,获取当前进程的IApplicationThread对象等,和刚刚封装获取的IServiceConnection 一并作为参数请求到AMS的bindIsolatedService方法来绑定Service。
Activity绑定服务调用到AMS过程时序图
- 本小节最后还是通过时序图来对上面的步骤进行回顾

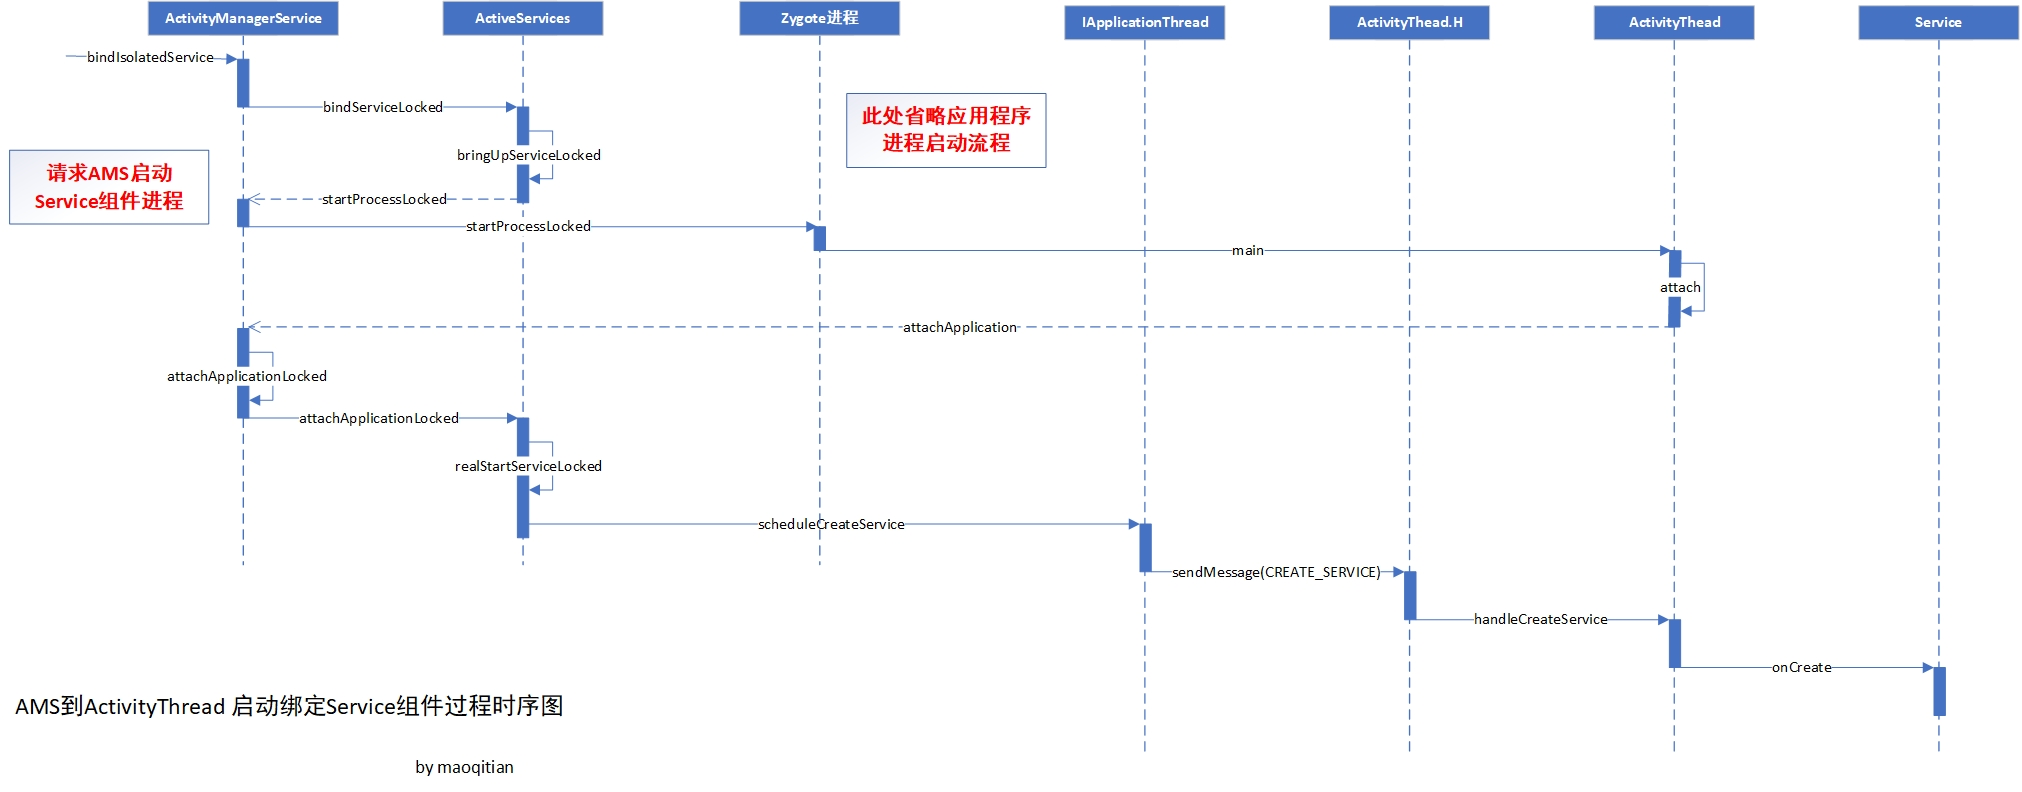
AMS 到 ActivityThread 启动绑定 Service 过程
服务与Activity组件建立绑定关系
- 接着上一小节,分析到ActivityManagerService方法,接着跟进
frameworks/base/services/core/java/com/android/server/am/ActivityManagerService.java
public int bindIsolatedService(IApplicationThread caller, IBinder token, Intent service,
            String resolvedType, IServiceConnection connection, int flags, String instanceName,
            String callingPackage, int userId) throws TransactionTooLargeException {
        enforceNotIsolatedCaller("bindService");
        ......
        synchronized(this) {
            return mServices.bindServiceLocked(caller, token, service,
                    resolvedType, connection, flags, instanceName, callingPackage, userId);//1
        }
    }
- 由以上源码注释1,同样是调用了用来管理Service的ActiveServices类的bindServiceLocked方法,
frameworks/base/services/core/java/com/android/server/am/ActiveServices.java
int bindServiceLocked(IApplicationThread caller, IBinder token, Intent service,
            String resolvedType, final IServiceConnection connection, int flags,
            String instanceName, String callingPackage, final int userId)
            throws TransactionTooLargeException {
        .....
        final ProcessRecord callerApp = mAm.getRecordForAppLocked(caller);//1

        ActivityServiceConnectionsHolder<ConnectionRecord> activity = null;
        if (token != null) {
            activity = mAm.mAtmInternal.getServiceConnectionsHolder(token);//2
            .....
        }
        .....

        ServiceLookupResult res =
            retrieveServiceLocked(service, instanceName, resolvedType, callingPackage,
                    Binder.getCallingPid(), Binder.getCallingUid(), userId, true,
                    callerFg, isBindExternal, allowInstant);//3

        ServiceRecord s = res.record;//4

        ......
            AppBindRecord b = s.retrieveAppBindingLocked(service, callerApp);//5
            ConnectionRecord c = new ConnectionRecord(b, activity,
                    connection, flags, clientLabel, clientIntent,
                    callerApp.uid, callerApp.processName, callingPackage); //6

            IBinder binder = connection.asBinder();
            s.addConnection(binder, c);
            b.connections.add(c);
            if (activity != null) {
                activity.addConnection(c);
            }
            b.client.connections.add(c);
            c.startAssociationIfNeeded();
            .......
            ArrayList<ConnectionRecord> clist = mServiceConnections.get(binder);
            if (clist == null) {
                clist = new ArrayList<>();
                mServiceConnections.put(binder, clist);
            }
            clist.add(c);//7

            /**
             * 8
             **/
            if ((flags&Context.BIND_AUTO_CREATE) != 0) {
                s.lastActivity = SystemClock.uptimeMillis();
                if (bringUpServiceLocked(s, service.getFlags(), callerFg, false,
                        permissionsReviewRequired) != null) {
                    return 0;
                }
            }
            .....

            if (s.app != null && b.intent.received) {
                // Service is already running, so we can immediately
                // publish the connection.
                try {
                    c.conn.connected(s.name, b.intent.binder, false);//9
                } catch (Exception e) {
                   .....
                }

                // If this is the first app connected back to this binding,
                // and the service had previously asked to be told when
                // rebound, then do so.
                if (b.intent.apps.size() == 1 && b.intent.doRebind) {
                    requestServiceBindingLocked(s, b.intent, callerFg, true);
                }
            } else if (!b.intent.requested) {
                requestServiceBindingLocked(s, b.intent, callerFg, false); //10
            }
            getServiceMapLocked(s.userId).ensureNotStartingBackgroundLocked(s);

        } finally {
            Binder.restoreCallingIdentity(origId);
        }

        return 1;
    }
- 由以上源码,
- 注释1处,通过上一小节获取的IApplicationThread对象得到正在请求绑定服务的Activity组件所在的应用程序进程
- 注释2处根据token 也就是 binder引用获取对应的ActivityServiceConnectionsHolder,也就是需要绑定服务的Activity组件
- 注释3和4处通过Intent类型的service参数最终获取了描述需要绑定的Service对象描述 ServiceRecord
- 注释5处则调用了ServiceRecord的retrieveAppBindingLocked方法
- 接着看到retrieveAppBindingLocked方法
frameworks/base/services/core/java/com/android/server/am/ServiceRecord.java
final ArrayMap<Intent.FilterComparison, IntentBindRecord> bindings
            = new ArrayMap<Intent.FilterComparison, IntentBindRecord>();

public AppBindRecord retrieveAppBindingLocked(Intent intent,
            ProcessRecord app) {
        Intent.FilterComparison filter = new Intent.FilterComparison(intent);
        IntentBindRecord i = bindings.get(filter);
        if (i == null) { //1
            i = new IntentBindRecord(this, filter);
            bindings.put(filter, i);
        }
        AppBindRecord a = i.apps.get(app);//2
        if (a != null) {
            return a;
        }
        a = new AppBindRecord(this, i, app);
        i.apps.put(app, a);
        return a;
    }
- 远程服务是一对多的关系,可以和多个应用程序进程绑定的,所以,每个绑定服务的应该程序进程ProcessRecord在服务ServiceRecord中被描述成了IntentBindRecord,并保存在ArrayMap类型的bindings的map中,
-
由以上源码注释1,通过的Intent.FilterComparison来查看当前应用程序进程是否绑定了服务,没有绑定则新建IntentBindRecord并保存
-
源码注释2处获取IntentBindRecord中是否存在AppBindRecord,它服务与其应用程序进程之间的关联对象,如果存在也说明之前就绑定过,否则新建AppBindRecord并返回。
-
接着回看前一个步骤ActiveServices的bindServiceLocked方法注释6,此时又把AppBindRecord、描述Activity组件的ActivityServiceConnectionsHolder和IServiceConnection封装成了代表Activity组件与远程服务ServiceRecord建立了连接,描述对象为ConnectionRecord,前面也说过服务绑定是一对多关系,所以服务也能被多个Activity绑定,也就是会有多个ConnectionRecord对象,这里就将它们全部放入ArrayList保存,也就是注释7处的clist,并且以IServiceConnection引用为key,值为ArrayList保存到AMS的ArrayMap中保存,也就是mServiceConnections,以待后续服务启动回调绑定
远程 Service 进程fork
- 接着前一个步骤ActiveServices的bindServiceLocked方法注释8,根据之前的分析,绑定服务设置的flag为BIND_AUTO_CREATE,所以该判断条件成立,则调用bringUpServiceLocked方法。(ActiveServices的bindServiceLocked方法注释10将在下一小节继续分析)
frameworks/base/services/core/java/com/android/server/am/ActiveServices.java
private String bringUpServiceLocked(ServiceRecord r, int intentFlags, boolean execInFg,
            boolean whileRestarting, boolean permissionsReviewRequired)
            throws TransactionTooLargeException {

        .......
        ProcessRecord app;

        HostingRecord hostingRecord = new HostingRecord("service", r.instanceName);

        if (!isolated) {
            app = mAm.getProcessRecordLocked(procName, r.appInfo.uid, false);
            .........
            if (app != null && app.thread != null) {
                try {
                    app.addPackage(r.appInfo.packageName, r.appInfo.longVersionCode, mAm.mProcessStats);
                    realStartServiceLocked(r, app, execInFg);//1
                    return null;
                }
                ......
        } else {
            // If this service runs in an isolated process, then each time
            // we call startProcessLocked() we will get a new isolated
            // process, starting another process if we are currently waiting
            // for a previous process to come up.  To deal with this, we store
            // in the service any current isolated process it is running in or
            // waiting to have come up.
            app = r.isolatedProc;
            if (WebViewZygote.isMultiprocessEnabled()
                    && r.serviceInfo.packageName.equals(WebViewZygote.getPackageName())) {
                hostingRecord = HostingRecord.byWebviewZygote(r.instanceName);
            }
            if ((r.serviceInfo.flags & ServiceInfo.FLAG_USE_APP_ZYGOTE) != 0) {
                hostingRecord = HostingRecord.byAppZygote(r.instanceName, r.definingPackageName,
                        r.definingUid);//2
            }
        }

        // Not running -- get it started, and enqueue this service record
        // to be executed when the app comes up.
        if (app == null && !permissionsReviewRequired) {
            if ((app=mAm.startProcessLocked(procName, r.appInfo, true, intentFlags,
                    hostingRecord, false, isolated, false)) == null) { //3
                ......

        }
        .......
        if (!mPendingServices.contains(r)) {
            mPendingServices.add(r);
        } //4
    }
- 如以上源码,文章开头例子使用的远程服务,也就是服务启动进程与Activity进程不同,所以会在注释2处获取启动进程描述对象HostingRecord,如果没有启动,则通过注释3处调用ActivitManagerService.startProcessLocked启动Service 进程,并在注释4处保存需要启动的服务描述ServiceRecord,进程启动fork Zygote进程可查看前面文章(深入理解Android之应用程序进程启动),应用进程fork成功后会调用应用程序进程的ActivityThread的main方法,最后注释4会把待启动的Service描述ServiceRecord保存到mPendingServices(ArrayList),以便后续应用进程启动后使用,接着看到ActivityThread的main方法。
frameworks/base/core/java/android/app/ActivityThread.java
public static void main(String[] args) {
      ........
        ActivityThread thread = new ActivityThread();
        thread.attach(false, startSeq);//1

      .......
    }

private void attach(boolean system, long startSeq) {
        sCurrentActivityThread = this;
        mSystemThread = system;
        if (!system) {
            android.ddm.DdmHandleAppName.setAppName("<pre-initialized>",
                                                    UserHandle.myUserId());
            RuntimeInit.setApplicationObject(mAppThread.asBinder());
            final IActivityManager mgr = ActivityManager.getService(); //2
            try {
                mgr.attachApplication(mAppThread, startSeq); //3
            } catch (RemoteException ex) {
                throw ex.rethrowFromSystemServer();
            }
           .......
    }
- 由以上源码1,首先创建了ActivityThread对象,并调用了ActivityThread的私有方法attach,在该方法中注释2应该很熟悉,获取了与AMS进行binder通信的本地引用,然后注释3处调用AMS的attachApplication与AMS进行通信,接着往下看到AMS的attachApplication方法。
frameworks/base/services/core/java/com/android/server/am/ActivityManagerService.java
@Override
    public final void attachApplication(IApplicationThread thread, long startSeq) {
        synchronized (this) {
            attachApplicationLocked(thread, callingPid, callingUid, startSeq);//1
            Binder.restoreCallingIdentity(origId);
        }
    }
- 由以上源码注释1处ActivityManagerService继续调用了attachApplicationLocked,接着往下看
frameworks/base/services/core/java/com/android/server/am/ActivityManagerService.java
 @GuardedBy("this")
    private final boolean attachApplicationLocked(IApplicationThread thread,
            int pid, int callingUid, long startSeq) {

        .....
         // Find any services that should be running in this process...
        if (!badApp) {
            try {
                didSomething |= mServices.attachApplicationLocked(app, processName);
                checkTime(startTime, "attachApplicationLocked: after mServices.attachApplicationLocked");
            } catch (Exception e) {
                ....
            }
        }
        ......
}
- 由以上源码,attachApplicationLocked方法本身逻辑是很多的,这里先忽略大部分不是本文分析的代码,直接看到注释1处,从因为注释也可以看出是找到应该在此进程中运行的任何服务,从而调用了ActiveServices的attachApplicationLocked方法,接着往下看。
远程Service组件创建
frameworks/base/services/core/java/com/android/server/am/ActiveServices.java
boolean attachApplicationLocked(ProcessRecord proc, String processName)
            throws RemoteException {
        boolean didSomething = false;
        // Collect any services that are waiting for this process to come up.
        if (mPendingServices.size() > 0) {
            ServiceRecord sr = null;
            try {
                for (int i=0; i<mPendingServices.size(); i++) {
                    sr = mPendingServices.get(i); //1
                    if (proc != sr.isolatedProc && (proc.uid != sr.appInfo.uid
                            || !processName.equals(sr.processName))) {
                        continue;
                    }

                    mPendingServices.remove(i);
                    i--;
                    proc.addPackage(sr.appInfo.packageName, sr.appInfo.longVersionCode,
                            mAm.mProcessStats);
                    realStartServiceLocked(sr, proc, sr.createdFromFg);//2
                    didSomething = true;
                    .........
                }
            } catch (RemoteException e) {
               ......
            }
        }
        .....
    }
- 由以上源码注释1,遍历之前保存待启动Service组件的**mPendingServices(ArrayList)**集合,获取ServiceRecord,注释2处调用realStartServiceLocked方法,之后启动Service 过程和上一篇文章深入理解Android 之Service启动流程基本相同,最终调用到 Service 的 OnCreate方法完成Service组件启动创建,这里不再进行展开。
AMS 到 ActivityThread 启动绑定 Service 过程时序图
绑定Service组件的Activity组件的ServiceConnection回调
- 本小节接着回到上一节ActiveServices注释10 的 bindServiceLocked 方法
frameworks/base/services/core/java/com/android/server/am/ActiveServices.java
 int bindServiceLocked(IApplicationThread caller, IBinder token, Intent service,
            String resolvedType, final IServiceConnection connection, int flags,
            String instanceName, String callingPackage, final int userId)
            throws TransactionTooLargeException {

          .......

            if (s.app != null && b.intent.received) {
                // Service is already running, so we can immediately
                // publish the connection.
                try {
                    c.conn.connected(s.name, b.intent.binder, false);//1
                } catch (Exception e) {
                    Slog.w(TAG, "Failure sending service " + s.shortInstanceName
                            + " to connection " + c.conn.asBinder()
                            + " (in " + c.binding.client.processName + ")", e);
                }

                // If this is the first app connected back to this binding,
                // and the service had previously asked to be told when
                // rebound, then do so.
                if (b.intent.apps.size() == 1 && b.intent.doRebind) {
                    requestServiceBindingLocked(s, b.intent, callerFg, true);
                }
            } else if (!b.intent.requested) {
                requestServiceBindingLocked(s, b.intent, callerFg, false);//2
            }

            getServiceMapLocked(s.userId).ensureNotStartingBackgroundLocked(s);

        } finally {
            Binder.restoreCallingIdentity(origId);
        }

        return 1;
    }
- 如上代码所示,注释1处如果服务已经启动,则可以直接发布链接。否则调用注释2处的方法,接着看ActiveServices的requestServiceBindingLocked方法
frameworks/base/services/core/java/com/android/server/am/ActiveServices.java
private final boolean requestServiceBindingLocked(ServiceRecord r, IntentBindRecord i,
            boolean execInFg, boolean rebind) throws TransactionTooLargeException {
        .......
        if ((!i.requested || rebind) && i.apps.size() > 0) {
            try {
                bumpServiceExecutingLocked(r, execInFg, "bind");
                r.app.forceProcessStateUpTo(ActivityManager.PROCESS_STATE_SERVICE);
                r.app.thread.scheduleBindService(r, i.intent.getIntent(), rebind,
                        r.app.getReportedProcState());//1
                if (!rebind) {
                    i.requested = true;
                }
                i.hasBound = true;
                i.doRebind = false;
            } catch (TransactionTooLargeException e) {
                ....
            } catch (RemoteException e) {
               ....
            }
        }
        return true;
    }
- 由以上代码注释1,ServiceRecord中保存的就是Activity组件所在应用程序进程的ActivityThread内部类IApplicationThread的实现类ApplicationThread引用,我们接着看到ApplicationThread的scheduleBindService方法
frameworks/base/core/java/android/app/ActivityThread.java
 public final void scheduleBindService(IBinder token, Intent intent,
                boolean rebind, int processState) {
            updateProcessState(processState, false);
            BindServiceData s = new BindServiceData();
            s.token = token;
            s.intent = intent;
            s.rebind = rebind;

            if (DEBUG_SERVICE)
                Slog.v(TAG, "scheduleBindService token=" + token + " intent=" + intent + " uid="
                        + Binder.getCallingUid() + " pid=" + Binder.getCallingPid());
            sendMessage(H.BIND_SERVICE, s);//1
        }
- 由以上代码,还是熟悉的操作,这里调用了ActivityThread 中代表Android主线程处理的内部Handler类H发送了BIND_SERVICE消息,将ServcieRecord等数据封装成了BindServiceData对象,继续往下看
frameworks/base/core/java/android/app/ActivityThread.java
class H extends Handler {
       .....
    public void handleMessage(Message msg) {
            .....
            switch (msg.what) {
                case BIND_SERVICE:
                   Trace.traceBegin(Trace.TRACE_TAG_ACTIVITY_MANAGER, "serviceBind");
                    handleBindService((BindServiceData)msg.obj); //1
                    Trace.traceEnd(Trace.TRACE_TAG_ACTIVITY_MANAGER);
                    break;
            }
}
- 由以上代码注释1,很清晰,Handler在主线程处理消息调用了ActivityThread的handleBindService方法
frameworks/base/core/java/android/app/ActivityThread.java
private void handleBindService(BindServiceData data) {
        Service s = mServices.get(data.token);//1
        ........
        if (s != null) {
            try {
                data.intent.setExtrasClassLoader(s.getClassLoader());
                data.intent.prepareToEnterProcess();
                try {
                    if (!data.rebind) {
                        IBinder binder = s.onBind(data.intent);//2
                        ActivityManager.getService().publishService(
                                data.token, data.intent, binder); //3
                    } else {
                        s.onRebind(data.intent);
                     ActivityManager.getService().serviceDoneExecuting(
                                data.token, SERVICE_DONE_EXECUTING_ANON, 0, 0);
                    }
                } catch (RemoteException ex) {
                    throw ex.rethrowFromSystemServer();
                }
            } catch (Exception e) {
               ......
            }
        }
    }
- 前面已经讨论了远程Service组件目前已经启动,并且在ActivityThread的创建启动Service方法handleCreateService中将启动的Service实例加入到了ArrayMap类型的mServices中,
- 注释1处则根据ServiceRecord获取对应的Service组件
- 注释2处回调了Servcie组件的onBind方法,将Service远程服务的IBinder引用获取返回,也就是文章开始Demo中的IRemoteService.Stub类型的mBinder
- 注释3处再次调用AMS服务的publishService方法传递刚刚获取的mBinder引用数据
- 接着看AMS的publishService方法,如下所示
frameworks/base/services/core/java/com/android/server/am/ActivityManagerService.java
public void publishService(IBinder token, Intent intent, IBinder service) {
        // Refuse possible leaked file descriptors
        ......

        synchronized(this) {
            if (!(token instanceof ServiceRecord)) {
                throw new IllegalArgumentException("Invalid service token");
            }
            mServices.publishServiceLocked((ServiceRecord)token, intent, service);//1
        }
    }
- 由以上源码,还是老样子继续调用了ActiveServices的publishServiceLocked方法
frameworks/base/services/core/java/com/android/server/am/ActiveServices.java
void publishServiceLocked(ServiceRecord r, Intent intent, IBinder service) {
        final long origId = Binder.clearCallingIdentity();
        try {
            ......
            if (r != null) {
                Intent.FilterComparison filter
                        = new Intent.FilterComparison(intent);//1
                IntentBindRecord b = r.bindings.get(filter);//2
                if (b != null && !b.received) {
                    b.binder = service;//3
                    b.requested = true;//4
                    b.received = true;//5
                    ArrayMap<IBinder, ArrayList<ConnectionRecord>> connections = r.getConnections();//6
                    for (int conni = connections.size() - 1; conni >= 0; conni--) {
                        ArrayList<ConnectionRecord> clist = connections.valueAt(conni);
                        for (int i=0; i<clist.size(); i++) {
                            ConnectionRecord c = clist.get(i);
                            ......
                            try {
                                c.conn.connected(r.name, service, false); //7
                            } catch (Exception e) {
                               .......
                            }
                        }
                    }
                }
                ........
            }
        } finally {
           .......
        }
    }
- 由以上源码,看完似乎又找到了豁然开朗的感觉,结合前面第二小节服务与Activity组件建立绑定关系的分析
- 注释1处还是根据Intentl来获取Intent.FilterComparison
- 注释2处根据第一步中获取的Intent.FilterComparison从ServiceRecord的bindings获取IntentBindRecord,这都是在前面第二小节分析中创建的,接着注释3将刚刚通过Service的OnBind方法获取的 IBinder引用赋值给IntentBindRecord,并在注释4和注释5处将值设置为true,避免后续的AMS重复请求
- 前面说过Service绑定的一对多属性,所以他们都是使用了同一个key也就是InnerConnection,之前我们分析中是将其封装在了描述Actiivty组件与Service组件之间联系的描述类ConnectionRecord中
- 接着从泛型为ConnectionRecord的ArrayList结合最后一个开始遍历获取ConnectionRecord对象,然后获取与之对应的InnerConnection,然后注释7处调用它的connected方法,接着我们再次看回LoadedApk类的InnerConnection
frameworks/base/core/java/android/app/LoadedApk.java
static final class ServiceDispatcher {

private final ServiceDispatcher.InnerConnection mIServiceConnection;//1

 private static class InnerConnection extends IServiceConnection.Stub {
            @UnsupportedAppUsage
            final WeakReference<LoadedApk.ServiceDispatcher> mDispatcher;

            InnerConnection(LoadedApk.ServiceDispatcher sd) {
                mDispatcher = new WeakReference<LoadedApk.ServiceDispatcher>(sd);
            }

            public void connected(ComponentName name, IBinder service, boolean dead)
                    throws RemoteException {
                LoadedApk.ServiceDispatcher sd = mDispatcher.get();
                if (sd != null) {
                    sd.connected(name, service, dead); //2
                }
            }
        }
}
- 在文章第一小节分析ContextImpl的bindServiceCommon方法就已经创建了IServiceConnection的实现类InnerConnection并封装到了LoadedApk的ServiceDispatcher,以上源码注释2实际调用的是ServiceDispatcher的connected,接着往下看
frameworks/base/core/java/android/app/LoadedApk.java
static final class ServiceDispatcher {
......
 public void connected(ComponentName name, IBinder service, boolean dead) {
            if (mActivityExecutor != null) {
                mActivityExecutor.execute(new RunConnection(name, service, 0, dead));
            } else if (mActivityThread != null) {
                mActivityThread.post(new RunConnection(name, service, 0, dead));//2
            } else {
                doConnected(name, service, dead);
            }
            .....
        }
 ......
}
- 根据前面的分析,mActivityThread指向的 ActivityThread的handler成员H,也就是说这里可以给Activity组件所在应用程序进程的主线程发送消息,让其运行Runnable类型的RunConnection,也就是说run方法在主线程运行,接着看run方法逻辑
frameworks/base/core/java/android/app/LoadedApk.java
private final ServiceConnection mConnection;

private final class RunConnection implements Runnable {
            RunConnection(ComponentName name, IBinder service, int command, boolean dead) {
                mName = name;
                mService = service;
                mCommand = command;
                mDead = dead;
            }

            public void run() {
                if (mCommand == 0) {
                    doConnected(mName, mService, mDead);//1
                } ....
            }

           ...
        }

 public void doConnected(ComponentName name, IBinder service, boolean dead) {
            ServiceDispatcher.ConnectionInfo old;
            ServiceDispatcher.ConnectionInfo info;

            .....
            // If there is a new viable service, it is now connected.
            if (service != null) {
                mConnection.onServiceConnected(name, service);//2
            } else {
                // The binding machinery worked, but the remote returned null from onBind().
                mConnection.onNullBinding(name);
            }
        }
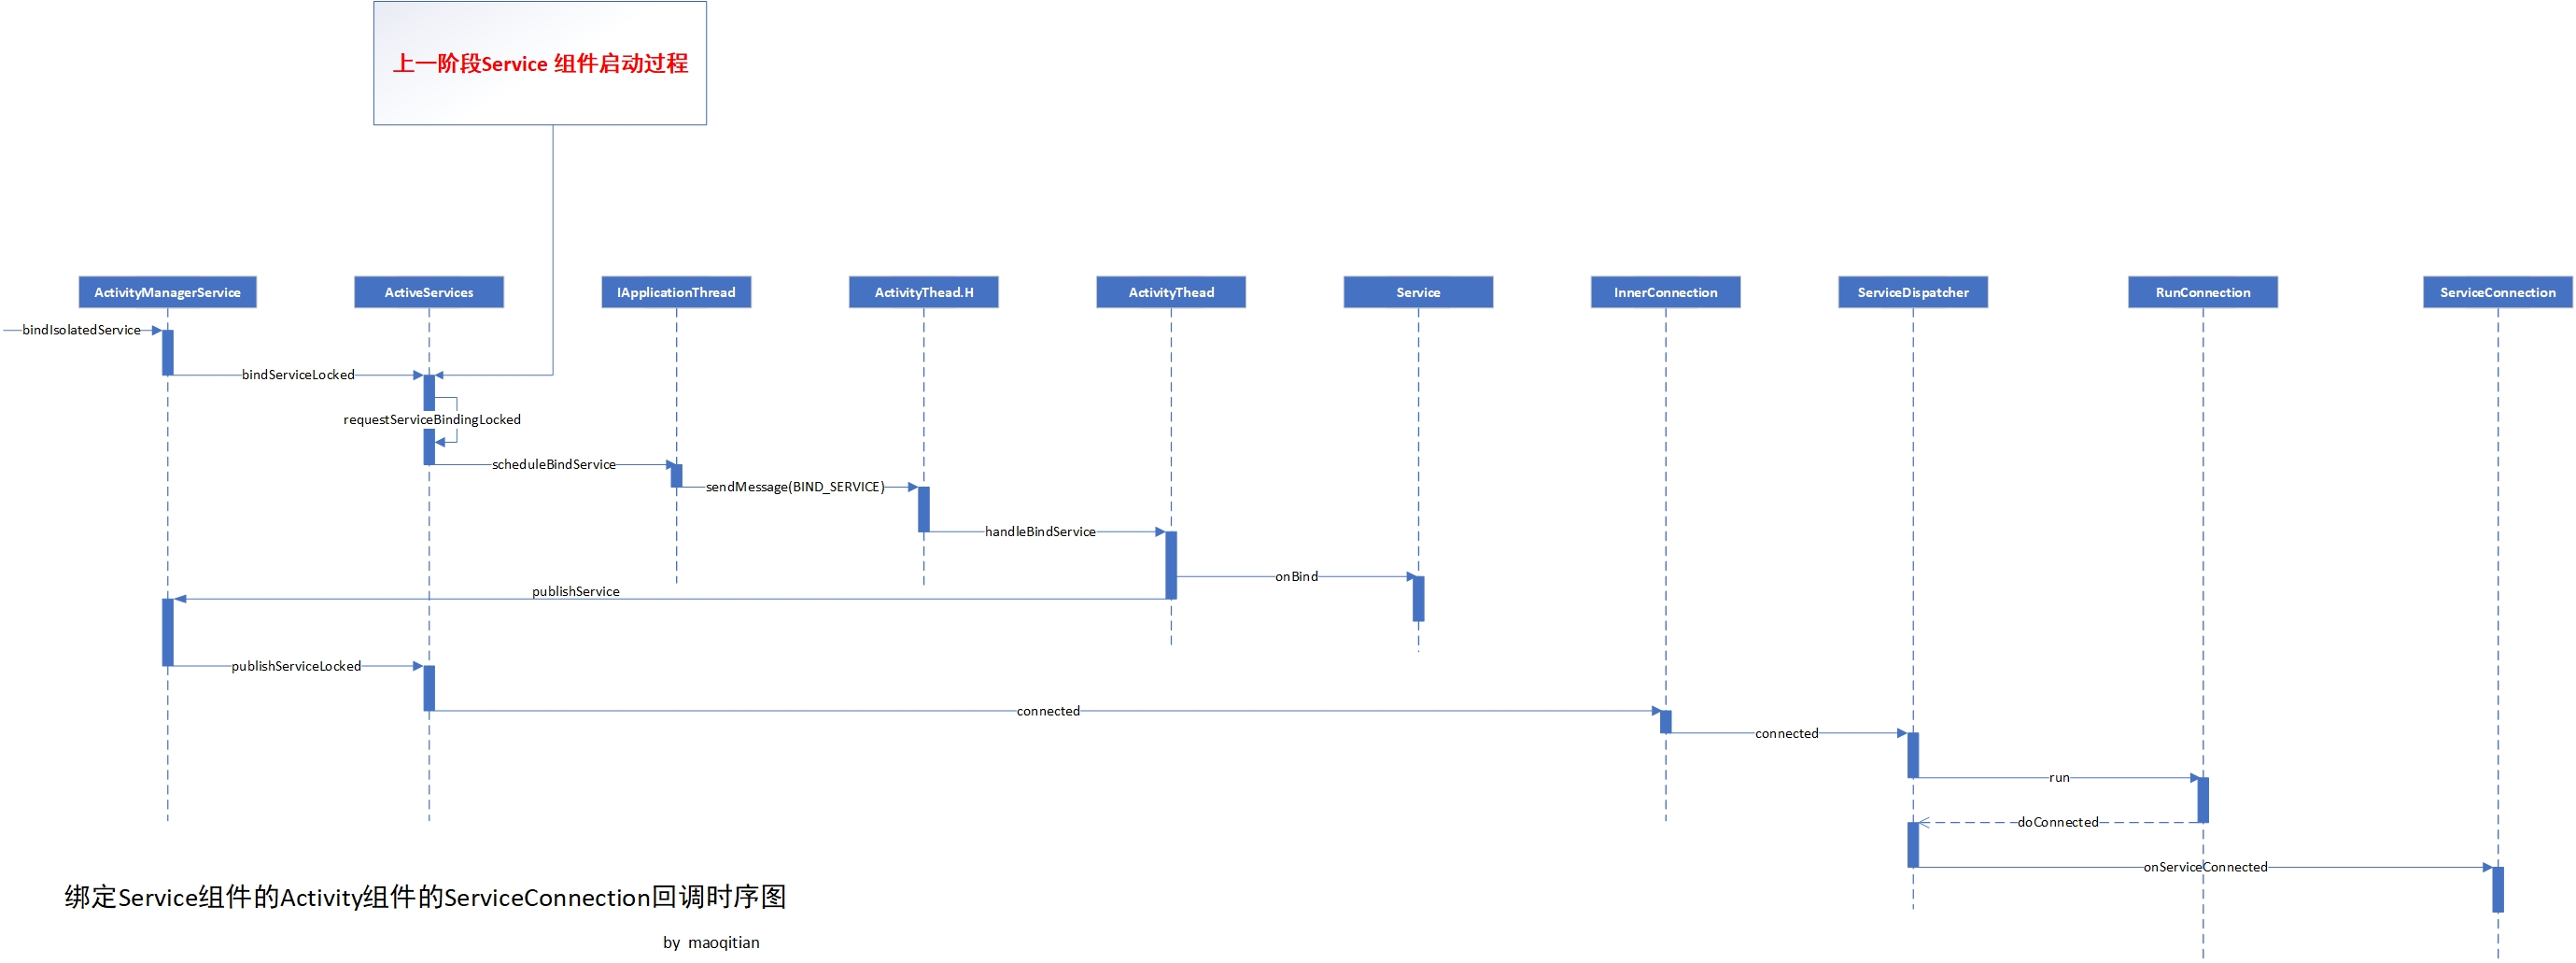
- 如以上源码,注释1处调用了doConnected方法,它传入了一个mService对象,经前面分析已经很清晰,它就是指向远程Service组件中组件的Binder对象,也可以理解成Demo例子中的IRemoteService.Stub类型mBinder,接着在注释2处调用之前在Activity组件创建的ServiceConnection实现类引用,并调用onServiceConnected将远程服务mBinder回调给Activity组件。
绑定Service组件的Activity组件的ServiceConnection回调时序图
总结
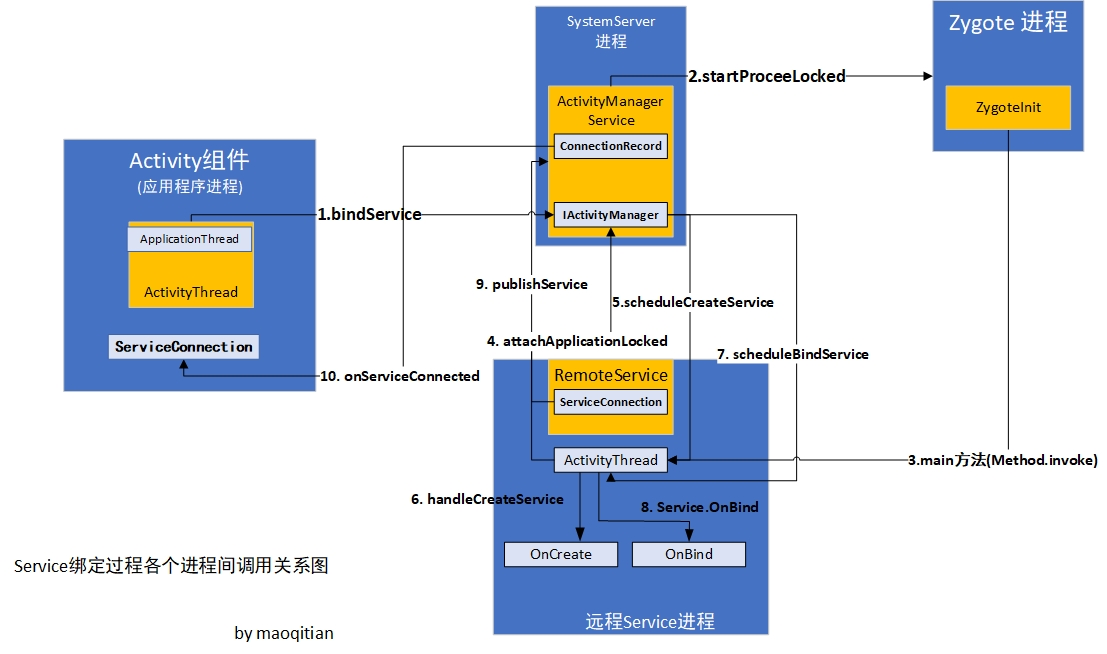
- 和应用程序进程启动一样,服务绑定过程也涉及了四个进程,其中最核心的就是AMS所在的SystemServer进程
- 涉及进程间通信方式有两种,一种是socket方式fork Zygote进程,另一种是Binder,线程间通信方式为Handler
- 组件与服务绑定关系被描述成ConnectionRecord,它包含的IServiceConnection指向与服务绑定的组件,InnerConnection实现了IServiceConnection,ServiceDispatcher包含InnerConnection、ConnectionRecord、ServiceConnection,最终通过绑定组件的主线程Handler.post将onServiceConnected回调方法运行在绑定服务组件的主线程。
- ContextImpl 和 ContextWrapper 之间联系使用的是静态代理模式,ContextWrapper和 ContextThemeWrapper 使用了装饰模式
最后
- 经过分析,服务绑定过程还是步骤比较多的,需要一些耐心,在阅读源码的过程中也能清晰看到服务绑定流程方法调用顺序和文章开头Demo执行顺序是一样的。
参考
- 书籍《Android 系统情景源代码分析》第三版
- Android 10 源码地址
