1. 前言
最近在折腾FastDFS,今天测试了Fast上传,浏览,下载文件的操作,终于成功了,这里总结一下,下次忘了方便翻阅。
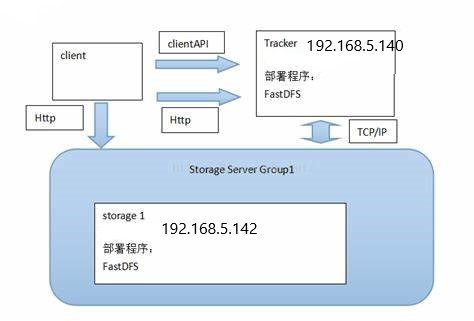
2. Tracker & Storage 配置
简单地用一张图表示,这里就不具体配置了
pom
        <dependency>
            <groupId>net.oschina.zcx7878</groupId>
            <artifactId>fastdfs-client-java</artifactId>
            <version>1.27.0.0</version>
        </dependency>
3. 测试FastDFS基本功能
新建一个test_fdfs模块

pom
3.1 上传文件到Storage
还可以参考官方FastDFS
 @Test
 public void testUpload() {

        try {
//         通过ClientGlobal简单配置一下trackerServers
            String trackerServers = "192.168.5.140:22122";
            ClientGlobal.initByTrackers(trackerServers);

//            ClientGlobal.initByProperties("config/fastdfs‐client.properties");  // 不知道为什么properties扫描不到
            System.out.println("network_timeout=" + ClientGlobal.g_network_timeout + "ms");
            System.out.println("charset=" + ClientGlobal.g_charset);

//   下面是基本流程
            //创建客户端TrackerClient
            TrackerClient tc = new TrackerClient();

            //连接tracker Server
            TrackerServer ts = tc.getConnection();
            if (ts == null) {
                System.out.println("getConnection return null");
                return;
            }

            //获取一个storage server
            StorageServer ss = tc.getStoreStorage(ts);
            if (ss == null) {
                System.out.println("getStoreStorage return null");
            }

            //创建一个storage存储客户端
            StorageClient1 sc1 = new StorageClient1(ts, ss);

            // upload_file1参数配置
            NameValuePair[] meta_list = null;  //new NameValuePair[0];
            String item = "D:\\85YK0RRRS47L.jpg"; // 下面所示
            String fileid;

            // 执行上传upload-file1,返回一个storage上的fileId
            fileid = sc1.upload_file1(item, "jpg", meta_list);
            System.out.println("Upload local file " + item + " ok, fileid=" + fileid);
        } catch (Exception ex) {
            ex.printStackTrace();
        }
    }
文件:

执行测试:
打印出了fileid=group1/M00/00/00/wKgFjl6Xv0OAF85NABG7On7QrTg138.jpg

M00在Storage上设置的是 /home/fastdfs/fdfs_storage/data
检查一下Storage上有没有该文件,有就对了😎

3.2 FastDFS上浏览文件
    @Test
    public void testQueryFile() throws IOException, MyException {
        String trackerServers = "192.168.5.140:22122";
        ClientGlobal.initByTrackers(trackerServers);
        TrackerClient trackerClient = new TrackerClient();
        TrackerServer trackerServer = trackerClient.getConnection();
        StorageServer storageServer = trackerClient.getStoreStorage(trackerServer);
        StorageClient storageClient = new StorageClient(trackerServer, storageServer);

    //  调用query_file_info
        FileInfo fileInfo = storageClient.query_file_info("group1", "M00/00/00/wKgFjl6Xv0OAF85NABG7On7QrTg138.jpg");
        System.out.println(fileInfo);
    }
执行测试:

3.3 从FastDFS下载文件
    @Test
    public void testDownload() throws IOException, MyException {
        String trackerServers = "192.168.5.140:22122";
        ClientGlobal.initByTrackers(trackerServers);
        TrackerClient trackerClient = new TrackerClient();
        TrackerServer trackerServer = trackerClient.getConnection();
        StorageServer storageServer = trackerClient.getStoreStorage(trackerServer);
        StorageClient1 storageClient1 = new StorageClient1(trackerServer, storageServer);
// 用 二进制文件 FileOutputStream 方式写入
        byte[] result = storageClient1.download_file1("group1/M00/00/00/wKgFjl6XtQmAKpRfABG7On7QrTg149.jpg");
        File file = new File("C:\\Users\\Acer\\Desktop\\download\\1.jpg");
        FileOutputStream fileOutputStream = new FileOutputStream(file);
        fileOutputStream.write(result);
        fileOutputStream.close();
    }
执行测试:

最后把图片贴出来 YEAL!!\( ̄︶ ̄*\))