

嘿嘿大家好!我又来水文章了!!

今天带来的是实现一个简易的二维码海报分享的小组件!我们可以通过配置我们需要展示的数据,用户名啊,二维码图片等,整合在一起渲染,然后导出图片进行分享。
可以利用这个东东,可以做很多变形。例如生成表白网页等(手动滑稽)

目前这个东东只是一个小demo,没有做很细的组件拆分啊,canvas类之类的东西。然后H5方面的兼容性也没有完全考虑哈哈哈,估计会有一些小bug,小程序方面暂时没有遇到什么问题,除了不适配Ipad这种大屏幕的(样式会变得奇怪~)
如果对大家有点点帮助,希望大家点一个赞!
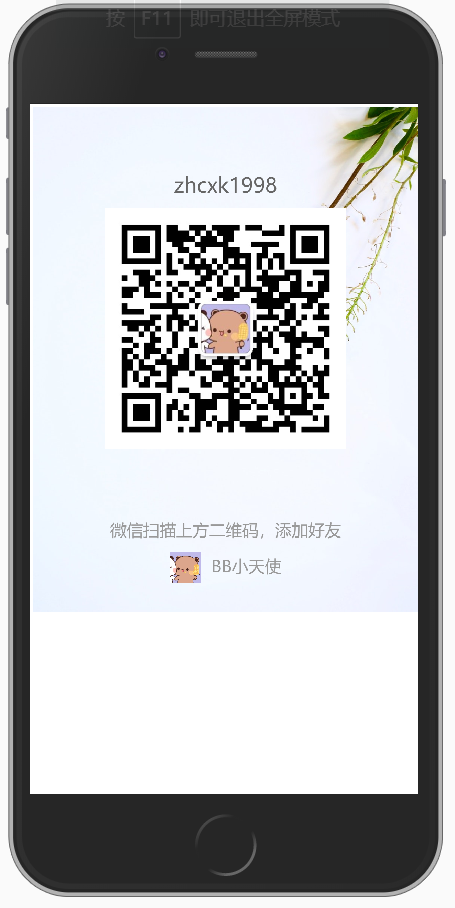
效果预览
微信小程序的效果
点击预览按钮会直接打开生成的海报进行预览

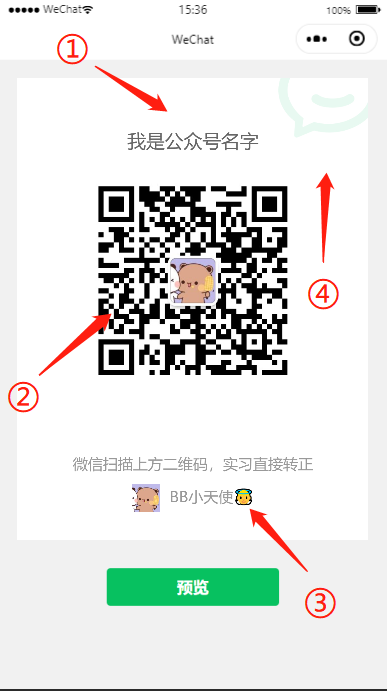
H5上的效果
H5偷懒了,不想搞按钮啥的,直接点击图片生成海报的
base64编码图片嘿嘿。
技术分析
以微信小程序举例
- 我们的顶部名字需要居中,而名字是变量会不定宽度
- 二维码也需要居中显示,根据比例进行缩放
- 下面的消息部分与上面类似,需要居中显示。用户信息部分,因为需要头像跟用户名进行组合,然后再居中显示。所以需要计算文字的动态宽度。
- 背景图,需要先进行背景的绘制,根据背景图确定canvas大小
代码实现
前提是,我们的背景需要定尺寸,我这里的背景图是
1030 * 1035的,因为我这是基于背景图尺寸来确定canvas渲染的位置,所以尽量是竖图会比较好嘿嘿~
H5实现方法
1. 先定义一个canvas
定义一个
canvas组件,弄个id待会获取一下,onclick是偷懒,其实应该弄个按钮来保存图片嘿嘿
  <div class="container">
    <canvas id="canvas" onclick="saveImage()"></canvas>
  </div>
2. 获取页面宽度,像素比等参数
因为我们是需要页面宽度来对背景图,二维码图片等进行缩放处理。所以这个很重要。至于这个像素比,是因为每个手机的分辨率那些都不同,我们需要对
canvas画布进行缩放来适应手机分辨率,否则图片就会不清晰。
function initParameter() {
  const {
    screen: {
      width
    },
    devicePixelRatio
  } = window

  this.windowWidth = width
  this.dpr = Math.round(devicePixelRatio)
}
3. 初始化canvas画布
这里我们需要获取
canvas示例,以及他的context对象存起来。然后开始调用方法
这里需要注意一点的是,我们获取图片对象的时候,因为获取的过程是异步的,所以我们需要使用await来等待图片都加载完成了,然后再进行下面的渲染绘制工作
async function initCanvas() {
  const canvas = document.getElementById('canvas')
  const ctx = canvas.getContext('2d')

  this.canvas = canvas
  this.ctx = ctx

  await getBackgroundImage()
  await getQRCodeImage()
  await getAvatarImage()

  this.fillBackgroundImage()
  this.fillQrCodeImage()
  this.fillUsernameText()
  this.fillHelpText()
  this.fillUserInfo()

}
4. 获取要绘制的图片信息
这里的话我们通过设置一个
Promise来获取图片对象。
这里注意一下,我使用了一个getURLBase64()方法来将图片url转换成base64编码。至于为什么待会的第四点会提到
我们将图片加载进来,生成一个图片对象,存在全局里面。随后我们可以通过canvas对这些iamge对象进行绘制。
// 获取背景图片对象
function getBackgroundImage() {
  return new Promise(async (resolve) => {
    const backgroundImage = new Image()
    backgroundImage.src = await getURLBase64('http://cdn.algbb.cn/test/wechatbg.jpg')
    // backgroundImage.src = 'http://cdn.algbb.cn/test/wechatbg.jpg'
    backgroundImage.crossOrigin = '*'
    backgroundImage.onload = () => {
      this.backgroundImage = backgroundImage
      resolve()
    }
  })
}

// 获取二维码图片对象
function getQRCodeImage() {
  return new Promise(async (resolve) => {
    const qrCodeImage = new Image()
    qrCodeImage.src = await getURLBase64('http://cdn.algbb.cn/test/qrcode.jpg')
    // qrCodeImage.src = 'http://cdn.algbb.cn/test/qrcode.jpg'
    qrCodeImage.crossOrigin = '*'
    qrCodeImage.onload = () => {
      this.qrCodeImage = qrCodeImage
      resolve()
    }
  })
}

// 获取用户头像图片对象
function getAvatarImage() {
  return new Promise(async (resolve) => {
    const avatarImage = new Image()
    avatarImage.src = await getURLBase64('http://cdn.algbb.cn/test/avatar.jpg')
    // avatarImage.src = 'http://cdn.algbb.cn/test/avatar.jpg'
    avatarImage.crossOrigin = '*'
    avatarImage.onload = () => {
      this.avatarImage = avatarImage
      resolve()
    }
  })
}
5. 设置一个获取图片base64编码的方法
为什么要多此一举将图片转换成
base64编码呢,因为canvas导出图片的方法toDataURL()的方法,如果我们图片是存在跨域问题,他会导出失败,会报错。具体大家可以百度百度一下canvas导出图片报错。
网上有另一种方法,通过设置图片对象的corssOrigin的方法来实现跨域。但是这个方法有时候可以,有时候仍然会报错。还是获取base64编码保险点。
function getURLBase64(url) {
  return new Promise((resolve, reject) => {
    const xhr = new XMLHttpRequest()
    xhr.open('get', url, true)
    xhr.responseType = 'blob'
    xhr.onload = function () {
      if (this.status === 200) {
        const blob = this.response
        const fileReader = new FileReader()
        fileReader.onloadend = function (e) {
          const {
            target
          } = e
          const result = target.result
          resolve(result)
        }
        fileReader.readAsDataURL(blob)
      }
    }
    xhr.onerror = function () {
      reject()
    }
        xhr.send()
      })
6. 绘制背景图片
这个算是重中之重了!我们这里要根据我们的背景图片,来设置
canvas的尺寸,然后进行绘制背景图片。
接下来所有的绘制工作都是通过这里来进行的。所以这个十分重要!!
这里我们要做的事情有以下几点:
- 设置
canvas尺寸,根据手机页面宽度来设置,再给他留一点空白这样子。 - 根据页面宽度来对我们的背景图片进行等比例缩放,就是下面的
scale变量 - 设置
canvas的样式,跟尺寸对应上 - 这里要对尺寸乘上我们的
dpr,然后再利用scale方法对canvas画布进行缩放 - 开始绘制我们的背景图片。
这一块我还没有深入研究过。微信小程序的话,canvas的样式里的尺寸不要乘dpr,canvas的尺寸要乘dpr,这样才能达到效果。
function fillBackgroundImage() {
  const {
    width,
    height
  } = this.backgroundImage

  // canvas宽度为手机宽度 - 40px
  const newCanvasWidth = this.windowWidth - 40
  const scale = width / newCanvasWidth
  const newCanvasHeight = height / scale

  // 设置canvas尺寸这些
  this.canvas.width = newCanvasWidth * this.dpr
  this.canvas.height = newCanvasHeight * this.dpr

  this.canvas.style.width = (newCanvasWidth * this.dpr) + 'px'
  this.canvas.style.height = (newCanvasHeight * this.dpr) + 'px'
  // 按照dpr进行缩放
  this.ctx.scale(this.dpr, this.dpr)

  // 绘制背景图片
  this.ctx.clearRect(0, 0, newCanvasWidth, newCanvasHeight)
  this.ctx.drawImage(this.backgroundImage, 0, 0, newCanvasWidth, newCanvasHeight)

  this.canvasWidth = newCanvasWidth
  this.canvasHeight = newCanvasHeight
}
7. 绘制二维码图片
接下来我们就可以计算一下坐标,然后居中绘制一下二维码
这里我们要做的事情有以下几个:
- 根据
canvas尺寸来确定二维码的宽度(留一点间距) - 设置渲染的横纵坐标,这个参考一下css的居中显示,其实就是整个canvas的宽度的一半,减去我们二维码宽度的一半,就是我们需要渲染的起点坐标了
- 绘制二维码图片
function fillQrCodeImage() {
  const {
    width,
    height
  } = this.qrCodeImage
  const {
    canvasWidth,
    canvasHeight
  } = this

  // 设置二维码尺寸,默认正方形
  const qrCodeImageWidth = canvasWidth - 140
  const scale = width / qrCodeImageWidth
  const qrCodeImageHeight = height / scale

  // 设置渲染坐标
  const renderPointX = canvasWidth / 2 - qrCodeImageWidth / 2
  const renderPointY = canvasHeight / 2 - qrCodeImageHeight / 2 - 30

  this.qrCodePointX = renderPointX
  this.qrCodePointY = renderPointY
  this.qrCodeImageWidth = qrCodeImageWidth
  this.qrCodeImageHeight = qrCodeImageHeight

  this.ctx.drawImage(this.qrCodeImage, renderPointX, renderPointY, qrCodeImageWidth, qrCodeImageHeight)
}
8. 绘制顶部说明文字
这里我们需要设置一个方法来绘制一下顶部的说明文字
这里的话就比较简单了,我们先设置一下canvas绘制文字的信息,字体颜色这些。
关键在于textAlign这个属性,我们设置居中center之后就会很省心了,可以利用canvas的居中直接进行渲染,省下很多功夫
横坐标就设置canvas宽度的一半,就是直接在中间进行水平坐标的起点,搭配上上面的textAlign居中的属性就可以实现文字居中。
至于纵坐标就是,根据我们刚刚绘制的二维码的纵坐标,往上一点点就好了。
function fillUsernameText() {
  const {
    canvasWidth
  } = this

  this.ctx.font = 'normal 20px 微软雅黑'
  this.ctx.fillStyle = '#666'
  this.ctx.textAlign = 'center'
  this.ctx.textBaseline = 'middle'

  this.ctx.fillText('zhcxk1998', canvasWidth / 2, this.qrCodePointY - 20)
}
9. 绘制下面说明文字
这里弄一个方法来绘制下面的说明文字
这里与上面类似,没什么区别,就是纵坐标是根据二维码高度往下一点就好了
function fillHelpText() {
  const {
    canvasWidth
  } = this

  this.ctx.font = 'normal 16px 微软雅黑'
  this.ctx.fillStyle = '#999'
  this.ctx.textAlign = 'center'
  this.ctx.textBaseline = 'middle'
  this.ctx.fillText('微信扫描上方二维码,添加好友', canvasWidth / 2, this.qrCodePointY + this.qrCodeImageHeight + 80)
}
10. 绘制用户信息(头像 + 用户名)
这里也算一个小难点吧,我们需要获取用户名的动态宽度,与头像组合起来,然后再进行居中渲染
这里我们要做的事情有以下几个:
- 利用
canvas的measureText()的方法来获取用户名的动态宽度 - 设置头像尺寸,然后将图片进行等比例缩放
- 然后我们设置一下头像与用户名的间距
- 计算出头像与用户名组合的宽度
- 文字渲染要设置左对齐,不然会出现排版异常的问题
- 与上面的二维码绘制一样,算出坐标,让他们居中渲染
function fillUserInfo() {
  const userName = 'BB小天使'
  const {
    canvasWidth
  } = this
  const {
    width,
    height
  } = this.avatarImage
  const {
    width: textWidth
  } = this.ctx.measureText(userName)

  // 设置头像大小,默认头像为正方形,30 * 30
  const avatarWidth = 30
  const scale = width / avatarWidth
  const avatarHeight = height / scale

  // 设置用户名与头像的间隔
  const cap = 10
  // 计算出头像与名字组合的宽度
  const composeWidth = avatarWidth + textWidth + cap

  // 配置渲染的横纵坐标
  const renderPointX = canvasWidth / 2 - composeWidth / 2
  const renderPointY = this.qrCodePointY + this.qrCodeImageHeight + 100

  // 设置回左对齐,不然与头像与名字排列会乱
  this.ctx.textAlign = 'left'

  // 渲染
  this.ctx.fillText(userName, renderPointX + avatarWidth + cap, renderPointY + avatarHeight / 2)
  this.ctx.drawImage(this.avatarImage, renderPointX, renderPointY, avatarWidth, avatarHeight)
}
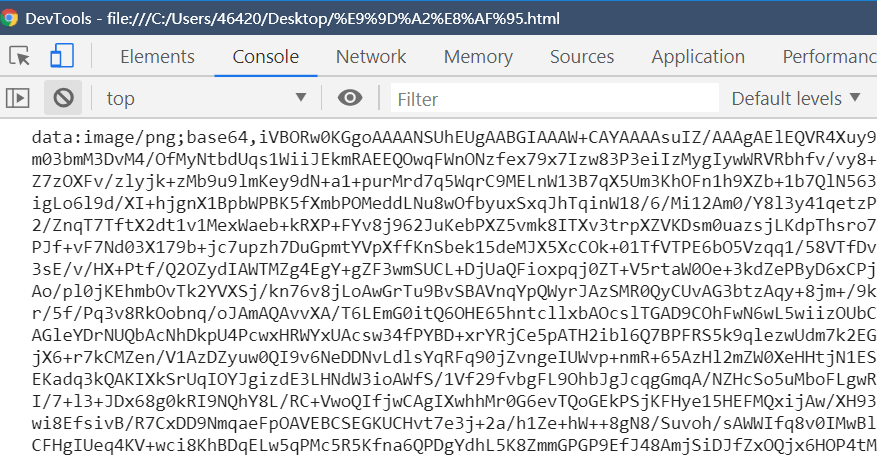
11. 设置导出海报图片的方法
这里我们可以利用
canvas的toDataURL()的方法进行导出图片
function saveImage() {
  const {
    canvasWidth,
    canvasHeight
  } = this

  console.log(this.canvas.toDataURL())
}
这样我们点击的时候就会再控制台输出我们的base64编码啦
12. 页面启动时候调用这些函数
到这里我们就已经完成了所有的任务了,只需要开始的时候调用一下这些方法就可以了
window.onload = () => {
  initParameter()
  initCanvas()
}
微信小程序实现大致流程
微信小程序的实现方法,与H5没有什么区别,主要的问题是只有几个
- 获取
canvas的示例 - 导出图片时候需要设置一下图片尺寸为整数
这里就不大篇幅的介绍了,主要介绍一下大致的方法还有坑
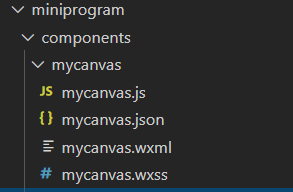
1. 定义专门的component组件
我们先再component下创建出相关的目录结构。
在组件里面接受页面传递过来的信息,以及我们本身渲染要用的数据
Component({
  /**
   * 组件的属性列表
   */
  properties: {
    publicInfo: Object,
    userInfo: Object,
  },

  /**
   * 组件的初始数据
   */
  data: {
    canvasWidth: 0,
    canvasHeight: 0,
    isLoading: true
  },

  lifetimes: {
    ready() {

    },
  },
})
2. 在页面中通过参数传递给组件进行渲染
接下来我们再首页的pages里的index.json中定义一下usingComponents的参数,让这个页面可以使用我们定义的组件
// index.json
{
  "usingComponents": {
    "my-canvas": "../../components/mycanvas/mycanvas"
  }
}
然后我们再index.wxml中进行调用一下,我们为这个组件通过props来传递我们的用户信息,或者二维码信息等
<!-- index.wxml -->
<view>
  <my-canvas wx:if="{{!isLoading}}" user-info="{{userInfo}}" public-info="{{publicInfo}}"></my-canvas>
</view>
配置要传递的参数,传给组件进行渲染canvas
Page({
  data: {
    userInfo: {
      userName: '',
      userAvatar: ''
    },
    publicInfo: {
      publicName: '',
      publicQrCode: '',
      publicBackground: '',
      publicHelpText: ''
    },
    isLoading: true
  },
  async onLoad() {
    this.setCanvasInfo()
  },

  async setCanvasInfo() {
    await this.setUserInfo()
    await this.setPublicInfo()
    this.setData({
      isLoading: false
    })
  },

  async setUserInfo() {
    const { userInfo: { nickName, avatarUrl } } = await wx.getUserInfo()
    this.setData({
      userInfo: {
        userName: nickName,
        userAvatar: avatarUrl
      }
    })
  },
  async setPublicInfo() {
    this.setData({
      publicInfo: {
        publicName: '我是公众号名字',
        publicQrCode: '../../images/qrcode.jpg',
        publicBackground: '../../images/bg.jpg',
        publicHelpText: '微信扫描上方二维码,实习直接转正'
      }
    })
  }
});
微信小程序实现的坑
1. 组件中无法获取canvas实例
这个问题,我们需要看一下官方文档的。我们是通过wx.createSelectorQuery()的方法来获取我们页面的元素,
如果我们再组件中获取元素的话,我们需要调用一下他的in()方法,限定他作用域才能正常获取
const query = wx.createSelectorQuery().in(this)

query.select('#canvas')
  .fields({ node: true, size: true })
  .exec(async (res) => { xxx })
2. 页面需要异步获取数据,导致组件接受不到参数
这个原因是,如果我们页面中异步获取数据,然后再传递给组件,这样的话,就会导致组件一开始并不能及时的接受到数据,图片信息等。就会出错。
我们解决的方法很简单,我们再页面中设置一个变量isLoading来判断是否异步获取完数据,获取完了之后我们再渲染我们的canvas组件,通过wx:if来控制组件渲染。这样就可以保证我们的组件能获取到数据了。
  // js中
  async onLoad() {
    this.setCanvasInfo()
  },

  async setCanvasInfo() {
    await this.setUserInfo()
    await this.setPublicInfo()
    this.setData({
      isLoading: false
    })
  },

  // wxml中
  <my-canvas wx:if="{{!isLoading}}" user-info="{{userInfo}}" public-info="{{publicInfo}}"></my-canvas>
3. 导出图片时候无法获取canvas对象
我们是通过用wx.canvasToTempFilePath()这个方法来生成对象,他有一个参数canvasId还有一个canvas的参数。我们如果指定了canvas是2D的话,传canvasId就无法获取,我们需要直接传递canvas对象才可以
wx.canvasToTempFilePath({
    ...
    canvas: this.canvas,
})
4. 生成海报预览图片的时候报错
这个问题很奇葩,我们是用wx.canvasToTempFilePath()这个方法来让生成图片的。我们需要指定导出图片的尺寸是整数,不然再一些手机上会报错,无法生成图片。
我们使用Math.round来取整
saveImage() {
  const { canvasWidth, canvasHeight } = this.data
  wx.canvasToTempFilePath({
    x: 0,
    y: 0,
    width: canvasWidth,
    height: canvasHeight,
    destWidth: Math.round(canvasWidth * this.dpr),
    destHeight: Math.round(canvasHeight * this.dpr),
    canvas: this.canvas,
    fileType: 'jpg',
    success(res) {
      const { tempFilePath } = res
      // 通过新页面进行预览
      wx.previewImage({
        current: tempFilePath,
        urls: [tempFilePath]
      })
    },
    fail(err) {
      wx.showToast({
        title: '失败'
      })
    }
  }, this)
 }
H5的代码
微信小程序同样的,就一点点区别,这里就只放H5的代码啦
<!DOCTYPE html>
<html>

<head>
  <script>
    window.onload = () => {
      initParameter()
      initCanvas()
    }

    function initParameter() {
      const {
        screen: {
          width
        },
        devicePixelRatio
      } = window
      this.windowWidth = width
      this.dpr = Math.round(devicePixelRatio)
    }

    async function initCanvas() {
      const canvas = document.getElementById('canvas')
      const ctx = canvas.getContext('2d')

      this.canvas = canvas
      this.ctx = ctx

      await getBackgroundImage()
      await getQRCodeImage()
      await getAvatarImage()

      this.fillBackgroundImage()
      this.fillQrCodeImage()
      this.fillUsernameText()
      this.fillHelpText()
      this.fillUserInfo()

    }

    function getBackgroundImage() {
      return new Promise(async (resolve) => {
        const backgroundImage = new Image()
        backgroundImage.src = await getURLBase64('http://cdn.algbb.cn/test/wechatbg.jpg')
        // backgroundImage.src = 'http://cdn.algbb.cn/test/wechatbg.jpg'
        backgroundImage.crossOrigin = '*'
        backgroundImage.onload = () => {
          this.backgroundImage = backgroundImage
          resolve()
        }
      })
    }

    function getQRCodeImage() {
      return new Promise(async (resolve) => {
        const qrCodeImage = new Image()
        qrCodeImage.src = await getURLBase64('http://cdn.algbb.cn/test/qrcode.jpg')
        // qrCodeImage.src = 'http://cdn.algbb.cn/test/qrcode.jpg'
        qrCodeImage.crossOrigin = '*'
        qrCodeImage.onload = () => {
          this.qrCodeImage = qrCodeImage
          resolve()
        }
      })
    }

    function getAvatarImage() {
      return new Promise(async (resolve) => {
        const avatarImage = new Image()
        avatarImage.src = await getURLBase64('http://cdn.algbb.cn/test/avatar.jpg')
        // avatarImage.src = 'http://cdn.algbb.cn/test/avatar.jpg'
        avatarImage.crossOrigin = '*'
        avatarImage.onload = () => {
          this.avatarImage = avatarImage
          resolve()
        }
      })
    }

    function fillBackgroundImage() {
      const {
        width,
        height
      } = this.backgroundImage

      // canvas宽度为手机宽度 - 40px
      const newCanvasWidth = this.windowWidth - 40
      const scale = width / newCanvasWidth
      const newCanvasHeight = height / scale

      this.canvas.width = newCanvasWidth * this.dpr
      this.canvas.height = newCanvasHeight * this.dpr
      this.canvas.style.width = (newCanvasWidth * this.dpr) + 'px'
      this.canvas.style.height = (newCanvasHeight * this.dpr) + 'px'
      this.ctx.scale(this.dpr, this.dpr)

      this.ctx.clearRect(0, 0, newCanvasWidth, newCanvasHeight)
      this.ctx.drawImage(this.backgroundImage, 0, 0, newCanvasWidth, newCanvasHeight)

      this.canvasWidth = newCanvasWidth
      this.canvasHeight = newCanvasHeight
    }

    function fillQrCodeImage() {
      const {
        width,
        height
      } = this.qrCodeImage
      const {
        canvasWidth,
        canvasHeight
      } = this

      // 设置二维码尺寸,默认正方形
      const qrCodeImageWidth = canvasWidth - 140
      const scale = width / qrCodeImageWidth
      const qrCodeImageHeight = height / scale

      // 设置渲染坐标
      const renderPointX = canvasWidth / 2 - qrCodeImageWidth / 2
      const renderPointY = canvasHeight / 2 - qrCodeImageHeight / 2 - 30

      this.qrCodePointX = renderPointX
      this.qrCodePointY = renderPointY
      this.qrCodeImageWidth = qrCodeImageWidth
      this.qrCodeImageHeight = qrCodeImageHeight

      this.ctx.drawImage(this.qrCodeImage, renderPointX, renderPointY, qrCodeImageWidth, qrCodeImageHeight)
    }

    function fillUsernameText() {
      const {
        canvasWidth
      } = this

      this.ctx.font = 'normal 20px 微软雅黑'
      this.ctx.fillStyle = '#666'
      this.ctx.textAlign = 'center'
      this.ctx.textBaseline = 'middle'

      this.ctx.fillText('zhcxk1998', canvasWidth / 2, this.qrCodePointY - 20)
    }

    function fillHelpText() {
      const {
        canvasWidth
      } = this

      this.ctx.font = 'normal 16px 微软雅黑'
      this.ctx.fillStyle = '#999'
      this.ctx.textAlign = 'center'
      this.ctx.textBaseline = 'middle'
      this.ctx.fillText('微信扫描上方二维码,添加好友', canvasWidth / 2, this.qrCodePointY + this.qrCodeImageHeight + 80)
    }

    function fillUserInfo() {
      const userName = 'BB小天使'
      const {
        canvasWidth
      } = this
      const {
        width,
        height
      } = this.avatarImage
      const {
        width: textWidth
      } = this.ctx.measureText(userName)

      // 设置头像大小,默认头像为正方形,30 * 30
      const avatarWidth = 30
      const scale = width / avatarWidth
      const avatarHeight = height / scale

      // 设置用户名与头像的间隔
      const cap = 10
      // 计算出头像与名字组合的宽度
      const composeWidth = avatarWidth + textWidth + cap

      // 配置渲染的横纵坐标
      const renderPointX = canvasWidth / 2 - composeWidth / 2
      const renderPointY = this.qrCodePointY + this.qrCodeImageHeight + 100

      // 设置回左对齐,不然与头像与名字排列会乱
      this.ctx.textAlign = 'left'

      // 渲染
      this.ctx.fillText(userName, renderPointX + avatarWidth + cap, renderPointY + avatarHeight / 2)
      this.ctx.drawImage(this.avatarImage, renderPointX, renderPointY, avatarWidth, avatarHeight)
    }

    function saveImage() {
      const {
        canvasWidth,
        canvasHeight
      } = this

      console.log(this.canvas.toDataURL())
    }

    function getURLBase64(url) {
      return new Promise((resolve, reject) => {
        const xhr = new XMLHttpRequest()
        xhr.open('get', url, true)
        xhr.responseType = 'blob'
        xhr.onload = function () {
          if (this.status === 200) {
            const blob = this.response
            const fileReader = new FileReader()
            fileReader.onloadend = function (e) {
              const {
                target
              } = e
              const result = target.result
              resolve(result)
            }
            fileReader.readAsDataURL(blob)
          }
        }
        xhr.onerror = function () {
          reject()
        }
        xhr.send()
      })
    }
  </script>
  <style>
  </style>
</head>

<body>
  <div class="container">
    <canvas id="canvas" onclick="saveImage()"></canvas>
  </div>
</body>

</html>
总结
这次小分享只是大致的介绍了一下,如何利用canvas,将我们的二维码,用户新等对象,在canvas上进行一定要求的绘制。然后再实现导出图片,分享。
如果有帮助,希望大家可以点一个赞哦!嘿嘿!
