

背景介绍
近来公司尝试 React 框架,要做一个小程序,最后选型为 Taro + Taro-ui ,鉴于本人第一次写 React ,踩了不少坑,今天就介绍一下 Taro 框架下的生产带小程序码的canvas海报的过程。 ps:Taro 是一套遵循 React 语法规范的 多端开发 解决方案 ,文档地址。
需求
利用微信的社交能力通过小程序达到裂变的目的,拉取新用户。 样式类似这样:
选择界面
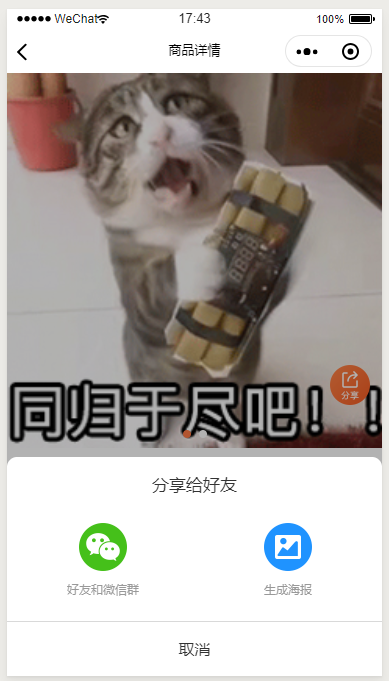
- 利用小程序官方提供的api可以直接分享转发到微信群打开小程序
- 利用小程序生成海报保存图片到相册分享到朋友圈,用户长按识别二维码打开小程序来达到裂变的目的
代码分解
下面我会对主要代码进行分析,完整代码放在了最后,可以直接放进你的 Taro 项目中直接运行看看,部分图片地址需要你自己替换一下。
分享页面
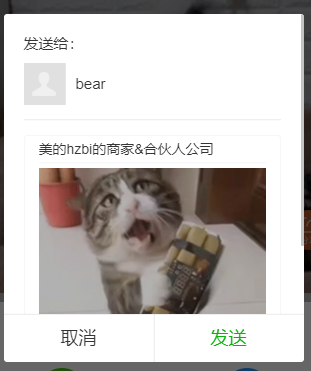
简单来说就是触发转发事件,选择转发对象并生成如下内容
<Button
    className='goodDetail__shareLayout--Text goodDetail__shareLayout--reset' open-type="share" onClick={() => this.share()}
>
    好友和微信群
</Button>
share() {
    return {
        title: '转发分享', // 转发标题
        path: 'goods/pages/goodDetail/index?id=1227440223760351233&__key_=15851931571301' // 转发路径
        // imageUrl: 'xxxx', 自定义图片路径
    }
}
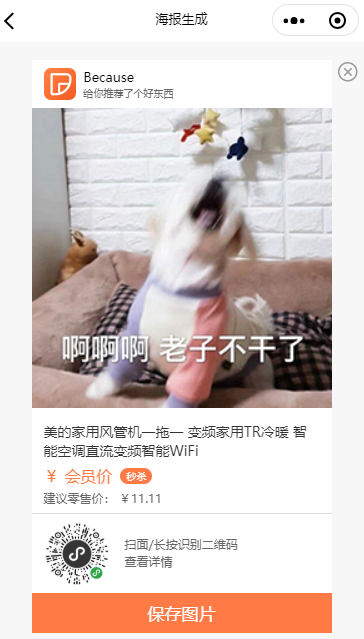
海报展示页面
实际上,我们生成的海报是用canvas画的,其样式是基于px像素单位的真实大小,不容易兼容不同机型的样式,所以我考虑显示的海报其实用正常的HTML代码编写的,真正的canvas放在屏幕外展示,最后保存时再用。
index.jsx
<AtFloatLayout className='posterLayout' isOpened={poster_isOpened} onClose={() => this.closePoster()}>
    <View className='canvas-box'>
        <View className='canvas-cancle' onClick={() => this.closePoster()}></View> // 关闭按钮
        <View className='canvas--html'>
            使用HTML标签编写生成展示的海报
        </View>

        // 真正的canvas元素通过绝对定位隐藏在屏幕外
        {
            share_isOpened &&
            <canvas
              type="2d"
              id="myCanvas"
              style="width: 300px; height: 542px;"
            >
            </canvas>
        }
    </View>
    <View
        onClick={() => this.clickSave()}
        className='posterLayout--button'
    >保存图片</View>
</AtFloatLayout>

index.scss
.goodDetail {
    .posterLayout {
        .canvas-box {
            box-sizing: border-box;
            position: relative;
            width: 100vw;
            padding-top: 3vh;
            text-align: center;

            // 隐藏canvas元素
            #myCanvas {
                margin: 0 auto;
                position: absolute;
                top: 0;
                left: -10000px;
            }
        }
    }
}
canvas元素
海报的展示结束了,就要开始画canvas了,如下,一个canvas元素(以新版小程序为准)需要指定 ‘type’,‘id’,和宽高。
<canvas
    type="2d"
    id="myCanvas"
    style="width: 300px; height: 542px;"
>
</canvas>
获取小程序码
首先我们需要向后台发送请求,获得小程序二维码的网络地址,以备后面使用,文档地址。(这边有个注意点,调取小程序码的接口是服务端调动的,我自己前端调用后返回的图片 Buffer 怎么也转不成图片显示,有大佬会的可以告知一下在小程序环境怎么转,是否需要使用到文件模块)
如果后台用的是有参数限制的方法,可以让后台把信息存储在数据库中,后面获取小程序二维码时再发请求拿到真正的数据信息。
这边注意一下,createCanvas()方法是个Promise,因为绘制canvas时调用获取图片信息是要发接口的,是要时间的,为了防止网络差图片加载不出来我做了async/await处理。
generatePoster() {
      Taro.showLoading({
          title: '海报生成中',
          icon: 'none',
          mask: true
      })
      // 这里实际上应该向后台发请求后去小程序码
      setTimeout(() => {
          // 将拿到的二维码地址存到state中等待调用,并开始绘制canvas
          this.setState({
              QRCodePath: 'https://res.wx.qq.com/wxdoc/dist/assets/img/WXACode.fa3d686a.png'
          }, async () => {
              await this.createCanvas()
              Taro.hideLoading()
              this.setState({
                  poster_isOpened: true
              })
          })
      }, 1000)
  }
完整绘制代码
下面正式绘制,代码如下,主要涉及到获取绘图上下文,绘制图片,绘制文字,绘制路径等,这些api我就不做过多介绍,大家看看文档参考地址。
注意我这边是返回了一个Promise,原因上面介绍了。
createCanvas() {
      const { QRCodePath } = this.state
      let that = this
      return new Promise(function (resolve, reject) {
          Taro.createSelectorQuery()
              .select('#myCanvas')
              .fields({
                  node: true,
                  size: true,
              })
              .exec(async (res) => {
                  const width = res[0].width
                  const height = res[0].height

                  const canvas = res[0].node
                  const ctx = canvas.getContext('2d')

                  const dpr = Taro.getSystemInfoSync().pixelRatio
                  canvas.width = width * dpr
                  canvas.height = height * dpr
                  ctx.scale(dpr, dpr)

                  ctx.fillStyle = '#ffffff'
                  ctx.fillRect(0, 0, 300, 542)

                  that.drawTxt({ context: ctx, text: 'Because', fillStyle: '#000000', broken: true, x: 52, y: 8, font: '13px sans-serif', lineHeight: 18, maxWidth: 450, maxLine: 2 })

                  that.drawTxt({ context: ctx, text: '给你推荐了个好东西', fillStyle: '#666666', broken: true, x: 52, y: 28, font: '10px sans-serif', lineHeight: 14, maxWidth: 450, maxLine: 2 })

                  that.drawTxt({ context: ctx, text: '美的家用风管机一拖一 变频家用TR冷暖 智能空调直流变频智能WiFi', fillStyle: '#000000', broken: true, x: 12, y: 358, font: '14px sans-serif', lineHeight: 20, maxWidth: 276, maxLine: 2 })

                  that.drawTxt({ context: ctx, text: '¥ 会员价', fillStyle: '#FF7A45', broken: true, x: 12, y: 400, font: 'normal normal bold 16px sans-serif', lineHeight: 28, maxWidth: 80, maxLine: 2 })

                  that.drawTxt({ context: ctx, text: `建议零售价: ¥11.11`, fillStyle: '#666666', broken: true, x: 12, y: 425, font: '12px sans-serif', lineHeight: 17, maxWidth: 276, maxLine: 2 })

                  ctx.beginPath()
                  ctx.lineWidth = 0.5
                  ctx.fillStyle = '#666666'
                  ctx.moveTo(0, 450)
                  ctx.lineTo(300, 450)
                  ctx.stroke()

                  that.drawTxt({ context: ctx, text: `扫面/长按识别二维码查看详情`, fillStyle: '#666666', broken: true, x: 100, y: 480, font: '12px sans-serif', lineHeight: 17, maxWidth: 116, maxLine: 2 })

                  // 将要绘制的图片放在一个数组中
                  let imgList = []
                  imgList.push(
                      {
                          src: 'https://res.wx.qq.com/wxdoc/dist/assets/img/WXACode.fa3d686a.png'
                      },
                      {
                          src: 'https://res.wx.qq.com/wxdoc/dist/assets/img/WXACode.fa3d686a.png',
                      },
                      {
                          src: QRCodePath,
                      },
                      {
                          src: 'https://res.wx.qq.com/wxdoc/dist/assets/img/WXACode.fa3d686a.png',
                      }
                  )
                  // 对图片数组进行接口调用返回Promise并将结果存入Promise.all数组中
                  let imgPromise = await Promise.all(imgList.map((item) => {
                      return Taro.getImageInfo({
                          src: item.src
                      })
                  })).catch(err => {
                      reject(err)
                  })
                  // 对Promise.all数组进行图片绘制操作
                  imgPromise.forEach((item, index) => {
                      let imgtag = canvas.createImage()
                      imgtag.src = item.path
                      if (index == 0) {
                          imgtag.onload = () => {
                              ctx.drawImage(imgtag, 12, 8, 32, 32)
                          }
                      } else if (index == 1) {
                          imgtag.onload = () => {
                              ctx.drawImage(imgtag, 0, 48, 300, 300)
                          }
                      } else if (index == 2) {
                          imgtag.onload = () => {
                              ctx.drawImage(imgtag, 12, 460, 72, 72)
                          }
                      } else {
                          imgtag.onload = () => {
                              ctx.drawImage(imgtag, (95 + (index - 3) * 36), 405, 32, 16)
                          }
                      }
                  })
                  // 绘制完成,对外resolve
                  resolve(true)
              })
      })
  }
canvas实例和绘图上下文
首先要取得canvas的实例和其绘图上下文,文档地址,注意其中的canvas.width = res[0].width * dpr; canvas.height = res[0].height * dpr;ctx.scale(dpr, dpr)这边主要是为了匹配不同手机的dpr,保证清晰度。
Taro.createSelectorQuery()
    .select('#myCanvas')
    .fields({
        node: true,
        size: true,
    })
    .exec((res) => {
        const width = res[0].width
        const height = res[0].height

        const canvas = res[0].node
        const ctx = canvas.getContext('2d')

        const dpr = Taro.getSystemInfoSync().pixelRatio
        canvas.width = width * dpr
        canvas.height = height * dpr
        ctx.scale(dpr, dpr)
        }
    )
绘制图片
先看一段绘制图片的代码,写法是canvas文档代码片段的格式。实际代码中我对绘制图片做了统一封装处理,大家可以在上面完整绘制代码查看。
const img0 = canvas.createImage()
img0.onload = () => {
    ctx.drawImage(img0, 12, 8, 32, 32) // 图片资源,x坐标,y坐标,图片宽度,图片高度
}
Taro.getImageInfo({
    src: 'https://xxxxx/20200331/11a09f02-c181-4aba-9c61-fd3b9312d009.png',
    success: function (imgres) {
        img0.src = imgres.path
    }
})
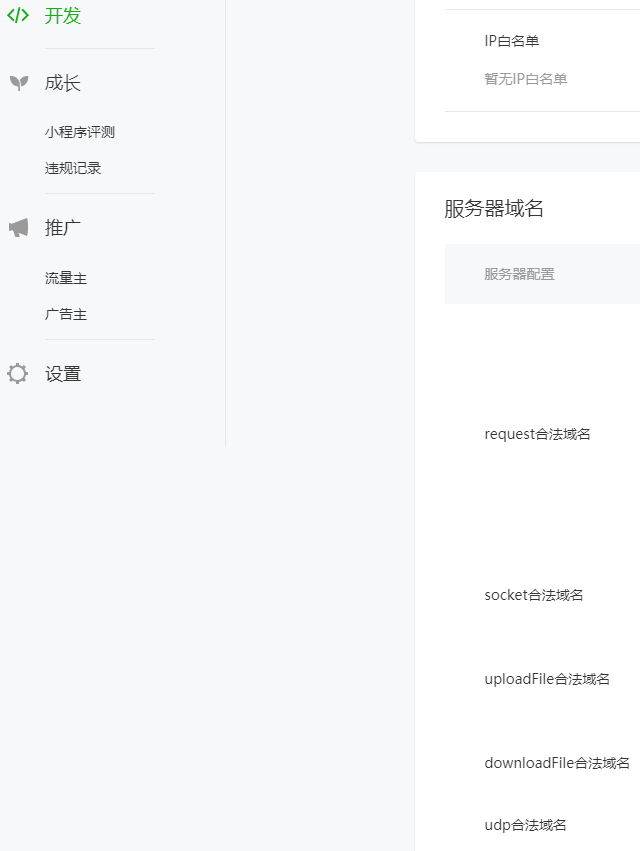
这边提出一个注意点,drawImage()的第一个参数‘img’是所要绘制的图片资源(网络图片要通过 getImageInfo / downloadFile 先下载),getImageInfo / downloadFile 这两个方法则对于网络图片需先配置download域名才能生效,具体方法是:
- 登录微信公众号平台
- 点击开发侧边栏
- 点击‘开发设置’tab页,找到服务器域名模块进行修改
绘制文字
因为canvas文字绘制不支持自动换行,如果你fillText()方法设置了maxwidth参数,文字会在高度不变的情况下全部塞进去,如果长度不够,文字就会变形,在参考一定资料后做了一定的封装,支持自动换行和行数限制,省略号的功能暂时没做,如果有需要自己添加。参考地址
/*方法说明
*@method drawTxt
*@param context canvas上下文
*@param text 绘制的文字
*@param fillStyle 字体样式
*@param broken 用来控制中英文截断
*@param x 绘制文字的x坐标
*@param y 绘制文字的y坐标
*@param font 字体的大小和种类等
*@param lineHeight 行高/换行高度
*@param maxWidth 一行最长长度
*@param maxLine 最多显示行数
*/
drawTxt({context,  text = 'test text', fillStyle = '#000', broken = true, ...rest}) {
    if (!context) throw Error('请传入绘制上下文环境context')
    // 默认设置
    let origin = {x: 0, y: 0, lineHeight: 30, maxWidth: 630 , font: 28, maxLine: 2}

    // 获取最后的数据
    let {x, y, font, lineHeight, maxWidth, maxLine} = {...origin, ...rest}

    // 设置字体样式
    context.textAlign = 'left'
    context.textBaseline = 'middle' // 没有好的方法控制行高,所以设置绘制文本时的基线为em 方框的正中
    context.fillStyle = fillStyle
    context.font = font

    // broken: true  如果不考虑英文单词的完整性 适用于所有情况
    // broken: false  考虑英文单词的完整性 仅适用于纯英文
    //【TODO: 中英混排且考虑单词截断...】

    let splitChar = broken ? '' : ' '

    let arrText = text.split(splitChar)
    let line = ''
    let linesCount = 0

    y = y + lineHeight / 2 // 配合context.textBaseline将文字至于中间部分
    for (var n = 0; n < arrText.length; n++) {
        let testLine = line + arrText[n] + splitChar
        let testWidth = context.measureText(testLine).width
        if (testWidth > maxWidth && n > 0) {
            if (linesCount < maxLine) { // 判断行数在限制行数内绘制文字
                linesCount++
                context.fillText(line, x, y)
                line = arrText[n] + splitChar
                y += lineHeight
            }
        } else {
        // 一行还未绘制完成
            line = testLine
        }
    }
    context.fillText(line, x, y)
}

that.drawTxt({context: ctx, text: 'Because', fillStyle: '#000000', broken: true, x: 52, y: 8, font: '13px sans-serif', lineHeight: 18, maxWidth: 450, maxLine: 2 }
关于这边,大家可以注意一下context.textBaseline = 'middle'和y = y + lineHeight这个操作主要是应对UI图实际上开始的位置是整个行高的坐标,并非是文字的坐标,有兴趣的可以看一下textBaseline的介绍。
这样常见的文字和图片绘制基本没问题了,还有其他填充矩形fillRect()方法,绘制路线beginPath()方法,大家自己对着文档看看。
授权相册和保存图片
获取授权
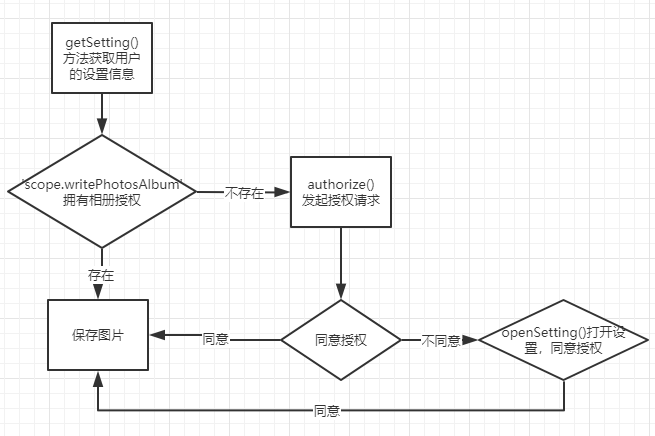
至此,展示图片和canvas都准备好了,下面就是保存图片到手机相册了。
- 我们需要先通过getSetting()方法获取用户的设置信息。
- 通过判断res.authSetting['scope.writePhotosAlbum']字段是否拥有相册授权,如果存在我们就可以直接去保存canvas了,如果不存在,我们需要去申请获取权限。
- authorize()方法向用户发起授权请求。调用后会立刻弹窗询问用户是否同意授权小程序使用某项功能或获取用户的某些数据,但不会实际调用对应接口。如果用户之前已经同意授权,则不会出现弹窗,直接返回成功。
- 授权成功我们就可以去保存canvas,如果用户取消了,我们下次申请时会直接报错,这时我们需要手动引导用户打开设置,通过openSetting()允许授权。
大致流程如下
// 点击保存,获取授权
clickSave () {
    let that = this
    Taro.getSetting().then(res => {
        if (!res.authSetting['scope.writePhotosAlbum']) {
            Taro.authorize({
                scope: 'scope.writePhotosAlbum',
                success () {
                    that.savePoster('#myCanvas')
                }
            }).catch(() => {
                Taro.showModal({
                    content: '检测到您没打开下载图片功能权限,是否去设置打开?',
                    confirmText: "确认",
                    cancelText: "取消",
                    success (res2) {
                        //点击“确认”时打开设置页面
                        if (res2.confirm) {
                            Taro.openSetting({
                                success (res3) {
                                    if (res3.authSetting['scope.writePhotosAlbum']) {
                                        // that.savePoster('#myCanvas')
                                    }
                                }
                            })
                        } else {
                            console.log('用户点击取消')
                        }
                    }
                })
            })
        } else {
            that.savePoster('#myCanvas')
        }
    })
}
保存图片
将canvas保存到相册只需要先用canvasToTempFilePath()方法将canvas转成图片,然后调用saveImageToPhotosAlbum()保存即可,参考地址。
savePoster(id) {
    Taro.createSelectorQuery()
        .select(id)
        .fields({
            node: true,
            size: true,
        }).exec((res) => {
            const canvas = res[0].node
            Taro.canvasToTempFilePath({
                x: 0,
                y: 0,
                width: 300,
                height: 540,
                destWidth: 300 * Taro.getSystemInfoSync().pixelRatio,
                destHeight: 540 * Taro.getSystemInfoSync().pixelRatio,
                canvas: canvas,
                success: (res1) => {
                    console.log(res1.tempFilePath)
                    Taro.saveImageToPhotosAlbum({
                        filePath: res1.tempFilePath,
                        success: () => {
                            Taro.showToast({
                                title: '图片已保存至相册',
                                icon: 'none',
                                mask: true,
                                duration: 2000
                            })
                            this.setState({
                                poster_isOpened: false,
                                share_isOpened: false
                            })
                        }
                    })
                }
            })
        })
}
图片不断放大的bug
像上面那样多次导出canvas图片时,真机会发生导出图片不断以左上角放大的bug,原因未知,我猜测是canvas元素重置的问题,我对其做了删除和创建的处理,bug是解决了,但bug的原因还是不知道,如果有人知道,还请告知。
// 真正的canvas元素通过绝对定位隐藏在屏幕外
{
    share_isOpened &&
    <canvas
      type="2d"
      id="myCanvas"
      style="width: 300px; height: 542px;"
    >
    </canvas>
}
获取小程序码参数
在原生小程序中scene 字段的值会作为 query 参数传递给小程序/小游戏,并且是在onLoad生命周期中获取; 但是在Taro中则是直接保存在this.$router中,在componentWillMount生命周期中获取。
componentWillMount () {
    let params = this.$router.params
    if (params) {
        // 发获取获取真正的存储信息
        Taro.request({
            url: 'xxxx',
            data: {
                params
            },
            header: 'header',
            method: 'GET',
        })
    }
}
总结
到这里,基本结束了,我在简单提几个注意点。
- 转发将 button 设置 open-type="share" 即可触发转发的事件。
- canvas元素需要显示的设置宽高和type类型。
- 可以考虑展示的海报用普通元素编码,canvas隐藏来保证适配和样式。
- 小程序码是服务端调用生成的。
- ctx.drawImage()绘制的图片需要是本地图片,网络图片要先getImageInfo()或者downloadFile()下载,要在小程序后台配置download域名。
- 网络图片要先getImageInfo()或者downloadFile()下载需要时间,要注意绘制完成再保存图片。
- ctx.fillText()绘制文字不可换行,需要封装。
- 多次保存会出现不断放大的bug,需要额外处理。
- 相册授权的流程注意各种判断。 最后附上相关代码,自己尝试的时候记得替换相关网络图片地址。 index.jsx
import Taro, { Component } from '@tarojs/taro'
import { View, Text, Image, Button } from '@tarojs/components'
import { AtFloatLayout } from 'taro-ui'
import './index.scss'
class GoodDetail extends Component {
constructor(props) {
super(props)
this.state = {
QRCodePath: '', // 小程序码地址
share_isOpened: false, // 分享弹框
poster_isOpened: false //
}
}
componentWillMount() {
let params = this.$router.params
if (params) {
Taro.request({
url: 'xxxx',
data: {
params
},
header: 'header',
method: 'GET',
})
}
}
componentWillMount() {
}
config = {
navigationBarTitleText: '海报生成'
}
// 分享按钮
shareButton() {
let button = null
button = <View className='goodDetail__button--share' onClick={this.clickShareButton}></View>
return button
}
clickShareButton = () => {
this.setState({
share_isOpened: true
})
}
// 将button 组件 open-type="share"
shareLayout() {
const { share_isOpened } = this.state
return (
<AtFloatLayout className='shareLayOut activityOut' isOpened={share_isOpened} onClose={() => this.shareLayoutClick()}>
<View className='conponContent'>
<View className='head'>
分享给好友
</View>
<View className='goodDetail__shareLayout--Icon--box'>
<View className='goodDetail__shareLayout--Icon-area'>
<Button
className='goodDetail__shareLayout--Icon--wechat goodDetail__shareLayout--reset'
open-type="share"
>
</Button>
<Button
className='goodDetail__shareLayout--Text goodDetail__shareLayout--reset' open-type="share" onClick={() => this.share()}
>
好友和微信群
</Button>
</View>
<View className='goodDetail__shareLayout--Icon-area' onClick={() => this.generatePoster()}>
<View className='goodDetail__shareLayout--Icon--poster'>
</View>
<View className='goodDetail__shareLayout--Text'>
生成海报
</View>
</View>
</View>
<View className='goodDetail__shareLayout--Button' onClick={() => this.shareLayoutClick()}>取消</View>
</View>
</AtFloatLayout>
)
}
shareLayoutClick() {
this.setState({
share_isOpened: false
})
}
share() {
return {
title: '转发分享', // 转发标题
path: 'goods/pages/goodDetail/index?id=1227440223760351233&__key_=15851931571301' // 转发路径
// imageUrl: 'xxxx', 自定义图片路径
}
}
generatePoster() {
Taro.showLoading({
title: '海报生成中',
icon: 'none',
mask: true
})
// 这里实际上应该向后台发请求后去小程序码
setTimeout(() => {
// 将拿到的二维码地址存到state中等待调用,并开始绘制canvas
this.setState({
QRCodePath: 'https://res.wx.qq.com/wxdoc/dist/assets/img/WXACode.fa3d686a.png'
}, async () => {
await this.createCanvas()
Taro.hideLoading()
this.setState({
poster_isOpened: true
})
})
}, 1000)
}
closePoster() {
this.setState({
poster_isOpened: false
})
}
/*方法说明
*@method drawTxt
*@param context canvas上下文
*@param text 绘制的文字
*@param fillStyle 字体样式
*@param broken 用来控制中英文截断
*@param x 绘制文字的x坐标
*@param y 绘制文字的y坐标
*@param font 字体的大小和种类等
*@param lineHeight 行高/换行高度
*@param maxWidth 一行最长长度
*@param maxLine 最多显示行数
*/
drawTxt({ context, text = 'test text', fillStyle = '#000', broken = true, ...rest }) {
if (!context) throw Error('请传入绘制上下文环境context')
// 默认设置
let origin = { x: 0, y: 0, lineHeight: 30, maxWidth: 630, font: 28, maxLine: 2 }
// 获取最后的数据
let { x, y, font, lineHeight, maxWidth, maxLine } = { ...origin, ...rest }
// 设置字体样式
context.textAlign = 'left'
context.textBaseline = 'middle' // 没有好的方法控制行高,所以设置绘制文本时的基线为em 方框的正中
context.fillStyle = fillStyle
context.font = font
// broken: true 如果不考虑英文单词的完整性 适用于所有情况
// broken: false 考虑英文单词的完整性 仅适用于纯英文
//【TODO: 中英混排且考虑单词截断...】
let splitChar = broken ? '' : ' '
let arrText = text.split(splitChar)
let line = ''
let linesCount = 0
y = y + lineHeight / 2 // 配合context.textBaseline将文字至于中间部分
for (var n = 0; n < arrText.length; n++) {
let testLine = line + arrText[n] + splitChar
let testWidth = context.measureText(testLine).width
if (testWidth > maxWidth && n > 0) {
if (linesCount < maxLine) { // 判断行数在限制行数内绘制文字
linesCount++
context.fillText(line, x, y)
line = arrText[n] + splitChar
y += lineHeight
}
} else {
// 一行还未绘制完成
line = testLine
}
}
context.fillText(line, x, y)
}
createCanvas() {
const { QRCodePath } = this.state
let that = this
return new Promise(function (resolve, reject) {
Taro.createSelectorQuery()
.select('#myCanvas')
.fields({
node: true,
size: true,
})
.exec(async (res) => {
const width = res[0].width
const height = res[0].height
const canvas = res[0].node
const ctx = canvas.getContext('2d')
const dpr = Taro.getSystemInfoSync().pixelRatio
canvas.width = width * dpr
canvas.height = height * dpr
ctx.scale(dpr, dpr)
ctx.fillStyle = '#ffffff'
ctx.fillRect(0, 0, 300, 542)
that.drawTxt({ context: ctx, text: 'Because', fillStyle: '#000000', broken: true, x: 52, y: 8, font: '13px sans-serif', lineHeight: 18, maxWidth: 450, maxLine: 2 })
that.drawTxt({ context: ctx, text: '给你推荐了个好东西', fillStyle: '#666666', broken: true, x: 52, y: 28, font: '10px sans-serif', lineHeight: 14, maxWidth: 450, maxLine: 2 })
that.drawTxt({ context: ctx, text: '美的家用风管机一拖一 变频家用TR冷暖 智能空调直流变频智能WiFi', fillStyle: '#000000', broken: true, x: 12, y: 358, font: '14px sans-serif', lineHeight: 20, maxWidth: 276, maxLine: 2 })
that.drawTxt({ context: ctx, text: '¥ 会员价', fillStyle: '#FF7A45', broken: true, x: 12, y: 400, font: 'normal normal bold 16px sans-serif', lineHeight: 28, maxWidth: 80, maxLine: 2 })
that.drawTxt({ context: ctx, text: `建议零售价: ¥11.11`, fillStyle: '#666666', broken: true, x: 12, y: 425, font: '12px sans-serif', lineHeight: 17, maxWidth: 276, maxLine: 2 })
ctx.beginPath()
ctx.lineWidth = 0.5
ctx.fillStyle = '#666666'
ctx.moveTo(0, 450)
ctx.lineTo(300, 450)
ctx.stroke()
that.drawTxt({ context: ctx, text: `扫面/长按识别二维码查看详情`, fillStyle: '#666666', broken: true, x: 100, y: 480, font: '12px sans-serif', lineHeight: 17, maxWidth: 116, maxLine: 2 })
// 将要绘制的图片放在一个数组中
let imgList = []
imgList.push(
{
src: 'https://res.wx.qq.com/wxdoc/dist/assets/img/WXACode.fa3d686a.png'
},
{
src: 'https://res.wx.qq.com/wxdoc/dist/assets/img/WXACode.fa3d686a.png',
},
{
src: QRCodePath,
},
{
src: 'https://res.wx.qq.com/wxdoc/dist/assets/img/WXACode.fa3d686a.png',
}
)
// 对图片数组进行接口调用返回Promise并将结果存入Promise.all数组中
let imgPromise = await Promise.all(imgList.map((item) => {
return Taro.getImageInfo({
src: item.src
})
})).catch(err => {
reject(err)
})
// 对Promise.all数组进行图片绘制操作
imgPromise.forEach((item, index) => {
let imgtag = canvas.createImage()
imgtag.src = item.path
if (index == 0) {
imgtag.onload = () => {
ctx.drawImage(imgtag, 12, 8, 32, 32)
}
} else if (index == 1) {
imgtag.onload = () => {
ctx.drawImage(imgtag, 0, 48, 300, 300)
}
} else if (index == 2) {
imgtag.onload = () => {
ctx.drawImage(imgtag, 12, 460, 72, 72)
}
} else {
imgtag.onload = () => {
ctx.drawImage(imgtag, (95 + (index - 3) * 36), 405, 32, 16)
}
}
})
// 绘制完成,对外resolve
resolve(true)
})
})
}
posterLayout() {
const { poster_isOpened, share_isOpened, QRCodePath } = this.state
return (
<AtFloatLayout className='posterLayout' isOpened={poster_isOpened} onClose={() => this.closePoster()}>
<View className='canvas-box'>
<View className='canvas-cancle' onClick={() => this.closePoster()}></View>
<View className='canvas--html'>
<View className='canvas--html--head'>
<Image
className='canvas--html--head--image'
src='https://res.wx.qq.com/wxdoc/dist/assets/img/WXACode.fa3d686a.png'
>
</Image>
<View className='canvas--html--head--text'>
<View className='canvas--html--head--name'>Because</View>
<View className='canvas--html--head--tip'>给你推荐了个好东西</View>
</View>
</View>
<Image
className='canvas--html--image'
src='https://res.wx.qq.com/wxdoc/dist/assets/img/WXACode.fa3d686a.png'
></Image>
<View className='canvas--html--good--name'>美的家用风管机一拖一 变频家用TR冷暖 智能空调直流变频智能WiFi</View>
<View className='canvas--html--good--info'>
<Text className='canvas--html--good--price'>¥ 会员价</Text>
<Text className='canvas--html--good--tags'>秒杀</Text>
</View>
<View className='canvas--html--good--minRetailPrice'>
建议零售价: ¥11.11
</View>
<View className='canvas--html--qrcode'>
<Image
src={QRCodePath}
className='canvas--html--qrcode--image'
></Image>
<View className='canvas--html--qrcode--tip'>
<View className='canvas--html--qrcode--text'>扫面/长按识别二维码</View>
<View className='canvas--html--qrcode--text'>查看详情</View>
</View>
</View>
</View>
{
share_isOpened &&
<canvas
type="2d"
id="myCanvas"
style="width: 300px; height: 542px;"
>
</canvas>
}
</View>
<View
onClick={() => this.clickSave()}
className='posterLayout--button'
>保存图片</View>
</AtFloatLayout>
)
}
// 点击保存,获取授权
clickSave() {
let that = this
Taro.getSetting().then(res => {
if (!res.authSetting['scope.writePhotosAlbum']) {
Taro.authorize({
scope: 'scope.writePhotosAlbum',
success() {
that.savePoster('#myCanvas')
},
fail() {
// Taro.showToast({
// title: '图片保存失败',
// icon: 'none',
// mask: true,
// duration: 2000
// })
}
}).catch(() => {
Taro.showModal({
content: '检测到您没打开下载图片功能权限,是否去设置打开?',
confirmText: "确认",
cancelText: "取消",
success(res2) {
//点击“确认”时打开设置页面
if (res2.confirm) {
Taro.openSetting({
success(res3) {
if (res3.authSetting['scope.writePhotosAlbum']) {
// that.savePoster('#myCanvas')
}
}
})
} else {
console.log('用户点击取消')
}
}
})
})
} else {
that.savePoster('#myCanvas')
}
})
}
savePoster(id) {
Taro.createSelectorQuery()
.select(id)
.fields({
node: true,
size: true,
}).exec((res) => {
const canvas = res[0].node
Taro.canvasToTempFilePath({
x: 0,
y: 0,
width: 300,
height: 540,
destWidth: 300 * Taro.getSystemInfoSync().pixelRatio,
destHeight: 540 * Taro.getSystemInfoSync().pixelRatio,
canvas: canvas,
success: (res1) => {
console.log(res1.tempFilePath)
Taro.saveImageToPhotosAlbum({
filePath: res1.tempFilePath,
success: () => {
Taro.showToast({
title: '图片已保存至相册',
icon: 'none',
mask: true,
duration: 2000
})
this.setState({
poster_isOpened: false,
share_isOpened: false
})
}
})
}
})
})
}
render() {
return (
<View className='goodDetail'>
{this.shareLayout()}
{this.posterLayout()}
{this.shareButton()}
</View>
)
}
}
export default GoodDetail
index.scss
.goodDetail {
  &__button {
      &--share {
          position: fixed;
          bottom: 45%;
          right: 24px;
          width: 80px;
          height: 80px;
          background: url("https://res.wx.qq.com/wxdoc/dist/assets/img/WXACode.fa3d686a.png") no-repeat center center;
          background-size: cover;;
      }
  }
  &__shareLayout {
      &--Icon {
          &--box {
              display: flex;
              justify-content: space-between;
              padding: 24px 140px 48px 120px;
          }
          &--area {
              text-align: center;
          }
          &--wechat {
              width: 96px;
              height: 96px;
              margin-bottom: 20px;
              background: url("https://res.wx.qq.com/wxdoc/dist/assets/img/WXACode.fa3d686a.png") no-repeat center center;
              background-size: cover;;
          }
          &--poster {
              width: 96px;
              height: 96px;
              margin-bottom: 20px;
              background: url("https://res.wx.qq.com/wxdoc/dist/assets/img/WXACode.fa3d686a.png") no-repeat center center;
              background-size: cover;;
          }
      }
      &--Text {
          font-size: 24px;
          color: #999999;
      }
      &--Button {
          font-size: 32px;
          color: #333333;
          text-align: center;
          line-height: 110px;
          border-top: 1px solid #D9D9D9;
      }
      &--reset {
          padding: 0 !important;
          background-color: #fff !important;
          line-height: 32px !important;
      }
      &--reset::after {
          border: none !important;
      }
  }
  .goodDetail__shareLayout--Icon-area {
      display: flex;
      flex-direction: column;
      justify-content: center;
      align-items: center;
  }
  .shareLayOut {
      border-top-left-radius: 20px;
      border-top-right-radius: 20px;

      .at-float-layout__container {
          border-top-left-radius: 20px;
          border-top-right-radius: 20px;
          min-height: 300px;
          background: #ffffff;

          .layout-body {
              padding: 0;
              min-height: 300px;
              max-height: 950px;
              border-top-left-radius: 20px;
              border-top-right-radius: 20px;
              .layout-body__content{
                  min-height: 300px;
                  max-height: 950px;
              }
          }
      }

      .conponContent {
          position: relative;
          border-top-left-radius: 20px;
          border-top-right-radius: 20px;

          .head {
              font-size: 34px;
              height: 108px;
              line-height: 108px;
              padding: 0 24px;
              border-top-left-radius: 20px;
              border-top-right-radius: 20px;
              text-align: center;
              z-index: 999;
          }
          .popHeight {
              height: 108px;
          }
      }
  }
  .posterLayout {
      .at-float-layout__container {
          min-height: 100vh;
          background: #F7F7F7;
          .layout-body {
              padding: 0;
              min-height: 100vh;
              max-height: 100vh;
              .layout-body__content{
                  min-height: 100vh;
                  max-height: 100vh;
              }
          }
      }
      .canvas-box {
          box-sizing: border-box;
          position: relative;
          width: 100vw;
          padding-top: 3vh;
          text-align: center;
          #myCanvas {
              margin: 0 auto;
              position: absolute;
              top: 0;
              left: -10000px;
          }
          .canvas-cancle {
              position: absolute;
              top: 3vh;
              right: 18px;
              width: 48px;
              height: 48px;
              background-color: red;
          }
      }
      .canvas--html {
          box-sizing: border-box;
          text-align: left;
          width: 600px;
          margin: 0 auto;
          background-color: #fff;
          &--head {
              display: flex;
              align-items: center;
              padding: 16px 24px;
              &--image {
                  width: 64px;
                  height: 64px;
                  margin-right: 16px;
              }
              &--name {
                  font-size: 26px;
                  color: #000000;
                  line-height: 36px;
              }
              &--tip {
                  font-size: 20px;
                  color: #666666;
                  line-height: 28px;
              }
          }
          &--image {
              width: 600px;
              height: 600px;
          }
          &--good {
              &--name {
                  height: 80px;
                  padding: 20px 24px 0 24px;
                  overflow: hidden;
              }
              &--info {
                  padding: 0 24px;
                  display: flex;
                  align-items: center;
                  line-height: 56px;
              }
              &--price {
                  font-size: 32px;
                  margin-right: 16px;
                  color: #FF7A45;
              }
              &--tags {
                  text-align: center;
                  width: 64px;
                  height: 32px;
                  line-height: 32px;
                  font-size: 20px;
                  color: #ffffff;
                  border-radius: 32px;
                  background-color: #FF7A45;

              }
              &--minRetailPrice {
                  padding: 0 24px;
                  padding-bottom: 12px;
                  font-size: 24px;
                  line-height: 34px;
                  color: #666666;
              }
          }
          &--qrcode {
              display: flex;
              align-items: center;
              padding: 14px 24px;
              border-top: 1px solid #D9D9D9;
              &--image {
                  width: 130px;
                  height: 130px;
                  margin-right: 32px;
              }
              &--tip {
                  font-size: 24px;
                  line-height: 34px;
                  color: #666666;
              }
          }
      }
      .posterLayout--button {
          width: 600px;
          height: 80px;
          line-height: 80px;
          text-align: center;
          font-size: 34px;
          margin: 0 auto;
          color: #ffffff;
          background-color: #FF7A45;
          // border-radius: 80px;
      }
  }
}
