@[TOC](IOS 屏幕适配(一)理论篇)
1. IOS 屏幕适配基本概念
1.1 IOS 设备的尺寸和分辨率
1.1.1 分辨率相关概念
- 点(Points):
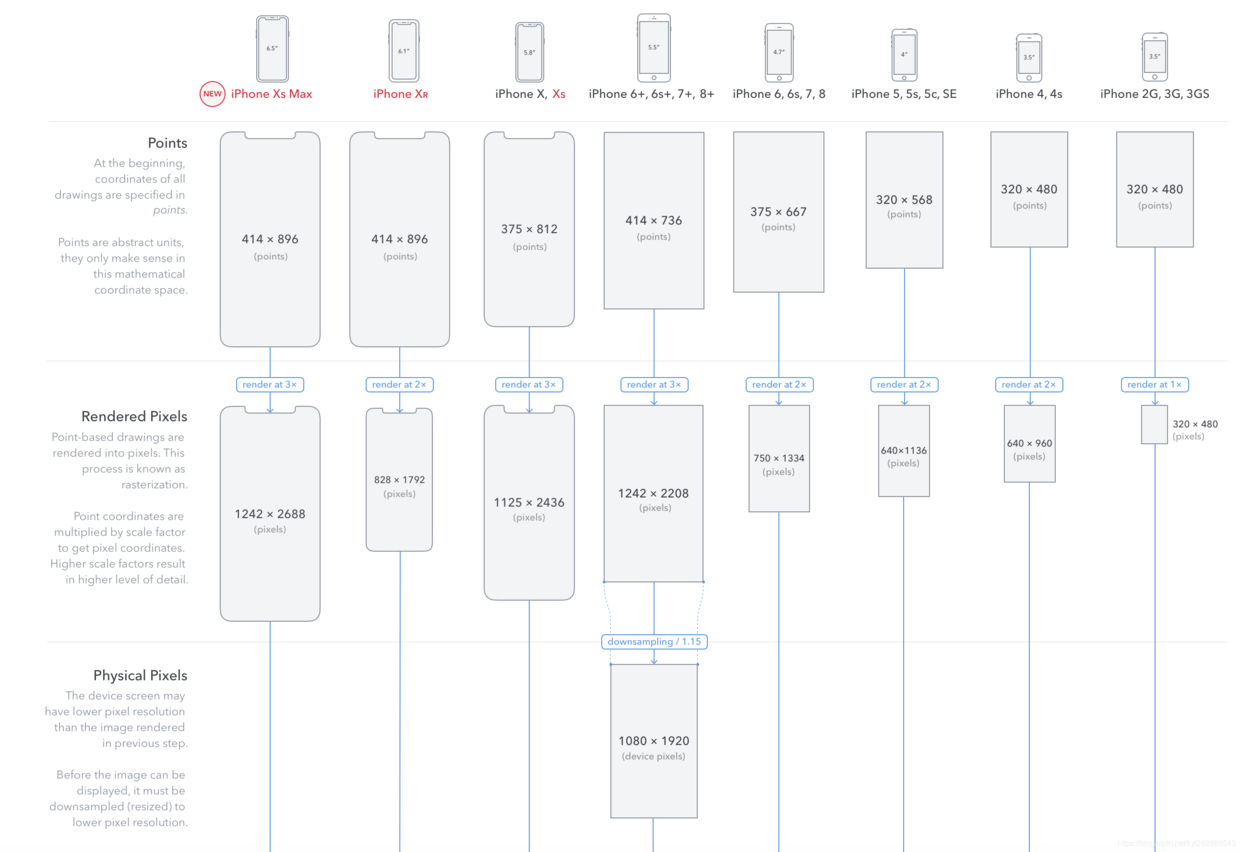
是iOS开发中引入的抽象单位,称作点。开发过程中所有基于坐标系的绘制都是以 point 作为单位,在iPhone 2G,3G,3GS的年代,point 和屏幕上的像素是完全一一对应的,即 320 * 480 (points), 也是 320 * 480 (pixels)
- 渲染像素 (Rendered Pixels):
Rendered Pixels: 渲染像素, 以 point 为单位的绘制最终都会渲染成 pixels,这个过程被称为光栅化。基于 point 的坐标系乘以比例因子可以得到基于像素的坐标系,高比例因子会使更多的细节展示,目前的比例因子会是 1x,2x,3x
- 物理像素(Physical Pixels):
Physical Pixels: 物理像素,就是设备屏幕实际的像素
- 设备屏幕的物理长度(Physical Device):
Physical Device: 设备屏幕的物理长度,使用英寸作为单位。比如iPhone 4屏幕是3.5英寸,iPhone 5 是4英寸,iphone 6是4.7英寸,这里的数字是指手机屏幕对角线的物理长度。实际上会是Physical Pixels的像素值(而不是Rendered Pixels的像素值)会渲染到该屏幕上, 屏幕会有 PPI(pixels-per-inch) 的特性,PPI 的值告诉你每英寸会有多少像素渲染。
1.1.2 IOS 各个设备对应的分辨率
- 更多关于IOS设备分辨率可以看The Ultimate Guide To iPhone Resolutions
| 机型 | 屏幕宽高(point) | 渲染像素(pixel) | 物理像素(pixel) | 屏幕对角线长度(英寸) | 屏幕模式 |
|---|---|---|---|---|---|
| iPhone 2G,3G,3GS | 320 * 480 | 320 * 480 | 320 * 480 | 3.5(163PPI) | 1x |
| iPhone 4, 4s | 320 * 480 | 640 * 960 | 640 * 960 | 3.5 (326PPI) | 2x |
| iPhone 5, 5s | 320 * 568 | 640 * 1136 | 640 * 1136 | 4 (326PPI) | 2x |
| iPhone 6, 6s, 7 | 375 * 667 | 750 * 1334 | 750 * 1334 | 4.7 (326PPI) | 2x |
| iPhone 6 Plus, 6s Plus, 7 Plus | 414 * 736 | 1242 * 2208 | 1080 * 1920 | 5.5 (401PPI) | 3x |
- iphone设备尺寸
| 机型 | 屏幕宽高(point) | 比例 | 像素密度(PPI) | 屏幕尺寸 | 型号代码 | 发布日 |
|---|---|---|---|---|---|---|
| iPhone 2g | 480×320 | 3:2 | 163ppi | 3.5 | iPhone1,1 | 2008.01 |
| iPhone 3g | 480×320 | 3:2 | 163ppi | 3.5 | iPhone1,2 | 2008.06 |
| iPhone 3gs | 480×320 | 3:2 | 163ppi | 3.5 | iPhone2,1 | 2009.06 |
| iPhone 4 | 960×640 | 3:2 | 163ppi | 3.5 | iPhone3,1、iPhone3,2、iPhone3,3 | 2010.06 |
| iPhone 4s | 960×640 | 3:2 | 326ppi | 3.5 | iPhone4,1 | 2011.10 |
| iPhone 5 | 1136×640 | 16:9 | 326ppi | 4.0 | iPhone5,1、iPhone5,2 | 2012.09 |
| iPhone 5c | 1136×640 | 16:9 | 326ppi | 4.0 | iPhone5,3、iPhone5,4 | 2013.09 |
| iPhone 5s | 1136×640 | 16:9 | 326ppi | 4.0 | iPhone6,1、iPhone6,2 | 2013.09 |
| iPhone 6 | 1334×750 | 16:9 | 401ppi | 4.7 | iPhone7,2 | 2014.09 |
| iPhone 6 plus | 1920×1080 | 16:9 | 401ppi | 5.5 | iPhone7,1 | 2014.09 |
| iPhone 6s | 1334×750 | 16:9 | 401ppi | 4.7 | iPhone8,2 | 2015.09 |
| iPhone 6s plus | 1920×1080 | 16:9 | 401ppi | 5.5 | iPhone8,1 | 2015.09 |
| iPhone 5 SE | 1136×640 | 16:9 | 401ppi | 4.0 | iPhone8,4 | 2016.03 |
| iPhone 7 | 1334×750 | 16:9 | 401ppi | 4.7 | iPhone9,1、iPhone9,3 | 2016.09 |
| iPhone 7 plus | 1920×1080 | 16:9 | 401ppi | 5.5 | iPhone9,2、iPhone9,4 | 2016.09 |
| iPhone 8 | 1334×750 | 16:9 | 401ppi | 4.7 | iPhone10,1、iPhone10,4 | 2017.09 |
| iPhone 8 plus | 1920×1080 | 16:9 | 401ppi | 5.5 | iPhone10,2、iPhone10,5 | 2017.09 |
| iPhone X | 2436×1125 | 18:9 | 458ppi | 5.8 | iPhone10,3、iPhone10,6 | 2017.09 |
| iPhone XS | 2436×1125 | 18:9 | 458ppi | 5.8 | iPhone11,2 | 2018.09 |
| iPhone XS Max | 2688×1242 | 18:9 | 458ppi | 6.5 | iPhone11,4、iPhone11,6 | 2018.09 |
| iPhone XR | 1792×828 | 19.5:9 | 326ppi | 6.1 | iPhone11,8 | 2018.09 |
- ipad 尺寸
| 机型 | 屏幕宽高(point) | 屏幕模式(Scale) | 物理像素(pixel) | 比例 | 像素密度(PPI) | 屏幕尺寸 | 型号代码 | 发布日 |
|---|---|---|---|---|---|---|---|---|
| iPad | 1024×768 | @1x | 1024×768 | 4:3 | 163ppi | 9.7 | iPad1,1 | 2010.01 |
| iPad 2 | 1024×768 | @1x | 1024×768 | 4:3 | 163ppi | 9.7 | iPad2,1、iPad2,2、iPad2,3、iPad2,4 | 2011.03 |
| iPad 3(New) | 1024×768 | @2x | 2048×1536 | 4:3 | 264ppi | 9.7 | iPad3,1、iPad3,2、iPad3,3 | 2012.03 |
| iPad 4 | 1024×768 | @2x | 2048×1536 | 4:3 | 264ppi | 9.7 | iPad3,4、iPad3,5、iPad3,6 | 2012.10 |
| iPad 5 | 1024×768 | @2x | 2048×1536 | 4:3 | 264ppi | 9.7 | iPad6,11、iPad6,12 | 2017.03 |
- ipad Air尺寸
| 机型 | 屏幕宽高(point) | 屏幕模式(Scale) | 物理像素(pixel) | 比例 | 像素密度(PPI) | 屏幕尺寸 | 型号代码 | 发布日 |
|---|---|---|---|---|---|---|---|---|
| iPad Air | 1024×768 | @2x | 2048×1536 | 4:3 | 264ppi | 9.7 | iPad4,1、iPad4,2、iPad4,3 | 2013.10 |
| iPad Air 2 | 1024×768 | @2x | 2048×1536 | 4:3 | 264ppi | 9.7 | iPad5,3、iPad5,4 | 2014.10 |
- iPad Pro 尺寸
| 机型 | 屏幕宽高(point) | 屏幕模式(Scale) | 物理像素(pixel) | 比例 | 像素密度(PPI) | 屏幕尺寸 | 型号代码 | 发布日 |
|---|---|---|---|---|---|---|---|---|
| iPad Pro 12.9-inch | 1366×1024 | @2x | 2732×2048 | 4:3 | 264ppi | 12.9 | iPad6,7、iPad6,8 | 2015.09 |
| iPad Pro 9.7-inch | 1024×768 | @2x | 2048×1536 | 4:3 | 264ppi | 9.7 | iPad6,3、iPad6,4 | 2016.03 |
| iPad Pro 12.9-inch 2 | 1366×1024 | @2x | 2732×2048 | 4:3 | 264ppi | 12.9 | iPad7,1、iPad7,2 | 2017 |
| iPad Pro 10.5 | 1112×834 | @2x | 2224×1668 | 4:3 | 264ppi | 10.5 | iPad7,3、iPad7,4 |
- ipad Mini尺寸
| 机型 | 屏幕宽高(point) | 屏幕模式(Scale) | 物理像素(pixel) | 比例 | 像素密度(PPI) | 屏幕尺寸 | 型号代码 | 发布日 |
|---|---|---|---|---|---|---|---|---|
| iPad mini | 1024×768 | @1X | 1024×768 | 4:3 | 163 | 7.9 | iPad2,5、iPad2,6、iPad2,7 | 2012.10 |
| iPad mini 2 | 1024×768 | @2X | 2048×1536 | 4:3 | 326 | 7.9 | iPad4,5、iPad4,6、iPad4,7 | 2013.10 |
| iPad mini 3 | 1024×768 | @2X | 2048×1536 | 4:3 | 326 | 7.9 | iPad4,7、iPad4,8、iPad4,9 | 2014.10 |
| iPad mini 4 | 1024×768 | @2X | 2048×1536 | 4:3 | 326 | 7.9 | iPad5,1、iPad5,2 | 2015.09 |
- iPod Touch尺寸
| 机型 | 屏幕宽高(point) | 屏幕模式(Scale) | 物理像素(pixel) | 比例 | 像素密度(PPI) | 屏幕尺寸 | 型号代码 | 发布日 |
|---|---|---|---|---|---|---|---|---|
| iTouch | 480*320 | @1X | 480*320 | 3:2 | 163ppi | 3.5 | iPod1,1 | 2007.09 |
| iTouch 2 | 480*320 | @1X | 480*320 | 3:2 | 163ppi | 3.5 | iPod2,1 | 2008.09 |
| iTouch 3 | 480*320 | @1X | 480*320 | 3:2 | 163ppi | 3.5 | iPod3,1 | 2009.09 |
| iTouch 4 | 480*320 | @2X | 960*640 | 3:2 | 326ppi | 3.5 | iPod4,1 | 2010.09 |
| iTouch 5 | 568*320 | @2X | 1136*640 | 16:9 | 326ppi | 4.0 | iPod5,1 | 2012.09 |
| iTouch 6 | 568*320 | @2X | 1136*640 | 16:9 | 326ppi | 4.0 | iPod7,1 | 2015.07 |
- 1x, 2x, 3x 的含义:
屏幕模式,描述的就是屏幕中一个点有多少个 Rendered Pixels 渲染,对于2倍屏(又称 Retina 显示屏),会有 2 * 2 = 4 个像素的面积渲染,对于3倍屏(又称 Retina HD 显示屏),会有 3 * 3 = 9 个像素的面积渲染。
iOS 开发中,所有控件的坐标以及控件大小都是以点为单位的,假如我在屏幕上需要展示一张 20 * 20 (单位:point)大小的图片,那么设计师应该怎么给我图呢?这里就会用到屏幕模式的概念,如果屏幕是 2x,那么就需要提供 40 * 40 (单位: pixel)大小的图片,如果屏幕是 3x,那么就提供 60 * 60 大小的图片,且图片的命名需要遵守以下规范: Standard:<device_modifier>.<filename_extension> High resolution:@2x<device_modifier>.<filename_extension> High HD resolution:@3x<device_modifier>.<filename_extension>
ImageName: 图片名字,根据场景命名 device_modifier: 可选,可以是 ~ipad 或者 ~iphone, 当需要为 iPad 和 iPhone 分别指定一套图时需要加上此字段 filename_extension: 图片后缀名,iOS中使用 png 图片
例如: MyImage.png - 1x 显示屏自动加载的图片版本 MyImage@2x.png - 2x 显示屏自动加载的图片版本 MyImage@3x.png - 3x 显示屏自动加载的图片版本 MyImage@2x~iphone.png - 2x iPhone 和 iPod touch 显示屏自动加载的图片版本 MyImage@3x~iphone.png - 3x iPhone and iPod 显示屏自动加载的图片版本
- 2x屏幕的设备会自动加载 xxx@2x.png 命名的图片资源,3x屏幕的设备会自动加载 xxx@3x.png 的图片, 现在基本没有 1x屏幕的设备了,可以不用提供这个分辨率的图片了。
1.2 设计和开发之间的多屏适配问题
- 现在APP设计开发必须考虑适配大、中、小三种屏幕。所以如何做到交付一套设计稿解决适配大中小三屏的问题?设计和开发之间采用什么协作模式?
一个基本思路是:
- 选择一种尺寸作为设计和开发基准;
- 定义一套适配规则,自动适配剩下两种尺寸;
- 特殊适配效果给出设计效果。
更多详情可以参考这篇文章:手机淘宝的设计方案
- 参考手机淘宝的设计方案如下:
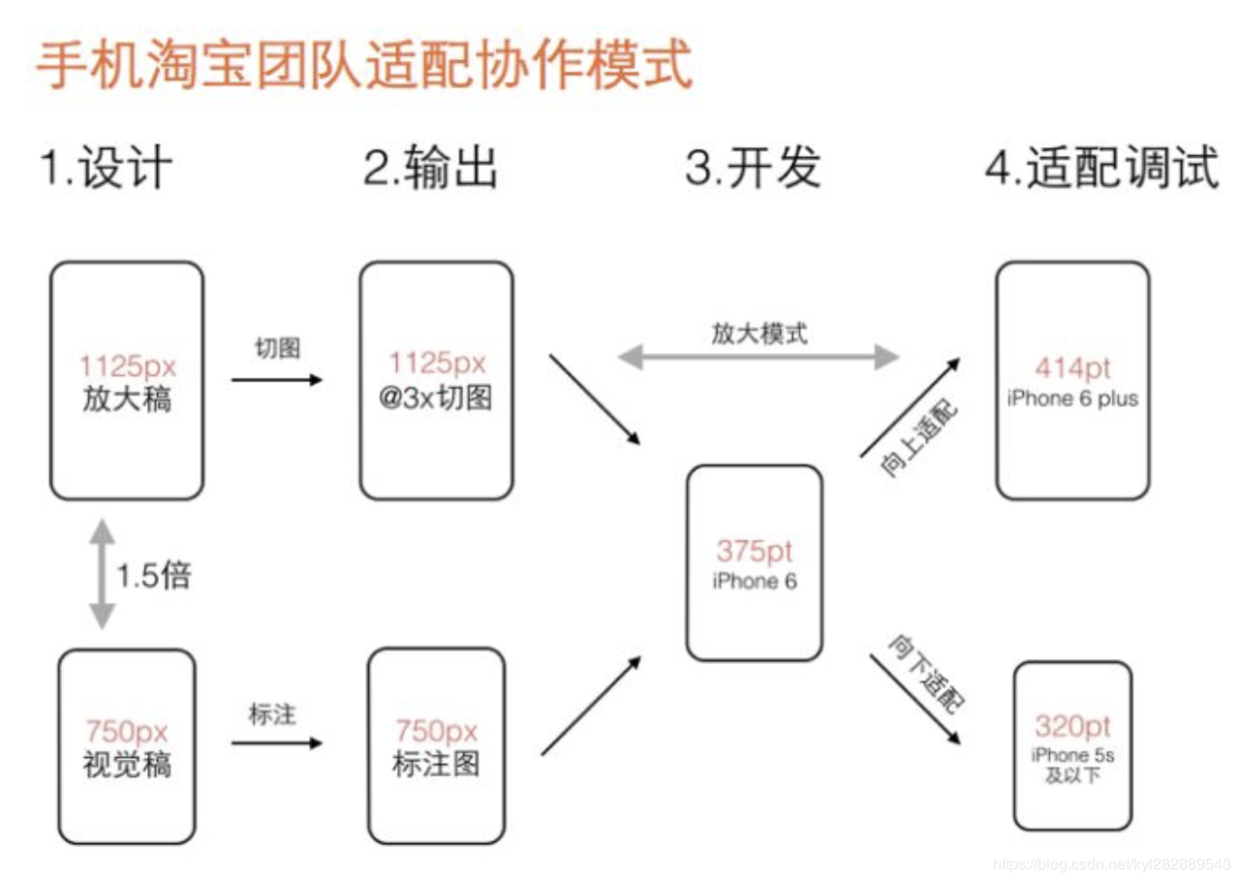
- 第一步,视觉设计阶段,设计师按宽度750px(iPhone 6)做设计稿,除图片外所有设计元素用矢量路径来做。设计定稿后在750px的设计稿上做标注,输出标注图。同时等比放大1.5倍生成宽度1125px的设计稿,在1125px的稿子里切图。
- 第二步,输出两个交付物给开发工程师:一个是程序用到的@3x切图资源,另一个是宽度750px的设计标注图。
- 第三步,开发工程师拿到750px标注图和@3x切图资源,完成iPhone 6(375pt)的界面开发。此阶段不能用固定宽度的方式开发界面,得用自动布局(auto layout),方便后续适配到其它尺寸。
- 第四步,适配调试阶段,基于iPhone 6的界面效果,分别向上向下调试iPhone 6 plus(414pt)和iPhone 5S及以下(320pt)的界面效果。由此完成大中小三屏适配。
- 为什么选择iPhone 6作为基准尺寸?
当面对大中小三种屏幕需要适配的时候,很容易想到先做好一种屏幕,再去适配剩下两种屏幕。第一个决定是到底以哪种屏幕作为设计和开发的基准尺寸。我们选择中间尺寸的iPhone 6(750px/375pt)作为基准,基于几个原因:
- 从中间尺寸向上和向下适配的时候界面调整的幅度最小。375pt下的设计效果适配到414pt和320pt偏差不会太大。假设以414pt为基准做出很优雅的设计,到320pt可能元素之间比例就不是那么回事了,比如图片和文字之间视觉比例可能失调。
- iPhone 6 plus有两种显示模式,标准模式分辨率为1242x2208,放大模式分辨率为1125x2001(即iPhone 6的1.5倍)。可见官方系统里iPhone 6和iPhone 6 plus分辨率之间就存在1.5倍的倍率关系。很多情况下这两种尺寸可以用1.5倍直接等比适配。
- 1242x2208这个奇葩的数值是苹果官方都不愿意公开宣传的一个分辨率,不便于记忆和计算栅格。640x1136虽然是广泛应用的一个分辨率,但是大屏时代依然以小尺寸为设计基准显然不合时宜,设计师会停留在小屏的视角做设计. 所以,iPhone6的750x1334是最适合基准尺寸
1.3 开发时适配规范
- 适配规则:文字流式,控件弹性,图片等比缩放。
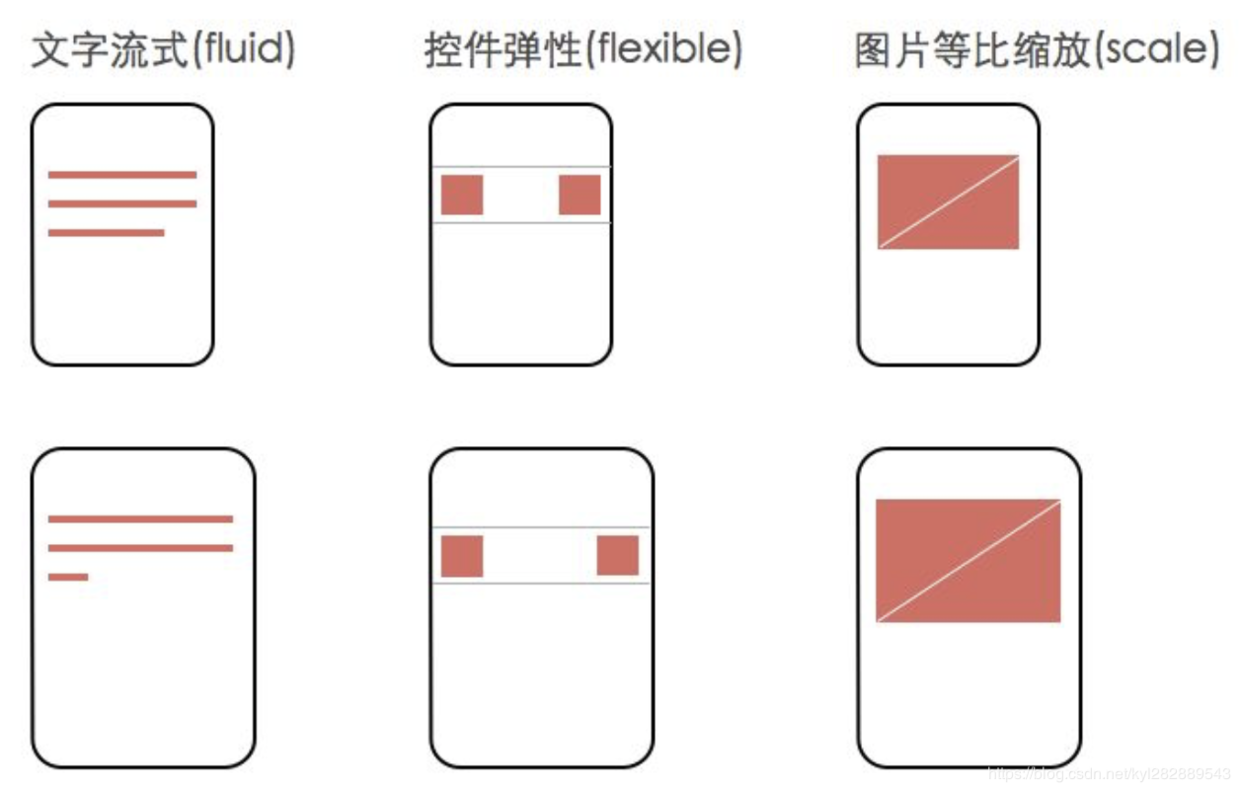
控件弹性指的是,navigation、cell、bar等适配过程中垂直方向上高度不变;水平方向宽度变化时,通过调整元素间距或元素右对齐的方式实现自适应。这样屏幕越大,在垂直方向上可以显示更多内容,发挥大屏幕的优势。
2. IOS 屏幕适配代码实现
2.1 布局处理
2.1.1 masonary布局适配实例
- 在使用masonary自动布局时,可以根据6s的屏幕设计,设置一个比例系数,比如
//以6/6s为准宽度缩小系数
#define kJLXWidthScale [UIScreen mainScreen].bounds.size.height/375.0
//高度缩小系数
#define kJLXHeightScale [UIScreen mainScreen].bounds.size.height/667.0
- 这样在布局的的时候,可以考虑使用上这个系数设置高度
UIButton *createrButton = [[UIButton alloc] init];

[self.view addSubview:createrButton];

UIEdgeInsets padding = UIEdgeInsetsMake(0, 10, 65, 10);

[createrButton setBackgroundImage:[UIImage imageNamed:@"common_button_pink"] forState:UIControlStateNormal];

[createrButton mas_makeConstraints:^(MASConstraintMaker *make){

 make.left.equalTo(self.view.mas_left).with.offset(padding.left);

 make.height.equalTo(@(60*kJLXHeightScale));

 make.bottom.equalTo(self.view.mas_bottom).with.offset(-padding.bottom);

 make.right.equalTo(self.view.mas_right).with.offset(-padding.right);

}];
- 这样在5s小屏手机上面,按钮的高度就会根据比例系数来动态调整大小。
2.1.2 Jimu 1.0 用到的布局适配函数
- 之前Jimu 1.0中用到的布局转换主要通过下面这个函数来转换实际的宽度或高度:
横屏下,水平方向适配函数
/// 设备横屏下,水平方向适配·
///
/// - Parameters:
///   - iPhone6Scale: iPhone6 水平方向@2x尺寸
///   - iPadScale: 分辨率比例为768*1024的iPad 水平方向@2x尺寸
/// - Returns: 适配后的尺寸
func layoutHorizontal(iPhone6 iPhone6Scale: Float, iPad iPadScale: Float) -> Float {

    let iphoneWidth = iPhone6Scale / 2
    let iPadWidth = iPadScale / 2

    var newWidth: Float = 0

    switch Device.type() {
    case .iPhone4:
        newWidth = iphoneWidth * (480.0 / 667.0)
    case .iPhone5:
        newWidth = iphoneWidth * (568.0 / 667.0)
    case .iPhone6:
        newWidth = iphoneWidth
    case .iPhone6p:
        newWidth = iphoneWidth * (736.0 / 667.0)
    case .iPhoneX:
        newWidth = iphoneWidth * ((812.0 - 78) / 667.0)
    case .iPhoneXR:
        newWidth = iphoneWidth * ((896.0 - 78) / 667.0)
    case .iPad_768_1024:
        newWidth = iPadWidth
    case .iPad_834_1112:
        newWidth = iPadWidth * (1112.0 / 1024.0)
    case .iPad_1024_1366:
        newWidth = iPadWidth * (1366.0 / 1024.0)
    }

    return newWidth
}
设备横屏下,垂直方向适配函数
/// 设备横屏下,垂直方向适配
///
/// - Parameters:
///   - iPhone6Scale: iPhone6 垂直方向@2x尺寸
///   - iPadScale: 分辨率比例为768*1024的iPad 垂直方向@2x尺寸
/// - Returns: 适配后的尺寸
func layoutVertical(iPhone6 iPhone6Scale: Float, iPad iPadScale: Float) -> Float {

    let iphoneHeight = iPhone6Scale / 2
    let iPadHeight = iPadScale / 2

    var newHeight: Float = 0

    switch Device.type() {
    case .iPhone4:
        newHeight = iphoneHeight * (320.0 / 375.0)
    case .iPhone5:
        newHeight = iphoneHeight * (320.0 / 375.0)
    case .iPhone6:
        newHeight = iphoneHeight
    case .iPhone6p:
        newHeight = iphoneHeight * (414.0 / 375.0)
    case .iPhoneX:
        newHeight = iphoneHeight * (375.0 / 375.0)
    case .iPhoneXR:
        newHeight = iphoneHeight * (414.0 / 375.0)
    case .iPad_768_1024:
        newHeight = iPadHeight
    case .iPad_834_1112:
        newHeight = iPadHeight * (834.0 / 768.0)
    case .iPad_1024_1366:
        newHeight = iPadHeight * (1024.0 / 768.0)
    }

    return newHeight
}
- 这种适配方式,可以满足横屏下适配各种设备,但是所有布局的代码都需要调用这两个函数,浸入性很强。所以需要优化一下。
2.1.3 布局适配优化
2.1.3.1 增加判断设备类型的extension扩展
- 先来看一下之前Jimu 1.0 是通过一个自定义枚举来实现的,这样的不好的地方也是浸入性很强,每个调用的地方都需要用这个枚举值。
/// 获取设备型号
enum Device {

    case iPhone4            /// 4/4s          320*480  @2x
    case iPhone5            /// 5/5C/5S/SE    320*568  @2x
    case iPhone6            /// 6/6S/7/8      375*667  @2x
    case iPhone6p           /// 6P/6SP/7P/8P  414*736  @3x
    case iPhoneX            /// X             375*812   @3x
    //    case iPhoneXS           /// XS            375*812   @3x (同X)
    case iPhoneXR           /// XR            414*896   @2x (放大模式下为 375*812)
    //    case iPhoneXSMAX        /// XSMAX         414*896   @3x (同XR)


    case iPad_768_1024      /// iPad(5th generation)/iPad Air/iPad Air2/iPad pro(9.7)  768*1024  @2x
    case iPad_834_1112      /// iPad pro(10.5)  834*1112   @2x
    case iPad_1024_1366     /// iPad pro(12.9)  1024*1366  @2x


    /// 判断具体设备
    ///
    /// - Returns: 具体设备名
    static func type() -> Device {

        switch screenWidth {
        case 480.0:
            return .iPhone4
        case 568.0:
            return .iPhone5
        case 667.0:
            return .iPhone6
        case 736.0:
            return .iPhone6p
        case 812.0:
            return .iPhoneX
        case 896.0:
            return .iPhoneXR
        case 1024.0:
            return .iPad_768_1024
        case 1112.0:
            return .iPad_834_1112
        case 1366.0:
            return .iPad_1024_1366
        default:
            return .iPad_768_1024
        }
    }

    /// 判断是否为iPad
    ///
    /// - Returns: true 是, false 否
    static func isIPad() -> Bool  {
        //        print("() = \(self.type())")
        return (UI_USER_INTERFACE_IDIOM() == UIUserInterfaceIdiom.pad)
    }

    static func isIPhone5() -> Bool {
        return Device.type() == Device.iPhone5 ? true : false
    }

    static var safeAreaInsets: UIEdgeInsets {
        if #available(iOS 11.0, *) {
            return UIApplication.shared.delegate?.window??.safeAreaInsets ?? .zero
        }
        return .zero
    }

    static var safeScreenWidth: CGFloat {
        return UIScreen.main.bounds.width-safeAreaInsets.left-safeAreaInsets.right
    }

    static var safeScreenHeight: CGFloat {
        return UIScreen.main.bounds.height-safeAreaInsets.top-safeAreaInsets.bottom
    }

}
- 将上面设备类型判断代码优化为UIDevice的一个类扩展
extension UIDevice {

    func Version()->String{

        let appVersion: String = Bundle.main.object(forInfoDictionaryKey: "CFBundleShortVersionString") as! String
        return appVersion
    }


    @objc public class func isiPhoneX() -> Bool {
        if (UIScreen.main.currentMode?.size.equalTo(CGSize.init(width: 1125, height: 2436)))! {
            return true
        }
        return false
    }

    public class func isiPhone6PlusBigMode() -> Bool {
        if (UIScreen.main.currentMode?.size.equalTo(CGSize.init(width: 1125, height: 2001)))! {
            return true
        }
        return false
    }

    public class func isiPhone6Plus() -> Bool {
        if (UIScreen.main.currentMode?.size.equalTo(CGSize.init(width:1242, height: 2208)))! {
            return true
        }
        return false
    }

    public class func isiPhone6BigMode() -> Bool{
        if (UIScreen.main.currentMode?.size.equalTo(CGSize.init(width: 320, height: 568)))! {
            return true
        }
        return false
    }

    public class func isiPhone6() -> Bool {
        if (UIScreen.main.currentMode?.size.equalTo(CGSize.init(width:750, height: 1334)))! {
            return true
        }
        return false
    }

    public class func isiPhone5() -> Bool {
        if (UIScreen.main.currentMode?.size.equalTo(CGSize.init(width: 640, height: 1136)))! {
            return true
        }
        return false
    }

    public class func isiOS11() -> Bool {
        if #available(iOS 11.0, *) {
            return true
        } else {
            return false
        }
    }

    public class func isiOS10() -> Bool {
        if #available(iOS 10.0, *) {
            return true
        } else {
            return false
        }
    }

    public class func isiOS9() -> Bool {
        if #available(iOS 9.0, *) {
            return true
        } else {
            return false
        }
    }

    public class func isiOS8() -> Bool {
        if #available(iOS 8.0, *) {
            return true
        } else {
            return false
        }
    }

    public class func isAiPad() -> Bool {
        if UIDevice.current.userInterfaceIdiom == UIUserInterfaceIdiom.pad {
            return true
        }
        return false
    }
}
- 然后为了简化调用,可以定义一个全局变量
// MARK: - 判断 机型
let isiPhone5 = UIDevice.isiPhone5()
let isiPhone6 = UIDevice.isiPhone6()
let isiPhone6BigModel = UIDevice.isiPhone6BigMode()
let isiPhone6Plus = UIDevice.isiPhone6Plus()
let isiPhone6PlusBigMode = UIDevice.isiPhone6PlusBigMode()
let isiPhoneX = UIDevice.isiPhoneX()
let isIpad = UIDevice.isAiPad()

// MARK: - 系统类型
let kisiOS11 = UIDevice.isiOS11()
let kisiOS10 = UIDevice.isiOS10()
let kisiOS9 = UIDevice.isiOS9()
let kisiOS8 = UIDevice.isiOS8()
- 定义全局变量简化屏幕宽度,高度计算
let screenWidth = max(UIScreen.main.bounds.height, UIScreen.main.bounds.width)
let screenHeight = min(UIScreen.main.bounds.height, UIScreen.main.bounds.width)
let screenBounds = UIScreen.main.bounds
2.1.3.2 增加 NSInteger 类扩展
extension NSInteger {
    /// iphone 5 上的大小
    /// 🌶 《*注意运算顺序 -60.i5(-30) 等价于 -(60.i5(-30)) 结果为 -(-30) 或者 -60》
    ///
    /// - Parameter size: iphone 5 上的大小
    /// - Returns: isiPhone5 ? size : CGFloat(self)
    func i5(_ size: CGFloat) -> CGFloat {
        return isiPhone5 ? size : CGFloat(self)
    }

    /// iphone 6 放大模式上的大小
    /// 🌶 《*注意运算顺序 -60.i6BigModel(-30) 等价于 -(60.i6BigModel(-30)) 结果为 -(-30) 或者 -60》
    ///
    /// - Parameter size: iphone 6 放大模式 上的大小
    /// - Returns: isiPhone6BigModel ? size : CGFloat(self)
    func i6BigModel(_ size: CGFloat) -> CGFloat {
        return isiPhone6BigModel ? size : CGFloat(self)
    }

    /// iphone 6p 放大模式上的大小
    /// 🌶 《*注意运算顺序 -60.i6PBigModel(-30) 等价于 -(60.i6PBigModel(-30)) 结果为 -(-30) 或者 -60》
    ///
    /// - Parameter size: iphone 6p 放大模式 上的大小
    /// - Returns: isiPhone6PlusBigMode ? size  : CGFloat(self)
    func i6PBigModel(_ size: CGFloat) -> CGFloat {
        return isiPhone6PlusBigMode ? size : CGFloat(self)
    }

    /// iphone x 上的大小
    /// 🌶 《*注意运算顺序 -60.ix(-30) 等价于 -(60.ix(-30)) 结果为 -(-30) 或者 -60》
    ///
    /// - Parameter size: iphone x 上的大小
    /// - Returns: isiPhoneX ? size / 2.0 : CGFloat(self)
    func ix(_ size: CGFloat) -> CGFloat {
        return isiPhoneX ? size : CGFloat(self)
    }

    /// ipad
    /// 🌶 《*注意运算顺序 -60.ipad(-30) 等价于 -(60.ipad(-30)) 结果为 -(-30) 或者 -60》
    ///
    /// - Parameter size: ipad 上的大小
    /// - Returns: isIpad ? size : CGFloat(self)
    func ipad(_ size: CGFloat) -> CGFloat {
        return isIpad ? size : CGFloat(self)
    }

    /// 比例缩放 width
    ///
    /// - Parameter size: origin width
    /// - Returns: 比例缩放后的 width 没有除以2.0
    func scaleW() -> CGFloat {
        return (screenWidth / 375 * CGFloat(self))
    }
    /// 比例缩放 height result没有除以2.0
    ///
    /// - Parameter size: origin height
    /// - Returns: 比例缩放后的 height 没有除以2.0
    func scaleH() -> CGFloat {
        return (screenHeight / 667 * CGFloat(self))
    }
}
2.1.3.3 增加 CGFloat 类扩展
extension CGFloat {

    /// iphone 5 上的大小
    /// 🌶 《*注意运算顺序 -60.i5(-30) 等价于 -(60.i5(-30)) 结果为 -(-30) 或者 -60》
    ///
    /// - Parameter size: iphone 5 上的大小
    /// - Returns: isiPhone5 ? size : self
    func i5(_ size: CGFloat) -> CGFloat {
        return isiPhone5 ? size : self
    }

    /// iphone 6 放大模式上的大小
    /// 🌶 《*注意运算顺序 -60.i6BigModel(-30) 等价于 -(60.i6BigModel(-30)) 结果为 -(-30) 或者 -60》
    ///
    /// - Parameter size: iphone 6 放大模式 上的大小
    /// - Returns: isiPhone6BigModel ?  : self
    func i6BigModel(_ size: CGFloat) -> CGFloat {
        return isiPhone6BigModel ? size : self
    }

    /// iphone 6p 放大模式上的大小
    /// 🌶 《*注意运算顺序 -60.i6PBigModel(-30) 等价于 -(60.i6PBigModel(-30)) 结果为 -(-30) 或者 -60》
    ///
    /// - Parameter size: iphone 6p 放大模式 上的大小
    /// - Returns: isiPhone6PlusBigMode ? size : self
    func i6PBigModel(_ size: CGFloat) -> CGFloat {
        return isiPhone6PlusBigMode ? size : self
    }

    /// iphone x上的大小
    /// 🌶 《*注意运算顺序 -60.ix(-30) 等价于 -(60.ix(-30)) 结果为 -(-30) 或者 -60》
    ///
    /// - Parameter size: iphone x 上的大小
    /// - Returns: isiPhoneX ? size  : self
    func ix(_ size: CGFloat) -> CGFloat {
        return isiPhoneX ? size : self
    }

    /// ipad 上的大小
    /// 🌶 《*注意运算顺序 -60.ipad(-30) 等价于 -(60.ipad(-30)) 结果为 -(-30) 或者 -60》
    ///
    /// - Parameter size: ipad 上的大小
    /// - Returns: isIpad ? size : self
    func ipad(_ size: CGFloat) -> CGFloat {
        return isIpad ? size : self
    }


    /// 比例缩放 width
    ///
    /// - Parameter size: origin width
    /// - Returns: 比例缩放后的 width 没有除以2.0
    func scaleW() -> CGFloat {
        return (screenWidth / 375 * self)
    }
    /// 比例缩放 height
    ///
    /// - Parameter size: origin height
    /// - Returns: 比例缩放后的 height 没有除以2.0
    func scaleH() -> CGFloat {
        return (screenHeight / 667 * self)
    }
}
2.1.3.4 增加 Bool 类扩展
extension Bool {
    /// iphone 5 上的大小
    ///
    /// - Parameter size: iphone 5 上的大小
    /// - Returns: isiPhone5 ? size : self
    func i5(_ size: Bool) -> Bool {
        return isiPhone5 ? size : self
    }

    /// iphone 6 放大模式上的大小
    ///
    /// - Parameter size: iphone 6 放大模式 上的大小
    /// - Returns: isiPhone6BigModel ? size : self
    func i6BigModel(_ size: Bool) -> Bool {
        return isiPhone6BigModel ? size : self
    }

    /// iphone 6p 放大模式上的大小
    ///
    /// - Parameter size: iphone 6p 放大模式 上的大小
    /// - Returns: isiPhone6PlusBigMode ? size  : self
    func i6PBigModel(_ size: Bool) -> Bool {
        return isiPhone6PlusBigMode ? size : self
    }

    /// iphone x 上的大小
    ///
    /// - Parameter size: iphone x 上的大小
    /// - Returns: isiPhoneX ? size / 2.0 : self
    func ix(_ size: Bool) -> Bool {
        return isiPhoneX ? size : self
    }

    /// ipad
    ///
    /// - Parameter size: ipad 上的大小
    /// - Returns: isIpad ? size : self
    func ipad(_ size: Bool) -> Bool {
        return isIpad ? size : self
    }
}
2.2 图片适配处理
- 在项目中经常有这样的需求:如下图,截取一部分拉伸,其他不变

UIImage *img = [UIImage imageNamed:@"popup"];

img = [img resizableImageWithCapInsets:UIEdgeInsetsMake(0, 13, 0, 55) resizingMode:UIImageResizingModeStretch];

self.resizableImgView.image = img;
swift 代码如下
/// 从中间拉伸图片
    ///
    /// - Parameter image: 拉伸之前原始图
    /// - Returns: 拉伸后图片
    static func stretchFromCenter(image: UIImage?) -> UIImage? {
        guard let oriImage = image else {
            return nil
        }
        let result = oriImage.resizableImage(withCapInsets: UIEdgeInsetsMake(oriImage.size.height/2, oriImage.size.width/2, oriImage.size.height/2, oriImage.size.width/2), resizingMode: .stretch)
        return result
    }
- 平铺图片:即一张小图可以平铺为多张小图

UIImage *img = [UIImage imageNamed:@"about"];

img = [img resizableImageWithCapInsets:UIEdgeInsetsMake(0, 11.5, 0, 11) resizingMode:UIImageResizingModeTile];

self.resizableImgView.image = img;
- 通过纯颜色创建图片
/// 通过纯色创建图片
    ///
    /// - Parameter color: 颜色
    /// - Returns: 通过纯颜色创建的图片
    static func createImage(with color: UIColor) -> UIImage {
        let rect = CGRect(x: 0.0, y: 0.0, width: 1.0, height: 1.0)
        UIGraphicsBeginImageContext(rect.size)
        let ctx = UIGraphicsGetCurrentContext()
        guard let context = ctx else { return UIImage() }
        context.setFillColor(color.cgColor)
        context.fill(rect)
        let theImage: UIImage? = UIGraphicsGetImageFromCurrentImageContext()
        UIGraphicsEndImageContext()
        return theImage ?? UIImage()
    }
2.3 文字适配处理
2.3.1 根据字符串计算宽度,高度
- 自动适配原则上UILabel都是不设置高度的,根据文字内容自动适配高度。这个时候我们经常需要用到根据文字String 字符串来计算整个字符串的宽度和高度。
jimu 1.0 用到的计算方法如下:
extension String {

func calculateSize(_ size: CGSize, font: UIFont) -> CGSize {
        let paragraphStyle = NSMutableParagraphStyle()
        //        paragraphStyle.lineSpacing = 7
        paragraphStyle.lineBreakMode = .byCharWrapping
        let attributes = [NSAttributedStringKey.font:font, NSAttributedStringKey.paragraphStyle:paragraphStyle.copy()]
        let expectedLabelSize = (self as NSString).boundingRect(with: size, options: [.usesLineFragmentOrigin, .usesFontLeading], attributes: attributes, context: nil).size
        return expectedLabelSize
    }


    func getWidth(font: UIFont) -> CGFloat {
        let attrs = [NSAttributedStringKey.font : font]
       return (self as NSString).boundingRect(with: CGSize.zero, options: .usesLineFragmentOrigin, attributes: attrs, context: nil).size.width
    }
}
// 计算文字高度或者宽度与weight参数无关
extension String {
    func ga_widthForComment(fontSize: CGFloat, height: CGFloat = 15) -> CGFloat {
        let font = UIFont.systemFont(ofSize: fontSize)
        let rect = NSString(string: self).boundingRect(with: CGSize(width: CGFloat(MAXFLOAT), height: height), options: .usesLineFragmentOrigin, attributes: [NSAttributedStringKey.font: font], context: nil)
        return ceil(rect.width)
    }

    func ga_heightForComment(fontSize: CGFloat, width: CGFloat) -> CGFloat {
        let font = UIFont.systemFont(ofSize: fontSize)
        let rect = NSString(string: self).boundingRect(with: CGSize(width: width, height: CGFloat(MAXFLOAT)), options: .usesLineFragmentOrigin, attributes: [NSAttributedStringKey.font: font], context: nil)
        return ceil(rect.height)
    }

    func ga_heightForComment(fontSize: CGFloat, width: CGFloat, maxHeight: CGFloat) -> CGFloat {
        let font = UIFont.systemFont(ofSize: fontSize)
        let rect = NSString(string: self).boundingRect(with: CGSize(width: width, height: CGFloat(MAXFLOAT)), options: .usesLineFragmentOrigin, attributes: [NSAttributedStringKey.font: font], context: nil)
        return ceil(rect.height)>maxHeight ? maxHeight : ceil(rect.height)
    }
}
2.3.2 UIColor 转换
extension UIColor {


    /// RGB颜色
    ///
    /// - Parameters:
    ///   - red: R
    ///   - green: G
    ///   - blue: B
    ///   - alpha: A
    convenience init(red:Int, green:Int, blue:Int, alpha:CGFloat = 1.0) {
        self.init(red: CGFloat(red)/255.0, green: CGFloat(green)/255.0, blue: CGFloat(blue)/255.0, alpha: alpha)
    }


    /// 16进制颜色
    ///
    /// - Parameters:
    ///   - rgb: RGB Int值
    ///   - alpha: 透明度
    convenience init(hex rgb:Int, alpha:CGFloat = 1.0) {
        self.init(red: (rgb >> 16) & 0xFF, green: (rgb >> 8) & 0xFF, blue: rgb & 0xFF, alpha: alpha)
    }


    /// 随机颜色
    ///
    /// - Parameter randomAlpha: 是否随机透明度,默认false
    /// - Returns: 随机颜色
    public static func random(randomAlpha: Bool = false) -> UIColor {
        let randomRed = CGFloat(Float(arc4random()) / 0xFFFFFFFF)
        let randomGreen = CGFloat(Float(arc4random()) / 0xFFFFFFFF)
        let randomBlue = CGFloat(Float(arc4random()) / 0xFFFFFFFF)
        let alpha = randomAlpha ? CGFloat(Float(arc4random()) / 0xFFFFFFFF) : 1.0
        return UIColor(red: randomRed, green: randomGreen, blue: randomBlue, alpha: alpha)
    }

    /// Hex String -> UIColor
    convenience init(hexString: String, alpha: CGFloat = 1.0) {
        let hexString = hexString.trimmingCharacters(in: .whitespacesAndNewlines)
        let scanner = Scanner(string: hexString)

        if hexString.hasPrefix("#") {
            scanner.scanLocation = 1
        }

        var color: UInt32 = 0
        scanner.scanHexInt32(&color)

        let mask = 0x000000FF
        let r = Int(color >> 16) & mask
        let g = Int(color >> 8) & mask
        let b = Int(color) & mask

        let red   = CGFloat(r) / 255.0
        let green = CGFloat(g) / 255.0
        let blue  = CGFloat(b) / 255.0

        self.init(red: red, green: green, blue: blue, alpha: alpha)
    }
}
2.3.3
2.4 特殊控件适配处理
3. IOS 最新系统适配问题
- 苹果官方资料:
3.1 IOS 13 适配
3.1.1 即将废弃的 LaunchImage
从 iOS 8 的时候,苹果就引入了 LaunchScreen,我们可以设置 LaunchScreen来作为启动页。当然,现在你还可以使用LaunchImage来设置启动图。不过使用LaunchImage的话,要求我们必须提供各种屏幕尺寸的启动图,来适配各种设备,随着苹果设备尺寸越来越多,这种方式显然不够 Flexible。而使用 LaunchScreen的话,情况会变的很简单, LaunchScreen是支持AutoLayout+SizeClass的,所以适配各种屏幕都不在话下。
- 注意啦⚠️,从2020年4月开始,所有使⽤ iOS13 SDK的 App将必须提供 LaunchScreen,LaunchImage即将退出历史舞台*。
3.1.2 Sign in with Apple -提供第三方登录的注意啦
如果你的应用使用了第三方登录,那么你可能也需要加下 「Sign in with Apple」 Sign In with Apple will be available for beta testing this summer. It will be required as an option for users in apps that support third-party sign-in when it is commercially available later this year.
- 如何集成 可以参考这篇博客:Sign in with Apple
3.1.3 iOS 13 DeviceToken有变化
NSString *dt = [deviceToken description]; dt = [dt stringByReplacingOccurrencesOfString: @"<" withString: @""]; dt = [dt stringByReplacingOccurrencesOfString: @">" withString: @""]; dt = [dt stringByReplacingOccurrencesOfString: @" " withString: @""]; 这段代码运行在 iOS 13 上已经无法获取到准确的DeviceToken字符串了,iOS 13 通过[deviceToken description]获取到的内容已经变了。
- 解决方案
- (void)application:(UIApplication *)application didRegisterForRemoteNotificationsWithDeviceToken:(NSData *)deviceToken
{
    if (![deviceToken isKindOfClass:[NSData class]]) return;
    const unsigned *tokenBytes = [deviceToken bytes];
    NSString *hexToken = [NSString stringWithFormat:@"%08x%08x%08x%08x%08x%08x%08x%08x",
                          ntohl(tokenBytes[0]), ntohl(tokenBytes[1]), ntohl(tokenBytes[2]),
                          ntohl(tokenBytes[3]), ntohl(tokenBytes[4]), ntohl(tokenBytes[5]),
                          ntohl(tokenBytes[6]), ntohl(tokenBytes[7])];
    NSLog(@"deviceToken:%@",hexToken);
}
3.1.4 MPMoviePlayerController 在iOS 13已经不能用了
'MPMoviePlayerController is no longer available. Use AVPlayerViewController in AVKit.'
- 解决方案:
既然不能再用了,那只能换掉了。替代方案就是AVKit里面的那套播放器。
3.1.5 控制器的 modalPresentationStyle 默认值变了
查阅了下 UIModalPresentationStyle枚举定义,赫然发现iOS 13新加了一个枚举值:
typedef NS_ENUM(NSInteger, UIModalPresentationStyle) {
    UIModalPresentationFullScreen = 0,
    UIModalPresentationPageSheet API_AVAILABLE(ios(3.2)) API_UNAVAILABLE(tvos),
    UIModalPresentationFormSheet API_AVAILABLE(ios(3.2)) API_UNAVAILABLE(tvos),
    UIModalPresentationCurrentContext API_AVAILABLE(ios(3.2)),
    UIModalPresentationCustom API_AVAILABLE(ios(7.0)),
    UIModalPresentationOverFullScreen API_AVAILABLE(ios(8.0)),
    UIModalPresentationOverCurrentContext API_AVAILABLE(ios(8.0)),
    UIModalPresentationPopover API_AVAILABLE(ios(8.0)) API_UNAVAILABLE(tvos),
    UIModalPresentationBlurOverFullScreen API_AVAILABLE(tvos(11.0)) API_UNAVAILABLE(ios) API_UNAVAILABLE(watchos),
    UIModalPresentationNone API_AVAILABLE(ios(7.0)) = -1,
    UIModalPresentationAutomatic API_AVAILABLE(ios(13.0)) = -2,
};
- 解决方案
- 如果你完全接受苹果的这个默认效果,那就不需要去修改任何代码。
- 如果,你原来就比较细心,已经设置了modalPresentationStyle的值,那你也不会有这个影响。
- 对于想要找回原来默认交互的同学,直接设置如下即可: self.modalPresentationStyle = UIModalPresentationOverFullScreen;
3.1.6 UITextField 的私有属性 _placeholderLabel 被禁止访问了
- IOS 13下调用下面代码会导致闪退
[self.textField setValue:self.placeholderColor forKeyPath:@"_placeholderLabel.textColor"];
打印错误信息如下:
'Access to UITextField's _placeholderLabel ivar is prohibited. This is an application bug'
- 解决方案:
UITextField有个attributedPlaceholder的属性,我们可以自定义这个富文本来达到我们需要的结果。

NSMutableAttributedString *placeholderString = [[NSMutableAttributedString alloc] initWithString:placeholder attributes:@{NSForegroundColorAttributeName : self.placeholderColor}];
_textField.attributedPlaceholder = placeholderString;
iOS 13 通过 KVC 方式修改私有属性,有 Crash 风险,谨慎使用!并不是所有KVC都会Crash,要尝试!
3.1.7 UISearchBar显示问题
- SearchBar的高度只有1px
- 升级到iOS13,UISearchController上的SearchBar显示异常,查看后发现对应的高度只有1px,目前没找到具体导致的原因,
- 解决办法是: 使用KVO监听frame值变化后设置去应该显示的高度
- 黑线处理crash
- 之前为了处理搜索框的黑线问题会遍历后删除UISearchBarBackground,在iOS13会导致UI渲染失败crash;
- 解决办法是: 设置UISearchBarBackground的layer.contents为nil
- TabBar红点偏移
- 如果之前有通过TabBar上图片位置来设置红点位置,在iOS13上会发现显示位置都在最左边去了。遍历UITabBarButton的subViews发现只有在TabBar选中状态下才能取到UITabBarSwappableImageView,
- 解决办法是: 修改为通过UITabBarButton的位置来设置红点的frame
3.1.8 黑暗模式 Dark Mode
Apps on iOS 13 are expected to support dark mode Use system colors and materials Create your own dynamic colors and images Leverage flexible infrastructure
UI 需要出一套新交互
- 在iOS13,为UIViewController和UIView扩展了一个新的API-overrideUserInterfaceStyle,使用方法,官方文档大致是这么说的:
- 通过设置overrideUserInterfaceStyle属性以使该视图及其子视图具有特定的UIUserInterfaceStyle。但如果想要获取当前的UIUserInterfaceStyle,需要改用traitCollection.userInterfaceStyle。
- 尽可能使用UIViewController上的overrideUserInterfaceStyle属性。仅在以下时间使用此属性: (1) 在单个视图或小视图层次结构上局部使用特定样式。 (2) 您希望在整个UIWindow及其视图控制器和模态弹出的ViewController上使用特定样式,且不希望强制更改整个应用程序具有样式。 (如果您确实希望整个应用程序具有某种样式,请不要使用它,而是在Info.plist中设置UIUserInterfaceStyle键。)
- 当设置在普通的UIView上时: 此属性仅影响此视图及其子视图的特征。 它不会影响任何视图控制器或其他视图控制器的子视图。
- 在UIWindow上设置时: 此属性会影响rootViewController,从而影响整个视图控制器和视图层次结构。 它还会影响该window模态出来的界面。
- 由此可见,
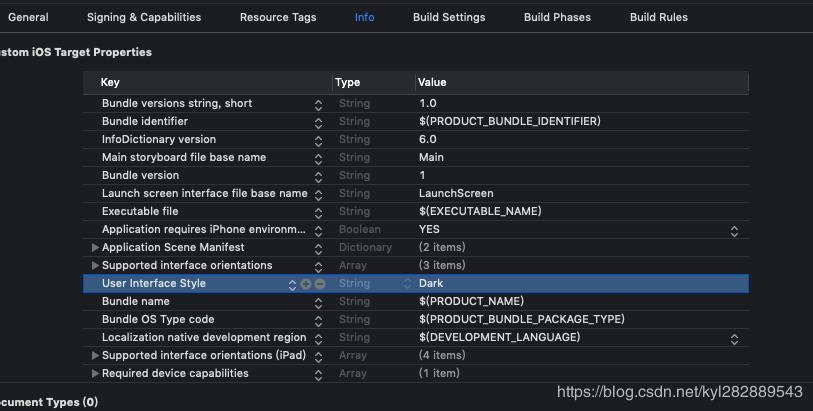
overrideUserInterfaceStyle不仅会影响自己,还会影响自己的子视图,换做window就会影响整个window中的所有视图及视图控制器,包括模态跳转出来的视图控制器。 而且,文档中也特别强调了,你可以设置整个应用程序只是用某种样式,具体方法可以通过代码,也可以通过info.plist配置键User Interface Style,对应的Value为Light/Dark。
if #available(iOS 13.0, *) {
    window?.overrideUserInterfaceStyle = .light;
}
3.1.8.1 适配黑暗模式
- 适配Dark 模式主要从这几个方面:
- 模拟器调试(simulator debug)
- 图片(assets)
- 颜色(color)
- 状态栏(status bar)
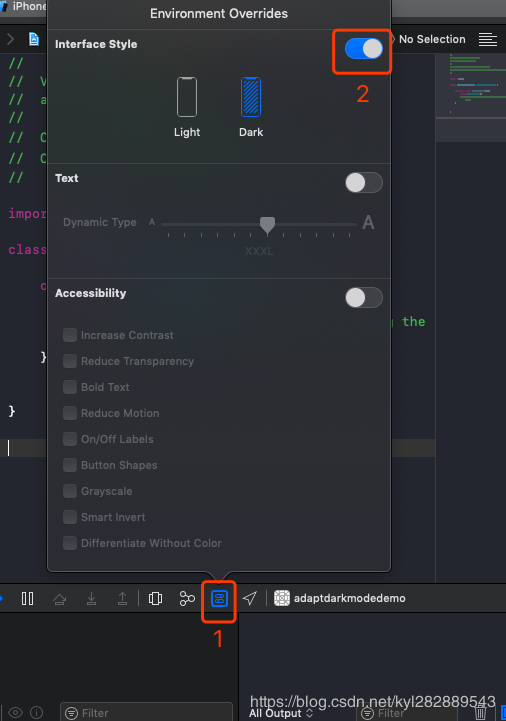
3.1.8.1.1 模拟器调试
- 运行项目,点击Xcode底部调试栏中Environment Overrides.
- 开启Interface Style,就可以切换了。如下图:
3.1.8.1.2 图片适配
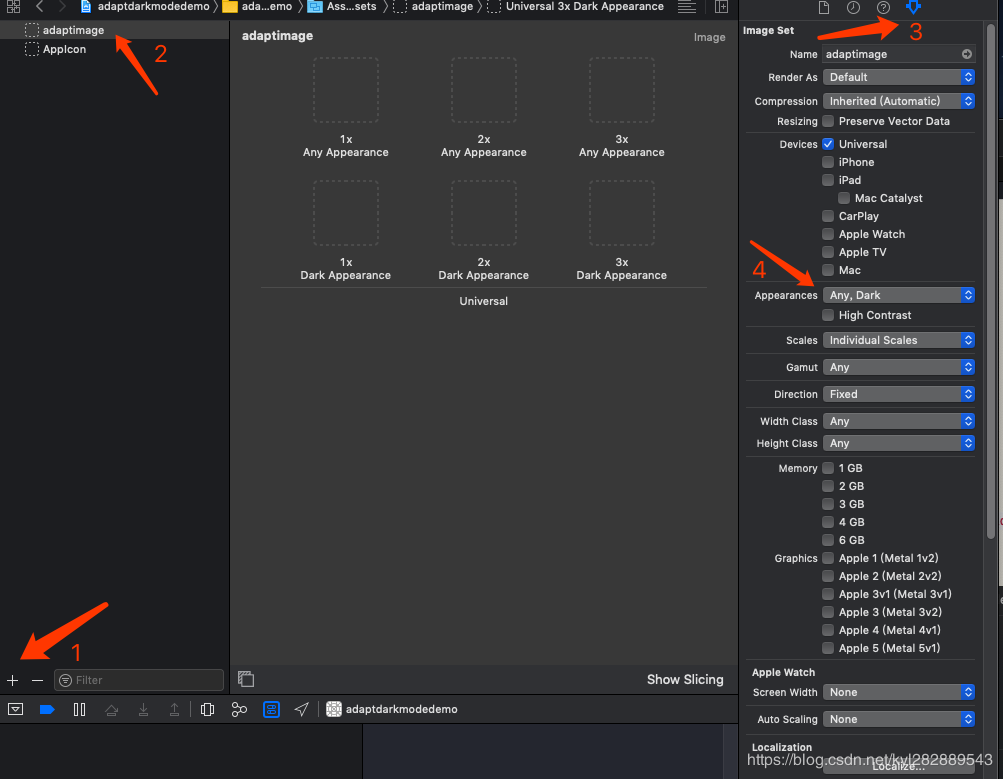
- 图片适配,主要是我们本地图片资源适配,网络图片的话,还是比较繁琐。
- 图片适配比较方便的就是通过Assets.xcassets进行图片管理:
- 添加一个image set,重命名如"adaptimage",选中该image set;
- 选中Attributes Inspector;
- 将Appearances由"None"改为"Any,Dark";
- 不同模式下设置不同图片即可,mode 改变会自动选择不同的图片
- 当然图片适配,你也可以直接使用判断当前系统
mode的方式进行区分,就我个人而言不是很喜欢这种方式,因为还需要监听系统模式的变化,重写UITraitEnvironment协议方法traitCollectionDidChange(_:),我们先看下协议方法:
/** Trait environments expose a trait collection that describes their environment. */
public protocol UITraitEnvironment : NSObjectProtocol {

    @available(iOS 8.0, *)
    var traitCollection: UITraitCollection { get }

    /** To be overridden as needed to provide custom behavior when the environment's traits change. */
    @available(iOS 8.0, *)
    func traitCollectionDidChange(_ previousTraitCollection: UITraitCollection?)
}
- 最后,我们只需要在改变系统mode的时候,重写代理:
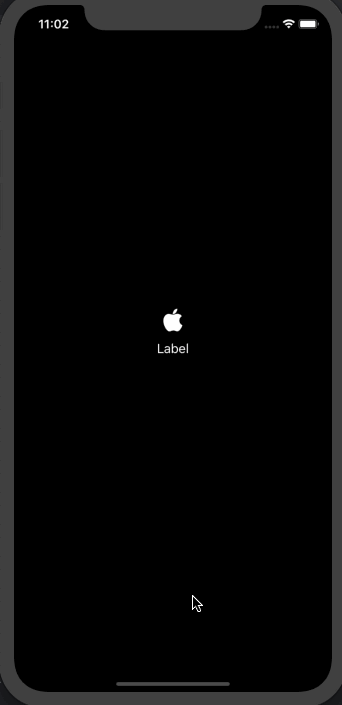
func updateImageView() {
    let image = traitCollection.userInterfaceStyle == .light ? UIImage(named: "dark-ios") : UIImage(named: "white-ios")
    imageView.image = image
}

override func traitCollectionDidChange(_ previousTraitCollection: UITraitCollection?) {
    super.traitCollectionDidChange(previousTraitCollection)
    updateImageView()
}
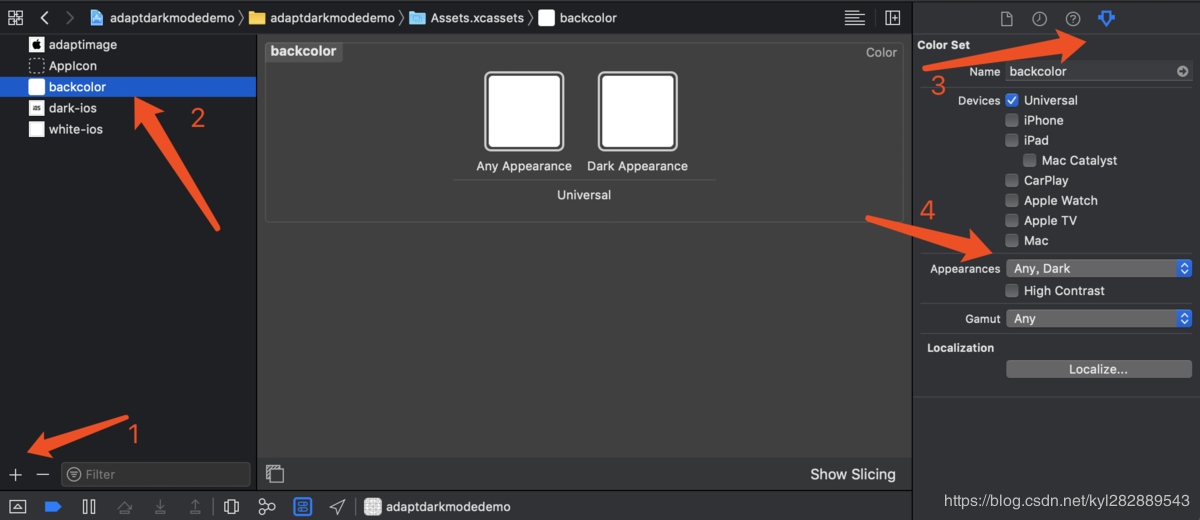
3.1.8.1.3 颜色适配
- 颜色适配有三种方式:
- 方法一:是通过
Assets.xcassets添加一个Color Set,目前系统支持≥iOS11.0
extension UIColor {
    @available(iOS 11.0, *)
    public /*not inherited*/ init?(named name: String) // load from main bundle

    @available(iOS 11.0, *)
    public /*not inherited*/ init?(named name: String, in bundle: Bundle?, compatibleWith traitCollection: UITraitCollection?)
}
- 方法二:代码创建动态颜色
init(dynamicProvider: @escaping (UITraitCollection) -> UIColor),目前系统支持≥iOS 13.0
// 方法二
let titleColor = UIColor.init(dynamicProvider: { (trait) -> UIColor in
    return trait.userInterfaceStyle == .light ? UIColor.black : UIColor.white
})
btn.setTitleColor(titleColor, for: .normal)
- 方法三:像图片一样,监听模式转变,重写
traitCollectionDidChange(_:)方法,不推荐这种。
3.1.8.1.4 状态栏适配
- 目前状态栏也增加了一种模式,由之前的两种,变成了三种, 其中
default由之前的黑色内容,变成了会根据系统模式,自动选择当前展示lightContent还是darkContent。
public enum UIStatusBarStyle : Int {
    case `default` // Automatically chooses light or dark content based on the user interface style

    @available(iOS 7.0, *)
    case lightContent // Light content, for use on dark backgrounds

    @available(iOS 13.0, *)
    case darkContent // Dark content, for use on light backgrounds
}
- 我们在使用的时候,就可以重写preferredStatusBarStyle的get方法:
override var preferredStatusBarStyle: UIStatusBarStyle{
    get{
        return .lightContent
    }
}
3.1.9 模态弹出默认交互改变
iOS 13 的
presentViewController默认有视差效果,模态出来的界面现在默认都下滑返回。 一些页面必须要点确认才能消失的,需要适配。如果项目中页面高度全部是屏幕尺寸,那么多出来的导航高度会出现问题。
/*
 Defines the presentation style that will be used for this view controller when it is presented modally. Set this property on the view controller to be presented, not the presenter.
 If this property has been set to UIModalPresentationAutomatic, reading it will always return a concrete presentation style. By default UIViewController resolves UIModalPresentationAutomatic to UIModalPresentationPageSheet, but other system-provided view controllers may resolve UIModalPresentationAutomatic to other concrete presentation styles.
 Defaults to UIModalPresentationAutomatic on iOS starting in iOS 13.0, and UIModalPresentationFullScreen on previous versions. Defaults to UIModalPresentationFullScreen on all other platforms.
 */
@property(nonatomic,assign) UIModalPresentationStyle modalPresentationStyle API_AVAILABLE(ios(3.2));
- 解决方案:
// Swift
self.modalPresentationStyle = .fullScreen

// Objective-C
self.modalPresentationStyle = UIModalPresentationFullScreen;
3.1.10 App启动过程中,部分View可能无法实时获取到frame
可能是为了优化启动速度,App 启动过程中,部分View可能无法实时获取到正确的frame
- 解决方案
// 只有等执行完 UIViewController 的 viewDidAppear 方法以后,才能获取到正确的值,在viewDidLoad等地方 frame Size 为 0,例如:
 [[UIApplication sharedApplication] statusBarFrame];
更多关于IOS的变化参考:iOS13AdaptationTips
少壮不努力,老大徒悲伤
参考博客:www.jianshu.com/p/75f34462b…