

服务:所有的Service相关在开发文档中都有详细说明
Android Service真正的完全详解
一、概述
Service 是一种可在后台执行长时间运行操作而不提供界面的应用组件。
服务可由其他应用组件启动,而且即使用户切换到其他应用,服务仍将在后台继续运行。此外,组件可通过绑定到服务与之进行交互,甚至是执行进程间通信 (IPC)。例如,服务可在后台处理网络事务、播放音乐,执行文件 I/O 或与内容提供程序进行交互。
服务分为:启动状态、绑定状态,又分为:前台服务、后台服务
清单文件声明
Service作为组件之一,如同对 Activity 及其他组件的操作一样,必须在应用的清单文件中声明所有服务
<application ... >
      <service android:name=".ExampleService" />
      ...
  </application>
android:name
name属性是唯一必需的属性,用于指定服务的类名。发布应用后,请保此类名不变,以避免因依赖显式 Intent 来启动或绑定服务而破坏代码的风险。
exported
可以通过添加 android:exported = false,确保服务仅适用于您的应用。这可以有效阻止其他应用启动您的服务,即便在使用显式 Intent 时也如此。
description
为避免用户因无法识别或信任而意外停止您的服务,您需要添加 android:description,用一个短句解释服务的作用及其提供的好处。
使用显示Intent
为确保应用的安全性,在启动 Service 时,请始终使用显式 Intent,且不要为服务声明 Intent 过滤器。
使用隐式 Intent 启动服务存在安全隐患,因为您无法确定哪些服务会响应 Intent,而用户也无法看到哪些服务已启动。
- 从 Android 5.0(API 级别 21)开始,如果使用隐式 Intent 调用 bindService(),则系统会抛出异常。
服务状态
启动方式分为:启动状态、绑定状态
服务状态分为:前台服务、后台服务
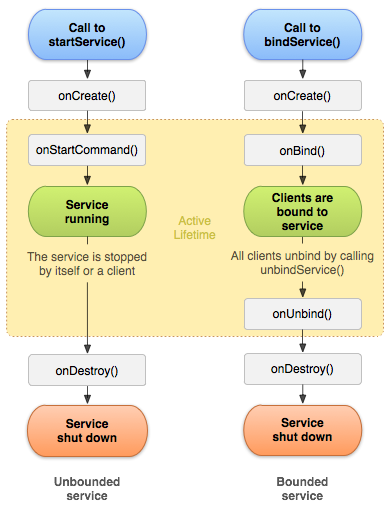
二、启动状态
组件通过startService启动服务,服务即处于“启动”状态。
即可在后台无限期运行,即使启动服务的组件已被销毁也不受影响,除非手动调用才能停止服务。
启动服务
- 使用显式 Intent,startService() 或 startForegroundService()
如果服务尚未运行,则系统首先会调用 onCreate(),然后调用onStartCommand() 方法 - 多个启动请求会多次调用 onStartCommand()(onCreate只调用一次)
public class ServiceOfStart extends BaseService {
    /**
     * 首次创建服务时,系统将调用此方法来执行一次性设置程序(在调用 onStartCommand() 或 onBind() 之前)。
     * 如果服务已在运行,则不会调用此方法。该方法只被调用一次
     */
    @Override
    public void onCreate() {
        super.onCreate();
    }

    /**
     * 每次通过startService()方法启动Service时都会被回调
     * @param intent
     * @param flags 启动请求时是否有额外数据
     * @param startId  指明当前服务的唯一ID,与stopSelf配合使用
     * @return 当Service因内存不足而被系统kill后的重建方式
     */
    @Override
    public int onStartCommand(Intent intent, int flags, int startId) {
        //stopSelf(startId);
        return super.onStartCommand(intent, flags, startId);
    }

    @Override
    public void onDestroy() {
    }
}

启动:startService(intent)
停止:stopService(intent) 或 Service内部调用stopSelf(startId)

==>
onCreate:只调用一次
onStartCommand:可多次调用
onDestory:stopService/stopSelf一次即停止服务
停止服务
stopService(intent) 、 Service内部调用stopSelf(startId)
- 停止服务,stopSelf()/stopSelf(最新id) 或 stopService(),只需一次请求即可停止服务onDestory
- 如果服务同时处理多个对 onStartCommand() 的请求,则不应在处理完一个启动请求之后停止服务,因为您可能已收到新的启动请求。
为避免停止后续新的服务,在调用 stopSelf(int) 时,您需传递与停止请求 ID 相对应的启动请求 ID(传递给 onStartCommand() 的 startId)。此外,如果服务在您能够调用 stopSelf(int) 之前收到新启动请求,则 ID 不匹配,服务也不会停止。---dev
public int onStartCommand(Intent intent, int flags, int startId) {

    startIdList.add(startId);

    if (mThread == null) {
        mThread = new Thread(() -> {
            while (!isDestory) {//服务停止了,子线程不会停止,需做判断结束循环
                Log.d(TAG, "onStartCommand: " + ++extraIndex);
                if (extraIndex > 10) {
                    curStopId = startIdList.remove(0);
                    stopSelf(curStopId);
                    Log.d(TAG, "onStartCommand: extraIndex > 10 stopSelf: "+curStopId);
                }
                Thread.sleep(1000);
            }
        });
        mThread.start();
    }
}

多次start
==>
 onStartCommand: 0
 ...
 onStartCommand: 11
 onStartCommand: extraIndex > 10 stopSelf: 1
 onStartCommand: 12
 onStartCommand: extraIndex > 10 stopSelf: 2
 onStartCommand: 13
 onStartCommand: extraIndex > 10 stopSelf: 3
 onDestroy: extraIndex=13, startId=3

stopSelf()/stopSelf(最新id)/stopService: 调用一次就会停止服务onDestory
stopSelf(非最新id):不会onDestory
三、绑定状态
组件通过调用 bindService() 绑定到服务时,服务即处于“绑定”状态。
绑定服务提供了一个客户端-服务器接口,允许组件与服务进行交互、发送请求、获取结果,甚至是利用进程间通信 (IPC) 跨进程执行这些操作。
多个组件可以同时绑定到该服务,全部取消绑定后,该服务即会被销毁
- 与启动服务的区别,如何选择
- start:无限期运行时?
- bind:与其他组件提供服务时?
- 绑定服务通常只在为其他应用组件提供服务时处于活动状态,不会无限期在后台运行
- 如果您确实允许服务同时具有已启动和已绑定状态,则在启动服务后,如果所有客户端均解绑服务,则系统不会销毁该服务。为此,您必须通过调用 stopSelf() 或 stopService() 显式停止服务。
- 客户端通过调用 bindService() 绑定到服务。调用时,它必须提供 ServiceConnection 的实现,后者会监控与服务的连接。bindService() 的返回值表明所请求的服务是否存在,以及是否允许客户端访问该服务。当创建客户端与服务之间的连接时,Android 系统会调用 ServiceConnection 上的 onServiceConnected()。onServiceConnected() 方法包含 IBinder 参数,客户端随后会使用该参数与绑定服务进行通信。
- 您可以同时将多个客户端连接到服务。但是,系统会缓存 IBinder 服务通信通道。换言之,只有在第一个客户端绑定服务时,系统才会调用服务的 onBind() 方法来生成 IBinder。然后,系统会将同一 IBinder 传递至绑定到相同服务的所有其他客户端,无需再次调用 onBind()
3.1 创建绑定服务
创建提供绑定的服务时,您必须提供 IBinder,进而提供编程接口,以便客户端使用此接口与服务进行交互。您可以通过三种方法定义接口:
- 扩展Binder类:与客户端相同的进程中运行
- 使用 Messenger:夸进程,单线程通信
- 使用 AIDL:跨进程,多线程通信
注意:
如果无需跨不同应用执行并发IPC,则应通过实现 Binder 来创建接口;
如果您想执行 IPC,但不需要处理多线程,请使用 Messenger 来实现接口;
只有在需要不同应用的客户端通过 IPC 方式访问服务,并且希望在服务中进行多线程处理时,才有必要使用 AIDL。
3.2 扩展Binder类
如果服务是供自有应用专用,并且在与客户端相同的进程中运行(常见情况),则应通过扩展 Binder 类来创建接口
- ServiceConnection收到 Binder 后,客户端可利用其直接访问 Binder 实现或 Service 中可用的公共方法。
- 如果服务只是自有应用的后台工作线程,则优先采用这种方法。只有当其他应用或不同进程占用服务时,可以不必使用此方法创建接口。
- 只有客户端和服务处于同一应用和进程内时,此方法才有效
step:
1. 扩展Binder类
2. 实现ServiceConnection类
3. 在ServiceConnection类中获取Binder实例
4. 通过Binder实例:获取Service实例,或通过扩展Binder定义的接口,来与Service通信
public class ServiceOfBind extends BaseService{
@Override
public void onCreate() {}
@Override
public IBinder onBind(Intent intent) {
_run();
return new MyBinder();
}
@Override
public void onRebind(Intent intent) {}
@Override
public boolean onUnbind(Intent intent) {}
private void _run() {
new Thread(() -> {
//isBinding、isStarting是在BaseService时封装的,无需在意
while (isBinding || isStarting) {
Log.d(TAG, "_run: " + ++extraIndex);
Thread.sleep(1000);
}
}).start();
}
//通过MyBinder返回的Service实例调用
public int setIndexChange(){
this.extraIndex = extraIndex+100;
return extraIndex;
}
public class MyBinder extends Binder implement IBinder{
//直接返回Service实例与Service通信
public ServiceOfBind getService(){
return ServiceOfBind.this;
}
//或者定义IBinder接口与Service通信
public int setIndexChange(){
extraIndex = extraIndex+100;
return extraIndex;
}
}
}
public class ServiceMainActivity extends BaseActivity {
private List<MyServiceConnection> connectionList = new ArrayList<>();
public void onViewClicked(View view) {
switch (view.getId()) {
case R.id.btn_service_bind:
Intent intentOfBind = new Intent(this, ServiceOfBind.class);
MyServiceConnection connection = new MyServiceConnection();
boolean bindService = bindService(intentOfBind, connection, Context.BIND_AUTO_CREATE);
connectionList.add(connection);
break;
case R.id.btn_service_unbind:
MyServiceConnection con = connectionList.remove(0);
unbindService(con);
break;
//通信
case R.id.btn_service_bind_jump:
MyServiceConnection con = connectionList.get(0);
int curIndex = con.getMyBinder().getService().setIndexChange();
break;
}
}
public class MyServiceConnection implements ServiceConnection {
private ServiceOfBind.MyBinder mBinder;
private boolean mConnectedStatus;
@Override
public void onServiceConnected(ComponentName name, IBinder service) {
this.mBinder = (ServiceOfBind.MyBinder) service;
this.mConnectedStatus = true;
}
@Override
public void onServiceDisconnected(ComponentName name) {
this.mConnectedStatus = false;
}
public ServiceOfBind.MyBinder getMyBinder() {
return mBinder;
}
}
}
==>
onCreat:只调用一次
onBind:只调用一次
onServiceConnected:每次bindService时调用
onUnbind:所有客户端取消绑定后调用一次(多个bind时,一次取消绑定不会调用任何方法)
onDestory:服务销毁时调用(onUnbind并不一定是服务销毁了,只是所有通过绑定的客户端解绑了,还可能存在启动状态的服务)
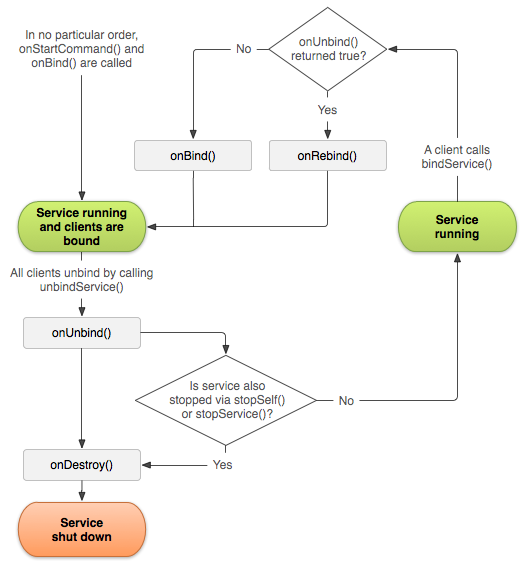
onRebind:重新绑定时根据onUnbind的返回值,调用onBind/onRebind(上声明周期图所示,未测试)
onServiceDisconnected:unBinderService时不会调用。当与服务的连接意外中断(例如服务崩溃或被终止)时系统调用该方法
3.3 使用 Messenger
如需让服务与远程进程通信,则可使用 Messenger 为服务提供接口
- 在服务内定义 Handler,以响应不同类型的 Message 对象。
- 此 Handler 是 Messenger 的基础。Messenger可返回一个 IBinder,以便客户端能利用 Message 对象向服务发送命令。
- 这是执行进程间通信 (IPC) 最为简单的方法,因为 Messenger 会在单个线程中创建包含所有请求的队列,这样就不必对服务进行线程安全设计。
- 借助此方法,无需使用 AIDL 便可执行进程间通信 (IPC)
- 纯 AIDL 接口会同时向服务发送多个请求,服务随后必须执行多线程处理
- 对于大多数应用,服务无需执行多线程处理,因此使用 Messenger 即可让服务一次处理一个调用。如果服务必须执行多线程处理,请使用 AIDL 来定义接口
客户端通过connction返回的接口给服务端通信
服务端通过msg.repyTo传递过来的messenger与客户端通信

public class ServiceOfMessenger extends BaseService{

    private class MyHandler extends Handler{
        public void handleMessage(Message msg) {
             //收到client消息
             extraIndex += 100;
             //给client发消息
             Messenger msger = msg.replyTo;
             Message ms = Message.obtain();
             ms.what = 2;
             ms.arg1 = extraIndex;
             msger.send(ms);
             break;
        }
    }

    @Override
    public IBinder onBind(Intent intent) {
         super.onBind(intent);
         _run();

        Messenger messenger = new Messenger(new MyHandler());
        return messenger.getBinder();
    }

    private void _run() {
        mThread = new Thread(() -> {
            while (isBinding || isStarting) {
                Log.d(TAG, "_run: " + ++extraIndex);
                Thread.sleep(1000);
            }
        }).start();
    }
}

//设置不同的进程(当然也可以不设置在同进程中绑定,此处作为试验)
<service android:name=".old.service.ServiceOfMessenger"
    android:exported="true"
    android:process=":messenger"/>

//<!---------------其它App内--------------->
public class ServiceMainActivity extends BaseActivity {
    private List<ServConntMsger> conntMsgerList = new ArrayList<>();

    public Handler myHandle = new Handler(){
    @Override
    public void handleMessage(Message msg) {
        //收到service消息
        int index = msg.arg1;
        btnMsgerCommu.setText("通信:"+index);
    }
    };
    private Messenger mMessenger = new Messenger(myHandle);

    public void onViewClicked(View view) {
        switch (view.getId()) {
            case R.id.btn_service_bind_msg_bind:
                Intent intentOfMsger = new Intent();
                ComponentName comp = new ComponentName("com.varmin.vdemo", "com.varmin.vdemo.old.service.ServiceOfMessenger");
                intentOfMsger.setComponent(comp);
                ServConntMsger conntMsger = new ServConntMsger();
                boolean bindService = bindService(intentOfMsger, conntMsger, Context.BIND_AUTO_CREATE);
                conntMsgList.add(conntMsger);
                break;
            case R.id.btn_service_bind_msg_unbind:
                ServConntMsger conntMsg = conntMsgList.remove(0);
                unbindService(conntMsg);
                break;
            //通信
            case R.id.btn_service_bind_msg_connt:
                ServConntMsger cntMsg = conntMsgList.get(0);
                Message message = Message.obtain();
                message.what = 1;
                //把client能够处理消息的msger发送过去
                message.replyTo = mMessenger;
                cntMsg.msger.send(message);
                break;
        }
    }

    class ServConntMsger implements ServiceConnection{
        private Messenger msger;
        @Override
        public void onServiceConnected(ComponentName name, IBinder service) {
            msger = new Messenger(service);
        }
        @Override
        public void onServiceDisconnected(ComponentName name) {}
    }
}


==>
绑定、取消绑定等操作,结果同“扩展Binder”
3.4 使用 AIDL
IPC:进程间通信,Inter-Process-Communication
AIDL:Android 接口定义语言,Android Interface Definition Language
Android有多重IPC通信方式:Bundle、Messgener、AIDL、ContentProvider、Socket,AIDL只是其中一种。
-
在 Android 中,一个进程通常无法访问另一个进程的内存。因此,为进行通信,进程需将其对象分解成可供操作系统理解的原语,并将其编组为可供操作的对象。编写执行该编组操作的代码较为繁琐,因此 Android 会使用 AIDL 处理此问题。
-
Android 接口定义语言 (AIDL) 可以利用它定义客户端与服务均认可的编程接口,将对象分解成原语,操作系统可通过识别这些原语并将其编组到各进程中来执行 IPC。
-
对于之前采用 Messenger 的方法而言,其实际上是以 AIDL 作为其底层结构。如上所述,Messenger 会在单个线程中创建包含所有客户端请求的队列,以便服务一次接收一个请求。
-
如果想让服务同时处理多个请求,则可直接使用 AIDL。在此情况下,服务必须达到线程安全的要求,并且能够进行多线程处理。
注意:
只有在需要不同应用的客户端通过 IPC 方式访问服务,并且希望在服务中进行多线程处理时,才有必要使用 AIDL。
如果无需跨不同应用执行并发IPC,则应通过实现 Binder 来创建接口;
如果您想执行 IPC,但不需要处理多线程,请使用 Messenger 来实现接口。
3.4.1 绑定服务
定义aidl注意
- 生成的 IBinder 接口内包含 .aidl 文件中的所有代码注释(import 和 package 语句之前的注释除外)。
- 您可以在 ADL 接口中定义 String 常量和 int 字符串常量。例如:const int VERSION = 1;。
- 方法调用由 transact() 代码分派,该代码通常基于接口中的方法索引。由于这会增加版本控制的难度,因此您可以向方法手动配置事务代码:void method() = 10;。 使用
- @nullable 注释可空参数或返回类型。
创建aidl文件
- 选中src目录,File -> New -> AIDL -> AIDL file,创见xxx.aidl文件
- Make project -> 会在app/generated/aidl_source_ooupt_dir/debug/out下生产相应的xxx.java文件
- 在Service中通过new xxx.Stub类生成IBinder实例,在onBind中返回
其它App中:
- 在另一个App中将.aidl文件复制到相同路径下,Make project
- 在ServiceConnection中xxx.Stub.asInterface(service)方法获取接口实例
- 绑定
//.aidl文件
interface IMyAidlInterface {
    void basicTypes(int anInt, long aLong, boolean aBoolean, float aFloat,double aDouble, String aString);
    void setProcessName(String name);
    void changeIndex(int offset);
    int getIndex();
}

public class ServiceOfAIDL extends BaseService {
    @Override
    public IBinder onBind(Intent intent) {
        new Thread(() -> {
                while (isBinding || isStarting) {
                    Log.d(TAG, "_run: " + ++extraIndex);
                    Thread.sleep(1000);
                }
        }).start();
        //Stub实例
        return binder;
    }

    public IMyAidlInterface.Stub binder = new IMyAidlInterface.Stub(){
        @Override
        public void basicTypes(int anInt, long aLong, boolean aBoolean, float aFloat, double aDouble, String aString) throws RemoteException {}

        @Override
        public void setProcessName(String name) throws RemoteException {}

        @Override
        public void changeIndex(int offset) throws RemoteException {
            extraIndex += offset;
        }

        @Override
        public int getIndex() throws RemoteException {
            return extraIndex;
        }
    };
}

<service android:name=".old.service.ServiceOfAIDL"
    android:exported="true"
    android:process=":aidl"/>

//<!--------------------其它App-------------------->
public class ServiceAIDLActivity extends BaseActivity {
    private List<ServConntAidl> conntAidlList = new ArrayList<>();

    public void onViewClicked(View view) {
        switch (view.getId()) {
            case R.id.btn_aidl_bind:
                Intent intent = new Intent();
                ComponentName compName = new ComponentName("com.varmin.vdemo", "com.varmin.vdemo.old.service.ServiceOfAIDL");
                intent.setComponent(compName);
                ServConntAidl servCont = new ServConntAidl();
                bindService(intent, servCont, Context.BIND_AUTO_CREATE);
                conntAidlList.add(servCont);
                break;
            case R.id.btn_aidl_unbind:
                ServConntAidl connt = conntAidlList.remove(0);
                unbindService(connt);
                break;
            case R.id.btn_aidl_commu:
                ServConntAidl cnt = conntAidlList.get(0);
                cnt.aidl.setProcessName("remote:lib");
                cnt.aidl.changeIndex(100);
                int index = cnt.aidl.getIndex();
                break;
        }
    }

    class ServConntAidl implements ServiceConnection {
        private IMyAidlInterface aidl;
        @Override
        public void onServiceConnected(ComponentName name, IBinder service) {
            aidl = IMyAidlInterface.Stub.asInterface(service);
        }

        @Override
        public void onServiceDisconnected(ComponentName name) {}
    }
}
3.4.2 AIDL中的数据类型
类型
- Java 编程语言中的所有原语类型(如 int、long、char、boolean 等)
- String、 CharSequence
- Map:
- 所有元素必须是以上列表中支持的数据类型
- 或者所声明的由 AIDL 生成的其他接口
- 或 Parcelable 类型。
- 不支持泛型 Map(如 Map<String,Integer> 形式的 Map)
- 尽管生成的方法旨在使用 Map 接口,但另一方实际接收的具体类始终是 HashMap
- List:
- 所有元素必须是以上列表中支持的数据类型
- 或者您所声明的由 AIDL 生成的其他接口
- 或 Parcelable 类型。
- 可选择将 List 用作“泛型”类(例如,List)
- 尽管生成的方法旨在使用 List 接口,但另一方实际接收的具体类始终是 ArrayList
- 实现Parcelabel的引用类型
即使在与接口相同的包内定义上方未列出的附加类型,亦须为其各自加入一条 import 语句
//TODO 注释掉的编译不通过,Parcelabel不支持?
interface IMyAidlInterface2 {
    void basicTypes(int anInt, float aFloat,double aDouble, long aLong,boolean aBoolean, byte aByte, char aChar);
    //void basicTypes3(short s);

    void basicRe(String str, CharSequence cs);

    //void basicRe2(List<String> list);
    //void basicRe3(Map map);
}
【TODO】自定义类型
【TODO】方向标记
你真的理解AIDL中的in,out,inout么
探索AIDL定向tag in out inout原理
所有非原语参数均需要指示数据走向的方向标记。
这类标记可以是 in、out或inout。原语默认为in,不能是其他方向。
- in: 表示参数数据只能由客户端传递到服务端,基本类型就默认只支持in修饰符。
- out:表示参数数据只能由服务端传递到客户端。即服务端如果修改了参数对象的值,那么客户端的值也会变化,但是服务端无法读取到客户端对象的值。
- inout:表示参数数据能够双向传递。
3.4.3 【TODO】多线程
- aidl在service端每次收到client端的请求,会启动一个新的线程去执行相应的操作
- Messenger在service收到的请求是放在Handler的MessageQueue里面,只需要绑定一个线程,最终looper会从messageQueue中获取message交给handler处理
3.5 前台服务
前台服务是用户主动意识到的一种服务,因此在内存不足时,系统也不会考虑将其终止。
- 前台服务必须为状态栏提供通知,将其放在运行中的标题下方。除非将服务停止或从前台移除,否则不能清除该通知。
- 处于前台时,应用可以自由创建和运行前台与后台 Service。
进入后台时,在一个持续数分钟的时间窗内,应用仍可以创建和使用 Service。 在该时间窗结束后,应用将被视为处于空闲状态。 此时,系统将停止应用的后台 Service,就像应用已经调用 Service 的 Service.stopSelf() 方法一样。(针对启动状态的Service) - 在 Android 8.0 之前,创建前台 Service 的方式通常是先创建一个后台 Service,然后将该 Service 推到前台。 Android 8.0 有一项复杂功能:系统不允许后台应用创建后台 Service。 因此,Android 8.0 引入了一种全新的方法,即 startForegroundService(),以在前台启动新 Service。
在系统创建 Service 后,应用有五秒的时间来调用该 Service 的 startForeground() 方法以显示新 Service 的用户可见通知。 如果应用在此时间限制内未调用 startForeground(),则系统将停止此 Service 并声明此应用为 ANR。
注意:如果应用面向 Android 9(API 级别 28)或更高版本并使用前台服务,则其必须请求 FOREGROUND_SERVICE 权限。这是一种普通权限,因此,系统会自动为请求权限的应用授予此权限。
如果请求 FOREGROUND_SERVICE,则系统会抛出 SecurityException。
public class ServiceOfForeground extends BaseService {

    class ActionReciver extends BroadcastReceiver {
        @Override
        public void onReceive(Context context, Intent intent) {
            //点击通知View发送广播
            String action = intent.getAction();
            if(TextUtils.equals(action, ACTION_ADD)) extraIndex += 100;
            if(TextUtils.equals(action, ACTION_MINUS)) extraIndex -= 100;
        }
    }
    @Override
    public void onCreate() {
        super.onCreate();
        mActionReciver = new ActionReciver();
        IntentFilter intentFilter = new IntentFilter();
        intentFilter.addAction(ACTION_ADD);
        intentFilter.addAction(ACTION_MINUS);
        registerReceiver(mActionReciver, intentFilter);
    }

    @Override
    public int onStartCommand(Intent intent, int flags, int startId) {
        _startForeground();
        new Thread(() -> {
            while (!isDestory) {
                Log.d(TAG, "_run: " + ++extraIndex);


                if(extraIndex > 200){
                    stopForeground(true);//停止前台服务,但不会终止服务。参数:是否移除通知
                }else {//更新通知内容
                    remoteView.setTextViewText(R.id.tv_common_recycler_center, extraIndex+"");
                    notifyMana.notify(ONGOING_NOTIFICATION_ID, notification);
                }
                notifyMana.notify(ONGOING_NOTIFICATION_ID, notification);
                Thread.sleep(1000);
            }
        }).start();
        return super.onStartCommand(intent, flags, startId);
    }

    private void _startForeground() {
        ...
        remoteView = new RemoteViews(getPackageName(), R.layout.item_remote_view);
        PendingIntent leftPending = PendingIntent.getBroadcast(this, REQUEST_REMOTE_LEFT,new Intent(ACTION_MINUS), PendingIntent.FLAG_UPDATE_CURRENT);
        remoteView.setOnClickPendingIntent(R.id.tv_common_recycler_left, leftPending);
        PendingIntent rightPending = PendingIntent.getBroadcast(this, REQUEST_REMOTE_RIGHT,new Intent(ACTION_ADD),PendingIntent.FLAG_UPDATE_CURRENT);
        remoteView.setOnClickPendingIntent(R.id.tv_common_recycler_right, rightPending);
        ...
        notification = new Notification.Builder(this, CHANNEL_DEFAULT_IMPORTANCE).build();
        startForeground(ONGOING_NOTIFICATION_ID, notification);
    }

    @Override
    public void onDestroy() {
        unregisterReceiver(mActionReciver);
    }
}

startService/stopService
==>
正常start启动,home到后台几分钟,就被系统回收了
startForeground方式启动,home到后台,不会被系统回收
【?】Android 开发 8.0版本启动Service的方法
- “8.0及以上要使用startForegroundService启动,否则报错”
- 但是在10.0上直接startService没有报错?
- 最多在10.0上startForegroundService以后未startForegroun推到前台的话,如果APP此时在后台,系统会自动销毁该服务
- 未声明权限,未报错?
3.6 管理服务声明周期
start/bind共同存在
- onCreate只调用一次
- 可多次调用onStartCommand
- onBind只一次
- stopService:若还存在绑定,则不onDestory
- unbindService:若还存在启动,则不onDestory
- onDestory:stop时无绑定,unbind时无启动
3.7 双向通信
启动状态
- 客户端--> 服务端
通过Intent发送消息给服务端
- 服务端 --> 客户端
可通过广播或Handler发送消息
绑定状态
Binder
- 客户端--> 服务端
//客户端调用正常binder定义接口
ServConntBinder con = conntBinderList.get(0);
ServiceOfBind.MyBinder myBinder = con.getMyBinder();
myBinder.getService().setIndexChange();
- 服务端 --> 客户端
定义Callback接口,在客户端实现
/**
* 定义Callback方法,在客户端注册监听
* 服务端setIndexCallback,回调客户端监听的callback
*/
public class MyBinder extends Binder{
    private Callback mCallback;
    public ServiceOfBind getService(){return ServiceOfBind.this;}

    //在客户端注册监听
    public void callback(Callback callback){
        if (callback != null) {
            this.mCallback = callback;
            callback.callback(extraIndex);
        }
    }
    //在服务端调用客户端的回调接口
    private void setIndexCallback(int index){
        if (mCallback != null) {
            mCallback.callback(index);
        }
    }
}

//客户端
public void onServiceConnected(ComponentName name, IBinder service) {
    this.mBinder = (ServiceOfBind.MyBinder) service;
    //注册监听
    mBinder.callback(new ServiceOfBind.Callback() {
        @Override
        public void callback(int index) {
            btnCommu.post(new Runnable() {
                public void run() {
                    btnCommu.setText("双向通信:"+index);
                }
            });
        }
    });
}
Messenger
通过Messenger发送消息,两端实现Handler接收消息
- 客户端--> 服务端
/**
* 客户端
* 服务端传过来的IBinder生成Messenger
* 通过Messenger向服务端通信,在服务端的Handler中接收并处理
* 客户端在给服务端通信时,带上在客户端实现的Messenger对象replyTo
*/
public void onServiceConnected(ComponentName name, IBinder service) {
    msger = new Messenger(service);
}

Message msg = Message.obtain();
msg.what = 1;
msg.replyTo = mMessenger;
msger.send(msg);
- 服务端 --> 客户端
//客户端发送消息
Message msg = Message.obtain();
msg.what = 1;
msg.replyTo = mMessenger;
msger.send(msg);

//服务端收到消息
private class MyHandler extends Handler{
    @Override
    public void handleMessage(Message msg) {
        extraIndex += 100;
        mReplyTo = msg.replyTo;
    }
}

/**
* 服务端发送消息:
* 服务端收到replyTo的客户端Messenger,以此发送消息给客户端
* 客户端在Handler中接收并处理
*/
Message ms = Message.obtain();
ms.what = 2;
ms.arg1 = extraIndex;
mReplyTo.send(ms);


//客户端收到消息
public Handler myHandle = new Handler() {
    @Override
    public void handleMessage(Message msg) {
        int index = msg.arg1;
        btnMsgerCommu.setText("双向通信:" + index);
    }
};
AIDL
同Binder实现原理相同,客户端注册Callback监听
- 客户端--> 服务端
//客户端调用aidlSub方法
ServConntAIDL cntAidl = conntAIDLList.get(0);
cntAidl.aidlSub.changeIndex(100);
- 服务端 --> 客户端
//.aidl接口
interface Callback {
    void callback(int index);
}

//.aidl接口
interface IMyAidlInterface {
    void setProcessName(String name);
    void changeIndex(int offset);
    int getIndex();

    void callback(Callback callback);
    void setIndexCallback(int index);
}

//服务端实现接口
public IMyAidlInterface.Stub binder = new IMyAidlInterface.Stub(){
    private Callback mCallback;
    @Override
    public void callback(Callback callback) throws RemoteException {
        this.mCallback = callback;
    }

    @Override
    public void setIndexCallback(int index) throws RemoteException {
        if (mCallback != null) {
            mCallback.callback(index);
        }
    }

};

//客户端注册监听
class ServConntAIDL implements ServiceConnection {
    private IMyAidlInterface aidlSub;
    @Override
    public void onServiceConnected(ComponentName name, IBinder service) {
        aidlSub = IMyAidlInterface.Stub.asInterface(service);
        try {
            /*aidlSub.callback(new Callback() {
            });*/

            /**
            * 注意:实现的是Callback.Stub而不是Callback,否则报错
            */
            aidlSub.callback(new Callback.Stub() {
                @Override
                public void callback(int index) throws RemoteException {
                    btnAIDLCommu.post(new Runnable() {
                        @Override
                        public void run() {
                            btnAIDLCommu.setText("双向通信:"+index);
                        }
                    });
                }
            });
        } catch (RemoteException e) {
            e.printStackTrace();
        }
    }
}
3.7 IntentService
继承自是Service
- Service默认主线程执行,需实现子线程工作
- IntentService实现了子线程操作,而且做完即stopSelf结束,不会常驻后台
- 多次startService,handler发送消息进入队列依次执行,每次只在子线程中执行一个消息操作,每次都自动调用stopSelf(stopSelf各自的startId,并不一定会onDestory)。
后台执行限制:
IntentService 是一项 Service,因此其遵守针对后台 Service 的新限制。
因此,许多依赖 IntentService 的应用在适配 Android 8.0 或更高版本时无法正常工作。 出于这一原因,Android 支持库 26.0.0 引入了一个新的JobIntentService类,该类提供与 IntentService 相同的功能,在 Android 8.0 或更高版本上运行时使用计划作业而非 Service。
使用:
public class MyIntentService extends IntentService {
    public MyIntentService() {
        super("my_intent_service");
    }

    @Override
    protected void onHandleIntent(@Nullable Intent intent) {
        String taskName = intent.getStringExtra("task_name");
        for (int i = 0; i < 5; i++) {
            Thread.sleep(1000);
            Log.d(TAG, "onHandleIntent: "+taskName+", "+i);
        }
    }
}

<!--Activity-->
case R.id.btn_service_intent_service_start://多次启动
    Intent intent = new Intent(this, MyIntentService.class);
    intent.putExtra("task_name", "task_"+ ++intentServiceCc);
    startService(intent);
    break;
case R.id.btn_service_intent_service_stop:
    stopService(new Intent(this, MyIntentService.class));
    break;

==>
MyIntentService: constructor
onCreate:
onStartCommand:------------------ startId=1
onStartCommand:------------------ startId=2
onStartCommand:------------------ startId=3
onHandleIntent: task_1, 0
...
onHandleIntent: task_1, 4
onHandleIntent: task_2, 0
...
onHandleIntent: task_2, 4
onHandleIntent: task_3, 0
...
onHandleIntent: task_3, 4
onDestroy: ----------------------
原理:
//操作放入消息队列,在HandlerThead中的子线程执行
private final class ServiceHandler extends Handler {
    public ServiceHandler(Looper looper) {
        super(looper);
    }

    @Override
    public void handleMessage(Message msg) {
        onHandleIntent((Intent)msg.obj);
        //stopSelf并不一定会onDestory(使用最新的startId,或每个startId都stop完了,才会调用onDestory)
        stopSelf(msg.arg1);
    }
}

@Override
public void onCreate() {
    HandlerThread thread = new HandlerThread("IntentService[" +    mName + "]");
    thread.start();

    //使用HandlerThread的Looper
    mServiceHandler = new ServiceHandler(thread.getLooper());
}

@Override
public void onStart(@Nullable Intent intent, int startId) {
    Message msg = mServiceHandler.obtainMessage();
    msg.arg1 = startId;
    msg.obj = intent;
    mServiceHandler.sendMessage(msg);
}
3.8 触发onDestory
stopSelf、unbindService,并不一定会调用onDestory
- stopService
- 仅仅start启动:停止服务,onDestory
- 联合bind启动:需全部解绑以后,onDestory
- stopSelf
- stopService()/stopSelf()/stopSelf(最新id):仅start启动时,onDestory
- stopSelf(不是最新id):只是停止服务,并不会onDestory;
需全部startId都stopSelft(startId)以后才会onDestory
- unbindService
- 仅bind启动:全部解绑,onDestory
- 联合start启动:需stop和全部解绑以后,onDestory
