

Google推JetPack已经有一段时间了,伴随之而来的是MVVM架构,使用ViewModel LiveData等工具来实现data-binding。
JetPack中还附带了一个Navigation,顾名思义,即导航功能,主要目的是用来实现单Activity架构,之前写过一篇文章,是利用fragmentation来实现单Activity架构,抱着学习的态度,这次的项目采用了Navigation来实现单Activity架构。
先附带项目的MVVM架构图:
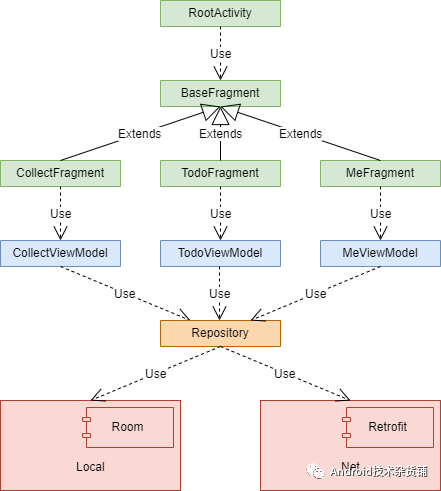
- 绿色代表View层
- 蓝色代表ViewModel层
- 红色代表Model层
各层之间均是单向依赖,即V层向VM层发起请求,VM层向M层获取数据,再通过LiveData作为桥梁,V层监听LiveData数据,数据变化时更新UI。
举个代码例子吧,登录流程:
首先是V层代码:
class LoginFragment : BaseFragment(), View.OnClickListener {
  private val viewModel by lazy {
    ViewModelProviders.of(this).get(LoginViewModel::class.java)
  }

  ... ...

  override fun bindView(savedInstanceState: Bundle?, rootView: View) {
    observe()
    fragmentLoginSignInLayoutSignIn.setOnClickListener(this)
  }

  override fun onClick(v: View?) {
    when (v?.id) {
      R.id.fragmentLoginSignInLayoutSignIn -> {
            //调用登录
            viewModel.login(
                fragmentLoginSignInLayoutAccount.text.toString(),
                fragmentLoginSignInLayoutPassword.text.toString()
            )
        }
      ... ...
    }
  }

  /**
   * 监听数据变化
   */
  private fun observe() {
    //登录监听
    viewModel.loginLiveData.observe(this, Observer {
        if (it.errorCode != 0) {
            toast(it.errorMsg)
        } else {
            Navigation.findNavController(fragmentLoginSignInLayoutSignIn)
                .navigate(R.id.action_loginFragment_to_mainFragment)
        }
    })
    //注册监听
    viewModel.registerLiveData.observe(this, Observer {
        if (it.errorCode != 0) {
            toast(it.errorMsg)
        } else {
            toast("注册成功,返回登录页登录")
            getSignInAnimation(fragmentLoginSignUpLayout)
        }
    })
    //loading窗口监听
    viewModel.isLoading.observe(this, Observer {
        if (it) {
            showLoading()
        } else {
            dismissAllLoading()
        }
    })
  }
}
获取LoginViewModel的实例,点击登录按钮时,调用其login(userName:String,password:String)方法,在observe()方法中获取其LiveData数据的observe方法,监听其数据变化,在Observer匿名类里进行UI的更新。
VM层代码:
class LoginViewModel(application: Application) : BaseViewModel(application) {

  /**
   * 登录数据
   */
  var loginLiveData = MutableLiveData<LoginResponse>()
  /**
   * 注册数据
   */
  var registerLiveData = MutableLiveData<LoginResponse>()
  /**
   * 登出数据
   */
  var logOutLiveData = MutableLiveData<LoginResponse>()

  private val repository = LoginRepository.getInstance(PackRatNetUtil.getInstance())

  fun login(username: String, password: String) {
    launch {
        loginLiveData.postValue(repository.login(username, password))
    }
  }

  fun register(username: String, password: String, repassword: String) {
    launch {
        registerLiveData.postValue(repository.register(username, password, repassword))
    }
  }

  fun logOut() {
    launch {
        logOutLiveData.postValue(repository.logOut())
    }
  }

}
很简单,做的就是实例化LiveData和repository数据依赖层,并调用repository获取数据,最后往里postValue赋值。我这里包装了一层BaseViewModel,它继承了AndroidViewModel,它与普通的ViewModel不同之处在于可以需要传入application参数,也就是可以获取一个全局context引用。
abstract class BaseViewModel(application: Application) : AndroidViewModel(application){
  /**
   * 加载变化
   */
  var isLoading = MutableLiveData<Boolean>()
  /**
   * 统一协程处理
   */
  fun launch(block:suspend() -> Unit) = viewModelScope.launch {
    try {
        isLoading.value = true
        withContext(Dispatchers.IO){
            block()
        }
        isLoading.value = false
    }catch (t:Throwable){
        t.printStackTrace()
        getApplication<PackRatApp>().toast(t.message)
        isLoading.value = false
    }
  }
}
抽离了一个协程方法,耗时操作统一到IO线程操作,loading在耗时方法完成时置为false,通知页面关闭弹窗。
M层代码:
class LoginRepository private constructor(
private val net: PackRatNetUtil
) {
  companion object {
    @Volatile
    private var instance: LoginRepository? = null

    fun getInstance(net: PackRatNetUtil) =
        instance ?: synchronized(this) {
            instance ?: LoginRepository(net).apply {
                instance = this
            }
        }
  }

  suspend fun login(username: String, password: String) =
    net.fetchLoginResult(username, password)

  suspend fun register(username: String, password: String, repassword: String) =
    net.fetchRegisterResult(username, password, repassword)

  suspend fun logOut() =
    net.fetchQuitResult()
}
这里做的事情也很简单,从网络层获取数据,当然,如果需要存放本地数据库,可以如下实现:
class CollectRepository private constructor(
private var collectDao: CollectDao,
private var net: PackRatNetUtil
) {
  companion object {
    @Volatile
    private var instance: CollectRepository? = null

    fun getInstance(collectDao: CollectDao, net: PackRatNetUtil) =
        instance ?: synchronized(this) {
            instance ?: CollectRepository(collectDao, net).apply {
                instance = this
            }
        }
  }

  /**
   * 获取收藏列表数据
   */
  suspend fun getCollects() = try {
    net.fetchCollectList()
  } catch (t: Throwable) {
    t.printStackTrace()
    collectDao.getCollectList()
  }


  /**
   * 设置收藏列表存储入数据库
   */
  suspend fun setCollects(collects: List<Collect>) {
    collects.forEach {
        collectDao.insert(it)
        log(content = it.content)
    }
  }
}
传入本地数据库及网络层的实例,然后依照不同的情况分别获取数据。
class PackRatNetUtil private constructor() {
  companion object {
    @Volatile
    private var instance: PackRatNetUtil? = null

    fun getInstance() = instance ?: synchronized(this) {
        instance ?: PackRatNetUtil().apply {
            instance = this
        }
    }
  }

  private val collectService = ServiceCreator.create(CollectService::class.java)

  private val loginService = ServiceCreator.create(LoginService::class.java)

  /**
   * 从服务器获取收藏列表
   */
  suspend fun fetchCollectList() = collectService.getCollectAsync().await()

  /**
   * 获取登录结果
   */
  suspend fun fetchLoginResult(username: String, password: String) =
    loginService.loginAsync(username, password).await()

  /**
   * 此方法用于retrofit使用 [Call] 的 [Callback] 回调与协程 [await] 的回调相连
   * 不过 retrofit 后续提供了[CoroutineCallAdapterFactory],可返回[Deferred]作为回调
   * @Deprecated 引入[com.jakewharton.retrofit:retrofit2-kotlin-coroutines-adapter]包可以使用Deferred作为回调
   */
  private suspend fun <T> Call<T>.await(): T = suspendCoroutine { continuation ->
    enqueue(object : Callback<T> {
        override fun onFailure(call: Call<T>, t: Throwable) {
            continuation.resumeWithException(t)
        }

        override fun onResponse(call: Call<T>, response: Response<T>) {
            val body = response.body()
            if (body != null) {
                continuation.resume(body)
            } else {
                continuation.resumeWithException(NullPointerException("response body is null"))
            }
        }
    })
  }
}
这里提下,之前retrofit没有提供coroutines-adapter依赖包时,不能使用Deferred作为回调,可重写其Call的await方法,将协程的resume方法与resumeWithException方法与之对应,从而使retrofit能更好的与协程使用,不过retrofit后续提供了
implementation "com.jakewharton.retrofit:retrofit2-kotlin-coroutines-adapter:$retrofitCoroutineVersion"
所以可在其apiService里使用Deferred作为回调。
interface LoginService {
  @FormUrlEncoded
  @POST("user/login")
  fun loginAsync(
    @Field("username") username: String,
    @Field("password") password: String
  ): Deferred<LoginResponse>

  @FormUrlEncoded
  @POST("user/register")
  fun registerAsync(
    @Field("username") username: String,
    @Field("password") password: String,
    @Field("repassword") repassword: String
  ): Deferred<LoginResponse>

  @FormUrlEncoded
  @GET("user/logout/json")
  fun quitAsync(): Deferred<LoginResponse>
}
MVVM其核心思路就在于各层之间单向依赖单向交流,不能出现V层直接请求数据等操作。后续有空再写Navigation实现单Activity架构的思路。
先贴项目代码:github.com/512DIDIDI/P…
