

Vuex 是什么?
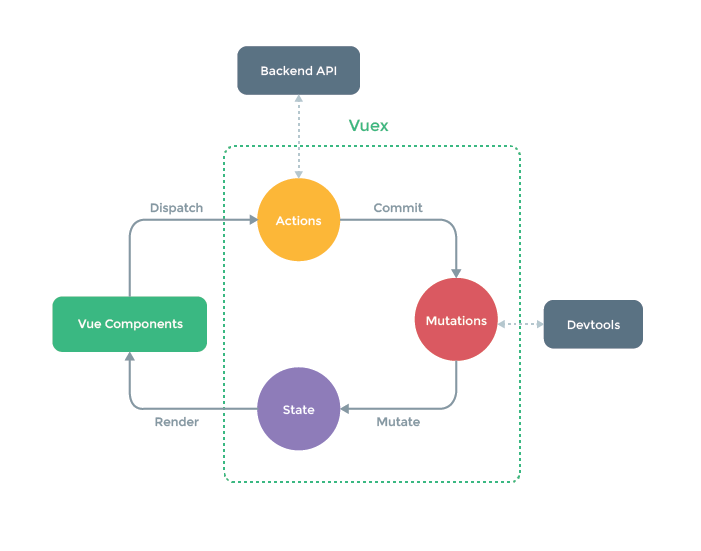
Vuex 是一个专为 Vue.js 应用程序开发的状态管理模式。它采用集中式存储管理应用的所有组件的状态,并以利用 Vue.js 的细粒度数据响应机制来进行高效的状态更新。它的核心概念有State,Getter,Mutation,Action,Module。
Vuex 初始化
安装
在项目中 import Vuex from 'vuex' 的时候,实际上引用的是一个对象,它的定义在/node_modules/vuex 中:
  var index = {
      Store: Store,
      install: install,
      version: '3.1.2',
      mapState: mapState,
      mapMutations: mapMutations,
      mapGetters: mapGetters,
      mapActions: mapActions,
      createNamespacedHelpers: createNamespacedHelpers
    };
  return index;
Vue.use(Vuex) 实质上是启动了 vuex 的install方法 安装到vue
  function initUse (Vue) {
    Vue.use = function (plugin) {
      var installedPlugins = (this._installedPlugins || (this._installedPlugins = []));
      if (installedPlugins.indexOf(plugin) > -1) {
        return this
      }

      // additional parameters
      var args = toArray(arguments, 1);
      args.unshift(this);
      if (typeof plugin.install === 'function') {
        plugin.install.apply(plugin, args);
      } else if (typeof plugin === 'function') {
        plugin.apply(null, args);
      }
      installedPlugins.push(plugin);
      return this
    };
  }

  function install (_Vue) {
    if (Vue && _Vue === Vue) {
      if (process.env.NODE_ENV !== 'production') {
        console.error(
          '[vuex] already installed. Vue.use(Vuex) should be called only once.'
        );
      }
      return
    }
    Vue = _Vue;
    applyMixin(Vue);
  }
可以看出install 的逻辑很简单,就是把传入的 _Vue 赋值给 Vue 并执行了 applyMixin(Vue) 方法。
  function applyMixin (Vue) {
      var version = Number(Vue.version.split('.')[0]);

      if (version >= 2) {
        Vue.mixin({ beforeCreate: vuexInit });
      } else {
        // override init and inject vuex init procedure
        // for 1.x backwards compatibility.
        var _init = Vue.prototype._init;
        Vue.prototype._init = function (options) {
          if ( options === void 0 ) options = {};

          options.init = options.init
            ? [vuexInit].concat(options.init)
            : vuexInit;
          _init.call(this, options);
        };
      }

      /**
      * Vuex init hook, injected into each instances init hooks list.
      */

      function vuexInit () {
        var options = this.$options;
        // store injection
        if (options.store) {
          this.$store = typeof options.store === 'function'
            ? options.store()
            : options.store;
        } else if (options.parent && options.parent.$store) {
          this.$store = options.parent.$store;
        }
      }
    }
从applyMixin方法中可以看出它会先判断Vue版本号,对于 Vue 2.0 以上版本,它其实就全局混入了一个 beforeCreate 钩子函数,在创建前把 options.store 保存在所有组件的 this.$store 中,这个 options.store 就是我们在实例化 Store 对象的实例。
Store 实例化
其实 这里 大致 可以分为三步:
  var Store = function Store (options) {
    var this$1 = this;
    if ( options === void 0 ) options = {};

    // Auto install if it is not done yet and `window` has `Vue`.
    // To allow users to avoid auto-installation in some cases,
    // this code should be placed here. See #731
    if (!Vue && typeof window !== 'undefined' && window.Vue) {
      install(window.Vue);
    }

    if (process.env.NODE_ENV !== 'production') {
      assert(Vue, "must call Vue.use(Vuex) before creating a store instance.");
      assert(typeof Promise !== 'undefined', "vuex requires a Promise polyfill in this browser.");
      assert(this instanceof Store, "store must be called with the new operator.");
    }

    var plugins = options.plugins; if ( plugins === void 0 ) plugins = [];
    var strict = options.strict; if ( strict === void 0 ) strict = false;

    // store internal state
    this._committing = false;
    this._actions = Object.create(null);
    this._actionSubscribers = [];
    this._mutations = Object.create(null);
    this._wrappedGetters = Object.create(null);
    this._modules = new ModuleCollection(options); 第一步:实例化模块,创建模块树
    this._modulesNamespaceMap = Object.create(null);
    this._subscribers = [];
    this._watcherVM = new Vue();
    this._makeLocalGettersCache = Object.create(null);

    // bind commit and dispatch to self
    var store = this;
    var ref = this;
    var dispatch = ref.dispatch;
    var commit = ref.commit;
    this.dispatch = function boundDispatch (type, payload) {
      return dispatch.call(store, type, payload)
    };
    this.commit = function boundCommit (type, payload, options) {
      return commit.call(store, type, payload, options)
    };

    // strict mode
    this.strict = strict;

    var state = this._modules.root.state;

    // init root module.
    // this also recursively registers all sub-modules
    // and collects all module getters inside this._wrappedGetters
    installModule(this, state, [], this._modules.root); 第二步:安装模块

    // initialize the store vm, which is responsible for the reactivity
    // (also registers _wrappedGetters as computed properties)
    resetStoreVM(this, state); 第三部 注册 Store 实例

    // apply plugins
    plugins.forEach(function (plugin) { return plugin(this$1); });

    var useDevtools = options.devtools !== undefined ? options.devtools : Vue.config.devtools;
    if (useDevtools) {
      devtoolPlugin(this);
    }
  };
第一步:实例化模块,创建模块树
模块对于 Vuex 的意义:如果应用变得复杂时,使用单一状态树,应用的所有状态会集中到一个比较大的对象,store 对象就有可能变得相当臃肿。Vuex 为了解决这个问题允许我们将 store 分割成模块(module)。并且每个模块拥有自己的 state、mutation、action、getter。 但从数据结构来看,模块的设计是树形结构,自己是一个 root module 模块,下面有子模块Vuex 需要完成这颗树的构建,构建过程的入口就是:
this._modules = new ModuleCollection(options)
通过 debugger 可以发现 ModuleCollection 的实例化过程实则是执行了 register 方法。
  var ModuleCollection = function ModuleCollection (rawRootModule) {
    // register root module (Vuex.Store options)
    this.register([], rawRootModule, false);
  };
  ModuleCollection.prototype.register = function register (path, rawModule, runtime) {
      var this$1 = this;
      if ( runtime === void 0 ) runtime = true;

    if (process.env.NODE_ENV !== 'production') {
      assertRawModule(path, rawModule);
    }

    var newModule = new Module(rawModule, runtime);
    if (path.length === 0) {
      this.root = newModule;
    } else {
      var parent = this.get(path.slice(0, -1));
      parent.addChild(path[path.length - 1], newModule);
    }

    // register nested modules
    if (rawModule.modules) {
      forEachValue(rawModule.modules, function (rawChildModule, key) {
        this$1.register(path.concat(key), rawChildModule, runtime);
      });
    }
  };
register 方法 首先是 通过 var newModule = new Module(rawModule, runtime) 得到modules实例;
  var Module = function Module (rawModule, runtime) {
    this.runtime = runtime;
    // Store some children item
    this._children = Object.create(null);
    // Store the origin module object which passed by programmer
    this._rawModule = rawModule;
    var rawState = rawModule.state;

    // Store the origin module's state
    this.state = (typeof rawState === 'function' ? rawState() : rawState) || {};
  };
通过Module 的构造函数 主要有 3个 属性,this._rawModule 表示模块的配置,this._children 表示它的所有子模块,this.state 表示这个模块定义的 state。
在 register 函数中 实例化一个 Module 后,会判断 当前 path 的长度,如果为0,它就是一个根模块,会将 newModule 实例赋值给this.root,否则就 会运行如下代码建立父子关系。
  const parent = this.get(path.slice(0, -1));
  parent.addChild(path[path.length - 1], newModule)
这一步的代码 很清晰,先找到 父,然后通过父模块的addChild 建立父子模块。 再回到register 方法 它的最后一步判断如果有子模块存在 就根据 key 作为 path,递归调用register方法,这样在上一步判断 path 长度时就不会为0了。
  ModuleCollection.prototype.get = function get (path) {
    return path.reduce(function (module, key) {
      return module.getChild(key)
    }, this.root)
  };
传入的 path 是它的父模块的 path,然后从根模块开始,通过 reduce 方法一层层去找到对应的模块,查找的过程中,执行的是 module.getChild(key) 方法:
  Module.prototype.getChild = function getChild (key) {
    return this._children[key]
  };
看代码一目了然,就是返回当前模块的 _children 中对应 key 的模块,每个模块的 _children 是通过执行 parent.addChild(path[path.length - 1], newModule) 方法添加:
  Module.prototype.addChild = function addChild (key, module) {
    this._children[key] = module;
  };
其实 对于 子模块而言,它们的 parent 就是上一层 module,这样它们就会通过 父模块的 addChild 方法被添加到 父模块 的 _children 中。递归执行这样的过程,实例出一颗完整的模块树。
第二步:安装模块
实例化完模块后, debugger回到 Store 函数中。
  var state = this._modules.root.state;
  installModule(this, state, [], this._modules.root);
installModule 函数如下:
  function installModule (store, rootState, path, module, hot) {
    var isRoot = !path.length;
    var namespace = store._modules.getNamespace(path);

    // register in namespace map
    if (module.namespaced) {
      if (store._modulesNamespaceMap[namespace] && process.env.NODE_ENV !== 'production') {
        console.error(("[vuex] duplicate namespace " + namespace + " for the namespaced module " + (path.join('/'))));
      }
      store._modulesNamespaceMap[namespace] = module;
    }

    // set state
    if (!isRoot && !hot) {
      var parentState = getNestedState(rootState, path.slice(0, -1));
      var moduleName = path[path.length - 1];
      store._withCommit(function () {
        if (process.env.NODE_ENV !== 'production') {
          if (moduleName in parentState) {
            console.warn(
              ("[vuex] state field \"" + moduleName + "\" was overridden by a module with the same name at \"" + (path.join('.')) + "\"")
            );
          }
        }
        Vue.set(parentState, moduleName, module.state);
      });
    }

    var local = module.context = makeLocalContext(store, namespace, path);

    module.forEachMutation(function (mutation, key) {
      var namespacedType = namespace + key;
      registerMutation(store, namespacedType, mutation, local);
    });

    module.forEachAction(function (action, key) {
      var type = action.root ? key : namespace + key;
      var handler = action.handler || action;
      registerAction(store, type, handler, local);
    });

    module.forEachGetter(function (getter, key) {
      var namespacedType = namespace + key;
      registerGetter(store, namespacedType, getter, local);
    });

    module.forEachChild(function (child, key) {
      installModule(store, rootState, path.concat(key), child, hot);
    });
  }
installModule 函数方法有 5 个入参,store 表示 root store;state 表示 root state;path 表示模块的访问路径;module 表示当前的模块,hot 表示是否是热更新。
默认情况下,模块内部的 action、mutation 和 getter 是注册在全局命名空间的——这样使得多个模块能够对同一 mutation 或 action 作出响应。
如果希望你的模块具有更高的封装度和复用性,你可以通过添加 namespaced: true 的方式使其成为带命名空间的模块。当模块被注册后,它的所有 getter、action 及 mutation 都会自动根据模块注册的路径调整命名。启用了命名空间的 getter 和 action 会收到局部化的 getter,dispatch 和 commit。换言之,你在使用模块内容(module assets)时不需要在同一模块内额外添加空间名前缀。更改 namespaced 属性后不需要修改模块内的代码。 获取命名空间的方法如下:
const namespace = store._modules.getNamespace(path)
方法的具体实现:
  ModuleCollection.prototype.getNamespace = function getNamespace (path) {
    var module = this.root;
    return path.reduce(function (namespace, key) {
      module = module.getChild(key);
      return namespace + (module.namespaced ? key + '/' : '')
    }, '')
  };
namespaced 为 true 且 没有冲突的情况下会将 namespace 对应的模块保存下来 :
store._modulesNamespaceMap[namespace] = module;
接下来 会 判断 是否 是root 然后执行 以下方法 拿到 state,然后通过Vue.set 一层层 初始化 state。
  function getNestedState (state, path) {
    return path.length
      ? path.reduce(function (state, key) { return state[key]; }, state)
      : state
  }
接下来会执行 makeLocalContext 方法:
 function makeLocalContext (store, namespace, path) {
   var noNamespace = namespace === '';

   var local = {
     dispatch: noNamespace ? store.dispatch : function (_type, _payload, _options) {
       var args = unifyObjectStyle(_type, _payload, _options);
       var payload = args.payload;
       var options = args.options;
       var type = args.type;

       if (!options || !options.root) {
         type = namespace + type;
         if (process.env.NODE_ENV !== 'production' && !store._actions[type]) {
           console.error(("[vuex] unknown local action type: " + (args.type) + ", global type: " + type));
           return
         }
       }

       return store.dispatch(type, payload)
     },

     commit: noNamespace ? store.commit : function (_type, _payload, _options) {
       var args = unifyObjectStyle(_type, _payload, _options);
       var payload = args.payload;
       var options = args.options;
       var type = args.type;

       if (!options || !options.root) {
         type = namespace + type;
         if (process.env.NODE_ENV !== 'production' && !store._mutations[type]) {
           console.error(("[vuex] unknown local mutation type: " + (args.type) + ", global type: " + type));
           return
         }
       }

       store.commit(type, payload, options);
     }
   };

   // getters and state object must be gotten lazily
   // because they will be changed by vm update
   Object.defineProperties(local, {
     getters: {
       get: noNamespace
         ? function () { return store.getters; }
         : function () { return makeLocalGetters(store, namespace); }
     },
     state: {
       get: function () { return getNestedState(store.state, path); }
     }
   });

   return local
 }
makeLocalContext 有 3 个入参,store 表示 root store;namespace 表示模块的命名空间,path 表示模块的 path。该方法定义了 local 对象,对于 dispatch 和 commit 方法,如果没有 namespace,它们就直接指向了 root store 的 dispatch 和 commit 方法,否则会创建方法,把 type 自动拼接上 namespace,然后执行 store 上对应的方法。
debugger 回到 installModule ,这里接下来就是 分别完成 Mutation,Action,Getter 的注册。
  function registerMutation (store, type, handler, local) {
    var entry = store._mutations[type] || (store._mutations[type] = []);
    entry.push(function wrappedMutationHandler (payload) {
      handler.call(store, local.state, payload);
    });
  }
  function registerAction (store, type, handler, local) {
    var entry = store._actions[type] || (store._actions[type] = []);
    entry.push(function wrappedActionHandler (payload) {
      var res = handler.call(store, {
        dispatch: local.dispatch,
        commit: local.commit,
        getters: local.getters,
        state: local.state,
        rootGetters: store.getters,
        rootState: store.state
      }, payload);
      if (!isPromise(res)) {
        res = Promise.resolve(res);
      }
      if (store._devtoolHook) {
        return res.catch(function (err) {
          store._devtoolHook.emit('vuex:error', err);
          throw err
        })
      } else {
        return res
      }
    });
  }

  function registerGetter (store, type, rawGetter, local) {
    if (store._wrappedGetters[type]) {
      if (process.env.NODE_ENV !== 'production') {
        console.error(("[vuex] duplicate getter key: " + type));
      }
      return
    }
    store._wrappedGetters[type] = function wrappedGetter (store) {
      return rawGetter(
        local.state, // local state
        local.getters, // local getters
        store.state, // root state
        store.getters // root getters
      )
    };
  }
installModule 方法会完成模块下的 state、mutations、actions、getters、 的初始化工作,并且通过递归遍历的方式,就完成了所有子模块的安装工作。
第三步 注册 Store 实例
安装完模块后, debugger回到 Store 函数中。
resetStoreVM(this, state);
下面是方法定义:
  function resetStoreVM (store, state, hot) {
    var oldVm = store._vm;

    // bind store public getters
    store.getters = {};
    // reset local getters cache
    store._makeLocalGettersCache = Object.create(null);
    var wrappedGetters = store._wrappedGetters;
    var computed = {};
    forEachValue(wrappedGetters, function (fn, key) {
      // use computed to leverage its lazy-caching mechanism
      // direct inline function use will lead to closure preserving oldVm.
      // using partial to return function with only arguments preserved in closure environment.
      computed[key] = partial(fn, store);
      Object.defineProperty(store.getters, key, {
        get: function () { return store._vm[key]; },
        enumerable: true // for local getters
      });
    });

    // use a Vue instance to store the state tree
    // suppress warnings just in case the user has added
    // some funky global mixins
    var silent = Vue.config.silent;
    Vue.config.silent = true;
    store._vm = new Vue({
      data: {
        $$state: state
      },
      computed: computed
    });
    Vue.config.silent = silent;

    // enable strict mode for new vm
    if (store.strict) {
      enableStrictMode(store);
    }

    if (oldVm) {
      if (hot) {
        // dispatch changes in all subscribed watchers
        // to force getter re-evaluation for hot reloading.
        store._withCommit(function () {
          oldVm._data.$$state = null;
        });
      }
      Vue.nextTick(function () { return oldVm.$destroy(); });
    }
  }
resetStoreVM 首先遍历了 _wrappedGetters 获得每个 getter 的函数 fn 和 key,然后定义了 computed[key] = () => fn(store)。这里的_wrappedGetters 方法就定义在 安装模块 registerGetter 方法中。fn(store) 等于如下方法:
  store._wrappedGetters[type] = function wrappedGetter (store) {
    return rawGetter(
      local.state, // local state
      local.getters, // local getters
      store.state, // root state
      store.getters // root getters
    )
  }
实则 我们 访问 store.getters 是访问了store 实例 上的 get方法。
  computed[key] = partial(fn, store);
  Object.defineProperty(store.getters, key, {
    get: function () { return store._vm[key]; },
    enumerable: true // for local getters
  });
根据 key 访问 store.getters 的某一个 getter 的时候,实际上就是访问了 store._vm[key],也就是 computed[key],在执行 computed[key] 对应的函数的时候,会执行 rawGetter 方法,那么就会访问到 store.state,进而访问到 store._vm._data.?state,这样就建立了一个依赖关系。当 store.state 发生变化的时候,下一次再访问 store.getters 的时候会重新计算,这里的 store._vm 创建过程在代码中也清晰可见。
当严格模式下,store._vm 会添加一个 wathcer 来观测 this._data.?state 的变化,也就是当 store.state 被修改的时候, store._committing 必须为 true,否则在开发阶段会报警告。
  function enableStrictMode (store) {
    store._vm.$watch(function () { return this._data.$$state }, function () {
      if (process.env.NODE_ENV !== 'production') {
        assert(store._committing, "do not mutate vuex store state outside mutation handlers.");
      }
    }, { deep: true, sync: true });
  }
从 debugger 可以看到,在 Commit 过程中会执行 _withCommit 函数, 其实也就是 在 fn 之前 将_committing 变量 改为true。
  Store.prototype._withCommit = function _withCommit (fn) {
    var committing = this._committing;
    this._committing = true;
    fn();
    this._committing = committing;
  };
发布一篇之前在 vuex 方面的自我学习文章,欢迎交流学习。
