

一、使用webpack内置得stats分析相关文件
stats: 构建的统计信息,package.json 中使用 stats,方式如下:
"scripts":{
    "build:stats": "webpack --env production --json > stats.json"
}
如果你是vue-cli3搭建的项目工程,也可以按照下面得方式使用:
"scripts":{
    "build:stats": "vue-cli-service build --mode prod --json > stats.json"
}
配置好之后,运行命令,就会在根目录生成一个stats.json文件,可以查看分析结果。这种方式只是初级分析,颗粒度较大。
二、使用speed-measure-webpack-plugin进行速度分析
// 安装
npm install --save-dev speed-measure-webpack-plugin

// 使用方式
const SpeedMeasurePlugin = require("speed-measure-webpack-plugin");

const smp = new SpeedMeasurePlugin();

const webpackConfig = smp.wrap({
  plugins: [
    new MyPlugin(),
    new MyOtherPlugin()
  ]
});
配置好之后,运行打包命令的时候就可以看到每个loader 和插件执行耗时。
参考:www.npmjs.com/package/spe…
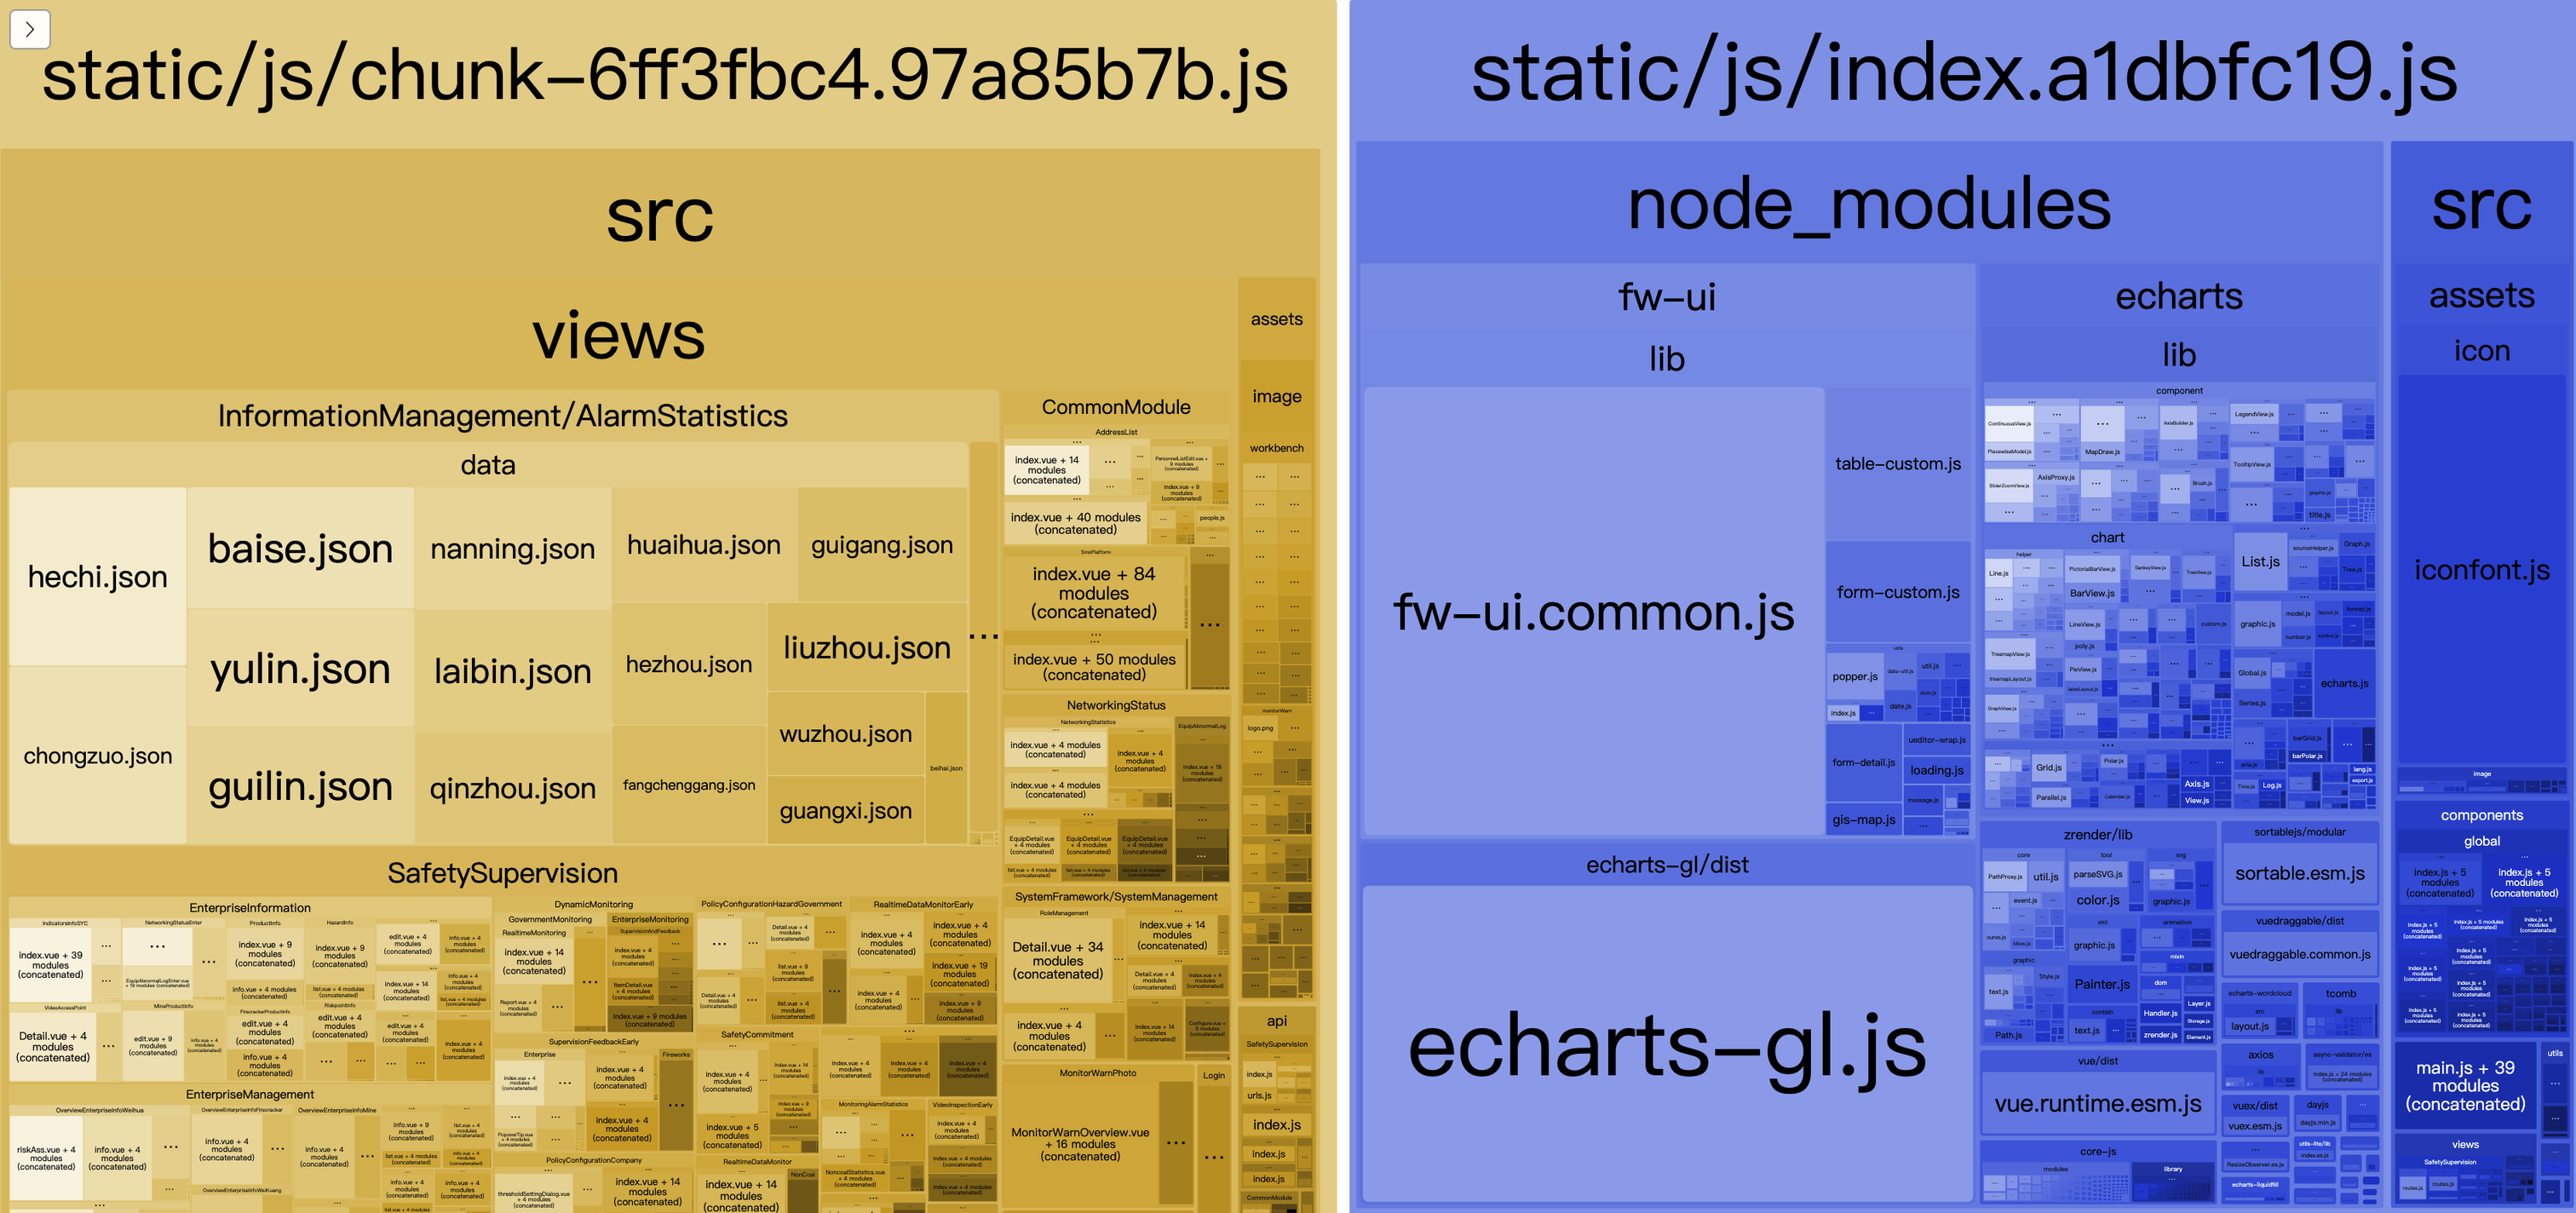
三、使用webpack-bundle-analyzer进行体积分析
这个插件应该大部分前端小伙伴都使用过吧!
// 安装
npm install --save-dev webpack-bundle-analyzer

// 使用
const BundleAnalyzerPlugin = require('webpack-bundle-analyzer').BundleAnalyzerPlugin;

module.exports = {
  plugins: [
    new BundleAnalyzerPlugin()
  ]
}
构建完成后,会在http://127.0.0.1:8888展示相关文件大小。按照提示就可以分析依赖的第三方模块文件大小和业务里面的组件代码大小。
四、使用多进程、多实例构建
采用这种方式对资源进行并行解析,有如下几种方案:
- thread-loader(官方推荐)
原理:每次 webpack 解析一个模块,thread-loader 会将它及它的依赖分配给 worker 线程中。
// 使用方式
module.exports={
    ...
    module:{
        rules:[
        {
            test:/\.js$/,
            use:[{
                loader:'thread-loader',
                options:{
                    workers: 3
                }
            },
            'babel-loader'
            ]
        }]
    }
    ...
}
- parallel-webpack
原理:parallel-webpack允许您并行运行多个Webpack构建,从而将工作分散到各个处理器上,从而有助于显着加快构建速度。
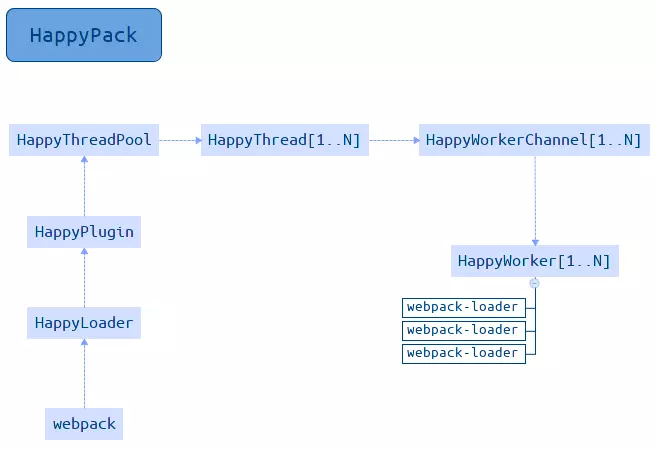
参考:www.npmjs.com/package/par… - HappyPack
原理:每次 webapck 解析一个模块时,HappyPack 会将它及它的依赖分配到worker线程中。
提示:由于HappyPack 对file-loader、url-loader 支持的不友好,所以不建议对该loader使用。
运行机制如下图所示:
// 安装
npm install --save-dev happypack

// 使用
const HappyPack=require('happypack')

module.exports = {
    plugins:[
        new HappyPack({
        id: 'jsx',
        threads: 4,
        loaders: [ 'babel-loader' ]
      }),
      new HappyPack({
        id: 'styles',
        threads: 2,
        loaders: [ 'style-loader', 'css-loader', 'less-loader' ]
      })
  ]
}
参考:www.npmjs.com/package/hap…
如果你使用vue-cli3构建项目的话,自动就会开启多线程打包。
五、多进程并行压缩代码
方法一:使用webpack-parallel-uglify-plugin插件
const parallelUglifyPlugin=require('webpack-parallel-uglify-plugin');

module.exports = {
  plugins: [
    new parallelUglifyPlugin({
      // Optional regex, or array of regex to match file against. Only matching files get minified.
      // Defaults to /.js$/, any file ending in .js.
      test,
      include, // Optional regex, or array of regex to include in minification. Only matching files get minified.
      exclude, // Optional regex, or array of regex to exclude from minification. Matching files are not minified.
      cacheDir, // Optional absolute path to use as a cache. If not provided, caching will not be used.
      workerCount, // Optional int. Number of workers to run uglify. Defaults to num of cpus - 1 or asset count (whichever is smaller)
      sourceMap, // Optional Boolean. This slows down the compilation. Defaults to false.
      uglifyJS: {
        // These pass straight through to uglify-js@3.
        // Cannot be used with uglifyES.
        // Defaults to {} if not neither uglifyJS or uglifyES are provided.
        // You should use this option if you need to ensure es5 support. uglify-js will produce an error message
        // if it comes across any es6 code that it can't parse.
      },
      uglifyES: {
        // These pass straight through to uglify-es.
        // Cannot be used with uglifyJS.
        // uglify-es is a version of uglify that understands newer es6 syntax. You should use this option if the
        // files that you're minifying do not need to run in older browsers/versions of node.
      }
    }),
  ],
};
方法二:使用uglify-webpack-plugin插件,开启parallel参数(备注:之前webpack版本使用,不支持压缩ES6的语法)
const UglifyJsPlugin = require('uglifyjs-webpack-plugin');

module.exports = {
  optimization: {
    minimizer: [new UglifyJsPlugin()],
  },
};
方法三:使用terser-webpack-plugin插件,开启parallel参数(推荐使用,支持压缩ES6的语法)
// 安装terset-webpack-plugin
npm install terser-webpack-plugin --save-dev

// 使用方式:
// webpack.config.js
const TerserPlugin = require('terser-webpack-plugin');

module.exports = {
  optimization: minimize: true,
    minimizer: [
      new TerserPlugin({
        parallel: true
      })
    ]
};
六、采用分包方式预编译资源模块
可以将vue、vuex、vue-router基础包和业务基础包打包成一个文件。
方法:使用DLLPlugin进行分包,DllReferencePlugin对manifest.json引用。
第一步:使用DLLPlugin进行分包,创建一个webpack.dll.js
const path=require("path");
const webpack=require("webpack");

module.exports = {
    entry:{
        library:['vue','vuex','vue-router']
    },
    output:{
        filename:'[name]_[chunkhash].dll.js',
        path:path.resolve(__dirname,'./build/library'),
        library:'[name]'
    },
    plugins: [
        new webpack.DllPlugin({
            name: '[name]_[hash]',
            path: resolve(__dirname,'./build/library/[name].json')
        })
    ]
}
第二步: 在package.json中增加配置:
"scripts": {
    "dll": "webpack --config webpack.dll.js"
  }
运行这条命令,就会生成一个分出的基础包。
第三步:在webpack配置文件中增加一个在生产环境起作用的插件配置
module.exports={
    plugins:[
        new webpack.DllReferencePlugin({
            manifest: require('./build/library/library.json')
        }),
    ]
}
七、利用缓存提升二次构建速度
方法:
(1)babel-loader开启缓存
(2)terset-webpack-plugin开启缓存 (webpack4推荐)
(3)使用cache-loader 或者hard-source-webpack-plugin
八、缩小构建目标
方法一:比如babel-loaader不去解析node_modules
module.exports={
    module:{
        rules:[
            {
                test: /\.js$/,
                loader: 'babel-loader',
                exclude: 'node_modules'
            }
        ]
    }
}
方法二:减少文件搜索范围
(1)优化 resolve.modules配置(减少模块搜索层级)
(2)优化 resolve.mainFields 配置
(3)优化 resolve.extensions 配置
(4)合理使用 alias
九、使用tree-shaking
1个模块可能有多个方法,只要其中的某个方法使用到了,则整个文件都会被打到 bundle 里面去,tree shaking 就是只把用到的方法打入 bundle ,没用到的方法会在 uglify 阶段被擦除掉。
使用:webpack 默认支持,在 .babelrc 里设置 modules: false 即可。production mode的情况下默认开启
要求:必须是 ES6 的语法,CJS 的方式不支持
在webpack构建过程中移除无用的css代码方式。 使用purgecss-webpack-plugin,配合mini-css-extract-plugin。
const glob = require('glob');
const path = require('path');
const MiniCssExtractPlugin = require('mini-css-extract-plugin');
const PurgecssPlugin = require('purgecss-webpack-plugin');

const PATHS = {
    src: path.join(__dirname, 'src')
};

module.exports={
    module:{
        rules:[
            {
                test: /\.css$/,
                use: [
                    MiniCssExtractPlugin.loader,
                    'css-loader'
                ]
            },
        ]
    },
    plugins:[
        new MiniCssExtractPlugin({
            filename: '[name]_[contenthash:8].css'
        }),
        new PurgecssPlugin({
            paths: glob.sync(`${PATHS.src}/**/*`,  { nodir: true }),
        })
    ]
}
十、对图片资源的压缩
在引入图片前可以使用某些在线图片压缩网站进行压缩,也可以在webpack中使用工具进行压缩。 这里我们使用一个image-webpack-loader来压缩图片。
// 安装
npm install image-webpack-loader --save-dev

// 使用
module.exports={
    rules: [{
          test: /\.(gif|png|jpe?g|svg)$/i,
          use: [
                'file-loader',
                {
                  loader: 'image-webpack-loader',
                  options: {
                    disable: true
                  },
                },
            ],
    }]
}
最后尽可能的使用高版本的webpack和Node,由于版本优化,内置了许多功能,也可以优化webpack的打包速度。
另外在使用vue-cli3构建项目的过程中,vue-cli3本身其实也做了很多优化,上面的优化手段vue-cli3这个工具有些优化其实已经帮我们做过了,我们就不用重复配置了,具体想了解的话可以看一下vue-cli3配置的源码
以上就是在学习优化webpack打包过程中的一些学习笔记,特此记录,欢迎小伙伴交流学习!
