

混入
基础
混入mixin提供了分发Vue组件中的可复用功能。
一个混入对象可以包含任意组件选项。当组件使用混入对象,所有选项会被混合仅该组件本身的选项。
// 定义一个混入对象
var myMixin = {
  created: function () {
    this.hello()
  },
  methods: {
    hello: function () {
      console.log('hello from mixin!')
    }
  }
}

// 定义一个使用混入对象的组件
var Component = Vue.extend({
  mixins: [myMixin]
})

var component = new Component() // => "hello from mixin!"
选项合并
当组件和混入对象有同名选项时,会合并。
数据对象会递归合并,发生冲突以组件优先。
var mixin = {
  data: function () {
    return {
      message: 'hello',
      foo: 'abc'
    }
  }
}

new Vue({
  mixins: [mixin],
  data: function () {
    return {
      message: 'goodbye',
      bar: 'def'
    }
  },
  created: function () {
    console.log(this.$data)
    // => { message: "goodbye", foo: "abc", bar: "def" }
  }
})
同名钩子函数会合并为一个数组,都被调用,混入钩子在组件自身钩子之前调用:
var mixin = {
  created: function () {
    console.log('混入对象的钩子被调用')
  }
}

new Vue({
  mixins: [mixin],
  created: function () {
    console.log('组件钩子被调用')
  }
})

// => "混入对象的钩子被调用"
// => "组件钩子被调用"
值为对象的选项,methods,components、directives会被合并为同一个对象。键名冲突时,取组件的。
var mixin = {
  methods: {
    foo: function () {
      console.log('foo')
    },
    conflicting: function () {
      console.log('from mixin')
    }
  }
}

var vm = new Vue({
  mixins: [mixin],
  methods: {
    bar: function () {
      console.log('bar')
    },
    conflicting: function () {
      console.log('from self')
    }
  }
})

vm.foo() // => "foo"
vm.bar() // => "bar"
vm.conflicting() // => "from self"
Vue.extent()也使用同样的策略合并。
全局混入
一旦全局混入会影响每一个之后创建的Vue实例。
// 为自定义的选项 'myOption' 注入一个处理器。
Vue.mixin({
  created: function () {
    var myOption = this.$options.myOption
    if (myOption) {
      console.log(myOption)
    }
  }
})

new Vue({
  myOption: 'hello!'
})
// => "hello!"
谨慎使用全局混入,推荐将其作为插件发布。
自定义选项合并策略
向Vue.config.optionMergeStrategies添加函数:
Vue.config.optionMergeStrategies.myOption = function (toVal, fromVal) {
  // 返回合并后的值
}
对于多数值为对象的选项,可以使用methods相同的合并策略:
var strategies = Vue.config.optionMergeStrategies
strategies.myOption = strategies.methods
自定义指令
简介
需要对普通DOM进行底层操作,就会用到自定义指令。
实现页面加载input框就处于聚焦:
// 注册一个全局自定义指令 `v-focus`
Vue.directive('focus', {
  // 当被绑定的元素插入到 DOM 中时……
  inserted: function (el) {
    // 聚焦元素
    el.focus()
  }
})
如果想注册局部指令,组件也接受一个directives的选项:
directives: {
  focus: {
    // 指令的定义
    inserted: function (el) {
      el.focus()
    }
  }
}
然后:
<input v-focus>
钩子函数
一个指令定义对象可以提供一下几个钩子函数:
- bind 只调用一次,指令第一次绑定到元素时调用
- inserted 被绑定元素插入父节点时调用
- update 所在组件的VNode更新时调用
- componentUpdated 指令所在组件的VNode和子VNode全部更新后调用
- unbind 指令与元素解绑时调用
钩子函数参数
- el 绑定的元素,用来直接操作DOM
- binding 一个对象包含:
- name 指令明
- value 指令绑定值
- oldValue 指令绑定的前一个值,只在update类似的钩子中使用
- expression 字符串形式的指令表达式
- arg 传给指令的参数
- modifiers 包含修饰符的对象
- vnode Vue编译生成的虚拟节点
- oldVnode 上一个虚拟节点 只在update系列钩子中用
除了el之外,其他都是只读的,如果要在钩子之间共享数据,建议使用元素的dataset
一个例子:
<div id="hook-arguments-example" v-demo:foo.a.b="message"></div>
Vue.directive('demo', {
  bind: function (el, binding, vnode) {
    var s = JSON.stringify
    el.innerHTML =
      'name: '       + s(binding.name) + '<br>' +
      'value: '      + s(binding.value) + '<br>' +
      'expression: ' + s(binding.expression) + '<br>' +
      'argument: '   + s(binding.arg) + '<br>' +
      'modifiers: '  + s(binding.modifiers) + '<br>' +
      'vnode keys: ' + Object.keys(vnode).join(', ')
  }
})

new Vue({
  el: '#hook-arguments-example',
  data: {
    message: 'hello!'
  }
})
动态指令参数
指令的参数可以是动态的v-mydirective:[argument]="value"
创建一个指令,通过固定布局将元素固定在页面上:
<div id="baseexample">
  <p>Scroll down the page</p>
  <p v-pin="200">Stick me 200px from the top of the page</p>
</div>
Vue.directive('pin', {
  bind: function (el, binding, vnode) {
    el.style.position = 'fixed'
    el.style.top = binding.value + 'px'
  }
})

new Vue({
  el: '#baseexample'
})
如果不是顶部而是左边,就可以使用动态参数:
<div id="dynamicexample">
  <h3>Scroll down inside this section ↓</h3>
  <p v-pin:[direction]="200">I am pinned onto the page at 200px to the left.</p>
</div>
Vue.directive('pin', {
  bind: function (el, binding, vnode) {
    el.style.position = 'fixed'
    var s = (binding.arg == 'left' ? 'left' : 'top')
    el.style[s] = binding.value + 'px'
  }
})

new Vue({
  el: '#dynamicexample',
  data: function () {
    return {
      direction: 'left'
    }
  }
})
函数简写
如果想在bind和update时触发相同行为:
Vue.directive('color-swatch', function (el, binding) {
  el.style.backgroundColor = binding.value
})
对象字面量
<div v-demo="{ color: 'white', text: 'hello!' }"></div>
Vue.directive('demo', function (el, binding) {
  console.log(binding.value.color) // => "white"
  console.log(binding.value.text)  // => "hello!"
})
渲染函数&JSX
基础
推荐使用模板来创建HTML。使用渲染函数,生成一些带锚点的标题:
<h1>
  <a name="hello-world" href="#hello-world">
    Hello world!
  </a>
</h1>
定义一个组件接口:
<anchored-heading :level="1">Hello world!</anchored-heading>
使用render函数:
Vue.component('anchored-heading', {
  render: function (createElement) {
    return createElement(
      'h' + this.level,   // 标签名称
      this.$slots.default // 子节点数组
    )
  },
  props: {
    level: {
      type: Number,
      required: true
    }
  }
})
向组件中传递不带v-slot指令的子节点时,这些子节点被存储在组件实例中的$slots.default中。
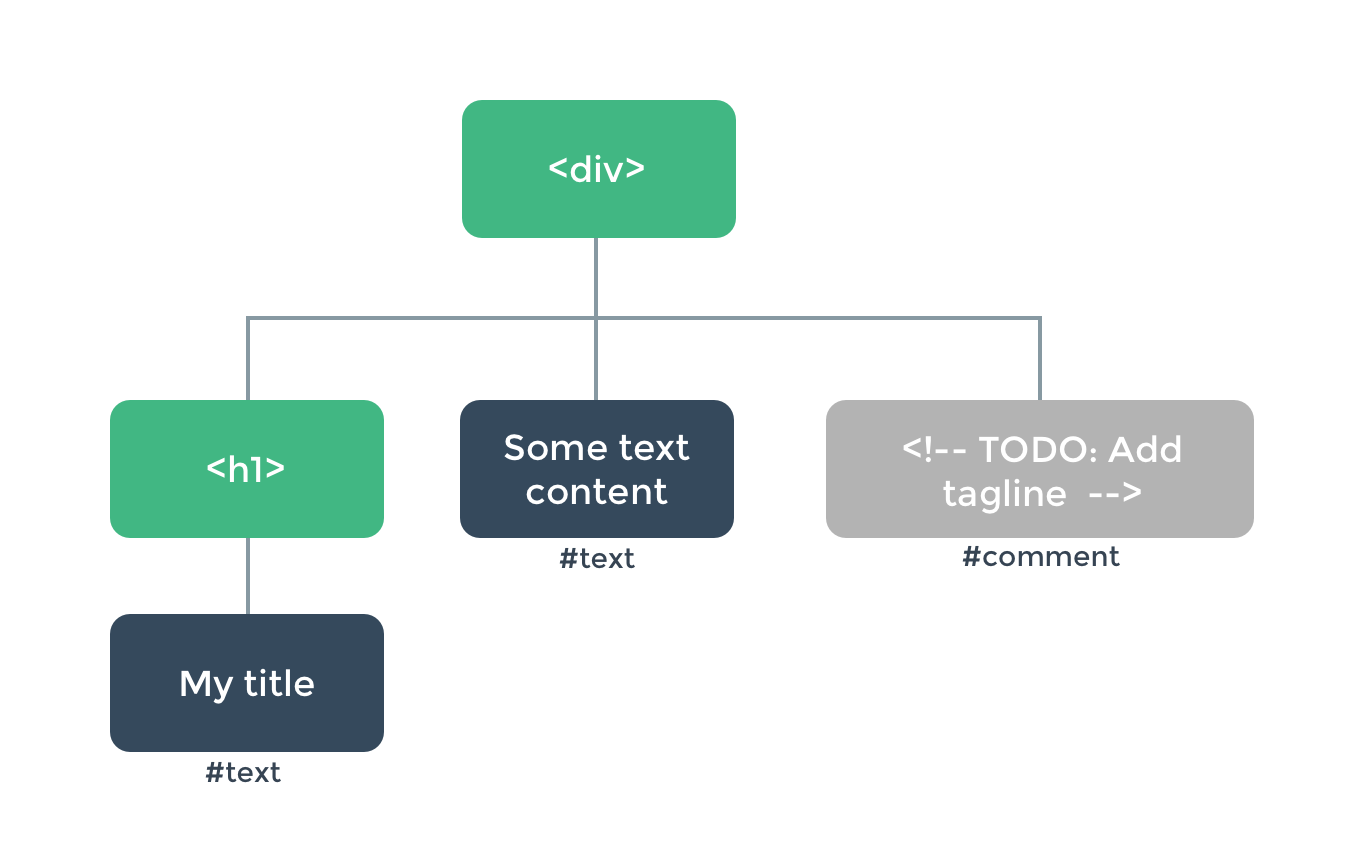
节点、树以及虚拟DOM
了解一下浏览器的工作原理:
<div>
  <h1>My title</h1>
  Some text content
  <!-- TODO: Add tagline -->
</div>
DOM树:
使用render函数更新这些节点:
render: function (createElement) {
  return createElement('h1', this.blogTitle)
}
虚拟DOM
Vue通过一个虚拟DOM追踪自己要如何改变真实DOM:
return createElement('h1', this.blogTitle)
createElement并不是返回一个实际的DOM元素,它告诉Vue页面上需要渲染什么样的节点,子节点。叫做虚拟节点VNode。虚拟DOM就是VNode树的称呼。
createElement参数
// @returns {VNode}
createElement(
  // {String | Object | Function}
  // 一个 HTML 标签名、组件选项对象,或者
  // resolve 了上述任何一种的一个 async 函数。必填项。
  'div',

  // {Object}
  // 一个与模板中属性对应的数据对象。可选。
  {
    // (详情见下一节)
  },

  // {String | Array}
  // 子级虚拟节点 (VNodes),由 `createElement()` 构建而成,
  // 也可以使用字符串来生成“文本虚拟节点”。可选。
  [
    '先写一些文字',
    createElement('h1', '一则头条'),
    createElement(MyComponent, {
      props: {
        someProp: 'foobar'
      }
    })
  ]
)
深入数据对象
createElement函数的第二个参数
{
  // 与 `v-bind:class` 的 API 相同,
  // 接受一个字符串、对象或字符串和对象组成的数组
  'class': {
    foo: true,
    bar: false
  },
  // 与 `v-bind:style` 的 API 相同,
  // 接受一个字符串、对象,或对象组成的数组
  style: {
    color: 'red',
    fontSize: '14px'
  },
  // 普通的 HTML attribute
  attrs: {
    id: 'foo'
  },
  // 组件 prop
  props: {
    myProp: 'bar'
  },
  // DOM 属性
  domProps: {
    innerHTML: 'baz'
  },
  // 事件监听器在 `on` 属性内,
  // 但不再支持如 `v-on:keyup.enter` 这样的修饰器。
  // 需要在处理函数中手动检查 keyCode。
  on: {
    click: this.clickHandler
  },
  // 仅用于组件,用于监听原生事件,而不是组件内部使用
  // `vm.$emit` 触发的事件。
  nativeOn: {
    click: this.nativeClickHandler
  },
  // 自定义指令。注意,你无法对 `binding` 中的 `oldValue`
  // 赋值,因为 Vue 已经自动为你进行了同步。
  directives: [
    {
      name: 'my-custom-directive',
      value: '2',
      expression: '1 + 1',
      arg: 'foo',
      modifiers: {
        bar: true
      }
    }
  ],
  // 作用域插槽的格式为
  // { name: props => VNode | Array<VNode> }
  scopedSlots: {
    default: props => createElement('span', props.text)
  },
  // 如果组件是其它组件的子组件,需为插槽指定名称
  slot: 'name-of-slot',
  // 其它特殊顶层属性
  key: 'myKey',
  ref: 'myRef',
  // 如果你在渲染函数中给多个元素都应用了相同的 ref 名,
  // 那么 `$refs.myRef` 会变成一个数组。
  refInFor: true
}
完整示例
var getChildrenTextContent = function (children) {
  return children.map(function (node) {
    return node.children
      ? getChildrenTextContent(node.children)
      : node.text
  }).join('')
}

Vue.component('anchored-heading', {
  render: function (createElement) {
    // 创建 kebab-case 风格的 ID
    var headingId = getChildrenTextContent(this.$slots.default)
      .toLowerCase()
      .replace(/\W+/g, '-')
      .replace(/(^-|-$)/g, '')

    return createElement(
      'h' + this.level,
      [
        createElement('a', {
          attrs: {
            name: headingId,
            href: '#' + headingId
          }
        }, this.$slots.default)
      ]
    )
  },
  props: {
    level: {
      type: Number,
      required: true
    }
  }
})
约束
VNode必须唯一
使用JavaScript代替模板功能
v-if和v-for
props: ['items'],
render: function (createElement) {
  if (this.items.length) {
    return createElement('ul', this.items.map(function (item) {
      return createElement('li', item.name)
    }))
  } else {
    return createElement('p', 'No items found.')
  }
}
v-model
props: ['value'],
render: function (createElement) {
  var self = this
  return createElement('input', {
    domProps: {
      value: self.value
    },
    on: {
      input: function (event) {
        self.$emit('input', event.target.value)
      }
    }
  })
}
事件&按键修饰符
Vue提供了响应的前缀用于on:
| 修饰符 | 前缀 |
|---|---|
| .passive | & |
| .capture | ! |
| .once | ~ |
| .captrue.once或者.once.capture | ~! |
on: {
  '!click': this.doThisInCapturingMode,
  '~keyup': this.doThisOnce,
  '~!mouseover': this.doThisOnceInCapturingMode
}
插槽
可以通过this.$slots访问静态插槽的内容,每个插槽都是一个VNode数组:
render: function (createElement) {
  // `<div><slot></slot></div>`
  return createElement('div', this.$slots.default)
}
也可以通过this.$scopedSlots访问作用域插槽:
props: ['message'],
render: function (createElement) {
  // `<div><slot :text="message"></slot></div>`
  return createElement('div', [
    this.$scopedSlots.default({
      text: this.message
    })
  ])
}
如果要使用render函数想子组件传递作用域插槽,可以利用scopedSlots:
render: function (createElement) {
  return createElement('div', [
    createElement('child', {
      // 在数据对象中传递 `scopedSlots`
      // 格式为 { name: props => VNode | Array<VNode> }
      scopedSlots: {
        default: function (props) {
          return createElement('span', props.text)
        }
      }
    })
  ])
}
JSX
如果你写了很多render函数很麻烦,有一个Babel插件,在Vue中使用JSX语法
new Vue({
  el: '#demo',
  render: function (h) {
    return (
      <AnchoredHeading level={1}>
        <span>Hello</span> world!
      </AnchoredHeading>
    )
  }
})
将h作为createElement的别名是一个习惯,也是JSX要求的。在任何方法中都有const h = this.$createElement
函数式组件
如果一些没有任何状态依赖的组件,我们将他标记为functional,一个函数式组件:
Vue.component('my-component', {
  functional: true,
  // Props 是可选的
  props: {
    // ...
  },
  // 为了弥补缺少的实例
  // 提供第二个参数作为上下文
  render: function (createElement, context) {
    // ...
  }
})
如果使用了单文件组件,那么基于模板的函数式组件是这样的:
<template functional>
</template>
组件需要的一切都是通过context参数传递,他是一个包含以下字段的对象:
- props
- children VNode子节点的数组
- slots
- scopedSlots
- data
- parent
- listeners
- injections
因为函数式组件只是函数,所以渲染开销低。
这样可以在将children,props,data传递给子组件之前操作他们。
根据传入的props的值来渲染不同的组件:
var EmptyList = { /* ... */ }
var TableList = { /* ... */ }
var OrderedList = { /* ... */ }
var UnorderedList = { /* ... */ }

Vue.component('smart-list', {
  functional: true,
  props: {
    items: {
      type: Array,
      required: true
    },
    isOrdered: Boolean
  },
  render: function (createElement, context) {
    function appropriateListComponent () {
      var items = context.props.items

      if (items.length === 0)           return EmptyList
      if (typeof items[0] === 'object') return TableList
      if (context.props.isOrdered)      return OrderedList

      return UnorderedList
    }

    return createElement(
      appropriateListComponent(),
      context.data,
      context.children
    )
  }
})
向子元素或子组件传递attribute和事件
普通组件中没有被定义prop的attribute会自动添加到组件根元素,与已有的同名attribute替换或者合并。
然而函数式组件要求显示定义该行为:
Vue.component('my-functional-button', {
  functional: true,
  render: function (createElement, context) {
    // 完全透传任何 attribute、事件监听器、子节点等。
    return createElement('button', context.data, context.children)
  }
})
还要手动添加attribute和监听器可以在子组件中使用data.attrs和listeners传递。
slots()和children对比
<my-functional-component>
  <p v-slot:foo>
    first
  </p>
  <p>second</p>
</my-functional-component>
children会给你两个段落标签,而slots().default只会传递第二个匿名段落标签,slots().foo会传递第一个具名段落标签。
模板编译
使用Vue.compile实施编译模板字符串
插件
插件通常用来为Vue添加全局功能:
- 添加全局方法或数学
- 添加全局资源:指令、过滤器、过渡
- 通过全局混入添加些组件
- 添加Vue实例方法,把他们加到Vue.prototype上去
- 库,提供自己API
使用插件
通过全局方法Vue.use()使用插件,需要在new Vue()之前完成
// 调用 `MyPlugin.install(Vue)`
Vue.use(MyPlugin)

new Vue({
  // ...组件选项
})
也可以传入一个可选的选项对象:
Vue.use(MyPlugin, { someOption: true })
Vue.use会自动阻止多次注册相同插件,即使多次调用也只会注册一次。
开发插件
插件应该暴露一个install方法,第一个参数是vue构造器,第二个参数是一个可选的选项:
MyPlugin.install = function (Vue, options) {
  // 1. 添加全局方法或属性
  Vue.myGlobalMethod = function () {
    // 逻辑...
  }

  // 2. 添加全局资源
  Vue.directive('my-directive', {
    bind (el, binding, vnode, oldVnode) {
      // 逻辑...
    }
    ...
  })

  // 3. 注入组件选项
  Vue.mixin({
    created: function () {
      // 逻辑...
    }
    ...
  })

  // 4. 添加实例方法
  Vue.prototype.$myMethod = function (methodOptions) {
    // 逻辑...
  }
}
过滤器
使用方法,可在花括号中,也可在v-bind中
<!-- 在双花括号中 -->
{{ message | capitalize }}

<!-- 在 `v-bind` 中 -->
<div v-bind:id="rawId | formatId"></div>
可以在组件的选项中定义本地的过滤器
filters: {
  capitalize: function (value) {
    if (!value) return ''
    value = value.toString()
    return value.charAt(0).toUpperCase() + value.slice(1)
  }
}
或者在创建Vue实例之前全局定义过滤器:
Vue.filter('capitalize', function (value) {
  if (!value) return ''
  value = value.toString()
  return value.charAt(0).toUpperCase() + value.slice(1)
})

new Vue({
  // ...
})
当全局和局部过滤器重名,会采用局部的。
过滤器可以串联:
{{ message | filterA | filterB }}
过滤器是js函数也可以接受参数
{{ message | filterA('arg1', arg2) }}
