前言
前阵子逛 github 的时候,看见一篇文章 《原生JS实现hash路由》, 想着照着 vue-router 的 api,参考这篇文章实现一个可直接用于 html, 支持 hash 路由和 history 路由的 js 插件。本文是 hash 路由的具体实现。
话不多说,先上 demo&& 源码&& 工程文件(htmlRouter文件夹下)
实现功能
- 使用
router.back() ; router.front()控制前进后退 - 使用
router.push(option); router.replace(option)实现路由跳转 - 根据当前路径动态显示对应的组件
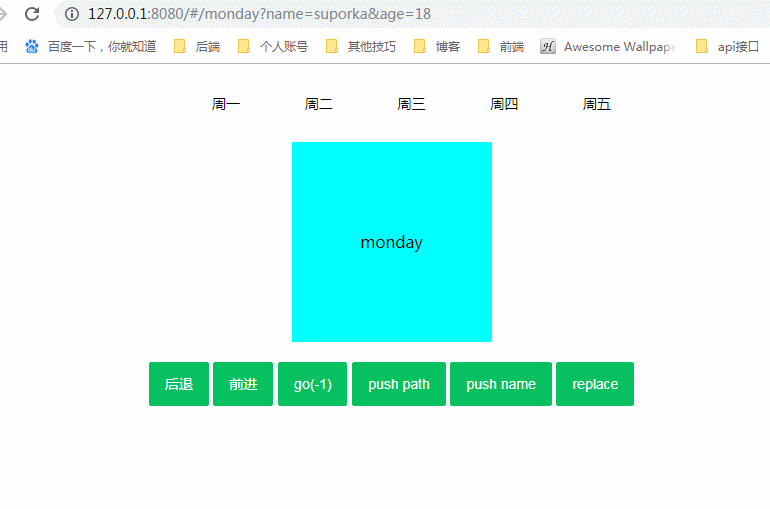
页面结构
使用自定义属性 data-component-name 使页面根据当前路由名称显示对应组件名的 dom 元素,默认拥有此属性的 dom 元素隐藏
<main>
      <div class="nav">
        <ul class="nav-list">
          <li class="nav-item"><a href="#/monday">周一</a></li>
          <li class="nav-item"><a href="#/tuesday">周二</a></li>
          <li class="nav-item"><a href="#/wednesday">周三</a></li>
          <li class="nav-item"><a href="#/thursday">周四</a></li>
          <li class="nav-item"><a href="#/friday">周五</a></li>
        </ul>
      </div>
      <div class="main-content">
        <div class="main-box" data-component-name="monday">monday</div>
        <div class="main-box" data-component-name="tuesday">tuesday</div>
        <div class="main-box" data-component-name="wednesday">wednesday</div>
        <div class="main-box" data-component-name="thursday">thursday</div>
        <div class="main-box" data-component-name="friday">friday</div>
      </div>
    </main>

    <div class="nav-area">
      <button class="nav-area-back" onclick="router.back();">后退</button>
      <button class="nav-area-front" onclick="router.front();">前进</button>
      <button class="nav-area-front" onclick="router.go(-1);">go(-1)</button>
      <button
        class="nav-area-front"
        onclick="router.push({path: '/monday', query: {name: 'suporka', age: '26'}});"
      >
        push path
      </button>
      <button
        class="nav-area-front"
        onclick="router.push({name: 'monday', query: {name: 'suporka', age: '26'}});"
      >
        push name
      </button>

      <button
        class="nav-area-front"
        onclick="router.replace({name: 'monday', query: {name: 'suporka', age: '18'}});"
      >
        replace
      </button>
    </div>
实现路由
1. 创建最外层类 Router
实现 new Router(option)创建路由,根据 vue-router 的配置选项,本文实现 mode 以及 routes 属性
import HashRouter from './HashRouter'
import HistoryRouter from './HistoryRouter';

class Router {
  constructor(routerConfig) {
    this._mode = routerConfig.mode || "hash"; // hash 或者 history
    this._routes = routerConfig.routes;
    // 根据不同的模式创建不同的路由类,本文是 hash 路由
    if (routerConfig.mode === "hash")
      this._router = new HashRouter(routerConfig);
    else this._router = new HistoryRouter(routerConfig);
    this._router.init(); // 路由初始化
  }
  back() {
    this._router.back();
  }
  front() {
    this._router.front();
  }
  go(n) {
    window.history.go(n);
  }
  push(option) {
    this._router.push(option);
  }
  replace(option) {
    this._router.replace(option);
  }
}
export default Router
2. 创建 hash 路由与 history 路由的共同父类 RouterParent
因为目前我们尚未实现 history 路由,不知道那些属性或方法是共同拥有的,所以暂时将 hash 路由的属性全部写于父类当中,当 history 路由实现时再将共同拥有的属性方法进行抽离,单独拥有的属性方法单独归属。
export default class RouterParent {
    constructor(routerConfig) {
        this._routes = routerConfig.routes; // 路由列表
        this.routeHistory = []; // 路由历史
        this.currentUrl = ''; // 当前的路由地址
        this.currentIndex = -1; // 当前的路由序列号
        this.frontOrBack = false; // 是否的点击前进后退造成的路由变化,此时不需要监听到路由变化函数
        this.replaceRouter = false; // 是否是替换当前路由
    }
}
3. 实现 hash 路由
vue-router 默认使用 Hash 模式。
使用 url 的 hash 来模拟一个完整的 url。此时 url 变化时,浏览器是不会重新加载的。
Hash(即#)是 url 的锚点,代表的是网页中的一个位置,仅仅改变#后面部分,浏览器只会滚动对应的位置,而不会重新加载页面。
Hash仅仅只是对浏览器进行指导,而对服务端是完全没有作用的!它不会被包括在 http 请求中,故也不会重新加载页面。同时 hash 发生变化时,url 都会被浏览器记录下来,这样你就可以使用浏览器的后退了。
因此,我们需要监听页面hash的变化,通过 window.addEventListener('hashchange', func, false);实现
init()
哈希路由继承父类RouterParent,我们在其 init() 方法时监听 hashchange 事件,初始化
class HashRouter extends RouterParent {
    constructor(routerConfig) {
        super(routerConfig);
    }
    init() {
        // 监听hash的变化
        // refresh 实现对应组件和当前路由绑定显示
        // bind(this) 传入此实例对象,否则this指向有问题
        window.addEventListener('hashchange', this.refresh.bind(this), false);
    }
}
因为在页面加载时,也需要根据此路由显示对应组件,因此加入 load 监听事件
class HashRouter extends RouterParent {
    constructor(routerConfig) {
        super(routerConfig);
    }
    init() {
        // 监听hash的变化
        // refresh 实现对应组件和当前路由绑定显示
        // bind(this) 传入此实例对象,否则this指向有问题
        window.addEventListener('hashchange', this.refresh.bind(this), false);
        window.addEventListener('load', this.refresh.bind(this), false);
    }
}
refresh()
在此实例中,我们使用 frontOrBack 属性判断当前是否处于前进后退,如果是前进后退,则路由历史列表 routeHistory 不变化
根据当前 hash 路径,从 routes 列表中找出对应的路由 name, 在操作对应的 dom 元素使其显示或隐藏
refresh() {
    if (this.frontOrBack) {
        // 前进后退造成的路由变化,此时不需要改变routeHistory的数据
        this.frontOrBack = false;
    } else {
        this.currentUrl = location.hash.slice(1) || '/';
        this.routeHistory = this.routeHistory.slice(0,this.currentIndex + 1); // 舍弃掉当前索引后的路由历史
        this.routeHistory.push(this.currentUrl); // 添加当前路径
        this.currentIndex++; // 当前索引自增
    }
    let path = getPath(),
        currentComponentName = '',
        nodeList = document.querySelectorAll('[data-component-name]');
    // 找出当前路由的名称
    for (let i = 0; i < this._routes.length; i++) {
        if (this._routes[i].path === path) {
            currentComponentName = this._routes[i].name;
            break;
        }
    }
    // 根据当前路由的名称显示对应的组件
    nodeList.forEach(item => {
        if (item.dataset.componentName === currentComponentName) {
            item.style.display = 'block';
        } else {
            item.style.display = 'none';
        }
    });
}

// 获取路径
function getPath() {
    let href = window.location.href;
    const index = href.indexOf('#');
    // empty path
    if (index < 0) return '';

    href = href.slice(index + 1);
    const searchIndex = href.indexOf('?');
    if (searchIndex < 0) return href;
    else {
        return href.slice(0, searchIndex);
    }
}
back() && front()
back() front() 都是通过修改当前路由索引和 hash,从而触发 hashchange 事件调用 refresh 方法
back() {
    if (this.currentIndex > 0) {
        this.frontOrBack = true; // 在refresh中会重置为false
        this.currentIndex--; // 修改索引
        this.currentUrl = this.routeHistory[this.currentIndex]; // 修改当前url
        window.location.hash = this.currentUrl; // 修改实际hash
    }
}

front() {
    const historyLength = this.routeHistory.length;
    if (this.currentIndex < historyLength - 1) {
        this.frontOrBack = true;
        this.currentIndex++;
        this.currentUrl = this.routeHistory[this.currentIndex];
        window.location.hash = this.currentUrl;
    }
}
push(option)
在vue-router中,可以通过 path, name 修改当前路由,并且可以携带 query 参数
因此优先判断 path, 如果有path,则直接修改 hash; 没有 path, 则根据 name 从 routes 中找出 path, 再修改 hash
push(option) {
    if (option.path) {
        changeHash(option.path, option.query);
    } else if (option.name) {
        let path = '';
        // 根据路由名称找路由path
        for (let i = 0; i < this._routes.length; i++) {
            if (this._routes[i].name === option.name) {
                path = this._routes[i].path;
                break;
            }
        }
        if (!path) {
            error('组件名称不存在');
        } else {
            changeHash(path, option.query);
        }
    }
}

// 报错
function error(message) {
    typeof console !== 'undefined' && console.error(`[html-router] ${message}`);
}
// 根据path和query修改hash
function changeHash(path, query) {
    if (query) {
        let str = '';
        for (let i in query) {
            str += '&' + i + '=' + query[i];
        }
        (str && (window.location.hash = path + '?' + str.slice(1))) ||
            (window.location.hash = path);
    } else {
        window.location.hash = path;
    }
}
replace(option)
其实 replace 和 push 很相似,参数也一致,唯一不同的是 replace 是替换当前路径,而且不会往 routerHistory 添加新的历史。可以通用 push 方法,通过 this.replaceRouter 声明当前为"替换路径"
replace(option) {
    this.replaceRouter = true;
    this.push(option);
}
因此在 refresh 方法中,我们也需要对 this.replaceRouter = true 这种状态进行单独处理
refresh() {
    if (this.frontOrBack) {
        // 前进后退造成的路由变化,此时不需要改变routeHistory的数据
        this.frontOrBack = false;
    } else {
        this.currentUrl = location.hash.slice(1) || '/';
        // 当前为replace状态
        if (this.replaceRouter) {
            this.routeHistory[this.currentIndex] = this.currentUrl;
            this.replaceRouter = false; // 重置replaceRouter
        } else {
            this.routeHistory.push(this.currentUrl);
            this.currentIndex++;
        }
        this.routeHistory = this.routeHistory.slice(
            0,
            this.currentIndex + 1
        );
    }
    let path = getPath(),
        currentComponentName = '',
        nodeList = document.querySelectorAll('[data-component-name]');
    // 找出当前路由的名称
    for (let i = 0; i < this._routes.length; i++) {
        if (this._routes[i].path === path) {
            currentComponentName = this._routes[i].name;
            break;
        }
    }
    // 根据当前路由的名称显示对应的组件
    nodeList.forEach(item => {
        if (item.dataset.componentName === currentComponentName) {
            item.style.display = 'block';
        } else {
            item.style.display = 'none';
        }
    });
}
Demo测试
import Router from './htmlRouter-dev'
window.router = new Router({
    mode: 'hash',
    routes: [
        {
            path: '/monday',
            name: 'monday',
        },
        {
            path: '/tuesday',
            name: 'tuesday',
        },
        {
            path: '/wednesday',
            name: 'wednesday',
        },
        {
            path: '/thursday',
            name: 'thursday',
        },
        {
            path: '/friday',
            name: 'friday',
        },
    ],
});
效果如下:
以上便是hash路由的实现,关于history路由的实现,我会在下篇文章中详细介绍,敬请期待
更多推荐
Canvas 进阶(二)写一个生成带logo的二维码npm插件
Canvas 进阶(三)ts + canvas 重写”辨色“小游戏