

前言
通过学习Android官方Layout的源码,可以帮助自己更好的理解Android的UI框架系统,了解内部便捷的封装好的API调用,有助于进行布局优化和自定义view实现等工作。这里把学习结果通过写博客进行总结,便于记忆,不至于将来遗忘。
本篇博客中源码基于Android 8.1
RelativeLayout特点
RelativeLayout是Android开发中最常用的Layout之一,它支持子view间设置相对位置关系,子view可以支持指定兄弟view作为锚点,基于锚点做相对位置布局。
要实现这样的功能,可以推测,RelativeLayout支持子view给LayoutParams设置相对位置规则的属性,以及在测量和布局过程中能够计算出子view间的相对位置和依赖关系。
源码探究
构造函数
public RelativeLayout(Context context, AttributeSet attrs, int defStyleAttr, int defStyleRes) {
    super(context, attrs, defStyleAttr, defStyleRes);
    // 初始化自定义属性
    initFromAttributes(context, attrs, defStyleAttr, defStyleRes);
    // 设置兼容模式标记位
    queryCompatibilityModes(context);
}
RelativeLayout的构造函数主要做两件事:初始化属性和设置兼容标记。
初始化属性
private void initFromAttributes(
        Context context, AttributeSet attrs, int defStyleAttr, int defStyleRes) {
    final TypedArray a = context.obtainStyledAttributes(
            attrs, R.styleable.RelativeLayout, defStyleAttr, defStyleRes);
    // 不受mGravity影响的子view ID,默认无忽略。
    mIgnoreGravity = a.getResourceId(R.styleable.RelativeLayout_ignoreGravity, View.NO_ID);
    // 对齐方式,默认Gravity.START | Gravity.TOP。
    mGravity = a.getInt(R.styleable.RelativeLayout_gravity, mGravity);
    a.recycle();
}
看源码可知RelativeLayout可以设置ignoreGravity和gravity属性,其中gravity属性会凌驾于子view的相对位置规则属性,而ignoreGravity可以设置不受gravity属性影响的子view。
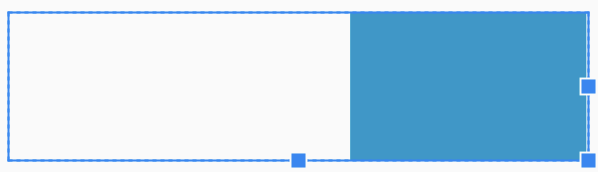
举例说明:
- 虽然子view设置了layout_alignParentLeft属性,但是RelativeLayout设置了gravity属性
<RelativeLayout
    android:layout_width="match_parent"
    android:layout_height="match_parent"
    android:gravity="right">

    <View
        android:id="@+id/view"
        android:layout_width="160dp"
        android:layout_height="100dp"
        android:layout_alignParentLeft="true"
        android:background="@android:color/holo_blue_dark"/>
</RelativeLayout>
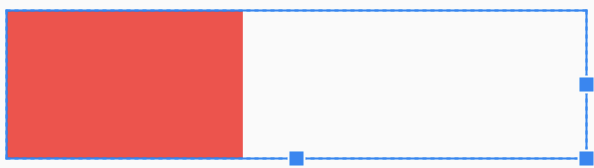
- RelativeLayout设置了ignoreGravity属性
<RelativeLayout
    android:layout_width="match_parent"
    android:layout_height="wrap_content"
    android:ignoreGravity="@+id/view"
    android:gravity="right">

    <View
        android:id="@+id/view"
        android:layout_width="160dp"
        android:layout_height="100dp"
        android:layout_alignParentLeft="true"
        android:background="@android:color/holo_blue_dark"/>
</RelativeLayout>
设置兼容标记
private void queryCompatibilityModes(Context context) {
    int version = context.getApplicationInfo().targetSdkVersion;
    // 小等于Android4.2的版本为true(不考虑低版本的话,就记住该变量值为false)
    mAllowBrokenMeasureSpecs = version <= Build.VERSION_CODES.JELLY_BEAN_MR1;
    // 大等于Android4.3的版本为true(不考虑低版本的话,就记住该变量值为true)
    mMeasureVerticalWithPaddingMargin = version >= Build.VERSION_CODES.JELLY_BEAN_MR2;
}
- mAllowBrokenMeasureSpecs 官方注释说明:
Compatibility hack. Old versions of the platform had problems with MeasureSpec value overflow and RelativeLayout was one source of them. Some apps came to rely on them. :(
在不低于Android4.3的版本上,RelativeLayout在测量阶段生成MeasureSpec时,若传入的测量模式为UNSPECIFIED,则生成的MeasureSpec的测量模式可以也置为UNSPECIFIED。
- mMeasureVerticalWithPaddingMargin 官方注释说明:
Compatibility hack. Old versions of the platform would not take margins and padding into account when generating the height measure spec for children during the horizontal measure pass.
在不低于Android4.3的版本上,RelativeLayout在测量阶段为子view生成高度MeasureSpec时,会计算padding和margin。
LayoutParams
RelativeLayout中定义了静态内部类LayoutParams继承自MarginLayoutParams。 其中有一些比较重要的成员变量:
// child设置的相对位置规则的属性值(容量为22)
private int[] mRules = new int[VERB_COUNT];
private int[] mInitialRules = new int[VERB_COUNT];

// child的左上右下边界约束(可理解为layout中的l、t、r、b)
private int mLeft, mTop, mRight, mBottom;

// layout_alignWithParentIfMissing属性值
public boolean alignWithParent;
- mRules说明 这里将layout_toLeftOf、layout_alignLeft等属性称为规则,mRules数组用于保存子view设置的相对位置规则属性的值,不同的下标索引存放对应的属性,总共有22个位置规则属性。 看LayoutParams构造函数中属性初始化部分:
public LayoutParams(Context c, AttributeSet attrs) {
    // 省略部分
    // ···

    final int[] rules = mRules;
    //noinspection MismatchedReadAndWriteOfArray
    final int[] initialRules = mInitialRules;

    final int N = a.getIndexCount();
    // 遍历TypedArray,依次解析出属性值。
    for (int i = 0; i < N; i++) {
        int attr = a.getIndex(i);
        // 注意:这里switch语句块中省略了很多case,仅列出了部分有代表性的举例。
        switch (attr) {
            case com.android.internal.R.styleable.RelativeLayout_Layout_layout_alignWithParentIfMissing:
                alignWithParent = a.getBoolean(attr, false);
                break;
            case com.android.internal.R.styleable.RelativeLayout_Layout_layout_toLeftOf:
                // 这里获取的值为layout_toLeftOf属性对应的view ID,将ID保存在rules数组索引0的位置里。
                rules[LEFT_OF] = a.getResourceId(attr, 0);
                break;
            case com.android.internal.R.styleable.RelativeLayout_Layout_layout_alignParentLeft:
                // 这里获取的值为layout_alignParentLeft属性对应的布尔值,按true=>-1,false=>0,
                // 转换成整型保存在rules数组索引9的位置。
                rules[ALIGN_PARENT_LEFT] = a.getBoolean(attr, false) ? TRUE : 0;
                break;
        }
    }

    mRulesChanged = true;
    System.arraycopy(rules, LEFT_OF, initialRules, LEFT_OF, VERB_COUNT);

    a.recycle();
}
可以看出,若属性值为view的ID,则保存在该属性对应的数组下标索引位置。若属性值为布尔值,则转换成-1或0后再保存。属性全部解析完后,mRules的某个索引值为0,表示子view没有设置这个属性值或设置为false。
上图中是所有规则属性,按顺序分别对应到mRules数组的22个元素中。
- mLeft, mTop, mRight, mBottom 和layout阶段中的l、t、r、b类似,表示左上右下边界约束,默认值为VALUE_NOT_SET,VALUE_NOT_SET常量值为Integer.MIN_VALUE。这四个成员变量值会在measure阶段确定,layout阶段将直接使用。
假设有view A设置了layout_below属性,属性值为view B的ID。那么view A的LayoutParams.mTop将被修改为view B的LayoutParams.mBottom(若有padding、margin,也需要加入计算)。
- alignWithParent layout_alignWithParentIfMissing属性,为true时,如果锚点不存在或锚点的可见性为GONE,则将父级用作锚点。
假设有 A layout_alignRight B,当B设置为GONE时,A的右边将靠父布局RelativeLayout的右边对齐。
相对位置依赖关系图
RelativeLayout在测量阶段会根据每个child的LayoutParams的mRules生成依赖关系图,用来表示各child间的位置依赖关系,便于计算尺寸和位置约束。
如图所示布局:
<RelativeLayout
    android:layout_width="match_parent"
    android:layout_height="match_parent">

    <View
        android:id="@+id/A"
        android:layout_width="100dp"
        android:layout_height="100dp"
        android:background="@android:color/holo_red_light"/>

    <View
        android:id="@+id/B"
        android:layout_width="200dp"
        android:layout_height="100dp"
        android:layout_toRightOf="@+id/A"
        android:background="@android:color/holo_blue_dark"/>

    <View
        android:id="@+id/C"
        android:layout_width="100dp"
        android:layout_height="100dp"
        android:layout_below="@+id/A"
        android:background="@android:color/holo_purple"/>

    <View
        android:id="@+id/D"
        android:layout_width="100dp"
        android:layout_height="100dp"
        android:layout_below="@+id/B"
        android:layout_alignRight="@+id/B"
        android:background="@android:color/holo_blue_bright"/>
</RelativeLayout>
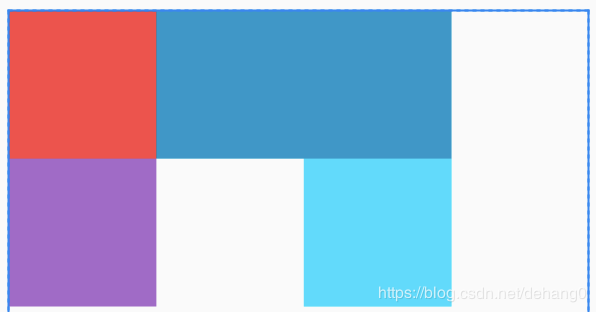
用依赖关系图表示为:
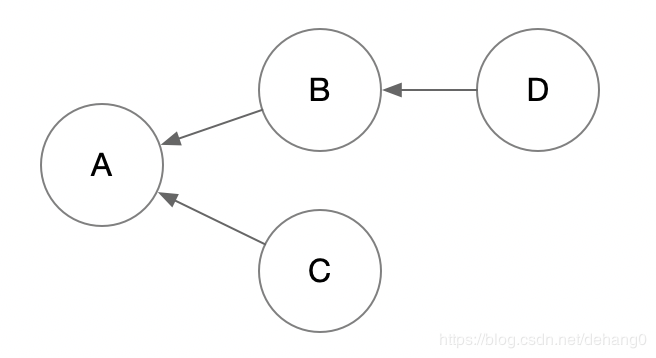
其中D的位置依赖B,B、C的位置依赖A,A无依赖。这里把依赖当前节点的view称为伴随节点,被当前节点依赖的view称为锚点节点,而没有依赖其他view的锚点节点称为根锚点节点。
比如此图例中:A为根锚点,并且是B、C的锚点,B、C是A伴随。B是D的锚点,D是B的伴随。
有了依赖关系图的概念,在代码中需要用数据结构来表示它:
节点Node
一个view用一个Node表示。
static class Node {
    /**
     * The view representing this node in the layout.
     */
    View view;

    /**
     * The list of dependents for this node; a dependent is a node
     * that needs this node to be processed first.
     */
    final ArrayMap<Node, DependencyGraph> dependents =
            new ArrayMap<Node, DependencyGraph>();

    /**
     * The list of dependencies for this node.
     */
    final SparseArray<Node> dependencies = new SparseArray<Node>();

    // ···
}
- view:持有view引用
- dependents:存放依赖我的view,即伴随节点集合
- dependencies:存放被我依赖的view,即锚点节点集合
依赖图DependencyGraph
一个RelativeLayout会生成一个DependencyGraph。
private static class DependencyGraph {
    /**
     * List of all views in the graph.
     */
    private ArrayList<Node> mNodes = new ArrayList<Node>();

    /**
     * List of nodes in the graph. Each node is identified by its
     * view id (see View#getId()).
     */
    private SparseArray<Node> mKeyNodes = new SparseArray<Node>();

    /**
     * Temporary data structure used to build the list of roots
     * for this graph.
     */
    private ArrayDeque<Node> mRoots = new ArrayDeque<Node>();

    // ···
}
- mNodes:RelativeLayout中的所有child节点集合
- mKeyNodes:RelativeLayout中的所有有view ID的child集合,view ID作为key
- mRoots:RelativeLayout中的所有根锚点集合
DependencyGraph中重要方法说明:
- findRoots 获取所有根锚点
// 入参rulesFilter表示一组规则索引,对应LayoutParams.mRules数组中的索引。
// 例如传入toLeftOf规则,则索引值为0,对应mRules[0]的位置。
private ArrayDeque<Node> findRoots(int[] rulesFilter) {
    final SparseArray<Node> keyNodes = mKeyNodes;
    final ArrayList<Node> nodes = mNodes;
    final int count = nodes.size();

    // Find roots can be invoked several times, so make sure to clear
    // all dependents and dependencies before running the algorithm
    // 首先遍历节点,清空旧数据。
    for (int i = 0; i < count; i++) {
        final Node node = nodes.get(i);
        node.dependents.clear();
        node.dependencies.clear();
    }

    // Builds up the dependents and dependencies for each node of the graph
    // 遍历节点构建依赖关系。
    for (int i = 0; i < count; i++) {
        final Node node = nodes.get(i);

        // 取出节点对应的view的LayoutParams中的mRules(mRules存放的是各规则属性的值)
        final LayoutParams layoutParams = (LayoutParams) node.view.getLayoutParams();
        final int[] rules = layoutParams.mRules;
        final int rulesCount = rulesFilter.length;

        // Look only the the rules passed in parameter, this way we build only the
        // dependencies for a specific set of rules
        // 遍历入参的规则索引数组,初始化各节点的锚点集合和伴随集合。
        for (int j = 0; j < rulesCount; j++) {
            // rulesFilter中的元素值是mRules数组的索引,根据索引从rules中取出对应元素值。
            final int rule = rules[rulesFilter[j]];
            if (rule > 0) {
                // 若rule大于0,表示child有设置对应的规则属性。例如child设置了layout_toLeftOf属性,那么rule值为设置的view ID。
                // The node this node depends on
                // 根据view ID获取节点,该节点即为当前child的锚点。
                final Node dependency = keyNodes.get(rule);
                // Skip unknowns and self dependencies
                if (dependency == null || dependency == node) {
                    continue;
                }
                // Add the current node as a dependent
                // 锚点节点记录伴随节点
                dependency.dependents.put(node, this);
                // Add a dependency to the current node
                // 伴随节点记录锚点
                node.dependencies.put(rule, dependency);
            }
        }
    }

    // 清空根锚点集合旧数据
    final ArrayDeque<Node> roots = mRoots;
    roots.clear();

    // Finds all the roots in the graph: all nodes with no dependencies
    // 遍历所有节点,初始化根锚点集合。
    for (int i = 0; i < count; i++) {
        final Node node = nodes.get(i);
        // 若该节点没有依赖任何别的节点,则添加至根锚点集合。
        if (node.dependencies.size() == 0) roots.addLast(node);
    }

    // 返回根锚点集合
    return roots;
}
该方法中首先清空旧数据。之后遍历节点,填充节点的dependents和dependencies集合。最后再次遍历节点,将没有依赖任何其他节点的节点,添加至根锚点集合。 可以看出在这个方法中,完成了RelativeLayout子节点依赖关系的构建。
- getSortedViews 将所有节点按照指定相对位置关系规则进行排序
// sorted用于保存排序后的结果,传入前已根据节点数量创建好数组。
// 入参rulesFilter表示一组规则索引,对应LayoutParams.mRules数组中的索引。
// 例如传入toLeftOf规则,则索引值为0,对应mRules[0]的位置。
void getSortedViews(View[] sorted, int... rules) {
    // 获取所有根锚点,用于从根锚点开始进行遍历。
    final ArrayDeque<Node> roots = findRoots(rules);
    // 用于记录遍历过的节点数和数组索引,用于结尾判断图是否存在环。
    int index = 0;

    Node node;
    // 依次取出根锚点集合的尾元素。
    while ((node = roots.pollLast()) != null) {
        final View view = node.view;
        final int key = view.getId();

        // 存储节点对应的view引用。
        sorted[index++] = view;

        // 取出该节点的伴随集合
        final ArrayMap<Node, DependencyGraph> dependents = node.dependents;
        final int count = dependents.size();
        // 遍历伴随节点
        for (int i = 0; i < count; i++) {
            final Node dependent = dependents.keyAt(i);
            final SparseArray<Node> dependencies = dependent.dependencies;

            // 从伴随节点的锚点集合中移除当前根锚点自身
            dependencies.remove(key);
            if (dependencies.size() == 0) {
                // 若伴随节点在移除根锚点后,没有再依赖其他的节点的话,则将其当作新的根锚点,加入根锚点集合中。
                roots.add(dependent);
            }
        }
    }

    // 在完成上述根锚点集合遍历后,会将所有节点按照依赖顺序存储在sorted数组中。
    // 若出现没有存满,说明出现了节点间循环依赖,RelativeLayout不允许child间循环依赖。
    if (index < sorted.length) {
        throw new IllegalStateException("Circular dependencies cannot exist"
                + " in RelativeLayout");
    }
}
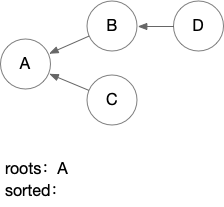
图例说明排序过程:
onMeasure测量
RelativeLayout的测量大致可以分成以下几个阶段:
- 构建依赖关系图
- 初始化辅助计算变量参数
- 计算水平方向测量规格
- 计算垂直方向测量规格
- 调整wrap_content情况下的宽高
- 根据Gravity属性调整位置
- 设置RelativeLayout自身的宽高
构建依赖关系图
protected void onMeasure(int widthMeasureSpec, int heightMeasureSpec) {
    // 判断是否构建过。当调用requestLayout方法时,会再次将mDirtyHierarchy置为true。
    if (mDirtyHierarchy) {
        mDirtyHierarchy = false;
        // 将child按照特定规则排序。
        sortChildren();
    }

    // ···
}
关键逻辑在sortChildren方法中:
private void sortChildren() {
    // 初始化mSortedVerticalChildren和mSortedHorizontalChildren数组,用于存放排序后的child。
    final int count = getChildCount();
    if (mSortedVerticalChildren == null || mSortedVerticalChildren.length != count) {
        mSortedVerticalChildren = new View[count];
    }

    if (mSortedHorizontalChildren == null || mSortedHorizontalChildren.length != count) {
        mSortedHorizontalChildren = new View[count];
    }

    // 清空DependencyGraph
    final DependencyGraph graph = mGraph;
    graph.clear();

    // 往DependencyGraph中添加child,初始化DependencyGraph中数据。
    for (int i = 0; i < count; i++) {
        graph.add(getChildAt(i));
    }

    // 按照特定规则将child进行排序。
    graph.getSortedViews(mSortedVerticalChildren, RULES_VERTICAL);
    graph.getSortedViews(mSortedHorizontalChildren, RULES_HORIZONTAL);
}
该方法中将初始化依赖关系图DependencyGraph,之后再对child进行排序,将结果保存在mSortedVerticalChildren和mSortedHorizontalChildren数组中。
DependencyGraph初始化逻辑在DependencyGraph.add方法中,通过add方法保存所有child节点:
void add(View view) {
    final int id = view.getId();
    // 从对象缓存池中取一个Node实例,Node将持有这个view引用。
    final Node node = Node.acquire(view);

    // 若view有设置ID,则根据ID保存至mKeyNodes。
    if (id != View.NO_ID) {
        mKeyNodes.put(id, node);
    }

    // mNodes保存所有节点。
    mNodes.add(node);
}
graph.getSortedViews方法前面有介绍过,将按照指定的相对位置规则对child进行排序。这里传入了两组规则RULES_VERTICAL和RULES_HORIZONTAL:
// 垂直相对位置依赖的规则,对应到LayoutParams.mRules数组的索引是[2,3,4,6,8]。
private static final int[] RULES_VERTICAL = {
        ABOVE, BELOW, ALIGN_BASELINE, ALIGN_TOP, ALIGN_BOTTOM
};
// 水平相对位置依赖的规则,对应到LayoutParams.mRules数组的索引是[0,1,5,7,16,17,18,19]。
private static final int[] RULES_HORIZONTAL = {
        LEFT_OF, RIGHT_OF, ALIGN_LEFT, ALIGN_RIGHT, START_OF, END_OF, ALIGN_START, ALIGN_END
};
这里把child按照垂直和水平两组相对位置规则分别进行排序,结果分别保存在mSortedVerticalChildren和mSortedHorizontalChildren数组中。
辅助变量参数准备
protected void onMeasure(int widthMeasureSpec, int heightMeasureSpec) {
    // ···

    // 测量过程中RelativeLayout的临时尺寸
    int myWidth = -1;
    int myHeight = -1;

    // RelativeLayout最终确定尺寸
    int width = 0;
    int height = 0;

    // 从RelativeLayout的测量规格中解析出模式和尺寸
    final int widthMode = MeasureSpec.getMode(widthMeasureSpec);
    final int heightMode = MeasureSpec.getMode(heightMeasureSpec);
    final int widthSize = MeasureSpec.getSize(widthMeasureSpec);
    final int heightSize = MeasureSpec.getSize(heightMeasureSpec);

    // Record our dimensions if they are known;
    // myWidth、myHeight记录EXACTLY或AT_MOST下的半明确的尺寸
    if (widthMode != MeasureSpec.UNSPECIFIED) {
        myWidth = widthSize;
    }

    if (heightMode != MeasureSpec.UNSPECIFIED) {
        myHeight = heightSize;
    }

    // width、height记录明确的尺寸
    if (widthMode == MeasureSpec.EXACTLY) {
        width = myWidth;
    }

    if (heightMode == MeasureSpec.EXACTLY) {
        height = myHeight;
    }

    View ignore = null;
    // 从mGravity取出水平轴相关对齐方式的比特位
    int gravity = mGravity & Gravity.RELATIVE_HORIZONTAL_GRAVITY_MASK;
    // 标记是否设置了水平轴相关的对齐方式(START为默认对齐,若设置了也可以忽略,所以这里排除START)
    final boolean horizontalGravity = gravity != Gravity.START && gravity != 0;
    // 取出垂直驻欧相关对齐方式的比特位
    gravity = mGravity & Gravity.VERTICAL_GRAVITY_MASK;
    // 标记是否设置了垂直轴相关的对齐方式(TOP为默认对齐,若设置了也可以忽略,所以这里排除TOP)
    final boolean verticalGravity = gravity != Gravity.TOP && gravity != 0;

    // 记录最宽松的左上右下四边界约束。测量过程中会比较最小的左上边界和最大的右下边界,故此处默认值设为MAX_VALUE和MIN_VALUE。
    int left = Integer.MAX_VALUE;
    int top = Integer.MAX_VALUE;
    int right = Integer.MIN_VALUE;
    int bottom = Integer.MIN_VALUE;

    // 标记是否有child设置了layout_alignParentEnd属性
    boolean offsetHorizontalAxis = false;
    // 标记是否有child设置了layout_alignParentBottom属性
    boolean offsetVerticalAxis = false;

    if ((horizontalGravity || verticalGravity) && mIgnoreGravity != View.NO_ID) {
        // 获取忽略RelativeLayout.gravity限制的child
        ignore = findViewById(mIgnoreGravity);
    }

    // 标记RelativeLayout尺寸是否是明确的
    final boolean isWrapContentWidth = widthMode != MeasureSpec.EXACTLY;
    final boolean isWrapContentHeight = heightMode != MeasureSpec.EXACTLY;

    // We need to know our size for doing the correct computation of children positioning in RTL
    // mode but there is no practical way to get it instead of running the code below.
    // So, instead of running the code twice, we just set the width to a "default display width"
    // before the computation and then, as a last pass, we will update their real position with
    // an offset equals to "DEFAULT_WIDTH - width".
    // 获取布局方向,RTL或LTR
    final int layoutDirection = getLayoutDirection();
    if (isLayoutRtl() && myWidth == -1) {
        // 若布局方向是从右至左且宽度未知,则设定一个默认宽度。
        myWidth = DEFAULT_WIDTH;
    }

    // ···
}
水平方向依赖约束测量
protected void onMeasure(int widthMeasureSpec, int heightMeasureSpec) {
    // ···

    // 获取根据水平规则排序的child数组。
    View[] views = mSortedHorizontalChildren;
    int count = views.length;

    for (int i = 0; i < count; i++) {
        View child = views[i];
        if (child.getVisibility() != GONE) {
            LayoutParams params = (LayoutParams) child.getLayoutParams();
            // 获取LayoutParams.mRules,用于获取child设置的所有规则属性值。
            // 方法中还会根据布局方向调整属性值,将toStartOf、toEndOf、alignStart、alignEnd、alignParentStart、alignParentEnd的view ID转到
            // 对应的toLeftOf、toRightOf、alignLeft、alignRight、alignParentLeft、alignParentRight上。
            //
            int[] rules = params.getRules(layoutDirection);

            // 根据规则调整child的LayoutParams的左右边界约束。
            applyHorizontalSizeRules(params, myWidth, rules);
            // 分发child测量
            measureChildHorizontal(child, params, myWidth, myHeight);

            // 利用child测量后获取child的测量宽度,再次调整child的左右边界约束,并返回是否设置了layout_alignParentEnd属性。
            if (positionChildHorizontal(child, params, myWidth, isWrapContentWidth)) {
                offsetHorizontalAxis = true;
            }
        }
    }

    // ···
}
这个阶段会先调整child的左右边界约束,并进行一次child分发测量。注意,此次测量仅保证宽度测量规格是准确的。
进入applyHorizontalSizeRules方法,看RelativeLayout如何对child进行边界约束:
private void applyHorizontalSizeRules(LayoutParams childParams, int myWidth, int[] rules) {
    RelativeLayout.LayoutParams anchorParams;

    // VALUE_NOT_SET indicates a "soft requirement" in that direction. For example:
    // left=10, right=VALUE_NOT_SET means the view must start at 10, but can go as far as it
    // wants to the right
    // left=VALUE_NOT_SET, right=10 means the view must end at 10, but can go as far as it
    // wants to the left
    // left=10, right=20 means the left and right ends are both fixed
    childParams.mLeft = VALUE_NOT_SET;
    childParams.mRight = VALUE_NOT_SET;

    // 获取该child的toLeftOf的那个锚点view的LayoutParams(若有的话)。
    // getRelatedViewParams方法会从DependencyGraph中查找,根据LEFT_OF从rules对
    // 应索引处取得view ID,因为DependencyGraph中保存了view ID和节点的映射集合,所
    // 以可以很方便的找到。若找到的锚点为GONE,则再找锚点的锚点。
    anchorParams = getRelatedViewParams(rules, LEFT_OF);
    if (anchorParams != null) {
        // 约束child的右边界为锚点的左边界,再减去margin。
        childParams.mRight = anchorParams.mLeft - (anchorParams.leftMargin +
                childParams.rightMargin);
    } else if (childParams.alignWithParent && rules[LEFT_OF] != 0) {
        // 上面没找到锚点的原因有可能是锚点都为GONE,或者child没有设置toLeftOf规则属性。
        // 这里再判断child是否设置toLeftOf和alignWithParentIfMissing属性。

        // 此时RelativeLayout的宽度不为UNSPECIFIED的情况,进行右边界约束,否则需要
        // 等到child测量完成后,再进行约束。
        if (myWidth >= 0) {
            // 约束child的右边界为RelativeLayout的右边界,再减去padding和margin。
            childParams.mRight = myWidth - mPaddingRight - childParams.rightMargin;
        }
    }

    // 获取child的toRightOf的锚点LayoutParams
    anchorParams = getRelatedViewParams(rules, RIGHT_OF);
    if (anchorParams != null) {
        // 约束child左边界为锚点的右边界,再加上margin。
        childParams.mLeft = anchorParams.mRight + (anchorParams.rightMargin +
                childParams.leftMargin);
    } else if (childParams.alignWithParent && rules[RIGHT_OF] != 0) {
        // 约束child左边界为RelativeLayout的左边界,再加上padding和margin。
        childParams.mLeft = mPaddingLeft + childParams.leftMargin;
    }

    // 获取child的alignLeft的锚点LayoutParams
    anchorParams = getRelatedViewParams(rules, ALIGN_LEFT);
    if (anchorParams != null) {
        // 约束左边界为锚点左边界
        childParams.mLeft = anchorParams.mLeft + childParams.leftMargin;
    } else if (childParams.alignWithParent && rules[ALIGN_LEFT] != 0) {
        // 约束左边界为RelativeLayout左边界
        childParams.mLeft = mPaddingLeft + childParams.leftMargin;
    }

    // 获取alignRight的锚点LayoutParams
    anchorParams = getRelatedViewParams(rules, ALIGN_RIGHT);
    if (anchorParams != null) {
        // 约束右边界为锚点右边界
        childParams.mRight = anchorParams.mRight - childParams.rightMargin;
    } else if (childParams.alignWithParent && rules[ALIGN_RIGHT] != 0) {
        if (myWidth >= 0) {
            // 约束右边界为RelativeLayout右边界
            childParams.mRight = myWidth - mPaddingRight - childParams.rightMargin;
        }
    }

    if (0 != rules[ALIGN_PARENT_LEFT]) {
        // 若设置了alignParentLeft规则属性,则约束左边界为RelativeLayout左边界。
        childParams.mLeft = mPaddingLeft + childParams.leftMargin;
    }

    if (0 != rules[ALIGN_PARENT_RIGHT]) {
        if (myWidth >= 0) {
            // 若设置了alignParentRight,则约束右边界为RelativeLayout右边界。
            childParams.mRight = myWidth - mPaddingRight - childParams.rightMargin;
        }
    }
}
接着进入measureChildHorizontal方法,看分发child测量:
private void measureChildHorizontal(
        View child, LayoutParams params, int myWidth, int myHeight) {
    // 为child生成宽度测量规格。
    final int childWidthMeasureSpec = getChildMeasureSpec(params.mLeft, params.mRight,
            params.width, params.leftMargin, params.rightMargin, mPaddingLeft, mPaddingRight,
            myWidth);

    final int childHeightMeasureSpec;
    if (myHeight < 0 && !mAllowBrokenMeasureSpecs) {
        // 若高度测量模式为UNSPECIFIED(不考虑低版本)
        if (params.height >= 0) {
            // 若child的LayoutParams.height设置了明确的像素值,则为child生成精确的高度测量规格。
            childHeightMeasureSpec = MeasureSpec.makeMeasureSpec(
                    params.height, MeasureSpec.EXACTLY);
        } else {
            // Negative values in a mySize/myWidth/myWidth value in
            // RelativeLayout measurement is code for, "we got an
            // unspecified mode in the RelativeLayout's measure spec."
            // Carry it forward.
            // 为child也生成UNSPECIFIED的高度测量规格。
            childHeightMeasureSpec = MeasureSpec.makeMeasureSpec(0, MeasureSpec.UNSPECIFIED);
        }
    } else {
        final int maxHeight;
        // 高版本mMeasureVerticalWithPaddingMargin为true,低版本可忽略不计。
        if (mMeasureVerticalWithPaddingMargin) {
            // 计算child的高度,并确保不小于0。
            maxHeight = Math.max(0, myHeight - mPaddingTop - mPaddingBottom
                    - params.topMargin - params.bottomMargin);
        } else {
            maxHeight = Math.max(0, myHeight);
        }

        final int heightMode;
        if (params.height == LayoutParams.MATCH_PARENT) {
            heightMode = MeasureSpec.EXACTLY;
        } else {
            heightMode = MeasureSpec.AT_MOST;
        }
        // 为child生成高度测量规格(此时的高度规格不一定准确)。
        childHeightMeasureSpec = MeasureSpec.makeMeasureSpec(maxHeight, heightMode);
    }

    child.measure(childWidthMeasureSpec, childHeightMeasureSpec);
}
该方法中为child生成了宽度和高度测量规格,之后调用child测量。其中调用了getChildMeasureSpec方法生成宽度测量规格,接下来看这个方法:
/**
 * @param childStart The left or top field of the child's layout params
 * @param childEnd The right or bottom field of the child's layout params
 * @param childSize The child's desired size (the width or height field of
 *        the child's layout params)
 * @param startMargin The left or top margin
 * @param endMargin The right or bottom margin
 * @param startPadding mPaddingLeft or mPaddingTop
 * @param endPadding mPaddingRight or mPaddingBottom
 * @param mySize The width or height of this view (the RelativeLayout)
 * @return MeasureSpec for the child
 */
private int getChildMeasureSpec(int childStart, int childEnd,
        int childSize, int startMargin, int endMargin, int startPadding,
        int endPadding, int mySize) {
    int childSpecMode = 0;
    int childSpecSize = 0;

    // Negative values in a mySize value in RelativeLayout
    // measurement is code for, "we got an unspecified mode in the
    // RelativeLayout's measure spec."
    // RelativeLayout自身测量规格模式为UNSPECIFIED时,mySize值为-1。
    final boolean isUnspecified = mySize < 0;
    // mAllowBrokenMeasureSpecs在高版本为false,低版本忽略不计。
    if (isUnspecified && !mAllowBrokenMeasureSpecs) {
        if (childStart != VALUE_NOT_SET && childEnd != VALUE_NOT_SET) {
            // 若左/上和右/下都设置了约束,则计算区间距离作为尺寸,测量规格为精确值。
            // Constraints fixed both edges, so child has an exact size.
            childSpecSize = Math.max(0, childEnd - childStart);
            childSpecMode = MeasureSpec.EXACTLY;
        } else if (childSize >= 0) {
            // 若child的LayoutParams.width/height设置了精确像素值,则测量规格也是精确值。
            // The child specified an exact size.
            childSpecSize = childSize;
            childSpecMode = MeasureSpec.EXACTLY;
        } else {
            // 为child生成的测量规格模式也沿用UNSPECIFIED。
            // Allow the child to be whatever size it wants.
            childSpecSize = 0;
            childSpecMode = MeasureSpec.UNSPECIFIED;
        }

        // 生成测量规格并返回。
        return MeasureSpec.makeMeasureSpec(childSpecSize, childSpecMode);
    }

    // Figure out start and end bounds.
    int tempStart = childStart;
    int tempEnd = childEnd;

    // If the view did not express a layout constraint for an edge, use
    // view's margins and our padding
    // 若child没有设置左/上边界约束,则以RelativeLayout左边界加上padding和margin作为左/上边界。
    if (tempStart == VALUE_NOT_SET) {
        tempStart = startPadding + startMargin;
    }
    // 若child没有设置右/下边界约束,则以RelativeLayout右边界减去padding和margin作为右/下边界。
    if (tempEnd == VALUE_NOT_SET) {
        tempEnd = mySize - endPadding - endMargin;
    }

    // Figure out maximum size available to this view
    // 计算区间距离作为约束下的可用尺寸。
    final int maxAvailable = tempEnd - tempStart;

    if (childStart != VALUE_NOT_SET && childEnd != VALUE_NOT_SET) {
        // 左/上和右/下都设置了约束,则尺寸可以确定(在高版本中,此处的isUnspecified值为false)。
        // Constraints fixed both edges, so child must be an exact size.
        childSpecMode = isUnspecified ? MeasureSpec.UNSPECIFIED : MeasureSpec.EXACTLY;
        childSpecSize = Math.max(0, maxAvailable);
    } else {
        if (childSize >= 0) {
            // child的LayoutParams设置了精确像素值。
            // Child wanted an exact size. Give as much as possible.
            childSpecMode = MeasureSpec.EXACTLY;

            if (maxAvailable >= 0) {
                // 确保child的尺寸不得超过约束尺寸。
                // We have a maximum size in this dimension.
                childSpecSize = Math.min(maxAvailable, childSize);
            } else {
                // We can grow in this dimension.
                childSpecSize = childSize;
            }
        } else if (childSize == LayoutParams.MATCH_PARENT) {
            // child的LayoutParams为填充父布局,以约束尺寸作为child的尺寸。
            // Child wanted to be as big as possible. Give all available
            // space.
            childSpecMode = isUnspecified ? MeasureSpec.UNSPECIFIED : MeasureSpec.EXACTLY;
            childSpecSize = Math.max(0, maxAvailable);
        } else if (childSize == LayoutParams.WRAP_CONTENT) {
            // child的LayoutParams为恰好包裹内容。
            // Child wants to wrap content. Use AT_MOST to communicate
            // available space if we know our max size.
            if (maxAvailable >= 0) {
                // We have a maximum size in this dimension.
                childSpecMode = MeasureSpec.AT_MOST;
                // 以约束尺寸作为最大限制尺寸。
                childSpecSize = maxAvailable;
            } else {
                // We can grow in this dimension. Child can be as big as it
                // wants.
                childSpecMode = MeasureSpec.UNSPECIFIED;
                childSpecSize = 0;
            }
        }
    }

    // 生成测量规格并返回。
    return MeasureSpec.makeMeasureSpec(childSpecSize, childSpecMode);
}
该方法中根据child的LayoutParams的边界约束和LayoutParams的width/height值和RelativeLayout自身测量规格以及间距值,结合RelativeLayout布局特性,生成测量规格。
回到onMeasure方法中,在执行完measureChildHorizontal方法后,紧接着执行positionChildHorizontal方法:
private boolean positionChildHorizontal(View child, LayoutParams params, int myWidth,
        boolean wrapContent) {

    final int layoutDirection = getLayoutDirection();
    // 获取转换过得mRules
    int[] rules = params.getRules(layoutDirection);

    if (params.mLeft == VALUE_NOT_SET && params.mRight != VALUE_NOT_SET) {
        // child右边界已设置,左边界未设置,这里进行设置。
        // Right is fixed, but left varies
        // 经过刚才的测量,child的宽度可以确定,这里通过用右边界减去child宽度求得左边界。
        params.mLeft = params.mRight - child.getMeasuredWidth();
    } else if (params.mLeft != VALUE_NOT_SET && params.mRight == VALUE_NOT_SET) {
        // Left is fixed, but right varies
        // 通过用左边界加上child宽度求得右边界。
        params.mRight = params.mLeft + child.getMeasuredWidth();
    } else if (params.mLeft == VALUE_NOT_SET && params.mRight == VALUE_NOT_SET) {
        // 左右边界都未设置
        // Both left and right vary
        if (rules[CENTER_IN_PARENT] != 0 || rules[CENTER_HORIZONTAL] != 0) {
            // 该child设置了centerInParent或centerHorizontal属性,即为水平居中。
            // 判断RelativeLayout的测量规格模式是否为EXACTLY。
            if (!wrapContent) {
                // 测量模式为EXACTLY,RelativeLayout的宽度为明确像素值。
                // centerHorizontal方法利用child宽度和RelativeLayout宽度设置child的左右约束。
                centerHorizontal(child, params, myWidth);
            } else {
                // positionAtEdge方法以RelativeLayout左右边界和child宽度计算设置child的左右约束。
                positionAtEdge(child, params, myWidth);
            }
            return true;
        } else {
            // This is the default case. For RTL we start from the right and for LTR we start
            // from the left. This will give LEFT/TOP for LTR and RIGHT/TOP for RTL.
            positionAtEdge(child, params, myWidth);
        }
    }
    // 这里的rules已被转换过,因此START和END相关属性值都为0,必定返回false。
    return rules[ALIGN_PARENT_END] != 0;
}
positionChildHorizontal方法作用是补充设置child的左右边界约束。在前面流程中child的左右约束根据自身设置属性来设置,存在未设置约束的边界,因此在child宽度准确测量完后,利用child宽度再设置左右约束。
垂直方向依赖约束测量
protected void onMeasure(int widthMeasureSpec, int heightMeasureSpec) {
    // ···

    // 获取根据垂直规则排序的child数组
    views = mSortedVerticalChildren;
    count = views.length;
    final int targetSdkVersion = getContext().getApplicationInfo().targetSdkVersion;

    for (int i = 0; i < count; i++) {
        final View child = views[i];
        if (child.getVisibility() != GONE) {
            final LayoutParams params = (LayoutParams) child.getLayoutParams();

            // 和applyHorizontalSizeRules方法作用类似,根据child设置的相对位置属性设置上下边界约束。
            applyVerticalSizeRules(params, myHeight, child.getBaseline());
            // 分发child测量(此次测量确定了准确的child的高度)。
            measureChild(child, params, myWidth, myHeight);
            // positionChildVertical分发和positionChildHorizontal类似,在
            // child测量后,利用child高度补充设置上下边界。该方法固定返回false。
            if (positionChildVertical(child, params, myHeight, isWrapContentHeight)) {
                offsetVerticalAxis = true;
            }

            if (isWrapContentWidth) {
                // RelativeLayout的宽度规格模式不为EXACTLY。
                // 记录RelativeLayout至少需要的最大宽度。
                if (isLayoutRtl()) {
                    if (targetSdkVersion < Build.VERSION_CODES.KITKAT) {
                        width = Math.max(width, myWidth - params.mLeft);
                    } else {
                        width = Math.max(width, myWidth - params.mLeft + params.leftMargin);
                    }
                } else {
                    if (targetSdkVersion < Build.VERSION_CODES.KITKAT) {
                        width = Math.max(width, params.mRight);
                    } else {
                        width = Math.max(width, params.mRight + params.rightMargin);
                    }
                }
            }

            if (isWrapContentHeight) {
                // RelativeLayout的宽度规格模式不为EXACTLY。
                // 记录RelativeLayout至少需要的最大高度。
                if (targetSdkVersion < Build.VERSION_CODES.KITKAT) {
                    height = Math.max(height, params.mBottom);
                } else {
                    height = Math.max(height, params.mBottom + params.bottomMargin);
                }
            }

            if (child != ignore || verticalGravity) {
                // 若RelativeLayout设置了垂直轴相关的对齐方式,且该child没有忽略,记录最靠左的左边界。
                left = Math.min(left, params.mLeft - params.leftMargin);
                // 记录最靠上的上边界。
                top = Math.min(top, params.mTop - params.topMargin);
            }

            if (child != ignore || horizontalGravity) {
                // 记录最靠右的右边界。
                right = Math.max(right, params.mRight + params.rightMargin);
                // 记录最靠下的下边界。
                bottom = Math.max(bottom, params.mBottom + params.bottomMargin);
            }
        }
    }

    // ···
}
垂直方向依赖约束的测量逻辑和水平方向的类似,遍历child,根据child设置的规则属性设置上下边界约束,然后为child生成宽高测量规格,调用child测量,最后再利用child测量高度补充设置之前未设置的上下边界。
同时在这个阶段还会计算RelativeLayout至少需要的最大宽度和最大高度,以及左上右下边界范围。
到此RelativeLayout共经过了两次遍历child分发测量。
调整WrapContent情况下的宽高
protected void onMeasure(int widthMeasureSpec, int heightMeasureSpec) {
    // ···

    // 省略查找mBaselineView部分。通过遍历未GONE的child,比较最左上位置的child,作为mBaselineView。
    // ···

    if (isWrapContentWidth) {
        // RelativeLayout的宽度规格模式不为EXACTLY
        // Width already has left padding in it since it was calculated by looking at
        // the right of each child view
        width += mPaddingRight;

        if (mLayoutParams != null && mLayoutParams.width >= 0) {
            // 和自身的LayoutParams.width比较最大值
            width = Math.max(width, mLayoutParams.width);
        }

        // 确保不小于最小宽度
        width = Math.max(width, getSuggestedMinimumWidth());
        // 获取调整后的尺寸(根据测量规格的模式和尺寸限制调整期望尺寸,并设置状态位)
        width = resolveSize(width, widthMeasureSpec);

        // offsetHorizontalAxis固定为false,以下可忽略
        if (offsetHorizontalAxis) {
            for (int i = 0; i < count; i++) {
                final View child = views[i];
                if (child.getVisibility() != GONE) {
                    final LayoutParams params = (LayoutParams) child.getLayoutParams();
                    final int[] rules = params.getRules(layoutDirection);
                    if (rules[CENTER_IN_PARENT] != 0 || rules[CENTER_HORIZONTAL] != 0) {
                        centerHorizontal(child, params, width);
                    } else if (rules[ALIGN_PARENT_RIGHT] != 0) {
                        final int childWidth = child.getMeasuredWidth();
                        params.mLeft = width - mPaddingRight - childWidth;
                        params.mRight = params.mLeft + childWidth;
                    }
                }
            }
        }
    }

    if (isWrapContentHeight) {
        // RelativeLayout的高度规格模式不为EXACTLY
        // Height already has top padding in it since it was calculated by looking at
        // the bottom of each child view
        height += mPaddingBottom;

        if (mLayoutParams != null && mLayoutParams.height >= 0) {
            // 和自身的LayoutParams.height比较最大值
            height = Math.max(height, mLayoutParams.height);
        }

        // 确保不小于最小高度
        height = Math.max(height, getSuggestedMinimumHeight());
        // 获取调整后的尺寸(根据测量规格的模式和尺寸限制调整期望尺寸,并设置状态位)
        height = resolveSize(height, heightMeasureSpec);

        // offsetVerticalAxis固定为false,以下可忽略
        if (offsetVerticalAxis) {
            for (int i = 0; i < count; i++) {
                final View child = views[i];
                if (child.getVisibility() != GONE) {
                    final LayoutParams params = (LayoutParams) child.getLayoutParams();
                    final int[] rules = params.getRules(layoutDirection);
                    if (rules[CENTER_IN_PARENT] != 0 || rules[CENTER_VERTICAL] != 0) {
                        centerVertical(child, params, height);
                    } else if (rules[ALIGN_PARENT_BOTTOM] != 0) {
                        final int childHeight = child.getMeasuredHeight();
                        params.mTop = height - mPaddingBottom - childHeight;
                        params.mBottom = params.mTop + childHeight;
                    }
                }
            }
        }
    }
}
根据Gravity属性调整位置
protected void onMeasure(int widthMeasureSpec, int heightMeasureSpec) {
    // ···

    // RelativeLayout是否设置了gravity属性
    if (horizontalGravity || verticalGravity) {
        final Rect selfBounds = mSelfBounds;
        // 设置RelativeLayout的区域
        selfBounds.set(mPaddingLeft, mPaddingTop, width - mPaddingRight,
                height - mPaddingBottom);

        final Rect contentBounds = mContentBounds;
        // 该方法将根据mGravity计算contentBounds应该位于selfBounds中的位置区域。
        // 假设RelativeLayout设置right|bottom对齐方式,selfBounds=Rect(0,0,680,1032),right - left=600,
        // bottom - top=400,排布方向为LTR,则计算完成后contentBounds=Rect(80,632,680,1032)。
        Gravity.apply(mGravity, right - left, bottom - top, selfBounds, contentBounds,
                layoutDirection);

        // 计算水平和垂直偏移量
        final int horizontalOffset = contentBounds.left - left;
        final int verticalOffset = contentBounds.top - top;
        if (horizontalOffset != 0 || verticalOffset != 0) {
            for (int i = 0; i < count; i++) {
                final View child = views[i];
                if (child.getVisibility() != GONE && child != ignore) {
                    // 跳过GONE和ignoreGravity属性设置的view

                    // 为每个child的四边界约束加上偏移量
                    final LayoutParams params = (LayoutParams) child.getLayoutParams();
                    if (horizontalGravity) {
                        params.mLeft += horizontalOffset;
                        params.mRight += horizontalOffset;
                    }
                    if (verticalGravity) {
                        params.mTop += verticalOffset;
                        params.mBottom += verticalOffset;
                    }
                }
            }
        }
    }
}
设置RelativeLayout自身的尺寸
protected void onMeasure(int widthMeasureSpec, int heightMeasureSpec) {
    // ···

    // 判断是否从右至左布局
    if (isLayoutRtl()) {
        final int offsetWidth = myWidth - width;
        for (int i = 0; i < count; i++) {
            final View child = views[i];
            if (child.getVisibility() != GONE) {
                final LayoutParams params = (LayoutParams) child.getLayoutParams();
                params.mLeft -= offsetWidth;
                params.mRight -= offsetWidth;
            }
        }
    }

    // 设置宽高尺寸
    setMeasuredDimension(width, height);
}
至此完成了RelativeLayout的测量流程。
onLayout布局
@Override
protected void onLayout(boolean changed, int l, int t, int r, int b) {
    //  The layout has actually already been performed and the positions
    //  cached.  Apply the cached values to the children.
    final int count = getChildCount();

    // 遍历child
    for (int i = 0; i < count; i++) {
        View child = getChildAt(i);
        if (child.getVisibility() != GONE) {
            RelativeLayout.LayoutParams st =
                    (RelativeLayout.LayoutParams) child.getLayoutParams();
            // 使用child的LayoutParams的上下左右约束作为边界对child进行布局。
            child.layout(st.mLeft, st.mTop, st.mRight, st.mBottom);
        }
    }
}
RelativeLayout的布局流程很简单,即利用测量阶段确定的各child的四边界约束进行布局。
onDraw绘制
RelativeLayout没有重写该方法,无需特殊绘制。
总结
RelativeLayout较核心较复杂的逻辑都在onMeasure测量阶段。在测量过程中会进行两次child分发测量,先准确测量child宽度,再准确测量child高度。RelativeLayout在测量阶段依靠依赖关系图为各child设置上下左右四边界的约束,再借助四边界约束确定child的尺寸。 在onLayout布局阶段中,直接利用各child的四边界约束进行布局。
