

导航
[深入01] 执行上下文
[深入02] 原型链
[深入03] 继承
[深入04] 事件循环
[深入05] 柯里化 偏函数 函数记忆
[深入06] 隐式转换 和 运算符
[深入07] 浏览器缓存机制(http缓存机制)
[深入08] 前端安全
[深入09] 深浅拷贝
[深入10] Debounce Throttle
[深入11] 前端路由
[深入12] 前端模块化
[深入13] 观察者模式 发布订阅模式 双向数据绑定
[深入14] canvas
[深入15] webSocket
[深入16] webpack
[深入17] http 和 https
[深入18] CSS-interview
[深入19] 手写Promise
[深入20] 手写函数
[部署01] Nginx
[部署02] Docker 部署vue项目
[部署03] gitlab-CI
[源码-webpack01-前置知识] AST抽象语法树
[源码-webpack02-前置知识] Tapable
[源码-webpack03] 手写webpack - compiler简单编译流程
[源码] Redux React-Redux01
[源码] axios
[源码] vuex
[源码-vue01] data响应式 和 初始化渲染
[源码-vue02] computed 响应式 - 初始化,访问,更新过程
前置知识
一些单词
canvas:画布

triangle:三角形
rectangle:矩形

arc:弧
anti:反对,反
clockwise:顺时针方向
anticlockwise:逆时针方向

curve:曲线
quadratic:平方的
弧长 弧度
- 弧度 = 弧长 / 半径
弧度 = 弧长 / 半径

圆的弧长 = 2PI * R   //即周长

1°的弧长 = 2PI * R / 360 = PI * R / 180

1°的弧度 = PI / 180
canvas
属性
- 只有两个属性:with 和 height
默认的width=300,height=150
<canvas
  id="canvas" width="200" height="200"
  style="border: 1px solid red;"
></canvas>

(1) 指定width 和 height的方式有三种
1. 标准方式:canvas 标签自带的 width 和 height 属性
2. css方式
3. js方式: domTarget.width  和  domTarget.height
在不支持canvas的浏览器中显示 (替换内容)
- 替换内容:写在canvas便签内
- 不支持的浏览器将显示替换内容,而支持的浏览器会忽略标签内的内容
- 注意:canvas必须有结束标签,如果没有,后面的内容将被认为是替换的内容
<canvas id="canvas" width="200" height="200">
  替换的内容
  // <img src="images/clock.png" width="150" height="150" alt=""/>
</canvas>
渲染上下文 - the render context
- getContext() 方法
- 获取 ( 渲染上下文 ) 和 ( 绘画功能 )
- 参数:表示( 上下文的格式 )
2d,3d
如何判断浏览器是否支持canvas标签
var canvas = document.getElementById('canvas');
if (canvas.getContext) { // ------------------------ 通过判断 getContext 方法是否存在来判断
  console.log('你的浏览器支持Canvas!');
} else {
  console.log('你的浏览器不支持Canvas!');
}
模块
<canvas
    id="canvas" width="200" height="200"
    style="border: 1px solid red;"
  >
    替换的内容
  </canvas>
<script>
  window.addEventListener('load', draw, false)
  // load事件:在页面加载完成时候触发,包括DOM,图片,视频等所有资源加载完毕时执行
  // DOMContentLoaded:在DOM加载完成时触发
  // 或者 <body onload="draw();">...</body>

  function draw() {
    var canvas = document.getElementById('canvas');
    if (canvas.getContext) { // ------------------------ getCotext方法存在,说明浏览器支持canvas
      console.log('你的浏览器支持Canvas!');
      var ctx = canvas.getContext('2d');
      // 实现绘画的逻辑...
    } else {
      console.log('你的浏览器不支持Canvas!');
    }
  }
绘制的过程
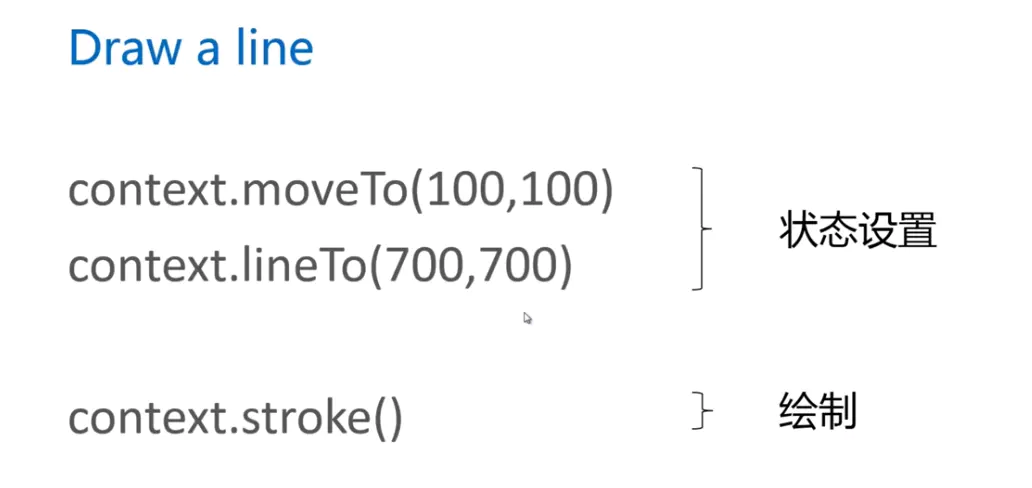
- 先定义状态,后绘制
绘制 矩形 rectangle:矩形
- fillRect(x, y, width, height) -------- 填充矩形,
x y 表示矩形左上角的坐标,原点是左上角 0 0 位置 - strokeRect(x, y, width, height) ---- 边框矩形
- clearRect(x, y, width, height) ------ 清除矩形区域,使其清除部分完全透明
// 矩形

ctx.fillRect(300, 100, 100, 100) // 填充矩形
ctx.clearRect(350, 150, 30, 30); // 清除矩形区域,使其清除部分完全透明
ctx.strokeRect(400, 200, 50, 50) // 矩形边框
画 一条 直线 和 一个 三角形
- beginPath() ---------- 新建路径,新建后可以绘制
- closePath() ----------- 闭合路径,闭合后可以重新绘制,( 非必须,重新beginPath也行 )
- stroke() --------------- 用线条绘制
- fill() ------------------- 填充绘制
- moveTo() ------------- 起始位置
- lineTo() --------------- 绘制直线,是一个点
- lineWidth:----------- 直线的宽度,是一个数字
- lineCap:------------- 直线的末端线帽样式,'round'
- save()---------------- 保存整个环境
- restore() ------------ 恢复之前的环境,如旋转canvas后,需要恢复之前的环境,不然所有后续的绘图都会旋转
function drawLineAndTriangle(ctx) {
  // 三角形
  ctx.beginPath() //------------------------------------------ 一个路径的开始
  ctx.moveTo(100, 100) // ----- 起始点
  ctx.lineTo(80, 120) // ------ 直线的第二个点
  ctx.lineTo(120, 120) // ----- 直线的第三个点
  ctx.closePath() // ----------------------------------------- 一个路径的结束
  ctx.lineWidth = 4 // -------- 直线的宽度
  ctx.strokeStyle = 'red' // ------ 直线的颜色,需要在绘画前设置
  ctx.stroke() // --------------------------------------------- 描边 (绘制)
  ctx.fillStyle= 'yellow' // ------ 填充的颜色,需要在绘画前设置
  ctx.fill() // ----------------------------------------------- 填充 (绘制)

  // 直线
  ctx.beginPath()
  ctx.moveTo(30, 30)
  ctx.lineTo(100, 30)
  ctx.closePath()
  ctx.lineWidth = 2 !!!!!!!!!!!!!!!!!!!
  ctx.strokeStyle = 'blue'
  ctx.stroke()
}
画 弧线 和 圆
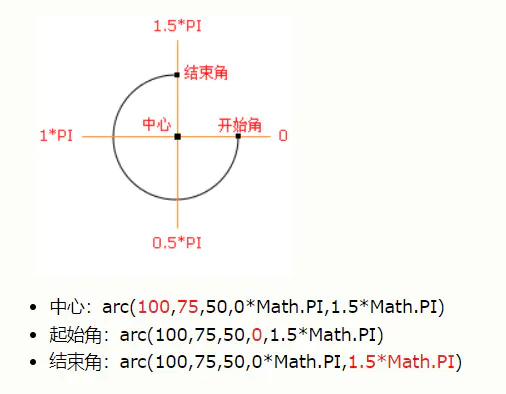
- arc(x, y, radius, startAngle, endAngle, anticlockwise)
以x,y为圆心,radius为半径, startAngle和endAngle为角度,anticlockwise为方向的圆弧(圆)- anticlockwise:布尔值,表示是否逆时针方向,
默认的方向是顺时针 - startAngle, endAngle代表的是( 弧度 ),而不是角度
- 注意:起始角度为三点钟位置,并且是以弧度计算的
弧度=(Math.PI/180)*角度
- arcTo(x1, y1, x2, y2, radius)
根据给定的控制点和半径画一段圆弧,再以直线连接两个控制点。
- arc:是弧的意思
// 圆弧
ctx.beginPath()
ctx.arc(200, 150, 40, 90 * Math.PI/180, 1.5 * Math.PI, false)
ctx.stroke()

// 圆
ctx.beginPath()
ctx.arc(200, 350, 40, 0, 2 * Math.PI, false)
ctx.fill()
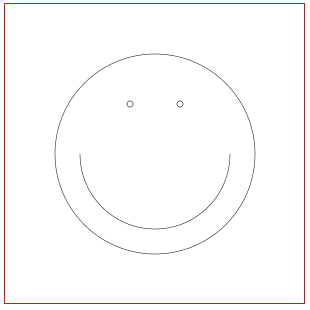
画一个笑脸
function drawLineAndTriangle(ctx) {

  ctx.beginPath()
  ctx.arc(300, 300, 200, 0, 2 * Math.PI) // --------------------- 大圆
  ctx.stroke()
  // ctx.closePath() 可要可不要

  ctx.beginPath()
  ctx.arc(250, 200, 6, 0, 2* Math.PI) // ------------------------ 左眼
  ctx.stroke()

  ctx.beginPath()
  ctx.arc(350, 200, 6, 0, 2* Math.PI) // ------------------------ 右眼
  ctx.stroke()

  ctx.beginPath()
  ctx.arc(300, 300, 150, 0, 1 * Math.PI) ------------------------- 嘴
  ctx.stroke()
}
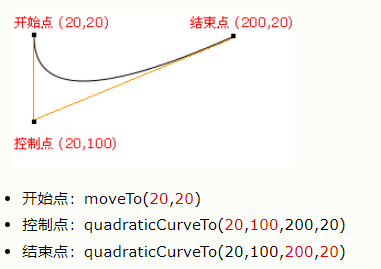
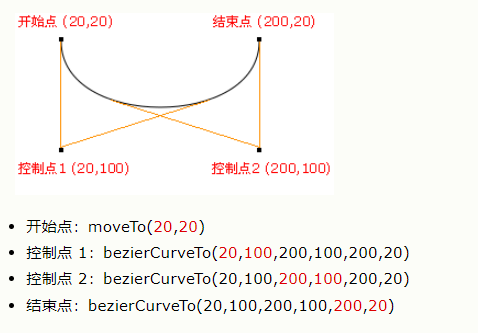
二次贝塞尔曲线,三次贝塞尔曲线
- quadraticCurveTo(cp1x, cp1y, x, y) ------------------ 绘制二次贝塞尔曲线
- cp1x,cp1y为一个控制点,x,y为结束点
- bezierCurveTo(cp1x, cp1y, cp2x, cp2y, x, y) --------- 绘制三次贝塞尔曲线
- cp1x,cp1y为控制点一
- cp2x,cp2y为控制点二
- x,y为结束点
- 注意:起始点通过moveTo()获取
color
- fillStyle
- strokeStyle
globalAlpha - 透明度
- globalAlpha:设置透明度
0-1之间 - 注意:globalAlpha 和 fillStyle 和 strokeStyle 需要在绘画前设置
lineCap:线段终点的样子
- butt
- round:圆头
- square
  ctx.beginPath();
  ctx.moveTo(100, 100)
  ctx.lineTo(100, 300)
  ctx.strokeStyle = 'red'
  ctx.lineWidth = 20
  ctx.lineCap = 'round' // ------------------ 设置线段终点的样子为圆形
  // 注意:所有的状态设置都必须在 stroke绘画前面
  ctx.stroke()
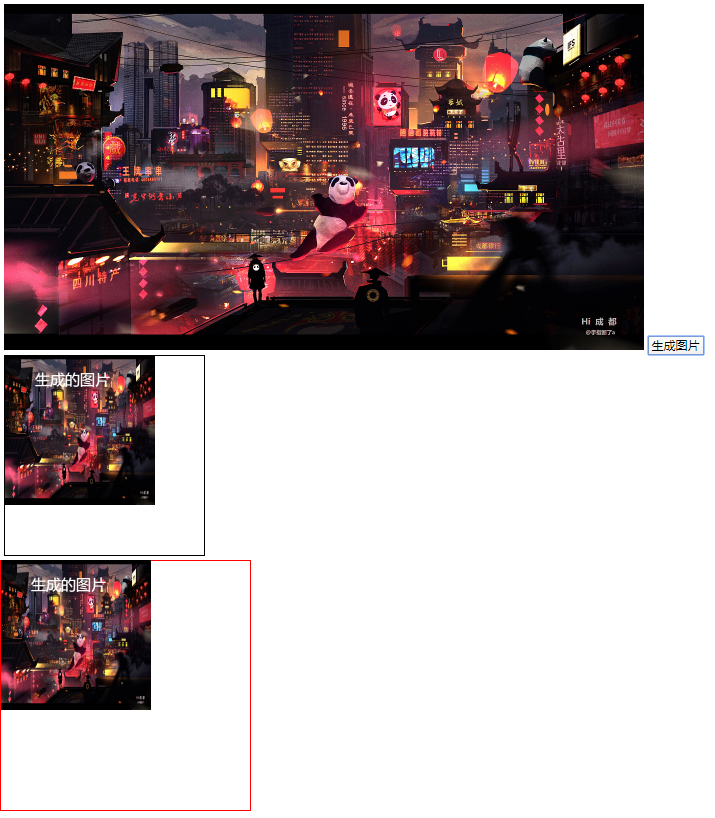
实例1:canvas实现生成一张图片保存到本地
drawImage
- context.drawImage(img,x,y)
- context.drawImage(img, x, y, width, height)
- context.drawImage(img,sx,sy,swidth,sheight,x,y,width,height)
img:图片x:在画布上放置图像的 x 坐标y:在画布上放置图像的 y 坐标witdh:图像的宽度height:图像的高度- sx:剪切图像的 x 坐标
- sy:剪切图像的 y 坐标
- swidth:剪切图像的宽度
- sheight:剪切图像的高度
- 注意:剪切部分是去掉的部分,不显示
fillText 和 font
- context.fillText(text,x,y,maxWidth) 在画布上绘制填色的文本
- tetx文本,xy坐标,maxWidth允许的最大文本宽度
context.font = "" 设置或返回字体属性
canvas.toDataURL()
- canvas.toDataURL(type, encoderOptions):返回一个包含图片展示的URI
- type:图片的类型
image/png - encoderOptions:图片质量
- 返回值:一个包含图片展示的URI,默认为 PNG 格式,图片的分辨率为96dpi
new Image()
new Image(width, height) 用于生成 HTMLImageElement 实例- 注意:用js生成的img实例,并不在文档中,需要手动插入
- 属性:src,currentSrc
- 方法:
- onload:图像加载完成,会触发onload属性指定的回调函数
- onerror:图像加载完成,同时也会触发onerror属性指定的回调函数
new Image(width, heght)

 mounted() {
    const limg = require('../images/1.jpg');
    const img = new Image(200, 200);   ------------- 参数分别是 width 和 height
    img.src = limg;    ---------------- 除了src,还有currentSrc表示当前src,因为src可以动态指定
    img.onload = function() {
      console.log('加载完成');
      document.body.appendChild(img);   -------------- 插入文档
    }
    img.onerror = function() {
      console.log('错误')
    }
  }
------
canvas实现生成图片保存到本地


实例:
<!DOCTYPE html>
<html lang="en">
<head>
  <meta charset="UTF-8">
  <meta name="viewport" content="width=device-width, initial-scale=1.0">
  <title>Document</title>
  <style>
    #imgContainer {
      width: 400px;
      height: 400px;
      border: 1px solid black;
    }
  </style>
</head>
<body>
  <div>
    <img src="./002.jpg" alt="002.jpg" id="imgx">
    <button id="button">生成图片</button>

    <div id="imgContainer"></div>
  </div>
  <script>
    window.onload = function() {
      const imgx = document.getElementById('imgx')
      const button = document.getElementById('button')
      const imgContainer = document.getElementById('imgContainer')

      button.addEventListener('click', clickButton, false)
      function clickButton() {
        combine()
      }
      function combine() {
        const canvas = document.createElement('canvas') // -------- 创建canvas标签
        canvas.width = 500
        canvas.height = 500
        canvas.style = "border: 1px solid red"
        document.documentElement.appendChild(canvas) // ------------ 添加到HTML的DOM中

        const context = canvas.getContext('2d') // ----------------- 获取渲染上下文和绘画功能
        context.drawImage(imgx, 0, 0, 300, 300) // ----------------- drawImage() 生成图片

        context.fillStyle = 'white';
        context.font = '30px Georgia';
        context.fillText('生成的图片', 60, 60) // ------------------- 填充文字

        const currentUrl = canvas.toDataURL('image/png') // -------- toDataURL() 返回图片的 URI
        imgContainer.innerHTML = `<img src=${currentUrl}>` // ------ 填充内容
      }
    }
  </script>
</body>
</html>
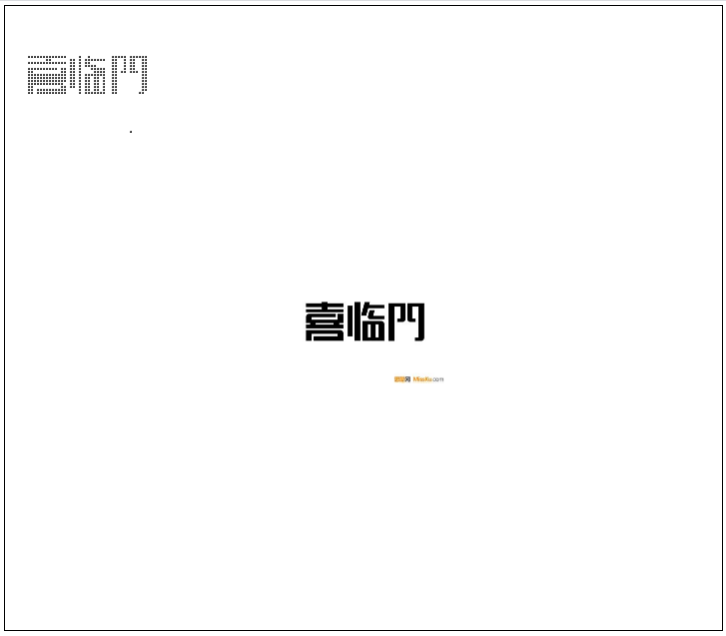
实例2:实现一个粒子文字动画
getImageData()
context.getImageData(x,y,width,height)- getImageData() 返回 ( ImageData对象 ),获取画布指定矩形的 像素数据
putImageData()
- 将 ImageData对象 绘制到 canvas 上
ImageData对象
- 包含
widthheightdata三个属性 - data属性:是一个数组( Uint8ClampedArray ),包含以 RGBA 顺序的数据,数据使用 0 至 255(包含)的整数表示
- 图像是二维的,由height决定行数,width决定列数
- R - 红色 (0-255)
- G - 绿色 (0-255)
- B - 蓝色 (0-255)
- A - alpha 通道 (0-255; 0 是透明的, 255 是完全可见的)
- alpha的值大于128,即为有颜色的点
- 注意:data中点的排列顺序是 从左到右,从上到下的顺序,而每个点占数组的四个成员
context.save() 和 context.restore()
- context.save()用来保存canvas的状态
- save后可以调用canvas的平移,缩放,旋转,裁剪等操作
- context.restore()
- 恢复之前保存的状态
实现静态粒子文字
<!DOCTYPE html>
<html lang="en">
<head>
  <meta charset="UTF-8">
  <meta name="viewport" content="width=device-width, initial-scale=1.0">
  <title>Document</title>
</head>
<body>
  <script>
    class CanvasPartiular {
      constructor() {
        this.clientWidth = null // html宽度
        this.clientHeight = null // html高度
        this.sx = null // canvas的drawImage画图的x坐标,同时也是图片的宽度
        this.sy = null // canvas的drawImage画图的y坐标,同时也是图片的高度
        this.canvas = null // canvas实例
        this.context = null // canvas的渲染上下文
        this.img = null // new Image() 生成的图片
        this.imageData = null // iamgeData对象,包括width,height,data数组
        this.dotArr = [] // ------------------------------ 用来收集像素点,成员是一个包含x,y, cricle的对象
        this.createCanvas() // 创建函数
        this.createImage() // 创建函数
      }

      createCanvas = () =>  {
        const HTML = document.documentElement
        const clientWidth = HTML.clientWidth
        const clientHeight = HTML.clientHeight
        const canvas = this.canvas = document.createElement('canvas') // ------------- 创建canvas
        canvas.width = this.clientWidth = clientWidth
        canvas.height = this.clientHeight = clientHeight
        canvas.style.border = '1px solid black';
        this.context = canvas.getContext('2d') // ------------------------------------ 获取context
        document.body.appendChild(canvas)
      }

      createImage = () => {
        const img = this.img = new Image()
        img.src = './5.jpg'
        if (img.complete) { // -------------------------- if else保证了图片加载完成后再执行 init 方法
          this.init()
        }
        else {
          img.onload = this.init
        }
      }

      init = () =>  {
        const sx = this.sx = this.clientWidth/2 - this.img.width/2;
        // 横坐标和宽,可以自己用两个正方形验证
        const sy = this.sy = this.clientHeight/2 - this.img.height/2;
        this.context.drawImage(this.img, sx, sy)
        // 画图
        const imageData = this.imageData = this.context.getImageData(sx, sy, this.img.width, this.img.height)
        // 获取 imageData 对象
        this.getDotList()
      }

      // 重点是该函数,获取dotList数组
      getDotList = () => {
        const dataArr = this.imageData.data
        const imgWidth = this.imageData.width
        for(let x = 0; x < imgWidth; x = x + 6) {
        // x 表示横轴的点,每次增加6则每个点之间有间隙
          for(let y = 0; y < this.imageData.height; y = y + 6 ) {
            // y 表示纵轴

            const iDotPositionInArray = (y * imgWidth + x) * 4
            // (1) y * imgWidth:表示该点的位置已经是第y行了,即有 y * imgWidth个点
            // (2) y * imgWidth + x:表示该点的具体位置,即前面有 y * imgWidth + x 个点
            // (3) (y * imgWidth + x) * 4:表示再data数组中,该点的位置。因为每个点占据data数组的4个成员

            if(dataArr[iDotPositionInArray + 3] > 256/2 && dataArr[iDotPositionInArray] < 100) {
              // iDotPositionInArray + 3:表示该点的 Alpha 透明度
              // Alpha在0 - 256之间
              // 256/2:表示该点可见,不是透明的
              this.dotArr.push({x, y, radius: 2}) // x,y表示坐标,radius半径,半径随便设合适即可
            }
          }
        }
        this.draw()
      }

      draw = () => {
        const context = this.context
        // context.clearRect(0, 0, this.clientWidth, this.clientHeight);
        // clearRect清除矩形的canvas,即清除drawImage的图片,下面重新画点图
        context.fillStyle = 'black'
        this.dotArr.forEach(({x,y,radius}) => {
          context.save()
          context.beginPath()
          context.arc(x, y, radius, 0, 360 * Math.PI/180) // 画圆
          context.fill()
          context.restore()
        })
      }
    }

    new CanvasPartiular()
  </script>
</body>
</html>
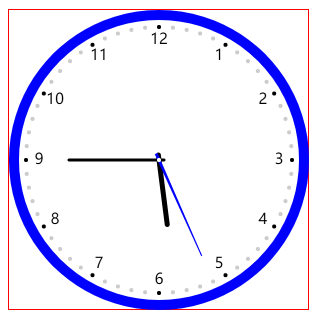
实例3:时钟动画
- 弧度 = 弧长 / 半径
context.translate()
- context.translate(x, y), 从新映射画布上的 (0, 0) 位置
context.font
- context.font = "40px Arial" 设置文本内容的字体属性
context.textAlign
- context.textAlign = 'center' --------- 设置文本 ( 左右对齐 ) 方式
context.textBaseline
- context.textBaseline = 'middle' ----- 设置文本的 ( 上下对齐 ) 方式
context.fillText()
- context.fillText(text, x, y, maxWidth) 在画布上绘制填色的文本,默认黑色
sin函数,cos 函数
cos(180° - a) = - cos(a)sin(180° - a) = sin(a)sin(2a) = 2 * sin(a) * cos(a)
context.rotate()
- context.rotate(angle) 旋转当前绘图,参数以弧度计算
context.lineWidth
- context.lineWidth = 10 设置线条宽度,以像素计算
context.lineCap
- context.lineCap = 'round' 设置线条末端线帽的样式
context.save() 和 context.restore()
- context.save() 保存当前环境状态
- context.restore() 返回之前保存过的路径状态和属性
<!DOCTYPE html>
<html lang="en">
<head>
  <meta charset="UTF-8">
  <meta name="viewport" content="width=device-width, initial-scale=1.0">
  <title>Document</title>
  <style>
    * {
      margin: 0;
      padding: 0;
    }
    html {
      height: 100%;
    }
    body {
      height: 100%;
      display: flex;
      justify-content: center;
      align-items: center;
    }
    #canvas {
      border: 1px solid red;
    }
  </style>
</head>
<body>
  <canvas id="canvas" width=600 height=600></canvas>
  <script>
    const canvas = document.getElementById('canvas')
    const cWidth = canvas.width
    const cHeight = canvas.height
    const context = canvas.getContext('2d')

    const center = context.translate(cWidth/2, cHeight/2)
    const arcRadius = cWidth/2;
    const rate = cWidth / 600; // -------- 比例,以当前大小600为基准,如果cWidth = 1200则rate为2,放大一倍

    function clockBorder() { // 时钟外圆边框
      context.beginPath()
      context.arc(0, 0, (arcRadius - 20/2) * rate, 0, 360 * Math.PI/180) // 时钟大圆
      context.strokeStyle='blue'
      context.lineWidth = 20 * rate;
      context.stroke()
      context.closePath()
    }

    function clockNumber() { // 数字刻度
      var numberArr = [3,4,5,6,7,8,9,10,11,12,1,2];
      context.font = `${30 * rate}px Arail`;
      context.textAlign = 'center';
      context.textBaseline = 'middle';
      context.fillStyle = 'black';
      numberArr.forEach((item, index) => {
        const rad = 2 * Math.PI / 12 * index;
        // ----------------------------------------------------- 2 * Math.PI / 12 表示一个小时所占的弧度
        // ----------------------------------------------------- rad表示当前点数的弧度
        const x = Math.cos(rad) * (arcRadius - 60) * rate;
        const y = Math.sin(rad) * (arcRadius - 60) * rate;
        context.fillText(item, x, y) // ------------------------ 填充数字
      })
    }

    function clockDot() { // 60份的刻度,和上面一样
      for(let i = 0; i < 60; i++) {
        const rad = 2 * Math.PI / 60 * i;
        const x = Math.cos(rad) * ( arcRadius - 34) * rate;
        const y = Math.sin(rad) * ( arcRadius - 34) * rate;
        context.beginPath()
        context.arc(x, y, 4 * rate, 0, 360 * Math.PI/180)
        if (i % 5 === 0) {
          context.fillStyle = '#000' // 整点的数字对应的刻度颜色高亮
        } else {
          context.fillStyle = '#ccc'
        }
        context.fill() // -------------------------------------- 画圆填充颜色
      }
    }

    function clockPointer(hour, minute, second) { // ----------- 时针分针秒针
      // 时针
      const radHour = 2 * Math.PI / 12 * hour; // ----------------------------------------- 一小时的弧度
      const radHourMinute = 2 * Math.PI / 12 / 60 * minute; // ---------------------------- 一分钟的弧度
      const radHourtMinuteSecond = 2 * Math.PI / 12 / 60 / 60 * second; // ---------------- 一秒钟的弧度
      context.save() // --------------------- 保存当前环境状态,因为画别的分针,秒针时不能用现在的旋转后的环境
      context.rotate(radHour + radHourMinute + radHourtMinuteSecond) // -------------------- 旋转的总角度
      context.beginPath()
      context.lineWidth = 10 * rate;
      context.lineCap = 'round';
      context.strokeStyle='black'
      context.moveTo(0, 10 * rate)
      context.lineTo(0, (-arcRadius/2 + 20) * rate)
      context.stroke()
      context.restore() // ---------------------------------------------------- 旋转后,获取旋转之前的状态

      // 分针
      const radMinute =  2 * Math.PI / 60 * minute;
      context.save()
      context.beginPath()
      context.rotate(radMinute)
      context.lineCap = 'round'
      context.strokeStyle='black'
      context.lineWidth = 6 * rate;
      context.moveTo(0, 10 * rate)
      context.lineTo(0, (-arcRadius + 120) * rate)
      context.stroke()
      context.restore()

      // 秒针
      const radSecond = 2 * Math.PI / 60 * second;
      context.save()
      context.beginPath()
      context.rotate(radSecond)
      context.lineCap = 'round'
      context.lineWidth = 5 * rate;
      context.moveTo(-3 * rate, 14 * rate)
      context.lineTo(3 * rate, 14 * rate)
      context.lineTo(1* rate, (-arcRadius + 90) * rate)
      context.lineTo(-1* rate, (-arcRadius + 90) * rate)
      context.fillStyle = 'blue'
      context.fill()
      context.restore()

      // 圆点
      context.beginPath()
      context.arc(0, 0, 4 * rate, 0, 2 * Math.PI)
      context.fillStyle = '#fff'
      context.fill()
    }

    clockDot()
    clockBorder()
    clockNumber()
    clockPointer(4, 15, 60)


    setInterval(() => {
      context.clearRect(-300, -300, 600, 600) // ------------------------------ 清除后,从新绘制
      clockBorder()
      clockDot()
      clockNumber()
      const date = new Date()
      const hour = date.getHours()
      const minute = date.getMinutes()
      const second = date.getSeconds()
      clockPointer(hour, minute, second)
    }, 1000)
  </script>
</body>
</html>
实例4:缩放图像
HTML5滑动条
<input type="range"> 滑动条- 注意:input标签是单标签,即没有结束标签
- html单标签有:
<input>,<img>,<link>,<br>,<hr>,<meta>
<input type="range" min="1" max="10" step="1" value="3" />
- min:允许的最小值
- max:允许的最大值
- step:数字间隔
- value:默认值
context.drawImage() --- 重点理解这9个参数
context.drawImage(img,sx,sy,swidth,sheight,x,y,width,height)- sx:要裁剪的原图像的起始点x坐标
- sy:要裁剪的原图像的起始点y坐标
- swidth:要裁剪的原图像的宽度
- sheight:要裁剪的原图像的高度
- x:裁剪完的图像要放在canvas上的起始点的x坐标
- y:裁剪完的图像要放在canvas上的起始点的y坐标
- width:裁剪完的图像要放在canvas上的宽度
- height:裁剪完的图像要放在canvas上的高度
<!DOCTYPE html>
<html lang="en">
<head>
  <meta charset="UTF-8">
  <meta name="viewport" content="width=device-width, initial-scale=1.0">
  <title>Document</title>
</head>
<body style="background: #777;">
  <canvas id="canvas" width="400" height="400"
    style="border: 1px solid red; display: block; margin: 0 auto;"
  ></canvas>
  <input
    type="range"
    id="range"
    style="display: block;margin: 20px auto;width: 400px"
    min="0.1"
    max="3.0"
    step="0.01"
    value="1.0"
  >
  <script>
    const canvas = document.getElementById('canvas')
    const slider = document.getElementById('range')
    const context = canvas.getContext('2d')

    const img = new Image()
    img.src = './002.jpg'
    if (img.complete) {
      init()
    } else {
      img.onload = init
    }

    function init() {
      const scale = slider.value
      drawImageByScale(scale)
    }

    function drawImageByScale(scale) {
      const imgWidth = img.width * scale;
      const imgHeight = img.height * scale;
      const canvasWidth = canvas.width;
      const canvasHeight = canvas.height;
      const dx = canvasWidth/2 - imgWidth/2;
      const dy = canvasHeight/2 - imgHeight/2;

      context.clearRect(0, 0, canvasWidth, canvasWidth)
      context.save()
      context.beginPath()
      context.drawImage(img, dx, dy, imgWidth, imgHeight)
      context.restore()
    }

    slider.onmousemove = function() {
      const scale = slider.value
      drawImageByScale(scale)
    }
  </script>
</body>
</html>
实例5:刮刮卡
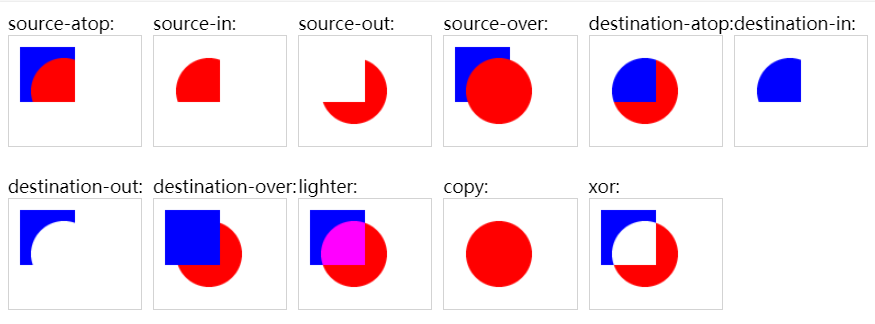
content.globalCompositeOperation
- context.globalCompositeOperation = 'source-over' 设置如何将源(新的)图像设置到目标(已有)图像上
- Composite:组合,合成
- destination:目标,终点
n - 红色色表示源(新的)图像,蓝色表示目标(已有)图像
context.lineJoin
- context.lineJoin = 'round' 设置当两条线相交时,边角的类型
- context.linWidth = 40
- context.linCap = 'round'
canvas中获取鼠标的坐标有很大的偏移,不精确?
- canvas的宽高必须在canvas标签中设置,不能用css设置,不然会偏移
代码
<!DOCTYPE html>
<html lang="en">
<head>
  <meta charset="UTF-8">
  <meta name="viewport" content="width=device-width, initial-scale=1.0">
  <title>Document</title>
  <style>
    * {
      margin: 0;
      padding: 0;
    }
    #canvas { // 设置canvas的背景,可以用别的图片作为底层,将canvas移动到图片上重叠
      background-image: url('./4.jpg');
      background-position: center;
      background-repeat: no-repeat;
      background-size: cover;
      border: 1px solid red;
    }
  </style>
</head>
<body>
  <canvas id="canvas" width=400 height=330></canvas>
  <script>
    const canvas = document.getElementById('canvas')
    const canvasWidth = canvas.width
    const canvasHeight = canvas.height
    if (canvas.getContext) { // ----------------------------------- 浏览器是否支持canvas
      const context = canvas.getContext('2d')
      const img = new Image()
      img.src = './002.jpg'
      if (img.complete) { // --------------------------------- if...else保证图标加载完成后执行drawImages()
        drawImages()
      } else {
        img.onload = drawImages
      }

      let isEmit = false // 用于标志移动时时候可以画线条了,因为只有鼠标按下后或者touch后生效,结束后又设为false
      let drawDots = 0 // 用来记录现在画的线段后,canvas源图像透明的点,>2/3则显示整个canvas背景


      function drawImages() {
        context.drawImage(img, 0, 0, canvas.width, canvas.height)
        context.globalCompositeOperation = 'destination-out'
        // ----------------------------------  context.globalCompositeOperation
        // ---------------------------------- 'destination-out' 目标图被源图占据的部分将透明

        // 监听鼠标和touch事件
        canvas.addEventListener('mousedown', moveStart, false);
        canvas.addEventListener('touchstart', moveStart, false);
        canvas.addEventListener('mousemove', move, false);
        canvas.addEventListener('touchmove', move, false);
        canvas.addEventListener('mouseup', moveEnd, false);
        canvas.addEventListener('touchend', moveEnd, false);
        context.lineWidth = 30
        context.lineCap = 'round'
        context.lineJoin = 'round'
        context.strokeStyle = 'white'
      }

      function moveStart(e) {
        isEmit = true // 点击后才准许移动时画图
        drawLineFn(e)
      }
      function move(e) {
        if (!isEmit) return; // 不成立,则返回
        drawLineFn(e)
      }
      function moveEnd(e) {
        isEmit = false // 结束后移动不能再画图
        drawLineFn(e)
        paintAll() // 判断是否全部显示背景图,当画到一定程度,直接可以显示全部
      }
      function getDot(e) {
        const dotx = e.type.match('mouse') ? e.clientX : e.changedTouches[0].clientX;
        const doty = e.type.match('mouse') ? e.clientY : e.changedTouches[0].clientY;
        return { dotx, doty }
      }
      function drawLineFn(e) {
        const {dotx, doty} = getDot(e)
        context.save()
        context.beginPath()
        context.moveTo(dotx, doty)
        context.lineTo(dotx + 0.11, doty + 0.1) // 画线
        context.stroke()
        context.closePath()
        context.restore()
      }
      function paintAll() {
        const imageData = context.getImageData(0, 0, canvasWidth, canvasHeight)
        const allDots = imageData.width * imageData.height; // ----------- 图片所有的点
        for(let i = 0; i < allDots; i++) {
          if(imageData.data[i*4 + 3] === 0) { // ------------------------- 统计透明的点
            drawDots++ // 统计透明的点
          }
        }
        if (drawDots > allDots * 2/3) { // 透明占总数点的比例
          context.save()
          context.beginPath()
          context.fillRect(0, 0, canvasWidth, canvasHeight) // 用源图占满整个目标图,globalCompositeOperation的运用
          context.closePath()
          context.restore()
        }
      }
    };
  </script>
</body>
</html>

资料
canvas-api:www.w3school.com.cn/tags/html_r…
MDN:developer.mozilla.org/zh-CN/docs/…
ImageData对象:developer.mozilla.org/zh-CN/docs/…
canvas转成图片保存:segmentfault.com/a/119000001…
粒子动画3:juejin.cn/post/684490…
粒子动画1:juejin.cn/post/684490…
时钟动画:www.imooc.com/video/11261
globalCompositeOperation1:www.w3school.com.cn/tags/canvas…
globalCompositeOperation2:www.w3school.com.cn/tiy/t.asp?f…
刮刮卡1:juejin.cn/post/684490…
刮刮卡2:juejin.cn/post/684490…
