

本文基于OkHttp 4.3.1源码分析 OkHttp - 官方地址 OkHttp - GitHub代码地址
概述
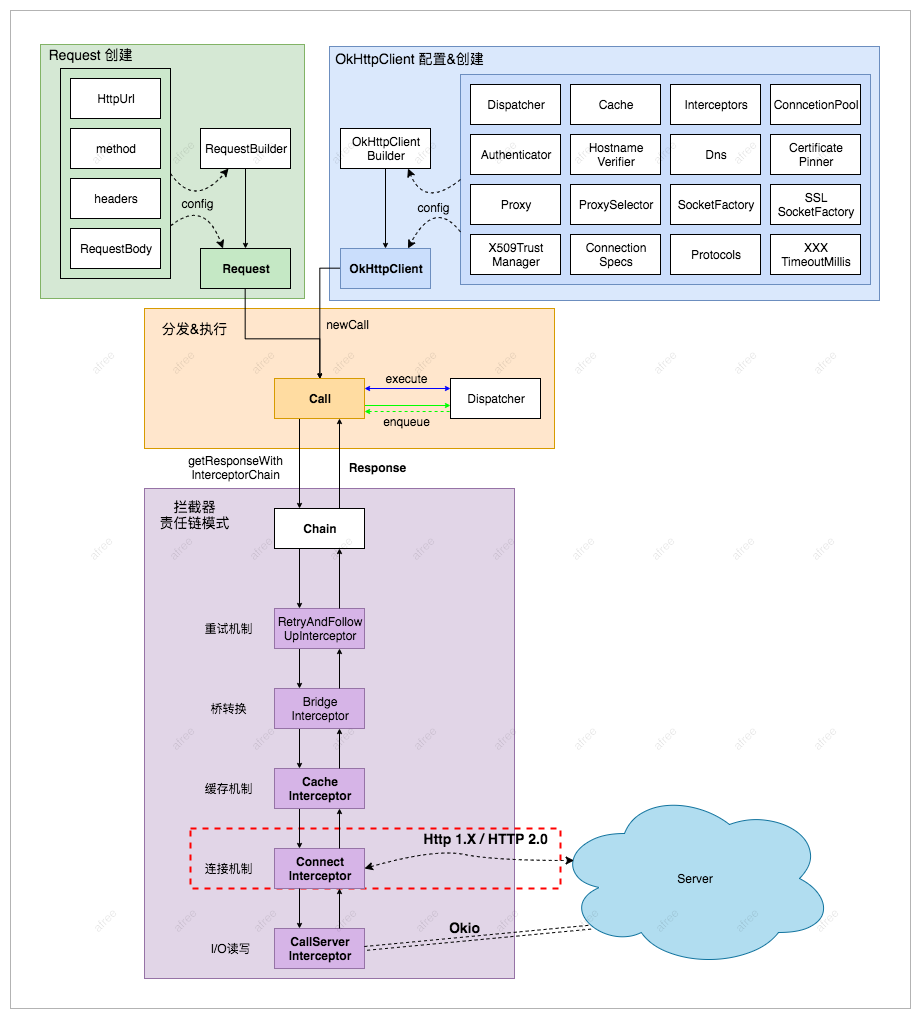
OkHttp整体流程(本文覆盖红色部分)
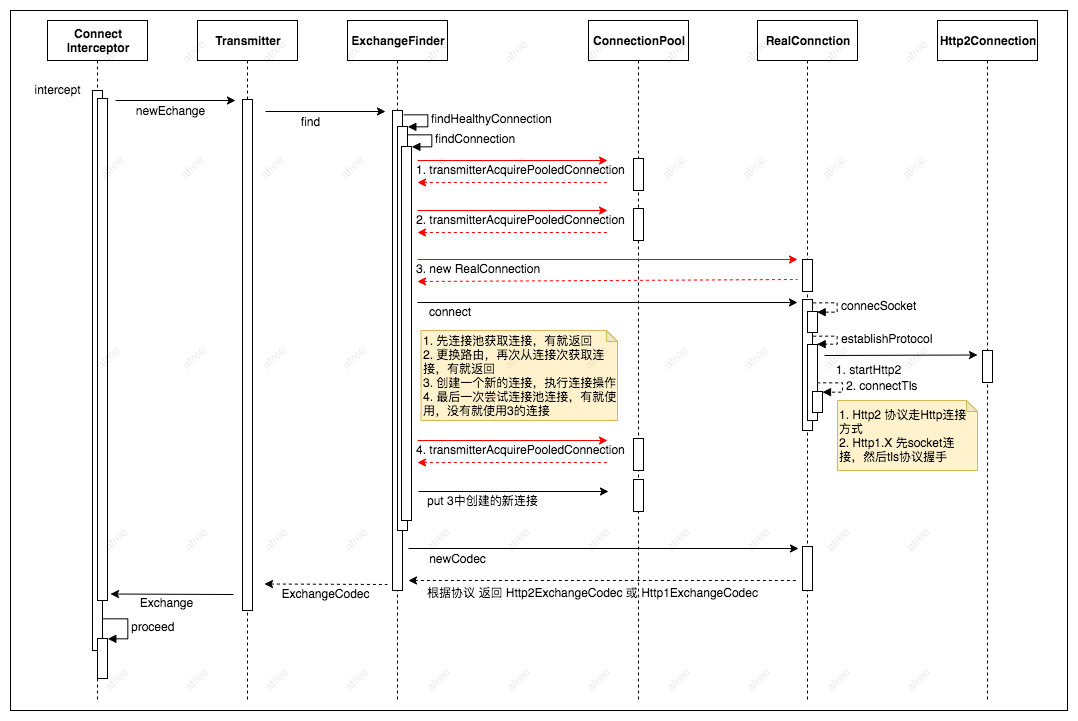
连接时序图
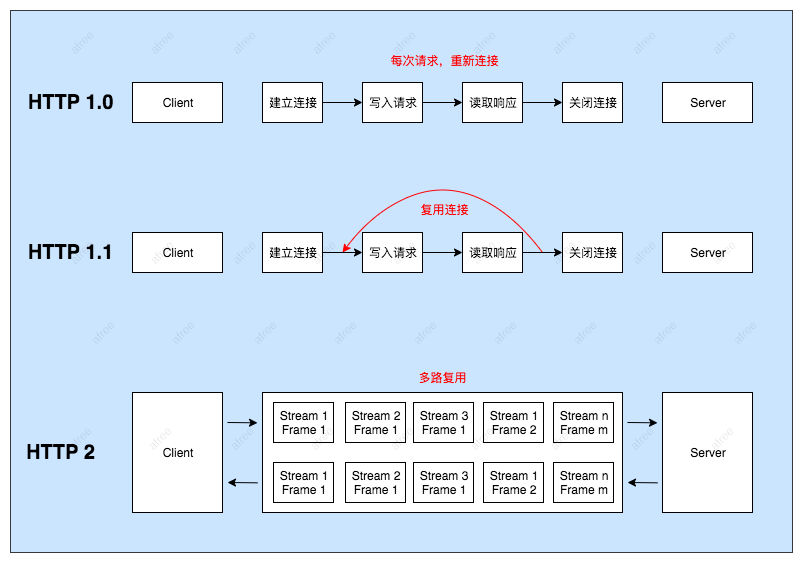
HTTP不同协议连接区分 参考:HTTP/2 是如何建立连接的
源码分析
ConnectInterceptor
- 获取发射机
- 获取有效连接,RealConnection
- 创建编码器,ExchangeCodex,实际I/O工作逻辑
- 创建一个Exchange,封装上面结果,为后续网络读写工作提供API
object ConnectInterceptor : Interceptor {

  @Throws(IOException::class)
  override fun intercept(chain: Interceptor.Chain): Response {
    val realChain = chain as RealInterceptorChain
    val request = realChain.request()
    // 取发射机,RealCall 创建时默认会创建一个实例
    val transmitter = realChain.transmitter()

    // 对于非GET请求 检查为true
    val doExtensiveHealthChecks = request.method != "GET"
    // 构建Exchange
    val exchange = transmitter.newExchange(chain, doExtensiveHealthChecks)

    return realChain.proceed(request, transmitter, exchange)
  }
}
发射机 Transmitter
Bridge between OkHttp's application and network layers. This class exposes high-level application layer primitives: connections, requests, responses, and streams.
OkHttp 应用层和网络层的桥梁,它提供了应用层连接、请求、响应的最上层函数
Transmitter构造方法
RealCall 创建时默认会创建一个实例,持有client、call、connectionPool的引用
class Transmitter(
  private val client: OkHttpClient,
  private val call: Call
) {
  // 持有连接池引用
  private val connectionPool: RealConnectionPool = client.connectionPool.delegate
  // 监听器
  private val eventListener: EventListener = client.eventListenerFactory.create(call)

  }
Transmitter.prepareToConnect
准备连接,触发时机:重试桥开始会执行此方法
  fun prepareToConnect(request: Request) {
    if (this.request != null) {
      if (this.request!!.url.canReuseConnectionFor(request.url) && exchangeFinder!!.hasRouteToTry()) {
        return // 可以重用下,结束
      }
      check(exchange == null)
      // 重置
      if (exchangeFinder != null) {
        maybeReleaseConnection(null, true)
        exchangeFinder = null
      }
    }
    // 构造一个ExchangeFinder实例(下面介绍)
    this.request = request
    this.exchangeFinder = ExchangeFinder(
        this, connectionPool, createAddress(request.url), call, eventListener)
  }
交换器
核心类
- Exchange ,单个Http请求,传输交换数据实现类
- ExchangeFinder ,请求连接获取,请求编解码实例构建,逻辑累
- ExchangeCodec,Http连接I/O操作上层封装类
Transmitter.newExchange
- 获取连接 RealConnection
- 构造连接的编码器,ExchangeCodec
- 创建Exchange,它主要负责HTTP连接的维护管理及通知ExchangeCodec编码器进行实际的I/O操作
  internal fun newExchange(chain: Interceptor.Chain, doExtensiveHealthChecks: Boolean): Exchange {
    ...
    // 建立连接初始方法,获取连接后,会创建一个ExchangeCodec用于I/O工作
    val codec = exchangeFinder!!.find(client, chain, doExtensiveHealthChecks)
    // 创建一个 Exchange
    val result = Exchange(this, call, eventListener, exchangeFinder!!, codec)

    synchronized(connectionPool) {
      this.exchange = result
      this.exchangeRequestDone = false
      this.exchangeResponseDone = false
      return result
    }
  }
ExchangeFinder.find
- 获取连接 RealConnection
- 构造连接的编码器,ExchangeCodec
  fun find(
    client: OkHttpClient,
    chain: Interceptor.Chain,
    doExtensiveHealthChecks: Boolean
  ): ExchangeCodec {
    val connectTimeout = chain.connectTimeoutMillis()
    val readTimeout = chain.readTimeoutMillis()
    val writeTimeout = chain.writeTimeoutMillis()
    val pingIntervalMillis = client.pingIntervalMillis
    val connectionRetryEnabled = client.retryOnConnectionFailure

    try {
      // 获取有效连接
      val resultConnection = findHealthyConnection(
          connectTimeout = connectTimeout,
          readTimeout = readTimeout,
          writeTimeout = writeTimeout,
          pingIntervalMillis = pingIntervalMillis,
          connectionRetryEnabled = connectionRetryEnabled,
          doExtensiveHealthChecks = doExtensiveHealthChecks
      )
      // 创建 编码器
      return resultConnection.newCodec(client, chain)
    } catch (e: RouteException) {
      trackFailure()
      throw e
    } catch (e: IOException) {
      trackFailure()
      throw RouteException(e)
    }
  }
ExchangeFinder.findHealthyConnection
- 执行获取连接方法,获取连接
- 如果连接是新创建的连接,则直接返回结果
- 如果连接是复用连接池的连接,则继续判断该连接是否可用,可用则返回,不可用则继续find
 private fun findHealthyConnection(
    connectTimeout: Int,
    readTimeout: Int,
    writeTimeout: Int,
    pingIntervalMillis: Int,
    connectionRetryEnabled: Boolean,
    doExtensiveHealthChecks: Boolean
  ): RealConnection {
    while (true) {
      // 执行连接获取方法
      val candidate = findConnection(
          connectTimeout = connectTimeout,
          readTimeout = readTimeout,
          writeTimeout = writeTimeout,
          pingIntervalMillis = pingIntervalMillis,
          connectionRetryEnabled = connectionRetryEnabled
      )

      // 新创建的连接,无需判断可用,可以直接返回连接结果
      synchronized(connectionPool) {
        if (candidate.successCount == 0) {
          return candidate
        }
      }

      // 判断该连接是否可用
      if (!candidate.isHealthy(doExtensiveHealthChecks)) {
        candidate.noNewExchanges()
        continue
      }

      return candidate
    }
  }
ExchangeFinder.findConnection
获取连接过程
- 第一次,先从连接池获取连接
- 第二次,选择新的路由,再次尝试从连接池获取
- 构造一个新的连接
- 第三次,在高并发情况下,尝试走HTTP2的多路复用连接
- 如果连接池没有获取到连接,则走构造的那个新的连接,新的连接会加入到连接池
  private fun findConnection(
    connectTimeout: Int,
    readTimeout: Int,
    writeTimeout: Int,
    pingIntervalMillis: Int,
    connectionRetryEnabled: Boolean
  ): RealConnection {
    var foundPooledConnection = false
    var result: RealConnection? = null
    var selectedRoute: Route? = null
    var releasedConnection: RealConnection?
    val toClose: Socket?
    synchronized(connectionPool) {
      if (transmitter.isCanceled) throw IOException("Canceled")
      hasStreamFailure = false
      // 之前的连接
      releasedConnection = transmitter.connection
      // 前连接不为null 且不支持新的ExChange了则释放连接 否则toClose 赋值null
      toClose = if (transmitter.connection != null && transmitter.connection!!.noNewExchanges) {
        transmitter.releaseConnectionNoEvents()
      } else {
        null
      }

      if (transmitter.connection != null) {
        // 之前的连接可用,直接赋值result
        result = transmitter.connection
        releasedConnection = null
      }
      // 没有可用连接,则尝试获取新的连接
      if (result == null) {
        // 先从连接池获取链接
        if (connectionPool.transmitterAcquirePooledConnection(address, transmitter, null, false)) {
          foundPooledConnection = true
          result = transmitter.connection
        } else if (nextRouteToTry != null) {
          selectedRoute = nextRouteToTry
          nextRouteToTry = null
        } else if (retryCurrentRoute()) {
          selectedRoute = transmitter.connection!!.route()
        }
      }
    }
    // 如果等待close的连接不为null则关闭掉
    toClose?.closeQuietly()
    // 释放的连接不为空,事件通知连接回收
    if (releasedConnection != null) {
      eventListener.connectionReleased(call, releasedConnection!!)
    }
    // 连接池获取的连接不为空,事件通知连接连接获得
    if (foundPooledConnection) {
      eventListener.connectionAcquired(call, result!!)
    }
    if (result != null) {
      // 找到了连接,返回连接,结束方法
      return result!!
    }

    // 如果至此没有获取到可用连接,则尝试更改路由,在连接
    var newRouteSelection = false
    if (selectedRoute == null && (routeSelection == null || !routeSelection!!.hasNext())) {
      // 有新的路由,则标记选了新的路由,以及获取新的路由
      newRouteSelection = true
      routeSelection = routeSelector.next()
    }

    var routes: List<Route>? = null
    synchronized(connectionPool) {
      if (transmitter.isCanceled) throw IOException("Canceled")

      if (newRouteSelection) {
        // 如果更改了路由,则有新的一批地址,尝试从新的一批地址获取可用连接
        routes = routeSelection!!.routes
        if (connectionPool.transmitterAcquirePooledConnection(
                address, transmitter, routes, false)) {
          foundPooledConnection = true
          result = transmitter.connection
        }
      }

      if (!foundPooledConnection) {
        if (selectedRoute == null) {
          selectedRoute = routeSelection!!.next()
        }
        // 如果仍然没有获取到可用连接,则直接创建一个新的连接实例
        result = RealConnection(connectionPool, selectedRoute!!)
        connectingConnection = result
      }
    }

    // 如果第二次从连接池中找到了可用连接,则直接返回该连接
    if (foundPooledConnection) {
      eventListener.connectionAcquired(call, result!!)
      return result!!
    }

    // 如果没有找到直接用的连接,则尝试TCP+TLC握手(阻塞过程)
    result!!.connect(
        connectTimeout,
        readTimeout,
        writeTimeout,
        pingIntervalMillis,
        connectionRetryEnabled,
        call,
        eventListener
    )
    // 连接 可用,则从路由黑名单中移除 该路由地址
    connectionPool.routeDatabase.connected(result!!.route())

    var socket: Socket? = null
    synchronized(connectionPool) {
      connectingConnection = null
      // 最后一次尝试连接 (这个只在一个host多个并发连接情况下发生)
      if (connectionPool.transmitterAcquirePooledConnection(address, transmitter, routes, true)) {
        // 如果成功,则优先使用连接池的连接,并关闭之前创建的连接socket
        result!!.noNewExchanges = true
        socket = result!!.socket()
        result = transmitter.connection

        nextRouteToTry = selectedRoute
      } else {
        // 没有从连接池获取到连接,则把之前创建的连接存储进入
        connectionPool.put(result!!)
        transmitter.acquireConnectionNoEvents(result!!)
      }
    }
    socket?.closeQuietly()

    eventListener.connectionAcquired(call, result!!)
    return result!!
  }
连接池
初始化时机
OkHttpClient.Builder构造时,会默认构造一个连接池
 class Builder constructor() {
    internal var connectionPool: ConnectionPool = ConnectionPool()
}
ConnectionPool
连接池,管理HTTP 和HTTP/2的所有连接,维护一定的连接,清理超过配置的连接,及提供可复用的连接。 默认最大空闲连接数目5个,最长连接时长5分钟
结构:内部持有delegate为RealConnectionPool,它是连接池管理的逻辑实现类
class ConnectionPool internal constructor(
  internal val delegate: RealConnectionPool // 连接池管理逻辑真正实现类
) {
  constructor(
    maxIdleConnections: Int,
    keepAliveDuration: Long,
    timeUnit: TimeUnit
  ) : this(RealConnectionPool(
      taskRunner = TaskRunner.INSTANCE, // 工作线程
      maxIdleConnections = maxIdleConnections, // 最大空闲连接数5
      keepAliveDuration = keepAliveDuration, // 最长连接时长5min
      timeUnit = timeUnit
  ))

  constructor() : this(5, 5, TimeUnit.MINUTES)

  fun idleConnectionCount(): Int = delegate.idleConnectionCount()

  fun connectionCount(): Int = delegate.connectionCount()

  /** Close and remove all idle connections in the pool. */
  fun evictAll() {
    delegate.evictAll()
  }
}
RealConnectionPool.transmitterAcquirePooledConnection
前面我们知道Transmitter持有ConnectionPool,且看它持有的变量是直接以RealConnectionPool作为类型的,可以显示执行到它的其它方法 transmitterAcquirePooledConnection尝试获取连接池中的连接,达到复用连接的目的 一共两种情况可以使用复用的连接,1.需要多路复用连接且有支持多路复用的连接;2.能给目标Address分配stream的连接
  fun transmitterAcquirePooledConnection(
    address: Address,
    transmitter: Transmitter,
    routes: List<Route>?,
    requireMultiplexed: Boolean
  ): Boolean {
    this.assertThreadHoldsLock()

    for (connection in connections) {
      // 需要复用连接 && 该连接不支持复用连接(HTTP2) 则该连接不可用
      if (requireMultiplexed && !connection.isMultiplexed) continue
      // 如果该连接可以给对应的 address 分配stream 则返回true
      if (!connection.isEligible(address, routes)) continue
      // 满足条件下,获取
      transmitter.acquireConnectionNoEvents(connection)
      return true
    }
    return false
  }
RealConnectionPool.acquireConnectionNoEvents
获取连接,然后在连接实例中的transmitters中添加对应承载的Transmitter弱引用
  fun acquireConnectionNoEvents(connection: RealConnection) {
    connectionPool.assertThreadHoldsLock()

    check(this.connection == null)
    this.connection = connection
    // 连接的transmitters集合添加一个弱引用
    connection.transmitters.add(TransmitterReference(this, callStackTrace))
  }
RealConnectionPool.put
ExchangeFinder最后find的connection是创建的新的connection,则会执行Pool的put新连接方法 put方法 先将新的连接添加到连接集合中,然后执行清理任务
  fun put(connection: RealConnection) {
    this.assertThreadHoldsLock()

    connections.add(connection)
    cleanupQueue.schedule(cleanupTask) // 执行清理任务一次
  }
RealConnectionPool.cleanup
对连接池的连接进行维护,主要是清理长时间无用的连接(超过空闲连接个数且超过最大空闲时长)
fun cleanup(now: Long): Long {
    var inUseConnectionCount = 0
    var idleConnectionCount = 0
    var longestIdleConnection: RealConnection? = null
    var longestIdleDurationNs = Long.MIN_VALUE


    synchronized(this) {
      for (connection in connections) {
        // 如果该连接正在被使用,则继续遍历,使用连接数+1
        if (pruneAndGetAllocationCount(connection, now) > 0) {
          inUseConnectionCount++
          continue
        }
        // 空闲连接数+1
        idleConnectionCount++

        // 记录最长空闲时长,以及最长空闲时长对应的连接
        val idleDurationNs = now - connection.idleAtNanos
        if (idleDurationNs > longestIdleDurationNs) {
          longestIdleDurationNs = idleDurationNs
          longestIdleConnection = connection
        }
      }

      when {
        // 当连接最长空闲时长大于配置的时长 & 空闲连接个是> 配置的个数
        longestIdleDurationNs >= this.keepAliveDurationNs
            || idleConnectionCount > this.maxIdleConnections -> {
          // 则移除 最大的那个空闲连接
          connections.remove(longestIdleConnection)
          // 如果连接为空了,则停止所有的清除任务
          if (connections.isEmpty()) cleanupQueue.cancelAll()
        }
        // 其它情况则结束语句
        ...      }
    }
    // 关闭被移除的连接,释放资源
    longestIdleConnection!!.socket().closeQuietly()

    // Cleanup again immediately.
    return 0L
  }
连接
RealConnection.connect
连接操作,根据是否代理会做两个逻辑区分,最后都是执行socket连接,然后进行协议的处理
fun connect(
    connectTimeout: Int,
    readTimeout: Int,
    writeTimeout: Int,
    pingIntervalMillis: Int,
    connectionRetryEnabled: Boolean,
    call: Call,
    eventListener: EventListener
  ) {
    check(protocol == null) { "already connected" }

    var routeException: RouteException? = null
    val connectionSpecs = route.address.connectionSpecs
    val connectionSpecSelector = ConnectionSpecSelector(connectionSpecs)

    ...

    while (true) {
      try {
        // 是否走代理通道, 即一个HTTPS请求 但是其有HTTP的代理通道
        if (route.requiresTunnel()) {
          // 通过代理通道建立连接 ,也叫隧道连接
          connectTunnel(connectTimeout, readTimeout, writeTimeout, call, eventListener)
          if (rawSocket == null) {
            // We were
            break
          }
        } else {
          // 建立连接
          connectSocket(connectTimeout, readTimeout, call, eventListener)
        }
        establishProtocol(connectionSpecSelector, pingIntervalMillis, call, eventListener)
        eventListener.connectEnd(call, route.socketAddress, route.proxy, protocol)
        break
      } catch (e: IOException) {
        ... // 异常处理
      }
    }

    if (route.requiresTunnel() && rawSocket == null) {
      throw RouteException(ProtocolException(
          "Too many tunnel connections attempted: $MAX_TUNNEL_ATTEMPTS"))
    }
  }
RealConnection.connectSocket
- 创建原生Socket
- 进行Socket连接,至此对应的底层Socket通道已经建立
 private fun connectSocket(
    connectTimeout: Int,
    readTimeout: Int,
    call: Call,
    eventListener: EventListener
  ) {
    val proxy = route.proxy
    val address = route.address
    // 创建原生Socket
    val rawSocket = when (proxy.type()) {
      Proxy.Type.DIRECT, Proxy.Type.HTTP -> address.socketFactory.createSocket()!!
      else -> Socket(proxy)
    }
    this.rawSocket = rawSocket
    // 发送开始连接事件
    eventListener.connectStart(call, route.socketAddress, proxy)
    rawSocket.soTimeout = readTimeout
    try {
      // 找应用对应的平台 进行连接
      Platform.get().connectSocket(rawSocket, route.socketAddress, connectTimeout)
    } catch (e: ConnectException) {
      throw ConnectException("Failed to connect to ${route.socketAddress}").apply {
        initCause(e)
      }
    }

    ...
  }
RealConnection.establishProtocol
前面已经建立Socket连接通道,现在是对各个协议进行支持
- 非HTTPS,1. 支持HTTP2情况下,优先走HTTP/2协议连接,2. 不支持,则走HTTP/1协议
- HTTPS,则先进行TLS握手,握手成功后,如果是HTTP/2协议,则走HTTP/2连接方式
  private fun establishProtocol(
    connectionSpecSelector: ConnectionSpecSelector,
    pingIntervalMillis: Int,
    call: Call,
    eventListener: EventListener
  ) {
    if (route.address.sslSocketFactory == null) {
      if (Protocol.H2_PRIOR_KNOWLEDGE in route.address.protocols) {
        // 非HTTPS,支持HTTP2,优先走HTTP2
        socket = rawSocket
        protocol = Protocol.H2_PRIOR_KNOWLEDGE
        startHttp2(pingIntervalMillis)
        return
      }

      socket = rawSocket
      protocol = Protocol.HTTP_1_1
      return
    }
    // 加密连接开始
    eventListener.secureConnectStart(call)
    // 开始Tls连接
    connectTls(connectionSpecSelector)
    // 加密连接结束
    eventListener.secureConnectEnd(call, handshake)

    if (protocol === Protocol.HTTP_2) {
      startHttp2(pingIntervalMillis)
    }
  }
RealConnection.connectTls
进行Tls连接
- 基于之前的原生Socket建立包装的SSLSocket
- 对SSLSocket进行相关安全信息的配置
- 通过SSLSocket进行握手,及握手过程中,进行一些证书信息校验
- 握手成功,构建对应连接的source及sink读写流
  private fun connectTls(connectionSpecSelector: ConnectionSpecSelector) {
    val address = route.address
    val sslSocketFactory = address.sslSocketFactory
    var success = false
    var sslSocket: SSLSocket? = null
    try {
      // 基于之前创建的原生Socket 建立一个SSLSocket
      sslSocket = sslSocketFactory!!.createSocket(
          rawSocket, address.url.host, address.url.port, true /* autoClose */) as SSLSocket

      // 对sslSocket进行 安全连接的配置 以及Tls的扩展配置
      val connectionSpec = connectionSpecSelector.configureSecureSocket(sslSocket)
      if (connectionSpec.supportsTlsExtensions) {
        Platform.get().configureTlsExtensions(sslSocket, address.url.host, address.protocols)
      }

      // 开始握手
      sslSocket.startHandshake()
      // 获取sslSession
      val sslSocketSession = sslSocket.session
      val unverifiedHandshake = sslSocketSession.handshake()

      // 验证证书对主机是否ok
      if (!address.hostnameVerifier!!.verify(address.url.host, sslSocketSession)) {
        val peerCertificates = unverifiedHandshake.peerCertificates
        if (peerCertificates.isNotEmpty()) {
          val cert = peerCertificates[0] as X509Certificate
          throw SSLPeerUnverifiedException("""
              |Hostname ${address.url.host} not verified:
              |    certificate: ${CertificatePinner.pin(cert)}
              |    DN: ${cert.subjectDN.name}
              |    subjectAltNames: ${OkHostnameVerifier.allSubjectAltNames(cert)}
              """.trimMargin())
        } else {
          throw SSLPeerUnverifiedException(
              "Hostname ${address.url.host} not verified (no certificates)")
        }
      }

      val certificatePinner = address.certificatePinner!!

      handshake = Handshake(unverifiedHandshake.tlsVersion, unverifiedHandshake.cipherSuite,
          unverifiedHandshake.localCertificates) {
        certificatePinner.certificateChainCleaner!!.clean(unverifiedHandshake.peerCertificates,
            address.url.host)
      }

      // Check that the certificate pinner is satisfied by the certificates presented.
      certificatePinner.check(address.url.host) {
        handshake!!.peerCertificates.map { it as X509Certificate }
      }

      // Success! Save the handshake and the ALPN protocol.
      val maybeProtocol = if (connectionSpec.supportsTlsExtensions) {
        Platform.get().getSelectedProtocol(sslSocket)
      } else {
        null
      }
      // 握手成功,获取source和sink流
      socket = sslSocket
      source = sslSocket.source().buffer()
      sink = sslSocket.sink().buffer()
      protocol = if (maybeProtocol != null) Protocol.get(maybeProtocol) else Protocol.HTTP_1_1
      success = true
    } finally {
      if (sslSocket != null) {
        Platform.get().afterHandshake(sslSocket)
      }
      if (!success) {
        sslSocket?.closeQuietly()
      }
    }
  }
RealConnection.startHttp2
构建一个Http2Connection,然后启动HTTP/2协议连接, http2连接实现是OkHttp中http2的包模块进行实现的
  private fun startHttp2(pingIntervalMillis: Int) {
    val socket = this.socket!!
    val source = this.source!!
    val sink = this.sink!!
    socket.soTimeout = 0
    // 构建Http2Connection ,然后启动
    val http2Connection = Http2Connection.Builder(client = true, taskRunner = TaskRunner.INSTANCE)
        .socket(socket, route.address.url.host, source, sink)
        .listener(this) // 添加RealConnection作为listerner
        .pingIntervalMillis(pingIntervalMillis)
        .build()
    this.http2Connection = http2Connection
    this.allocationLimit = Http2Connection.DEFAULT_SETTINGS.getMaxConcurrentStreams()
    http2Connection.start()
  }
RealConnection.newCodec
构造编码器,Http2ExchangeCodec 或者 Http1ExchangeCodec,它们的作用封装了对请求和响应的读写操作
  @Throws(SocketException::class)
  internal fun newCodec(client: OkHttpClient, chain: Interceptor.Chain): ExchangeCodec {
    val socket = this.socket!!
    val source = this.source!!
    val sink = this.sink!!
    val http2Connection = this.http2Connection

    return if (http2Connection != null) {
      Http2ExchangeCodec(client, this, chain, http2Connection)
    } else {
      socket.soTimeout = chain.readTimeoutMillis()
      source.timeout().timeout(chain.readTimeoutMillis().toLong(), MILLISECONDS)
      sink.timeout().timeout(chain.writeTimeoutMillis().toLong(), MILLISECONDS)
      Http1ExchangeCodec(client, this, source, sink)
    }
  }
HTTP2连接
Http2Connection.start
配置HTTP2的请求前置信息,开启线程进行连接前置的信息读取
  fun start(sendConnectionPreface: Boolean = true) {
    if (sendConnectionPreface) { // 必为true
      // 配置“连接前奏”,每个端点都需要发送连接前奏作为正在使用的协议的最终确认,并建立 HTTP/2 连接的初始设置。
      writer.connectionPreface()
      writer.settings(okHttpSettings)
      val windowSize = okHttpSettings.initialWindowSize
      if (windowSize != DEFAULT_INITIAL_WINDOW_SIZE) {
        writer.windowUpdate(0, (windowSize - DEFAULT_INITIAL_WINDOW_SIZE).toLong())
      }
    }
    // 开启线程 进行连接前奏的读取工作
    Thread(readerRunnable, connectionName).start()
  }
Http2Connection.ReaderRunnable
读取连接前奏信息,确认连接正常
  inner class ReaderRunnable internal constructor(
    internal val reader: Http2Reader
  ) : Runnable, Http2Reader.Handler {
    override fun run() {
      var connectionErrorCode = ErrorCode.INTERNAL_ERROR
      var streamErrorCode = ErrorCode.INTERNAL_ERROR
      var errorException: IOException? = null
      try {
        // 读取连接前奏信息
        reader.readConnectionPreface(this)
        while (reader.nextFrame(false, this)) {
        }
        connectionErrorCode = ErrorCode.NO_ERROR
        streamErrorCode = ErrorCode.CANCEL
      } catch (e: IOException) {
        errorException = e
        connectionErrorCode = ErrorCode.PROTOCOL_ERROR
        streamErrorCode = ErrorCode.PROTOCOL_ERROR
      } finally {
        close(connectionErrorCode, streamErrorCode, errorException)
        reader.closeQuietly()
      }
    }
