

这个例子是商城后台项目的一部分,主要使用了oAuth2的密码模式完成用户名密码认证功能。主要流程是:使用Nacos作为注册中心,操作用户的服务user-mgr-service作为服务提供者,注册到Nacos,通过Dubbo供oAuth2调用,同时oAuth2也作为Rest服务提供者,注册到Nacos,提供用户登录/user/login服务。网关Gateway也注册到Nacos,提供统一入口,路由到oAuth2服务,完成用户认证。
(文章主要写一下实现步骤,具体代码附上的话太多了,影响阅读。github.com/toyranger/c…)
1. Spring Security oAuth2 密码模式
1.1 密码模式和授权码模式
{placeholder}
2. oAuth2实现认证服务器
2.1 创建授权服务器
参考之前的文章:juejin.cn/post/684490…
ClientDetailsServiceConfigurer:通过配置的数据源,配置ClientDetailsService AuthorizationServerSecurityConfigurer:用来配置令牌端点(Token Endpoint)的安全约束. AuthorizationServerEndpointsConfigurer:用来配置授权(authorization)以及令牌(token)
@Configuration
@EnableAuthorizationServer
public class AuthorizationServerConfiguration extends AuthorizationServerConfigurerAdapter {

  @Autowired
  private BCryptPasswordEncoder passwordEncoder;

  @Bean
  @Primary
  @ConfigurationProperties(prefix = "spring.datasource")
  public DataSource dataSource() {
    return DataSourceBuilder.create().build();
  }

  @Bean
  public TokenStore tokenStore() {
    return new JdbcTokenStore(dataSource());
  }

  @Bean
  public ClientDetailsService jdbcClientDetailsService() {
    return new JdbcClientDetailsService(dataSource());
  }

  /***
   * 用于支持密码模式
   */
  @Autowired
  private AuthenticationManager authenticationManager;

  @Override
  public void configure(AuthorizationServerEndpointsConfigurer endpoints) throws Exception {

    endpoints.authenticationManager(authenticationManager).tokenStore(tokenStore());
  }

  @Override
  public void configure(AuthorizationServerSecurityConfigurer security) throws Exception {
//    允许客户端访问 /oauth/check_token检查token
    security.checkTokenAccess("isAuthenticated()").allowFormAuthenticationForClients();
  }

  @Override
  public void configure(ClientDetailsServiceConfigurer clients) throws Exception {
    clients.withClientDetails(jdbcClientDetailsService());
  }

  /***
   * 内存模式
   */
//  @Override
//  public void configure(ClientDetailsServiceConfigurer clients) throws Exception {
//
//    clients.inMemory()
//        .withClient("client")
//        .secret(passwordEncoder.encode("secret"))
//        .authorizedGrantTypes("password", "refresh_token")
//        .scopes("backend")
//        .resourceIds("backend-resources")
//        .accessTokenValiditySeconds(60 * 60 * 24)
//        .refreshTokenValiditySeconds(60 * 60 * 24 * 30);
//  }
}
2.2 创建认证服务器和资源服务器
认证服务器的任务是根据用户名查询用户,以及用户所具有的权限,资源服务器的任务是配置访问资源(url)所需要的对应的权限。这里把他们写在一个Configuration中
@Configuration
@EnableWebSecurity
@EnableResourceServer
public class WebSecurityConfiguration extends WebSecurityConfigurerAdapter {

  @Bean
  public BCryptPasswordEncoder passwordEncoder() {
    return new BCryptPasswordEncoder();
  }

  @Bean
  public UserDetailsService userDetailsService() {
    return new UserDetailsServiceImpl();
  }

  @Override
  protected void configure(AuthenticationManagerBuilder auth) throws Exception {
    auth.userDetailsService(userDetailsService());
  }

  /***
   * 用于支持 password 模式
   * @return
   * @throws Exception
   */
  @Bean
  @Override
  public AuthenticationManager authenticationManagerBean() throws Exception {
    return super.authenticationManagerBean();
  }

  @Override
  public void configure(WebSecurity web) throws Exception {
    web.ignoring().antMatchers("/user/login");
  }

  @Override
  protected void configure(HttpSecurity http) throws Exception {
    http.exceptionHandling().and()
        .sessionManagement().sessionCreationPolicy(SessionCreationPolicy.STATELESS)
        .and()
        .authorizeRequests()
        .antMatchers("/user/info").hasAnyAuthority("UserInfo")
        .antMatchers("/user/logout").hasAnyAuthority("UserLogout");

  }
}
2.3 在用户认证的userDetailsService中,需要通过Dubbo调用user-mgr-service提供的服务
public class UserDetailsServiceImpl implements UserDetailsService {

  @Reference(version = "1.0.0")
  private UserMgrApi userMgrApi;

  @Reference(version = "1.0.0")
  private PermissionMgrApi permissionMgrApi;

  @Override
  public UserDetails loadUserByUsername(String s) throws UsernameNotFoundException {

    User userByName = userMgrApi.selectOne(s);

    if (null == userByName) {
      return null;
    }

    List<GrantedAuthority> grantedAuthorities = Lists.newArrayList();
    List<Permission> permissions = permissionMgrApi.selectListByUserId(userByName.getId());
    permissions.forEach(permission -> {
      GrantedAuthority grantedAuthority = new SimpleGrantedAuthority(permission.getEnname());
      grantedAuthorities.add(grantedAuthority);
    });

    return new org.springframework.security.core.userdetails.User(userByName.getUsername(),
        userByName.getPassword(), grantedAuthorities);
  }
}

用户信息是基于RBAC授权模型,通过username查询用户,查到用户之后通过userId查询对应的权限,都是很简单的dao操作,使用mybatis(plus)就可以完成。
3. oAuth2对外提供rest接口,/user/login
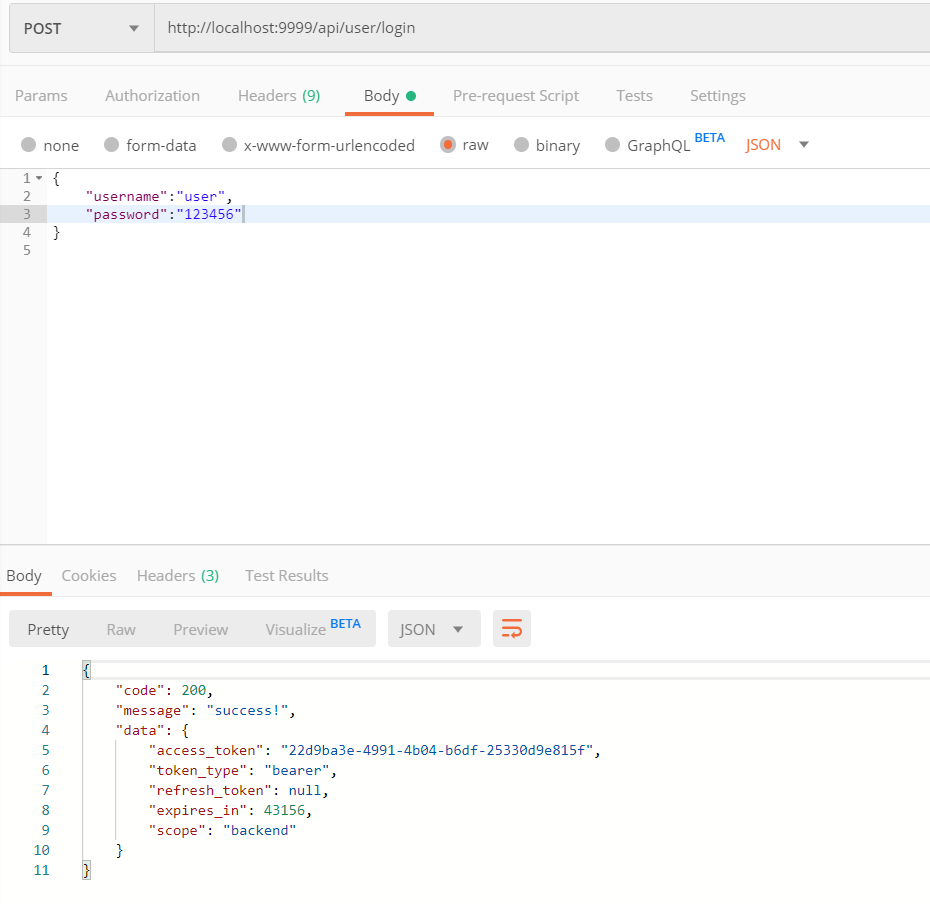
oAuth2密码需要传username、password、grant_type、client_id、client_secret五个参数,而用户只需要传username和password即可,所以其余的参数需要登录服务自己传过去。 这里使用RestTemplate,向oAuth2服务发起请求。 成功认证之后,会得到Token。
@PostMapping("/user/login")
  public CommonsResponse login(@RequestBody LoginParam loginParam) {

    String tokenUrl = "http://localhost:8091/oauth/token";
    MultiValueMap<String, Object> multiValueMap = new LinkedMultiValueMap<>();
    multiValueMap.add("username", loginParam.getUsername());
    multiValueMap.add("password", loginParam.getPassword());
    multiValueMap.add("grant_type", oauth2_grant_type);
    multiValueMap.add("client_id", oauth2_client_id);
    multiValueMap.add("client_secret", oauth2_client_secret);

    HttpHeaders headers = new HttpHeaders();
    headers.setContentType(MediaType.APPLICATION_FORM_URLENCODED);

    HttpEntity<MultiValueMap<String, Object>> entity = new HttpEntity<>(multiValueMap, headers);
    TokenEntity tokenEntity;
    try {
      tokenEntity = restTemplate.postForObject(tokenUrl, entity, TokenEntity.class);
    } catch (Exception e) {
      tokenEntity = null;
    }

    if (null == tokenEntity) {
      return new CommonsResponse(BaseStatusEnum.UNAUTHORIZED.getIndex(),
          BaseStatusEnum.UNAUTHORIZED.getMsg(), null);
    }
    return new CommonsResponse(BaseStatusEnum.SUCCESS.getIndex(), BaseStatusEnum.SUCCESS.getMsg(),
        tokenEntity);
  }
4. 加入网关Gateway
网关可以限流和熔断,为应用提供统一的入口。这里只使用了基本的功能。
cloud:
    nacos:
      discovery:
        server-addr: localhost:8848
    gateway:
      #      设置与服务注册发现组件结合,这样可以采用服务名的路由策略
      discovery:
        locator:
          enable: true

      routes:
        - id: BUSINESS-OAUTH2
          #          采用LoadBalanceClient方式请求,以lb://开头,后面跟注册在nacos上的服务名
          uri: lb://business-security
          #          断言,或者叫谓词
          predicates:
            - Path=/api/user/**
          filters:
            - StripPrefix=1
5. 运行示例
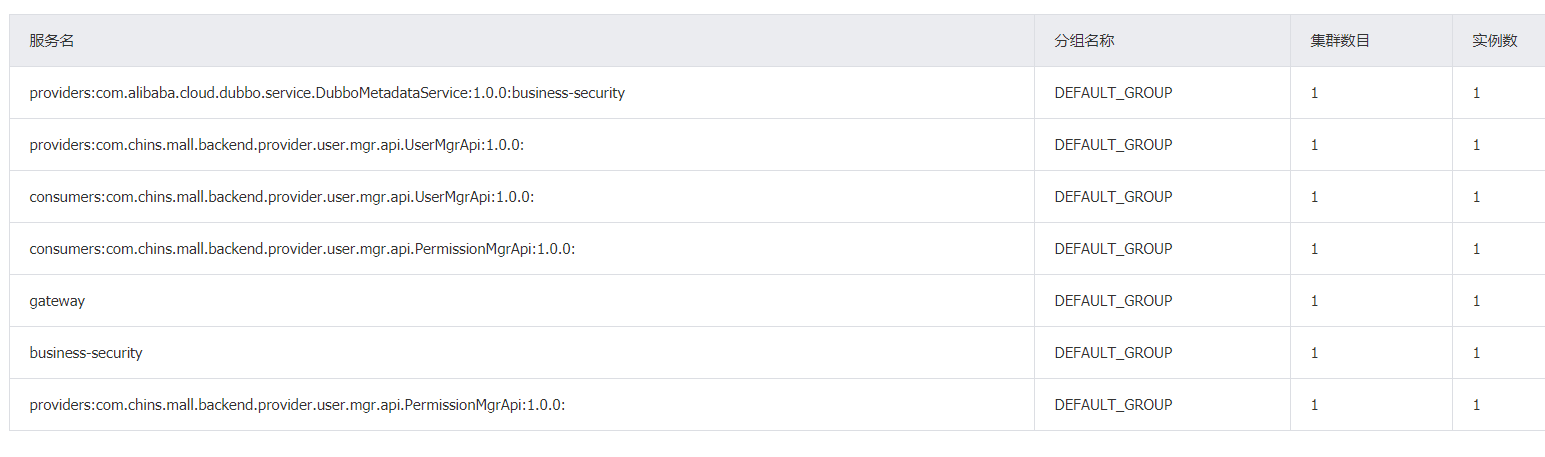
5.1 注册到Nacos:
5.2 访问网关:
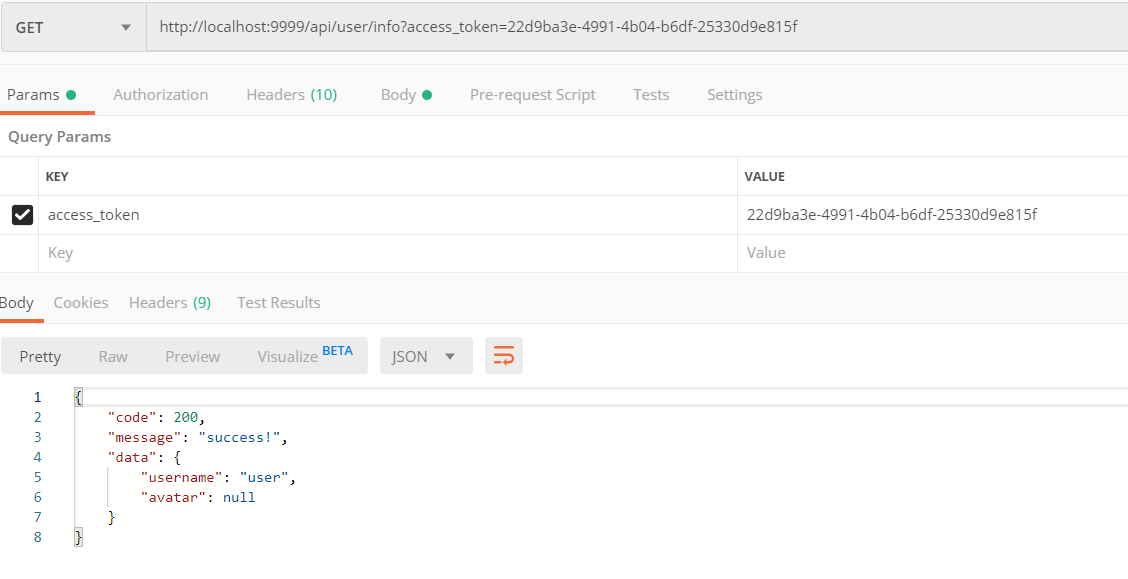
5.3 测试token权限
可以看到在资源服务中配置了 .antMatchers("/user/info").hasAnyAuthority("UserInfo"),即访问/user/info需要UserInfo权限,而此时RBAC表中,"user"用户具有这个权限

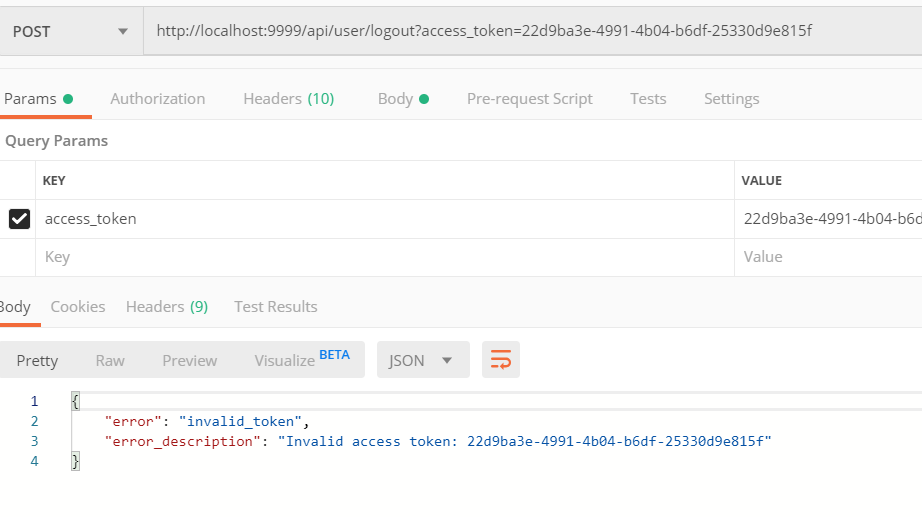
此时如果我把"user"用户的/user/logout权限去掉(对应的表是tb_role_permission),那么他访问这个url的时候就会返回没有权限:
(好像是,修改了权限,之前获取的token就会失效,需要重新获取)
