

WindowManager顾名思义,它是对window进行管理的类,而window则是一个抽象类, Window有三大类,Application Window(应用程序窗口)、Sub window(子窗口)、System window(系统窗口)。这些类型的窗口都有各自的type值,Application window的type值为1~99,Sub window的type值范围为1000~1999,System window的type值范围为2000~2999。手机屏幕相当于一个坐标轴(X、Y、Z)z轴则是从手机屏内指向手机屏外,也就是说越靠近用户z值越大,这里的type值就相当于值。它的具体实现则是phoneWindow,它对view进行管理。WindowManager是一个接口类,它继承了ViewManager,viewManager其实就是一个接口
public interface ViewManager
{
    public void addView(View view, ViewGroup.LayoutParams params);
    public void updateViewLayout(View view, ViewGroup.LayoutParams params);
    public void removeView(View view);
}
是不是很熟悉,我们常用的addView和removeView都是出自这里。WindowManager继承了这个类,除此之外它还有什么方法呢
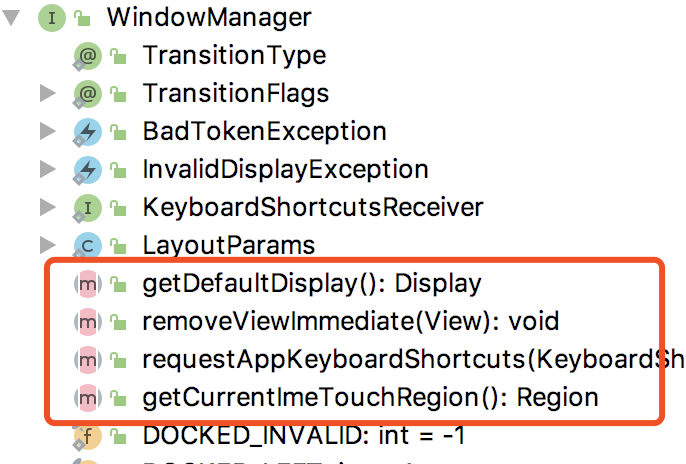
- getDefaultDisplay:返回的是一个Display对象也就是屏幕,这个屏幕则是WindowManager实例创建的widow添加的地方。
- removeViewImmediate:它是removeView的变体,它会在这个方法返回之前就调用view的onDetachedFromWindow方法,它不适用于普通应用程序,如果要用的话需要非常小心。
- requestAppKeyboardShortcuts:异步获取键盘快捷键
- getCurrentImeTouchRegion:返回当前IME窗口的触摸区域,如果没有则返回一个空白区域。
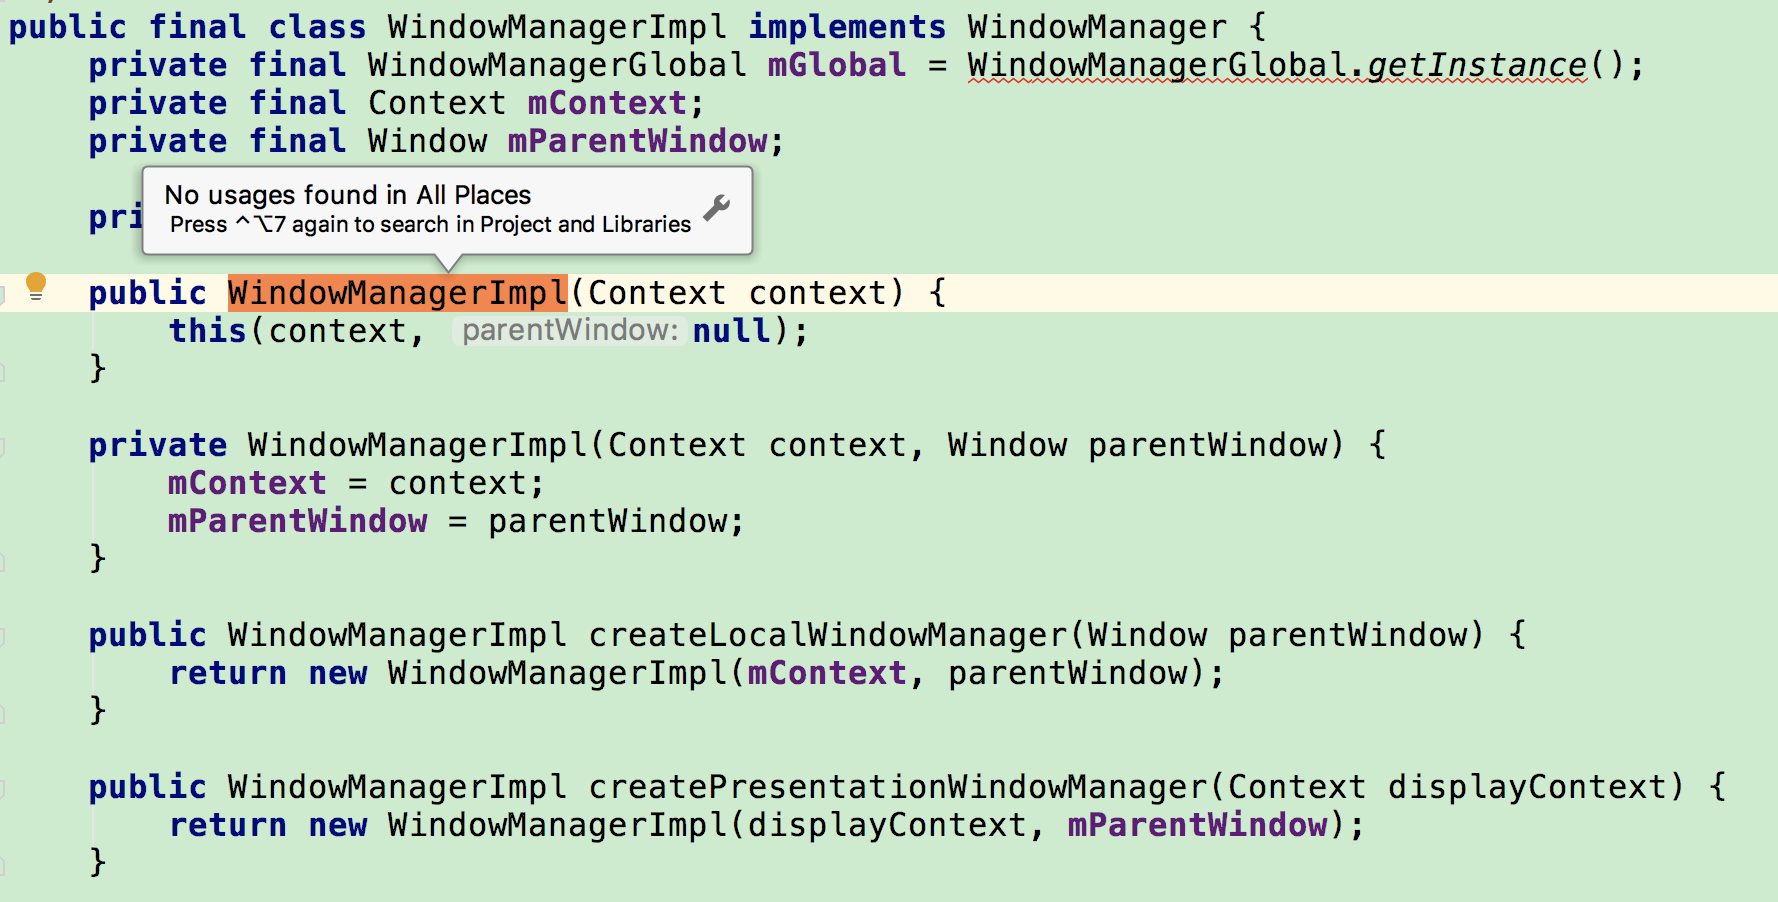
从上面的结构中也可以看出来WindowManager其实是一个interface,那么它的创建也就是它的实现类的创建,那又是在什么时候呢,首先我们看看它的实现类WindownManagerImpl

public void setWindowManager(WindowManager wm, IBinder appToken, String appName,
        boolean hardwareAccelerated) {
    mAppToken = appToken;
    mAppName = appName;
    mHardwareAccelerated = hardwareAccelerated
            || SystemProperties.getBoolean(PROPERTY_HARDWARE_UI, false);
    if (wm == null) {
        wm = (WindowManager)mContext.getSystemService(Context.WINDOW_SERVICE);
    }
    mWindowManager = ((WindowManagerImpl)wm).createLocalWindowManager(this);
}
我们再来看看这个setWindowManager方法又是在哪儿调用的

final void attach(Context context, ActivityThread aThread,
        Instrumentation instr, IBinder token, int ident,
        Application application, Intent intent, ActivityInfo info,
        CharSequence title, Activity parent, String id,
        NonConfigurationInstances lastNonConfigurationInstances,
        Configuration config, String referrer, IVoiceInteractor voiceInteractor,
        Window window, ActivityConfigCallback activityConfigCallback) {
    attachBaseContext(context);

    mFragments.attachHost(null /*parent*/);

    mWindow = new PhoneWindow(this, window, activityConfigCallback);
    mWindow.setWindowControllerCallback(this);
    mWindow.setCallback(this);
    mWindow.setOnWindowDismissedCallback(this);
...

    mWindow.setWindowManager(
            (WindowManager)context.getSystemService(Context.WINDOW_SERVICE),
            mToken, mComponent.flattenToString(),
            (info.flags & ActivityInfo.FLAG_HARDWARE_ACCELERATED) != 0);
    if (mParent != null) {
        mWindow.setContainer(mParent.getWindow());
    }
    mWindowManager = mWindow.getWindowManager();
    ...
}
可以看到是在activity的attach方法中创建了window也就是phoneWindow,然后又创建了WindowManager。值得注意的是这里的setWindowManager方法中的第一个参数,实际上是传入了一个WindowManagerImpl实例,是因为context.getSystemService方法最终会调用SystemServiceRegistry中的方法如下
registerService(Context.WINDOW_SERVICE, WindowManager.class,
        new CachedServiceFetcher<WindowManager>() {
    @Override
    public WindowManager createService(ContextImpl ctx) {
        return new WindowManagerImpl(ctx);
    }});
所以这里创建了一个WMI的实例。我们在回过头来看看创建的PhoneWindow都做了什么
public PhoneWindow(Context context, Window preservedWindow,
        ActivityConfigCallback activityConfigCallback) {
    this(context);
    // Only main activity windows use decor context, all the other windows depend on whatever
    // context that was given to them.
    mUseDecorContext = true;
    if (preservedWindow != null) {
        mDecor = (DecorView) preservedWindow.getDecorView();
   ...
    }

    mActivityConfigCallback = activityConfigCallback;
}
这里其实就是初始化操作,比如为mDecor赋值,它调用了window的getDecorView方法,因为window为抽象类,而且PhoneWindow为他的实现类,所以该方法的实现就在PhoneWindow中
@Override
public final View getDecorView() {
    if (mDecor == null || mForceDecorInstall) {
        installDecor();
    }
    return mDecor;
}
就是调用了installDecor方法
private void installDecor() {
    mForceDecorInstall = false;
    if (mDecor == null) {
        mDecor = generateDecor(-1);
        mDecor.setDescendantFocusability(ViewGroup.FOCUS_AFTER_DESCENDANTS);
        mDecor.setIsRootNamespace(true);
        if (!mInvalidatePanelMenuPosted && mInvalidatePanelMenuFeatures != 0) {
            mDecor.postOnAnimation(mInvalidatePanelMenuRunnable);
        }
    } else {
        mDecor.setWindow(this);
    }
    if (mContentParent == null) {
        mContentParent = generateLayout(mDecor);
...
        } else {
            mTitleView = findViewById(R.id.title);
            }
        }
...
}
可以看到这里新创建了一个DecorView,这个DecorView就是一个FrameLayout,通过上述可以看出来其实他就两部分title和content,当然在attach中初始化window时,只会初始化mContentParent。接着看PhoneWindow这个类,它有setConentView方法,我们在activity中也经常使用这个方法,activity中的setContentView方法调用如下
public void setContentView(@LayoutRes int layoutResID) {
    getWindow().setContentView(layoutResID);
    initWindowDecorActionBar();
}
他其实是调用了window的setContentView也就是这个PhoneWindow中的方法
@Override
public void setContentView(int layoutResID) {
    // Note: FEATURE_CONTENT_TRANSITIONS may be set in the process of installing the window
    // decor, when theme attributes and the like are crystalized. Do not check the feature
    // before this happens.
    if (mContentParent == null) {
        installDecor();
    } else if (!hasFeature(FEATURE_CONTENT_TRANSITIONS)) {
        mContentParent.removeAllViews();
    }

    if (hasFeature(FEATURE_CONTENT_TRANSITIONS)) {
        final Scene newScene = Scene.getSceneForLayout(mContentParent, layoutResID,
                getContext());
        transitionTo(newScene);
    } else {
        mLayoutInflater.inflate(layoutResID, mContentParent);
    }
    mContentParent.requestApplyInsets();
    final Callback cb = getCallback();
    if (cb != null && !isDestroyed()) {
        cb.onContentChanged();
    }
    mContentParentExplicitlySet = true;
}
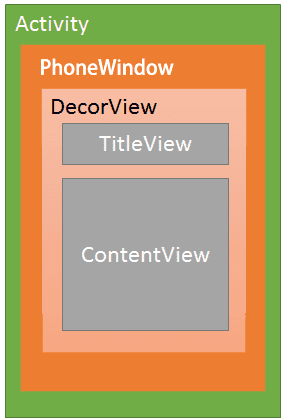
由于之前我们已经创建了这个decor,所以这里直接就会调用 mLayoutInflater.inflate(layoutResID, mContentParent);分析到这里我们就可以清楚的了解activity、window,DecorView的关系了
public void handleResumeActivity(IBinder token, boolean finalStateRequest, boolean isForward,
        String reason) {
 ...

    final Activity a = r.activity;

    if (r.window == null && !a.mFinished && willBeVisible) {
        r.window = r.activity.getWindow();
        View decor = r.window.getDecorView();
        decor.setVisibility(View.INVISIBLE);
        ViewManager wm = a.getWindowManager();
        WindowManager.LayoutParams l = r.window.getAttributes();
        a.mDecor = decor;
        l.type = WindowManager.LayoutParams.TYPE_BASE_APPLICATION;
     ...
        }
        if (a.mVisibleFromClient) {
            if (!a.mWindowAdded) {
                a.mWindowAdded = true;
                wm.addView(decor, l);
            }
        }

    ...
}
可以看到这里首先会获取之前创建好的PhoneWindow以及DecorView,这里同时为这个window设置了type,这里给的是type值为1。mVisibleFromClient默认为true,mWindowAdded默认为false所以这里会调用WM的addView,也就是WMImpl中的addView,WMImpl中的所有操作基本都交给了WindowManagerGlobal,所以就看看这个类中的addView
public void addView(View view, ViewGroup.LayoutParams params,
        Display display, Window parentWindow) {
  ...

    final WindowManager.LayoutParams wparams = (WindowManager.LayoutParams) params;
    if (parentWindow != null) {
        parentWindow.adjustLayoutParamsForSubWindow(wparams);
    }

    ViewRootImpl root;
    View panelParentView = null;
...
        root = new ViewRootImpl(view.getContext(), display);

        view.setLayoutParams(wparams);

        mViews.add(view);
        mRoots.add(root);
        mParams.add(wparams);

        // do this last because it fires off messages to start doing things
        try {
            root.setView(view, wparams, panelParentView);
        }
...
    }
}
如果是子窗口的话会处理一下LayoutParam,然后会创建一个ViewRootImpl,这个对象是view树的根并负责管理view,它会触发view的测量、布局和绘制,并且负责与WMS进行进程间通信。这里还有三个list
private final ArrayList<View> mViews = new ArrayList<View>();
private final ArrayList<ViewRootImpl> mRoots = new ArrayList<ViewRootImpl>();
private final ArrayList<WindowManager.LayoutParams> mParams =
        new ArrayList<WindowManager.LayoutParams>();
从其定义可以看出分别是VIew列表,ViewRootImpl列表以及布局参数列表。最后调用了ViewRootImpl中的setVIew方法
public void setView(View view, WindowManager.LayoutParams attrs, View panelParentView) {
    synchronized (this) {
      		 ...
    requestLayout();
...
            try {
                mOrigWindowType = mWindowAttributes.type;
                mAttachInfo.mRecomputeGlobalAttributes = true;
                collectViewAttributes();
                res = mWindowSession.addToDisplay(mWindow, mSeq, mWindowAttributes,
                        getHostVisibility(), mDisplay.getDisplayId(), mWinFrame,
                        mAttachInfo.mContentInsets, mAttachInfo.mStableInsets,
                        mAttachInfo.mOutsets, mAttachInfo.mDisplayCutout, mInputChannel);
            } ...

}
他首先会调用requestLayout方法,这个方法并不只是负责layout的,他还负责view的测量和绘制。我们仔细看一下。他还在ViewRootImpl中
@Override
public void requestLayout() {
    if (!mHandlingLayoutInLayoutRequest) {
        checkThread();
        mLayoutRequested = true;
        scheduleTraversals();
    }
}
真正起作用的是这个scheduleTraversals方法
void scheduleTraversals() {
    if (!mTraversalScheduled) {
        mTraversalScheduled = true;
        mTraversalBarrier = mHandler.getLooper().getQueue().postSyncBarrier();
        mChoreographer.postCallback(
                Choreographer.CALLBACK_TRAVERSAL, mTraversalRunnable, null);
        if (!mUnbufferedInputDispatch) {
            scheduleConsumeBatchedInput();
        }
        notifyRendererOfFramePending();
        pokeDrawLockIfNeeded();
    }
}
这里需要注意的mChoreographer,它是Choreographer对象,它是用于接收显示系统的VSync信号,在下一帧渲染是控制一些操作,这个操作就是其中的mTravsersalRunnable。那么我们就看看这个runnable做了什么,他也在ViewRootImpl中。
final class TraversalRunnable implements Runnable {
    @Override
    public void run() {
        doTraversal();
    }
}
继续看doTraversal
void doTraversal() {
    if (mTraversalScheduled) {
     	...
        performTraversals();
...
    }
}
这里是performTraversals是使得viewTree开始工作的方法,它的实现
 private void performTraversals() {
        // cache mView since it is used so much below...
        final View host = mView;
        ...
        if (!mStopped || mReportNextDraw) {
            // Ask host how big it wants to be
            performMeasure(childWidthMeasureSpec, childHeightMeasureSpec);
        }
        ...
        final boolean didLayout = layoutRequested && (!mStopped || mReportNextDraw);
        boolean triggerGlobalLayoutListener = didLayout
                || mAttachInfo.mRecomputeGlobalAttributes;
        if (didLayout) {
            performLayout(lp, mWidth, mHeight);
        ...
        boolean cancelDraw = mAttachInfo.mTreeObserver.dispatchOnPreDraw() || !isViewVisible;

        if (!cancelDraw && !newSurface) {
           ...

            performDraw();
        } ...
    }
}
可以看到这个方法中依次调用了performMeasure-performLayout-performDraw方法,performMeasure会调用view的measure方法,在measure方法中调用View的onMeasure方法;performLayout会调用View的layout方法,在layout方法中调用view的onLayout方法;而这个performDraw则会调用ViewRootImpl中的draw方法,这个方法会调用drawSoftware,这个方法中会调用view的draw方法这也直接印证了之前说的view绘制流程。 然后才会调用IWindowSession中的addToDisplay方法,而这个IWindowSession是一个aidl文件,所以他是一个Binder对象,它的server端实现为Session,,当然如果不知道的话可以搜索IWindowSession.Stub,就能知道服务端的实现

 @Override
   public int addToDisplay(IWindow window, int seq, WindowManager.LayoutParams attrs,
        int viewVisibility, int displayId, Rect outFrame, Rect outContentInsets,
        Rect outStableInsets, Rect outOutsets,
        DisplayCutout.ParcelableWrapper outDisplayCutout, InputChannel outInputChannel) {
        return mService.addWindow(this, window, seq, attrs, viewVisibility, displayId, outFrame,
         outContentInsets, outStableInsets, outOutsets, outDisplayCutout, outInputChannel);
    }
这里其实就是调用了WMS中的addWindow方法,可以看到最终起作用的是WindowManagerService。
