

介绍
Panel-Magic 是一个基于 AngularX+ 并面向设计师或运营人员的可视化搭建平台,目前仅可用于快速生成微信小程序应用,具有与 Photoshop 相似的交互体验!!
好了,吹完之后接下来开始从技术角度剖析其中主要的实现原理
在此之前说明该平台的定位,目的不是给技术人员编辑完之后进行二次开发或代码的定制化。关于这个定位问题我个人的想法是,code 问题不可能完全交托给可视化编辑、除非是类似传统的简单的企业介绍页等还有可能完全代替,但还是比不上直接代码生成的工具,所以 Panel-Magic 一开始的定位就是给设计师或运营人员使用,生成的产物不再是 code。
技术栈
- 框架选型:Angular8
- UI 组件库:ng-zorro-antd(宇宙第一组件库)
- 本地存储:IndexedDB
- 响应式编程库:Rxjs
- 编写语言:Typescript
- CSS 预处理器:SCSS
- 最终产物:JSON
工作流程
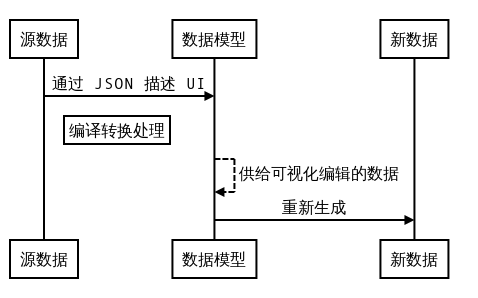
关键是中间的数据模型的建模过程以及可视化界面的创建,生成的新数据和源数据都是约定好固定格式的 JSON 描述文件,其包含固定的 key 字段和对应的 value 值类型,生成小程序的过程在生成完新数据之后
目前源数据约定的数据格式为
{
    "app_id": "",
    "cata_data": [
        {
            "group": "默认组",
            "pages": [
                {
                    "title": "首页",
                    "name": "首页",
                    "router": "page10001",
                    "isEdit": false,
                    "uniqueId": 1556693791081,
                },
            ],
            "isEdit": false,
            "uniqueId": 1556693791066,
        }
    ]
}
更为完整的约定格式在 MockModel.ts
目录结构
src
├── app
│   ├── appdata                                 // AppData 根服务,数据模型 AppDataModel 的核心服务
│   ├── base-class                              // 基类
│   ├── core                                    // HttpClient 服务
│   ├── panel-extend                            // 可视化搭建交互部分
│   │   ├── model                               // 数据模型
│   │   ├── panel-assist-arbor                  // 右侧可操作区域如对齐、图层、前进后退等操作入口
│   │   ├── panel-catalogue                     // 页面分组管理
│   │   ├── panel-event                         // 事件管理
│   │   ├── panel-layer                         // 图层列表管理
│   │   ├── panel-scaleplate                    // 标尺管理
│   │   ├── panel-scope-enchantment             // 核心拖拽部分,包括辅助线、轮廓描述等
│   │   ├── panel-senior-vessel-edit            // 容器组合管理
│   │   ├── panel-shell                         // “手机壳”区域管理
│   │   ├── panel-soul                          // 左侧组件库管理
│   │   ├── panel-widget                        // 每个部分组件如按钮、文字等
│   │   │   ├── all-widget-container
│   │   │   │   ├── auxiliaryline-widget
│   │   │   │   ├── button-widget
│   │   │   │   ├── linkrange-widget
│   │   │   │   ├── picture-widget
│   │   │   │   ├── rect-widget
│   │   │   │   └── text-widget
│   │   │   ├── all-widget-unit
│   │   │   │   ├── map-view
│   │   │   │   ├── navigation-bar-view
│   │   │   │   ├── rich-text-view
│   │   │   │   ├── slideshow-picture-view
│   │   │   │   └── tab-bar-view
│   │   │   ├── all-widget-vessel
│   │   │   │   └── senior-vessel-widget
│   │   │   └── model
│   │   ├── panel-widget-appearance             // “设置”管理
│   │   │   ├── model
│   │   │   ├── panel-widget-animation
│   │   │   ├── panel-widget-clip-path
│   │   │   ├── panel-widget-facade
│   │   │   ├── panel-widget-filter
│   │   │   ├── panel-widget-picture
│   │   │   ├── panel-widget-shadow
│   │   │   └── panel-widget-text
│   │   ├── panel-widget-appearance-site        // 每个部分组件的专属“设置”
│   │   │   ├── panel-button-site
│   │   │   ├── panel-combination-site
│   │   │   ├── panel-line-site
│   │   │   ├── panel-linkrange-site
│   │   │   ├── panel-map-site
│   │   │   ├── panel-picture-site
│   │   │   ├── panel-rect-site
│   │   │   ├── panel-slideshow-picture-site
│   │   │   └── panel-text-site
│   │   └── panel-widget-details                // 弹出来的“设置”管理界面
│   ├── public                                  // 公共组件
│   │   ├── directive
│   │   ├── image-gallery
│   │   ├── my-color-picker
│   │   ├── ng-thumb-auto
│   │   ├── pipe
│   │   ├── theme
│   │   ├── top-navbar
│   │   └── util
│   ├── service                                 // 服务端 service
│   │   ├── hs-files
│   │   └── hs-xcx
│   └── share
├── assets                                      // 资源文件
布局排版
为了实现更好的自由布局排版,绝对定位是我的首选选择,也更能匹配像素级别的定制编辑
除了定位数据以外,每个组件其实都具有通用的样式数据,如边框设置、阴影设置、文本设置、定位设置等通用元素,甚至也具有通用的事件设置,然后对于编辑来说,组件同时也具有如选中时的轮廓样式数据等,所以我们定义一个基本组件数据模型,让所有组件都继承这个模型,那就是 PanelWidgetModel.ts
拿 button 按钮组件举例来说,它位于 src/app/panel-extend/panel-widget/all-widget-container/button-widget;
├── button-widget.component.html
├── button-widget.component.ts
└── button-widget.data.ts
其中
button-widget.data.ts文件是用于在左侧拖拽组件到中间编辑区域时候的默认样式和事件数据,它是直接实例化了 PanelWidgetModel 并导出
其中 component 部分为:
import { Component, OnInit, Input } from "@angular/core";
import { PanelWidgetModel } from "../../model";

@Component({
    selector: "app-button-widget",
    templateUrl: "./button-widget.component.html",
    styles: [""],
})
export class ButtonWidgetComponent implements OnInit {
    private _widget: PanelWidgetModel;

    @Input()
    public get widget(): PanelWidgetModel {
        return this._widget;
    }
    public set widget(v: PanelWidgetModel) {
        this._widget = v;
    }
    constructor() {}

    ngOnInit() {}
}
然后在渲染的时候双向绑定里面的文本数据
<p *ngIf="!widget.isHiddenText" class="text-overflow-hidden">{{ widget.autoWidget.content }}</p>
对于简单的组件 PanelWidgetModel 提供的基本数据模型足矣;
稍微复杂的组件如 map 地图组件则可以在 component 文件里自行拓展 PanelWidgetModel 类;
有了 PanelWidgetModel 之后,我们来看看渲染组件的核心代码部分 👇;
<div class="zoom-area" [ngStyle]="{ 'background-color': panelInfo.bgColor }">
    <ng-container *ngFor="let widget of widgetList$ | async">
        <div class="widget-shell" [ngStyle]="widget.profileModel.styleContent">
            <app-panel-widget [widget]="widget" [isSimpleFunc]="false"></app-panel-widget>
        </div>
    </ng-container>
</div>
在模版中异步循环渲染 widgetList$ 里的组件并传递数据给 app-panel-widget 组件;
其中 widgetList$ 定义为;
public get widgetList$(): BehaviorSubject<Array<PanelWidgetModel>> {
    return this.panelExtendService.widgetList$;
}

// 在 panelExtendService 服务里
public widgetList$: BehaviorSubject<Array<PanelWidgetModel>> = new BehaviorSubject<Array<PanelWidgetModel>>([]);
就是上述提到的 PanelWidgetModel 类列表;
而 app-panel-widget 组件位于 src/app/panel-extend/panel-widget/panel-widget.component.ts
它负责接收 widgetList$ 里的每一个不同组件并根据 type 类型负责渲染对应的组件;
<div
    class="widget-main"
    [nrIsStopPropagation]="true"
    nrDraggable
    [nrIdBody]="'#free-panel-main'"
    (launchMouseIncrement)="acceptDraggableIncrement($event)"
    nrMouseMoveOut
    (dblclick)="acceptDoubleClick()"
    (mousedown)="acceptWidgetChecked($event)"
    (emitMouseType)="acceptMouseMoveOut($event)"
    (contextmenu)="acceptWidgetRightClick($event)"
>
    <ng-container *ngIf="widget.autoWidget">
        <div class="widget-content {{ widget.type }}" *ngIf="widget.type != 'combination'" [ngStyle]="widgetStyle">
            <ng-container [ngSwitch]="widget.type">
                <!-- more ... -->
                <!-- 按钮 -->
                <ng-container *ngSwitchCase="'button'">
                    <app-button-widget [widget]="widget"></app-button-widget>
                </ng-container>
                <!-- more ... -->
            </ng-container>
        </div>
    </ng-container>
</div>
nrDraggable: 指定该组件是可拖拽组件launchMouseIncrement: 由 public 里的 DraggableDirective 指令提供,用于返回鼠标事件的 movementY 和 movementXnrMouseMoveOut: 由 public 里的 MousemoveoutDirective 指令提供,用于返回鼠标的移入和移出事件监听emitMouseType: 由 public 里的 MousemoveoutDirective 指令提供,返回鼠标是移入还是移出事件contextmenu: 右键事件
所以,当你在面板中选中某个组件的时候,不单单只是一个简单的 click 事件组成,是由鼠标的移入、鼠标按下、鼠标弹起等分解步骤来完成;
我们先看看 mousedown 事件, 它执行的方法为 acceptWidgetChecked;
public acceptWidgetChecked(event: MouseEvent): void {
    if (!this.isSimpleFunc) {
        event.stopPropagation();
        event.preventDefault();
        if (
            !this.panelScopeEnchantmentService.scopeEnchantmentModel.outerSphereInsetWidgetList$.value.some(
                w => w.uniqueId == this.widget.uniqueId
            )
        ) {
            event.shiftKey == true
                ? this.panelScopeEnchantmentService.toggleOuterSphereInsetWidget(this.widget)
                : this.panelScopeEnchantmentService.onlyOuterSphereInsetWidget(this.widget);
        } else {
            if (event.shiftKey == true) this.panelScopeEnchantmentService.toggleOuterSphereInsetWidget(this.widget);
        }
        this.openMouseMoveLaunch();
    }
}
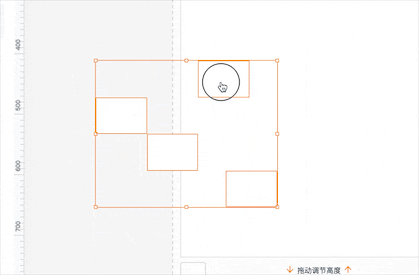
这里先补充一下,panelScopeEnchantmentService 服务负责管理拖拽时的辅助线计算、轮廓描边生成以及右键事件等核心编辑服务,该服务的 ScopeEnchantmentModel 就是用于生成组件轮廓数据和拖拽点的数据模型类;
所谓'轮廓描述',就是计算多个或单个组件的最长、最高的描边
回到 acceptWidgetChecked, 这里当鼠标按下的时候并不是直接生成该组件的轮廓描述,而是多了 shiftKey 键盘事件的判断,用于按住 shiftKey 的时候多选多个组件并将生成的轮廓描边包含出多个组件,如
其中生成轮廓的逻辑核心部分在 panelScopeEnchantmentService 里的 handleFromWidgetListToProfileOuterSphere 方法,👇
public handleFromWidgetListToProfileOuterSphere(arg: { isLaunch?: boolean } = { isLaunch: true }): void {
    const oriArr = this.scopeEnchantmentModel.outerSphereInsetWidgetList$.value.map(e => {
        e.profileModel.isCheck = true;
        // 根据当前位置重新设置mousecoord
        e.profileModel.setMouseCoord([e.profileModel.left, e.profileModel.top]);
        return e.profileModel;
    });
    if (oriArr.length > 0) {
        // 计算出最小的left,最小的top,最大的width和height
        const calcResult = this.calcProfileOuterSphereInfo();
        // 如果insetWidget数量大于一个则不允许开启旋转,且旋转角度重置
        if (oriArr.length == 1) {
            calcResult.isRotate = true;
            calcResult.rotate = oriArr[0].rotate;
        } else {
            calcResult.isRotate = false;
        }
        // 赋值
        this.scopeEnchantmentModel.launchProfileOuterSphere(calcResult, arg.isLaunch);
        // 同时生成八个方位坐标点,如果被选组件大于一个则不生成
        this.scopeEnchantmentModel.handleCreateErightCornerPin();
    }
}
其中 calcProfileOuterSphereInfo 是计算大小和位置的核心
public calcProfileOuterSphereInfo(): OuterSphereHasAuxlModel {
    const insetWidget = this.scopeEnchantmentModel.outerSphereInsetWidgetList$.value;
    let outerSphere = new OuterSphereHasAuxlModel().setData({
        left: Infinity,
        top: Infinity,
        width: -Infinity,
        height: -Infinity,
        rotate: 0,
    });
    let maxWidth = null;
    let maxHeight = null;
    let minWidthEmpty = Infinity;
    let minHeightEmpty = Infinity;
    insetWidget.forEach(e => {
        let offsetCoord = { left: 0, top: 0 };
        if (e.profileModel.rotate != 0 && insetWidget.length > 1) {
            offsetCoord = this.handleOuterSphereRotateOffsetCoord(e.profileModel);
        }

        outerSphere.left = Math.min(outerSphere.left, e.profileModel.left + offsetCoord.left);
        outerSphere.top = Math.min(outerSphere.top, e.profileModel.top + offsetCoord.top);

        maxWidth = Math.max(maxWidth, e.profileModel.left + e.profileModel.width + offsetCoord.left * -1);
        maxHeight = Math.max(maxHeight, e.profileModel.top + e.profileModel.height + offsetCoord.top * -1);

        if (e.profileModel.left + e.profileModel.width < 0) {
            minWidthEmpty = Math.min(minWidthEmpty, Math.abs(e.profileModel.left) - e.profileModel.width);
        } else {
            minWidthEmpty = 0;
        }

        if (e.profileModel.top + e.profileModel.height < 0) {
            minHeightEmpty = Math.min(minHeightEmpty, Math.abs(e.profileModel.top) - e.profileModel.height);
        } else {
            minHeightEmpty = 0;
        }
    });

    outerSphere.width = Math.abs(maxWidth - outerSphere.left) - minWidthEmpty;
    outerSphere.height = Math.abs(maxHeight - outerSphere.top) - minHeightEmpty;
    outerSphere.setMouseCoord([outerSphere.left, outerSphere.top]);

    return outerSphere;
}
更为完整的逻辑在 panelScopeEnchantmentService 服务里;
接下来就是拖拽事件,拖拽的组件并不单单是某个组件,而是轮廓包含在内的所有被选中组件,核心代码在 src/app/panel-extend/panel-scope-enchantment/model/scope-enchantment.model.ts 的 handleLocationInsetWidget 方法里;
/**
 * 根据主轮廓的位置计算轮廓内被选组件的位置
 */
public handleLocationInsetWidget(
    increment: DraggablePort,
    allWidget: Array<PanelWidgetModel> = this.outerSphereInsetWidgetList$.value
): void {
    if (Array.isArray(allWidget)) {
        const pro = this.valueProfileOuterSphere;
        // 所有轮廓内的组件计算位置
        allWidget.forEach(w => {
            w.profileModel.mouseCoord[0] += increment.left;
            w.profileModel.mouseCoord[1] += increment.top;
            let obj = { left: w.profileModel.mouseCoord[0], top: w.profileModel.mouseCoord[1] };
            if (!(pro.lLine || pro.rLine || pro.vcLine)) {
                obj.left = w.profileModel.mouseCoord[0];
                pro.left = pro.mouseCoord[0];
            } else {
                obj.left += pro.left - pro.mouseCoord[0];
            }
            if (!(pro.tLine || pro.bLine || pro.hcLine)) {
                obj.top = w.profileModel.mouseCoord[1];
                pro.top = pro.mouseCoord[1];
            } else {
                obj.top += pro.top - pro.mouseCoord[1];
            }
            w.profileModel.setData(obj);
            /**
             * 如果被选的所有组件当中有组合组件combination,则需要重新计算其子集的所有widget轮廓数值
             */
            if (w.type == "combination") {
                this.handleLocationInsetWidget(increment, w.autoWidget.content);
            }
        });
    }
}
注:由于拖拽的过程当中,改变的是每个组件自身的位置信息数据,而轮廓描述是由 calcProfileOuterSphereInfo 计算生成的,所有在拖拽的过程当中还需要实时计算主轮廓数据;
小结:
- 组件的布局排版、位置数据、样式、通用设置等都依赖于
PanelWidgetModel类 - 组件的选中或多个组件一起选中依赖于
ScopeEnchantmentModel类,用于描述边框信息,八个方位拖拽点数据等,拖拽组件的过程其实就是将该类选中的所有组件批量改变位置信息
神奇的 "旋转" 所带来的问题
默认情况下所以依赖于 PanelWidgetModel 类的组件都可以进行旋转,但就是因为这个旋转角度,所影响的问题包括了拖拽边框拉伸、多选组件一起拉伸、对齐辅助线计算不准确等一系列问题,所以在旋转之后需要计算与不旋转时候的差值增量,具体计算方式可以看我另一篇水文 12.拖拽拉伸加上旋转角度的数学原理
核心函数位于 src/app/panel-extend/panel-scope-enchantment/panel-scope-enchantment.service.ts 的 handleOuterSphereRotateOffsetCoord;
public handleOuterSphereRotateOffsetCoord(
    arg: ProfileModel,
    type: "lt" | "rt" | "lb" | "rb" = "lt"
): { left: number; top: number } | undefined {
    const fourCoord = this.conversionRotateToOffsetLeftTop({
        width: arg.width,
        height: arg.height,
        rotate: arg.rotate,
    });
    if (fourCoord) {
        let min = Infinity;
        let max = -Infinity;
        for (let e in fourCoord) {
            min = Math.min(min, fourCoord[e][0]);
            max = Math.max(max, fourCoord[e][1]);
        }
        const typeObj = {
            lt: [min, max],
            rt: [-min, max],
            lb: [min, -max],
            rb: [-min, -max],
        };
        if (typeObj[type]) {
            return {
                left: Math.round(arg.width / 2 + typeObj[type][0]),
                top: Math.round(arg.height / 2 - typeObj[type][1]),
            };
        }
    }
    return;
}

/// more...

public conversionRotateToOffsetLeftTop(arg: {
    width: number;
    height: number;
    rotate: number;
}): {
    lt: number[];
    rt: number[];
    lb: number[];
    rb: number[];
} {
    // 转化角度使其成0~360的范围
    arg.rotate = this.conversionRotateOneCircle(arg.rotate);
    let result = {
        lt: [(arg.width / 2) * -1, arg.height / 2],
        rt: [arg.width / 2, arg.height / 2],
        lb: [(arg.width / 2) * -1, (arg.height / 2) * -1],
        rb: [arg.width / 2, (arg.height / 2) * -1],
    };
    let convRotate = this.conversionRotateToMathDegree(arg.rotate);
    let calcX = (x, y) => <any>(x * Math.cos(convRotate) + y * Math.sin(convRotate)) * 1;
    let calcY = (x, y) => <any>(y * Math.cos(convRotate) - x * Math.sin(convRotate)) * 1;
    result.lt = [calcX(result.lt[0], result.lt[1]), calcY(result.lt[0], result.lt[1])];
    result.rt = [calcX(result.rt[0], result.rt[1]), calcY(result.rt[0], result.rt[1])];
    result.lb = [result.rt[0] * -1, result.rt[1] * -1];
    result.rb = [result.lt[0] * -1, result.lt[1] * -1];
    return result;
}
具体的边框拉伸计算方式核心都在 DraggableTensileCursorService 服务
选中多个组件同时进行边框拉伸计算方式
如果只选中一个组件对其进行边框拉伸是很好计算的,即使有个旋转角度也很好的计算,倘若选中的是多个组件一起呢?
我的解决方案就是;
拖拽边框拉伸改变的其实不是组件本身的边框,而是主轮廓
ScopeEnchantmentModel的边框,只是顺便计算一下这个轮廓内部所有被选中的组件相对于轮廓来说的位置比例而已
核心代码位于 src/app/panel-extend/panel-scope-enchantment/model/profile.model.ts;
/**
 * 根据传入的主轮廓数据计算该组件在主轮廓里的位置比例
 */
public recordInsetProOuterSphereFourProportion(pro: ProfileModel, widget: ProfileModel = this): void {
    this.insetProOuterSphereFourProportion = {
        left: (widget.left - pro.left) / pro.width,
        top: (widget.top - pro.top) / pro.height,
        right: (widget.left - pro.left + widget.width) / pro.width,
        bottom: Math.abs(widget.top - pro.top + widget.height) / pro.height,
    };
}
PS: ProfileModel 类是 PanelWidgetModel 类里的用于描述组件本身的轮廓数据类
这样一来所有被选中的组件都有了相对于主轮廓来说的位置比例,在进行拉伸计算的时候,将组件自己的宽高和主轮廓的宽高比例保持一致,即可
对齐辅助线生成规则
先看看对齐辅助线效果;
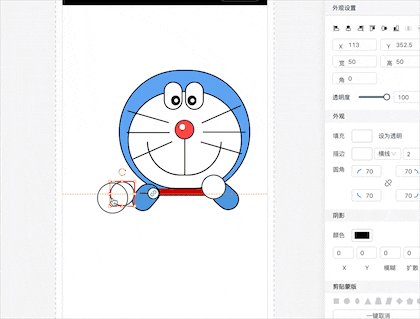
用过 PS 的蛇鸡丝应该对这个功能不会陌生,我个人也很喜欢这么牛逼的辅助线对齐;
我们先看看对齐辅助线渲染的模版文件,它位于 src/app/panel-extend/panel-scope-enchantment/panel-scope-enchantment.component.html;
<!-- 辅助线 -->
<div class="auxiliary-container">
    <ng-container *ngIf="scopeEnchantment.profileOuterSphere$ | async">
        <div
            class="v v-left"
            *ngIf="(scopeEnchantment.profileOuterSphere$ | async).lLine"
            [ngStyle]="{
                left:
                    (scopeEnchantment.profileOuterSphere$ | async).left +
                    (scopeEnchantment.profileOuterSphere$ | async).offsetAmount.left +
                    'px'
            }"
        ></div>
        <div
            class="v v-center"
            *ngIf="(scopeEnchantment.profileOuterSphere$ | async).vcLine"
            [ngStyle]="{ left: (scopeEnchantment.profileOuterSphere$ | async).vCenterStyle + 'px' }"
        ></div>
        <div
            class="v v-right"
            *ngIf="(scopeEnchantment.profileOuterSphere$ | async).rLine"
            [ngStyle]="{
                left:
                    (scopeEnchantment.profileOuterSphere$ | async).rightStyle -
                    (scopeEnchantment.profileOuterSphere$ | async).offsetAmount.left +
                    'px'
            }"
        ></div>
        <div
            class="h h-top"
            *ngIf="(scopeEnchantment.profileOuterSphere$ | async).tLine"
            [ngStyle]="{
                top:
                    (scopeEnchantment.profileOuterSphere$ | async).top +
                    (scopeEnchantment.profileOuterSphere$ | async).offsetAmount.top +
                    'px'
            }"
        ></div>
        <div
            class="h h-center"
            *ngIf="(scopeEnchantment.profileOuterSphere$ | async).hcLine"
            [ngStyle]="{ top: (scopeEnchantment.profileOuterSphere$ | async).hCenterStyle + 'px' }"
        ></div>
        <div
            class="h h-bottom"
            *ngIf="(scopeEnchantment.profileOuterSphere$ | async).bLine"
            [ngStyle]="{
                top:
                    (scopeEnchantment.profileOuterSphere$ | async).bottomStyle -
                    (scopeEnchantment.profileOuterSphere$ | async).offsetAmount.top +
                    'px'
            }"
        ></div>
    </ng-container>
</div>
辅助线数据依赖于 ScopeEnchantmentModel 里的 profileOuterSphere$, 其实就是描述主轮廓的可观察类, 定义如下;
public profileOuterSphere$: BehaviorSubject<OuterSphereHasAuxlModel> = new BehaviorSubject(null);
其中 OuterSphereHasAuxlModel 就是包含了对齐辅助线的所有位置数据
大致思路就是
在点击主轮廓正准备拖拽的时刻,计算好不在主轮廓内的其他外部组件的所有位置数据信息并记录在某个变量里,完了之后在拖拽的过程当中,计算主轮廓的位置信息与这个变量内的数据差值是否达到了临界点,从而决定是否显示对齐辅助线和改变位置;
在 src/app/panel-extend/panel-scope-enchantment/panel-scope-enchantment.component.ts 这个组件下开启对主轮廓的订阅
// 生成完主轮廓之后计算其余组件的横线和竖线情况并保存起来
this.profileOuterSphereRX$ = this.scopeEnchantment.profileOuterSphere$.pipe().subscribe(value => {
    const insetW = this.panelScopeEnchantmentService.scopeEnchantmentModel.outerSphereInsetWidgetList$.value;
    if (value) {
        this.createAllLineSave();
        // 主轮廓创建完成就开启角度值监听
        this.openRotateSubject(value);
        // 根据角度计算主轮廓的offset坐标增量
        const cValue = cloneDeep(value);
        const offsetCoord = this.panelScopeEnchantmentService.handleOuterSphereRotateOffsetCoord(cValue);
        value.setOffsetAmount(offsetCoord);
        // 开始记录所有被选组件的位置比例
        insetW.forEach(w => {
            w.profileModel.recordInsetProOuterSphereFourProportion(value);
        });
    }
    this.panelScopeEnchantmentService.panelScopeTextEditorModel$.next(null);
    this.clipPathService.emptyClipPath();
});
然后拖拽过程中限流的计算位置信息
/**
 * 计算辅助线的显示与否情况
 * 分为6种情况
 * 辅助线只会显示在主轮廓的4条边以及2条中线
 * 遍历时先寻找离四条边最近的4个数值
 * 参数target表示除了用于计算最外主轮廓以外还能计算其他的辅助线情况,(例如左侧的组件库里的待创建的组件)
 */
public handleAuxlineCalculate(
    target: OuterSphereHasAuxlModel = this.scopeEnchantmentModel.valueProfileOuterSphere
): void {
    const outerSphere = target;
    const offsetAmount = outerSphere.offsetAmount;
    const aux = this.auxliLineModel$.value;
    const mouseCoord = outerSphere.mouseCoord;

    // 差量达到多少范围内开始对齐
    const diffNum: number = 4;

    outerSphere.resetAuxl();

    if (mouseCoord) {
        for (let i: number = 0, l: number = aux.vLineList.length; i < l; i++) {
            if (Math.abs(aux.vLineList[i] - mouseCoord[0] + offsetAmount.left * -1) <= diffNum) {
                outerSphere.left = aux.vLineList[i] + offsetAmount.left * -1;
                outerSphere.lLine = true;
            }
            if (Math.abs(aux.vLineList[i] - (mouseCoord[0] + outerSphere.width) + offsetAmount.left) <= diffNum) {
                outerSphere.left = aux.vLineList[i] - outerSphere.width + offsetAmount.left;
                outerSphere.rLine = true;
            }
            if (outerSphere.lLine == true && outerSphere.rLine == true) break;
        }
        for (let i: number = 0, l: number = aux.hLineList.length; i < l; i++) {
            if (Math.abs(aux.hLineList[i] - mouseCoord[1] + offsetAmount.top * -1) <= diffNum) {
                outerSphere.top = aux.hLineList[i] + offsetAmount.top * -1;
                outerSphere.tLine = true;
            }
            if (Math.abs(aux.hLineList[i] - (mouseCoord[1] + outerSphere.height) + offsetAmount.top) <= diffNum) {
                outerSphere.top = aux.hLineList[i] - outerSphere.height + offsetAmount.top;
                outerSphere.bLine = true;
            }
            if (outerSphere.tLine == true && outerSphere.bLine == true) break;
        }
        for (let i: number = 0, l: number = aux.hcLineList.length; i < l; i++) {
            if (Math.abs(aux.hcLineList[i] - (mouseCoord[1] + outerSphere.height / 2)) <= diffNum) {
                outerSphere.top = aux.hcLineList[i] - outerSphere.height / 2;
                outerSphere.hcLine = true;
                break;
            }
        }
        for (let i: number = 0, l: number = aux.vcLineList.length; i < l; i++) {
            if (Math.abs(aux.vcLineList[i] - (mouseCoord[0] + outerSphere.width / 2)) <= diffNum) {
                outerSphere.left = aux.vcLineList[i] - outerSphere.width / 2;
                outerSphere.vcLine = true;
                break;
            }
        }
    }
}
前进和后退
关于前进与后退可以看我另一篇水文 富交互Web应用中的撤销和前进;
实现原理比较简单粗暴,就是把每一次你认为需要记录下来的操作存一份数据到浏览器的 IndexedDB 里,前进就是在表里面查找最新保存的状态并渲染,后退就是查找上一次状态并渲染
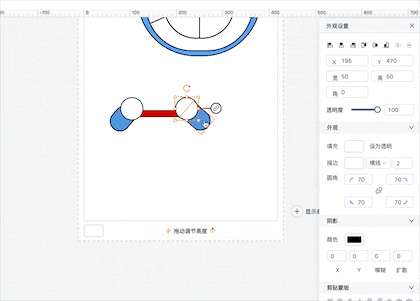
剪贴蒙版
我特别喜欢剪贴蒙版部分,在写它的过程当中感觉就像是做了好几道初中数学大题!
我们先看看它的效果
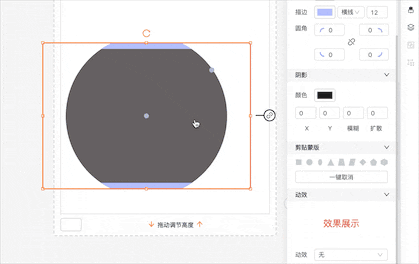
它的核心其实就是依赖于一个 CSS 的属性 clip-path
而展示出来的几个固定剪贴蒙版本质上就是在计算组件的 clip-path 对应的不同属性值
核心文件在 clip-path-mask.model.ts
小结
整体的搭建从架构方面来说并不复杂,生成的小程序代码包也没那么的神秘,其中花费时间较多的自然就是在处理各种极致交互体验的技术细节上,在实现功能之前建好数据模型是一个良好的习惯,Panel-Magic 还有很多比较复杂的功能点,感兴趣的可以去 Star 一下😉
