

本文将结合例子进行一步步讲解,例子也会从简单到复杂逐步提升,这样理解的更深刻
<div id="app"></div>
const app = new Vue({
    template: '<div>child</div>',
})
app.$mount('#app');
创建实例
首先先调用new Vue创建了一个实例,在core/instance/index中定义了Vue的构造函数
function Vue(options) {
    this._init(options)
}
initMixin(Vue)
stateMixin(Vue)
eventsMixin(Vue)
lifecycleMixin(Vue)
renderMixin(Vue)
在该文件中定义了Vue构造函数,并且通过下面几个Mixin方法,在Vue原型上也定义了一些方法,为什么不用class因为class没有prototype这么灵活。
Mixin方法 |
方法 | 属性 |
|---|---|---|
initMixin |
_init |
- |
stateMixin |
$set、$delete、$watch |
$data、$props |
eventsMixin |
$on、$off、$once、$emit |
- |
lifecycleMixin |
_update、$forceUpdate、$detory |
- |
renderMixin |
_render、$nextTick |
- |
调用_init方法
方法在core/instance/init.js中,
let uid = 0;
Vue.prototype._init = function (options) {
    const vm = this;
    vm._uid = uid++;
    vm._isVue = true;
    if (options && options._isComponent) {
        initInternalComponent(vm, options)
    } else {
        vm.$options = mergeOptions(
            resolveConstructorOptions(vm.constructor),
            options || {},
            vm
        )
    }
    vm._renderProxy = vm;
    vm._self = vm;
    initLifecycle(vm);
    initEvents(vm);
    initRender(vm);
    callhook(vm, 'beforeCreate');
    initInjections(vm);
    initState(vm);
    initProvide(vm),
    callHook(vm, 'created')
}
属性:
- _uid: 实例的唯一标识
- _isVue: 表示当前是
Vue的实例 - $options: 合并后的
options - _renderProxy: 实例本身
- _self: 实例本身 方法:
- initLifecyle: 初始化自身属性,如果当前组件是子组件,就在当前组件的父组件的
$children中加入自己 - initEvents: 用于父子组件事件通信初始化,如下子组件
child进行和父组件事件通信的初始化,并在vm._events对应的事件名称加入这个函数<div class="parent"> <child @change="changeToDo"></child> </div> - initRender:初始化自身属性,同时初始化渲染函数
_c、$createElement。在Vue原型上添加属性$attrs、$listeners,并让这些属性进行响应式监听 - callHook: 触发声明周期
- initInjections: 处理
inject,inject能够向子孙后代注入一个依赖,不管组件层次有多深 - initState: 初始化
props、methods、data、computed、watch。让数据响应式就是这个阶段完成的,watch和computed都会生成对应的Watcher - initProvide: 初始化
provide,用于接受inject传入的数据
$mount
创建实例后,会调用_init进行一系列的初始化操作,然后调用$mount,$mount在不同平台有不同的定义,以web为例
Vue.$prototype.$mount = function (el) {
    el = el && query(el);
    const options = this.$options;
    if (!options.render) {
        let template = options.template
    }
    if (template) {
        const { render, staticRenderFns } = compileToFunction(template, {
            // ...
        })
        options.render = render;
        options.staticRenderFns = staticRenderFns
    }
    return mount.call(this, el);
}
在不同的平台调用不同的编译方式最后把template编译为render函数。然后返回调用了mount函数,最终调用的是mountComponent
// cores/instance/lifecycle.js
function mountComponent(vm, el) {
    vm.$el = el;
    callHook(vm, 'beforeMount');
    updateComponent = () => {
        vm._update(vm._render())
    }
    new Watcher(vm, updateComponent, noop, {
        before() {
            if (vm._isMounted && !vm._isDestoryed) {
                callHook(vm, 'beforeUpdate')
            }
        }
    })
    if (vm.$vnode == null) {
        vm._isMounted = true;
        callHook(vm, 'mounted')
    }
}
首先声明了回调函数upateComponent,然后创建了渲染watcher,渲染watcher在初始化的时候就会执行回调函数updateComponent,updateComponent内部调用了_render和_update。这两个方法在文章开头的renderMixin、lifecycleMixin中定义了,_render用于生成vnode,_update调用patch:具体的path可参照这篇文章Vue 源码patch过程详解,把vnode中定义的内容渲染到真实DOM中,最后调用mounted钩子。
更改data
把上面的例子进行更改,当template中data发生了更改,再看看具体的变化。
new Vue({
    template: '<div class="parent" @click="change">{{visible}}</div>'
    data: {
        return {
            visible: 'all'
        }
    },
    methods: {
        change() {
            this.visible = 'change';
        }
    }
})
当我们点击元素的时候,就会触发change事件更改data中定义的值visible
数据响应式
在initState中会对data中定义的值进行响应式设置
//core/instance/state.js
function initData(vm) {
    let data = vm.$options.data;
    data = vm._data = typeof data === 'function'
        ? getData(data, vm)
        : data || {}
    observe(data, true)
}
这里在初始化data的时候,首先调用了本身,得到返回的值,然后调用observe进行数据响应式具体的可参照这篇文章深入源码学习Vue响应式原理。回到mountComponent中,在创建renderWatcher的时候首先会执行一遍updateComponent,进行依赖收集
数据更新
当数据更新后,依赖该data数据的watcher就会更新,这里只有renderWatcher有依赖,所以这个watcher就会调用回调函数,重新执行一遍_render和_update。vm._render根据template生成的render来生成vnode
// core/instance/render.js
Vue.prototype._render = function {
    const vm = this;
    const { render, _parentVnode } = vm.$options;
    if (_parentVnode) {
        vm.$scopedSlots = normalizeScopedSlots(
            _parentVnode.data.scopedSlots,
            vm.$slots,
            vm.$scopedSlots,
        )
    }
    vm.$vnode = _parentVnode;
    let vm.$vnode = _parentVnode
    let vnode
    try {
        currentRenderingInstance = vm;
        vnode = render.call(vm._renderProxy, vm.$createElement)
    } finally {
        currentRenderingInstance = null
    }
    if (Array.isArray(vnode) && vnode.length === 1) {
        vnode = vnode[0]
    }
    vnode.parent = _parentVnode
    return vnode;
}
可以看到通过调用render函数最后生成了vnode, $createElement也在当前文件夹中定义过,最后生成vnode然后调用_update执行patch操作,把修改后的数据反映到真实DOM
子组件创建
对上面的例子在进行扩展,创建一个子组件
Vue.component('child', {
    template: '<div class="child">child</div>'
})
new Vue({
    template: '<div class="parent"><child></child></div>'
})
这里声明了一个子组件,并且父组件中调用了这个子组件,首先compileToFunctions将其编译为对应的render函数上面把new Vue中声明的template编译为如下的render函数
ƒ anonymous(
) {
with(this){return _c('div',{staticClass:"parent"},[_c('child')],1)}
}
当执行当前render就会生成如下的vnode
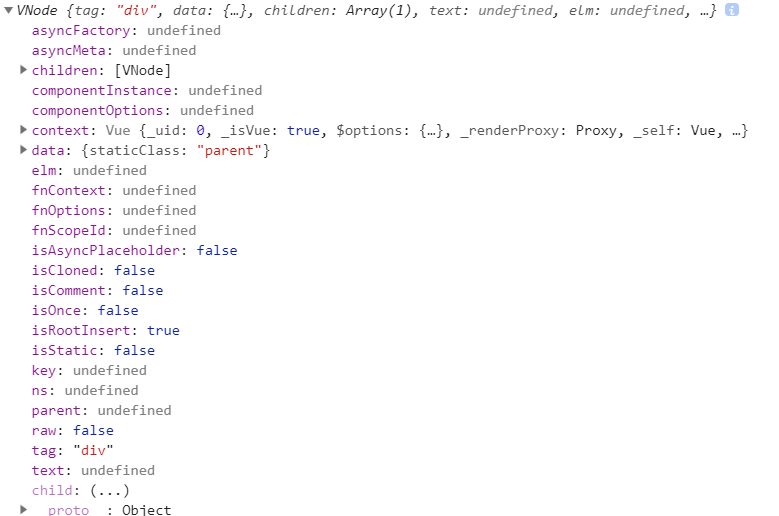
当执行patch的时候,当发现vnode下面有children就会对children进行一系列操作。
Vue.component
回到Vue.component声明子组件,当调用Vue.component都发生了什么,方法定义在core/global-api/assets.js中
Vue.component = function (id, definition) {
    definition.name = definition.name || id;
    definition = this.options._base.extend(definition)
    this.options[type + 's'][id] = definition;
}
this._options._base就是Vue构造函数,相当于调用的是Vue.extend,然后生成的definition挂载到this.options.components上,属性名为child。Vue.extend的方法定义在
Vue.extend = function (extendOptions) {
    const Super = this;
    const Sub = function VueComponent(options) {
        this._init(options)
    }
    Sub.prototype = Object.create(Super.prototype);
    Sub.prototype.constructor = Sub;
    // ...
    return Sub;
}
可以看到返回是一个继承Vue的构造函数,并且创建实例的实例也会调用Vue的_init函数
patch
具体的逻辑可以参照Vue 源码patch过程详解
回到父组件的$mount操作,当创建渲染watcher的时候,会立即执行updateComponent,然后内部会执行_update函数,可以执行patch操作,然后上面图片可以看到children中存在值,就会走到createChildren为children中的元素调用createElm。因为child是子组件就会走到
createComponent并且二返回true,在内部调用钩子init,init
钩子函数具体实现如下:
const componentVNodeHooks = {
    init: (vnode) => {
        const child = vnode.componentInstance = createComponentInstanceForVnode(vnode, activeInstance)
        child.$mount(vnode.elm)
    }
}
这里就会调用createComponentInstanceForVnode函数,这个函数实际调用的就是前面在Vue.extend中返回的继承于Vue的构造函数,最后在调用$mount函数。所以父子组件在渲染的时候钩子执行的先后顺序就是
父beforeMounted => 子beforeMounted => 子mounted => 父mounted
