

提纲:
- 滚动穿透
- 登陆,授权流程
- 手机号授权流程
- 保存图片
- webview的使用
问题一二针对于,弹窗内容嵌套在蒙层内。
1. 点击弹窗外关闭,
<view class="modal" wx:if="{{hasPaid}}" bindtap="togglePaidModal">
    <view class="modal_content" catchtap="handleTap2">
        <view class="modal_content_title">你已经购买过该课程</view>
        <view class="modal_content_desc">您已经购买该课程了,请前往听课</view>
        <view bindtap="gotoStudy" class="modal_content_btn">去听课</view>
    </view>
    <image catchtap="togglePaidModal" class="modal_close" src="../../assets/images/class/modal_close.png" />
</view>

	// 已经支付的弹窗
	togglePaidModal: function(e) {
		this.setData({
			hasPaid: !this.data.hasPaid,
		})
	},
	handleTap2: function(e) {

	},
重点在于小程序事件中,catchtap 会阻止冒泡。详情可以浏览微信小程序事件机制。
2. 解决滚动穿透问题
<view class="modal" wx:if="{{addWxModal}}" bindtap="toggleWxModal" catchtouchmove="preventTouchMove">
    <view class="modal_content" catchtap="handleTap2">
        <image class="content_bacimg" src="../../assets/images/my/join_class.png" />
        </view>
    </view>
    <image class="modal_close" catchtap="toggleWxModal" src="../../assets/images/class/modal_close.png" />
</view>

preventTouchMove: function() {

}
滚动穿透问题,最外层modal中,添加catchtouchmove="preventTouchMove"。阻止父级滚动。
3. 登陆, 授权流程
userInfo常见的维护于app.globalData中,或者storage中。本文维护于app.globalData中。
3.1 首先需要弄清楚下面几个东西。
(1)wx.login,调用接口获取登录凭证(code),通过凭证进而换取用户登录态信息,包括用户的唯一标识(openid)及本次登录的会话密钥(session_key)等(前端只需把code传给后端,换取凭证后端来做)。
(2)code,登录凭证。这个直接通过wx.login就可以拿到,不用点击button授权。
(3)openid,用户唯一标识。把code传给后端,后端根据加密算法和微信接口服务换取来的。
(4)wx.checkSession。检查登录态是否过期。通过wx.login接口获得的用户登录态拥有一定的时效性。用户越久未使用小程序,用户登录态越有可能失效。反之如果用户一直在使用小程序,则用户登录态一直保持有效。开发者只需要调用wx.checkSession接口检测当前用户登录态是否有效
(5)authSetting['scope.userInfo'],判断用户是否授权过,此授权和以上的code换取openid不同,此授权是指拿到用户头像,city,country,gender,nickName,province等等
(6)open-type="getUserInfo",对于button的设置,只有添加该条属性,才可以弹窗确认授权,获取到用户相关信息。
所以,所谓的登陆,授权其实是分为两部分。登陆:code换取oppenid,作为用户唯一标识,进行以后的业务(通常是放在header中)。授权:通过button获取授权,拿到用户信息,传给后端用来更新,记录用户信息。
3.2 登陆: code换取openid
附上一张小程序官方截图,红色标识,为我们需要注意的。
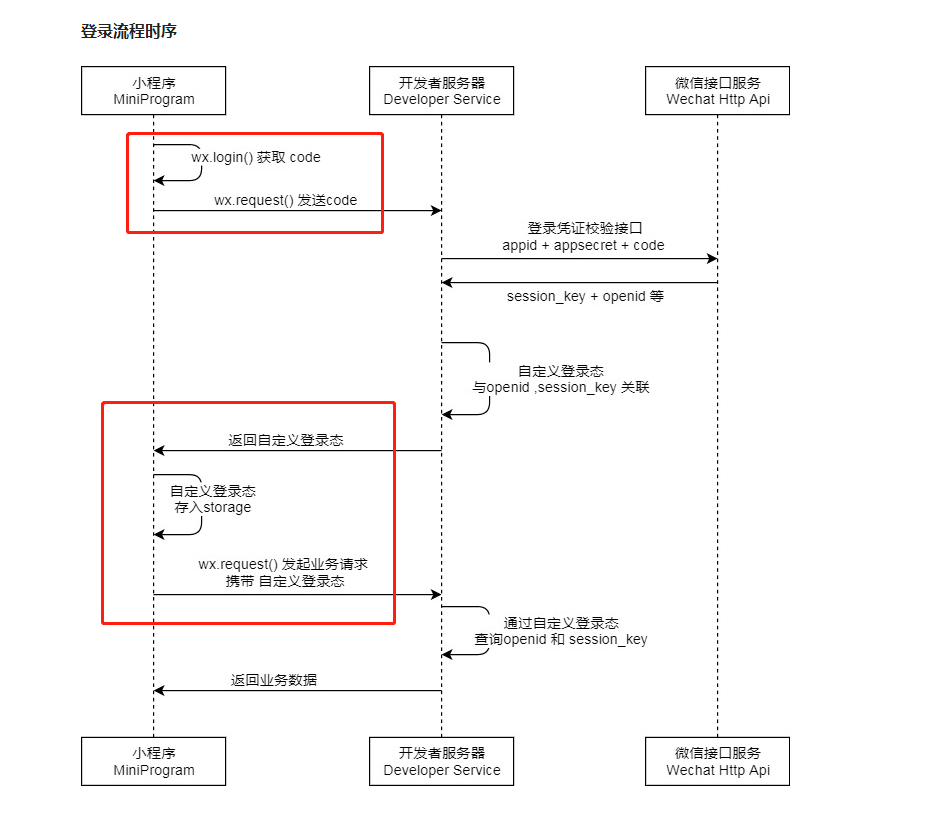
通过wx.login获取code,在通过code传给后端接口,换取openid等信息,存进app.globalData中。这样就算登陆完成了,下次请求别的业务接口,带上openid就可以了。(建议使用自定义登录态,不直接使用openid)
this.userLoginPromise = new Promise((resolve, reject) => {
    let loginSuccess= false

    wx.checkSession({
        success: () => {
            loginSuccess = true
        },
        complete: ()  => {
            if (loginSuccess && this.globalData.userInfo.openid) {
                resolve()
            }else {
                wx.login({
                    success: res => {
                        if (res.code) {
                            getOpenIdReq(encodeURIComponent(res.code)).then(response => {
                                    this.globalData.userInfo = {
                                        ...this.globalData.userInfo,
                                        ...response,
                                    }
                                    resolve()
                                // }
                            }).catch(e => {
                                reject(e)
                            })
                        }
                    },
                    fail: e => {
                        wx.showToast({
                            title: "登录出错",
                            duration: 2000,
                            icon: 'none',
                        })
                    }
                })
            }
        }
    })

})
3.3 授权:主要目的为了,获取用户头像,性别,城市,等信息,保存在后端或者是需要显示个人头像等情况。
流程:
- 判断用户是否授权过(
wx.getSetting) - 授权过可以直接通过
wx.getUserInfo拿到信息。 - 如果没有授权过,需要配合
button拿到用户信息。
// 查看用户是否授权过
wx.getSetting({
	success: res => {
		if (res.authSetting['scope.userInfo']) {
			// 已经授权,可以直接调用 getUserInfo 获取头像昵称,不会弹框
			wx.getUserInfo({
				success: res => {
					this.setData({
						maskModal: false, // 授权过,隐藏授权button
					})
				}
			})
		}
	}
})
如果没有授权,展示授权button,通过wx接口,获取用户信息,并发送请求给后端,更新用户信息成功后,将授权button隐藏。open-type="getUserInfo"
// wxml
<button wx:if="{{maskModal}}" class="mask" open-type="getUserInfo" bindgetuserinfo="bindGetUserInfo" />


// js
bindGetUserInfo: function(e) {
	const { encryptedData } = e.detail
	if(!encryptedData){
		return
	}
	this.updateUserInfo(e.detail)
	this.setData({
		maskModal: false,
	})
},

// 后端接口更新用户信息
updateUserInfo: function(options = {}) {
	const { encryptedData, iv, userInfo } = options
	const params = {
		...userInfo,
		iv,
		encryptedData,
	}
	updateUserinfoReq(params).then(res => {
	})
},
4. 手机号授权流程
建议后端提供一个,判断用户是否绑定手机号的接口。之后处理起来就比较容易一些。也符合正常流程。
注意点:
- 把请求到的是否授权手机号表示,维护在app.globalData中,无论在任何组件内部,都可以直接拿到使用。
- 要在请求登陆接口返回openid以后调用是否授权手机号接口,因为后端需要根据header中的openid来辨识用户。
初始化:
// app.js
userPhonePromise: null,
onLaunch: function() {
     this.userPhonePromise = new Promise((resolve, reject) => {
        // 放在用户登陆接口之后
        this.userLoginPromise.then(_ =>
            validateMobileReq()
        ).then(response => {
            this.globalData.phoneAuthorized = !!response
            resolve();
            if (this.globalData.phoneAuthorized){
                console.log('手机已授权')
            }else{
                console.log('手机未授权')
            }
        }).catch(e =>{
            reject()
        })
    })
},

// 页面内的使用  class.js
onShow: function (options) {
	app.userPhonePromise.then(_ => {
	    // 本页面用到的变量标识
        this.setData({ phoneAuthorized: app.globalData.phoneAuthorized })
	})
},
当页面中存在,手机授权按钮时,授权后需要更新app.globalData的数据以及当前页面的状态
<view wx:if="{{phoneAuthorized}}" class="footer_buy" bindtap="gotoPay" />
<button wx:else class="footer_buy" open-type="getPhoneNumber" bindgetphonenumber="getPhoneNumber" />

// button 授权弹窗事件回调
getPhoneNumber: function (e) {
    // 是否授权
	if (!e.detail.encryptedData) {
		return
	}
	this.updateUserPhone(e.detail)
},

updateUserPhone: function (options = {}) {
	const {
		encryptedData,
		iv
	} = options
	const params = {
		...app.globalData.userInfo,
		iv,
		encryptedData,
	}
	// 后端更新用户信息请求
	updateUserinfoReq(params).then(res => {
		const {
			phone,
			...others = {}
		} = res
		app.globalData.userInfo = {
			...app.globalData.userInfo,
			...others,
			phone,
		}
		if (phone) {
		    // 全局维护的授权,方便其他页面进入调用
			app.globalData.phoneAuthorized = true
			// 本页面维护的授权状态标识
			this.setData({
				phoneAuthorized: true,
			})
		}
	})
},
5. 保存图片流程
注意事项:
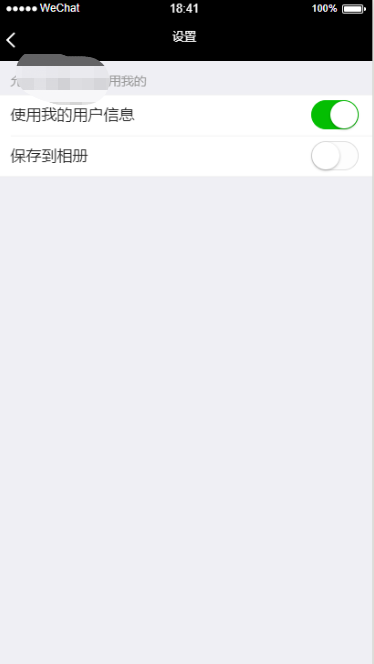
- 先查看是否有权限保存图片。(1. 如果没有授权过,会拉起小程序授权弹窗(图一);2. 如果之前拉起过授权弹窗, 给了保存权限,会保存到手机;3. 如果之前拉起过授权弹窗,但是拒绝了权限访问,这次不会拉起系统弹窗,只会返回false值。需要手动拉起微信设置权限(图二))
- 保存图片入参filePath,图片文件路径,可以是临时文件路径或永久文件路径 (本地路径) ,不支持网络路径。所以后端返回的图片,需要先调用wx.getImageInfo转为临时文件路径
saveWxImg: function (e) {
	wx.showLoading({
		title: '加载中...',
	})
	wx.getSetting({
		success: (res) => {
			if (res.authSetting['scope.writePhotosAlbum']) {
				this.saveImg()
			} else {
				wx.authorize({
					scope: 'scope.writePhotosAlbum',
					success: () => {
						this.saveImg()
					},
					fail: (err) => {
						wx.hideLoading()
						this.toggleModal()
					}
				})
			}
		}
	})
},

saveImg: function () {
	wx.getImageInfo({
		src: this.data.classTeacherWxUrl,
		success(res) {
			const {
				path,
			} = res
			wx.saveImageToPhotosAlbum({
				filePath: path,
				success(res) {
					wx.hideLoading()
					wx.showToast({
						title: '已保存,扫一扫图片添加班主任吧',
						duration: 2000,
						icon: 'none'
					})
				},
				fail() {
					wx.hideLoading()
				}
			})
		},
		fail() {
			wx.hideLoading()
		}
	})
},

6. 小程序中webview的使用(个人类型的小程序暂不支持使用。)
正常小程序page中,跳转到webview页面,带上将要访问的url即可。
const webviewUrl = `/pages/classWeb/classWeb?path=${url}&originPage=${originPage}&unitId=${trialTeachUnitId}`
wx.navigateTo({
	url: webviewUrl,
})
webview页面中,显示url
<web-view src="{{url}}"></web-view>

onLoad: function (options) {
	const {
		path,
	} = options
	if (path.indexOf('http') < 0) {
		options.path = 'https://' + options.path
	}
	this.setData({
		url: decodeURIComponent(options.path)
	}
},
7. component的使用需要在${page}.json中引入,其他没什么特殊的地方。
// home.json
{
  "usingComponents": {
    "class-list": "/components/class-list/class-list",
    "tab-bar": "/components/tab-bar/tab-bar"
  }
}
8. 微信提供了wx.getSystemInfo和wx.getSystemInfoSync访问设备信息,区分ios,android。
9. 特殊字体family的使用,
UI给到TTF,WOFF等字体文件后,访问transfonter.org/转换成base64。导出改为font.wxss。 在app.wxss中引入,之后就可以直接使用了。
// app.wxss
@import "./font.wxss"

// font.wxss
@font-face {
   font-family: 'DIN Alternate';
   src: url(data:application/font-woff2;charset=utf-8;base64,d09GMgABAAAAEAAAAAAAAAAAkJwgAAAAA1fCHZQAAAADWQ16c) format('woff'),
       url('DINAlternate-Bold.ttf') format('truetype');
   font-weight: bold;
   font-style: normal;
}
10. 动态设置当前页面的标题
wx.setNavigationBarTitle({
  title: '当前页面'
})
未完待续
- 小程序中使用锚点注意事项
