

文章收集在 GitHub JavaEgg 中,欢迎star+指导
JavaEgg——《“Java技术员”成长手册》,包含Java基础、框架、存储、搜索、优化、分布式等必备知识,N线互联网开发必备技能兵器谱。
笔记来源 尚硅谷教学笔记
一、Hello Spring Boot
1、Spring Boot 简介
- 简化Spring应用开发的一个框架;
- 整个Spring技术栈的一个大整合;
- J2EE开发的一站式解决方案;
2、微服务
- 微服务:架构风格(服务微化)
- 一个应用应该是一组小型服务;可以通过HTTP的方式进行互通;
- 单体应用:ALL IN ONE
- 微服务:每一个功能元素最终都是一个可独立替换和独立升级的软件单元; 详细参照微服务文档
3、环境准备
- jdk1.8:Spring Boot 推荐jdk1.7及以上;java version "1.8.0_112"
- maven3.x:maven 3.3以上版本;Apache Maven 3.3.9
- IntelliJIDEA、STS
- SpringBoot 2.2.2.RELEASE; 统一环境;
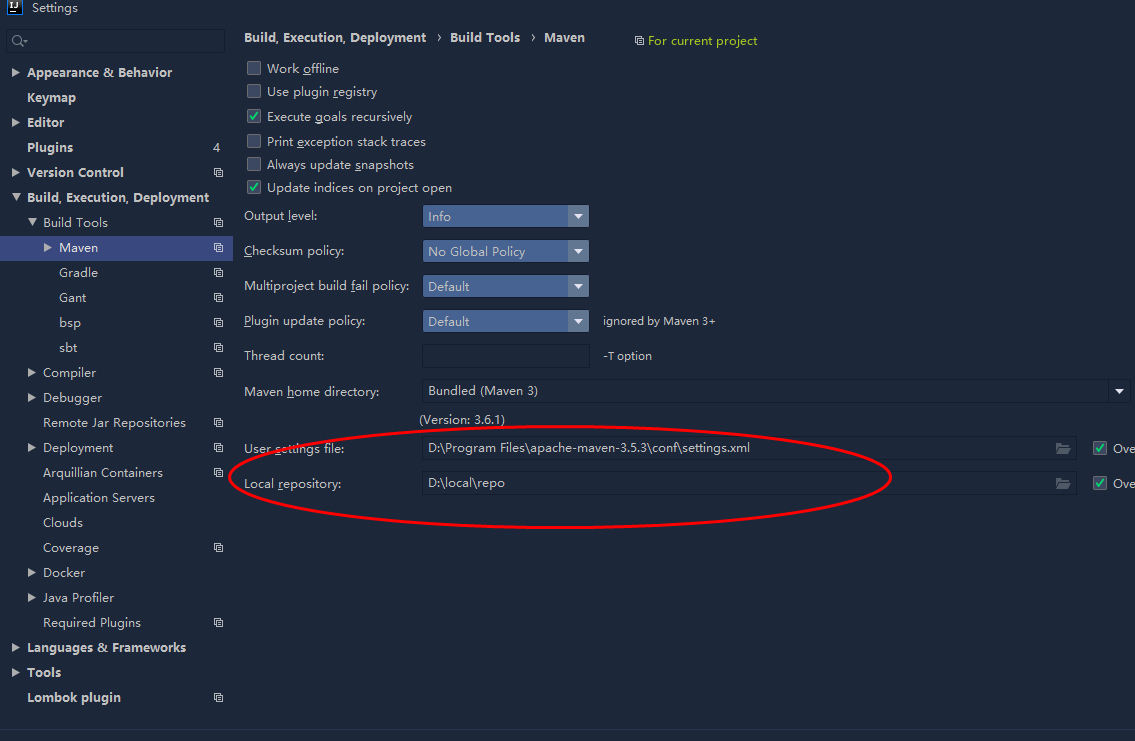
3.1、MAVEN设置;
给maven 的settings.xml配置文件的profiles标签添加
<profile>
    <id>jdk‐1.8</id>
    <activation>
    <activeByDefault>true</activeByDefault>
    <jdk>1.8</jdk>
    </activation>
	<properties>
        <maven.compiler.source>1.8</maven.compiler.source>
        <maven.compiler.target>1.8</maven.compiler.target>
        <maven.compiler.compilerVersion>1.8</maven.compiler.compilerVersion>
    </properties>
</profile>
3.2、IDEA设置
整合maven进来
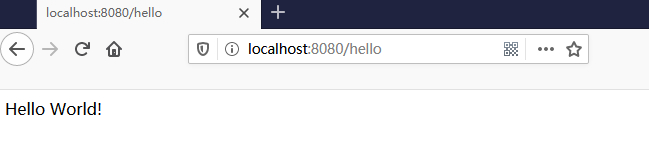
3.3、Spring Boot HelloWorld
实现一个小功能:浏览器发送hello请求,服务器接受请求并处理,响应Hello World字符串;
1、创建一个maven工程;(jar)
2、导入spring boot相关的依赖
<parent>
  <groupId>org.springframework.boot</groupId>
  <artifactId>spring‐boot‐starter‐parent</artifactId>
  <version>2.2.2.RELEASE</version>
</parent>
<dependencies>
  <dependency>
      <groupId>org.springframework.boot</groupId>
      <artifactId>spring‐boot‐starter‐web</artifactId>
  </dependency>
</dependencies>
3、编写一个主程序;启动Spring Boot应用
/**
* @SpringBootApplication 来标注一个主程序类,说明这是一个Spring Boot应用
*/
@SpringBootApplication
	public class HelloWorldMainApplication {
	public static void main(String[] args) {
	// Spring应用启动起来
 	SpringApplication.run(HelloWorldMainApplication.class,args);
  }
}
4、编写相关的Controller、Service
@Controller
    public class HelloController {
        @ResponseBody
        @RequestMapping("/hello")
        public String hello(){
            return "Hello World!";
        }
    }
5、运行主程序main方法,测试
6、简化部署
<!‐‐ 这个插件,可以将应用打包成一个可执行的jar包;‐‐>
  <build>
      <plugins>
          <plugin>
              <groupId>org.springframework.boot</groupId>
              <artifactId>spring‐boot‐maven‐plugin</artifactId>
          </plugin>
      </plugins>
  </build>
将这个应用打成jar包,直接使用java -jar的命令进行执行java -jar HelloWorldMainApplication.jar
3.4、Hello World探究
3.4.1、POM文件
-
父项目
<parent>
    <groupId>org.springframework.boot</groupId>
    <artifactId>spring‐boot‐starter‐parent</artifactId>
    <version>2.2.2.RELEASE</version>
</parent>
进入父项目,可以看到父项目的父项目(爷项目)
<!-- 爷爷项目(他的父项目)是 -->
<parent>
    <groupId>org.springframework.boot</groupId>
    <artifactId>spring‐boot‐dependencies</artifactId>
    <version>2.2.2.RELEASE</version>
    <relativePath>../../spring‐boot‐dependencies</relativePath>
</parent>
他来真正管理Spring Boot应用里面的所有依赖版本;是Spring Boot的版本仲裁中心;
以后我们导入依赖默认是不需要写版本的;(没有在dependencies里面管理的依赖自然需要声明版本号)
-
启动器
<dependency>
    <groupId>org.springframework.boot</groupId>
    <artifactId>spring‐boot‐starter‐web</artifactId>
</dependency>
spring-boot-starter-web:
spring-boot-starter:spring-boot场景启动器;帮我们导入了web模块正常运行所依赖的组件;
Spring Boot将所有的功能场景都抽取出来,做成一个个的starters(启动器),只需要在项目里面引入这些 starter
相关场景的所有依赖都会导入进来。要用什么功能就导入什么场景的启动器
3.4.2、主程序类,主入口类(跟着假装点进去,看看源码,成为一个看过源码的初学者)
/**
 * @SpringBootApplication 来标注一个主程序类,说明这是一个Spring Boot应用
 */
@SpringBootApplication
public class HelloWorldMainApplication {
    public static void main(String[] args) {
        // Spring应用启动起来
        SpringApplication.run(HelloWorldMainApplication.class, args);
    }
}
@SpringBootApplication: Spring Boot应用标注在某个类上说明这个类是SpringBoot的主配置类,SpringBoot
就应该运行这个类的main方法来启动SpringBoot应用;
@Target({ElementType.TYPE})
@Retention(RetentionPolicy.RUNTIME)
@Documented
@Inherited
@SpringBootConfiguration
@EnableAutoConfiguration
@ComponentScan(
    excludeFilters = {@Filter(
    type = FilterType.CUSTOM,
    classes = {TypeExcludeFilter.class}
), @Filter(
    type = FilterType.CUSTOM,
    classes = {AutoConfigurationExcludeFilter.class}
)}
)
public @interface SpringBootApplication {
@SpringBootConfiguration:Spring Boot的配置类; 标注在某个类上,表示这是一个Spring Boot的配置类;
@Configuration:用来标注这是个配置类;
@EnableAutoConfiguration:开启自动配置功能;
以前我们需要配置的东西,Spring Boot帮我们自动配置;@EnableAutoConfiguration告诉SpringBoot开启自动配置功能;这样自动配置才能生效;
@AutoConfigurationPackage
@Import({AutoConfigurationImportSelector.class})
public @interface EnableAutoConfiguration {
@AutoConfigurationPackage:自动配置包
Spring的底层注解**@Import**,给容器中导入一个组件;导入的组件由AutoConfigurationImportSelector.class
将主配置类(@SpringBootApplication标注的类)的所在包及下面所有子包里面的所有组件扫描到Spring容器;
@Import(EnableAutoConfigurationImportSelector.class); 给容器中导入组件?
AutoConfigurationImportSelector:导入哪些组件的选择器;
将所有需要导入的组件以全类名的方式返回;这些组件就会被添加到容器中;
会给容器中导入非常多的自动配置类(xxxAutoConfiguration);就是给容器中导入这个场景需要的所有组件, 并配置好这些组件;
有了自动配置类,免去了我们手动编写配置注入功能组件等的工作;
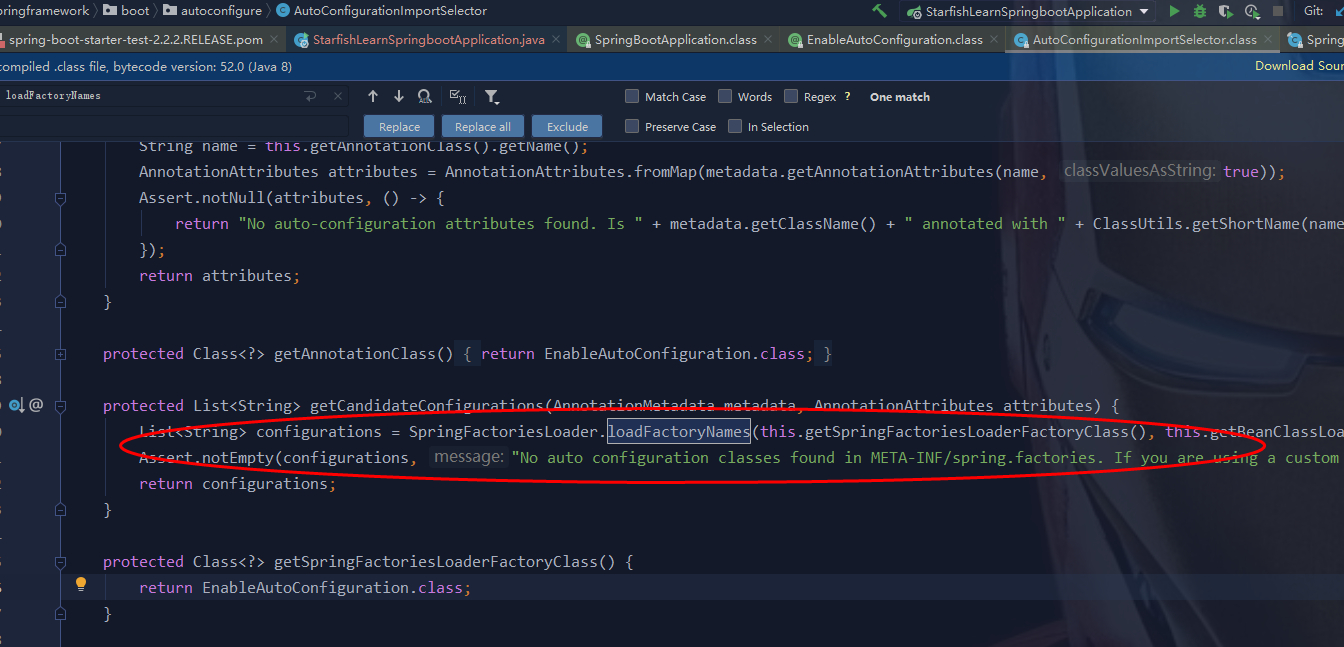
SpringFactoriesLoader.loadFactoryNames(this.getSpringFactoriesLoaderFactoryClass(), this.getBeanClassLoader());
Spring Boot在启动的时候从类路径下的META-INF/spring.factories中获取EnableAutoConfiguration指定的值,将这些值作为自动配置类导入到容器中,自动配置类就生效,帮我们进行自动配置工作;以前我们需要自己配置的东西,自动配置类都帮我们配置好了;
J2EE的整体整合解决方案和自动配置都在spring-boot-autoconfigure-2.2.2.RELEASE.jar;
3.5、使用Spring Initializer快速创建Spring Boot项目
-
IDEA:可以使用 Spring Initializer快速创建项目

IDE都支持使用Spring的项目创建向导快速创建一个Spring Boot项目; 选择我们需要的模块;向导会联网创建Spring Boot项目;
默认生成的Spring Boot项目;
- 主程序已经生成好了,我们只需要我们自己的逻辑
- resources文件夹中目录结构
- static:保存所有的静态资源; js css images;
- templates:保存所有的模板页面;(Spring Boot默认jar包使用嵌入式的Tomcat,默认不支持JSP页面);可以使用模板引擎(freemarker、thymeleaf);
- application.properties:Spring Boot应用的配置文件;可以修改一些默认设置;
-
STS使用 Spring Starter Project快速创建项目
二、配置文件
1、配置文件
SpringBoot使用一个全局的配置文件,配置文件名是固定的(有两种形式);
- application.properties
- application.yml
配置文件的作用:修改SpringBoot自动配置的默认值;(SpringBoot在底层都给我们自动配置好了)
YAML(YAML Ain't Markup Language) YAML A Markup Language:是一个标记语言
YAML:以数据为中心,比json、xml等更适合做配置文件;
以前的配置文件;大多都使用的是 xxxx.xml文件;eg:
YAML:配置例子
server:
  port: 8080
XML例子:
<server>
  <port>8080</port>
</server>
2、YAML语法:
1、基本语法
k:(空格)v:表示一对键值对(空格必须有);
以空格的缩进来控制层级关系;只要是左对齐的一列数据,都是同一个层级的
server:
	port: 8080
	path: /hello
属性和值是大小写敏感的;
2、值的写法
字面量:普通的值(数字,字符串,布尔)
k: v:字面直接来写;
字符串默认不用加上单引号或者双引号;
"":双引号;不会转义字符串里面的特殊字符;特殊字符会作为本身想表示的意思name: "zhangsan \n lisi":输出;zhangsan 换行 lisi
'':单引号;会转义特殊字符,特殊字符最终只是一个普通的字符串数据
name: ‘zhangsan \n lisi’:输出;zhangsan \n lisi
对象、Map(属性和值)(键值对):
k: v
:在下一行来写对象的属性和值的关系;注意缩进
对象还是k: v的方式
friends:
	lastName: zhangsan
	age: 20
行内写法:
friends: {lastName: zhangsan,age: 20}
数组(List、Set):
用-值表示数组中的一个元素
pets:
  ‐ cat
  ‐ dog
  ‐ pig
行内写法
pets: [cat,dog,pig]
3、配置文件值注入
3.1、配置文件:
person:
	lastName: hello
	age: 18
	boss: false
	birth: 2017/12/12
	maps: {k1: v1,k2: 12}
	lists:
		‐ lisi
		‐ zhaoliu
	dog:
		name: 小狗
		age: 12
3.2、javaBean:
/**
* 将配置文件中配置的每一个属性的值,映射到这个组件中
* @ConfigurationProperties:告诉SpringBoot将本类中的所有属性和配置文件中相关的配置进行绑定;
* prefix = "person":配置文件中哪个下面的所有属性进行一一映射
*
* 只有这个组件是容器中的组件,才能使用容器提供的@ConfigurationProperties功能;
*
*/
@Component
@ConfigurationProperties(prefix = "person")
public class Person {
  private String lastName;
  private Integer age;
  private Boolean boss;
  private Date birth;
  private Map<String,Object> maps;
  private List<Object> lists;
  private Dog dog;
}
我们可以导入配置文件处理器,以后编写配置就有提示了
<!‐‐导入配置文件处理器,配置文件进行绑定就会有提示‐‐>
<dependency>
	<groupId>org.springframework.boot</groupId>
	<artifactId>spring‐boot‐configuration‐processor</artifactId>
	<optional>true</optional>
</dependency>
3.3、@Value获取值和@ConfigurationProperties获取值的区别
| @ConfigurationProperties | @Value | |
|---|---|---|
| 功能 | 批量注入配置文件中的属性 | 一个个指定 |
| 松散绑定(松散语法) | 支持 | 不支持 |
| SpEL | 不支持 | 支持 |
| JSR303数据校验 | 支持 | 不支持 |
| 复杂类型封装 | 支持 | 不支持 |
-
配置文件yml还是properties他们都能获取到值;
-
如果说,我们只是在某个业务逻辑中需要获取一下配置文件中的某项值,使用@Value;
-
如果说,我们专门编写了一个javaBean来和配置文件进行映射,我们就直接使用@ConfigurationProperties;
3.4、配置文件注入值数据校验
 @Component
 @ConfigurationProperties(prefix = "person")
 @Validated
 public class Person {
    /**
      * <bean class="Person">
      * <property name="lastName" value="字面量/${key}从环境变量、配置文件中获取值/#
      	{SpEL}"></property>
      * <bean/>
      */
    //lastName必须是邮箱格式
    @Email
    //@Value("${person.last‐name}")
    private String lastName;
    //@Value("#{11*2}")
    private Integer age;
    //@Value("true")
    private Boolean boss;
    private Date birth;
    private Map<String,Object> maps;
    private List<Object> lists;
    private Dog dog;
 }
3.5、@PropertySource&@ImportResource&@Bean
@PropertySource:加载指定的配置文件;
/**
* 将配置文件中配置的每一个属性的值,映射到这个组件中
* @ConfigurationProperties:告诉SpringBoot将本类中的所有属性和配置文件中相关的配置进行绑定;
* prefix = "person":配置文件中哪个下面的所有属性进行一一映射
*
* 只有这个组件是容器中的组件,才能容器提供的@ConfigurationProperties功能;
* @ConfigurationProperties(prefix = "person")默认从全局配置文件中获取值;
*
*/
@PropertySource(value = {"classpath:person.properties"})
@Component
@ConfigurationProperties(prefix = "person")
//@Validated
public class Person {
    /**
    * <bean class="Person">
    * <property name="lastName" value="字面量/${key}从环境变量、配置文件中获取值/#
    {SpEL}"></property>
    * <bean/>
    */
    //lastName必须是邮箱格式
    // @Email
    //@Value("${person.last‐name}")
    private String lastName;
    //@Value("#{11*2}")
    private Integer age;
    //@Value("true")
    private Boolean boss;}
@ImportResource:导入Spring的配置文件,让配置文件里面的内容生效;
Spring Boot里面没有Spring的配置文件,我们自己编写的配置文件,也不能自动识别; 想让Spring
的配置文件生效,加载进来;需要将@ImportResource标注在一个配置类上,导入Spring的配置文件让其生效
@ImportResource(locations = {"classpath:beans.xml"})
自定义的Spring配置文件
<?xml version="1.0" encoding="UTF‐8"?>
<beans xmlns="http://www.springframework.org/schema/beans"
xmlns:xsi="http://www.w3.org/2001/XMLSchema‐instance"
xsi:schemaLocation="http://www.springframework.org/schema/beans
http://www.springframework.org/schema/beans/spring‐beans.xsd">
<bean id="helloService" class="com.atguigu.springboot.service.HelloService"></bean>
</beans>
SpringBoot推荐给容器中添加组件的方式;推荐使用全注解的方式
-
配置类**@Configuration**------>Spring配置文件
-
使用**@Bean**给容器中添加组件
/**
* @Configuration:指明当前类是一个配置类;就是来替代之前的Spring配置文件
* 在配置文件中用<bean><bean/>标签添加组件
*/
@Configuration
    public class MyAppConfig {
    //将方法的返回值添加到容器中;容器中这个组件默认的id就是方法名
    @Bean
    public HelloService helloService02(){
    System.out.println("配置类@Bean给容器中添加组件了...");
    return new HelloService();
    }
}
3.6、配置文件占位符
1、随机数
${random.value}、${random.int}、${random.long}
${random.int(10)}、${random.int[1024,65536]}
2、占位符获取之前配置的值,如果没有可以是用 : 指定默认值
person.last‐name=张三${random.uuid}
person.age=${random.int}
person.birth=2017/12/15
person.boss=false
person.maps.k1=v1
person.maps.k2=14
person.lists=a,b,c
person.dog.name=${person.hello:hello}_dog
person.dog.age=15
3.7、Profile
3.7.1、多Profile文件
我们在主配置文件编写的时候,文件名可以是 application-{profile}.properties/yml
默认使用application.properties的配置;
3.7.2、yml支持多文档块方式
server:
	port: 8081
spring:
	profiles:
	active: prod
‐‐‐
server:
	port: 8083
spring:
	profiles: dev
‐‐‐
server:
	port: 8084
	spring:
profiles: prod #指定属于哪个环境
3.7.3、激活指定profile
1、在配置文件中指定 spring.profiles.active=dev
2、命令行:
java -jar spring-boot-02-config-0.0.1-SNAPSHOT.jar --spring.profiles.active=dev; 可以直接在测试的时候,配置传入命令行参数
3、虚拟机参数;
-Dspring.profiles.active=dev
3.8、配置文件加载位置
springboot 启动会扫描以下位置的application.properties或者application.yml文件作为Spring boot的默认配置文件
- file:./config/
- file:./
- classpath:/config/
- classpath:/
优先级由高到底,高优先级的配置会覆盖低优先级的配置;
SpringBoot会从这四个位置全部加载主配置文件;互补配置;
我们还可以通过spring.config.location来改变默认的配置文件位置
项目打包好以后,我们可以使用命令行参数的形式,启动项目的时候来指定配置文件的新位置;指定配置文件和默 认加载的这些配置文件共同起作用形成互补配置;
java -jar spring-boot-02-config-02-0.0.1-SNAPSHOT.jar --spring.config.location=G:/application.properties
3.9、外部配置加载顺序
SpringBoot也可以从以下位置加载配置; 优先级从高到低;高优先级的配置覆盖低优先级的配置,所有的配置会形成互补配置
-
命令行参数
所有的配置都可以在命令行上进行指定
java -jar spring-boot-02-config-02-0.0.1-SNAPSHOT.jar --server.port=8087 --server.context-path=/abc多个配置用空格分开; --配置项=值
-
来 自 java:comp/env 的 JNDI 属 性
-
Java系统属性(System.getProperties())
-
操作系统环境变量
-
RandomValuePropertySource配置的random.*属性值
由jar包外向jar包内进行寻找;优先加载带profile
- jar包外部的application-{profile}.properties或**application.yml(带spring.profile)**配置文件
- jar包内部的application-{profile}.properties或**application.yml(带spring.profile)**配置文件
再来加载不带profile
-
jar包外部的application.properties或application.yml(不带spring.profile)配置文件
-
jar包内部的application.properties或**application.yml(不带spring.profile)**配置文件
10.@Configuration注解类上的@PropertySource
11.通过SpringApplication.setDefaultProperties指定的默认属性所有支持的配置加载来源;
3.10、自动配置原理
配置文件到底能写什么?怎么写?自动配置原理; 配置文件能配置的属性参照
3.10.1、自动配置原理:
1)、SpringBoot启动的时候加载主配置类,开启了自动配置功能 @EnableAutoConfiguration
2)、@EnableAutoConfiguration 作用:
-
利用AutoConfigurationImportSelector给容器中导入一些组件
-
可以查看selectImports()方法的内容;
-
List configurations = getCandidateConfigurations(annotationMetadata, attributes);获取候选的配置
SpringFactoriesLoader.loadFactoryNames()
扫描所有jar包类路径下 META‐INF/spring.factories,把扫描到的这些文件的内容包装成properties对象
从properties中获取到 EnableAutoConfiguration.class类(类名)对应的值,然后把他们添加在容器
中
将类路径下 META-INF/spring.factories 里面配置的所有EnableAutoConfiguration的值加入到了容器中;
# Auto Configure
org.springframework.boot.autoconfigure.EnableAutoConfiguration=\
org.springframework.boot.autoconfigure.admin.SpringApplicationAdminJmxAutoConfiguration,\
org.springframework.boot.autoconfigure.aop.AopAutoConfiguration,\
org.springframework.boot.autoconfigure.amqp.RabbitAutoConfiguration,\
org.springframework.boot.autoconfigure.batch.BatchAutoConfiguration,\
org.springframework.boot.autoconfigure.cache.CacheAutoConfiguration,\
org.springframework.boot.autoconfigure.cassandra.CassandraAutoConfiguration,\
org.springframework.boot.autoconfigure.cloud.CloudAutoConfiguration,\
org.springframework.boot.autoconfigure.context.ConfigurationPropertiesAutoConfiguration,\
org.springframework.boot.autoconfigure.context.MessageSourceAutoConfiguration,\
org.springframework.boot.autoconfigure.context.PropertyPlaceholderAutoConfiguration,\
org.springframework.boot.autoconfigure.couchbase.CouchbaseAutoConfiguration,\
org.springframework.boot.autoconfigure.dao.PersistenceExceptionTranslationAutoConfiguration,
\
org.springframework.boot.autoconfigure.data.cassandra.CassandraDataAutoConfiguration,\
org.springframework.boot.autoconfigure.data.cassandra.CassandraRepositoriesAutoConfiguration
,\
org.springframework.boot.autoconfigure.data.couchbase.CouchbaseDataAutoConfiguration,\
org.springframework.boot.autoconfigure.data.couchbase.CouchbaseRepositoriesAutoConfiguration
,\
org.springframework.boot.autoconfigure.data.elasticsearch.ElasticsearchAutoConfiguration,\
org.springframework.boot.autoconfigure.data.elasticsearch.ElasticsearchDataAutoConfiguration
每一个这样的 xxxAutoConfiguration类都是容器中的一个组件,都加入到容器中;用他们来做自动配置;
3)、每一个自动配置类进行自动配置功能;
4)、以HttpEncodingAutoConfiguration(Http编码自动配置)为例解释自动配置原理;
    @Configuration  //表示这是一个配置类,以前编写的配置文件一样,也可以给容器中添加组件
    @EnableConfigurationProperties(HttpEncodingProperties.class) //启动指定类的
    //ConfigurationProperties功能;将配置文件中对应的值和HttpEncodingProperties绑定起来;并把
     //       HttpEncodingProperties加入到ioc容器中
    @ConditionalOnWebApplication //Spring底层@Conditional注解(Spring注解版),根据不同的条件,如     //果满足指定的条件,整个配置类里面的配置就会生效; 判断当前应用是否是web应用,如果是,当前配置类生效
    @ConditionalOnClass(CharacterEncodingFilter.class) //判断当前项目有没有这个类
      // CharacterEncodingFilter;SpringMVC中进行乱码解决的过滤器;
    @ConditionalOnProperty(prefix = "spring.http.encoding", value = "enabled", matchIfMissing = true) //判断配置文件中是否存在某个配置 spring.http.encoding.enabled;如果不存在,判断也是成立的即使我们配置文件中不配置pring.http.encoding.enabled=true,也是默认生效的;
    public class HttpEncodingAutoConfiguration {
        //他已经和SpringBoot的配置文件映射了
        private final HttpEncodingProperties properties;
        //只有一个有参构造器的情况下,参数的值就会从容器中拿
        public HttpEncodingAutoConfiguration(HttpEncodingProperties properties) {
            this.properties = properties;
        }
        @Bean //给容器中添加一个组件,这个组件的某些值需要从properties中获取
        @ConditionalOnMissingBean(CharacterEncodingFilter.class) //判断容器没有这个组件?
        public CharacterEncodingFilter characterEncodingFilter() {
            CharacterEncodingFilter filter = new OrderedCharacterEncodingFilter();
            filter.setEncoding(this.properties.getCharset().name());
            filter.setForceRequestEncoding(this.properties.shouldForce(Type.REQUEST));
            filter.setForceResponseEncoding(this.properties.shouldForce(Type.RESPONSE));
            return filter;
        }
根据当前不同的条件判断,决定这个配置类是否生效
一但这个配置类生效;这个配置类就会给容器中添加各种组件;这些组件的属性是从对应的properties类中获取 的,这些类里面的每一个属性又是和配置文件绑定的;
5)、所有在配置文件中能配置的属性都是在xxxxProperties类中封装者‘;配置文件能配置什么就可以参照某个功 能对应的这个属性类
@ConfigurationProperties(prefix = "spring.http.encoding") //从配置文件中获取指定的值和bean的属
性进行绑定
public class HttpEncodingProperties {
public static final Charset DEFAULT_CHARSET = Charset.forName("UTF‐8");
精髓:
1)、SpringBoot启动会加载大量的自动配置类
2)、我们看我们需要的功能有没有SpringBoot默认写好的自动配置类;
3)、我们再来看这个自动配置类中到底配置了哪些组件;(只要我们要用的组件有,我们就不需要再来配置了)
4)、给容器中自动配置类添加组件的时候,会从properties类中获取某些属性。我们就可以在配置文件中指定这 些属性的值;
xxxxAutoConfigurartion:自动配置类; 给容器中添加组件
xxxxProperties:封装配置文件中相关属性;
3.10.2、细节
1、@Conditional派生注解(Spring注解版原生的**@Conditional**作用)
作用:必须是@Conditional指定的条件成立,才给容器中添加组件,配置里面的所有内容才生效;
| @Conditional扩展注解 | 作用(判断是否满足当前指定条件) |
|---|---|
| @ConditionalOnJava | 系统的java版本是否符合要求 |
| @ConditionalOnBean | 容器中存在指定Bean; |
| @ConditionalOnMissingBean | 容器中不存在指定Bean; |
| @ConditionalOnExpression | 满足SpEL表达式指定 |
| @ConditionalOnClass | 系统中有指定的类 |
| @ConditionalOnMissingClass | 系统中没有指定的类 |
| @ConditionalOnSingleCandidate | 容器中只有一个指定的Bean,或者这个Bean是首选Bean |
| @ConditionalOnProperty | 系统中指定的属性是否有指定的值 |
| @ConditionalOnResource | 类路径下是否存在指定资源文件 |
| @ConditionalOnWebApplication | 当前是web环境 |
| @ConditionalOnNotWebApplication | 当前不是web环境 |
| @ConditionalOnJndi | JNDI存在指定项 |
自动配置类必须在一定的条件下才能生效; 我们怎么知道哪些自动配置类生效;
我们可以通过启用 debug=true属性;来让控制台打印自动配置报告,这样我们就可以很方便的知道哪些自动配置类生效;
=========================
AUTO‐CONFIGURATION REPORT
=========================
Positive matches:(自动配置类启用的)
‐‐‐‐‐‐‐‐‐‐‐‐‐‐‐‐‐
DispatcherServletAutoConfiguration matched:
‐ @ConditionalOnClass found required class
'org.springframework.web.servlet.DispatcherServlet'; @ConditionalOnMissingClass did not find
unwanted class (OnClassCondition)
‐ @ConditionalOnWebApplication (required) found StandardServletEnvironment
(OnWebApplicationCondition)
Negative matches:(没有启动,没有匹配成功的自动配置类)
‐‐‐‐‐‐‐‐‐‐‐‐‐‐‐‐‐
ActiveMQAutoConfiguration:
Did not match:
‐ @ConditionalOnClass did not find required classes 'javax.jms.ConnectionFactory',
'org.apache.activemq.ActiveMQConnectionFactory' (OnClassCondition)
AopAutoConfiguration:
Did not match:
‐ @ConditionalOnClass did not find required classes
'org.aspectj.lang.annotation.Aspect', 'org.aspectj.lang.reflect.Advice' (OnClassCondition)
三、日志
日志的详细介绍和logback的使用点击——>缕清各种Java Logging
1、日志框架
Java大猿帅在很久很久以前,要开发一个大型系统的心路和发展历程;
1、System.out.println("");将关键数据打印在控制台;去掉?写在一个文件?
2、框架来记录系统的一些运行时信息;日志框架 ; biglogging.jar;
3、高大上的几个功能?异步模式?自动归档?xxxx? biglogging-good.jar?
4、将以前框架卸下来?换上新的框架,重新修改之前相关的API;biglogging-prefect.jar;
5、JDBC---数据库驱动;
6、写了一个统一的接口层;日志门面(日志的一个抽象层);logging-abstract.jar; 给项目中导入具体的日志实现就行了;我们之前的日志框架都是实现的抽象层;
市面上的日志框架;
JUL、JCL、Jboss-logging、logback、log4j、log4j2、slf4j....
| 日志门面 (日志的抽象层) | 日志实现 |
|---|---|
| JCL(Jakarta Commons Logging)、 SLF4j(Simple Logging Facade for Java)、 jboss-logging | Log4j 、JUL(java.util.logging)、 Log4j2 Logback |
左边选一个门面(抽象层)、右边来选一个实现;我蒙着眼随便选两个,日志门面选: SLF4J,日志实现选:Logback(竟然和SpringBoot的设计者选的一样,英雄所见略同呀);
SpringBoot:底层是Spring框架,Spring框架默认是用JCL; SpringBoot选用 SLF4j和logback;
2、SLF4j使用
1、如何在系统中使用SLF4j
以后开发的时候,日志记录方法的调用,不应该来直接调用日志的实现类,而是调用日志抽象层里面的方法; 给系统里面导入slf4j的jar和 logback的实现jar
import org.slf4j.Logger;
import org.slf4j.LoggerFactory;
public class HelloWorld {
public static void main(String[] args) {
  Logger logger = LoggerFactory.getLogger(HelloWorld.class);
  logger.info("Hello World");
  }
}
每一个日志的实现框架都有自己的配置文件。使用slf4j以后,配置文件还是做成日志实现框架自己本身的配置文 件;
2、遗留问题
SpringBoot(slf4j+logback): Spring(commons-logging)、Hibernate(jboss-logging)、MyBatis、xxxx
统一日志记录,即使是别的框架和我一起统一使用slf4j进行输出?
如何让系统中所有的日志都统一到slf4j;
1、将系统中其他日志框架先排除出去;
2、用中间包来替换原有的日志框架;
3、我们导入slf4j其他的实现
3、SpringBoot日志关系
<dependency>
	<groupId>org.springframework.boot</groupId>
	<artifactId>spring‐boot‐starter</artifactId>
</dependency>
SpringBoot使用它来做日志功能;
<dependency>
  <groupId>org.springframework.boot</groupId>
  <artifactId>spring‐boot‐starter‐logging</artifactId>
</dependency>
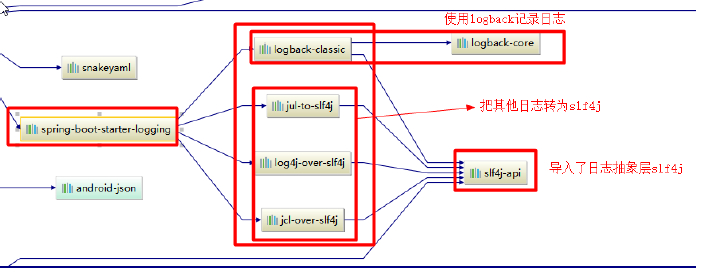
总结:
-
SpringBoot底层也是使用slf4j+logback的方式进行日志记录
-
SpringBoot也把其他的日志都替换成了slf4j;
-
中间替换包
@SuppressWarnings("rawtypes") public abstract class LogFactory { static String UNSUPPORTED_OPERATION_IN_JCL_OVER_SLF4J = "http://www.slf4j.org/codes.html#unsupported_operation_in_jcl_over_slf4j"; static LogFactory logFactory = new SLF4JLogFactory(); -
如果我们要引入其他框架?一定要把这个框架的默认日志依赖移除掉
Spring框架用的是commons-logging;
<dependency>
	<groupId>org.springframework</groupId>
	<artifactId>spring‐core</artifactId>
	<exclusions>
		<exclusion>
			<groupId>commons‐logging</groupId>
			<artifactId>commons‐logging</artifactId>
		</exclusion>
	</exclusions>
</dependency>
SpringBoot能自动适配所有的日志,而且底层使用slf4j+logback的方式记录日志,引入其他框架的时候,只需要把这个框架依赖的日志框架排除掉即可;
4、日志使用
4.1、默认配置
SpringBoot默认帮我们配置好了日志;
//记录器
Logger logger = LoggerFactory.getLogger(getClass());
@Test
public void contextLoads() {
    //System.out.println();
    //日志的级别;
    //由低到高 trace<debug<info<warn<error
    //可以调整输出的日志级别;日志就只会在这个级别以以后的高级别生效
    logger.trace("这是trace日志...");
    logger.debug("这是debug日志...");
    //SpringBoot默认给我们使用的是info级别的,没有指定级别的就用SpringBoot默认规定的级别;root
    级别
    logger.info("这是info日志...");
    logger.warn("这是warn日志...");
    logger.error("这是error日志...");
}
日志输出格式:
%d表示日期时间,
%thread表示线程名,
%‐5level:级别从左显示5个字符宽度
%logger{50} 表示logger名字最长50个字符,否则按照句点分割。
%msg:日志消息,
%n是换行符
‐‐>
%d{yyyy‐MM‐dd HH:mm:ss.SSS} [%thread] %‐5level %logger{50} ‐ %msg%n
SpringBoot修改日志的默认配置
logging.level.cn.starfish=trace
#logging.path=
# 不指定路径在当前项目下生成springboot.log日志
# 可以指定完整的路径;
#logging.file=G:/springboot.log
# 在当前磁盘的根路径下创建spring文件夹和里面的log文件夹;使用 spring.log 作为默认文件
logging.path=/spring/log
# 在控制台输出的日志的格式
logging.pattern.console=%d{yyyy‐MM‐dd} [%thread] %‐5level %logger{50} ‐ %msg%n
# 指定文件中日志输出的格式
logging.pattern.file=%d{yyyy‐MM‐dd} === [%thread] === %‐5level === %logger{50} ==== %msg%n
| logging.file | logging.path | Example | Description |
|---|---|---|---|
| (none) | (none) | 只在控制台输出 | |
| 指定文件名 | (none) | my.log | 输出日志到my.log文件 |
| (none) | 指定目录 | /var/log | 输出到指定目录的 spring.log 文件中 |
4.2、指定配置
给类路径下放上每个日志框架自己的配置文件即可;SpringBoot就不使用他默认配置的了
| Logging System | Customization |
|---|---|
| Logback | logback-spring.xml , logback-spring.groovy , logback.xml or logback.groovy |
| Log4j2 | log4j2-spring.xml or log4j2.xml |
| JDK (Java Util Logging) | logging.properties |
logback.xml:直接就被日志框架识别了;
logback-spring.xml:日志框架就不直接加载日志的配置项,由SpringBoot解析日志配置,可以使用SpringBoot
的高级Profile功能
<springProfile name="staging">
<!‐‐ configuration to be enabled when the "staging" profile is active ‐‐>
可以指定某段配置只在某个环境下生效
</springProfile>
如:
<appender name="stdout" class="ch.qos.logback.core.ConsoleAppender">
<!‐‐
   日志输出格式:
   %d表示日期时间,
   %thread表示线程名,
   %‐5level:级别从左显示5个字符宽度
   %logger{50} 表示logger名字最长50个字符,否则按照句点分割。
   %msg:日志消息,
   %n是换行符
‐‐>
<layout class="ch.qos.logback.classic.PatternLayout">
<springProfile name="dev">
<pattern>%d{yyyy‐MM‐dd HH:mm:ss.SSS} ‐‐‐‐> [%thread] ‐‐‐> %‐5level
%logger{50} ‐ %msg%n</pattern>
</springProfile>
<springProfile name="!dev">
<pattern>%d{yyyy‐MM‐dd HH:mm:ss.SSS} ==== [%thread] ==== %‐5level
%logger{50} ‐ %msg%n</pattern>
</springProfile>
</layout>
</appender>
如果使用logback.xml作为日志配置文件,还要使用profile功能,会有以下错误
no applicable action for [springProfile]
5、切换日志框架
可以按照slf4j的日志适配图,进行相关的切换;
slf4j+log4j的方式;
<dependency>
    <groupId>org.springframework.boot</groupId>
    <artifactId>spring‐boot‐starter‐web</artifactId>
    <exclusions>
        <exclusion>
        <artifactId>logback‐classic</artifactId>
        <groupId>ch.qos.logback</groupId>
        </exclusion>
    <exclusion>
        <artifactId>log4j‐over‐slf4j</artifactId>
        <groupId>org.slf4j</groupId>
        </exclusion>
    </exclusions>
</dependency>
<dependency>
    <groupId>org.slf4j</groupId>
    <artifactId>slf4j‐log4j12</artifactId>
</dependency>
切换为log4j2
<dependency>
  <groupId>org.springframework.boot</groupId>
  <artifactId>spring‐boot‐starter‐web</artifactId>
  <exclusions>
      <exclusion>
          <artifactId>spring‐boot‐starter‐logging</artifactId>
          <groupId>org.springframework.boot</groupId>
      </exclusion>
  </exclusions>
</dependency>
<dependency>
  <groupId>org.springframework.boot</groupId>
  <artifactId>spring‐boot‐starter‐log4j2</artifactId>
</dependency>
四、Web开发
1、使用SpringBoot
1)、创建SpringBoot应用,选中我们需要的模块;
2)、SpringBoot已经默认将这些场景配置好了,只需要在配置文件中指定少量配置就可以运行起来
3)、自己编写业务代码;
2、SpringBoot对静态资源的映射规则;
一层一层的剥开SpringBoot到ResourceProperties,可以看到加载resource的路径顺序,以及属性的一些操作链(SpringBoot1.xx的版本是继承了ResourceLoaderAware,2.xx和1.xx的变化还挺大饿)。
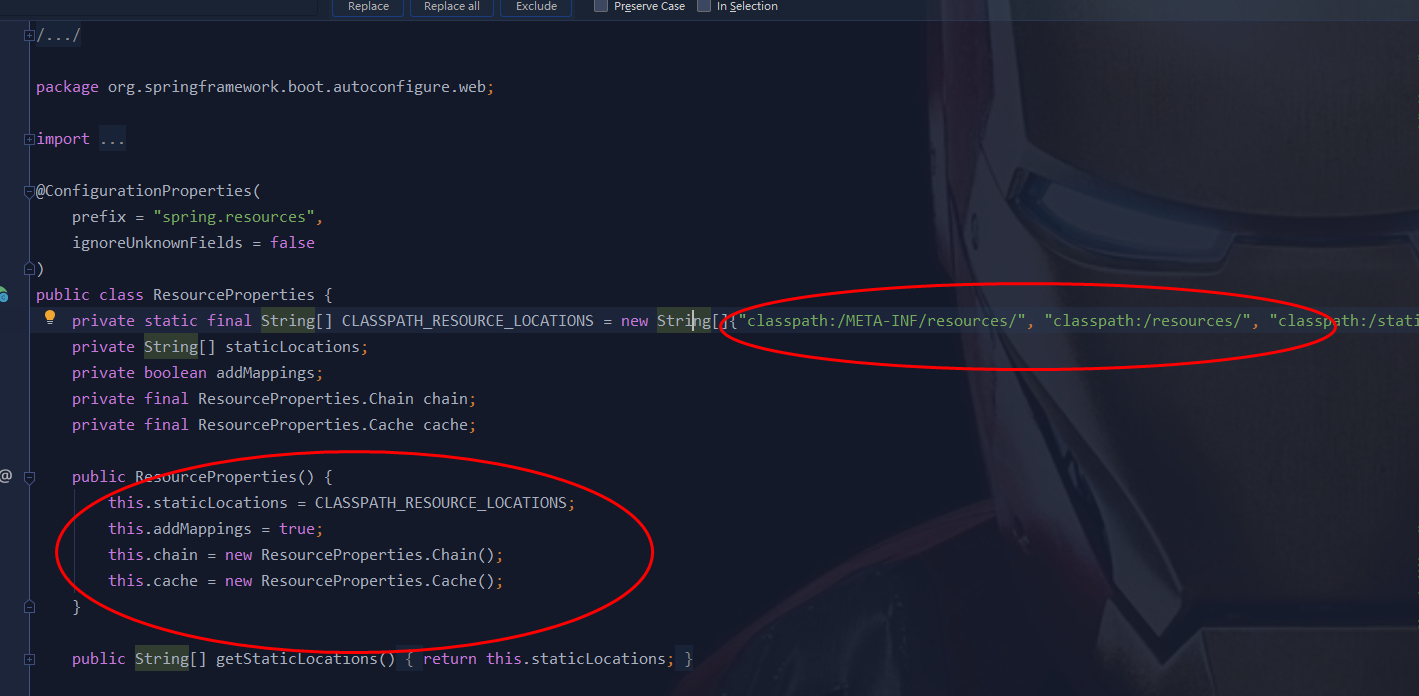
-
所有 /webjars/** ,都去 classpath:/META-INF/resources/webjars/ 找资源;
webjars:以jar包的方式引入静态资源;
localhost:8080/webjars/jquery/3.3.1/jquery.js
<!‐‐引入jquery‐webjar‐‐>在访问的时候只需要写webjars下面资源的名称即可
<dependency>
    <groupId>org.webjars</groupId>
    <artifactId>jquery</artifactId>
    <version>3.3.1</version>
</dependency>
-
"/**" 访问当前项目的任何资源,都去(静态资源的文件夹)找映射
"classpath:/META‐INF/resources/", "classpath:/resources/", "classpath:/static/", "classpath:/public/" "/":当前项目的根路径
localhost:8080/abc === 去静态资源文件夹里面找abc
- 欢迎页; 静态资源文件夹下的所有index.html页面;被"/**"映射;
localhost:8080/ 找index页面
- 所有的 **/favicon.ico 都是在静态资源文件下找;
## **3**、模板引擎
常见的模板引擎:JSP、Velocity、Freemarker、Thymeleaf

SpringBoot推荐的Thymeleaf; 语法更简单,功能更强大;
### 3.1、引入thymeleaf;
```xml
<dependency>
<groupId>org.springframework.boot</groupId>
<artifactId>spring‐boot‐starter‐thymeleaf</artifactId>
</dependency>
<!--切换thymeleaf版本-->
<properties>
<thymeleaf.version>3.0.9.RELEASE</thymeleaf.version>
<!‐‐布局功能的支持程序 thymeleaf3主程序 layout2以上版本‐‐>
<!‐‐ thymeleaf2 layout1‐‐>
<thymeleaf‐layout‐dialect.version>2.2.2</thymeleaf‐layout‐dialect.version>
</properties>
3.2、Thymeleaf使用
@ConfigurationProperties(prefix = "spring.thymeleaf")
public class ThymeleafProperties {
private static final Charset DEFAULT_ENCODING = Charset.forName("UTF‐8");
private static final MimeType DEFAULT_CONTENT_TYPE = MimeType.valueOf("text/html");
public static final String DEFAULT_PREFIX = "classpath:/templates/";
public static final String DEFAULT_SUFFIX = ".html";
只要我们把HTML页面放在classpath:/templates/,thymeleaf就能自动渲染;
-
导入thymeleaf的名称空间
<html lang="en" xmlns:th="http://www.thymeleaf.org"> -
使用thymeleaf语法;
<!DOCTYPE html>
<html lang="en" xmlns:th="http://www.thymeleaf.org">
<head>
<meta charset="UTF‐8">
<title>Title</title>
</head>
<body>
<h1>成功!</h1>
<!‐‐th:text 将div里面的文本内容设置为 ‐‐>
<div th:text="${hello}">这是显示欢迎信息</div>
</body>
</html>
3.3、语法规则
1)、th:text;改变当前元素里面的文本内容;
th:任意html属性;来替换原生属性的值
2)、表达式
Simple expressions:(表达式语法)
Variable Expressions: ${...}:获取变量值;OGNL;
1)、获取对象的属性、调用方法
2)、使用内置的基本对象:
#ctx : the context object.
#vars: the context variables.
#locale : the context locale.
#request : (only in Web Contexts) the HttpServletRequest object.
#response : (only in Web Contexts) the HttpServletResponse object.
#session : (only in Web Contexts) the HttpSession object.
#servletContext : (only in Web Contexts) the ServletContext object.
${session.foo}
3)、内置的一些工具对象:
#execInfo : information about the template being processed.
#messages : methods for obtaining externalized messages inside variables expressions, in the
same way as they would be obtained using #{…} syntax.
#uris : methods for escaping parts of URLs/URIs
#conversions : methods for executing the configured conversion service (if any).
#dates : methods for java.util.Date objects: formatting, component extraction, etc.
#calendars : analogous to #dates , but for java.util.Calendar objects.
#numbers : methods for formatting numeric objects.
#strings : methods for String objects: contains, startsWith, prepending/appending, etc.
#objects : methods for objects in general.
#bools : methods for boolean evaluation.
#arrays : methods for arrays.
#lists : methods for lists.
#sets : methods for sets.
#maps : methods for maps.
#aggregates : methods for creating aggregates on arrays or collections.
#ids : methods for dealing with id attributes that might be repeated (for example, as a
result of an iteration).
Selection Variable Expressions: *{...}:选择表达式:和${}在功能上是一样;
补充:配合 th:object="${session.user}:
<div th:object="${session.user}">
<p>Name: <span th:text="*{firstName}">Sebastian</span>.</p>
<p>Surname: <span th:text="*{lastName}">Pepper</span>.</p>
<p>Nationality: <span th:text="*{nationality}">Saturn</span>.</p>
</div>
Message Expressions: #{...}:获取国际化内容
Link URL Expressions: @{...}:定义URL;
@{/order/process(execId=${execId},execType='FAST')}
Fragment Expressions: ~{...}:片段引用表达式
<div th:insert="~{commons :: main}">...</div>
Literals(字面量)
Text literals: 'one text' , 'Another one!' ,…
Number literals: 0 , 34 , 3.0 , 12.3 ,…
Boolean literals: true , false
Null literal: null
Literal tokens: one , sometext , main ,…
Text operations:(文本操作)
String concatenation: +
Literal substitutions: |The name is ${name}|
Arithmetic operations:(数学运算)
Binary operators: + , ‐ , * , / , %
4、SpringMVC自动配置
4.1、Spring MVC auto-configuration
Spring Boot 自动配置好了SpringMVC
以下是SpringBoot对SpringMVC的默认配置:(WebMvcAutoConfiguration)
- Inclusion of ContentNegotiatingViewResolver and BeanNameViewResolver beans.
- 自动配置了ViewResolver(视图解析器:根据方法的返回值得到视图对象(View),视图对象决定如何 渲染(转发?重定向?))
- ContentNegotiatingViewResolver:组合所有的视图解析器的;
- 如何定制:我们可以自己给容器中添加一个视图解析器;自动的将其组合进来;
- Support for serving static resources, including support for WebJars (see below).静态资源文件夹路 径,webjars
- Static index.html support. 静态首页访问
- Custom Favicon support (see below). favicon.ico
- 自动注册了 of Converter , GenericConverter , Formatter beans. Converter:转换器; public String hello(User user):类型转换使用Converter Formatter 格式化器; 2017.12.17===Date;
@Bean
@ConditionalOnProperty(prefix = "spring.mvc", name = "date‐format")//在文件中配置日期格
式化的规则
public Formatter<Date> dateFormatter() {
return new DateFormatter(this.mvcProperties.getDateFormat());//日期格式化组件
}
自己添加的格式化器转换器,我们只需要放在容器中即可
- Support for HttpMessageConverters (see below).
- HttpMessageConverter:SpringMVC用来转换Http请求和响应的;User---Json
- HttpMessageConverters 是从容器中确定;获取所有的HttpMessageConverter; 自己给容器中添加HttpMessageConverter,只需要将自己的组件注册容器中 (@Bean,@Component)
- Automatic registration of MessageCodesResolver (see below).定义错误代码生成规则
- Automatic use of a ConfigurableWebBindingInitializer bean (see below). 我们可以配置一个ConfigurableWebBindingInitializer来替换默认的;(添加到容器)
4.2、扩展SpringMVC
<mvc:view‐controller path="/hello" view‐name="success"/>
<mvc:interceptors>
    <mvc:interceptor>
        <mvc:mapping path="/hello"/>
        <bean></bean>
    </mvc:interceptor>
</mvc:interceptors>
编写一个配置类(@Configuration),是WebMvcConfigurerAdapter类型;不能标注@EnableWebMvc;
既保留了所有的自动配置,也能用我们扩展的配置;
//使用WebMvcConfigurerAdapter可以来扩展SpringMVC的功能
@Configuration
    public class MyMvcConfig extends WebMvcConfigurerAdapter {
    @Override
    public void addViewControllers(ViewControllerRegistry registry) {
    // super.addViewControllers(registry);
    //浏览器发送 /atguigu 请求来到 success
    registry.addViewController("/atguigu").setViewName("success");
    }
}
原理:
1)、WebMvcAutoConfiguration是SpringMVC的自动配置类
2)、在做其他自动配置时会导入;@Import(EnableWebMvcConfiguration.class)
@Configuration
public static class EnableWebMvcConfiguration extends DelegatingWebMvcConfiguration {
    private final WebMvcConfigurerComposite configurers = new WebMvcConfigurerComposite();
    //从容器中获取所有的WebMvcConfigurer
    @Autowired(required = false)
    public void setConfigurers(List<WebMvcConfigurer> configurers) {
        if (!CollectionUtils.isEmpty(configurers)) {
            this.configurers.addWebMvcConfigurers(configurers);
    //一个参考实现;将所有的WebMvcConfigurer相关配置都来一起调用;
                    @Override
    // public void addViewControllers(ViewControllerRegistry registry) {
    // for (WebMvcConfigurer delegate : this.delegates) {
    // delegate.addViewControllers(registry);
    // }
        }
    }
}
3)、容器中所有的WebMvcConfigurer都会一起起作用;
4)、我们的配置类也会被调用;
效果:SpringMVC的自动配置和我们的扩展配置都会起作用;
4.3、全面接管SpringMVC;
SpringBoot对SpringMVC的自动配置不需要了,所有都是我们自己配置;所有的SpringMVC的自动配置都失效了 我们需要在配置类中添加@EnableWebMvc即可;
//使用WebMvcConfigurerAdapter可以来扩展SpringMVC的功能
@EnableWebMvc
@Configuration
public class MyMvcConfig extends WebMvcConfigurerAdapter {
@Override
public void addViewControllers(ViewControllerRegistry registry) {
    // super.addViewControllers(registry);
    //浏览器发送 /atguigu 请求来到 success
    registry.addViewController("/atguigu").setViewName("success");
	}
}
原理:
为什么@EnableWebMvc自动配置就失效了;
1)@EnableWebMvc的核心
@Import(DelegatingWebMvcConfiguration.class)
public @interface EnableWebMvc {
2)、
@Configuration
public class DelegatingWebMvcConfiguration extends WebMvcConfigurationSupport {
3)、
@Configuration
@ConditionalOnWebApplication
@ConditionalOnClass({ Servlet.class, DispatcherServlet.class,
WebMvcConfigurerAdapter.class })
//容器中没有这个组件的时候,这个自动配置类才生效
@ConditionalOnMissingBean(WebMvcConfigurationSupport.class)
@AutoConfigureOrder(Ordered.HIGHEST_PRECEDENCE + 10)
@AutoConfigureAfter({ DispatcherServletAutoConfiguration.class,
ValidationAutoConfiguration.class })
public class WebMvcAutoConfiguration {
4)、@EnableWebMvc将WebMvcConfigurationSupport组件导入进来;
5)、导入的WebMvcConfigurationSupport只是SpringMVC最基本的功能;
5、如何修改SpringBoot的默认配置
模式:
1)、SpringBoot在自动配置很多组件的时候,先看容器中有没有用户自己配置的(@Bean、@Component)如 果有就用用户配置的,如果没有,才自动配置;如果有些组件可以有多个(ViewResolver)将用户配置的和自己默 认的组合起来;
2)、在SpringBoot中会有非常多的xxxConfigurer帮助我们进行扩展配置
3)、在SpringBoot中会有很多的xxxCustomizer帮助我们进行定制配置
6、RestfulCRUD
1)、默认访问首页
//使用WebMvcConfigurerAdapter可以来扩展SpringMVC的功能
//@EnableWebMvc 不要接管SpringMVC
@Configuration
public class MyMvcConfig extends WebMvcConfigurerAdapter {
    @Override
    public void addViewControllers(ViewControllerRegistry registry) {
        // super.addViewControllers(registry);
        //浏览器发送 /atguigu 请求来到 success
        registry.addViewController("/atguigu").setViewName("success");
    }
    //所有的WebMvcConfigurerAdapter组件都会一起起作用
    @Bean //将组件注册在容器
    public WebMvcConfigurerAdapter webMvcConfigurerAdapter(){
        WebMvcConfigurerAdapter adapter = new WebMvcConfigurerAdapter() {
            @Override
            public void addViewControllers(ViewControllerRegistry registry) {
                registry.addViewController("/").setViewName("login");
                registry.addViewController("/index.html").setViewName("login");
            }
        };
        return adapter;
    }
}
2)、国际化
- 编写国际化配置文件;
- 使用ResourceBundleMessageSource管理国际化资源文件
- 在页面使用fmt:message取出国际化内容
步骤:
a、编写国际化配置文件,抽取页面需要显示的国际化消息
b、SpringBoot自动配置好了管理国际化资源文件的组件;
@ConfigurationProperties(prefix = "spring.messages")
public class MessageSourceAutoConfiguration {
    /**
     * Comma‐separated list of basenames (essentially a fully‐qualified classpath
     * location), each following the ResourceBundle convention with relaxed support for
     * slash based locations. If it doesn't contain a package qualifier (such as
     * "org.mypackage"), it will be resolved from the classpath root.
     */
    private String basename = "messages";
    //我们的配置文件可以直接放在类路径下叫messages.properties;
    @Bean
    public MessageSource messageSource() {
        ResourceBundleMessageSource messageSource = new ResourceBundleMessageSource();
        if (StringUtils.hasText(this.basename)) {
//设置国际化资源文件的基础名(去掉语言国家代码的)
            messageSource.setBasenames(StringUtils.commaDelimitedListToStringArray(
                    StringUtils.trimAllWhitespace(this.basename)));
        }
        if (this.encoding != null) {
            messageSource.setDefaultEncoding(this.encoding.name());
        }
        messageSource.setFallbackToSystemLocale(this.fallbackToSystemLocale);
        messageSource.setCacheSeconds(this.cacheSeconds);
        messageSource.setAlwaysUseMessageFormat(this.alwaysUseMessageFormat);
        return messageSource;
    }
 @ConfigurationProperties(prefix  =  "spring.messages")
public  class  MessageSourceAutoConfiguration  { 3

           private  String  basename  =  "messages";
           //我们的配置文件可以直接放在类路径下叫messages.properties; 12

           @Bean
           public  MessageSource  messageSource()  {
                   ResourceBundleMessageSource  messageSource  =  new  ResourceBundleMessageSource();
                   if  (StringUtils.hasText(this.basename))  {
                            //设置国际化资源文件的基础名(去掉语言国家代码的)                           messageSource.setBasenames(StringUtils.commaDelimitedListToStringArray(

                   StringUtils.trimAllWhitespace(this.basename))); 20     }

                   if (this.encoding != null) {

                   messageSource.setDefaultEncoding(this.encoding.name()); 23    }

                   messageSource.setFallbackToSystemLocale(this.fallbackToSystemLocale);

                   messageSource.setCacheSeconds(this.cacheSeconds);

                   messageSource.setAlwaysUseMessageFormat(this.alwaysUseMessageFormat);

           return  messageSource; 28        }
c、去页面获取国际化的值;
<!DOCTYPE html>
<html lang="en" xmlns:th="http://www.thymeleaf.org">
<head>
<meta http‐equiv="Content‐Type" content="text/html; charset=UTF‐8">
<meta name="viewport" content="width=device‐width, initial‐scale=1, shrink‐to‐
fit=no">
<meta name="description" content="">
<meta name="author" content="">
<title>Signin Template for Bootstrap</title>
<!‐‐ Bootstrap core CSS ‐‐>
<link href="asserts/css/bootstrap.min.css"
th:href="@{/webjars/bootstrap/4.0.0/css/bootstrap.css}" rel="stylesheet">
<!‐‐ Custom styles for this template ‐‐>
<link href="asserts/css/signin.css" th:href="@{/asserts/css/signin.css}"
rel="stylesheet">
</head>
<body class="text‐center">
<form class="form‐signin" action="dashboard.html">
<img class="mb‐4" th:src="@{/asserts/img/bootstrap‐solid.svg}"
src="asserts/img/bootstrap‐solid.svg" alt="" width="72" height="72">
<h1 class="h3 mb‐3 font‐weight‐normal" th:text="#{login.tip}">Please sign
in</h1>
<label class="sr‐only" th:text="#{login.username}">Username</label>
<input type="text" class="form‐control" placeholder="Username" th:placeholder="#
{login.username}" required="" autofocus="">
<label class="sr‐only" th:text="#{login.password}">Password</label>
<input type="password" class="form‐control" placeholder="Password"
th:placeholder="#{login.password}" required="">
<div class="checkbox mb‐3">
<label>
<input type="checkbox" value="remember‐me"/> [[#{login.remember}]]
</label>
</div>
<button class="btn btn‐lg btn‐primary btn‐block" type="submit" th:text="#
{login.btn}">Sign in</button>
<p class="mt‐5 mb‐3 text‐muted">© 2017‐2018</p>
<a class="btn btn‐sm">中文</a>
<a class="btn btn‐sm">English</a>
</form>
</body>
</html>
效果:根据浏览器语言设置的信息切换了国际化;
原理:
国际化Locale(区域信息对象);LocaleResolver(获取区域信息对象);默认的就是根据请求头带来的区域信息获取Locale进行国际化
@Bean
@ConditionalOnMissingBean
@ConditionalOnProperty(prefix = "spring.mvc", name = "locale")
public LocaleResolver localeResolver() {
	if (this.mvcProperties
	.getLocaleResolver() == WebMvcProperties.LocaleResolver.FIXED) {
	return new FixedLocaleResolver(this.mvcProperties.getLocale());
	}
	AcceptHeaderLocaleResolver localeResolver = new AcceptHeaderLocaleResolver();
	localeResolver.setDefaultLocale(this.mvcProperties.getLocale());
	return localeResolver;
}
d、点击链接切换国际化
/**
 * 可以在连接上携带区域信息
 */
public class MyLocaleResolver implements LocaleResolver {
    @Override
    public Locale resolveLocale(HttpServletRequest request) {
        String l = request.getParameter("l");
        Locale locale = Locale.getDefault();
        if(!StringUtils.isEmpty(l)){
            String[] split = l.split("_");
            locale = new Locale(split[0],split[1]);
        }
        return locale;
    }
    @Override
    public void setLocale(HttpServletRequest request, HttpServletResponse response, Locale
            locale) {
    }
}
    @Bean
    public LocaleResolver localeResolver(){
        return new MyLocaleResolver();
    }
}
3)、登陆
开发期间模板引擎页面修改以后,要实时生效
a、禁用模板引擎的缓存
# 禁用缓存
spring.thymeleaf.cache=false
b、页面修改完成以后ctrl+f9:重新编译; 登陆错误消息的显示
<p style="color: red" th:text="${msg}" th:if="${not #strings.isEmpty(msg)}"></p>
4)、拦截器进行登陆检查
拦截器
/**
 * 登陆检查,
 */
public class LoginHandlerInterceptor implements HandlerInterceptor {
    //目标方法执行之前
    @Override
    public boolean preHandle(HttpServletRequest request, HttpServletResponse response,
                             Object handler) throws Exception {
        Object user = request.getSession().getAttribute("loginUser");
        if(user == null){
//未登陆,返回登陆页面
            request.setAttribute("msg","没有权限请先登陆");
            request.getRequestDispatcher("/index.html").forward(request,response);
            return false;
        }else{
//已登陆,放行请求
            return true;
        }
    }
    @Override
    public void postHandle(HttpServletRequest request, HttpServletResponse response, Object
            handler, ModelAndView modelAndView) throws Exception {
    }
    @Override
    public void afterCompletion(HttpServletRequest request, HttpServletResponse response,
                                Object handler, Exception ex) throws Exception {
    }
注册拦截器
 //所有的WebMvcConfigurerAdapter组件都会一起起作用
   @Bean //将组件注册在容器
   public WebMvcConfigurerAdapter webMvcConfigurerAdapter(){
       WebMvcConfigurerAdapter adapter = new WebMvcConfigurerAdapter() {
           @Override
           public void addViewControllers(ViewControllerRegistry registry) {
               registry.addViewController("/").setViewName("login");
               registry.addViewController("/index.html").setViewName("login");
               registry.addViewController("/main.html").setViewName("dashboard");
           }
           //注册拦截器
           @Override
           public void addInterceptors(InterceptorRegistry registry) {
//super.addInterceptors(registry);
//静态资源; *.css , *.js
//SpringBoot已经做好了静态资源映射
               registry.addInterceptor(new
                       LoginHandlerInterceptor()).addPathPatterns("/**")
                       .excludePathPatterns("/index.html","/","/user/login");
           }
       };
       return adapter;
   }
5)、CRUD-员工列表
实验要求:
a、RestfulCRUD:CRUD满足Rest风格;
URI: /资源名称/资源标识 HTTP请求方式区分对资源CRUD操作
| 普通CRUD(uri来区分操作) | RestfulCRUD | |
|---|---|---|
| 查询 | getEmp | emp---GET |
| 添加 | addEmp?xxx | emp---POST |
| 修改 | updateEmp?id=xxx&xxx=xx | emp/{id}---PUT |
| 删除 | deleteEmp?id=1 | emp/{id}---DELETE |
b、实验的请求架构;
| 实验功能 | 请求URI | 请求方式 |
|---|---|---|
| 查询所有员工 | emps | GET |
| 查询某个员工(来到修改页面) | emp/1 | GET |
| 来到添加页面 | emp | GET |
| 添加员工 | emp | POST |
| 来到修改页面(查出员工进行信息回显) | emp/1 | GET |
| 修改员工 | emp | PUT |
| 删除员工 | emp/1 | DELETE |
c、员工列表:
thymeleaf公共页面元素抽取
1、抽取公共片段
<div th:fragment="copy">
© 2011 The Good Thymes Virtual Grocery
</div>
2、引入公共片段
<div th:insert="~{footer :: copy}"></div>
~{templatename::selector}:模板名::选择器
~{templatename::fragmentname}:模板名::片段名
3、默认效果:
insert的公共片段在div标签中
如果使用th:insert等属性进行引入,可以不用写~{}:
行内写法可以加上:[[~{}]];[(~{})];
三种引入公共片段的th属性:
th:insert:将公共片段整个插入到声明引入的元素中
th:replace:将声明引入的元素替换为公共片段
th:include:将被引入的片段的内容包含进这个标签中
<footer th:fragment="copy">
© 2011 The Good Thymes Virtual Grocery
</footer>
引入方式
<div th:insert="footer :: copy"></div>
引入片段的时候传入参数:
6)、CRUD-员工添加
添加页面
<div th:replace="footer :: copy"></div>
<div th:include="footer :: copy"></div>
效果
<div>
<footer>
© 2011 The Good Thymes Virtual Grocery
</footer>
</div>
<footer>
© 2011 The Good Thymes Virtual Grocery
</footer>
<div>
© 2011 The Good Thymes Virtual Grocery
</div>
7、错误处理机制
1)、SpringBoot默认的错误处理机制
默认效果:
a、浏览器,返回一个默认的错误页面
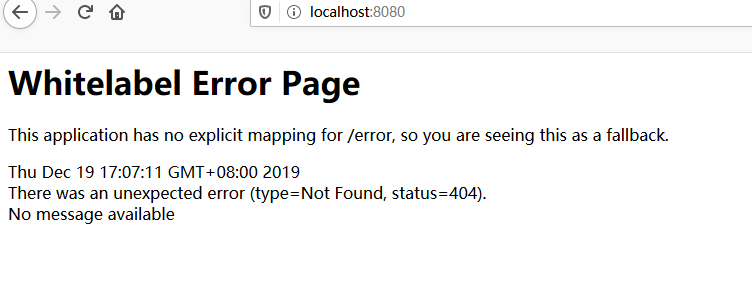
b、如果是其他客户端,默认响应一个json数据
原理:
可以参照ErrorMvcAutoConfiguration;错误处理的自动配置; 给容器中添加了以下组件
-
DefaultErrorAttributes:帮我们在页面共享信息;
@Override public Map<String, Object> getErrorAttributes(RequestAttributes requestAttributes, boolean includeStackTrace) { Map<String, Object> errorAttributes = new LinkedHashMap<String, Object>(); errorAttributes.put("timestamp", new Date()); addStatus(errorAttributes, requestAttributes); addErrorDetails(errorAttributes, requestAttributes, includeStackTrace); addPath(errorAttributes, requestAttributes); return errorAttributes; } -
BasicErrorController:处理默认/error请求
@Controller @RequestMapping("${server.error.path:${error.path:/error}}") public class BasicErrorController extends AbstractErrorController { @RequestMapping(produces = "text/html")//产生html类型的数据;浏览器发送的请求来到这个方法处理 public ModelAndView errorHtml(HttpServletRequest request, HttpServletResponse response) { HttpStatus status = getStatus(request); Map<String, Object> model = Collections.unmodifiableMap(getErrorAttributes( request, isIncludeStackTrace(request, MediaType.TEXT_HTML))); response.setStatus(status.value()); //去哪个页面作为错误页面;包含页面地址和页面内容 ModelAndView modelAndView = resolveErrorView(request, response, status, model); return (modelAndView == null ? new ModelAndView("error", model) : modelAndView); } @RequestMapping @ResponseBody //产生json数据,其他客户端来到这个方法处理; public ResponseEntity<Map<String, Object>> error(HttpServletRequest request) { Map<String, Object> body = getErrorAttributes(request, isIncludeStackTrace(request, MediaType.ALL)); HttpStatus status = getStatus(request); return new ResponseEntity<Map<String, Object>>(body, status); } -
ErrorPageCustomizer:
@Value("${error.path:/error}") //系统出现错误以后来到error请求进行处理;(web.xml注册的错误页面规则) private String path = "/error"; -
DefaultErrorViewResolver:
    @Override
    public ModelAndView resolveErrorView(HttpServletRequest request, HttpStatus status,
                                         Map<String, Object> model) {
        ModelAndView modelAndView = resolve(String.valueOf(status), model);
        if (modelAndView == null && SERIES_VIEWS.containsKey(status.series())) {
            modelAndView = resolve(SERIES_VIEWS.get(status.series()), model);
        }
        return modelAndView;
    }
    private ModelAndView resolve(String viewName, Map<String, Object> model) {
		//默认SpringBoot可以去找到一个页面? error/404
        String errorViewName = "error/" + viewName;
		//模板引擎可以解析这个页面地址就用模板引擎解析
        TemplateAvailabilityProvider provider = this.templateAvailabilityProviders
                .getProvider(errorViewName, this.applicationContext);
        if (provider != null) {
			//模板引擎可用的情况下返回到errorViewName指定的视图地址
            return new ModelAndView(errorViewName, model);
        }
		//模板引擎不可用,就在静态资源文件夹下找errorViewName对应的页面 error/404.html
        return resolveResource(errorViewName, model);
    }
步骤:
一但系统出现4xx或者5xx之类的错误;ErrorPageCustomizer就会生效(定制错误的响应规则);就会来到/error 请求;就会被BasicErrorController处理;
-
响应页面;去哪个页面是由DefaultErrorViewResolver解析得到的;
protected ModelAndView resolveErrorView(HttpServletRequest request,
                                        HttpServletResponse response, HttpStatus status, Map<String, Object> model) {
    //所有的ErrorViewResolver得到ModelAndView
    for (ErrorViewResolver resolver : this.errorViewResolvers) {
        ModelAndView modelAndView = resolver.resolveErrorView(request, status, model);
        if (modelAndView != null) {
            return modelAndView;
        }
    }
    return null;
}
2)、如何定制错误响应:
a. 如何定制错误的页面;
-
有模板引擎的情况下;error/状态码; 【将错误页面命名为 错误状态码.html 放在模板引擎文件夹里面error 文件夹下】,发生此状态码的错误就会来到对应的页面;
我们可以使用4xx和5xx作为错误页面的文件名来匹配这种类型的所有错误,精确优先(优先寻找精确的状态 码.html);
页面能获取的信息:timestamp:
- 时间戳
- status:状态码
- error:错误提示exception:异常对象
- message:异常消息
- errors:JSR303数据校验的错误都在这里
-
没有模板引擎(模板引擎找不到这个错误页面),静态资源文件夹下找;
-
以上都没有错误页面,就是默认来到SpringBoot默认的错误提示页面;
b. 如何定制错误的json数据;
-
自定义异常处理&返回定制json数据;
@ControllerAdvice public class MyExceptionHandler { @ResponseBody @ExceptionHandler(UserNotExistException.class) public Map<String,Object> handleException(Exception e){ Map<String,Object> map = new HashMap<>(); map.put("code","user.notexist"); map.put("message",e.getMessage()); return map; } } //没有自适应效果... -
转发到/error进行自适应响应效果处理
@ExceptionHandler(UserNotExistException.class)
public String handleException(Exception e, HttpServletRequest request){
    Map<String,Object> map = new HashMap<>();
    //传入我们自己的错误状态码 4xx 5xx,否则就不会进入定制错误页面的解析流程
    /**
    * Integer statusCode = (Integer) request
    .getAttribute("javax.servlet.error.status_code");
    */
    request.setAttribute("javax.servlet.error.status_code",500);
    map.put("code","user.notexist");
    map.put("message",e.getMessage());
    //转发到/error
    return "forward:/error";
}
3)、将我们的定制数据携带出去;
出现错误以后,会来到/error请求,会被BasicErrorController处理,响应出去可以获取的数据是由
getErrorAttributes得到的(是AbstractErrorController(ErrorController)规定的方法);
-
完全来编写一个ErrorController的实现类【或者是编写AbstractErrorController的子类】,放在容器中;
-
页面上能用的数据,或者是json返回能用的数据都是通过errorAttributes.getErrorAttributes得到; 容器中DefaultErrorAttributes.getErrorAttributes();默认进行数据处理的;
自定义ErrorAttributes
//给容器中加入我们自己定义的ErrorAttributes
@Component
public class MyErrorAttributes extends DefaultErrorAttributes {
    @Override
    public Map<String, Object> getErrorAttributes(RequestAttributes requestAttributes,
                                                  boolean includeStackTrace) {
        Map<String, Object> map = super.getErrorAttributes(requestAttributes,
                includeStackTrace);
        map.put("company","atguigu");
        return map;
    }
最终的效果:响应是自适应的,可以通过定制ErrorAttributes改变需要返回的内容,
8、配置嵌入式Servlet容器
SpringBoot默认使用Tomcat作为嵌入式的Servlet容器;
1)、如何定制和修改Servlet容器的相关配置;
-
修改和server有关的配置(ServerProperties【也是EmbeddedServletContainerCustomizer】);
server.port=8081 server.context‐path=/crud server.tomcat.uri‐encoding=UTF‐8 //通用的Servlet容器设置 server.xxx //Tomcat的设置 server.tomcat.xxx -
编写一个EmbeddedServletContainerCustomizer:嵌入式的Servlet容器的定制器;来修改Servlet容器的配置
@Bean //一定要将这个定制器加入到容器中
public EmbeddedServletContainerCustomizer embeddedServletContainerCustomizer(){
    return new EmbeddedServletContainerCustomizer() {
        //定制嵌入式的Servlet容器相关的规则
        @Override
        public void customize(ConfigurableEmbeddedServletContainer container) {
            container.setPort(8083);
        }
    };
}
2)、注册Servlet三大组件【Servlet、Filter、Listener】
由于SpringBoot默认是以jar包的方式启动嵌入式的Servlet容器来启动SpringBoot的web应用,没有web.xml文 件。
注册三大组件用以下方式
ServletRegistrationBean
//注册三大组件
@Bean
public ServletRegistrationBean myServlet(){
	ServletRegistrationBean registrationBean = new ServletRegistrationBean(new
MyServlet(),"/myServlet");
	return registrationBean;
}
FilterRegistrationBean
@Bean
public FilterRegistrationBean myFilter(){
    FilterRegistrationBean registrationBean = new FilterRegistrationBean();
    registrationBean.setFilter(new MyFilter());
    registrationBean.setUrlPatterns(Arrays.asList("/hello","/myServlet"));
    return registrationBean;
}
ServletListenerRegistrationBean
@Bean
public ServletListenerRegistrationBean myListener(){
    ServletListenerRegistrationBean<MyListener> registrationBean = new
    ServletListenerRegistrationBean<>(new MyListener());
    return registrationBean;
}
SpringBoot帮我们自动配置SpringMVC的时候,自动的注册SpringMVC的前端控制器;DIspatcherServlet;
DispatcherServletAutoConfiguration中:
@Bean(name = DEFAULT_DISPATCHER_SERVLET_REGISTRATION_BEAN_NAME)
@ConditionalOnBean(value = DispatcherServlet.class, name =
                   DEFAULT_DISPATCHER_SERVLET_BEAN_NAME)
public ServletRegistrationBean dispatcherServletRegistration(
    DispatcherServlet dispatcherServlet) {
    ServletRegistrationBean registration = new ServletRegistrationBean(
        dispatcherServlet, this.serverProperties.getServletMapping());
    //默认拦截: / 所有请求;包静态资源,但是不拦截jsp请求; /*会拦截jsp
    //可以通过server.servletPath来修改SpringMVC前端控制器默认拦截的请求路径
    registration.setName(DEFAULT_DISPATCHER_SERVLET_BEAN_NAME);
    registration.setLoadOnStartup(
        this.webMvcProperties.getServlet().getLoadOnStartup());
    if (this.multipartConfig != null) {
        registration.setMultipartConfig(this.multipartConfig);
    }
    return registration;
}
3)、替换为其他嵌入式Servlet容器
默认支持:
Tomcat(默认使用)
<dependency>
    <groupId>org.springframework.boot</groupId>
    <artifactId>spring‐boot‐starter‐web</artifactId>
    引入web模块默认就是使用嵌入式的Tomcat作为Servlet容器;
</dependency>
Jetty
<!‐‐ 引入web模块 ‐‐>
<dependency>
    <groupId>org.springframework.boot</groupId>
    <artifactId>spring‐boot‐starter‐web</artifactId>
    <exclusions>
        <exclusion>
            <artifactId>spring‐boot‐starter‐tomcat</artifactId>
            <groupId>org.springframework.boot</groupId>
        </exclusion>
    </exclusions>
</dependency>
<!‐‐引入其他的Servlet容器‐‐>
<dependency>
    <artifactId>spring‐boot‐starter‐jetty</artifactId>
    <groupId>org.springframework.boot</groupId>
</dependency>
Undertow
<!‐‐ 引入web模块 ‐‐>
<dependency>
    <groupId>org.springframework.boot</groupId>
    <artifactId>spring‐boot‐starter‐web</artifactId>
    <exclusions>
    <exclusion>
        <artifactId>spring‐boot‐starter‐tomcat</artifactId>
        <groupId>org.springframework.boot</groupId>
    </exclusion>
    </exclusions>
</dependency>
<!‐‐引入其他的Servlet容器‐‐>
<dependency>
    <artifactId>spring‐boot‐starter‐undertow</artifactId>
    <groupId>org.springframework.boot</groupId>
</dependency>
4)、嵌入式Servlet容器自动配置原理;
EmbeddedServletContainerAutoConfiguration:嵌入式的Servlet容器自动配置?
@AutoConfigureOrder(Ordered.HIGHEST_PRECEDENCE)
@Configuration
@ConditionalOnWebApplication
@Import(BeanPostProcessorsRegistrar.class)
//导入BeanPostProcessorsRegistrar:Spring注解版;给容器中导入一些组件
//导入了EmbeddedServletContainerCustomizerBeanPostProcessor:
//后置处理器:bean初始化前后(创建完对象,还没赋值赋值)执行初始化工作
public class EmbeddedServletContainerAutoConfiguration {
   @Configuration
   @ConditionalOnClass({ Servlet.class, Tomcat.class })//判断当前是否引入了Tomcat依赖;
   @ConditionalOnMissingBean(value = EmbeddedServletContainerFactory.class, search =
           SearchStrategy.CURRENT)//判断当前容器没有用户自己定义EmbeddedServletContainerFactory:嵌入式的
   Servlet容器工厂;作用:创建嵌入式的Servlet容器
   public static class EmbeddedTomcat {
       @Bean
       public TomcatEmbeddedServletContainerFactory tomcatEmbeddedServletContainerFactory()
       {
           return new TomcatEmbeddedServletContainerFactory();
       }
   }
   /**
    * Nested configuration if Jetty is being used.
    */
   @Configuration
   @ConditionalOnClass({ Servlet.class, Server.class, Loader.class,
           WebAppContext.class })
   @ConditionalOnMissingBean(value = EmbeddedServletContainerFactory.class, search =
           SearchStrategy.CURRENT)
   public static class EmbeddedJetty {
       @Bean
       public JettyEmbeddedServletContainerFactory jettyEmbeddedServletContainerFactory() {
           return new JettyEmbeddedServletContainerFactory();
       }
   }
   /**
    * Nested configuration if Undertow is being used.
    */
   @Configuration
   @ConditionalOnClass({ Servlet.class, Undertow.class, SslClientAuthMode.class })
   @ConditionalOnMissingBean(value = EmbeddedServletContainerFactory.class, search =
           SearchStrategy.CURRENT)
   public static class EmbeddedUndertow {
       @Bean
       public UndertowEmbeddedServletContainerFactory
       undertowEmbeddedServletContainerFactory() {
           return new UndertowEmbeddedServletContainerFactory();
       }
   }
-
EmbeddedServletContainerFactory(嵌入式Servlet容器工厂)
public interface EmbeddedServletContainerFactory { //获取嵌入式的Servlet容器 EmbeddedServletContainer getEmbeddedServletContainer( ServletContextInitializer... initializers); } -
EmbeddedServletContainer:(嵌入式的Servlet容器)
-
以TomcatEmbeddedServletContainerFactory为例
 @Override
    public EmbeddedServletContainer getEmbeddedServletContainer(
            ServletContextInitializer... initializers) {
//创建一个Tomcat
        Tomcat tomcat = new Tomcat();
//配置Tomcat的基本环节
        File baseDir = (this.baseDirectory != null ? this.baseDirectory
                : createTempDir("tomcat"));
        tomcat.setBaseDir(baseDir.getAbsolutePath());
        Connector connector = new Connector(this.protocol);
        tomcat.getService().addConnector(connector);
        customizeConnector(connector);
        tomcat.setConnector(connector);
        tomcat.getHost().setAutoDeploy(false);
        configureEngine(tomcat.getEngine());
        for (Connector additionalConnector : this.additionalTomcatConnectors) {
            tomcat.getService().addConnector(additionalConnector);
        }
        prepareContext(tomcat.getHost(), initializers);
//将配置好的Tomcat传入进去,返回一个EmbeddedServletContainer;并且启动Tomcat服务器
        return getTomcatEmbeddedServletContainer(tomcat);
我们对嵌入式容器的配置修改是怎么生效?
ServerProperties、EmbeddedServletContainerCustomizerEmbeddedServletContainerCustomizer:定制器帮我们修改了Servlet容器的配置? 怎么修改的原理?
容器中导入了EmbeddedServletContainerCustomizerBeanPostProcessor
 //初始化之前
    @Override
    public Object postProcessBeforeInitialization(Object bean, String beanName)
            throws BeansException {
//如果当前初始化的是一个ConfigurableEmbeddedServletContainer类型的组件
        if (bean instanceof ConfigurableEmbeddedServletContainer) {
//
            postProcessBeforeInitialization((ConfigurableEmbeddedServletContainer) bean);
        }
        return bean;
    }
    private void postProcessBeforeInitialization(
            ConfigurableEmbeddedServletContainer bean) {
//获取所有的定制器,调用每一个定制器的customize方法来给Servlet容器进行属性赋值;
        for (EmbeddedServletContainerCustomizer customizer : getCustomizers()) {
            customizer.customize(bean);
        }
    }
    private Collection<EmbeddedServletContainerCustomizer> getCustomizers() {
        if (this.customizers == null) {
// Look up does not include the parent context
            this.customizers = new ArrayList<EmbeddedServletContainerCustomizer>(
                    this.beanFactory
//从容器中获取所有这葛类型的组件:EmbeddedServletContainerCustomizer
//定制Servlet容器,给容器中可以添加一个EmbeddedServletContainerCustomizer类型的组件
                            .getBeansOfType(EmbeddedServletContainerCustomizer.class,
                                    false, false)
                            .values());
            Collections.sort(this.customizers, AnnotationAwareOrderComparator.INSTANCE);
            this.customizers = Collections.unmodifiableList(this.customizers);
        }
        return this.customizers;
    }
ServerProperties也是定制器
步骤:
a、SpringBoot根据导入的依赖情况,给容器中添加相应的
EmbeddedServletContainerFactory【TomcatEmbeddedServletContainerFactory】
b、容器中某个组件要创建对象就会惊动后置处理器; EmbeddedServletContainerCustomizerBeanPostProcessor;
只要是嵌入式的Servlet容器工厂,后置处理器就工作;
c、后置处理器,从容器中获取所有的EmbeddedServletContainerCustomizer,调用定制器的定制方法
5)、嵌入式Servlet容器启动原理;
什么时候创建嵌入式的Servlet容器工厂?
什么时候获取嵌入式的Servlet容器并启动Tomcat; 获取嵌入式的Servlet容器工厂:
-
SpringBoot应用启动运行run方法
-
refreshContext(context);SpringBoot刷新IOC容器【创建IOC容器对象,并初始化容器,创建容器中的每一个 组 件 】 ; 如 果 是 web 应 用 创 建 AnnotationConfigEmbeddedWebApplicationContext, 否 则 : AnnotationConfigApplicationContext
-
refresh(context);刷新刚才创建好的ioc容器;
public void refresh() throws BeansException, IllegalStateException { synchronized (this.startupShutdownMonitor) { // Prepare this context for refreshing. prepareRefresh(); // Tell the subclass to refresh the internal bean factory. ConfigurableListableBeanFactory beanFactory = obtainFreshBeanFactory(); // Prepare the bean factory for use in this context. prepareBeanFactory(beanFactory); try { // Allows post‐processing of the bean factory in context subclasses. -
onRefresh(); web的ioc容器重写了onRefresh方法
-
webioc容器会创建嵌入式的Servlet容器;createEmbeddedServletContainer();
-
获取嵌入式的Servlet容器工厂:
EmbeddedServletContainerFactory containerFactory = getEmbeddedServletContainerFactory();从ioc容器中获取EmbeddedServletContainerFactory 组件;TomcatEmbeddedServletContainerFactory创建对象,后置处理器一看是这个对象,就获取所有的定制器来先定制Servlet容器的相关配置;
-
使用容器工厂获取嵌入式的Servlet容器:
this.embeddedServletContainer = containerFactory .getEmbeddedServletContainer(getSelfInitializer()); -
嵌入式的Servlet容器创建对象并启动Servlet容器;
先启动嵌入式的Servlet容器,再将ioc容器中剩下没有创建出的对象获取出来;
IOC容器启动创建嵌入式的Servlet容器
9、使用外置的Servlet容器
9.1. 嵌入式Servlet容器:
应用打成可执行的jar
优点:简单、便携;
缺点:默认不支持JSP、优化定制比较复杂(使用定制器【ServerProperties、自定义
EmbeddedServletContainerCustomizer】,自己编写嵌入式Servlet容器的创建工厂
【EmbeddedServletContainerFactory】);
9.2. 外置的Servlet容器
外面安装Tomcat---应用war包的方式打包;
步骤
-
必须创建一个war项目;(利用idea创建好目录结构)
-
将嵌入式的Tomcat指定为provided;
<dependency> <groupId>org.springframework.boot</groupId> <artifactId>spring‐boot‐starter‐tomcat</artifactId> <scope>provided</scope> </dependency> -
必须编写一个SpringBootServletInitializer的子类,并调用configure方法
public class ServletInitializer extends SpringBootServletInitializer { @Override protected SpringApplicationBuilder configure(SpringApplicationBuilder application) { //传入SpringBoot应用的主程序 return application.sources(SpringBoot04WebJspApplication.class); } } -
启动服务器就可以使用;
9.3. 原理
-
jar包:执行SpringBoot主类的main方法——>启动ioc容器——>创建嵌入式的Servlet容器;
-
war包:启动服务器——>服务器启动SpringBoot应用【SpringBootServletInitializer】——>启动ioc容器;
servlet3.0(Spring注解版):
Shared libraries / runtimes pluggability: 规则:
-
服务器启动(web应用启动)会创建当前web应用里面每一个jar包里面ServletContainerInitializer实例:
-
ServletContainerInitializer的实现放在jar包的META-INF/services文件夹下,有一个名为
javax.servlet.ServletContainerInitializer的文件,内容就是ServletContainerInitializer的实现类的全类名
-
还可以使用@HandlesTypes,在应用启动的时候加载我们感兴趣的类;
流程:
-
启动Tomcat
-
org\springframework\spring-web\4.3.14.RELEASE\spring-web-4.3.14.RELEASE.jar!\META- INF\services\javax.servlet.ServletContainerInitializer:
Spring的web模块里面有这个文件:org.springframework.web.SpringServletContainerInitializer
-
SpringServletContainerInitializer将@HandlesTypes(WebApplicationInitializer.class)标注的所有这个类型的类都传入到onStartup方法的Set>;为这些WebApplicationInitializer类型的类创建实例;
-
每一个WebApplicationInitializer都调用自己的onStartup;
-
相当于我们的SpringBootServletInitializer的类会被创建对象,并执行onStartup方法
-
SpringBootServletInitializer实例执行onStartup的时候会createRootApplicationContext;创建容器
protected WebApplicationContext createRootApplicationContext( ServletContext servletContext) { //1、创建SpringApplicationBuilder SpringApplicationBuilder builder = createSpringApplicationBuilder(); StandardServletEnvironment environment = new StandardServletEnvironment(); environment.initPropertySources(servletContext, null); builder.environment(environment); builder.main(getClass()); ApplicationContext parent = getExistingRootWebApplicationContext(servletContext); if (parent != null) { this.logger.info("Root context already created (using as parent)."); servletContext.setAttribute( WebApplicationContext.ROOT_WEB_APPLICATION_CONTEXT_ATTRIBUTE, null); builder.initializers(new ParentContextApplicationContextInitializer(parent)); } builder.initializers( new ServletContextApplicationContextInitializer(servletContext)); builder.contextClass(AnnotationConfigEmbeddedWebApplicationContext.class); //调用configure方法,子类重写了这个方法,将SpringBoot的主程序类传入了进来 builder = configure(builder); //使用builder创建一个Spring应用 SpringApplication application = builder.build(); if (application.getSources().isEmpty() && AnnotationUtils .findAnnotation(getClass(), Configuration.class) != null) { application.getSources().add(getClass()); } Assert.state(!application.getSources().isEmpty(), "No SpringApplication sources have been defined. Either override the " + "configure method or add an @Configuration annotation"); // Ensure error pages are registered if (this.registerErrorPageFilter) { application.getSources().add(ErrorPageFilterConfiguration.class); } //启动Spring应用 return run(application); } -
Spring的应用就启动并且创建IOC容器
 public ConfigurableApplicationContext run(String... args) {
        StopWatch stopWatch = new StopWatch();
        stopWatch.start();
        ConfigurableApplicationContext context = null;
        FailureAnalyzers analyzers = null;
        configureHeadlessProperty();
        SpringApplicationRunListeners listeners = getRunListeners(args);
        listeners.starting();
        try {
            ApplicationArguments applicationArguments = new DefaultApplicationArguments(
                    args);
            ConfigurableEnvironment environment = prepareEnvironment(listeners,
                    applicationArguments);
            Banner printedBanner = printBanner(environment);
            context = createApplicationContext();
            analyzers = new FailureAnalyzers(context);
            prepareContext(context, environment, listeners, applicationArguments,
                    printedBanner);
//刷新IOC容器
            refreshContext(context);
            afterRefresh(context, applicationArguments);
            listeners.finished(context, null);
            stopWatch.stop();
            if (this.logStartupInfo) {
                new StartupInfoLogger(this.mainApplicationClass)
                        .logStarted(getApplicationLog(), stopWatch);
            }
            return context;
        }
        catch (Throwable ex) {
            handleRunFailure(context, listeners, analyzers, ex);
            throw new IllegalStateException(ex);
        }
    }
启动Servlet容器,再启动SpringBoot应用
五、SpringBoot与数据访问
1、JDBC
<dependency>
    <groupId>org.springframework.boot</groupId>
    <artifactId>spring‐boot‐starter‐jdbc</artifactId>
    </dependency>
    <dependency>
    <groupId>mysql</groupId>
    <artifactId>mysql‐connector‐java</artifactId>
    <scope>runtime</scope>
</dependency>
spring:
  datasource:
  username: root
  password: 123456
  url: jdbc:mysql://192.168.15.22:3306/jdbc
  driver‐class‐name: com.mysql.jdbc.Driver
默认是用org.apache.tomcat.jdbc.pool.DataSource作为数据源;
数据源的相关配置都在DataSourceProperties里面;
自动配置原理:
org.springframework.boot.autoconfigure.jdbc:
-
参考DataSourceConfiguration,根据配置创建数据源,默认使用Tomcat连接池;可以使用
spring.datasource.type指定自定义的数据源类型;
-
SpringBoot默认可以支持;
org.apache.tomcat.jdbc.pool.DataSource、HikariDataSource、BasicDataSource、 -
自定义数据源类型
/** * Generic DataSource configuration. */ @ConditionalOnMissingBean(DataSource.class) @ConditionalOnProperty(name = "spring.datasource.type") static class Generic { @Bean public DataSource dataSource(DataSourceProperties properties) { //使用DataSourceBuilder创建数据源,利用反射创建响应type的数据源,并且绑定相关属性 return properties.initializeDataSourceBuilder().build(); } } -
DataSourceInitializer:ApplicationListener;
作用:
-
runSchemaScripts();运行建表语句;
-
runDataScripts();运行插入数据的sql语句;
默认只需要将文件命名为:
schema‐*.sql、data‐*.sql
默认规则:schema.sql,schema‐all.sql;
可以使用
schema:
‐ classpath:department.sql
指定位置
- 操作数据库:自动配置了JdbcTemplate操作数据库
2、整合Druid数据源
<dependency>
   <groupId>com.alibaba</groupId>
   <artifactId>druid-spring-boot-starter</artifactId>
   <version>1.1.10</version>
</dependency>
@Configuration
public class DruidConfig {
    @ConfigurationProperties(prefix = "spring.datasource")
    @Bean
    public DataSource druid(){
        return new DruidDataSource();
    }
    //配置Druid的监控
//1、配置一个管理后台的Servlet
    @Bean
    public ServletRegistrationBean statViewServlet(){
        ServletRegistrationBean bean = new ServletRegistrationBean(new StatViewServlet(),
                "/druid/*");
        Map<String,String> initParams = new HashMap<>();
        initParams.put("loginUsername","admin");
        initParams.put("loginPassword","123456");
        initParams.put("allow","");//默认就是允许所有访问
        initParams.put("deny","192.168.15.21");
        bean.setInitParameters(initParams);
        return bean;
    }
    //2、配置一个web监控的filter
    @Bean
    public FilterRegistrationBean webStatFilter(){
        FilterRegistrationBean bean = new FilterRegistrationBean();
        bean.setFilter(new WebStatFilter());
        Map<String,String> initParams = new HashMap<>();
        initParams.put("exclusions","*.js,*.css,/druid/*");
        bean.setInitParameters(initParams);
        bean.setUrlPatterns(Arrays.asList("/*"));
        return bean;
    }
}
3、整合MyBatis
<dependency>
    <groupId>org.mybatis.spring.boot</groupId>
    <artifactId>mybatis‐spring‐boot‐starter</artifactId>
    <version>1.3.1</version>
</dependency>
步骤:
-
配置数据源相关属性
-
给数据库建表
-
创建JavaBean
-
注解版
//指定这是一个操作数据库的mapper
@Mapper
public interface DepartmentMapper {
    @Select("select * from department where id=#{id}")
    public Department getDeptById(Integer id);
    @Delete("delete from department where id=#{id}")
    public int deleteDeptById(Integer id);
    @Options(useGeneratedKeys = true,keyProperty = "id")
    @Insert("insert into department(departmentName) values(#{departmentName})")
    public int insertDept(Department department);
    @Update("update department set departmentName=#{departmentName} where id=#{id}")
    public int updateDept(Department department);
}
问题:
自定义MyBatis的配置规则;给容器中添加一个ConfigurationCustomizer;
@org.springframework.context.annotation.Configuration
public class MyBatisConfig {
    @Bean
    public ConfigurationCustomizer configurationCustomizer(){
        return new ConfigurationCustomizer(){
            @Override
            public void customize(Configuration configuration) {
                configuration.setMapUnderscoreToCamelCase(true);
            }
        };
    }
}
使用MapperScan批量扫描所有的Mapper接口; @MapperScan(value = "com.atguigu.springboot.mapper") @SpringBootApplication public class SpringBoot06DataMybatisApplication { public static void main(String[] args) { SpringApplication.run(SpringBoot06DataMybatisApplication.class, args); } } -
配置文件版
mybatis:
    config‐location: classpath:mybatis/mybatis‐config.xml 指定全局配置文件的位置
    mapper‐locations: classpath:mybatis/mapper/*.xml 指定sql映射文件的位置
4、整合SpringData JPA
-
编写一个实体类(bean)和数据表进行映射,并且配置好映射关系;
//使用JPA注解配置映射关系 @Entity //告诉JPA这是一个实体类(和数据表映射的类) @Table(name = "tbl_user") //@Table来指定和哪个数据表对应;如果省略默认表名就是user; public class User { @Id //这是一个主键 @GeneratedValue(strategy = GenerationType.IDENTITY)//自增主键 private Integer id; @Column(name = "last_name",length = 50) //这是和数据表对应的一个列 private String lastName; @Column //省略默认列名就是属性名 private String email; -
编写一个Dao接口来操作实体类对应的数据表(Repository)
//继承JpaRepository来完成对数据库的操作 public interface UserRepository extends JpaRepository<User,Integer> { } -
基本的配置JpaProperties
spring:
jpa:
hibernate:
# 更新或者创建数据表结构
ddl‐auto: update
# 控制台显示SQL
show‐sql: true
六、启动配置原理
几个重要的事件回调机制
配置在META-INF/spring.factories
ApplicationContextInitializer
SpringApplicationRunListener
只需要放在ioc容器中ApplicationRunner CommandLineRunner
启动流程:
1、创建SpringApplication对象
    initialize(sources);
    private void initialize(Object[] sources) {
//保存主配置类
        if (sources != null && sources.length > 0) {
            this.sources.addAll(Arrays.asList(sources));
        }
//判断当前是否一个web应用
        this.webEnvironment = deduceWebEnvironment();
//从类路径下找到META‐INF/spring.factories配置的所有ApplicationContextInitializer;然后保存起
        来
        setInitializers((Collection) getSpringFactoriesInstances(
                ApplicationContextInitializer.class));
//从类路径下找到ETA‐INF/spring.factories配置的所有ApplicationListener
        setListeners((Collection) getSpringFactoriesInstances(ApplicationListener.class));
//从多个配置类中找到有main方法的主配置类
        this.mainApplicationClass = deduceMainApplicationClass();
    }
2、运行run方法
public ConfigurableApplicationContext run(String... args) {
        StopWatch stopWatch = new StopWatch();
        stopWatch.start();
        ConfigurableApplicationContext context = null;
        FailureAnalyzers analyzers = null;
        configureHeadlessProperty();
//获取SpringApplicationRunListeners;从类路径下META‐INF/spring.factories
        SpringApplicationRunListeners listeners = getRunListeners(args);
//回调所有的获取SpringApplicationRunListener.starting()方法
        listeners.starting();
        try {
//封装命令行参数
            ApplicationArguments applicationArguments = new DefaultApplicationArguments(
                    args);
//准备环境
            ConfigurableEnvironment environment = prepareEnvironment(listeners,
                    applicationArguments);
//创建环境完成后回调SpringApplicationRunListener.environmentPrepared();表示环境准
            备完成
            Banner printedBanner = printBanner(environment);
//创建ApplicationContext;决定创建web的ioc还是普通的ioc
            context = createApplicationContext();
            analyzers = new FailureAnalyzers(context);
//准备上下文环境;将environment保存到ioc中;而且applyInitializers();
//applyInitializers():回调之前保存的所有的ApplicationContextInitializer的initialize方法
//回调所有的SpringApplicationRunListener的contextPrepared();
//
            prepareContext(context, environment, listeners, applicationArguments,
                    printedBanner);
//prepareContext运行完成以后回调所有的SpringApplicationRunListener的contextLoaded();
//s刷新容器;ioc容器初始化(如果是web应用还会创建嵌入式的Tomcat);Spring注解版
//扫描,创建,加载所有组件的地方;(配置类,组件,自动配置)
            refreshContext(context);
//从ioc容器中获取所有的ApplicationRunner和CommandLineRunner进行回调
//ApplicationRunner先回调,CommandLineRunner再回调
            afterRefresh(context, applicationArguments);
//所有的SpringApplicationRunListener回调finished方法
            listeners.finished(context, null);
            stopWatch.stop();
            if (this.logStartupInfo) {
                new StartupInfoLogger(this.mainApplicationClass)
                        .logStarted(getApplicationLog(), stopWatch);
            }
//整个SpringBoot应用启动完成以后返回启动的ioc容器;
            return context;
        }
        catch (Throwable ex) {
            handleRunFailure(context, listeners, analyzers, ex);
            throw new IllegalStateException(ex);
        }
    }
3、事件监听机制
配置在META-INF/spring.factories ApplicationContextInitializer
public class HelloApplicationContextInitializer implements
    ApplicationContextInitializer<ConfigurableApplicationContext> {
    @Override
    public void initialize(ConfigurableApplicationContext applicationContext) {
    				System.out.println("ApplicationContextInitializer...initialize..."+applicationContext);
    }
}
SpringApplicationRunListener
配置(META-INF/spring.factories)
org.springframework.context.ApplicationContextInitializer=\
com.atguigu.springboot.listener.HelloApplicationContextInitializer
org.springframework.boot.SpringApplicationRunListener=\
com.atguigu.springboot.listener.HelloSpringApplicationRunListener
只需要放在ioc容器中
ApplicationRunner
@Component
   public class HelloApplicationRunner implements ApplicationRunner {
   @Override
   public void run(ApplicationArguments args) throws Exception {
   System.out.println("ApplicationRunner...run....");
   }
}
CommandLineRunner
@Component
public class HelloCommandLineRunner implements CommandLineRunner {
    @Override
    public void run(String... args) throws Exception {
    System.out.println("CommandLineRunner...run..."+ Arrays.asList(args));
    }
}
笔记来源:
《尚硅谷视频笔记》
