

一、Socket通信简介
Android与服务器的通信方式主要有两种:
- Http通信
- Socket通信
两者的最大差异在于:
Http连接使用的是“请求-响应方式”,即在请求时建立连接通道,当客户端向服务器发送请求后,服务端才能向客户端返回数据。
Socket通信则是在双方建立连接后,可以直接进行数据的传输,在连接时可实现信息的主动推送,而不需要每次由客户端向服务器发送请求。
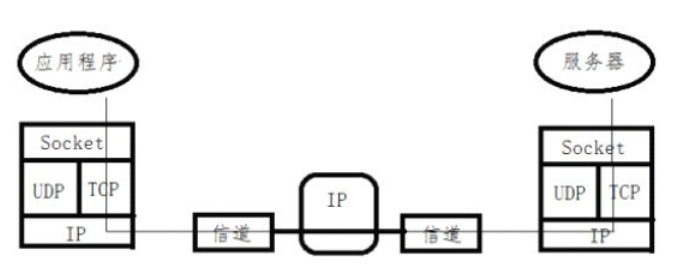
那么,什么是socket?
socket又称套接字,在程序内部提供了与外界通信的端口,即端口通信。
通过建立socket连接,可为通信双方的数据传输提供通道。socket的主要特点有数据丢失率低,使用简单且易于移植。
1、什么是Socket
socket是一种抽象层,应用程序通过它来发送和接受数据,使用Socket可以将应用程序添加到网络中,与处于同一网络中的其他应用程序进行通信。
简单来说,Socket提供了程序内部与外界通信的端口并为通信双方提供数据传输通道。
2、Socket分类
根据不同的底层协议,Socket的实现是多样化的。在这主要介绍TCP/IP协议簇当中主要的Socket类型为流套接字(streamsocket)和数据报套接字(datagramsocket)。
流套接字将TCP作为其端对端协议,提供了一个可信赖的字节流服务。
数据报嵌套字使用UDP协议,提供数据打包发送数据。
二、Socket基本通信模型
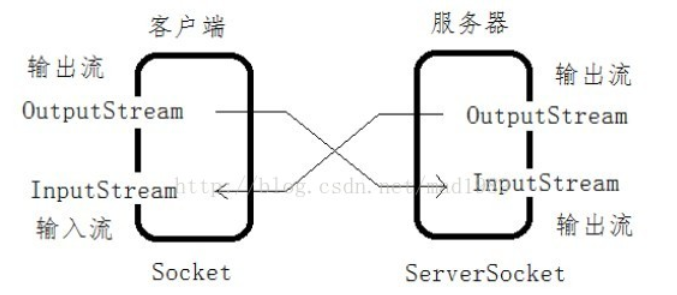
1、TCP通信模型
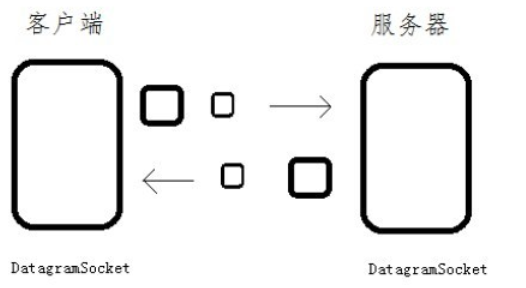
2、UDP通信模型
三、Socket基本实现原理
1、基于TCP协议的Socket
服务端首先声明一个ServerSocket对象并且指定端口号,然后调用Serversocket的accept()方法接受客户端的数据。
accept()方法在没有数据进行接受时处于堵塞状态。(Socket socket = serversocket.accept()),一旦接受数据,通过inputstream读取接受的数据。
客户端创建一个Socket对象,执行服务器端的ip地址和端口号(Socket socket = new Socket("172.168.10.108", 8080);),通过inputstream读取数据,获取服务器发出的数据(OutputStream outputstream = socket.getOutputStream();),最后将要发送的数据写入到outputstream即可进行TCP协议的socket数据传输。
2、基于UDP协议的数据传输
服务器端首先创建一个DatagramSocket对象,并且指定监听端口。接下来创建一个空的DatagramSocket对象用于接收数据(byte data[] = new byte[1024]; DatagramSocket packet = new DatagramSocket(data, data.length);),使用DatagramSocket的receive()方法接受客户端发送的数据,receive()与serversocket的accept()方法类似,在没有数据进行接受时处于堵塞状态。
客户端也创建个DatagramSocket对象,并且指定监听的端口。接下来创建一个InetAddress对象,这个对象类似于一个网络的发送地址(InetAddress serveraddress = InetAddress.getByName("172.168.1.120"))。定义要发送的一个字符串,创建一个DatagramPacket对象,并指定要将该数据包发送到网络对应的那个地址和端口号,最后使用DatagramSocket的对象的send()发送数据。
(String str = "hello"; byte data[] = str.getByte(); DatagramPacket packet = new DatagramPacket(data, data.length, serveraddress, 4567); socket.send(packet);)
四、android实现socket简单通信
1、使用TCP协议通信
- android端实现:
protected void connectServerWithTCPSocket() {

        Socket socket;
        try {// 创建一个Socket对象,并指定服务端的IP及端口号
            socket = new Socket("192.168.1.32", 1989);
            // 创建一个InputStream用户读取要发送的文件。
            InputStream inputStream = new FileInputStream("e://a.txt");
            // 获取Socket的OutputStream对象用于发送数据。
            OutputStream outputStream = socket.getOutputStream();
            // 创建一个byte类型的buffer字节数组,用于存放读取的本地文件
            byte buffer[] = new byte[4 * 1024];
            int temp = 0;
            // 循环读取文件
            while ((temp = inputStream.read(buffer)) != -1) {
                // 把数据写入到OuputStream对象中
                outputStream.write(buffer, 0, temp);
            }
            // 发送读取的数据到服务端
            outputStream.flush();

            /** 或创建一个报文,使用BufferedWriter写入,看你的需求 **/
//            String socketData = "[2143213;21343fjks;213]";
//            BufferedWriter writer = new BufferedWriter(new OutputStreamWriter(
//                    socket.getOutputStream()));
//            writer.write(socketData.replace("\n", " ") + "\n");
//            writer.flush();
            /************************************************/
        } catch (UnknownHostException e) {
            e.printStackTrace();
        } catch (IOException e) {
            e.printStackTrace();
        }

    }
- 服务器端简单实现
public void ServerReceviedByTcp() {
        // 声明一个ServerSocket对象
        ServerSocket serverSocket = null;
        try {
            // 创建一个ServerSocket对象,并让这个Socket在1989端口监听
            serverSocket = new ServerSocket(1989);
            // 调用ServerSocket的accept()方法,接受客户端所发送的请求,
            // 如果客户端没有发送数据,那么该线程就停滞不继续
            Socket socket = serverSocket.accept();
            // 从Socket当中得到InputStream对象
            InputStream inputStream = socket.getInputStream();
            byte buffer[] = new byte[1024 * 4];
            int temp = 0;
            // 从InputStream当中读取客户端所发送的数据
            while ((temp = inputStream.read(buffer)) != -1) {
                System.out.println(new String(buffer, 0, temp));
            }
            serverSocket.close();
        } catch (IOException e) {
            e.printStackTrace();
        }
    }
2、使用UDP协议通信
- 客户端发送数据实现:
protected void connectServerWithUDPSocket() {

        DatagramSocket socket;
        try {
            //创建DatagramSocket对象并指定一个端口号,注意,如果客户端需要接收服务器的返回数据,
            //还需要使用这个端口号来receive,所以一定要记住
            socket = new DatagramSocket(1985);
            //使用InetAddress(Inet4Address).getByName把IP地址转换为网络地址
            InetAddress serverAddress = InetAddress.getByName("192.168.1.32");
            //Inet4Address serverAddress = (Inet4Address) Inet4Address.getByName("192.168.1.32");
            String str = "[2143213;21343fjks;213]";//设置要发送的报文
            byte data[] = str.getBytes();//把字符串str字符串转换为字节数组
            //创建一个DatagramPacket对象,用于发送数据。
            //参数一:要发送的数据   参数二:数据的长度
            //参数三:服务端的网络地址  参数四:服务器端端口号
            DatagramPacket packet = new DatagramPacket(data, data.length ,serverAddress ,10025);
            socket.send(packet);//把数据发送到服务端。
        } catch (SocketException e) {
            e.printStackTrace();
        } catch (UnknownHostException e) {
            e.printStackTrace();
        } catch (IOException e) {
            e.printStackTrace();
        }
    }
- 客户端接收服务器返回的数据
public void ReceiveServerSocketData() {
        DatagramSocket socket;
        try {
            //实例化的端口号要和发送时的socket一致,否则收不到data
            socket = new DatagramSocket(1985);
            byte data[] = new byte[4 * 1024];
            //参数一:要接受的data 参数二:data的长度
            DatagramPacket packet = new DatagramPacket(data, data.length);
            socket.receive(packet);
            //把接收到的data转换为String字符串
            String result = new String(packet.getData(), packet.getOffset(),
                    packet.getLength());
            socket.close();//不使用了记得要关闭
            System.out.println("the number of reveived Socket is  :" + flag
                    + "udpData:" + result);
        } catch (SocketException e) {
            e.printStackTrace();
        } catch (IOException e) {
            e.printStackTrace();
        }
    }
- 服务器接收客户端实现:
public void ServerReceviedByUdp(){
        //创建一个DatagramSocket对象,并指定监听端口。(UDP使用DatagramSocket)
        DatagramSocket socket;
        try {
            socket = new DatagramSocket(10025);
            //创建一个byte类型的数组,用于存放接收到得数据
            byte data[] = new byte[4*1024];
            //创建一个DatagramPacket对象,并指定DatagramPacket对象的大小
            DatagramPacket packet = new DatagramPacket(data,data.length);
            //读取接收到得数据
            socket.receive(packet);
            //把客户端发送的数据转换为字符串。
            //使用三个参数的String方法。参数一:数据包 参数二:起始位置 参数三:数据包长
            String result = new String(packet.getData(),packet.getOffset() ,packet.getLength());
        } catch (SocketException e) {
            e.printStackTrace();
        } catch (IOException e) {
            e.printStackTrace();
        }
    }
五、总结
使用UDP方式,android端和服务器端接收可以看出,其实android端和服务器端的发送和接受大相径庭,只要端口号正确,相互通信就没有问题,TCP使用的是流的方式发送,UDP是以包的形式发送。
补充
1、ServerSocket.accept()方法底层源码
查看这部分代码主要是为了查看accept()底层源码实现阻塞等待的原理。
    public Socket accept() throws IOException {
        if (isClosed())
            throw new SocketException("Socket is closed");
        if (!isBound())
            throw new SocketException("Socket is not bound yet");
        Socket s = new Socket((SocketImpl) null);
        implAccept(s);
        return s;
    }
在accept()方法中调用implAccept()方法
protected final void implAccept(Socket s) throws IOException {
        SocketImpl si = null;
        try {
            if (s.impl == null)
              s.setImpl();
            else {
                s.impl.reset();
            }
            si = s.impl;
            s.impl = null;
            si.address = new InetAddress();
            si.fd = new FileDescriptor();

            //核心代码
            getImpl().accept(si);
            ......
        } catch (IOException e) {
            ......
        }
        s.impl = si;
        s.postAccept();
    }
而后调用PlainSocketImpl类中的accept()方法
    protected synchronized void accept(SocketImpl s) throws IOException {
        if (s instanceof PlainSocketImpl) {
            // pass in the real impl not the wrapper.
            SocketImpl delegate = ((PlainSocketImpl)s).impl;
            delegate.address = new InetAddress();
            delegate.fd = new FileDescriptor();

            // 对应代码
            impl.accept(delegate);
            // set fd to delegate's fd to be compatible with older releases
            s.fd = delegate.fd;
        } else {

            // 对应代码
            impl.accept(s);
        }
    }
此处再调用抽象类abstracPlainSocketImpl类中的accept()方法
    protected void accept(SocketImpl s) throws IOException {
        acquireFD();
        try {
            socketAccept(s);
        } finally {
            releaseFD();
        }
    }
其中acquireFD()方法的代码如下:
     /*
     * "Acquires" and returns the FileDescriptor for this impl
     *
     * A corresponding releaseFD is required to "release" the
     * FileDescriptor.
     */
    //“获取”并返回这个impl的文件描述符需要一个相应的releaseFD来“释放”文件描述符。
    FileDescriptor acquireFD() {
        synchronized (fdLock) {
            fdUseCount++;
            return fd;
        }
    }
而后再执行socketAccept()方法
    void socketAccept(SocketImpl s) throws IOException {
        int nativefd = checkAndReturnNativeFD();

        if (s == null)
            throw new NullPointerException("socket is null");

        int newfd = -1;
        InetSocketAddress[] isaa = new InetSocketAddress[1];
        //等待阻塞代码
        if (timeout <= 0) {
            newfd = accept0(nativefd, isaa);
        } else {
            configureBlocking(nativefd, false);
            try {
                waitForNewConnection(nativefd, timeout);
                newfd = accept0(nativefd, isaa);
                if (newfd != -1) {
                    configureBlocking(newfd, true);
                }
            } finally {
                configureBlocking(nativefd, true);
            }
        }
        /* Update (SocketImpl)s' fd '*/
        fdAccess.set(s.fd, newfd);
        /* Update socketImpls remote port, address and localport */
        InetSocketAddress isa = isaa[0];
        s.port = isa.getPort();
        s.address = isa.getAddress();
        s.localport = localport;
    }
该部分即为无请求时的阻塞代码块,逐一查看accetp0()方法、configureBlocking()方法等发现这些代码使用native代码实现,提高效率。
因而具体没有找到accept()方法的阻塞机理
个人感觉,configureBlocking()方法时等待阻塞的调用的方法,而accept0()方法是响应请求的方法。
(该部分纯属个人猜测,可能是错误的,因而希望大家指教)
2、OutputStream.flush()方法底层源码
flush()方法很简单,就是刷新此输出流并强制写出任何已缓冲的输出字节
    /**
     * Flushes this output stream and forces any buffered output bytes
     * to be written out. The general contract of <code>flush</code> is
     * that calling it is an indication that, if any bytes previously
     * written have been buffered by the implementation of the output
     * stream, such bytes should immediately be written to their
     * intended destination.
     * <p>
     * If the intended destination of this stream is an abstraction provided by
     * the underlying operating system, for example a file, then flushing the
     * stream guarantees only that bytes previously written to the stream are
     * passed to the operating system for writing; it does not guarantee that
     * they are actually written to a physical device such as a disk drive.
     * <p>
     * The <code>flush</code> method of <code>OutputStream</code> does nothing.
     *
     * @exception  IOException  if an I/O error occurs.
     */
    public void flush() throws IOException {
    }
最后附上Java测试socket,查看其底层源码实现机制,因为一直尝试网络请求没成功,只能debug一步一步查看底层实现机制。
感兴趣可以自己尝试下,查看具体实现原理。
import java.io.*;
import java.net.*;

public class socketTest {

	public static void main(String[] args) throws UnknownHostException, IOException {
		Socket socket = setSocket();
		if(socket == null) System.out.println("socket is null");
		InputStream inputStream = new FileInputStream("d://haha.txt");
		OutputStream outputStream = socket.getOutputStream();
		byte buffer[] = new byte[4 * 1024];
		int temp = 0;
		while((temp = inputStream.read(buffer)) != -1) {
			outputStream.write(buffer, 0, temp);
		}
		outputStream.flush();
		listener();
	}

	public static Socket setSocket() throws IOException{
        String ip = "127.0.0.5";
        int port = 8080;
        Socket socket = new Socket();
        //设置最长等待时间
        socket.setSoTimeout(8000);
        //进行连接请求
        socket.connect(new InetSocketAddress(ip, port));
        return socket;
    }

    //服务端监听方法
    public static void listener() throws IOException{
        //正常情况下,此处的"9999"和客户端中的端口号port需要相同,才能完成网络请求,
        //因为测试不成功,但是又想查看实现原理,因而才这样做!!!
    	ServerSocket server = new ServerSocket(9999);
        Socket socket = null;
        int i = 0;
        while(true){
            i++;
            socket = server.accept();//这也是个阻塞的方法来的
            System.out.println("有" + i + "个用户连接了服务器");
            new Thread(new socketTest().new ServerDoThread(socket)).start();
        }
    }

    class ServerDoThread implements Runnable {
    	Socket socket;
    	InputStream inputStream;

    	public ServerDoThread(Socket socket) {
    		this.socket = socket;
    		try {
				this.inputStream = socket.getInputStream();
			} catch (IOException e) {
				e.printStackTrace();
			}
    	}

    	@Override
    	public void run() {
    		byte buffer[] = new byte[1024 * 4];
    		int temp = 0;
    		try {
				while((temp = inputStream.read(buffer)) != -1) {
					System.out.println(new String(buffer, 0, temp));
				}
			} catch (IOException e) {
				// TODO Auto-generated catch block
				e.printStackTrace();
			}
    	}
    }

}
来源:Socket 通信原理(Android客户端和服务器以TCP&&UDP方式互通)
