

★注解是Android开发中的利器,使用注解能简洁代码,提高开发效率,EventBus及Arouter等有名的框架均有使用注解,清晰理解注解原理及使用流程就显得很重要。
”
使用场景
在Android开发时,注解主要在如下三种时机发挥作用:
- 程序开发
- 程序编译
- 程序运行
下面详细介绍一下注解在不同时机下的作用。
程序开发
在开发程序的时候,经常会使用@Override @Nullable等注解,这种注解和IDE共同作用提示代码编写中的错误,起到警示作用,减少代码错误,在实际编译的时候会被编译器丢弃,在class文件中不会出现。
程序编译
当处理一些简单且重复逻辑的时候,我们希望源代码保持整洁,但是希望在代码编译的时候补上这部分逻辑,Android中有名的butterknife框架就是这类注解。
程序运行
当程序运行的时候,我们希望通过获取标注的注解执行不同的逻辑,如EventBus使用不同线程发送消息。
语法介绍
在介绍注解语法之前,现在一个注解的例子:
import java.lang.annotation.Documented;
import java.lang.annotation.ElementType;
import java.lang.annotation.Inherited;
import java.lang.annotation.Retention;
import java.lang.annotation.RetentionPolicy;
import java.lang.annotation.Target;
@Target(ElementType.FIELD)
@Retention(RetentionPolicy.CLASS)
@Inherited
@Documented
public @interface BindView {
int value();
}
关键字
注解的关键字为@interface,这里注意要和接口关键字区别开来。
元注解
用来修饰注解的基础注解叫做元注解,注解中用四个元注解:
- @Target
- @Retention
- @Inherited
- @Documented
其中@Target和@Retention是自定义注解时必须要添加的元注解,下面详细介绍一下不同元注解的作用。
@Target
@Target注解表示注解的作用域,上例中@Target(ElementType.FIELD)标志注解作用于属性,下面给出所有作用域及注释:
| 作用域 | 注释 |
|---|---|
| TYPE | 作用于类,接口,枚举 |
| FIELD | 作用于属性 |
| METHOD | 作用于方法 |
| PARAMETER | 作用于方法参数 |
| CONSTRUCTOR | 作用于构造函数 |
| LOCAL_VARIABLE | 作用于局部变量 |
| ANNOTATION_TYPE | 作用于注解上 |
| PACKAGE | 作用于包上 |
@Target接受一个数组作为参数,所以可以设置多个注解的作用域,如:
@Target({ElementType.FIELD, ElementType.METHOD})
表示注解可作用于属性和方法上。
@Retention
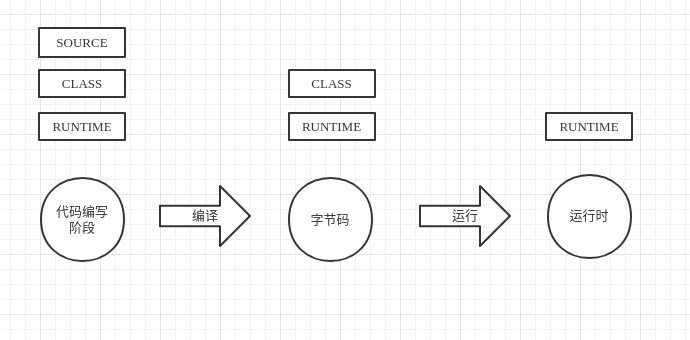
@Retention表示注解的生命周期,下面给出所有生命周期及注释:
| 生命周期 | 注释 |
|---|---|
| RetentionPolicy.SOURCE | 注解存在于源码,编译的时候不会打入class字节码中 |
| RetentionPolicy.CLASS | 注解存在于字节码中,但是不会被虚拟机加载 |
| RetentionPolicy.RUNTIME | 注解被虚拟机加载,运行时也起作用 |
不同的生命周期,对实际开发中各有意义,下面通过一张图说明不同生命周期的区别:
 后面在实战时会详细介绍RetentionPolicy.CLASS和RetentionPolicy.RUNTIME的使用。
@Inherited
表示当前注解是否可以被继承,默认为false。
@Documented
表示在生成Java Doc文档的时候该注解是否被生成文档。
实战演练
上面对注解进行了介绍,下面结合实例详细说明,RetentionPolicy.SOURCE一般结合lint工具使用,这里就不进行实战演练,重点对RetentionPolicy.CLASS和RetentionPolicy.RUNTIME进行介绍。下面就用这两种注解分别实现ButterKnife的View绑定功能。
Demo准备
创建一个Activity,并且在Activiy中添加一个按钮,代码如下, 布局代码:
<Button
        android:layout_width="match_parent"
        android:layout_height="wrap_content"
        android:id="@+id/btn_start"
        android:text="测试"/>
Activity代码:
public Button mStartBtn;
RetentionPolicy.RUNTIME
RetentionPolicy.RUNTIME类型的注解会被虚拟机加载到内存中,一般结合反射使用,先定义一个注解:
import java.lang.annotation.Documented;
import java.lang.annotation.ElementType;
import java.lang.annotation.Inherited;
import java.lang.annotation.Retention;
import java.lang.annotation.RetentionPolicy;
import java.lang.annotation.Target;
@Target(ElementType.FIELD)
@Retention(RetentionPolicy.RUNTIME)
@Inherited
@Documented
public @interface BindView {
int value();
}
该注解作用于属性的运行时注解,其中有一个value,下面再用这个注解来修饰上述界面中的Button:
@BindView(R.id.btn_start)
public Button mStartBtn;
然后再通过反射完成ID绑定动作,看下面代码片段,有完善的注释:
public static void initBind(Activity activity) {
        // 获取这个类所用的属性
        Field[] declaredFields = activity.getClass().getDeclaredFields();
        for (Field field : declaredFields) {
            // 检查属性是否被@BindView注解修饰
            BindView bindView = field.getAnnotation(BindView.class);
            if (bindView == null) {
                continue;
            }
            // 获取@BindView注解中的值并且通过findViewById找到对应的View
            View view = activity.findViewById(bindView.value());
            if (view == null) {
                continue;
            }
            // 由于反射调用, 需要确保属性能被访问
            field.setAccessible(true);
            try {
                // 通过反射给被@BindView修饰的属性设置找到的View
                field.set(activity, view);
            } catch (IllegalAccessException e) {
                e.printStackTrace();
            }
        }
    }
最后在Activity界面中绑定一下即可:
    @BindView(R.id.btn_start)
    public Button mStartBtn;
    @Override
    protected void onCreate(Bundle savedInstanceState) {
        super.onCreate(savedInstanceState);
        setContentView(R.layout.activity_main);
        // 绑定
        AnonationProcessor.initBind(this);
        mStartBtn.setOnClickListener(new View.OnClickListener() {
            @Override
            public void onClick(View v) {
                Toast.makeText(MainActivity.this, "注解测试", Toast.LENGTH_LONG).show();
            }
        });
    }
这样就通过反射运行时注解完成View绑定操作,下面通过一张图解释整体工作流程:
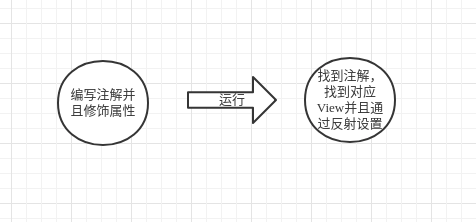
由于运行时注解需要通过反射完成View的设置,会有性能上的损耗,当然ButterKnife也不是通过这种方式完成View的绑定,看下面编译时注解。
RetentionPolicy.CLASS
编译时注解主要作用于编译过程中,可以生成class字节码文件,完成特殊逻辑,所以不会有性能上的损耗,但是会生成一些辅助文件,先看下工作流程:
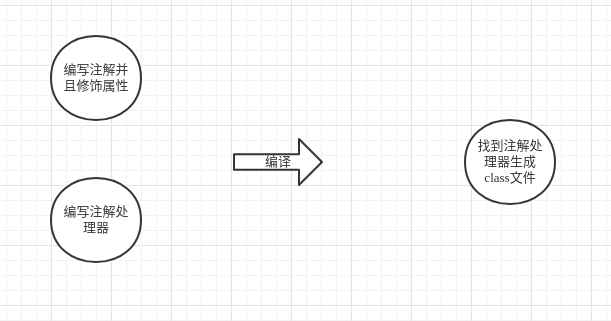
从上面的工作图中可以看到需要自定义注解处理器,下面介绍一下自定义注解处理器的流程。
Gradle 自定义注解处理器
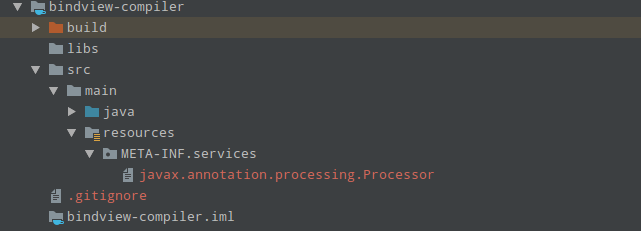
- 创建注解处理Module(Java Module), 这里创建的为bindview-compiler
- 在main目录下创建resources目录,然后再创建META-INF/services 目录,最后创建入口文件:
javax.annotation.processing.Processor,然后在文件里面定义入口文件,最后的目录结构如下:
 当然也可以通过@AutoService()动态生成入口文件,因为我使用的时候一直出现问题,所以就没有使用。
 - 创建注解处理入口类
public class BindViewProcessor extends AbstractProcessor {
    @Override
    public synchronized void init(ProcessingEnvironment processingEnvironment) {
        super.init(processingEnvironment);
    }
    @Override
    public SourceVersion getSupportedSourceVersion() {
        return SourceVersion.latestSupported();
    }
    @Override
    public Set<String> getSupportedAnnotationTypes() {
        //支持的注解
        Set<String> annotations = new LinkedHashSet<>();
        annotations.add(BindView.class.getCanonicalName());
        return annotations;
    }
    @Override
    public boolean process(Set<? extends TypeElement> set, RoundEnvironment roundEnvironment) {
        return false;
    }
}
4.在集成方gradle中引用
annotationProcessor project(path: ':bindview-compiler')
项目结构
上面看到看到注解处理module的集成方式是annotationProcessor,这个是为了不让注解处理的代码打到最后的产物中,但是注解处理module需要拿到注解处理,集成方又需要使用注解,所以最终的项目结构如下:
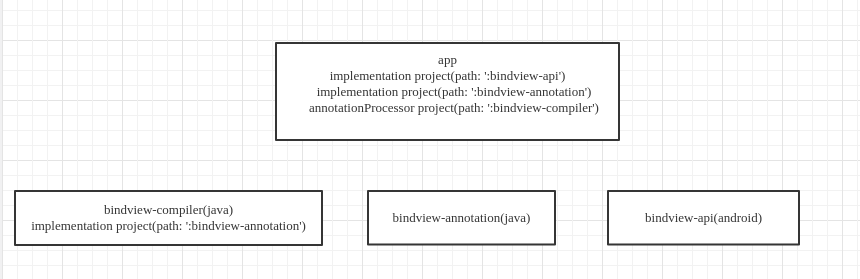
- bindview-compiler:注解处理模块,主要处理注解逻辑
- bindview-annotation:注解定义模块,主要是自定义的注解
- bindview-api:注解接口模块,集成方调用接口
其中集成方的dependencies如下:
implementation project(path: ':bindview-api')
implementation project(path: ':bindview-annotation')
annotationProcessor project(path: ':bindview-compiler')
bindview-compiler需要依赖注解定义模块:
implementation project(path: ':bindview-annotation')
注解入口
介绍下注解入口的类的重要函数,
初始化接口
@Override
public synchronized void init(ProcessingEnvironment processingEnvironment) {
    super.init(processingEnvironment);
}
注解入口类初始化接口,可以在这个函数里面做一些初始化操作,如Message信息打印的初始化:
mFiler = processingEnv.getFiler();
mMessager = processingEnv.getMessager();
JDK版本
@Override
public SourceVersion getSupportedSourceVersion() {
    return SourceVersion.latestSupported();
}
这里设置为最新的JDK版本即可。
设置支持注解
@Override
public Set<String> getSupportedAnnotationTypes() {
    Set<String> annotations = new LinkedHashSet<>();
    annotations.add(BindView.class.getCanonicalName());
    return annotations;
}
这里设置支持处理的注解集合。
注解处理入口
@Override
public boolean process(Set<? extends TypeElement> set, RoundEnvironment roundEnvironment) {
    return false;
}
这里的返回值表示是否拦截对支持的注解的处理,如果为true则表示拦截,后面其他注解处理器无法处理。
案例
这里简单实现一下Butterknife里面绑定view的逻辑,先看下处理流程图:
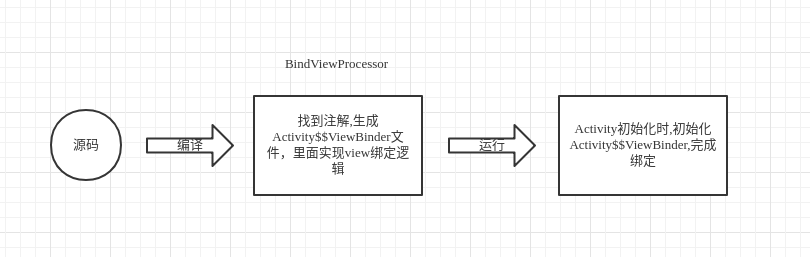
- 在源码里面使用注解,在Activity中的setContentView函数后执行bind操作
- 在注解处理函数里面,创建Activity?ViewBinder文件,里面有函数执行view绑定操作
- 运行时绑定接口实例化Activity?ViewBinder,并且传入Activity执行view绑定操作
创建注解文件
import java.lang.annotation.ElementType;
import java.lang.annotation.Retention;
import java.lang.annotation.RetentionPolicy;
import java.lang.annotation.Target;
@Target(ElementType.FIELD)
@Retention(RetentionPolicy.CLASS)
public @interface BindView {
int value();
}
注解处理
初始化
@Override
public synchronized void init(ProcessingEnvironment processingEnvironment) {
    super.init(processingEnvironment);
    //初始化我们需要的基础工具
    mFiler = processingEnv.getFiler();
    mMessager = processingEnv.getMessager();
}
设置支持的注解
@Override
public Set<String> getSupportedAnnotationTypes() {
    Set<String> annotations = new LinkedHashSet<>();
    annotations.add(BindView.class.getCanonicalName());
    return annotations;
}
注解处理
@Override
public boolean process(Set<? extends TypeElement> set, RoundEnvironment roundEnvironment) {
        Set<? extends Element> elements = roundEnvironment.getElementsAnnotatedWith(BindView.class);
        Map<TypeElement, ArrayList<BindViewInfo>> bindViewMap = new HashMap<>();
        for (Element element : elements) {
            // 判断注解修饰是否为属性,不为属性则直接结束
            if (element.getKind() != ElementKind.FIELD) {
                error(element.getSimpleName().toString() + "are not filed, can not use @Bindview");
                return false;
            }
            // 获取注解的值,这里是view的Id
            int resId = element.getAnnotation(BindView.class).value();
            // 获取属性的类
            TypeElement typeElement = (TypeElement) element.getEnclosingElement();
            if (!bindViewMap.containsKey(typeElement)) {
                bindViewMap.put(typeElement, new ArrayList<BindViewInfo>());
            }
            ArrayList<BindViewInfo> bindViewInfos = bindViewMap.get(typeElement);
            // 添加处理list
            bindViewInfos.add(new BindViewInfo(resId, element.getSimpleName().toString()));
        }
        // 生成class文件
        generateClass(bindViewMap);
        return false;
    }
private void generateClass(Map<TypeElement, ArrayList<BindViewInfo>> hashMap) {
        if (hashMap == null || hashMap.isEmpty()) {
            return;
        }
        Set<TypeElement> typeElements = hashMap.keySet();
        for (TypeElement typeElement : typeElements) {
            generateJavaClassBySb(typeElement, hashMap.get(typeElement));
        }
    }
private void generateJavaClassBySb(TypeElement typeElement, List<BindViewInfo> bindViewInfos) {
        try {
            StringBuffer sb = new StringBuffer();
            sb.append("package ");
            sb.append(getPackageName(typeElement.getQualifiedName().toString()) + ";\n");
            sb.append("import com.liwei.viewbinder.IViewBinder;\n");
            sb.append("public class " + typeElement.getSimpleName() + "?ViewBinder<T extends " + typeElement.getSimpleName() + "> implements IViewBinder<T> {\n");
            sb.append("@Override\n");
            sb.append("public void bind(T activity) {\n");
            for (BindViewInfo bindViewInfo : bindViewInfos) {
                sb.append("activity." + bindViewInfo.name + "=activity.findViewById(" + bindViewInfo.id + ");\n");
            }
            sb.append("}\n}");
            JavaFileObject sourceFile = mFiler.createSourceFile(typeElement.getQualifiedName().toString() + "?ViewBinder");
            Writer writer = sourceFile.openWriter();
            writer.write(sb.toString());
            writer.close();
        } catch (IOException e) {
            e.printStackTrace();
        }
    }
这里举例就直接使用字符串的方式生成java文件,对初学着比较直观,可以使用javapoet生成java文件。
接口模块
接口模块在案例里面就是bindview-api,这里是直接提供给集成方使用,需要在绑定的Activity中调用bind接口,先创建bind接口:
public interface IViewBinder<T> {
    void bind(T t);
}
ViewBinder管理类:
public class ViewBinder {
    public static void bind(Activity activity) {
        try {
            Class clazz = Class.forName(activity.getClass().getCanonicalName() + "?ViewBinder");
            IViewBinder<Activity> iViewBinder = (IViewBinder<Activity>) clazz.newInstance();
            iViewBinder.bind(activity);
        } catch (ClassNotFoundException e) {
            e.printStackTrace();
        } catch (IllegalAccessException e) {
            e.printStackTrace();
        } catch (InstantiationException e) {
            e.printStackTrace();
        }
    }
}
这里生成中间绑定类的对象,完成绑定动作。 Activity中执行Bind操作:
    @BindView(R.id.btn_start)
    public Button mStartBtn;
    @Override
    protected void onCreate(Bundle savedInstanceState) {
        super.onCreate(savedInstanceState);
        setContentView(R.layout.activity_main);
        ViewBinder.bind(this);
        mStartBtn.setOnClickListener(new View.OnClickListener() {
            @Override
            public void onClick(View v) {
                Toast.makeText(MainActivity.this, "注解测试", Toast.LENGTH_LONG).show();
            }
        });
    }
最后看下编译出的项目结构:
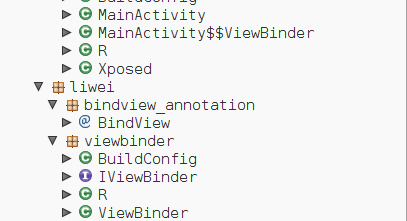
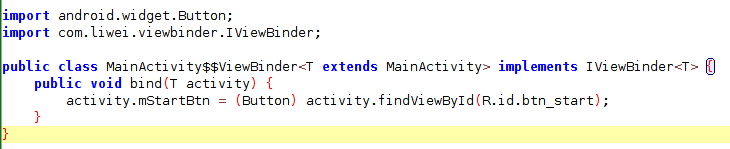
里面生成了ViewBinder文件,且不包含注解处理类,看下ViewBinder里面的内容:
总结
上面介绍了注解工作原理及使用,能深刻理解注解在项目开发中的重要作用,使代码更加简洁,文中主要是自己的实践和理解,如有错误,还望指正,谢谢!
最后给出Demo,如果有帮助到你,可以给个starAnnotationDemo,感谢!
