

你是否好奇过那些像 codesandbox 和 codepen 的 在线 react 编辑器是如何实现的?你是否用过 semantic react 或 react styleguidist,直接在浏览器中修改上面的例子,就能实时预览。
这周末我终于将零碎的概念汇总到了一起并实现了一个简单的方案。这篇文章就是这次实现过程的一个概览。如果你仍不清楚最终的效果,建议你翻阅到文章的底部,先试试内嵌的代码编辑器。
好啦,那我们直奔主题。
我们需要克服的挑战
- 在浏览器中转换 JSX/ES6
- 模块处理,我们可能在编辑器中引入模块
- 如何解析和修改 Javascript 代码
使用到的依赖包
@babel/standalone在浏览器中转换JSX/ES6acorn将 JS 解析成 ASTescodegen将 修改后的 AST 转回 JSdebounce, object-path
策略
这真的出人意料地简单。以下是一些步骤:
- 转换
JSX/ES6代码 - 在转换后的代码中,找到一个 JSX 表达式。等我们经过 AST 处理部分之后我们再来了解它。
- 转化
JSX表达式,将它“包装进”render方法内 - 创建一个函数,包含上面生成的代码,并且将依赖作为参数注入。
- 每当代码修改,调用步骤 4 的函数
有点懵?别担心,我们直接看示例。
假设我们从这样的一段代码开始入手:
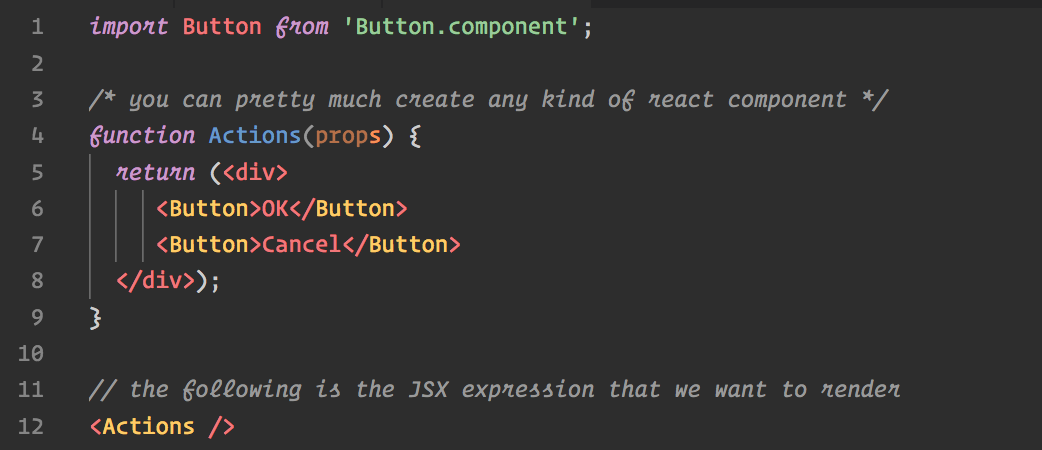
如何让这段代码能够在我们的网页上渲染?
我们现在的任务是转换上面的代码,处理引入的 button 组件,并且渲染第 12 行的 JSX。
下面是转换后的版本:
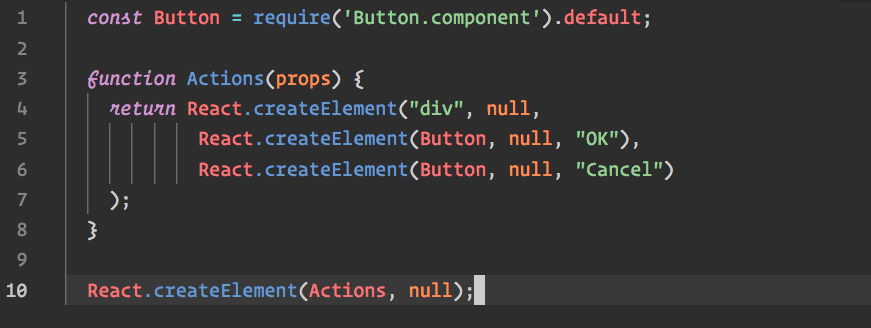
下面是我们需要“动态”生成的:
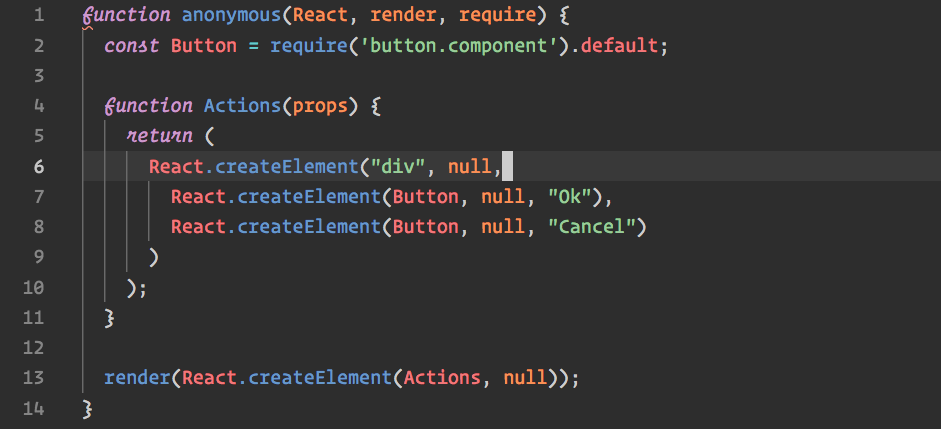
当我们生成上面的函数后,我们可以通过传递 一个 React 对象,一个渲染函数,一个模块处理函数作为参数,调用这个函数。
同时,注意我们将转化后的代码的第 10 行包含在了渲染函数的调用中。
希望你已经 get 到了整个思路。那么我们看一些具体的代码。
import React from "react";import ReactDOM from "react-dom";import ObjPath from "object-path";import * as Acorn from "acorn";import { generate as generateJs } from "escodegen";import { transform as babelTransform } from "@babel/standalone";function isReactNode(node) { const type = node.type; //"ExpressionStatement" const obj = ObjPath.get(node, "expression.callee.object.name"); const func = ObjPath.get(node, "expression.callee.property.name"); return ( type === "ExpressionStatement" && obj === "React" && func === "createElement" );}export function findReactNode(ast) { const { body } = ast; return body.find(isReactNode);}export function createEditor(domElement, moduleResolver = () => null) { function render(node) { ReactDOM.render(node, domElement); } function require(moduleName) { return moduleResolver(moduleName); } function getWrapperFunction(code) { try { // 1. transform code const tcode = babelTransform(code, { presets: ["es2015", "react"] }) .code; // 2. get AST const ast = Acorn.parse(tcode, { sourceType: "module" }); // 3. find React.createElement expression in the body of program const rnode = findReactNode(ast); if (rnode) { const nodeIndex = ast.body.indexOf(rnode); // 4. convert the React.createElement invocation to source and remove the trailing semicolon const createElSrc = generateJs(rnode).slice(0, -1); // 5. transform React.createElement(...) to render(React.createElement(...)), // where render is a callback passed from outside const renderCallAst = Acorn.parse(`render(${createElSrc})`) .body[0]; ast.body[nodeIndex] = renderCallAst; } // 6. create a new wrapper function with all dependency as parameters return new Function("React", "render", "require", generateJs(ast)); } catch (ex) { // in case of exception render the exception message render(<pre style={{ color: "red" }}>{ex.message}</pre>); } } return { // returns transpiled code in a wrapper function which can be invoked later compile(code) { return getWrapperFunction(code); }, // compiles and invokes the wrapper function run(code) { this.compile(code)(React, render, require); }, // just compiles and returns the stringified wrapper function getCompiledCode(code) { return getWrapperFunction(code).toString(); } };}当我们调用 createEditor 函数的时候,我们就创建了一个 编辑器 实例。这个函数接受 2 个参数:
- 将要渲染结果的DOM元素
- 一个模块处理函数
重点实现是 getWrappedFunction。这里引用了一张根据示例生成的 AST 树,帮助你理解程序中我们如何检测并修改 JSX 表达式的。
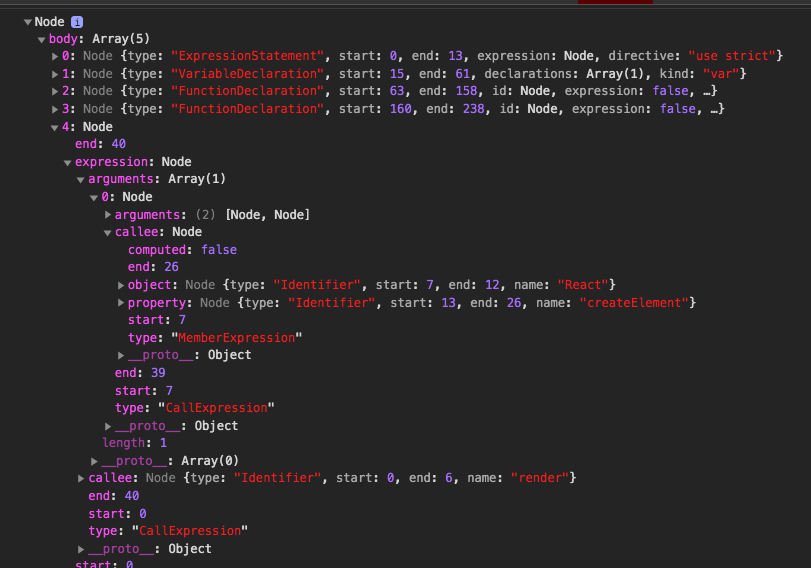
可以对比下上面的 AST 来理解 isReactNode 和 findReactNode是如何工作的。我们使用任意的代码串调用 Acorn.parse 方法,它将代码当做一段完整的 javascript 程序,因此解析后的结果包含了所有语句。我们需要从中找到 React.createElement 这一句。
下面,我们再看一下(完整的)实现:
import "./styles.scss";import React from "react";import ReactDOM from "react-dom";import { createEditor } from "./editor";import debounce from "debounce";// default code const code = `import x from 'x';// edit this examplefunction Greet() { return <span>Hello World!</span>}<Greet />`;class SandBox extends React.Component { state = { code }; editor = null; el = null; componentDidMount() { this.editor = createEditor(this.el); this.editor.run(code); } onCodeChange = ({ target: { value } }) => { this.setState({ code: value }); this.run(value); }; run = debounce(() => { const { code } = this.state; this.editor.run(code); }, 500); render() { const { code } = this.state; return ( <div className="app"> <div className="split-view"> <div className="code-editor"> <textarea value={code} onChange={this.onCodeChange} /> </div> <div className="preview" ref={el => (this.el = el)} /> </div> </div> ); }}const rootElement = document.getElementById("root");ReactDOM.render(<SandBox />, rootElement);你可以在哪里使用?
这真的是一个很有趣的尝试,我相信这项技术(实现)在下面的场景中将非常有用:
- 组件文档
- 在线的 IDE
- 一个简单的 动态 JSX 渲染
你来决定咯~
链接
[](https://codesandbox.io/s/react-live-editor-xqw3b?fontsize=14)
最后
你也许注意到我没有实现模块处理部分。这真的很简单,所以我把它留给我的读者。
感谢你的阅读!
