使用Netty主要是为了进行网络通信,而网络通信就要涉及到传输数据,数据是不能直接传递的,需要进行一系列处理。java序列化就是其中一种处理方式,但是由于各种各样的缺点,一般不会用,在这里我们介绍一个比较优秀的编码解码技术MessagePack。
这篇文章是我的《搞懂Netty》系列的第三篇,也是在前两篇文章的基础之上进行讲解的。我们使用的是Springboot整合的Netty。
一、为什么不用java序列化
不用java进行序列化,大体上可以归结为以下几条。
1、无法跨语言
比如说java编码后的数据,C++不认识,也不能解码。
2、性能低
编码解码的速度太慢。
3、码流太大
编码之后增加了很多其他的数据,占据空间。
4、开发难度大
对开发人员不友好。
以上几条随便一条都是极大地缺点,因此我们在这里先介绍其中一种编码和解码的技术,叫MessagePack。为什么要使用这个呢?因为以上四条都能很好的解决,所以要用它。当然还有很多其他的优秀技术,比如Protobuf等,以后用到的时候再说,我目前的项目由于是C++和java通信,因此选择了这个框架。
既然这个MessagePack这么好,下面我们就直接来看如何在Netty中使用。
二、MessagePack编解码
1、前提
在前面已经提到了,使用的是Springboot开发的,因此我们首先添加依赖,如果你没有使用maven直接下载相关的jar包导入也可以。
另外,本实例代码在Idea中已经运行通过,而且你最好建两个moducle跑一下,客户端一个,服务端一个。
       <!--添加netty依赖-->
        <dependency>
            <groupId>io.netty</groupId>
            <artifactId>netty-all</artifactId>
            <version>5.0.0.Alpha1</version>
        </dependency>
        <dependency>
            <groupId>org.msgpack</groupId>
            <artifactId>msgpack</artifactId>
            <version>0.6.12</version>
        </dependency>
导入了jar包之后,下面我们就来看看客户端和服务端的代码。
客户端和服务端实现的功能很简单,那就是在建立连接的时候,客户端给服务端发送10个Student对象数据。
2、服务端代码
(1)定义pojo对象Student类
@Message
public class Student implements Serializable {
    private String name;
    private Integer age;
	//getter和setter方法
    @Override
    public String toString() {
        return "Student{" +
                "name='" + name + '\'' +
                ", age=" + age +
                '}';
    }
}
在这里有两点需要我们注意:
第一点:添加@Message注解,表明可以对此进行序列化。
第二点:一定要有一个默认的构造器。在0.7的版本中据说已经修复了,不过形式上看起来有点麻烦。而且你用0.7的版本之后,上面的@Message注解不再有了。比较麻烦。还不如记住这两条,有注解和默认构造器即可。
(2)编码器MsgPackEncoder
//编码器
public class MsgPackEncoder extends MessageToByteEncoder<Object> {
    @Override
    protected void encode(ChannelHandlerContext channelHandlerContext,
    		Object o, ByteBuf byteBuf) throws Exception {
        MessagePack messagePack = new MessagePack();
        byte[] raw = messagePack.write(o);
        byteBuf.writeBytes(raw);
    }
}
这里面的代码很简单,只有三行,新建一个MessagePack对象,将对象o转化为byte保存在ByteBuf中。
(3)解码器MsgPackDecoder
//解码器
public class MsgPackDecoder extends MessageToMessageDecoder<ByteBuf> {
    @Override
    protected void decode(ChannelHandlerContext channelHandlerContext,
    			ByteBuf byteBuf, List<Object> list) throws Exception {
        int length = byteBuf.readableBytes();
        byte[] array = new byte[length];
        byteBuf.getBytes(byteBuf.readerIndex(), array, 0, length);
        MessagePack messagePack = new MessagePack();
        list.add(messagePack.read(array));
    }
}
在这里我们继承了MessageToMessageDecoder,然后重写了decode方法,在里面通过MessagePack再将缓冲区的byte转化为对象。
(4)服务端Server类
@Component
public class NettyServer {
    EventLoopGroup boss = new NioEventLoopGroup();
    EventLoopGroup work = new NioEventLoopGroup();
    @PostConstruct
    public void start() throws InterruptedException {
        try {
            final ServerBootstrap b = new ServerBootstrap();
            b.group(boss, work)
             .channel(NioServerSocketChannel.class)
             .option(ChannelOption.SO_BACKLOG, 1024)
             .childHandler(new ChannelInitializer<SocketChannel>() {
                 @Override
                 protected void initChannel(SocketChannel ch) throws Exception {
                   ch.pipeline().addLast(new LengthFieldBasedFrameDecoder(65535,0,2,0,2));
                   ch.pipeline().addLast(new MsgPackDecoder());
                   ch.pipeline().addLast(new LengthFieldPrepender(2));
                   ch.pipeline().addLast(new MsgPackEncoder());
                   ch.pipeline().addLast(new ServerUAVHandler());
                 }
              });
            ChannelFuture f = b.bind(8883).sync();
            f.channel().closeFuture().sync();
        } catch (InterruptedException e) {
        } finally {
            boss.shutdownGracefully();
            work.shutdownGracefully();
        }
    }
}
在这里面基本上全是套路代码,你直接拿来用即可,里面核心的就是try代码块。我们最关注的是下面这一部分:
 b.group(boss, work)
  .channel(NioServerSocketChannel.class)
  .option(ChannelOption.SO_BACKLOG, 1024)
  .childHandler(new ChannelInitializer<SocketChannel>() {
     @Override
     protected void initChannel(SocketChannel ch) throws Exception {
         ch.pipeline().addLast(new LengthFieldBasedFrameDecoder(65535,0,2,0,2));
         ch.pipeline().addLast(new MsgPackDecoder());
         ch.pipeline().addLast(new LengthFieldPrepender(2));
         ch.pipeline().addLast(new MsgPackEncoder());
         ch.pipeline().addLast(new ServerUAVHandler());
     }
});
我们来分析一下这些代码:
第一个类:LengthFieldBasedFrameDecoder
参数(1)maxFrameLength:表示的是包的最大长度,超出会做一些特殊处理。
参数(2)lengthFieldOffset:指定长度域的偏移量,表示跳过指定长度个字节才是长度域;
参数(3)lengthFieldLength:本数据帧的长度;
参数(4)lengthAdjustment:该字段加长度字段等于数据帧的长度,包体长度调整的大小。
参数(5)initialBytesToStrip:获取完一个完整的数据包之后,忽略前面的指定的位数个字节。
第二个类:MsgPackDecoder
这个类就是我们更改创建的解码类
第三个类:LengthFieldPrepender
客户端使用LengthFieldPrepender给数据添加报文头Length字段,接受方使用LengthFieldBasedFrameDecoder进行解码。
第四个类:MsgPackEncoder
这是我们刚刚创建的编码器类。
第五个类:ServerUAVHandler
这是我们的业务处理类,在这个类中我们处理客户端的各种事件。
从上面五个类可以看到,LengthFieldBasedFrameDecoder和LengthFieldPrepender,可以自动屏蔽TCP底层的拆包和粘包问题,因此在这里加上,也是为了解决粘包和拆包问题。
下面看看我们的ServerUAVHandler类,着重看看我们的业务处理类
(5)handler类
public class ServerUAVHandler extends ChannelHandlerAdapter {
    private int counter=0;
    @Override
    public void channelActive(ChannelHandlerContext ctx) throws Exception {
        System.out.println("channelActive");
    }
    @Override
    public void channelRead(ChannelHandlerContext ctx, Object msg) throws Exception {
        System.out.println("channelRead");
        List<Object> students = (List<Object>) msg;
        for (Object student : students) {
            System.out.println("属性:" + student);
        }
        System.out.println("counter:"+ ++counter);
    }
    @Override
    public void exceptionCaught(ChannelHandlerContext ctx, Throwable cause)
    													throws Exception {
        ctx.close();
    }
}
这里面很简单,在channelActive方法可以处理客户端的连接请求,在channelRead里面可以读取客户端发来的数据。我们使用counter变量记录客户端发了几条数据,不过有个坑需要我们去注意。
注意:List<>中一定得是Object类,而不能是我们的Student。
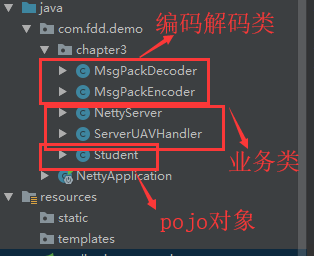
现在我们的服务端基本上就写完了,写完之后应该是这样的结构:
接下来就可以看看客户端了。
3、客户端代码
(1)定义pojo对象Student类:和服务端的Student类一样
(2)编码器MsgPackEncoder:和服务端的一样
(3)解码器MsgPackDecoder:和服务端的一样
(4)客户端client类
@Component
public class NettyClient {
    EventLoopGroup group = new NioEventLoopGroup();
    @PostConstruct
    public void start() throws Exception {
        try {
            Bootstrap b = new Bootstrap();
            b.group(group).channel(NioSocketChannel.class)
                    .option(ChannelOption.TCP_NODELAY, true)
                    .handler(new ChannelInitializer<SocketChannel>() {
                        @Override
                        public void initChannel(SocketChannel ch) throws Exception {
                            ch.pipeline().addLast(
                                new LengthFieldBasedFrameDecoder(65535,0,2,0,2));
                            ch.pipeline().addLast(new MsgPackDecoder());
                            ch.pipeline().addLast(new LengthFieldPrepender(2));
                            ch.pipeline().addLast(new MsgPackEncoder());
                            ch.pipeline().addLast(new ClientHandler());
                        }
                    });
            ChannelFuture channelFuture = b.connect("127.0.0.1", 8883).sync();
            channelFuture.channel().closeFuture().sync();
        } catch (InterruptedException e) {
            e.printStackTrace();
        } finally {
            group.shutdownGracefully();
        }
    }
}
由于和服务器的一样,我们也已经分析了,因此来看看里面不一样的clientHandler类实现吧。
public class ClientHandler extends ChannelHandlerAdapter {
    @Override
    public void channelActive(ChannelHandlerContext ctx)
    										throws Exception {
        Student loopStudent;
        for (int i = 1; i <= 10; i++) {
            loopStudent = new Student();
            loopStudent.setName("冯冬冬"+i);
            loopStudent.setAge(i);
            ctx.writeAndFlush(loopStudent);
		}
    }
}
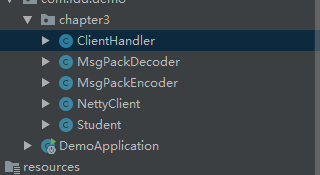
在这里面客户端和服务端建立连接的时候就发送是个对象数据。此时服务端肯定也是会收到10个。客户端也写完了,写完之后应该是下面的结构:
4、试验验证
现在先运行服务端,再运行客户端看看输出结果。这里给出服务端。

我们会看到服务端接收到了10调数据,而且没有粘包的现象。
对于这个MessagePack的方式和其他的框架综合对比之后,性能也不算是最优的,但是相对于java序列化机制那就好太多了,我之前曾经写了一篇protobuf的文章,有兴趣可以在我主页看看。
现在我们不仅可以解决粘包拆包的问题,而且也能处理编解码的问题,一个新问题又随之出来了,服务端给客户端主动推送消息该怎么办呢?这时候传统的HTTP协议,显然已经不能满足我们的需求。缺点太多了。于是有一个新的技术随之而生,叫做websocket,下一篇再叙述。感谢支持。