

参考:官方文档
如有错误欢迎指出
我对Navigation的理解
- 对于
Fragment:不用去操作supportFragmentManager,也就意味着对replace、show、hide说拜拜了。 - 对于
Activity:可能会大幅减少Activity,减少使用startActivity因为fragment有更详细的生命周期,更方便的传参。 - 使用
deepLink深链跳转更加方便。
三个关键组成部分
Navigation graph
一个xml资源文件,文件目录为res/navigation/*.xml,配置关于Navigation的导航内容。也可以理解成路由配置。
资源属性
<?xml version="1.0" encoding="utf-8"?>
<navigation xmlns:android="http://schemas.android.com/apk/res/android"
    xmlns:app="http://schemas.android.com/apk/res-auto"
    xmlns:tools="http://schemas.android.com/tools"
    android:id="@+id/sample_navigation"
    app:startDestination="@id/home_dest">

    <fragment
        android:id="@+id/home_dest"
        android:name="com.cxl.jetpack.nav.HomeFragment"
        tools:layout="@layout/home_dest"
        android:label="HomeFragment" >
        <action
            android:id="@+id/open_one_action"
            app:destination="@id/one_dest"
            app:enterAnim="@anim/slide_in_right"
            app:exitAnim="@anim/slide_out_left"
            app:popEnterAnim="@anim/slide_in_left"
            app:popExitAnim="@anim/slide_out_right"
            />
    </fragment>
    <fragment
        android:id="@+id/one_dest"
        android:name="com.cxl.jetpack.nav.OneFragment"
        android:label="OneFragment" >
        <argument
            android:name="flowStepNumber"
            app:argType="integer"
            android:defaultValue="1"/>
    </fragment>
</navigation>
tools:layout:预览属性,如果不配置该属性在Design面板会看不见预览。action:字面理解就是动作,作用是fragment之间进行切换。destination:目的地,跳转的目的地。enterAnim、exitAnim、popEnterAnim、popExitAnim:是页面切换和弹窗动画argument:类似于Activity的跳转传参,只不过传参取参更加方便简单,如下://传值且跳转 val flowStepNumberArg=1 val action = HomeFragmentDirections.nextAction(flowStepNumberArg) findNavController().navigate(action) //取值 val safeArgs: FlowStepFragmentArgs by navArgs() val flowStepNumber = safeArgs.flowStepNumber
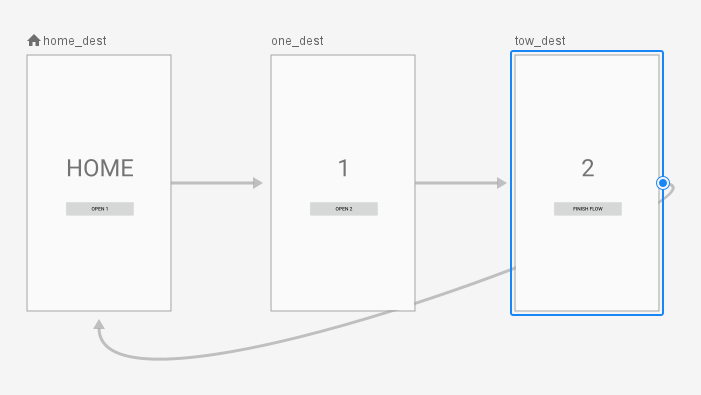
也可以使用Design面板(可以参考这篇文章:https://developer.android.com/guide/navigation/navigation-getting-started#nav-editor)进行配置,更方便。
NavHost
理解为主机,作用在fragment布局之上,如下:
<?xml version="1.0" encoding="utf-8"?>
<LinearLayout xmlns:android="http://schemas.android.com/apk/res/android"
    xmlns:app="http://schemas.android.com/apk/res-auto"
    android:orientation="vertical"
    xmlns:tools="http://schemas.android.com/tools"
    android:layout_width="match_parent"
    android:layout_height="match_parent"
    tools:context=".MainActivity">

    <androidx.appcompat.widget.Toolbar
       ... />

    <fragment
        android:id="@+id/my_nav_host_fragment"
        android:name="androidx.navigation.fragment.NavHostFragment"
        android:layout_width="match_parent"
        android:layout_height="0dp"
        android:layout_weight="1"
        app:defaultNavHost="true"
        app:navGraph="@navigation/sample_navigation" />

    <com.google.android.material.bottomnavigation.BottomNavigationView
        ... />

</LinearLayout>
可以看到比一般的fragment布局多了三个属性android:name="androidx.navigation.fragment.NavHostFragment"、app:defaultNavHost="true"、app:navGraph="@navigation/sample_navigation"。
android:name:指向NavHost的实现类NavHostFragment。app:defaultNavHost:默认值为false,当该值为false的时候,当前Activity中的Fragment使用了Navigation,且使用Navigation跳转到下一个Fragment,在下一个Fragment页面中点击了Back键会退出当前Activity。为true的时候是回到上一个Fragment中,如果上一个Fragment为null才会退出当前Activity。类似于我们处理WebView的back事件。app:navGraph:指向Navigation graph配置文件
NavController
可以理解为路由跳转控制器,在NavHost中协调目标内容的交换。如下:
//无参跳转
findNavController().navigate(R.id.flow_step_one_dest, null, options)
//或者携带参数
val flowStepNumberArg=1
val action = HomeFragmentDirections.nextAction(flowStepNumberArg)
findNavController().navigate(action)
那么该如何使用
第一步导入依赖
在App目录下的build.gradle内加入以下代码:
...
dependencies{
    ...
    //Navigation
    implementation "androidx.navigation:navigation-fragment-ktx:2.1.0"
    implementation "androidx.navigation:navigation-ui-ktx:2.1.0"
}
最好是使用最新版本,最新版本可以在这里查阅(打不开建议检查网络):Google's Maven Repository
可选*:项目级的build.gradle内加入以下代码:(加入这个Fragment质检传递参数更加方便)
···
 dependencies {
        ...
        classpath "androidx.navigation:navigation-safe-args-gradle-plugin:2.1.0"
    }
版本号都是一致的,推荐加个变量统一管理,比如在项目级build.gradle:
buildscript{
   ext{
        navigationVersion = "2.0.0"
   }
}
以上依赖可以分别修改为:
//项目级的dependencies
classpath "androidx.navigation:navigation-safe-args-gradle-plugin:$navigationVersion"
//App级的dependencies
implementation "androidx.navigation:navigation-fragment-ktx:$rootProject.navigationVersion"
implementation "androidx.navigation:navigation-ui-ktx:$rootProject.navigationVersion"
第二步基本框架搭建
新建几个Fragment并实现布局比如:
deep_link_dest.xml(对应DeepLinkFragment)
<?xml version="1.0" encoding="utf-8"?>
<TextView xmlns:android="http://schemas.android.com/apk/res/android"
    xmlns:tools="http://schemas.android.com/tools"
    android:gravity="center"
    android:textSize="80sp"
    android:text="Deep Link"
    android:orientation="vertical" android:layout_width="match_parent"
    android:layout_height="match_parent"
    tools:ignore="HardcodedText"/>
flow_step_one_dest.xml(对应OneFragment)
<?xml version="1.0" encoding="utf-8"?>
<LinearLayout xmlns:android="http://schemas.android.com/apk/res/android"
    xmlns:tools="http://schemas.android.com/tools"
    android:gravity="center"
    tools:ignore="HardcodedText"
    android:orientation="vertical" android:layout_width="match_parent"
    android:layout_height="match_parent">
    <TextView
        android:textSize="68sp"
        android:text="1"
        android:layout_marginBottom="50dp"
        android:layout_width="wrap_content"
        android:layout_height="wrap_content"/>

    <Button
        android:text="open 2"
        android:layout_width="200dp"
        android:layout_height="wrap_content"/>

</LinearLayout>
flow_step_two_dest.xml(对应TwoFragment)
<?xml version="1.0" encoding="utf-8"?>
<LinearLayout xmlns:android="http://schemas.android.com/apk/res/android"
    xmlns:tools="http://schemas.android.com/tools"
    android:gravity="center"
    tools:ignore="HardcodedText"
    android:orientation="vertical" android:layout_width="match_parent"
    android:layout_height="match_parent">
    <TextView
        android:id="@+id/twoTxt"
        android:textSize="68sp"
        android:text="2"
        android:layout_marginBottom="50dp"
        android:layout_width="wrap_content"
        android:layout_height="wrap_content"/>
    <Button
        android:text="Finish Flow"
        android:layout_width="200dp"
        android:layout_height="wrap_content"/>

</LinearLayout>
home_dest.xml(对应HomeFragment)
<?xml version="1.0" encoding="utf-8"?>
<LinearLayout xmlns:android="http://schemas.android.com/apk/res/android"
    xmlns:tools="http://schemas.android.com/tools"
    android:gravity="center"
    tools:context="com.cxl.jetpack.nav.HomeFragment"
    tools:ignore="HardcodedText"
    android:orientation="vertical" android:layout_width="match_parent"
    android:layout_height="match_parent">
    <TextView
        android:textSize="68sp"
        android:text="HOME"
        android:layout_marginBottom="50dp"
        android:layout_width="wrap_content"
        android:layout_height="wrap_content"/>
    <Button
        android:id="@+id/open1"
        android:text="open 1"
        android:layout_width="200dp"
        android:layout_height="wrap_content"/>

</LinearLayout>
新建Navigation graph资源文件
- 单击res文件夹,右键菜单选择New->Android Resource File
- 输入File name,选择Resource type为Navigation
- 点击ok即可创建
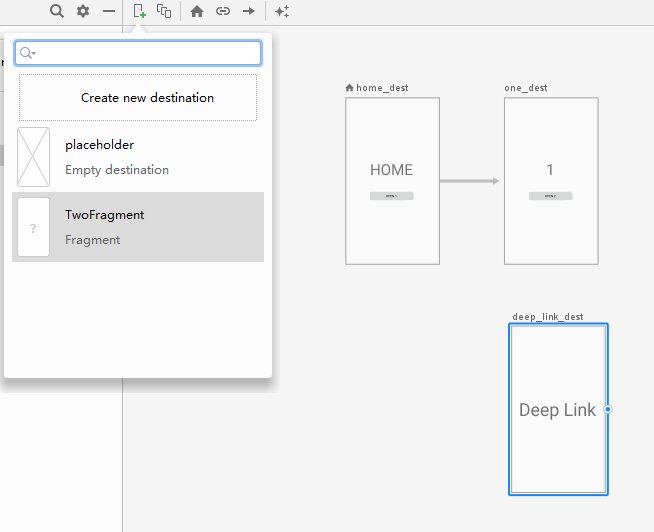
Navigation graph资源文件 把新建的Fragment引入到该资源文件内
新建menu/bottom_nav_menu.xml
<menu xmlns:android="http://schemas.android.com/apk/res/android">
    <item
        android:id="@id/home_dest"
        android:icon="@drawable/ic_home"
        android:title="home" />
    <item
        android:id="@id/deep_link_dest"
        android:icon="@drawable/ic_android"
        android:title="dest" />
</menu>
这里的item.id和Navigation graph资源文件中的fragment.id相对应,目前Navigation graph内容如下:
<?xml version="1.0" encoding="utf-8"?>
<navigation xmlns:android="http://schemas.android.com/apk/res/android"
    xmlns:app="http://schemas.android.com/apk/res-auto"
    xmlns:tools="http://schemas.android.com/tools"
    android:id="@+id/sample_navigation"
    app:startDestination="@id/home_dest">

    <fragment
        android:id="@+id/home_dest"
        ... >
        ...
    </fragment>
    <fragment
        android:id="@+id/one_dest"
        ... >
        ...
    </fragment>
    <fragment
        android:id="@+id/deep_link_dest"
        ... />
</navigation>
最后新建MainActivity和activity_main.xml。 activity_main.xml内容如下:
<?xml version="1.0" encoding="utf-8"?>
<LinearLayout xmlns:android="http://schemas.android.com/apk/res/android"
    xmlns:app="http://schemas.android.com/apk/res-auto"
    android:orientation="vertical"
    xmlns:tools="http://schemas.android.com/tools"
    android:layout_width="match_parent"
    android:layout_height="match_parent"
    tools:context=".MainActivity">
    <fragment
        android:id="@+id/my_nav_host_fragment"
        android:name="androidx.navigation.fragment.NavHostFragment"
        android:layout_width="match_parent"
        android:layout_height="0dp"
        android:layout_weight="1"
        app:defaultNavHost="true"
        app:navGraph="@navigation/sample_navigation" />

    <com.google.android.material.bottomnavigation.BottomNavigationView
        android:id="@+id/bottom_nav_view"
        android:layout_width="match_parent"
        android:layout_height="wrap_content"
        app:menu="@menu/bottom_nav_menu" />

</LinearLayout>
MainActivity内如如下:
package com.cxl.jetpack.nav

import android.content.res.Resources
import androidx.appcompat.app.AppCompatActivity
import android.os.Bundle
import android.util.Log
import android.widget.Toast
import androidx.navigation.fragment.NavHostFragment
import androidx.navigation.ui.setupWithNavController
import com.google.android.material.bottomnavigation.BottomNavigationView

class MainActivity : AppCompatActivity() {

    override fun onCreate(savedInstanceState: Bundle?) {
        super.onCreate(savedInstanceState)
        setContentView(R.layout.activity_main)
        //第一步获取到NavHostFragment
        val host: NavHostFragment = supportFragmentManager
            .findFragmentById(R.id.my_nav_host_fragment) as NavHostFragment? ?: return
        //第二步获取到NavController
        val navController = host.navController
        //第三步配置BottomNavigationView
        val bottomNav = findViewById<BottomNavigationView>(R.id.bottom_nav_view)
        bottomNav?.setupWithNavController(navController)
        //第四步添加路由监听
        navController.addOnDestinationChangedListener { _, destination, _ ->
            val dest: String = try {
                resources.getResourceName(destination.id)
            } catch (e: Resources.NotFoundException) {
                destination.id.toString()
            }
            Toast.makeText(this@MainActivity, "Navigated to $dest",
                Toast.LENGTH_SHORT).show()
            Log.d("NavigationActivity", "Navigated to $dest")
        }
    }
}
这样基本的框架就搭好啦。
| home | dest |
|---|---|
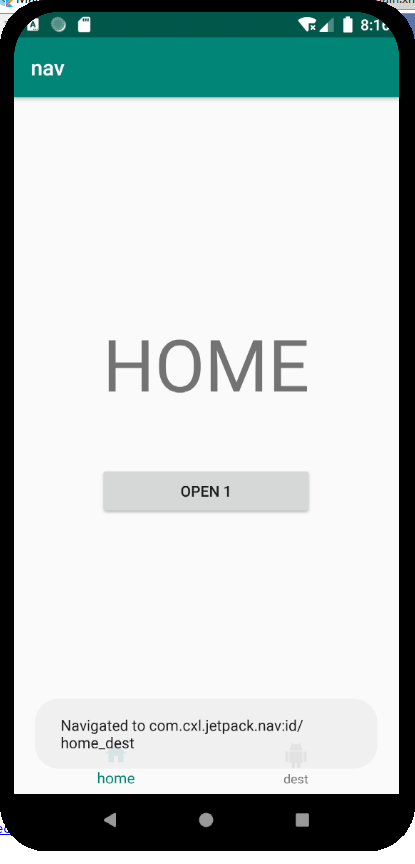 |
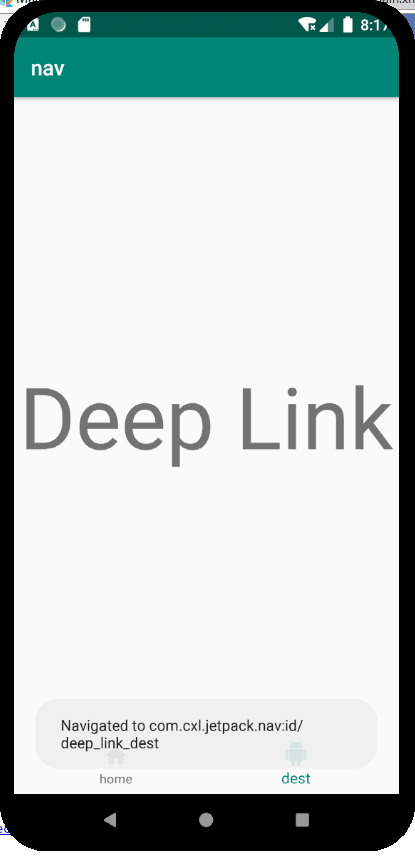 |
路由跳转
无参跳转
在HomeFragment中的onViewCreated(view: View, savedInstanceState: Bundle?)函数中添加以下代码:
view.findViewById<Button>(R.id.open1).setOnClickListener(Navigation.createNavigateOnClickListener(R.id.open_one_action))
其中R.id.open_one_action是我们在Navigation graph资源内添加的action属性,如下:
<?xml version="1.0" encoding="utf-8"?>
<navigation xmlns:android="http://schemas.android.com/apk/res/android"
    xmlns:app="http://schemas.android.com/apk/res-auto"
    xmlns:tools="http://schemas.android.com/tools"
    android:id="@+id/sample_navigation"
    app:startDestination="@id/home_dest">

    <fragment
        android:id="@+id/home_dest"
        android:name="com.cxl.jetpack.nav.HomeFragment"
        tools:layout="@layout/home_dest"
        android:label="HomeFragment" >
        <action
            android:id="@+id/open_one_action"
            app:destination="@id/one_dest"
            ...
            />
    </fragment>
    <fragment
        android:id="@+id/one_dest"
        tools:layout="@layout/flow_step_one_dest"
        android:name="com.cxl.jetpack.nav.OneFragment"
        android:label="OneFragment" >
        <action
            android:id="@+id/action_one_dest_to_twoFragment"
            app:destination="@+id/tow_dest"
            ... />
    </fragment>
    <fragment
        tools:layout="@layout/deep_link_dest"
        android:id="@+id/deep_link_dest"
        android:name="com.cxl.jetpack.nav.DeepLinkFragment"
        android:label="DeepLinkFragment" />
    <fragment
        tools:layout="@layout/flow_step_two_dest"
        android:id="@+id/tow_dest"
        android:name="com.cxl.jetpack.nav.TwoFragment"
        android:label="tow_dest" />
</navigation>
有参跳转
我们现在要往TwoFragment内跳转,且携带一个名为text的参数,该参数的值回覆盖id为twoTxt的TextView的text值。
第一步修改Navigation graph文件
向Navigation graphid为tow_dest的fragment节点添加子节点argument,如下所示
<?xml version="1.0" encoding="utf-8"?>
<navigation xmlns:android="http://schemas.android.com/apk/res/android"
    xmlns:app="http://schemas.android.com/apk/res-auto"
    xmlns:tools="http://schemas.android.com/tools"
    android:id="@+id/sample_navigation"
    app:startDestination="@id/home_dest">
    ...
    <fragment
        tools:layout="@layout/flow_step_two_dest"
        android:id="@+id/tow_dest"
        android:name="com.cxl.jetpack.nav.TwoFragment"
        android:label="tow_dest" >
        <argument
            android:name="text"
            app:argType="string"
            android:defaultValue="2"/>
    </fragment>
</navigation>
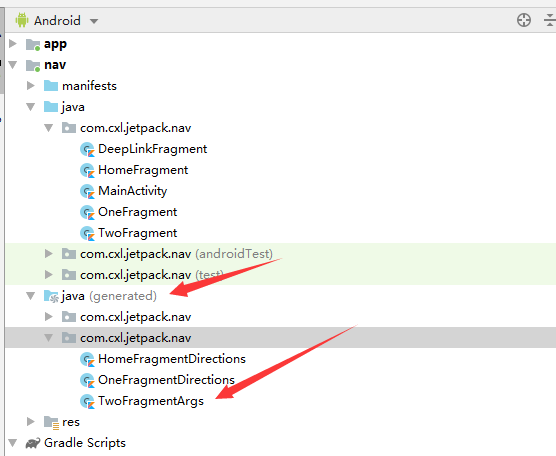
添加完后,此时我们build一下代码,在build\generated\source\navigation-args\debug\com\cxl\jetpack\nav目录下会生成一个TwoFragmentArgs类,我用该类进行传参跳转。
OneFragment中的onViewCreated(view: View, savedInstanceState: Bundle?)函数添加如下代码:
 view.findViewById<Button>(R.id.open2).setOnClickListener {
    findNavController().navigate(OneFragmentDirections.actionOneDestToTwoFragment("Hi"))
}
接收参数
val arg : TwoFragmentArgs by navArgs()
view.findViewById<TextView>(R.id.twoTxt).text=arg.text
记住要用Java8
回到首页
接下来我们从TwoFragment回到HomeFragment。
配置action
<?xml version="1.0" encoding="utf-8"?>
<navigation xmlns:android="http://schemas.android.com/apk/res/android"
    xmlns:app="http://schemas.android.com/apk/res-auto"
    xmlns:tools="http://schemas.android.com/tools"
    android:id="@+id/sample_navigation"
    app:startDestination="@id/home_dest">

    <fragment
        android:id="@+id/home_dest"
        ... />
    ...
    <fragment
        android:id="@+id/tow_dest"
        ... >
        ...
        <action
            android:id="@+id/action_tow_dest_to_home_dest"
            app:popUpTo="@id/home_dest" />
    </fragment>
</navigation>
注意这里用的是app:popUpTo而不是destination,关于app:popUpTo可以参考这个:popUpTo and popUpToInclusive。
使用Navigation返回首页
在TwoFragment的override fun onViewCreated(view: View, savedInstanceState: Bundle?)函数中添加如下代码:
//取值
val arg : TwoFragmentArgs by navArgs()
view.findViewById<TextView>(R.id.twoTxt).text=arg.text
//点击按钮跳转
view.findViewById<Button>(R.id.flow)
    .setOnClickListener(Navigation.createNavigateOnClickListener(R.id.action_tow_dest_to_home_dest))
使用Deep Link进行跳转
Deep Link一般的使用场景,app推送打开指定页面。
添加Deep Link
如下代码:
<?xml version="1.0" encoding="utf-8"?>
<navigation xmlns:android="http://schemas.android.com/apk/res/android"
    xmlns:app="http://schemas.android.com/apk/res-auto"
    xmlns:tools="http://schemas.android.com/tools"
    android:id="@+id/sample_navigation"
    app:startDestination="@id/home_dest">

    <fragment
        android:id="@+id/home_dest"
        .../>
    <fragment
        android:id="@+id/deep_link_dest"
        android:name="com.cxl.jetpack.nav.DeepLinkFragment"
        android:label="DeepLinkFragment"
        tools:layout="@layout/deep_link_dest">
        <argument
            android:name="dlValue"
            android:defaultValue="Deep Link"
            app:argType="string" />
        <deepLink
            android:id="@+id/deepLink"
            app:uri="https://cxl.cn/sample/nav/open-deep-link/{dlValue}" />
    </fragment>
    ...
</navigation>
随后在Manifests.xml添加nav-graph,如下:
<?xml version="1.0" encoding="utf-8"?>
<manifest xmlns:android="http://schemas.android.com/apk/res/android"
    package="com.example.myapplication">
    <application ... >
        <activity name=".MainActivity" ...>
            ...
            <nav-graph android:value="@navigation/sample_navigation" />
            ...
        </activity>
    </application>
</manifest>
使用Deep Link
 override fun onViewCreated(view: View, savedInstanceState: Bundle?) {
        super.onViewCreated(view, savedInstanceState)
        val args : DeepLinkFragmentArgs by navArgs()
        view.findViewById<TextView>(R.id.dlTv).run {
            text = args.dlValue
            setOnClickListener {
                val bundle = Bundle()
                bundle.putString("dlValue","通知跳转")
                val deepLink = findNavController()
                    .createDeepLink()
                    .setArguments(bundle)
                    .setDestination(R.id.deep_link_dest)
                    .createPendingIntent()
                val notificationManager =
                    context?.getSystemService(Context.NOTIFICATION_SERVICE) as NotificationManager
                if (Build.VERSION.SDK_INT >= Build.VERSION_CODES.O) {
                    notificationManager.createNotificationChannel(NotificationChannel(
                        "Deep Link", "Deep Links", NotificationManager.IMPORTANCE_HIGH)
                    )
                }
                val builder = NotificationCompat.Builder(
                    context!!, "Deep Link")
                    .setContentTitle("通知")
                    .setContentText("跳转到Deep Link")
                    .setSmallIcon(R.drawable.ic_android)
                    .setContentIntent(deepLink)
                    .setAutoCancel(true)
                notificationManager.notify(0, builder.build())
            }
        }
    }
以上代码实现点击TextView发送一个通知,用户点击通知跳转到Deep Link指向页面。
源码地址:GitHub
