

一、SpringBoot简介
1.什么是SpringBoot
产生背景:Spring开发比较繁琐,配置文件很多,部署流程复杂,整合第三方框架难度大。这会降低开发效率
SpringBoot是一个简化Spring应用创建和开发的框架
整合了整个Spring技术栈,是JavaEE开发一站式解决方案
2.为什么使用SpringBoot
优点:
- 可以快速构架Spring项目,并与主流框架进行集成
- 内置Servlet容器,不需要手动部署war包
- 使用starter管理依赖并进行版本控制
- 大量自动配置,简化开发
- 提供准生产环境的运行时监控
- 不需要XML文件
二、第一个SpringBoot程序
1.操作步骤
步骤:
1.1 创建一个Maven的jar工程
传统的应用需要创建web工程,然后将应用打成war包,然后部署在容器中
而SpringBoot只需要打成一个jar包,其中内置了tomcat
1.2 导入SpringBoot相关依赖
<?xml version="1.0" encoding="UTF-8"?>

<project xmlns="http://maven.apache.org/POM/4.0.0" xmlns:xsi="http://www.w3.org/2001/XMLSchema-instance"
         xsi:schemaLocation="http://maven.apache.org/POM/4.0.0 http://maven.apache.org/xsd/maven-4.0.0.xsd">
    <modelVersion>4.0.0</modelVersion>

    <groupId>com.ly</groupId>
    <artifactId>springboot01-helloworld</artifactId>
    <version>1.0-SNAPSHOT</version>

    <parent>
        <groupId>org.springframework.boot</groupId>
        <artifactId>spring-boot-starter-parent</artifactId>
        <version>2.1.9.RELEASE</version>
    </parent>

    <name>springboot01-helloworld</name>
    <!-- FIXME change it to the project's website -->
    <url>http://www.example.com</url>

    <properties>
        <project.build.sourceEncoding>UTF-8</project.build.sourceEncoding>
        <maven.compiler.source>1.8</maven.compiler.source>
        <maven.compiler.target>1.8</maven.compiler.target>
    </properties>

    <dependencies>
        <dependency>
            <groupId>junit</groupId>
            <artifactId>junit</artifactId>
            <version>4.11</version>
            <scope>test</scope>
        </dependency>
        <dependency>
            <groupId>org.springframework.boot</groupId>
            <artifactId>spring-boot-starter-web</artifactId>
        </dependency>
    </dependencies>

    <build>
    </build>
</project>
1.3 创建Controller
package com.ly.controller;

import org.springframework.stereotype.Controller;
import org.springframework.web.bind.annotation.RequestMapping;
import org.springframework.web.bind.annotation.ResponseBody;

/**
 * Author: LuYi
 * Date: 2019/10/27 11:05
 * Description: 描述
 */
@Controller
public class HelloController {

    @RequestMapping("/hello")
    @ResponseBody
    public String hello(){
        return "Hello World";
    }
}
1.4 创建启动类
package com.ly;

import org.springframework.boot.SpringApplication;
import org.springframework.boot.autoconfigure.SpringBootApplication;

/**
 * Author: LuYi
 * Date: 2019/10/27 11:05
 * Description: 使用@SpringBootApplication将类标注成SpringBoot应用
 */
@SpringBootApplication
public class App {
    public static void main(String[] args) {
        SpringApplication.run(App.class, args);
    }
}
默认会扫描@SpringBootApplication注解所在的包及其子包,也可使用@ComponentScan("com.ly.controller")注解进行指定
1.5 打包
<!--该插件可以将应用打包成一个可执行的jar包-->
<build>
    <plugins>
        <plugin>
            <groupId>org.springframework.boot</groupId>
            <artifactId>spring-boot-maven-plugin</artifactId>
        </plugin>
    </plugins>
</build>
添加该插件,将应用打成可执行的jar包, 执行:java -jar jar文件
2. 分析HelloWorld
2.1 POM文件
-
父工程
<parent> <groupId>org.springframework.boot</groupId> <artifactId>spring-boot-starter-parent</artifactId> <version>2.1.9.RELEASE</version> </parent> -
父工程的父工程:用来管理SpringBoot应用中依赖的版本,进行版本控制
<parent> <groupId>org.springframework.boot</groupId> <artifactId>spring-boot-dependencies</artifactId> <version>2.1.9.RELEASE</version> <relativePath>../../spring-boot-dependencies</relativePath> </parent> -
依赖:通过
starter指定依赖<dependency> <groupId>org.springframework.boot</groupId> <artifactId>spring-boot-starter-web</artifactId> </dependency>SpringBoot提供了很多starter(启动器),分别对应了不同的应用场景,当在项目中引入这些starter时,相应场景的依赖就会被导入进来
2.2 启动类
@Target({ElementType.TYPE})
@Retention(RetentionPolicy.RUNTIME)
@Documented
@Inherited
@SpringBootConfiguration
@EnableAutoConfiguration
@ComponentScan(
    excludeFilters = {@Filter(
    type = FilterType.CUSTOM,
    classes = {TypeExcludeFilter.class}
), @Filter(
    type = FilterType.CUSTOM,
    classes = {AutoConfigurationExcludeFilter.class}
)}
)
-
@SpringBootApplication
标注在类上,表示这个类是SpringBoot的启动类,通过该类的Main方法启动SpringBoot应用
-
@SpringBootConfiguration
标注在类上,表示这个类是SpringBoot的配置类
层级关系:SpringBootConfiguration——>@Configuration——>@Component
@Configuration:标注在类上,表示这个类是Spring的配置类,相当于XML配置文件
-
@EnableAutoConfiguration
开启自动配置功能,简化了以前繁琐的配置
SpringBoot在启动时会在/META-INF/spring.factories中EnableAutoConfiguration指定的值,将这些值作为自动配置类添加到容器中,这些自动配置类会帮我们完成很多配置工作。
-
@ComponentScan
标注在类上,指定要扫描的包及其子包
三、快速创建SpringBoot项目
1.简介
使用Spring initializer快速构建SpringBoot项目
2. 基本操作
-
pom文件和主程序类自动生成,直接写业务逻辑即可
-
resources文件夹的目录结构
|-static	存放静态资源,如js,css,images
|-template	存放模板引擎,如freemarker、thymeleaf等
|-application.properties	SpringBoot应用的配置文件,可以修改默认设置
四、配置文件
1.简介
SpringBoot的默认全局配置文件有两种:
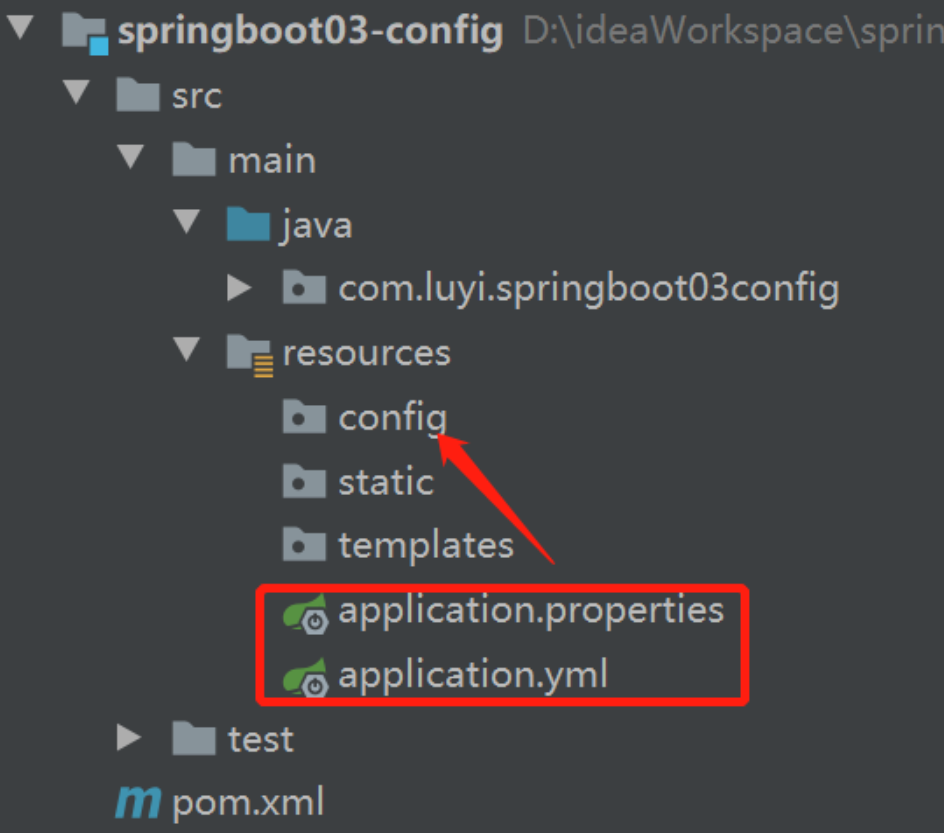
- application.properties
- application.yml
文件名固定,存放在classpath:/或classpath:/config/目录下
可以修改Spring Boot默认配置,具体参考: docs.spring.io/spring-boot…
注意:SpringBoot2.0和1.0的配置有区别,有的配置项已被删除
2.YAML用法
2.1 简介
YAML不是一种标记语言,YAML是专门用来写配置文件的,它以数据为中心,简介强大,比xml和properties更适合做配置文件
YAML文件以.yml或.yaml为后置名
2.2 application.yml
server:
  port: 8081	#写法:key: value 冒号后面必须有空格
  servlet:
    context-path: /springboot03/
2.3 语法规则
- 大小写敏感
- 使用缩进表示层级关系
- 缩进时不允许使用Tab键
- 缩进的空格数目不重要,但是要与对应的层级的左侧对齐
#表示注释
2.4 基本用法
YAML支持的数据结构有三种:
- 字面量:单个的,不可再分的值(字符串、数字、boolean值)
- 对象:键值对集合
- 数组:一组按次序排列的值
三种数据结构的用法:
1.字面量:普通的值,如数字、字符串、布尔值
number: 12.5
str: hello
name: 'tom cruise' #如字符串包含空格及特殊字符需要使用 引号 引起来
name: 'tom \n cruise' #不会对特殊字符进行转义 结果为:tom 换行 cruise
name: "tom \n cruise" #对特殊字符进行转义,会作为普通字符输出, 结果为 tom \n cruise
-
对象,也成为映射Map,包含属性和值
# 写法1:换行写 user: name: tom age: 20 sex: male # 写法2:行内写法 user: {name: tom, age: 20, sex: male}- 数组,如List、Set等
# 写法1: 一组短横线开头的行
names:
  - tom
  - jack
  - alice

# 写法2: 行内写法
name: {tom,jack,alice}
3. 为属性注入值
通过加载配置文件,为类中的属性注入值
3.1 编写application.yml
user:
  username: admin
  age: 21
  status: true
  birthday: 2019/2/14
  address:
    province: 黑龙江省
    city: 哈尔滨市
  lists:
    - list1
    - list2
    - list3
  maps: {k1: v1,k2: v2}
3.2 创建实体类
User
package com.luyi.bean;

import org.springframework.boot.context.properties.ConfigurationProperties;
import org.springframework.stereotype.Component;

import java.util.Date;
import java.util.List;
import java.util.Map;

/**
 * Author: LuYi
 * Date: 2019/10/27 13:49
 * Description: 通过加载配置文件为当前类中的属性注入值
 */
// 必须将当前类加入到容器
@Component
// 默认读取全局配置文件获取值,当前类中的所有属性与 user 进行绑定
@ConfigurationProperties(value = "user")
public class User {

    private String username;
    private Integer age;
    private Boolean status;
    private Date birthday;
    private Address address;
    private List<String> lists;
    private Map<String, Object> maps;

    public String getUsername() {
        return username;
    }

    public void setUsername(String username) {
        this.username = username;
    }

    public Integer getAge() {
        return age;
    }

    public void setAge(Integer age) {
        this.age = age;
    }

    public Boolean getStatus() {
        return status;
    }

    public void setStatus(Boolean status) {
        this.status = status;
    }

    public Date getBirthday() {
        return birthday;
    }

    public void setBirthday(Date birthday) {
        this.birthday = birthday;
    }

    public Address getAddress() {
        return address;
    }

    public void setAddress(Address address) {
        this.address = address;
    }

    public List<String> getLists() {
        return lists;
    }

    public void setLists(List<String> lists) {
        this.lists = lists;
    }

    public Map<String, Object> getMaps() {
        return maps;
    }

    public void setMaps(Map<String, Object> maps) {
        this.maps = maps;
    }

    @Override
    public String toString() {
        return "User{" +
                "username='" + username + '\'' +
                ", age=" + age +
                ", status=" + status +
                ", birthday=" + birthday +
                ", address=" + address +
                ", lists=" + lists +
                ", maps=" + maps +
                '}';
    }
}
Address
package com.luyi.bean;

/**
 * Author: LuYi
 * Date: 2019/10/27 13:50
 * Description: 描述
 */
public class Address {

    private String province;
    private String city;

    public String getProvince() {
        return province;
    }

    public void setProvince(String province) {
        this.province = province;
    }

    public String getCity() {
        return city;
    }

    public void setCity(String city) {
        this.city = city;
    }

    @Override
    public String toString() {
        return "Address{" +
                "province='" + province + '\'' +
                ", city='" + city + '\'' +
                '}';
    }
}
3.3 测试
package com.luyi.springboot03config;

import com.luyi.bean.User;
import org.junit.jupiter.api.Test;
import org.springframework.beans.factory.annotation.Autowired;
import org.springframework.boot.test.context.SpringBootTest;

@SpringBootTest
class Springboot03ConfigApplicationTests {

    @Autowired
    private User user;

    @Test
    void contextLoads() {
        System.out.println(user);
    }

}
3.4 添加配置文件处理器依赖(可选)
<!--配置文件处理器,自动生成元数据信息,编写配置文件会有提示-->
<dependency>
    <groupId>org.springframework.boot</groupId>
    <artifactId>spring-boot-configuration-processor</artifactId>
    <optional>true</optional>
</dependency>
3.5 使用properties配置文件
user.username=alice
user.age=22
user.status=false
user.birthday=2019/10/27
user.address.province=黑龙江省
user.address.city=哈尔滨
user.lists=list1,list2,list3
user.maps.k1=v1
user.maps.k2=v2
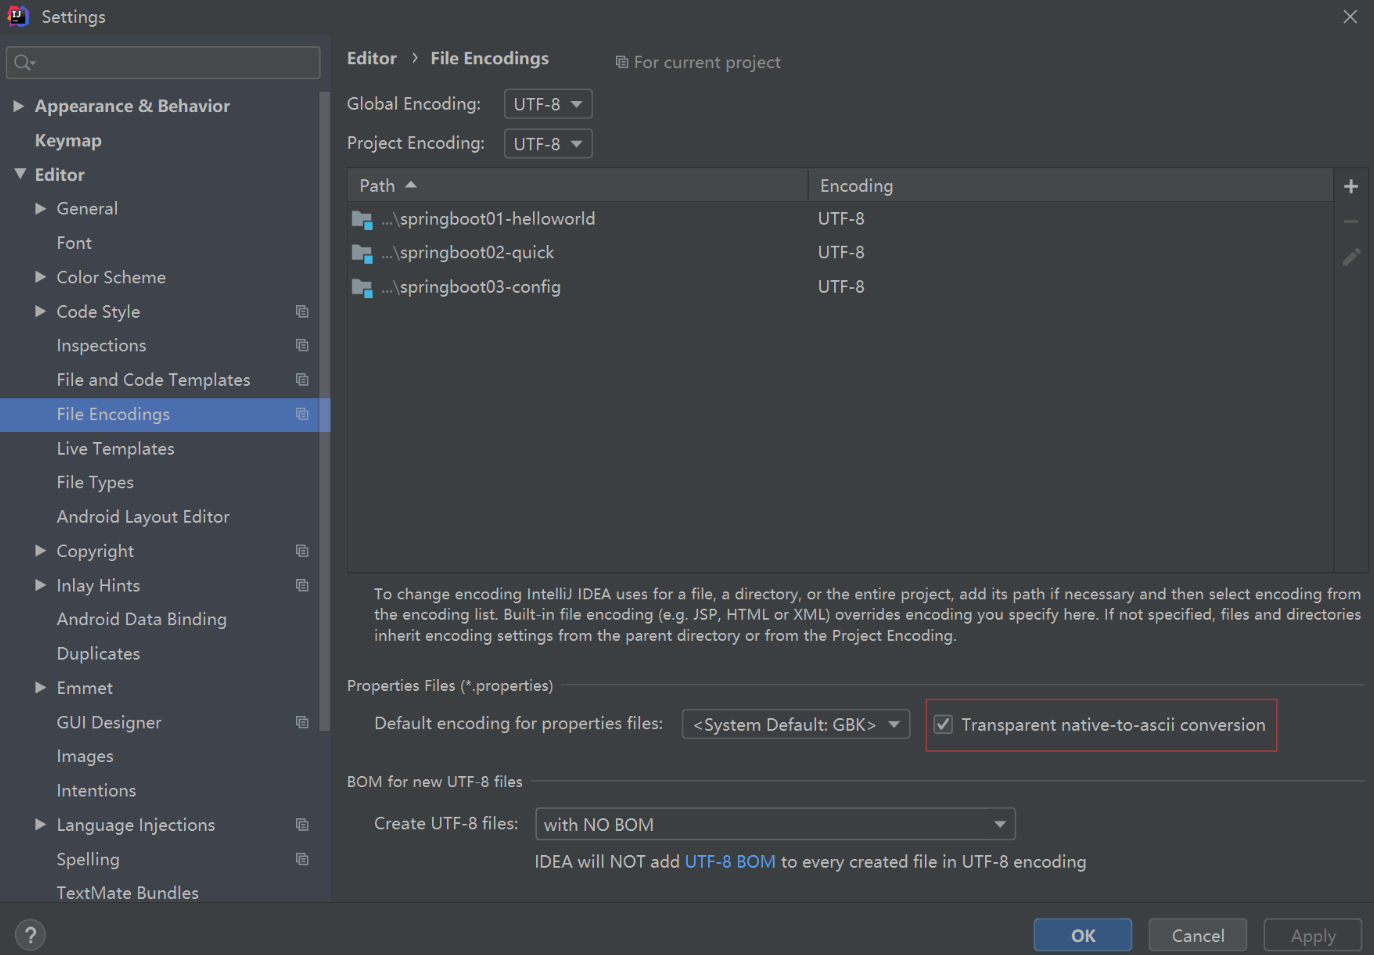
注意:在IDEA中默认使用UTF-8编码,properties文件默认使用ASCII编码,所以会出现乱码,可通过勾选解决
优先级:properties > yml
3.6 使用@Value注解注入值
@Value("${user.username}")
private String username;
@Value("${user.age}")
private Integer age;
@Value("${user.status}")
private Boolean status;
@Value("${user.birthday}")
private Date birthday;
//@Value不支持复杂类型封装
private Address address;
@Value("${user.lists}")
private List<String> lists;
private Map<String, Object> maps;
@Value与@ConfigurationProperties比较:
- 前者只可以单值注入,后者可以批量注入
- 前者不支持为复杂类型封装,后者支持
4.多环境配置
可以为不同环境提供不同配置信息,如开发环境、测试环境、生产环境等
两种方式:
- 创建多个properties文件
- 定义yml文档块
4.1 创建多个properties文件
步骤:
1.创建不同环境的properties文件
文件命名必须符合aplication-xxx.properties的格式
application-dev.properties
server.port=9991
application-test.properties
server.port=9992
application-prod.properties
server.port=9993
2.在application.properties中指定需要激活的配置
#指定要激活的配置
spring.profiles.active=prod
4.2 定义yml文档块
1.在yml中使用三个短横线定义多个文档块
spring:
  profiles: dev
server:
  port: 9991
---
spring:
  profiles: test
server:
  port: 9992
---
spring:
  profiles: prod
server:
  port: 9993
2.在第一个文档块指定要激活的环境
spring:
  profiles:
    active: test
---
5.加载外部配置文件
5.1 加载properties属性文件
问题:@ConfigurationProperties默认是从全局配置文件中读取值,如果想自定义属性文件中获取值怎么办?
解决:使用@PropertySource注解加载外部属性文件
// 必须将当前类加入到容器
@Component
//加载外部的属性文件
@PropertySource({"classpath:user.properties"})
// 默认读取全局配置文件获取值,当前类中的所有属性与 user 进行绑定
@ConfigurationProperties(value = "user")
public class User{
5.2 加载spring配置文件
问题:如果有信息需要写道xml文件中,想加载xml文件怎么办
解决:使用@ImportResource加载外部配置文件
5.3 使用注解方式添加组件
推荐使用全注解方式向Spring容器添加组件,@Configuration和@Bean
/**
 * Author: LuYi
 * Date: 2019/10/28 14:49
 * Description: 描述
 */
//添加在类上,表示这个类是一个配置类,相当于spring配置文件
@Configuration
public class SpringConfig {

    //标注在方法上,用来向容器中添加组件,将方法的返回值添加到容器中,方法名作为bean的id
    @Bean
    public Address address(){
        Address address = new Address();
        address.setProvince("山东");
        address.setCity("日照");
        return address;
    }
}
五、SpringBoot自动配置原理
1.执行流程
1.SpringBoot启动时加载主配置类,使用@EnableAutoConfiguration开启了自动配置功能
2.@EnableAutoConfiguration中使用了 @Import({AutoConfigurationImportSelector.class})向容器中添加了一些组件(自动配置类)
查看AutoConfigurationImportSelector类中的selectImports方法,再点击getAutoConfigurationEntry方法中的`getCandidateConfigurations方法
通过getCandidateConfigurations中的loadFactoryNames方法加载到SpringFactory,
再通过classLoader加载META-INF/spring.factories的配置,从配置中获取EnableAutoConfiguration(spring-boot-autoconfigure-2.1.9.RELEASE.jar)对应的值。
将这些自动配置类(xxxAutoConfiguration)添加到容器中
3.通过自动配置类完成自动配置功能。
2. 原理分析
以HttpEncodingAutoConfiguration为例,就是以前在web.xml中配置的CharacterEncodingFilter过滤器
//表示这是一个配置类,相当于以前编写的Spring配置文件
@Configuration
//启用HttpProperties类的ConfigurationProperties功能,通过配置文件为属性注入值,并将其添加到容器中
@EnableConfigurationProperties({HttpProperties.class})
//当该应用是web应用时才生效
@ConditionalOnWebApplication(
    type = Type.SERVLET
)
//必须包含CharacterEncodingFilter类才生效
@ConditionalOnClass({CharacterEncodingFilter.class})
//如果配置文件中有spring.http.encoding选项则该配置生效,否则不生效。但是默认已经生效了
@ConditionalOnProperty(
    prefix = "spring.http.encoding",
    value = {"enabled"},
    matchIfMissing = true
)
public class HttpEncodingAutoConfiguration {
    private final Encoding properties;

    //将容器中的HttpProperties注入
    public HttpEncodingAutoConfiguration(HttpProperties properties) {
        this.properties = properties.getEncoding();
    }

    //将返回的filter添加到容器中,作为bean
    @Bean
    //如果容器中没有这个bean才会生效
    @ConditionalOnMissingBean
    public CharacterEncodingFilter characterEncodingFilter() {
        CharacterEncodingFilter filter = new OrderedCharacterEncodingFilter();
        filter.setEncoding(this.properties.getCharset().name());
        filter.setForceRequestEncoding(this.properties.shouldForce(org.springframework.boot.autoconfigure.http.HttpProperties.Encoding.Type.REQUEST));
        filter.setForceResponseEncoding(this.properties.shouldForce(org.springframework.boot.autoconfigure.http.HttpProperties.Encoding.Type.RESPONSE));
        return filter;
    }
//从配置文件中获取指定的值,然后绑定到指定的属性值
@ConfigurationProperties(
    prefix = "spring.http"
)
public class HttpProperties {
    private Charset charset;
    private Boolean force;
    private Boolean forceRequest;
    private Boolean forceResponse;
    private Map<Locale, Charset> mapping;
注意:
- 根据当前情况进行判断,决定配置类是否生产,如果不满足条件自动配置就不会生效
- 自动配置类xxAutoConfiguration的属性是从对应的xxProperties类中获取
- xxProperties类中的信息是通过配置文件注入绑定的,可以通过配置文件指定属性的值
3.总结
- SpringBoot在启动时会加载大量的自动配置类
- 通过自动配置了向容器中添加组件
- 通过这些组件自动完成许多功能,从而简化配置
可以通过开启debug模式查看自动配置类的匹配情况
#开启debug模式
debug=true
六、Web开发
1.简介
使用SpringBoot开发Web应用的步骤:
1.创建SpringBoot项目,添加对应的starter
2.在配置文件中指定必要的少量配置
3.编写业务代码
Web开发的自动配置类WebMvcAutoConfiguration
2.关于静态资源的映射
2.1 静态资源的位置
查看WebMvcAutoConfiguration——>addResourceHandlers()——>getStaticLocations()——>staticLocations
静态资源的默认位置
"classpath:/META-INF/resources/",
"classpath:/resources/",
"classpath:/static/",
"classpath:/public/"
可以通过上面的文件夹可以访问到静态资源
也可以在配置文件中自己指定可以访问的位置
# 指定静态资源的位置 存放在根目录下的public文件夹中
spring.resources.static-locations=classpath:/public
2.2 欢迎页
查看WebMvcAutoConfiguration—>welcomePageHandlerMapping()—>getWelcomePage()
将index.html页面放到任意一个静态资源文件夹中的
2.3 网站图标
查看WebMvcAutoConfiguration—>内部类FaviconConfiguration—>faviconHandlerMapping
将favicon.ico放到静态资源的任意文件夹中即可
七、模板引擎
1.简介
目前Java Web开发推荐使用模板引擎,不建议使用jsp页面
- jsp的缺点:本质时Servlet,需要后台进行编译,效率较低
- 模板引擎:不需要编译,速度快
常用的模板引擎:Freemarker、Thymeleaf等
SpringBoot推荐Thymeleaf,且默认不支持jsp,因为jsp必须要打成war包。
补充:目前主流的web开发更推荐前后端分离,前端使用MVVM框架,Vue.js、Angular、React等
2.Thymeleaf的使用
步骤:
1.添加Thymeleaf的依赖
<dependency>
    <groupId>org.springframework.boot</groupId>
    <artifactId>spring-boot-starter-thymeleaf</artifactId>
</dependency>
2.将html页面放到templates下
templates下的html不能直接访问,需要使用Controller跳转,由Thymeleaf进行渲染
ThymeleafAutoConfiguration—>ThymeleafProperties
public static final String DEFAULT_PREFIX = "classpath:/templates/";
public static final String DEFAULT_SUFFIX = ".html";
默认拼接前缀和后缀
3.使用thymeleaf
<!DOCTYPE html>
<html lang="en" xmlns:th="http://www.w3.org/1999/xhtml">
<head>
    <meta charset="UTF-8">
    <title>Title</title>
</head>
<body>
    <h2>success</h2>
    <!--使用th:text属性设置元素中的文本,表达式:${}可以获取作用域中的数据-->
    <p th:text="${name}"></p>
</body>
</html>
4.修改页面后,让其实时生效
由于thymeleaf默认启用了缓存,将缓存禁用掉
#禁用thymeleaf的缓存
spring.thymeleaf.cache=false
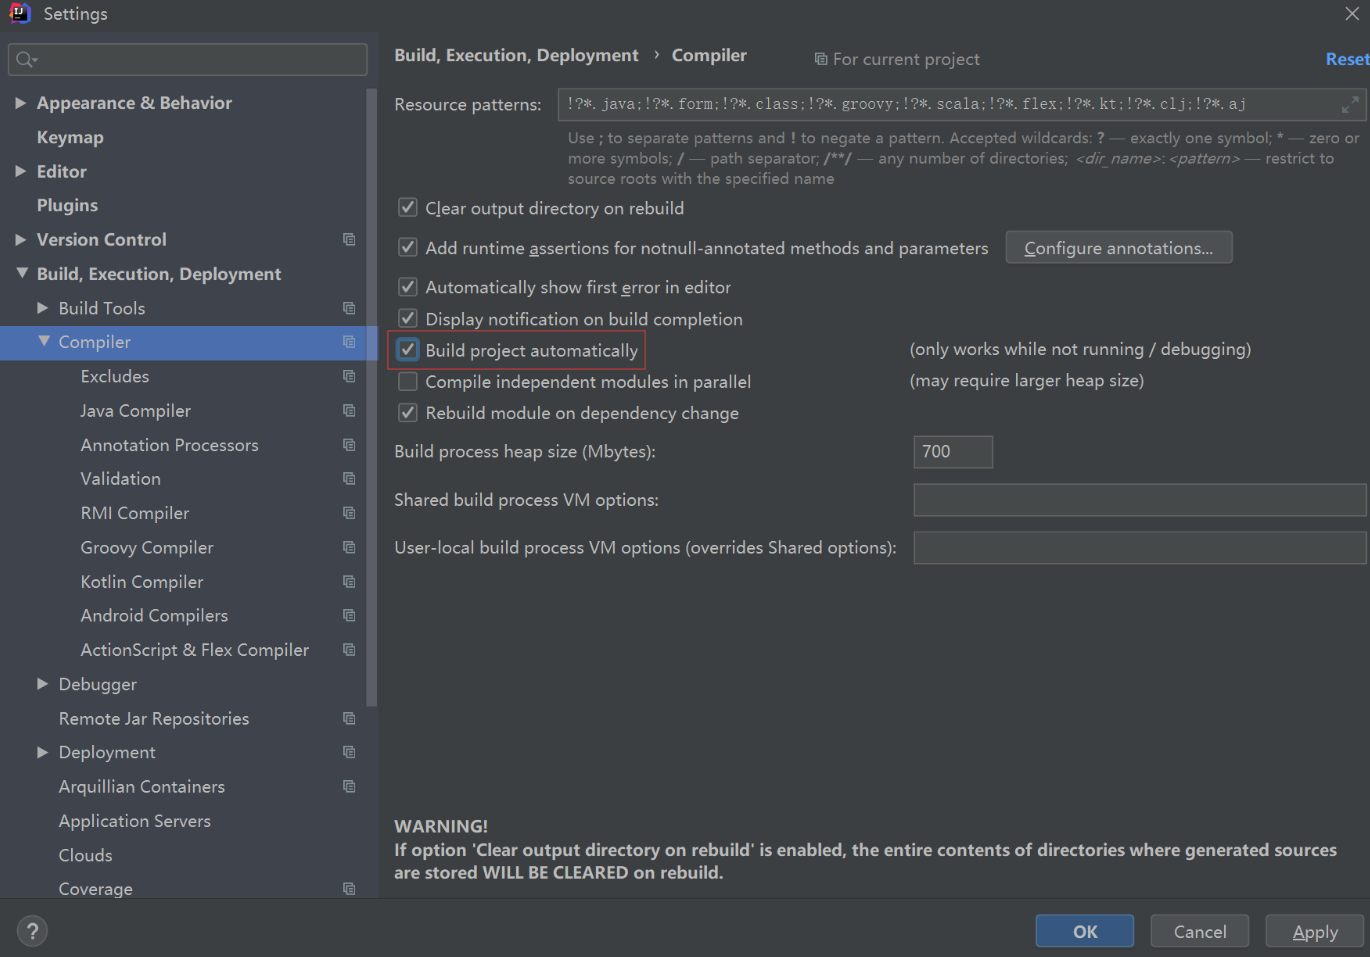
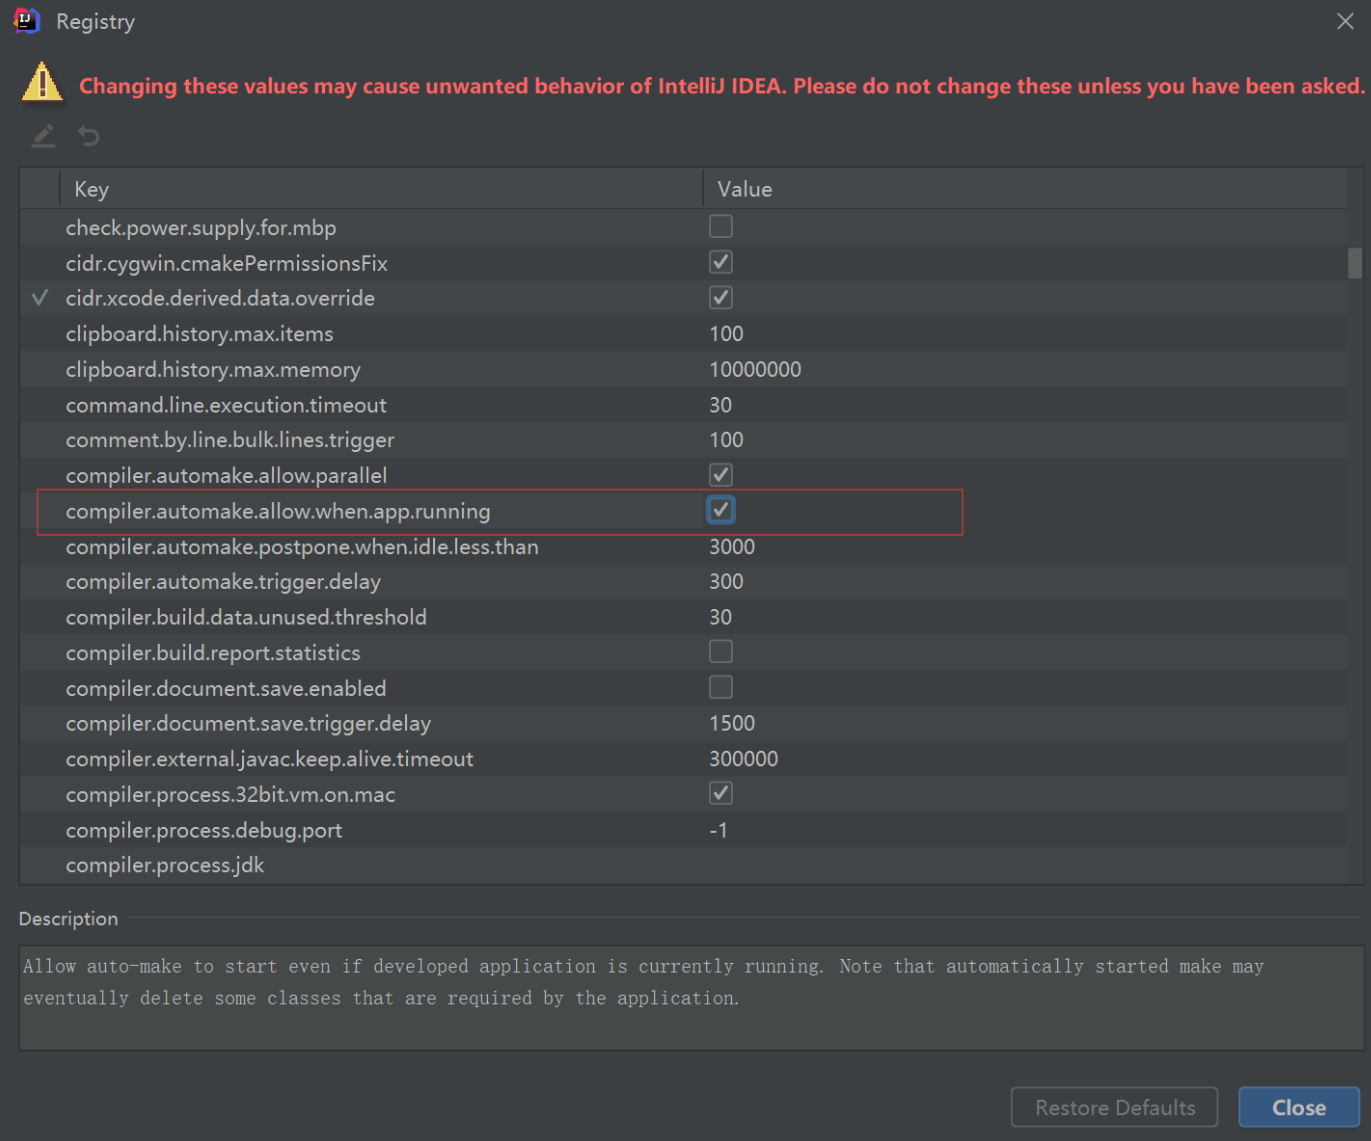
补充:还需要开启idea的自动编译,idea默认保存时不会自动编译
3.语法规则
3.1 常用属性
-
th:text、th:utext
设置元素中的文本内容
th:text对特殊字符进行转义,等价于内联方式[[${ }]]
th:utext不对特殊字符集进行转义,等价于内联方式[(${ })]
<!DOCTYPE html> <html lang="en" xmlns:th="http://www.w3.org/1999/xhtml"> <head> <meta charset="UTF-8"> <title>Title</title> </head> <body> <!--th:text、th:utext--> <div th:text="${hello}">aaa</div> <div th:utext="${hello}">bbb</div> <!--使用内联方式,可以在文本前后添加内容--> <div>[[${hello}]]aaa</div> <div>[(${hello})]bbb</div> </body> </html> -
th:html原生属性
用来替换指定的html原生属性的值
@RequestMapping("/test2")
public String test2(Model model){
    model.addAttribute("hello", "<mark>你好</mark>");

    model.addAttribute("id", "mydiv");
    model.addAttribute("title", "this is a div");
    return "result";
}
<!--th:html原生属性--> <div id="div1" title="这是一个div" th:id="${id}" th:title="${title}">div</div> -
th:if、th:unless、th:switch、th:case
条件判断,类似于if
<!--th:if、th:unless、th:switch、th:case--> <div th:if="${age>=18}">成年</div> <p th:unless="${age<18}">成年</p> <p th:switch="${role}"> <span th:case="student">学生</span> <span th:case="teacher">老师</span> <span th:case="*">其他</span> </p> <hr> -
th:each
循环,类似于for each
<!--th:each--> <ul> <li th:each="name:${names}" th:text="${name}"></li> </ul> -
th:object、th:field
用于表单数据对象的绑定,将表单绑定到Controller的一个JavaBean参数,常与th:field
一起使用,需要和*{}选择表达式配合使用
<!--th:object、th:field--> <h2>修改用户信息</h2> <!--th:object指定对象,th:field指定属性--> <form action="modify" method="post" th:object="${user}"> 编号:<input type="text" th:field="*{id}" readonly> <br> 姓名:<input type="text" th:field="*{name}"> <br> 年龄:<input type="text" th:field="*{age}"> <br> <input type="submit" value="修改"> </form> -
th:fragment
声明代码片段,常用于页面头部和尾部的引入
<!--th:fragment--> <header th:fragment="head"> 这是页面的头部,导航 </header> -
th:include、th:insert、th:replace
引入代码片段,类似于jsp:include
<!--th:include、th:insert、th:replace-->
<!--引入templates/include下的header.html页面中的fragment为head的片段-->
<div th:include="include/header::head"></div>
三者之间的区别
th:include会保留自己的标签,不要th:fragment的标签(Thymeleaf 3.0 后不推荐使用)
th:insert保留自己的标签,也保留th:fragment的标签
th:relpace不保留自己的标签,保留thfragment的标签
3.2 表达式
-
${} 变量表达式
获取对象的属性、方法
<!DOCTYPE html>
<html lang="en" xmlns:th="http://www.w3.org/1999/xhtml">
<head>
    <meta charset="UTF-8">
    <title>Title</title>
</head>
<body>
    <!--获取对象的属性、方法-->
    <div th:text="${user.name}"></div>
    <div th:text="${user['age']}"></div>
    <div th:text="${users[1].name}"></div>
    <!--<div th:text="${users.size()}"></div>-->
    <div>[[${users.size()}]]个</div>
</body>
</html>
使用内置的基本对象,如session和application
<!--使用内置基本对象-->
<div th:text="${session.sex}"></div>
<div th:text="${application.hobby}"></div>
使用内置的工具对象,如#strings、#dates、#arrays、#lists、#maps等
<!--使用内置的工具对象--> <div th:text="${#strings.startsWith(user.name, 't')}"></div> <div th:text="${#strings.substring(user.name, 0, 2)}"></div> <div th:text="${#strings.length(user.name)}"></div> <div th:text="${#dates.createNow()}"></div> <div th:text="${#dates.create(2018, 10, 14)}"></div> <div th:text="${#dates.format(birthday, 'yyyy-MM-dd HH:mm:ss')}"></div> -
*{} 选择表达式(星号表达式)
<!--*{}选择表达式--> <div th:object="${user}"> <div th:text="*{id}"></div> <div th:text="*{name}"></div> <div th:text="*{age}"></div> </div> -
@{} url表达式
<head> <meta charset="UTF-8"> <title>Title</title> <!--url表达式引入css文件--> <link rel="stylesheet" th:href="@{/css/style.css}"> </head> <!--url表达式--> <a th:href="@{/findUser(name=${user.name})}">查询指定的用户信息</a> <a href="product/list.html" th:href="@{/product/list}">商品列表</a> <script th:src="@{/js/common.js}"></script> -
运算符
eq gt le == != 三目运算符
4.热部署
使用SpringBoot提供的devtools实现热部署
原理:实时监控classpath下文件的变化,如果发生变化自动重启
配置:添加devtools依赖
<dependency>
    <groupId>org.springframework.boot</groupId>
    <artifactId>spring-boot-devtools</artifactId>
    <!--该依赖不传递-->
    <optional>true</optional>
</dependency>
八、扩展默认的SpringMVC功能
1.简介
以前在SpringMVC中可以通过如下代码进行视图跳转和拦截器:
<mvc:view-controller path="/showLogin" view-name="login"/>
<mvc:interceptors>
	<mvc:interceptor>
        <mvc:mapping path="/hello"/>
    	<bean class="com.luyi.interceptor.HelloInterceptor"/>
    </mvc:interceptor>
</mvc:interceptors>
SpringBoot默认配置默认没有提供以上功能,需要自己扩展,使用WebMvcConfigurer接口
2.基本操作
步骤:
1.定义一个配置类,实现WebMvcConfigurer接口
2.实现需要的方法
/**
 * Author: LuYi
 * Date: 2019/10/29 17:58
 * Description: 扩展默认的SpringMVC的功能
 * 要求:
 * 1.将该类标记为配置类
 * 2.实现WebMvcConfigurer接口
 * 3.根据需要实现接口中相应的方法
 *
 * 注意:这个接口中的方法都添加了jdk1.8中的default方法修饰,不强制实现所有方法(jdk1.8新特性)
 * 在SpringBoot1.0中是继承WebMvcConfigurerAdapter类,SpringBoot2.0是基于jdk1.8的,
 * 所以通过实现WebMvcConfigurer的方式
 */
//将该类设置为配置类
@Configuration
public class CustomMvcConfig implements WebMvcConfigurer {

    //添加ViewController
    @Override
    public void addViewControllers(ViewControllerRegistry registry) {
        //将访问login页面的url设置为showLogin
        registry.addViewController("/showLogin").setViewName("login");
    }

    @Override
    public void addInterceptors(InterceptorRegistry registry) {
        registry.addInterceptor(new MyInterceptor()).addPathPatterns("/**")
                .excludePathPatterns("/test2");
    }
}
九、全局异常处理
1.简介
当程序出现异常时进行全局处理,SpringBoot默认的异常信息提示:Whitelabel Error Page
两种方式:
- 定义错误码页面
- 定义异常通知
2.定义错误码页面
创建 错误状态码.html页面,放到templates/error目录中,当发生错误时会自动到该目录下查找对应的错误页面
可以创建如 4xx.html或5xx.html页面,用来匹配所有该类型的错误(会优先进行精确匹配
<!DOCTYPE html>
<html lang="en">
<head>
    <meta charset="UTF-8">
    <title>Title</title>
</head>
<body>
    <h2>5xx错误</h2>
    <h3>状态码:[[${status}]]</h3>
    <h3>异常消息:[[${message}]]</h3>
    <h3>错误提示:[[${error}]]</h3>
    <h3>时间戳:[[${timestamp}]]</h3>
</body>
</html>
3.定义异常通知
/**
 * Author: LuYi
 * Date: 2019/10/29 18:45
 * Description: 异常通知:用来处理全局异常
 */
@ControllerAdvice
public class ExceptionAdvice {

    @ExceptionHandler(ArithmeticException.class)
    public String arithmetic(Exception e){
        System.out.println("警报:程序出现异常,发短信:" + e.getMessage());
        return "error/5xx";
    }

    @ExceptionHandler(Exception.class)
    public String exception(Exception e){
        System.out.println("警报:程序出现异常,发邮件:" + e.getMessage());
        return "error/5xx";
    }
}
十、关于Servlet容器
1.简介
SpringBoot中默认内置了Servlet:Tomcat
问题:SpringBoot默认以jar包方式启动内置的Servlet容器,没有web.xml文件,如何注册Servlet三大组件:Servlet、Filter、Listener
解决:通过自定义Servlet配置,使用ServletRegistrationBean、FilterRegistrationBean、ServletListenerRegistrationBean
2.注册Servlet组件
步骤:
1.定义一个配置类
2.自定义一个方法,用来注册组件
/**
 * Author: LuYi
 * Date: 2019/10/29 19:12
 * Description: 自定义Servlet配置
 */
//将该类声明为配置类
@Configuration
public class CustomServletConfig {

    //将方法返回值放到Spring容器
    @Bean
    public ServletRegistrationBean myServlet(){
        ServletRegistrationBean<Servlet> registrationBean = new ServletRegistrationBean<>();
        //对MyServlet进行注册
        registrationBean.setServlet(new MyServlet());
        ArrayList<String> urls = new ArrayList<>();
        urls.add("/myServlet");
        registrationBean.setUrlMappings(urls);

        return registrationBean;
    }

    //注册Filter
    @Bean
    public FilterRegistrationBean myFilter(){
        FilterRegistrationBean<Filter> registrationBean = new FilterRegistrationBean<>();
        //注册filter
        registrationBean.setFilter(new MyFilter());
        registrationBean.addUrlPatterns("/showLogin", "/test1");
        return registrationBean;
    }

    //注册Listener
    @Bean
    public ServletListenerRegistrationBean myListener(){
        ServletListenerRegistrationBean<MyListener> registrationBean = new ServletListenerRegistrationBean<>();
        registrationBean.setListener(new MyListener());
        return registrationBean;
    }
}
3.使用外部的Servlet容器
3.1 优缺点
使用内置Servlet容器:
优点:使用简单,将应用打成jar包
缺点:不支持jsp、可定制性不高
使用外部的Servlet容器
优点:支持jsp、可定制性高
缺点:需要将应用打成war包
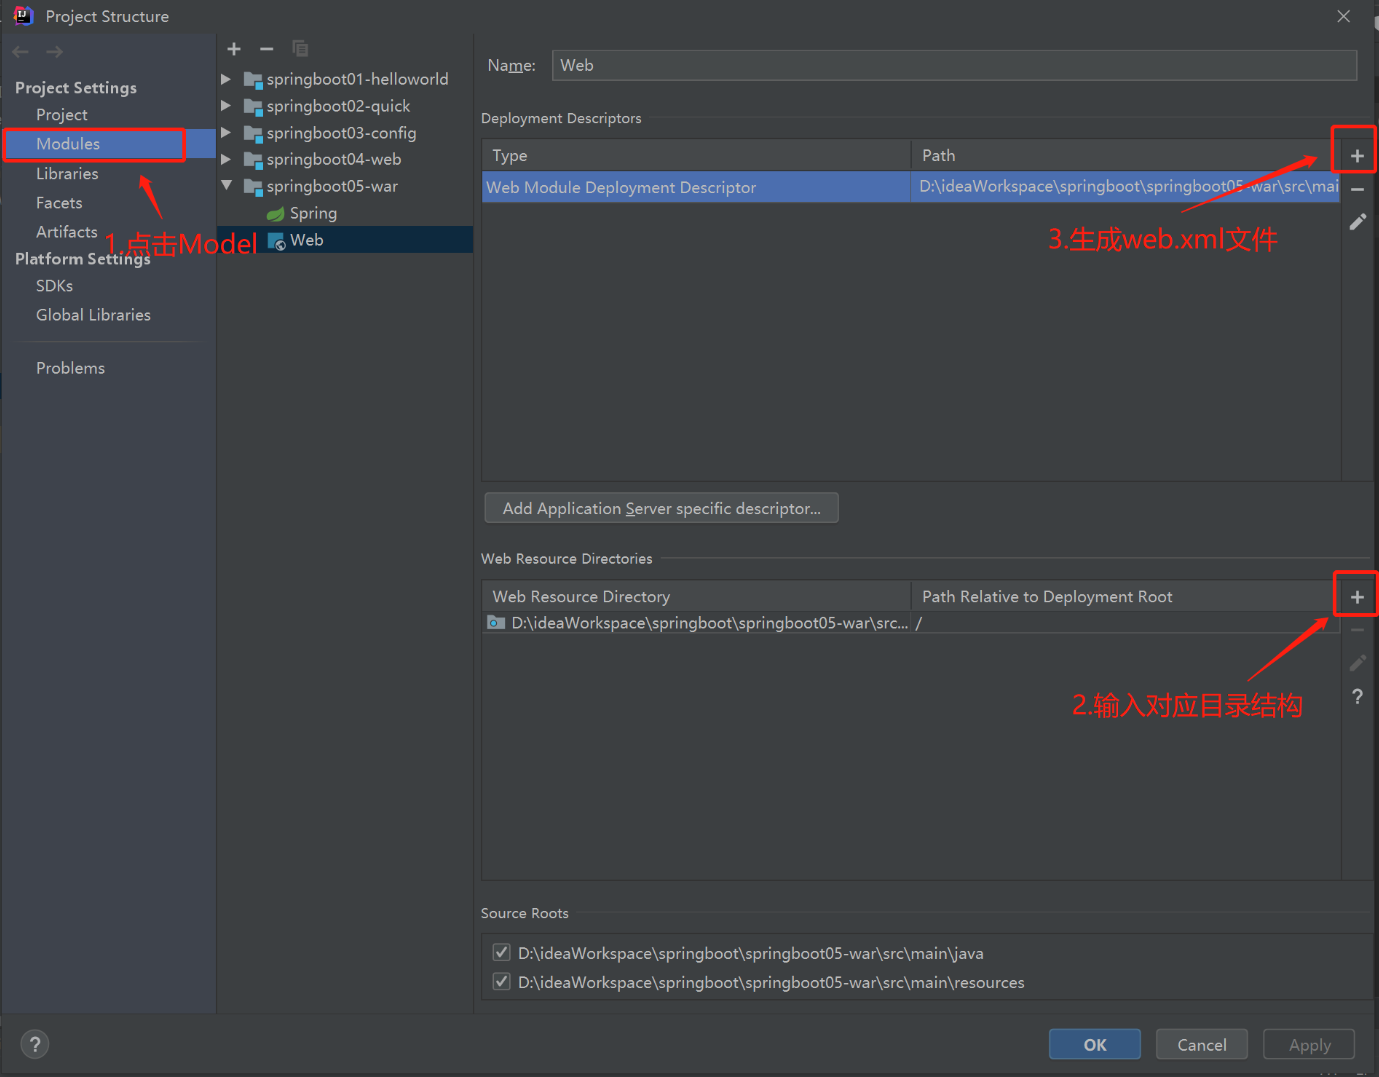
3.2 操作步骤
步骤:
1.创建一个Maven的war工程
有如下三个变化
1.打包方式变为war
<packaging>war</packaging>
2.将内置的tomcat的scope配置为provided
<dependency>
    <groupId>org.springframework.boot</groupId>
    <artifactId>spring-boot-starter-tomcat</artifactId>
    <scope>provided</scope>
</dependency>
3.定义了一个SpringBootServletInitializer的子类
/**
 * 要求:
 * 1.必须继承SpringBootServletInitializer
 * 2.重写configure()方法
 * 3.调用SpringApplicationBuilder的sources()方法,传入主程序类的
 */
public class ServletInitializer extends SpringBootServletInitializer {

    @Override
    protected SpringApplicationBuilder configure(SpringApplicationBuilder application) {
        return application.sources(Springboot05WarApplication.class);
    }

}
2.创建web目录的结构
3.配置前缀和后缀
spring.mvc.view.prefix=/WEB-INF/views/
spring.mvc.view.suffix=.jsp
4.配置Tomcat
要使用SpringBoot需要的Tomcat版本
十一、SpringBoot数据访问
1.JDBC
步骤:
1.创建工程,选择以下模板:web、jdbc、mysql
2.配置数据库连接信息
#指定数据库连接参数
spring.datasource.driver-class-name= com.mysql.jdbc.Driver
spring.datasource.url=jdbc:mysql://localhost:3306/springboot?useUnicode=true&characterEncoding=utf-8&useSSL=false
spring.datasource.username=root
spring.datasource.password=root

#指定数据源
spring.datasource.type=org.apache.commons.dbcp.BasicDataSource
3.测试
@RunWith(SpringJUnit4ClassRunner.class)
@SpringBootTest
class Springboot06JdbcApplicationTests {

    @Autowired
    private DataSource dataSource;

    @Test
    void contextLoads() throws SQLException {
        System.out.println("---------------------------");
        System.out.println("DataSource的类型: " + dataSource.getClass());
        System.out.println("Connection的连接: " + dataSource.getConnection());
    }

}
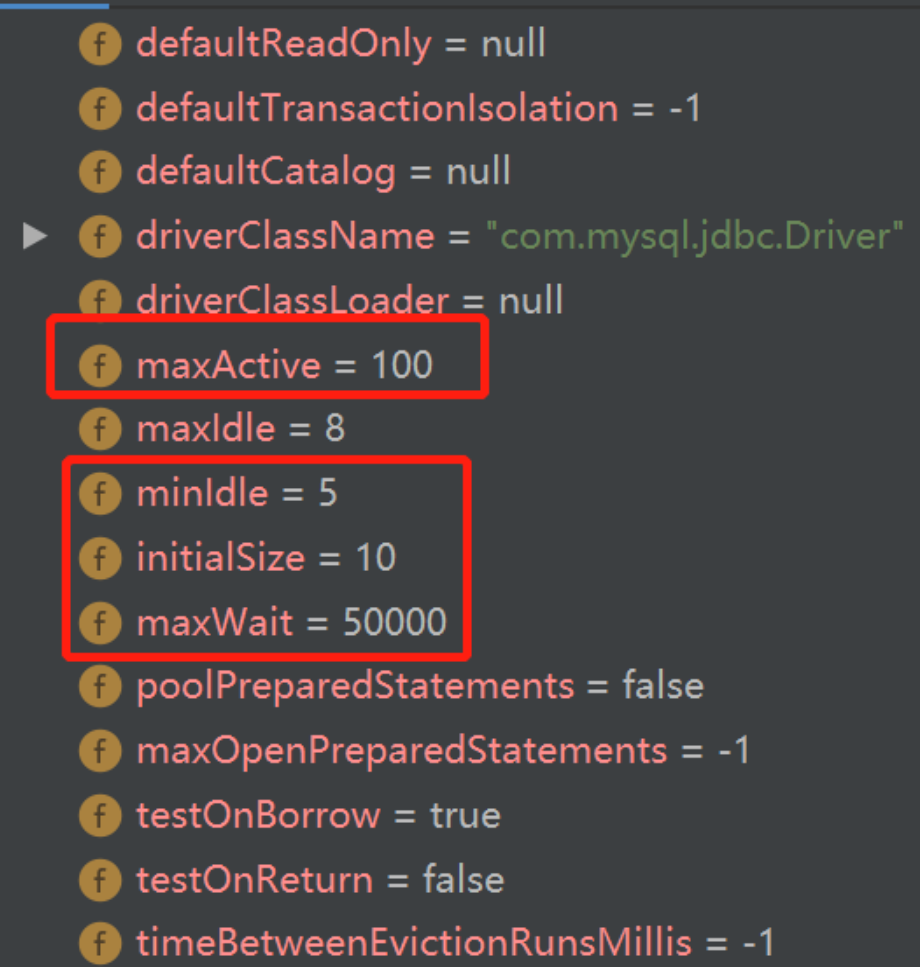
4.配置连接池参数
spring.datasource.initialSize=10
spring.datasource.maxActive=100
spring.datasource.minIdle=5
spring.datasource.maxWait=50000
问题:添加上面的参数不生效,因为SpringBoot默认并不支持这些参数(DataSourceProperties)
解决:自定义数据源配置
/**
 * Author: LuYi
 * Date: 2019/10/30 16:09
 * Description: 描述
 */
@Configuration
public class DatasourceConfig {

    @Bean
    //从配置文件中读取spring.datasource属性,并注入给数据源的属性
    @ConfigurationProperties(prefix = "spring.datasource")
    public DataSource dataSource(){
        return new BasicDataSource();
    }
}
5.使用JdbcTemplate操作数据库
/**
 * Author: LuYi
 * Date: 2019/10/30 16:17
 * Description: 描述
 */
@Controller
@RequestMapping("/user")
public class UserController {

    @Autowired
    private JdbcTemplate jdbcTemplate;

    @RequestMapping("/findAll")
    @ResponseBody
    public List<Map<String, Object>> findAll(){
        String sql = "select * from t_user";
        List<Map<String, Object>> list = jdbcTemplate.queryForList(sql);
        return list;
    }
}
2.MyBatis
2.1 基本步骤
1.创建工程,先择以下模块:web、mybatis
2.配置数据源
#配置DataSource
spring:
  datasource:
    driver-class-name: com.mysql.jdbc.Driver
    url: jdbc:mysql://localhost:3306/springboot?useUnicode=true&characterEncoding=utf-8&useSSL=false
    username: root
    password: root
    initialSize: 5
    maxActive: 100
    minIdle: 3
    maxWait: 50000
#配置MyBatis
mybatis:
    type-aliases-package: com.luyi.pojo
    mapper-locations: classpath:mapper/*.xml
3.编写Mapper、Service、Controller
4.配置MyBatisConfig配置类
/**
 * Author: LuYi
 * Date: 2019/10/30 16:57
 * Description: 描述
 */
@Configuration
//扫描MyBatis接口所在的包
@MapperScan("com.luyi.mapper")
public class MyBatisConfig {

    @Bean
    //加载主配置文件,注入配置信息
    @ConfigurationProperties(prefix = "spring.datasource")
    public DruidDataSource druidDataSource(){
        return new DruidDataSource();
    }
}
2.2 配置PageHelper分页插件
步骤:
1.添加PageHelper依赖
<dependency>
    <groupId>com.github.pagehelper</groupId>
    <artifactId>pagehelper-spring-boot-starter</artifactId>
    <version>1.2.10</version>
</dependency>
2.配置PageHelper的属性
#配置PageHelper
pagehelper:
  helper-dialect: mysql
3.使用PageHelper
@Override
public PageInfo<User> findByPage(int pageNum, int pageSize) {

    //使用PageHelper设置分页
    PageHelper.startPage(pageNum, pageSize);

    List<User> users = userMapper.selectAll();

    PageInfo<User> pageInfo = new PageInfo<>(users);

    return pageInfo;
}
2.3 使用MyBatis Plus
参考:mp.baomidou.com/
步骤:
1.添加MyBatis Plus的依赖
<dependency>
    <groupId>com.baomidou</groupId>
    <artifactId>mybatis-plus-boot-starter</artifactId>
    <version>3.1.0</version>
</dependency>

<dependency>
    <groupId>com.alibaba</groupId>
    <artifactId>druid</artifactId>
    <version>1.1.20</version>
</dependency>
2.配置全局配置文件
#配置DataSource
spring:
  datasource:
    driver-class-name: com.mysql.jdbc.Driver
    url: jdbc:mysql://localhost:3306/springboot?useUnicode=true&characterEncoding=utf-8&useSSL=false
    username: root
    password: root
    initialSize: 5
    maxActive: 100
    minIdle: 3
    maxWait: 50000
#配置MyBatis Plus
mybatis-plus:
  mapper-locations: classpath:mapper/*Mapper.xml
  type-aliases-package: com.luyi.pojo
  global-config:
    db-config:
      #主键类型
      id-type: auto
      #字段策略
      field-strategy: not_empty
      #驼峰下划线转换
      table-underline: true
      #全局表前缀
      table-prefix: t_
      #刷新mapper神器
      refresh-mapper: true
3 配置MyBatis Plus
/**
 * Author: LuYi
 * Date: 2019/10/31 9:59
 * Description: 描述
 */
@Configuration
@MapperScan("com.luyi.mapper")
public class MyBatisPlusConfig {

    /**
     * 分页插件,自动识别数据库类型
     * @return
     */
    @Bean
    public PaginationInterceptor paginationInterceptor(){
        return new PaginationInterceptor();
    }

    @Bean
    @ConfigurationProperties(prefix = "spring.datasource")
    public DataSource dataSource(){
        return new DruidDataSource();
    }
}
4.编写Mapper,继承BaseMapper
/**
 * Author: LuYi
 * Date: 2019/10/31 10:07
 * Description: 继承BaseMapper接口
 */
public interface UserMapper extends BaseMapper<User> {
}
5.测试
@RunWith(SpringRunner.class)
@SpringBootTest
class Springboot08MpApplicationTests {

    @Autowired
    private UserMapper userMapper;

    @Test
    void contextLoads() {
    }

    @Test
    public void add(){
        User user = new User();
        user.setUsername("xxx");
        user.setPassword("111");
        userMapper.insert(user);
        System.out.println("-------------" + user);
    }

    @Test
    public void removeById(){
        int i = userMapper.deleteById(3);
        System.out.println(i);
    }

    @Test
    public void modifyById(){
        User user = new User();
        user.setId(6);
        user.setUsername("zhangsan");
        user.setPassword("123");
        userMapper.updateById(user);
    }

    @Test
    public void findById(){
        User user = userMapper.selectById(1);
        System.out.println(user);
    }

    @Test
    public void findByCondition(){
        //定义条件构造器,用来封装查询条件
        QueryWrapper<User> wrapper = new QueryWrapper<>();
//        wrapper.eq("username", "tom");
        wrapper.like("username", "%a%");
        List<User> users = userMapper.selectList(wrapper);
        for (User user : users) {
            System.out.println(user);
        }
    }

    @Test
    public void findByPage(){
        Page<User> page = new Page<>(2, 2);
        QueryWrapper<User> wrapper = new QueryWrapper<>();
        IPage<User> userIPage = userMapper.selectPage(page, wrapper.select("id", "username", "password"));
        assertThat(page).isSameAs(userIPage);
        System.out.println("总条数---->" + userIPage.getTotal());
        System.out.println("当前页数---->" + userIPage.getCurrent());
        System.out.println("当前每页显示数---->" + userIPage.getSize());
        System.out.println(userIPage.getRecords());
        System.out.println("----------自带分页----------");
    }

}
补充:lombok的使用
步骤:
1.添加依赖
<dependency>
    <groupId>org.projectlombok</groupId>
    <artifactId>lombok</artifactId>
    <version>1.18.8</version>
    <scope>provided</scope>
</dependency>
2.使用lombok提供的注解
/**
 * Author: LuYi
 * Date: 2019/10/30 16:32
 * Description: Lombok的使用
 * Lombok提供了许多注解,标注在类上或者属性上
 */
@Getter
@Setter
@ToString
@Data   //相当于以上注解
@TableName(value = "t_user")    //指定当前数据库表的名称
public class User implements Serializable {

    private Integer id;
    private String username;
    private String password;
}
3.在Idea中安装lombok插件
由于源代码中没有getter/setter等的定义,Idea无法识别,可以安装lombok插件解决
十二、SpringBoot整合Redis
1.简介
Redis是一个内存数据库,可以作为缓存、消息中间件、key-value数据库等来使用
2.操作
步骤:
1.添加依赖
注意:在SpringBoot1.0中使用的Redis客户端时Jedis,在SpringBoot2.0中使用的时Lettuce
<!--整合Redis-->
<dependency>
    <groupId>org.springframework.boot</groupId>
    <artifactId>spring-boot-starter-data-redis</artifactId>
    <!--SpringBoot2.0使用的Redis客户端时Lettuce-->
    <exclusions>
        <exclusion>
            <groupId>io.lettuce</groupId>
            <artifactId>lettuce-core</artifactId>
        </exclusion>
    </exclusions>
</dependency>

<dependency>
    <groupId>redis.clients</groupId>
    <artifactId>jedis</artifactId>
</dependency>
2.配置redis
#redis配置
spring.redis.host=192.168.52.128
spring.redis.port=6379
spring.redis.database=0
spring.redis.jedis.pool.max-active=100
spring.redis.jedis.pool.max-idle=10
spring.redis.jedis.pool.min-idle=3
3.基本用法
使用SpringDataRedis提供的工具类:StringRedisTemplate、RedisTemplate
封装JsonUtils
/**
 * Author: LuYi
 * Date: 2019/10/31 17:37
 * Description: Json工具类,基于jackson
 */
public class JsonUtils {

    //获取jackson对象
    private static ObjectMapper objectMapper = new ObjectMapper();

    /**
     * 将对象转换为Json字符串
     */
    public static String objectToJson(Object obj){
        try {
            //将对象转换为Json字符串
            String jsonStr = objectMapper.writeValueAsString(obj);
            return jsonStr;
        } catch (JsonProcessingException e) {
            e.printStackTrace();
        }
        return null;
    }

    /**
     * 将Json字符串转换为对象
     */
    public static <T> T jsonToObject(String jsonStr, Class<T> clazz){
        try {
            T t = objectMapper.readValue(jsonStr, clazz);
            return t;
        } catch (JsonProcessingException e) {
            e.printStackTrace();
        }
        return null;
    }
}
测试
@RunWith(SpringRunner.class)
@SpringBootTest
public class Springboot09RedisApplicationTests {

    @Autowired
    private StringRedisTemplate stringRedisTemplate;

    @Autowired
    private RedisTemplate<String, String> redisTemplate;

    @Test
    public void contextLoads() {
    }

    /**
     * 使用StringRedisTemplate
     * Redis数据类型:String、List、Set、ZSet、Hash
     */
    @Test
    public void test1(){
        /**
         * 操作redis
         */
//        ValueOperations<String, String> value = stringRedisTemplate.opsForValue();
//        ListOperations<String, String> list = stringRedisTemplate.opsForList();
//        SetOperations<String, String> set = stringRedisTemplate.opsForSet();
//        ZSetOperations<String, String> zset = stringRedisTemplate.opsForZSet();
//        HashOperations<String, Object, Object> hash = stringRedisTemplate.opsForHash();

        /**
         * 操作String
         */
//        stringRedisTemplate.opsForValue().set("username", "admin");
//        System.out.println(stringRedisTemplate.opsForValue().get("username"));

        /**
         * 操作List
         */
//        stringRedisTemplate.opsForList().leftPush("name", "tom");
//        stringRedisTemplate.opsForList().leftPushAll("name", "aaa", "bbb", "ccc");
//        System.out.println(stringRedisTemplate.opsForList().range("name", 0, -1));

        /**
         * 存储对象
         */
        User user = new User();
        user.setId(1001);
        user.setUsername("tom");
        user.setPassword("123");

        //将对象转换为json格式
        String jsonStr = JsonUtils.objectToJson(user);
        System.out.println(jsonStr);

        stringRedisTemplate.opsForValue().set("user", jsonStr);

        //获取jsonStr
        String str = stringRedisTemplate.opsForValue().get("user");

        //将str转换为对象
        User u = JsonUtils.jsonToObject(str, User.class);
        System.out.println(u);
    }

    /**
     * 使用redisTemplate
     */
    @Test
    public void test2(){
        redisTemplate.opsForValue().set("sex", "male");
        String sex = redisTemplate.opsForValue().get("sex");
        System.out.println(sex);
    }

}
