

前言
本篇文章主要是要介绍如何在Spring IoC 容器中 如何管理Spring Bean生命周期。
在应用开发中,常常需要执行一些特定的初始化工作,这些工作都是相对比较固定的,比如建立数据库连接,打开网络连接等,同时,在结束服务时,也有一些相对固定的销毁工作需要执行。为了便于这些工作的设计,Spring IoC容器提供了相关的功能,可以让应用定制Bean的初始化和销毁过程。
Spring Bean 生命周期
图片描述
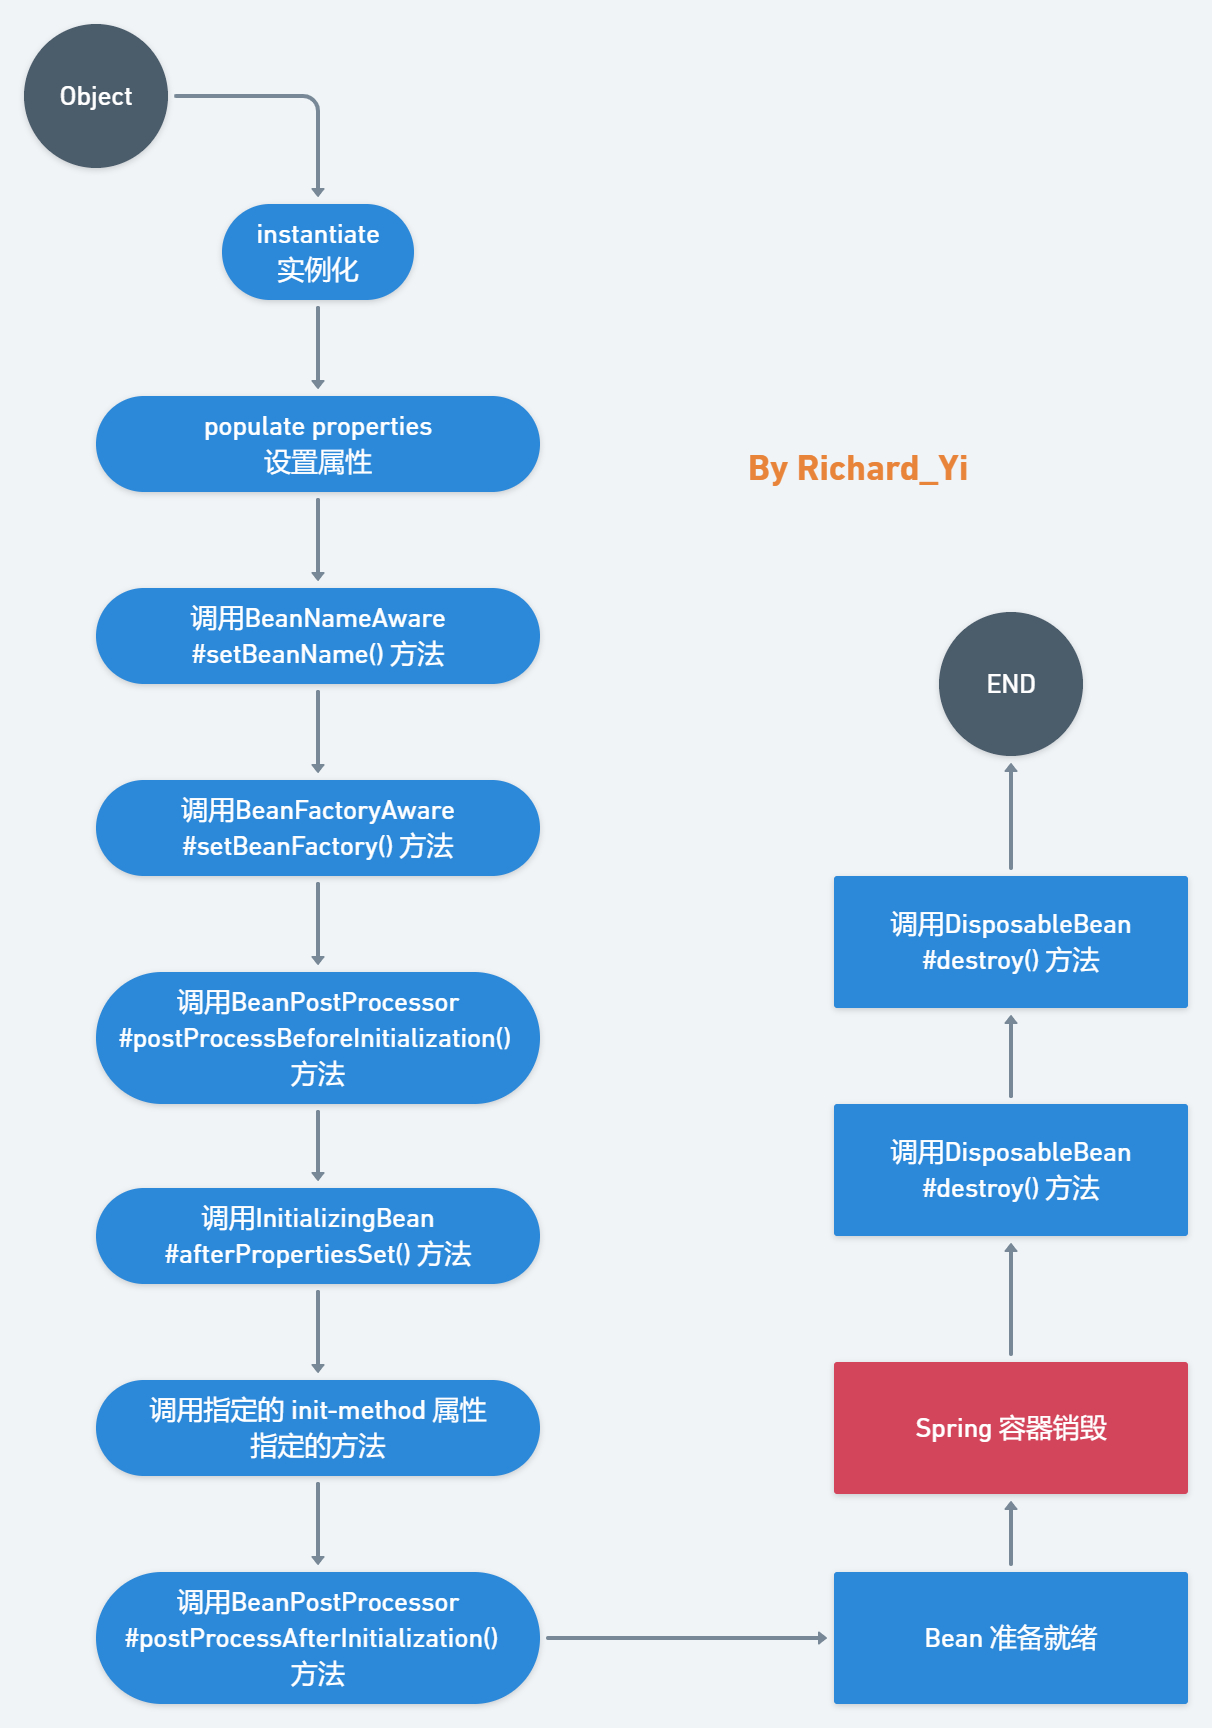
先来看看 Spring Bean 的生命周期流程图。结合图看后面的描述会更轻松一点哦。
文字描述
- Bean容器在配置文件中找到Spring Bean的定义。
- Bean容器使用Java Reflection API创建Bean的实例。
- 如果声明了任何属性,声明的属性会被设置。如果属性本身是Bean,则将对其进行解析和设置。
- 如果Bean类实现
BeanNameAware接口,则将通过传递Bean的名称来调用setBeanName()方法。 - 如果Bean类实现
BeanClassLoaderAware接口,则将通过传递加载此Bean的ClassLoader对象的实例来调用setBeanClassLoader()方法。 - 如果Bean类实现
BeanFactoryAware接口,则将通过传递BeanFactory对象的实例来调用setBeanFactory()方法。 - 如果有任何与BeanFactory关联的BeanPostProcessors对象已加载Bean,则将在设置Bean属性之前调用
postProcessBeforeInitialization()方法。 - 如果Bean类实现了
InitializingBean接口,则在设置了配置文件中定义的所有Bean属性后,将调用afterPropertiesSet()方法。 - 如果配置文件中的Bean定义包含
init-method属性,则该属性的值将解析为Bean类中的方法名称,并将调用该方法。 - 如果为Bean Factory对象附加了任何Bean 后置处理器,则将调用
postProcessAfterInitialization()方法。 - 如果Bean类实现
DisposableBean接口,则当Application不再需要Bean引用时,将调用destroy()方法。 - 如果配置文件中的Bean定义包含
destroy-method属性,那么将调用Bean类中的相应方法定义。
实例演示
接下来,我们用一个简单的DEMO来演示一下,整个生命周期的流转过程,加深你的印象。
- 定义一个
Person类,实现了DisposableBean, InitializingBean, BeanFactoryAware, BeanNameAware这4个接口,同时还有自定义的init-method和destroy-method。这里,如果不了解这几个接口的读者,可以先去看看这几个接口的定义。
public class Person implements DisposableBean, InitializingBean, BeanFactoryAware, BeanNameAware {

    private String name;

    Person() {
        System.out.println("Constructor of person bean is invoked!");
    }

    public String getName() {
        return name;
    }
    public void setName(String name) {
        this.name = name;
    }

    @Override
    public void setBeanFactory(BeanFactory beanFactory) throws BeansException {
        System.out.println("setBeanFactory method of person is invoked");
    }

    @Override
    public void setBeanName(String name) {
        System.out.println("setBeanName method of person is invoked");
    }

    public void init() {
        System.out.println("custom init method of person bean is invoked!");
    }

    //Bean initialization code  equals to
    @Override
    public void afterPropertiesSet() throws Exception {
        System.out.println("afterPropertiesSet method of person bean is invoked!");
    }

    //Bean destruction code
    @Override
    public void destroy() throws Exception {
        System.out.println("DisposableBean Destroy method of person bean is invoked!");
    }

    public void destroyMethod() {
        System.out.println("custom Destroy method of person bean is invoked!");
    }

}
- 定义一个
MyBeanPostProcessor实现BeanPostProcessor接口。
public class MyBeanPostProcessor implements BeanPostProcessor {


    @Override
    public Object postProcessBeforeInitialization(Object bean, String beanName) throws BeansException {
        System.out.println("post Process Before Initialization is invoked");
        return bean;
    }

    @Override
    public Object postProcessAfterInitialization(Object bean, String beanName) throws BeansException {
        System.out.println("post Process after Initialization is invoked");
        return bean;
    }
}
- 配置文件,指定
init-method和destroy-method属性
<?xml version="1.0" encoding="UTF-8"?>
<beans xmlns="http://www.springframework.org/schema/beans"
       xmlns:xsi="http://www.w3.org/2001/XMLSchema-instance"
       xsi:schemaLocation="http://www.springframework.org/schema/beans http://www.springframework.org/schema/beans/spring-beans.xsd">

    <bean name="myBeanPostProcessor" class="ric.study.demo.ioc.life_cycle_demo_set.MyBeanPostProcessor" />
    <bean name="personBean" class="ric.study.demo.ioc.life_cycle_demo_set.Person"
          init-method="init" destroy-method="destroyMethod">
        <property name="name" value="Richard Yi" />
    </bean>

</beans>
- 启动容器、销毁容器
public class Main {

    public static void main(String[] args) {
        ApplicationContext context = new ClassPathXmlApplicationContext("spring-config-1.xml");
        ((ClassPathXmlApplicationContext) context).destroy();
    }
}
- 输出
Constructor of person bean is invoked!
setBeanName method of person is invoked
setBeanFactory method of person is invoked
post Process Before Initialization is invoked
afterPropertiesSet method of person bean is invoked!
custom init method of person bean is invoked!
post Process after Initialization is invoked
DisposableBean Destroy method of person bean is invoked!
custom Destroy method of person bean is invoked!
可以看到这个结果和我们上面描述的一样。
源码解析
下面我们从源码角度来看看,上述描述的调用是如何实现的。
实际上如果你看过我之前的文章 Spring IoC 依赖注入 源码解析的话,应该知道上述调用的具体实现。
这里相当于把相关部分再拎出来讲一遍。
容器初始化
Spring IoC 依赖注入的阶段,创建Bean有三个关键步骤
- createBeanInstance() 实例化
- populateBean(); 属性装配
- initializeBean() 处理Bean初始化之后的各种回调事件
其中,initializeBean()负责处理Bean初始化后的各种回调事件。
protected Object initializeBean(final String beanName, final Object bean, RootBeanDefinition mbd) {
		if (System.getSecurityManager() != null) {
			AccessController.doPrivileged(new PrivilegedAction<Object>() {
				@Override
				public Object run() {
					invokeAwareMethods(beanName, bean);
					return null;
				}
			}, getAccessControlContext());
		}
		else {
            // 涉及到的回调接口点进去一目了然,代码都是自解释的
            // BeanNameAware、BeanClassLoaderAware或BeanFactoryAware
			invokeAwareMethods(beanName, bean);
		}

		Object wrappedBean = bean;
		if (mbd == null || !mbd.isSynthetic()) {
            // BeanPostProcessor 的 postProcessBeforeInitialization 回调
			wrappedBean = applyBeanPostProcessorsBeforeInitialization(wrappedBean, beanName);
		}

		try {
            // init-methods
            // 或者是实现了InitializingBean接口,会调用afterPropertiesSet() 方法
			invokeInitMethods(beanName, wrappedBean, mbd);
		}
		catch (Throwable ex) {
			throw new BeanCreationException(
					(mbd != null ? mbd.getResourceDescription() : null),
					beanName, "Invocation of init method failed", ex);
		}
		if (mbd == null || !mbd.isSynthetic()) {
            // BeanPostProcessor 的 postProcessAfterInitialization 回调
			wrappedBean = applyBeanPostProcessorsAfterInitialization(wrappedBean, beanName);
		}
		return wrappedBean;
	}
其中invokeAwareMethods会先调用一系列的***Aware接口实现
private void invokeAwareMethods(final String beanName, final Object bean) {
		if (bean instanceof Aware) {
			if (bean instanceof BeanNameAware) {
				((BeanNameAware) bean).setBeanName(beanName);
			}
			if (bean instanceof BeanClassLoaderAware) {
				((BeanClassLoaderAware) bean).setBeanClassLoader(getBeanClassLoader());
			}
			if (bean instanceof BeanFactoryAware) {
				((BeanFactoryAware) bean).setBeanFactory(AbstractAutowireCapableBeanFactory.this);
			}
		}
	}
然后再执行 BeanPostProcessor 的 postProcessBeforeInitialization 回调
	@Override
	public Object applyBeanPostProcessorsBeforeInitialization(Object existingBean, String beanName)
			throws BeansException {

		Object result = existingBean;
		for (BeanPostProcessor beanProcessor : getBeanPostProcessors()) {
			result = beanProcessor.postProcessBeforeInitialization(result, beanName);
			if (result == null) {
				return result;
			}
		}
		return result;
	}
然后再调用 初始化方法,其中包括 InitializingBean的afterPropertiesSet方法和指定的init-method方法,
protected void invokeInitMethods(String beanName, final Object bean, RootBeanDefinition mbd)
			throws Throwable {

		boolean isInitializingBean = (bean instanceof InitializingBean);
		if (isInitializingBean && (mbd == null || !mbd.isExternallyManagedInitMethod("afterPropertiesSet"))) {
			if (logger.isDebugEnabled()) {
				logger.debug("Invoking afterPropertiesSet() on bean with name '" + beanName + "'");
			}
			if (System.getSecurityManager() != null) {
				try {
					AccessController.doPrivileged(new PrivilegedExceptionAction<Object>() {
						@Override
						public Object run() throws Exception {
							((InitializingBean) bean).afterPropertiesSet();
							return null;
						}
					}, getAccessControlContext());
				}
				catch (PrivilegedActionException pae) {
					throw pae.getException();
				}
			}
			else {
				((InitializingBean) bean).afterPropertiesSet();
			}
		}

		if (mbd != null) {
			String initMethodName = mbd.getInitMethodName();
			if (initMethodName != null && !(isInitializingBean && "afterPropertiesSet".equals(initMethodName)) &&
					!mbd.isExternallyManagedInitMethod(initMethodName)) {
				invokeCustomInitMethod(beanName, bean, mbd);
			}
		}
	}
最后再执行 BeanPostProcessor 的 postProcessAfterInitialization 回调
	@Override
	public Object applyBeanPostProcessorsAfterInitialization(Object existingBean, String beanName)
			throws BeansException {

		Object result = existingBean;
		for (BeanPostProcessor beanProcessor : getBeanPostProcessors()) {
			result = beanProcessor.postProcessAfterInitialization(result, beanName);
			if (result == null) {
				return result;
			}
		}
		return result;
	}
好的,到这里我们介绍了Spring 容器初始化过程Bean加载过程当中的各种回调实现,下面介绍Spring 容器销毁阶段。
容器关闭
与Bean初始化类似,当容器关闭时,可以看到对Bean销毁方法的调用。销毁过程是这样的。顺着close()-> doClose() -> destroyBeans() -> destroySingletons() -> destroySingleton() -> destroyBean() -> bean.destroy(),会看到最终调用Bean的销毁方法。
protected void destroyBean(String beanName, DisposableBean bean) {
		// 忽略

		// Actually destroy the bean now...
		if (bean != null) {
			try {
				bean.destroy();
			}
			catch (Throwable ex) {
				logger.error("Destroy method on bean with name '" + beanName + "' threw an exception", ex);
			}
		}

		// 忽略
	}
这里注意哦,这个Bean的类型实际上是DisposableBeanAdapter,DisposableBeanAdapter是管理Spring Bean的销毁的,实际上这里运用了适配器模式。再来看看destroy()的具体方法。
@Override
	public void destroy() {
		if (!CollectionUtils.isEmpty(this.beanPostProcessors)) {
			for (DestructionAwareBeanPostProcessor processor : this.beanPostProcessors) {
				processor.postProcessBeforeDestruction(this.bean, this.beanName);
			}
		}

		if (this.invokeDisposableBean) {
			if (logger.isDebugEnabled()) {
				logger.debug("Invoking destroy() on bean with name '" + this.beanName + "'");
			}
			try {
				if (System.getSecurityManager() != null) {
					AccessController.doPrivileged(new PrivilegedExceptionAction<Object>() {
						@Override
						public Object run() throws Exception {
							((DisposableBean) bean).destroy();
							return null;
						}
					}, acc);
				}
				else {
                    // 调用 DisposableBean 的 destroy()方法
					((DisposableBean) bean).destroy();
				}
			}
			catch (Throwable ex) {
				String msg = "Invocation of destroy method failed on bean with name '" + this.beanName + "'";
				if (logger.isDebugEnabled()) {
					logger.warn(msg, ex);
				}
				else {
					logger.warn(msg + ": " + ex);
				}
			}
		}

		if (this.destroyMethod != null) {
            // 调用 设置的destroyMethod
			invokeCustomDestroyMethod(this.destroyMethod);
		}
		else if (this.destroyMethodName != null) {
			Method methodToCall = determineDestroyMethod();
			if (methodToCall != null) {
				invokeCustomDestroyMethod(methodToCall);
			}
		}
	}
BeanPostProcessor 是什么时候注册到容器的?
前面只介绍了BeanPostProcessor类在 Spring Bean 生命周期中的回调实现,却没有说明 BeanPostProcessor 是什么时候注册到容器的。下面我们来介绍下。
在Spring IoC 容器初始化的时候,容器会做一些初始化操作,其中就包括了BeanPostProcessor的register过程。详细的过程可以看我这篇IoC 容器初始化。
这里直接放源码吧。
源码位置AbstractApplicationContext#refresh()
@Override
	public void refresh() throws BeansException, IllegalStateException {
		synchronized (this.startupShutdownMonitor) {
			// Prepare this context for refreshing.
			prepareRefresh();

			// Tell the subclass to refresh the internal bean factory.
			ConfigurableListableBeanFactory beanFactory = obtainFreshBeanFactory();

			// Prepare the bean factory for use in this context.
			prepareBeanFactory(beanFactory);

			try {
				// Allows post-processing of the bean factory in context subclasses.
				postProcessBeanFactory(beanFactory);

				// Invoke factory processors registered as beans in the context.
				invokeBeanFactoryPostProcessors(beanFactory);

				// Register bean processors that intercept bean creation.
                // 在这里
				registerBeanPostProcessors(beanFactory);
			// ....忽略
		}
	}
	protected void registerBeanPostProcessors(ConfigurableListableBeanFactory beanFactory) {
		PostProcessorRegistrationDelegate.registerBeanPostProcessors(beanFactory, this);
	}
源码位置PostProcessorRegistrationDelegate#registerBeanPostProcessors()
public static void registerBeanPostProcessors(
			ConfigurableListableBeanFactory beanFactory, AbstractApplicationContext applicationContext) {

		String[] postProcessorNames = beanFactory.getBeanNamesForType(BeanPostProcessor.class, true, false);
// step1
		// Register BeanPostProcessorChecker that logs an info message when
		// a bean is created during BeanPostProcessor instantiation, i.e. when
		// a bean is not eligible for getting processed by all BeanPostProcessors.
		int beanProcessorTargetCount = beanFactory.getBeanPostProcessorCount() + 1 + postProcessorNames.length;
		beanFactory.addBeanPostProcessor(new BeanPostProcessorChecker(beanFactory, beanProcessorTargetCount));

// step2
		// Separate between BeanPostProcessors that implement PriorityOrdered,
		// Ordered, and the rest.
		List<BeanPostProcessor> priorityOrderedPostProcessors = new ArrayList<BeanPostProcessor>();
		List<BeanPostProcessor> internalPostProcessors = new ArrayList<BeanPostProcessor>();
		List<String> orderedPostProcessorNames = new ArrayList<String>();
		List<String> nonOrderedPostProcessorNames = new ArrayList<String>();
		for (String ppName : postProcessorNames) {
			if (beanFactory.isTypeMatch(ppName, PriorityOrdered.class)) {
				BeanPostProcessor pp = beanFactory.getBean(ppName, BeanPostProcessor.class);
				priorityOrderedPostProcessors.add(pp);
				if (pp instanceof MergedBeanDefinitionPostProcessor) {
					internalPostProcessors.add(pp);
				}
			}
			else if (beanFactory.isTypeMatch(ppName, Ordered.class)) {
				orderedPostProcessorNames.add(ppName);
			}
			else {
				nonOrderedPostProcessorNames.add(ppName);
			}
		}
// step3
		// First, register the BeanPostProcessors that implement PriorityOrdered.
		sortPostProcessors(priorityOrderedPostProcessors, beanFactory);
		registerBeanPostProcessors(beanFactory, priorityOrderedPostProcessors);

		// Next, register the BeanPostProcessors that implement Ordered.
		List<BeanPostProcessor> orderedPostProcessors = new ArrayList<BeanPostProcessor>();
		for (String ppName : orderedPostProcessorNames) {
			BeanPostProcessor pp = beanFactory.getBean(ppName, BeanPostProcessor.class);
			orderedPostProcessors.add(pp);
			if (pp instanceof MergedBeanDefinitionPostProcessor) {
				internalPostProcessors.add(pp);
			}
		}
		sortPostProcessors(orderedPostProcessors, beanFactory);
		registerBeanPostProcessors(beanFactory, orderedPostProcessors);

		// Now, register all regular BeanPostProcessors.
		List<BeanPostProcessor> nonOrderedPostProcessors = new ArrayList<BeanPostProcessor>();
		for (String ppName : nonOrderedPostProcessorNames) {
			BeanPostProcessor pp = beanFactory.getBean(ppName, BeanPostProcessor.class);
			nonOrderedPostProcessors.add(pp);
			if (pp instanceof MergedBeanDefinitionPostProcessor) {
				internalPostProcessors.add(pp);
			}
		}
		registerBeanPostProcessors(beanFactory, nonOrderedPostProcessors);

		// Finally, re-register all internal BeanPostProcessors.
		sortPostProcessors(internalPostProcessors, beanFactory);
		registerBeanPostProcessors(beanFactory, internalPostProcessors);

		// Re-register post-processor for detecting inner beans as ApplicationListeners,
		// moving it to the end of the processor chain (for picking up proxies etc).
		beanFactory.addBeanPostProcessor(new ApplicationListenerDetector(applicationContext));
	}
上述过程可以分成四步:
- 通过
beanFactory.getBeanNamesForType(BeanPostProcessor.class, true, false);方法获取beanFactory里继承了BeanPostProcessor接口的name的集合; - 把后置器beans分为
PriorityOrdered、Ordered、nonOrdered三大类,前两类是增加了排序条件的后置器;(Spring可以通过PriorityOrdered和Ordered接口控制处理器的优先级),这里实际上还有一类是MergedBeanDefinitionPostProcessor,不是核心点,不展开讲。 - 第三步可以分为以下小步
priorityOrderedPostProcessors,先排序后注册orderedPostProcessors,先排序后注册- 注册
nonOrderedPostProcessors,就是一般的处理器 internalPostProcessors,先排序后注册- 注册一个
ApplicationListenerDetector的 processor
DisposableBeanAdapter 什么时候注册到容器的?
DisposableBeanAdapter和上文的BeanPostProcessor的抽象层级不同,这个是和Bean绑定的,所以它的注册时机是在Spring Bean的依赖注入阶段,详细源码可以看我的这篇文章Spring IoC 依赖注入 源码解析。
源码位置:AbstractAutowireCapableBeanFactory#doCreateBean()
protected Object doCreateBean(final String beanName, final RootBeanDefinition mbd, final Object[] args)
			throws BeanCreationException {
		// 省略前面的超多步骤,想了解的可以去看源码或者我的那篇文章

		// Register bean as disposable.
    	// 这里就是DisposableBeanAdapter的注册步骤了
		try {
			registerDisposableBeanIfNecessary(beanName, bean, mbd);
		}
		catch (BeanDefinitionValidationException ex) {
			throw new BeanCreationException(
					mbd.getResourceDescription(), beanName, "Invalid destruction signature", ex);
		}

		return exposedObject;
	}
源码位置:AbstractBeanFactory#registerDisposableBeanIfNecessary()
protected void registerDisposableBeanIfNecessary(String beanName, Object bean, RootBeanDefinition mbd) {
		AccessControlContext acc = (System.getSecurityManager() != null ? getAccessControlContext() : null);
		if (!mbd.isPrototype() && requiresDestruction(bean, mbd)) {
			if (mbd.isSingleton()) {
                // 注册一个DisposableBean实现,该实现将执行给定bean的所有销毁工作。
                // 包括:DestructionAwareBeanPostProcessors,DisposableBean接口,自定义destroy方法。
				registerDisposableBean(beanName,
						new DisposableBeanAdapter(bean, beanName, mbd, getBeanPostProcessors(), acc));
			}
			else {
				// A bean with a custom scope...
				Scope scope = this.scopes.get(mbd.getScope());
				if (scope == null) {
					throw new IllegalStateException("No Scope registered for scope name '" + mbd.getScope() + "'");
				}
				scope.registerDestructionCallback(beanName,
						new DisposableBeanAdapter(bean, beanName, mbd, getBeanPostProcessors(), acc));
			}
		}
	}
结语
至此,Spring Bean的整个生命周期算是讲解完了,从容器初始化到容器销毁,以及回调事件的注册时机等方面都说明了一下,希望能对你有所帮助。
本文由博客一文多发平台 OpenWrite 发布!
