一个比较适合新手入门的项目案例,
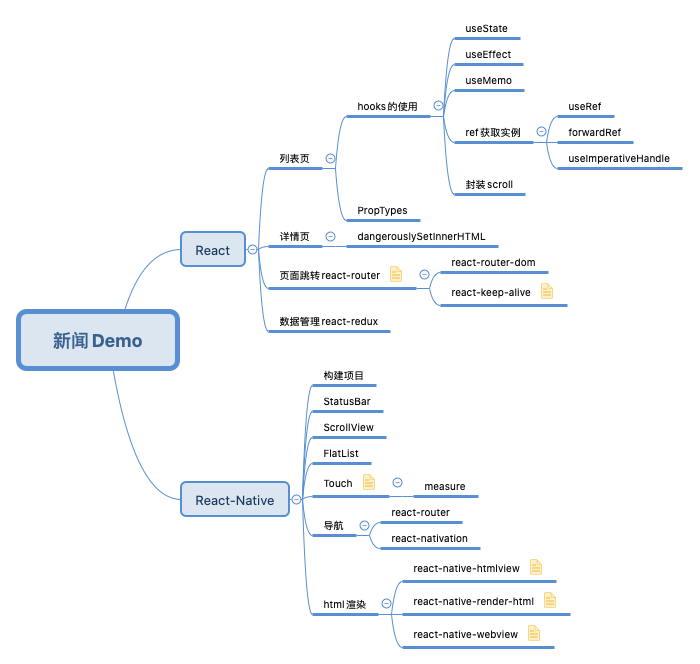
React新闻客户端的简单实现,项目代码已经上传GitHub,这个项目实现了新闻列表页面,新闻详细页面,然后使用路由管理页面跳转,使用redux统一管理数据;另外新闻客户端还有react-native的版本,将再另一篇文章中进行讲解。
项目构建
因为是入门级的项目,所以项目构建我们直接使用官方命令npx create-react-app my-app,并且不对配置进行更多的修改了,如果你想要自定义配置可以查看这里:如何扩展 Create React App 的 Webpack 配置。包安装完成之后,我们使用yarn run start运行项目。
列表页面
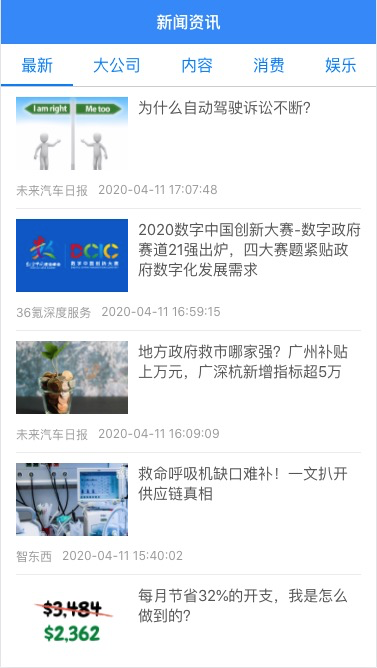
列表页面我们可以将它分为三个部分,分别实现:顶部的标题组件TitleHeader,展示分类标签的Tabs,最主要的新闻组件NewsList。
标题组件
标题组件主要是布局和样式的问题,列表是可以滚动查看新闻信息的,标题不会跟随滚动,而是要一直固定,第一时间想到的肯定是position: fixed;,但是在移动端使用fixed布局需要考虑到两个问题:
- ios中弹出软键盘fixed布局会失效,具体查看这里:移动端踩坑之旅-ios下fixed失效,软键盘等
- 使用
transform会导致fixed相对于使用transform的元素(必须是fixed布局元素的祖先)布局,具体查看这里:CSS3 transform对普通元素的N多渲染影响
所以我们不选择使用fixed布局,使用flex能够实现一样的效果:
import styled from 'styled-components';

export const Container = styled.div`
  display: flex;
  flex-direction: column;
  height: 100%;
  width: 100%;
`

export const TitleHeader = styled.div`
  height: 44px;
  background-color: rgb(47, 133, 252);
  color: rgb(255, 255, 255);
  width: 100%;
  display: flex;
  flex-direction: row;
  justify-content: center;
  align-items: center;
  font-size: 16px;
  font-weight: bold;
`
Container是包裹整个显示页面的元素,它被设置为占据整个可视区域;TitleHeader设置为固定高度,之后把NewsList设置为flex: 1,新闻列表就会占据剩余的可视区域。
标签列表
在标签列表中,我们会使用到better-scroll来实现标签列表的滑动展示,所以我们先对better-scroll进行初步的封装。
安装better-scroll插件时,因为better-scroll不同版本造成了一些问题,这里对better-scroll的版本进行简单的说明:
npm install better-scroll安装的是1.x的版本npm install better-scroll@next安装的是2.x的版本,而且这个版本是全功能的版本npm install @better-scroll/core@next安装的是2.x的核心版本,只有核心功能,不包含插件功能,如果需要插件功能,需要额外引入插件并配置。刚开始的时候我使用了better-scroll@next,然后又按照官方文档使用了插件,所以导致无法实现想要的功能。官方文档使用的是这个版本的。
构建scroll组件,首先我们设置scroll容器的样式,scroll容器必须是overflow: hidden:
const ScrollContainer = styled.div`
  width: 100%;
  height: 100%;
  overflow: hidden;
`
然后我们会使用hooks对组件进行初始化:
const Scroll = forwardRef((props, ref) => {
  const [bScroll, setBScroll] = useState()
  const scrollContaninerRef = useRef()
  const { direction, click, bounceTop, bounceBottom, threshold, stop, bounceTime } = props

  useEffect(() => {
    const scroll = new BScroll(scrollContaninerRef.current, {
      scrollX: direction === "horizental",
      scrollY: direction === "vertical",
      bounceTime,
      pullDownRefresh: !!pullDown && {
        threshold,
        stop
      },
      probeType: 3,
      click: click,
      bounce:{
        top: bounceTop,
        bottom: bounceBottom
      }
    });
    setBScroll(scroll);
    return () => {
      setBScroll(null);
    }
    // eslint-disable-next-line
  }, []);

  useImperativeHandle(ref, () => ({
    getBScroll() {
      if(bScroll) {
        return bScroll;
      }
    }
  }))
  return (
    <ScrollContainer ref={scrollContaninerRef}>
      {props.children}
    </ScrollContainer>
  )
})
这里我们使用到了useState、useEffect、useRef、useImperativeHandle,现在我们分别对这些hooks的使用进行说明。
useState
函数组件没有内部state,而useState的作用就是在函数组件重新渲染时保存state。
useState只有一个参数,即初始的state值。useState会返回一个数组,第一个元素为state,第二个元素为更新state的数组。初次渲染的时候返回的state就是我们设置的初始state值,state的更新方法和React的setState方法类似,但是我们设置的值会直接替换原来的state,而不是进行合并。
const [state, setState] = useState(initialState);
在hooks中,和useState功能相似的还有useMemo和useCallback。
useMemo类似与vue的计算属性,useMemo的结果是一个需要通过计算得到的值,计算这个值依靠其他数据,在其他数据没有变化的情况,这个值是不变的,只有useMemo依靠的数据发生改变,useMemo的结果才会发生改变。
const data = useMemo(()=>({number}),[number]);
useState和useMemo都是对数据进行处理,而useCallback则是对函数进行保存,useCallback接收一个内联回调函数参数和一个依赖项数组,只有当依赖项改变的时候才会,更新回调函数:
const addClick = useCallback(()=>{
    setNumber(number+1);
},[number]);
我们可以把这个过程理解为函数的柯里化const fn = (number) => () => setNumber(),useCallback返回的值可以视为fn(number)的结果;如果number一直不改变,则addClick一直保持不变。
useEffect
useEffect给函数组件增加了操作副作用的能力,副作用(effect)指那些没有发生在数据向视图转换过程中的逻辑,如 ajax 请求、访问原生dom 元素、本地持久化缓存、绑定/解绑事件、添加订阅、设置定时器、记录日志等。
useEffect接收一个函数,该函数会在组件渲染到屏幕之后才执行,如果需要清除副作用(如清除定时器)可以返回一个函数,在返回函数中清除副作用,如果不需要清除副作用,则不返回任何值。useEffect的第二个参数是依赖项数组,如果没有依赖项数组,则函数组件每次重新渲染,useEffect里的函数都会执行,如果依赖项数组为空(不依赖任何值),那么只会执行一次,如果依赖项数组不为空,则只有依赖项改变的时候,useEffect里的函数会重新执行。
useEffect(()=>{
    console.log('开启一个新的定时器')
    let $timer = setInterval(()=>{
        setNumber(number=>number+1);
    },1000);
    // useEffect 如果返回一个函数的话,该函数会在组件卸载和更新时调用
    // useEffect 在执行副作用函数之前,会先调用上一次返回的函数
    // 如果要清除副作用,要么返回一个清除副作用的函数
    return ()=>{
        console.log('destroy effect');
        clearInterval($timer);
    }
},[]); // 这里传入一个空的依赖项数组,这样就不会去重复执行
useRef & useImperativeHandle
useRef和类组件中的React.createRef作用是一样的,是为了获取React组件实例,或者dom元素。两者的不同在于useRef 返回的 ref 对象在组件的整个生命周期内保持不变,也就是说每次重新渲染函数组件时,返回的ref 对象都是同一个(使用 React.createRef ,每次重新渲染组件都会重新创建 ref)。
使用useRef会返回一个可变的ref对象,其current属性被初始化为传入的参数(initialValue)
const refContainer = useRef(initialValue);
useImperativeHandle一般配合forwardRef一起使用。
函数组件是没有实例的,所以我们无法获取到函数组件的ref,为了获取函数组件的ref,我们需要使用forwardRef。使用了forwardRef,我们可以在子组件中获取props和ref,这样我们将父组件的ref对象应用到子组件的dom元素上。
function Child(props,ref){
  return (
    <input type="text" ref={ref}/>
  )
}
Child = React.forwardRef(Child);
而useImperativeHandle配合forwardRef使用,用来自定义给父组件的ref值
function Child(props,ref){
  useImperativeHandle(ref, () => ({
    name: '自定义'
  }))
  return (
    <input type="text"/>
  )
}
Child = React.forwardRef(Child);
对这些使用到的hooks有了解后,我们再来理解代码中hooks的使用。
首先我们定义一个state,用来保存bScroll
const [bScroll, setBScroll] = useState()
在组件第一个渲染的时候,我们对bScroll进行初始化,这里使用到useRef来获取dom元素,然后返回一个清除副作用的函数,但是依赖项为空,所以实际上bScroll的初始化只执行一次。
useEffect(() => {
    const scroll = new BScroll(scrollContaninerRef.current, {
      scrollX: direction === "horizental",
      scrollY: direction === "vertical",
      bounceTime,
      pullDownRefresh: !!pullDown && {
        threshold,
        stop
      },
      probeType: 3,
      click: click,
      bounce:{
        top: bounceTop,
        bottom: bounceBottom
      }
    });
    setBScroll(scroll);
    return () => {
      setBScroll(null);
    }
    // eslint-disable-next-line
  }, []);
为了让其他组件能够对滚动区域进行操作,我们使用forwardRef和useImperativeHandle,把bScroll暴露出去。
useImperativeHandle(ref, () => ({
    getBScroll() {
      if(bScroll) {
        return bScroll;
      }
    }
}))
封装好scroll组件之后,我们再使用scroll组件来实现Tabs组件。首先确定组件的html结构,TabsContainer设置Tabs的宽高,List用来包含Item,并且List不能换行,需要设置white-space: nowrap。
<TabsContainer>
    <Scroll ref={scrollRef} direction={"horizental"}>
        <List>
          {tabs.map(({ id, name, newsid }) => {
            return <TabItem key={id} className={ selectedNewsId === newsid ? 'selected' : '' } onClick={(event) => clickItem(newsid, event)}>{name}</TabItem>
          })}
        </List>
    </Scroll>
</TabsContainer>
点击事件我们使用useCallback进行处理,每当点击标签的时候,我们都会尝试把选择标签滚动到起始位置,这里我们通过useRef获取bScroll,调用scrollToElement方法来实现。
const scrollRef = useRef()
const clickItem = useCallback(
    (id, event) => {
      const bScroll = scrollRef.current.getBScroll()
      bScroll.scrollToElement(event.target, 800)
      onChange(id)
    },
    // eslint-disable-next-line react-hooks/exhaustive-deps
    [],
)
新闻列表
实现新闻列表组件我们也需要使用scroll组件,但是现有的scroll组件的功能并不能满足我们的需求,所以我们先对scroll组件进行扩展。
新闻列表,我们需要用到下拉刷新功能,所以我们需要安装@better-scroll/pull-down插件,先运行yarn add @better-scroll/pull-down,然在scroll组件中使用
BScroll.use(PullDown)
const scroll = new BScroll(scrollContaninerRef.current, {
  scrollX: direction === "horizental",
  scrollY: direction === "vertical",
  bounceTime,
  pullDownRefresh: !!pullDown && {
    threshold,
    stop
  },
  probeType: 3,
  click: click,
  bounce:{
    top: bounceTop,
    bottom: bounceBottom
  }
});
BScroll.use(PullDown)是在better-scroll中使用下拉刷新插件,pullDownRefresh用于配置下拉参数,如果是null则不开启下拉刷新功能,threshold表示配置顶部下拉的距离来决定刷新时机,stop表示回弹停留的距离。然后再监听pullingDown事件,监听到下拉刷新被触发的时候,执行父组件传递过来的事件。
useEffect(() => {
    if (!bScroll || !pullDown) return
    bScroll.on('pullingDown', () => {
      pullDownDebounce();
    })
    return () => {
      bScroll.off('pullingDown')
    }
}, [bScroll, pullDown, pullDownDebounce])
整理一下下拉刷新的整个流程:
- 首先我们会先下拉一段距离,但是这个过程只有交互,并不会触发刷新事件
- 当我们释放列表并且下拉距离足够,此时会触发下拉事件,我们会想后台发送请求并获取数据
- 获取数据时,列表处于加载中的状态,但成功获取数据后,列表才会回到初始位置,结束下拉刷新这个过程
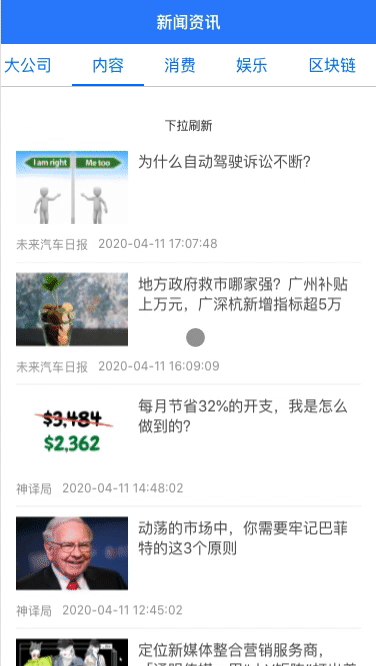
下拉的过程是插件自己处理的,触发刷新事件,由我们监听pullingDown事件,然后调用相关的方法获取数据,获取数据成功后,列表回弹也需要我们调用bScroll的finishPullDown方法来进行触发,所以在新闻列表组件中,我们需要能够使用ref:
const NewsList = forwardRef((props, ref) => {
  useImperativeHandle(ref, () => ({
      finishPullDown () {
        const bScroll = scrollRef.current.getBScroll()
        setIsPullingDown(false)
        setTimeout(() => {
          bScroll.finishPullDown()
          setBeforePullDown(true)
          bScroll.refresh()
        }, BOUNCE_TIME - 100);
      }
  }))
  return ()
})
新闻详情
新闻详情使用和列表页相似的布局方式,标题栏使用固定高度,内容区域设置为flex: 1,内容区域设置为overflow: auto;。
新闻的内容是富文本,我们需要使用使用dangerouslySetInnerHTML进行设置。
页面路由
react-router-dom
页面路由我们使用react-router-dom
import { BrowserRouter, Switch, Route } from "react-router-dom";
<BrowserRouter>
  <Switch>
    <Route exact path="/">
      <Home></Home>
    </Route>
    <Route path="/detail/:id">
      <Detail></Detail>
    </Route>
  </Switch>
</BrowserRouter>
Route组件必须放在Switch中,BrowserRouter控制路径的类型,BrowserRouter表示路径的浏览器路径形式,相对的HashRouter表示hash形式的路径。Route中的exact比较重要,如果没有设置exact,则所有路径都会匹配path="/",exact表示需要完全匹配路由,没有配置exact只有部分匹配就可以。
我们再在新闻列表中,给每条新闻信息加上<Link to={"/detail/" + post_id }></Link>标签,控制跳转对应的新闻详情页。
详情页面我们需要获取路由中的信息,react-router-dom提供了相应的hooks--useParams,通过useParams,我们可以获取路由中的商品id信息。在详情页面我们需要控制路由返回上一个页面,我们可以使用react-router-dom的useHistory,获取history,然后调用history的goBack方法。
react-keep-alive
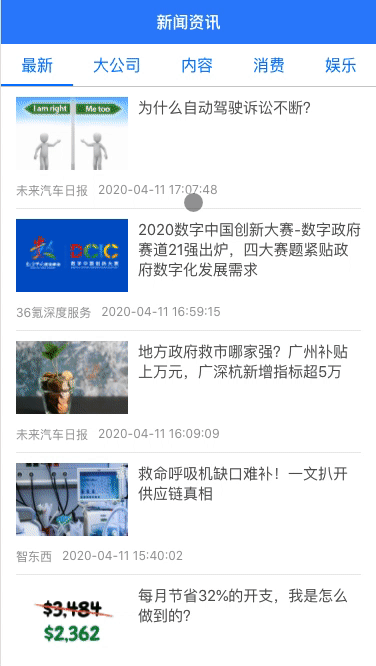
至此功能我们已经实现了,但是体验不是很友好,一般通过列表进入详情,然后返回列表时,我们希望列表停留在原本的位置,而不会每次都回到顶部。这个需求类似于vue中的keep-alive,但是react官方并没有实现,所以我们使用第三方组件react-keep-alive。
import { Provider as KeepAliveProvider, KeepAlive } from 'react-keep-alive';
<BrowserRouter>
    <KeepAliveProvider>
      <Switch>
        <Route exact path="/">
          <KeepAlive name="home">
            <Home></Home>
          </KeepAlive>
        </Route>
        <Route path="/detail/:id">
          <Detail></Detail>
        </Route>
      </Switch>
    </KeepAliveProvider>
</BrowserRouter>

状态管理
我们使用redux来实现状态管理,使用到的库有redux、react-redux、redux-thunk。
使用redux我们先要明确两个概念action和reducer。在redux中action是一个描述事件的简单对象,是redux中唯一能改变state的方法,action对象中应该包含type属性用来表示将要执行的动作,我们使用常量定义动作名称,然后把定义的常量统一放到constants.js中。reducer负责告诉redux如何更新state,reducer应当是一个纯函数,它接受旧的state和action,然后返回新的state。
reducer要求是纯函数,所以定义reducer时我们需要注意:
- 不要修改传入的参数(state和action)
- 不要执行有副作用的方法(API请求或者页面跳转)
- 不要调用非纯函数(Date.now、Math.random)
redux实现状态管理与框架无关,结合react使用,我们一般会使用到react-redux。
react-redux利用了react的Provider实现全局状态管理。
import { Provider } from "react-redux";
import store from "./store/index";
function App() {
  return (
    <Provider store={store}>
    </Provider>
  );
}

export default App;
将store数据注入到项目中之后,在需要操作使用数据的地方,使用connect,将使用到的方法和数据放入组件的props。
import {connect} from 'react-redux';
import { refreshList, loadList, changeSelectedNewsId } from "../../store/actions";
const mapStateToProps = (state) => ({
  list: state.list,
  newsId: state.newsId
})

const mapDispatchToProps = (dispatch) => ({
  refresh: () => dispatch(refreshList()),
  load: () => dispatch(loadList()),
  changeSelectedNewsId: (id) => dispatch(changeSelectedNewsId(id)),
})

export default connect(mapStateToProps, mapDispatchToProps)(React.memo(Home))
redux默认是同步操作的,往往项目中我们需要进行很多异步的操作,此时我们就需要用到redux-thunk。
export const getNewsDetail = (query) => {
  return dispatch => {
    return getDetail(query).then(data => {
      dispatch(changeCurrentNews(data))
    })
  }
}