

目录
- 1 简介
- 2 自动打开 NumLock
- 3 系统快照
- 4 国内源设置
- 5 安装yaourt以及pacaur
- 6 软件安装时下载加速
- 7 安装被锁定的问题
- 8 升级系统
- 9 常见的软件安装
- 9.1 pacman 基本用法
- 9.2 安装中文输入法
- 9.3 安装字体
- 9.4 安装vim
- 9.5 安装markdown编辑器
- 9.6 安装git
- 9.7 安装smartGit
- 9.8 安装图形化的解压软件
- 9.9 安装bat替代cat
- 9.10 安装护眼软件红移redshift
- 9.11 安装gnome磁盘管理
- 9.12 安装截图软件(可编辑)
- 9.13 安装google浏览器
- 9.14 安装uGet
- 9.15 安装网易云音乐
- 9.16 安装osdlyrics(本地音乐播放器显示歌词需要)
- 9.17 安装WPS-office
- 9.18 安装有道词典
- 9.19 安装ClamAV
- 9.20 安装sublime-text-3
- 9.21 安装虚拟机
- 9.22 安装QQ
- 9.23 安装Tim
- 9.24 安装微信
- 9.25 安装oh my zsh
- 10 XFCE图标主题美化
- 11 优化系统启动速度
- 12 将npm的注册表源设置为国内的镜像
- 13 问题与解决
- 附录I:/etc/pacman.conf
- 附录II:/etc/makepkg.conf
- 附录III:/etc/pacman.d/mirrorlist
- 附录IV:.zshrc
manjaro xfce 18.0 踩坑记录
1 简介 1.1 Manjaro Linux 1.2 开发桌面环境 2 自动打开 NumLock 3 系统快照 3.1 安装timeshift 3.2 使用timeshift创建系统快照 4 国内源设置 4.1 manjaro官方软件仓库 4.1.1 自动寻找最快的源 4.1.2 选择源 4.1.3 更新源 4.2 非官方仓库(Arch Linux 中文社区仓库) 4.2.1 手动添加archlinuxcn清华源 4.2.2 更新源 4.2.3 安装archlinuxcn-keyring包导入GPG key: 4.2.4 再次更新源 5 安装yaourt以及pacaur 6 软件安装时下载加速 6.1 使用aria2c多线程多链接加速 6.1.1 安装aria2c 6.1.2 配置pacman多线程多链接加速 6.1.3 配置yaourt多线程多链接加速 6.2 使用Axel单线程多链接加速 6.2.1 安装axel 6.2.2 配置pacman单线程多链接加速 6.2.3 配置yaourt单线程多链接加速 6.2.4 然后更新数据源 7 安装被锁定的问题 8 升级系统 9 常见的软件安装 9.1 pacman 基本用法 9.1.1 安装软件 9.1.2 删除软件 9.1.3 清空缓存 9.1.4 查询 9.1.5 同步文件数据库 9.1.6 升级系统 9.2 安装中文输入法 9.3 安装字体 9.4 安装vim 9.4.1 超强vim配置 9.5 安装markdown编辑器 9.6 安装git 9.7 安装smartGit 9.8 安装图形化的解压软件 9.9 安装bat替代cat 9.10 安装护眼软件红移redshift 9.11 安装gnome磁盘管理 9.12 安装截图软件(可编辑) 9.13 安装google浏览器 9.14 安装uGet 9.15 安装网易云音乐 9.16 安装osdlyrics(本地音乐播放器显示歌词需要) 9.17 安装WPS-office 9.18 安装有道词典 9.19 安装ClamAV 9.20 安装sublime-text-3 9.21 安装虚拟机 9.22 安装QQ 9.23 安装Tim 9.24 安装微信 9.24.1 命令直接安装 9.24.2 源码编译安装 9.24.3 使用发布版 9.25 安装oh my zsh 9.25.1 查看系统是否安装了zsh 9.25.2 查看系统当前使用的shell 9.25.3 切换shell为zsh 9.25.4 下载安装 oh my zsh 9.25.5 配置oh my zsh 10 XFCE图标主题美化 10.1 安装图标 10.2 安装主题 10.3 设置 11 优化系统启动速度 12 将npm的注册表源设置为国内的镜像 13 问题与解决 13.1 安装中遇到的问题 13.2 警告:xxx本地比xxx的版本更新 13.2.1 解决办法 13.3 aria2c下载xxx.db.sig出现错误 13.3.1 解决办法 13.4 错误:无法注册 ‘archlinuxcn’ 数据库 (数据库已登记) 附录I:/etc/pacman.conf 附录II:/etc/makepkg.conf 附录III:/etc/pacman.d/mirrorlist 附录IV:.zshrc
返回顶部1 简介
1.1 Manjaro Linux
Manjaro Linux是一个基于Arch Linux的发行版,继承了后者轻快、滚动式更新、 AUR软件多的==优点==,同时又改善了后者对新手不友好、软件包过于激进、不够稳定的==缺点==,是最能拿来用、最好用的Linux发行版。
它不仅开箱即用,界面人性化, 轻快不卡慢,稳定无崩溃,安静无弹窗,最最可喜的是软件超多!相信你用了Manjaro之后,再不会折腾、也不会再抛弃这个发行版了。
1.2 开发桌面环境
我对桌面环境的需求次序(优先级由高到低):
系统性能好,占用资源少——》软件数量多——》对用户友好,易安装,易使用——》界面美观
-
性能
对系统性能的要求,必须要足够好,占用资源少,给开发留下的资源越多越好。
作为一个开发者(程序员),想要提工作高效率,对系统性能的要求几乎达到苛刻的地步。
因为开发者在处理一个问题时,动则要调用大量工具,或者同时打开十几、几十、上百个网页来搜索网上的解决方案,而firefox或chrome等上网工具都是吃内存大户(牺牲空间复杂度换来快速的时间复杂度),有时候必须牺牲一些后台程序以加快系统速度适应开发者的需要。
而Manjaro Linux发行版和Xfce桌面都具有快速、轻量、加载程序快速、占用的系统资源少的优点。
-
软件
为了节省不必要的折腾时间,开发者手头上的工具是越多越好、越容易获取越好。
centos、slackware这些软件奇缺或者需要非常复杂的途径才能找到安装源的系统就没必要尝试了。
ubuntu系软件比较丰富,但QQ/TIM这样的基本软件还需要折腾一番,还未必能稳定使用。
arch linux系软件包异常丰富,无情碾压deb和rpm系诸多发行版,例如manjaro下可以一条命令安装好无比稳定、功能全面的deepinwine-tim或deepinwine-qq。
-
对用户友好
对任何一个工作者来说,时间就是衡量一切价值的标准,节省时间就是延长生命尺度。拿archlinux为反面典型,虽然其性能高可以节省工作时间,但是如果安装它都要从头开始学习ABC,那价值就大打折扣。就安装系统的便捷性来说,archlinux、gentoo、lfs这样的系统真没必要尝试。
-
界面外观
为了性能,必须牺牲酷炫的外观,过炫的桌面影响桌面性能;但是过于简单的桌面需要花时间配置还不一定能完全配置好,也是影响工作效率。所以,外观普通即可,默认桌面选择xfce4、lxde、mate甚至仿制windows界面都是不错的。
综合考虑下,以下是我对一些发行版及桌面的排序(仅代表个人观点):
- 发行版:
manjaro——》mint——》ubuntu——》debian——》其他
- 桌面环境
xfce 4——》mate/gnome-classic——》cinnamon——》lxde——》其他
我选择的开发桌面环境:
- manjaro-xfce-18.0-stable(第一选择)
- linuxmint-19-xfce
- ubuntu-16.04.5-desktop
2 自动打开 NumLock
确保已经安装 numlockx, 然后编辑 /etc/lightdm/lightdm.conf文件,在末尾添加以下几行:
1[Seat:*]
2greeter-setup-script=/usr/bin/numlockx on
3 系统快照
3.1 安装timeshift
sudo pacman -S timeshift
3.2 使用timeshift创建系统快照

4 国内源设置
4.1 manjaro官方软件仓库
4.1.1 自动寻找最快的源
sudo pacman-mirrors -i -c China -m rank
点击查看详细内容
 1
 2[elinuxboy@mjro18xfce ~]$ sudo pacman-mirrors -i -c China -m rank
 3.: INFO Downloading mirrors from repo.manjaro.org
 4.: INFO Using default mirror file
 5.: INFO Querying mirrors - This may take some time
 6   0.867 China          : https://mirrors.ustc.edu.cn/manjaro/
 7   0.557 China          : http://mirrors.tuna.tsinghua.edu.cn/manjaro/
 8   0.861 China          : https://mirrors.zju.edu.cn/manjaro/
 9   0.727 China          : https://mirrors.sjtug.sjtu.edu.cn/manjaro/
10<br>
11.: INFO User generated mirror list
12--
13.: INFO Custom mirror file saved: /var/lib/pacman-mirrors/custom-mirrors.json
14.: INFO Writing mirror list
15   China           : http://mirrors.tuna.tsinghua.edu.cn/manjaro/stable/$repo/$a
16.: INFO Mirror list generated and saved to: /etc/pacman.d/mirrorlist
17[elinuxboy@mjro18xfce ~]$
18<br>
19
4.1.2 选择源
在弹出窗口中选择排第一位的源(这里选择清华大学tsinghua的源)然后点击“OK”,再次单击“确定”即可选择好最快的源。

4.1.3 更新源
sudo pacman -Sy
4.2 非官方仓库(Arch Linux 中文社区仓库)
Arch Linux 中文社区仓库 是由 Arch Linux 中文社区驱动的非官方用户仓库。包含中文用户常用软件、工具、字体/美化包等。
完整的包信息列表(包名称/架构/维护者/状态)请 点击这里 查看。
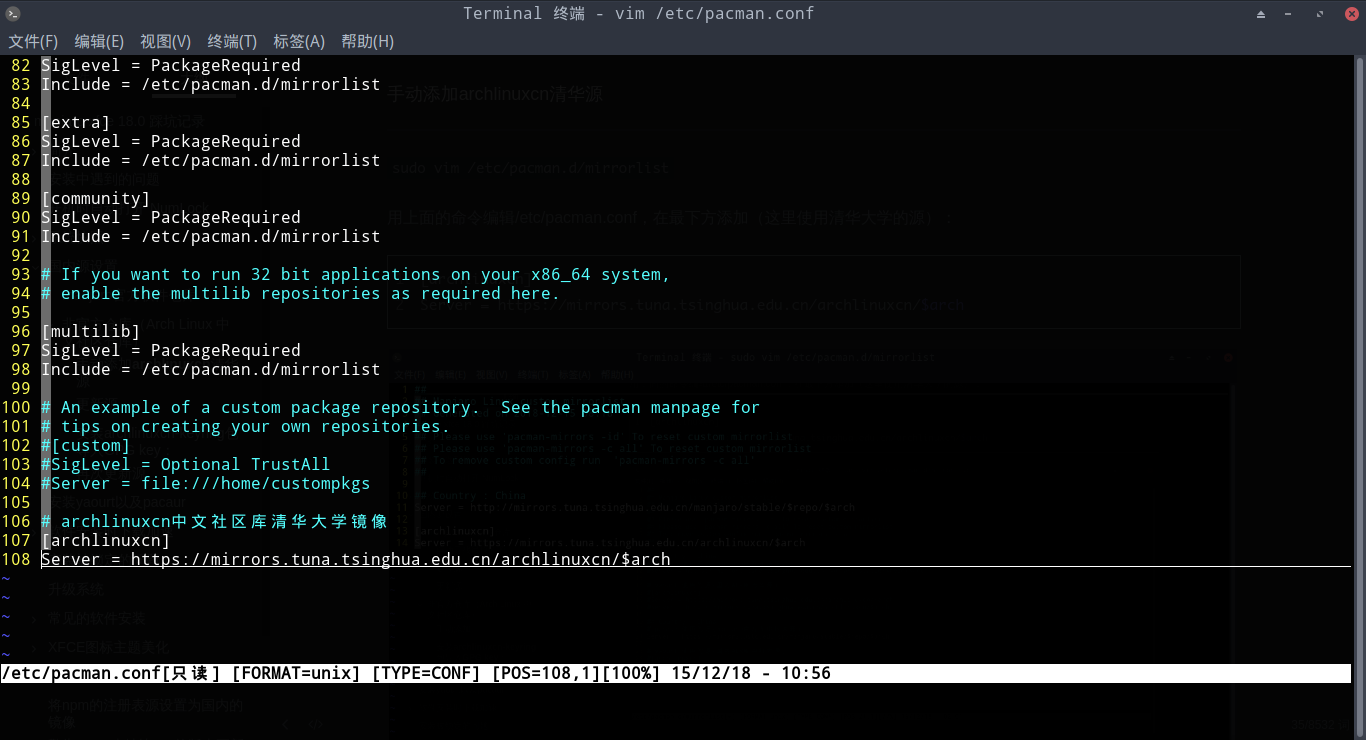
4.2.1 手动添加archlinuxcn清华源
sudo vim /etc/pacman.conf
用上面的命令编辑/etc/pacman.conf,在最下方添加(这里使用清华大学的源):
1[archlinuxcn]
2Server = https://mirrors.tuna.tsinghua.edu.cn/archlinuxcn/$arch
详情参见附录I。

4.2.2 更新源
sudo pacman -Sy
4.2.3 安装archlinuxcn-keyring包导入GPG key:
sudo pacman -S archlinuxcn-keyring
4.2.4 再次更新源
sudo pacman -Sy
5 安装yaourt以及pacaur
为了安装使用AUR方便,也可以额外安装yaourt以及pacaur
sudo pacman -S yaourt pacaur
注意:使用使用yaourt安装软件时:
返回顶部a.不需要使用sudo否则报root错误;
b.在提示调用vim时 输入vim然后回车;
c.如果不想输入vim: 修改~/.zshrc 文件文件最后加入export VISUAL=“vim” 即可。
6 软件安装时下载加速
设置替换wget或者curl下载命令。以下在配置时,aria2c和axel使用其中一种即可(这里使用aria2c)。
6.1 使用aria2c多线程多链接加速
aria2c 是一个自由、开源、轻量级多协议和多源的命令行下载工具。
aria2c 支持 HTTP/HTTPS、FTP、SFTP、 BitTorrent 和 Metalink 协议。
aria2c 可以通过内建的 JSON-RPC 和 XML-RPC 接口来操纵。
aria2c 下载文件的时候,自动验证数据块。它可以通过多个来源或者多个协议下载一个文件,并且会尝试利用你的最大下载带宽。
aria2c 支持多线程,可以使用多个源或协议下载文件,确实可以加速并尽可能多的完成下载。
6.1.1 安装aria2c
sudo pacman -Sy aria2c
6.1.2 配置pacman多线程多链接加速
编辑pacman配置文件/etc/pacman.conf,找到Xfercommand修改成如下:
1......
2# aria2c 多线程多链接
3XferCommand = /usr/bin/aria2c --allow-overwrite=true --log-level=error -l aria2c-error.log -c -m2 -x 8 -s 8 -j 8 -d $(dirname %o) -o $(basename %o) %u
4......
6.1.3 配置yaourt多线程多链接加速
编辑makepkg配置文件/etc/makepkg.conf,找到DLAGENTS修改成如下
点击查看详细内容
 1
 2......
 3#DLAGENTS=('file::/usr/bin/curl -gqC - -o %o %u'
 4#          'ftp::/usr/bin/curl -gqfC - --ftp-pasv --retry 3 --retry-delay 3 -o %o %u'
 5#          'http::/usr/bin/curl -gqb "" -fLC - --retry 3 --retry-delay 3 -o %o %u'
 6#          'https::/usr/bin/curl -gqb "" -fLC - --retry 3 --retry-delay 3 -o %o %u'
 7#          'rsync::/usr/bin/rsync --no-motd -z %u %o'
 8#          'scp::/usr/bin/scp -C %u %o')
 9#aria2c 多线程多链接
10DLAGENTS=('file::/usr/bin/aria2c --allow-overwrite=true --log-level=error -l aria2c-error.log -c -m2 -x 8 -s 8 -j 8 %u -o %o'
11        'ftp::/usr/bin/aria2c --allow-overwrite=true --log-level=error -l aria2c-error.log -c -m2 -x 8 -s 8 -j 8 %u -o %o'
12        'http::/usr/bin/aria2c --allow-overwrite=true --log-level=error -l aria2c-error.log -c -m2 -x 8 -s 8 -j 8 %u -o %o'
13        'https::/usr/bin/aria2c --allow-overwrite=true --log-level=error -l aria2c-error.log -c -m2 -x 8 -s 8 -j 8 %u -o %o'
14        'rsync::/usr/bin/rsync --no-motd -z %u %o'
15        'scp::/usr/bin/scp -C %u %o')
16......
17<br>
18
详情请参见附录II。
6.2 使用Axel单线程多链接加速
Axel 是一个轻量级下载程序,它和其他加速器一样,对同一个文件建立多个连接,每个连接下载单独的文件片段以更快地完成下载。
Axel 支持 HTTP、HTTPS、FTP 和 FTPS 协议。它也可以使用多个镜像站点下载单个文件,所以,Axel 可以加速下载高达 40%(大约,我个人认为)。它非常轻量级,因为它没有依赖并且使用非常少的 CPU 和内存。
Axel 一步到位地将所有数据直接下载到目标文件(LCTT 译注:而不是像其它的下载软件那样下载成多个文件块,然后拼接)。
注意:不支持在单条命令中下载两个文件。
6.2.1 安装axel
sudo pacman -S axel
6.2.2 配置pacman单线程多链接加速
编辑pacman配置文件/etc/pacman.conf,找到Xfercommand修改成如下:
1......
2# axel 单线程多链接
3XferCommand = /usr/bin/axel -a -n 16 %u -o %o
4......
6.2.3 配置yaourt单线程多链接加速
编辑makepkg配置文件/etc/makepkg.conf,找到DLAGENTS修改成如下
点击查看详细内容
 1
 2......
 3#DLAGENTS=('file::/usr/bin/curl -gqC - -o %o %u'
 4#          'ftp::/usr/bin/curl -gqfC - --ftp-pasv --retry 3 --retry-delay 3 -o %o %u'
 5#          'http::/usr/bin/curl -gqb "" -fLC - --retry 3 --retry-delay 3 -o %o %u'
 6#          'https::/usr/bin/curl -gqb "" -fLC - --retry 3 --retry-delay 3 -o %o %u'
 7#          'rsync::/usr/bin/rsync --no-motd -z %u %o'
 8#          'scp::/usr/bin/scp -C %u %o')
 9#axel 单线程多链接
10DLAGENTS=('file::/usr/bin/axel -a -n 16 %u -o %o'
11        'ftp::/usr/bin/axel -a -n 16 %u -o %o'
12        'http::/usr/bin/axel -a -n 16 %u -o %o'
13        'https::/usr/bin/axel -a -n 16 %u -o %o'
14        'rsync::/usr/bin/rsync --no-motd -z %u %o'
15        'scp::/usr/bin/scp -C %u %o')
16......
17<br>
18
6.2.4 然后更新数据源
sudo pacman -Syy
7 安装被锁定的问题
注意:出现无法锁定database的错误时,在确认没有安装任务时运行以下命令删除锁定:
sudo rm /var/lib/pacman/db.lck
8 升级系统
sudo pacman -Syu
或者
yaourt -Syu
9 常见的软件安装
9.1 pacman 基本用法
9.1.1 安装软件
 1# 安装或者升级单个软件包,或者一列软件包(包含依赖包),使用如下命令:
 2sudo pacman -S pkg_name1 pkg_name2 ...
 3
 4# 安装一个本地包(不从源里下载):
 5sudo pacman -U /path/to/package/package_name-version.pkg.tar.xz
 6
 7# 安装一个远程包(不在 pacman 配置的源里面):
 8sudo pacman -U http://www.example.com/repo/example.pkg.tar.xz
 9
10# 下载包而不安装它:
11sudo pacman -Sw pkg_name
9.1.2 删除软件
 1# 删除指定安装包,但是保留其全部已安装的依赖关系
 2sudo pacman -R pkg_name
 3
 4# 删除指定软件包,以及没有被其他已安装软件包使用的依赖关系。
 5sudo pacman -Rs pkg_name
 6
 7# 删除软件包和所有依赖这个软件包的程序:
 8# 警告: 此操作是递归的,请小心检查,可能会一次删除大量的软件包。
 9sudo pacman -Rsc pkg_name
10
11# 删除软件包,但是不删除依赖这个软件包的其他程序:
12sudo pacman -Rdd pkg_name
9.1.3 清空缓存
1# 清除未安装软件包的缓存
2sudo pacman -Sc
9.1.4 查询
 1# 在包数据库中查询软件包,查询位置包含了软件包的名字和描述(不指定string,则列出所有已安装的包):
 2pacman -Ss string1 string2 ...
 3
 4# 查询包含某个文件的包名
 5pacman -Fs pkg_name
 6
 7# 查询远程库中软件包包含的文件:
 8pacman -Fl pkg_name
 9
10# 获取已安装软件包所包含文件的列表:
11pacman -Ql pkg_name
12
13# 查询已安装的软件包(不指定string,则列出所有已安装的包):
14pacman -Qs string1 string2 ...
15
16# 显示软件包的详尽的信息:
17sudo pacman -Si pkg_name
18
19# 查询本地安装包的详细信息:
20sudo pacman -Qi pkg_name
9.1.5 同步文件数据库
1# 同步文件数据库:
2sudo pacman -Fy
9.1.6 升级系统
1# 升级整个系统,这个命令会同步非本地(local)软件仓库并升级系统的软件包:
2sudo pacman -Syu
3
4# 升级系统时安装其他软件包:
5sudo pacman -Syu pkg_name1 pkg_name2 ...
6
7# 强制 pacman 刷新软件包列表,每次修改镜像之后都应该使用
8sudo pacman -Syyu
9.2 安装中文输入法
- 安装小企鹅fcitx:
fcitx安装后会默认安装了拼音和五笔输入法。
sudo pacman -S fcitx fcitx-im fcitx-configtool
需要修改配置文件 ~/.xprofile,添加如下语句:
1#fcitx
2export GTK_IM_MODULE=fcitx
3export QT_IM_MODULE=fcitx
4export XMODIFIERS="@im=fcitx"
-
安装其他中文输入法
谷歌拼音输入法
sudo pacman -S fcitx-googlepinyin
启动fcitx并设置输入法之后就可以使用中文输入法啦,如果异常请重新登录或者重启!!
9.3 安装字体
sudo pacman -S ttf-dejavu wqy-zenhei wqy-microhei ttf-monaco
要使用新安装的字体,需要再设置里自行选择。
- 设置——》外观——》字体——》选择默认字体和默认等宽字体
9.4 安装vim
sudo pacman -S vim
9.4.1 超强vim配置
项目地址:https://github.com/elinuxboy/vim-deprecated
使用下面的命令自动安装配置:
wget -qO- https://raw.githubusercontent.com/elinuxboy/vim-deprecated/master/setup.sh | sh -x
或者用另一种方式自动安装:
1wget https://raw.githubusercontent.com/elinuxboy/vim-deprecated/master/setup.sh
2chmod +x setup.sh
3./setup.sh
9.5 安装markdown编辑器
以下只需要使用其中一种或几种。
yaourt -S typora(推荐使用)
sudo pacman -S remarkable
yaourt -S haroopad
sudo pacman -S retext
9.6 安装git
sudo pacman -S git
设置个人github信息
git config --global user.name "github昵称"
git config --global user.email "注册邮箱"
9.7 安装smartGit
一个Git客户端。archlinux/manjaro的主源里就有它。
yaout -S smartgit
9.8 安装图形化的解压软件
sudo pacman -S p7zip file-roller unrar
9.9 安装bat替代cat
sudo pacman -S bat
9.10 安装护眼软件红移redshift
sudo pacman -S redshift
9.11 安装gnome磁盘管理
sudo pacman -S gnome-disk-utility
9.12 安装截图软件(可编辑)
yaourt -S hotshots
注意:因为网络问题,这里可能需要对PKGBUILD做一些修改,将http改为https。
9.13 安装google浏览器
sudo pacman -S google-chrome
9.14 安装uGet
Linux 下最好的下载管理器
sudo pacman -S uget
9.15 安装网易云音乐
yaourt -S netease-cloud-music
9.16 安装osdlyrics(本地音乐播放器显示歌词需要)
sudo pacman -S osdlyrics
9.17 安装WPS-office
sudo pacman -S wps-office
9.18 安装有道词典
有道词典。
yaourt -S youdao-dict
9.19 安装ClamAV
Clam 防病毒软件(命令行)
sudo pacman -S clamav
Clam 防病毒软件(客户端)
sudo pacman -S clamtk
9.20 安装sublime-text-3
输入法修复版本
yaourt -S sublime-text-3-imfix
如果默认的拼音输入法还是无法使用,需要安装其他中文输入法。如谷歌拼音/搜狗拼音等。
9.21 安装虚拟机
yaourt -S vmware-workstation
注意:如果出现vmmod找不到的问题,需要安装linux-headers后再一次安装,之后重新登陆后即可。
9.22 安装QQ
yaourt -S deepin.com.qq.im
9.23 安装Tim
yaourt -S deepin.com.qq.office
9.24 安装微信
微信,公认最好的,是electronic-wechat。
9.24.1 命令直接安装
yaourt -S electronic-wechat
9.24.2 源码编译安装
在下载和运行这个项目之前,你需要在电脑上安装 Git 和 Node.js (来自 npm)。在命令行中输入:
- 下载仓库
git clone https://github.com/geeeeeeeeek/electronic-wechat.git
- 进入源码目录
cd electronic-wechat
- 安装, 运行应用
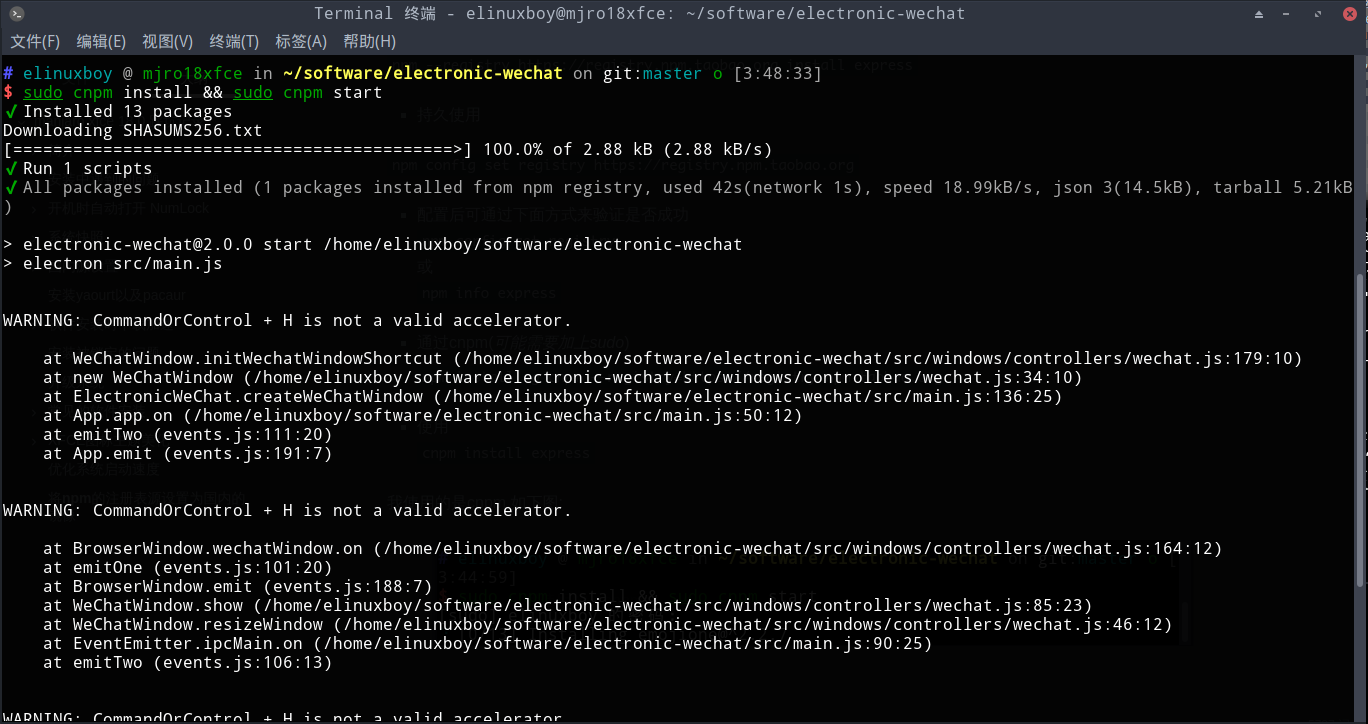
sudo npm install && sudo npm start
- 根据你的平台打包应用:
sudo npm run build:linux
9.24.3 使用发布版
1tar xvf electronic-wechat-linux-x64.tar.gz
2cd electronic-wechat-linux-x64
3./electronic-wechat %U
可以给他添加快捷方式
9.25 安装oh my zsh
9.25.1 查看系统是否安装了zsh
cat /etc/shells
1# Pathnames of valid login shells.
2# See shells(5) for details.
3
4/bin/sh
5/bin/bash
6/bin/zsh
7/usr/bin/zsh
8/usr/bin/git-shell
-
如果已经安装zsh,则会多出来以下条目
1/bin/zsh
2/usr/bin/zsh
9.25.2 查看系统当前使用的shell
1----
$ echo $SHELL
1/bin/bash
9.25.3 切换shell为zsh
$ chsh -s /bin/zsh
如果要切换回去bash:
chsh -s /bin/bash
重启生效,如下所示:
点击查看详细内容
 1
 2......
 3This is the Z Shell configuration function for new users,
 4zsh-newuser-install.
 5You are seeing this message because you have no zsh startup files
 6(the files .zshenv, .zprofile, .zshrc, .zlogin in the directory
 7~).  This function can help you with a few settings that should
 8make your use of the shell easier.
 9<br>
10You can:
11<br>
12(q)  Quit and do nothing.  The function will be run again next time.
13<br>
14(0)  Exit, creating the file ~/.zshrc containing just a comment.
15     That will prevent this function being run again.
16<br>
17(1)  Continue to the main menu.
18<br>
19--- Type one of the keys in parentheses --- 0
20mjroXfce18%
21<br>
22
- 查看当前shell
$ echo $SHELL
1/bin/zsh
9.25.4 下载安装 oh my zsh
wget https://github.com/robbyrussell/oh-my-zsh/raw/master/tools/install.sh -O - | sh
完成后如下所示:
点击查看详细内容
 1
 2......
 3Looking for an existing zsh config...
 4Found ~/.zshrc. Backing up to ~/.zshrc.pre-oh-my-zsh
 5Using the Oh My Zsh template file and adding it to ~/.zshrc
 6         __                                     __
 7  ____  / /_     ____ ___  __  __   ____  _____/ /_
 8 / __ \/ __ \   / __ `__ \/ / / /  /_  / / ___/ __ \
 9/ /_/ / / / /  / / / / / / /_/ /    / /_(__  ) / / /
10\____/_/ /_/  /_/ /_/ /_/\__, /    /___/____/_/ /_/
11                        /____/                       ....is now installed!
12<br>
13<br>
14Please look over the ~/.zshrc file to select plugins, themes, and options.
15<br>
16p.s. Follow us at https://twitter.com/ohmyzsh.
17<br>
18p.p.s. Get stickers and t-shirts at https://shop.planetargon.com.
19<br>
20mjroXfce18%
21<br>
22
9.25.5 配置oh my zsh
- 安装autojump自动跳转插件
1sudo pacman -S autojump
2echo ". /usr/share/autojump/autojump.zsh" >> ${ZDOTDIR:-$HOME}/.zshrc
3source .zshrc
- 安装zsh-syntax-highlighting语法高亮插件
1git clone https://github.com/zsh-users/zsh-syntax-highlighting.git $ZSH_CUSTOM/plugins/zsh-syntax-highlighting
2echo "source $ZSH_CUSTOM/plugins/zsh-syntax-highlighting/zsh-syntax-highlighting.zsh" >> ${ZDOTDIR:-$HOME}/.zshrc
3source .zshrc
- 安装zsh-autosuggestions语法历史记录插件
1git clone https://github.com/zsh-users/zsh-autosuggestions.git $ZSH_CUSTOM/plugins/zsh-autosuggestions
2echo "source $ZSH_CUSTOM/plugins/zsh-syntax-highlighting/zsh-syntax-highlighting.zsh" >> ${ZDOTDIR:-$HOME}/.zshrc
3source .zshrc
- 安装自动补全插件incr
1cd $ZSH_CUSTOM/plugins
2mkdir incr
3cd incr
4wget http://mimosa-pudica.net/src/incr-0.2.zsh
5echo "source $ZSH_CUSTOM/plugins/incr/incr*.zsh" >> ${ZDOTDIR:-$HOME}/.zshrc
6source .zshrc

详细的.zshrc请参见附录IV。
- 修改主题
修改.zshrc文件
1vim ~.zshrc
找到ZSH_THEME=“robbyrussell”,修改为:ZSH_THEME=“ys”;
1......
2ZSH_THEME="ys"
3......
更新配置
1source .zshrc
10 XFCE图标主题美化
10.1 安装图标
yaourt -S numix-circle-icon-theme-git
sudo pacman -S papirus-icon-theme
10.2 安装主题
sudo pacman -S arc-gtk-theme
10.3 设置
- 主题:设置——》外观——》样式——》arc
- 图标:设置——》外观——》图标——》numix circle
11 优化系统启动速度
Arch Linux 的 systemd-analyze 是个很不错的工具,利用它你可以很直观地观察到系统启动的时间都花到哪儿去了:
systemd-analyze
我注意到打开 AHCI 后,内核和用户空间的载入速度明显提高了,总启动时间从约 30 秒缩短到 20 秒,效果非常明显。
用下面这个命令,可以了解到是什么东西启动最慢:
systemd-analyze blame
此外,还可以把启动过程绘制成 SVG 图表供你审阅(用 GNOME 的图片预览或 Chrome 浏览器都可以打开),这个图表中你还可以观察到是否有启动慢的组件影响到了依赖它的组件的启动:
systemd-analyze plot > plot.svg
12 将npm的注册表源设置为国内的镜像
国内用户,建议将npm的注册表源设置为国内的镜像,可以大幅提升安装速度。
- 淘宝npm镜像
搜索地址:npm.taobao.org/
registry地址:registry.npm.taobao.org/
- cnpmjs镜像
搜索地址:cnpmjs.org/
registry地址:r.cnpmjs.org/
- 临时使用
npm --registry https://registry.npm.taobao.org install express
- 持久使用
npm config set registry https://registry.npm.taobao.org
-
配置后可通过下面方式来验证是否成功
npm config get registry
或
npm info express -
通过cnpm(可能需要加上sudo)
npm install -g cnpm --registry=https://registry.npm.taobao.org -
使用
cnpm install express
我使用的是cnpm.如下图:
13 问题与解决
13.1 安装中遇到的问题
-
安装时一直停在“正在加载位置数据”
解决办法:先把网络连接都断开,再启动安装,等地图位置加载完成后,再联网继续安装。
13.2 警告:xxx本地比xxx的版本更新
例如,加入archlinuxcn中文社区库后,执行sudo pacman -Syu升级系统后,出现如下问题:
1......
2警告:cower:本地 (18-2) 比 extra 的版本更新 (18-1)
3警告:inxi:本地 (3.0.29-1) 比 community 的版本更新 (3.0.28-1)
4警告:lib32-qt4:本地 (4.8.7-14) 比 multilib 的版本更新 (4.8.7-13)
5警告:libxpresent:本地 (1.0.0+3+g9d31d21-1) 比 extra 的版本更新 (1.0.0+2+gdd6771c-1)
6警告:package-query:本地 (1.9-3) 比 extra 的版本更新 (1.9-2)
7......
13.2.1 解决办法
该问题一般出现在:启用了多个镜像(比如同时使用manjaro官方库和archlinuxcn中文社区库),或者刚切换了镜像,然后执行升级系统命令。
该问题可以忽略,因为archlinuxcn中文社区库里面的版本要比manjaro官方库里面的版本更新,升级后本地的版本就是使用archlinuxcn中文社区库里面的最新版本。
例如:
1$ pacman -Ss cower
2extra/cower 18-1 [已安装: 18-2]
3    A simple AUR agent with a pretentious name
4archlinuxcn/cower 18-2 [已安装]
5    A simple AUR agent with a pretentious name
当然,也可以给软件包降级:
-
使用pacman的临时文件(安装本地包)降级
如果一个新包刚刚被安装并且没有删除pacman cache,你可以在
/var/cache/pacman/pkg/中找到较早版本. 安装替换现有的版本.pacman会处理依赖包但不会处理依赖库的版本冲突。如果一个其依赖库因该包降级需要降级,你需要手动降级这些包。
pacman -U /var/cache/pacman/pkg/package-old_version.pkg.tar.xz -
使用远程包(安装远程包)降级
pacman -U http://www.example.com/repo/package-old_version.pkg.tar.xz
13.3 aria2c下载xxx.db.sig出现错误
点击查看aria2c下载xxx.db.sig错误的详细内容
   1
  2# elinuxboy @ mjro18xfce in ~ [7:53:20]
  3$ sudo pacman -Sy
  4[sudo] elinuxboy 的密码:
  5:: 正在同步软件包数据库...
  6<br>
  712/15 07:53:25 [NOTICE] Downloading 1 item(s)
  8<br>
  912/15 07:53:26 [NOTICE] 下载已完成:/var/lib/pacman/sync/core.db.part
 10<br>
 11下载结果:
 12gid   |stat|avg speed  |path/URI
 13======+====+===========+=======================================================
 14e48729|OK  |   589KiB/s|/var/lib/pacman/sync/core.db.part
 15<br>
 16状态标识:
 17(OK):下载已完成。
 18<br>
 1912/15 07:53:26 [NOTICE] Downloading 1 item(s)
 20<br>
 2112/15 07:53:26 [ERROR] CUID#7 - Download aborted. URI=https://mirrors.ustc.edu.cn/manjaro/stable/core/x86_64/core.db.sig
 22Exception: [AbstractCommand.cc:351] errorCode=3 URI=https://mirrors.ustc.edu.cn/manjaro/stable/core/x86_64/core.db.sig
 23  -> [HttpSkipResponseCommand.cc:219] errorCode=3 未找到资源
 24<br>
 2512/15 07:53:26 [NOTICE] GID 为 3ec1fe753480d611 的下载项未完成:/var/lib/pacman/sync/core.db.sig.part
 26<br>
 27下载结果:
 28gid   |stat|avg speed  |path/URI
 29======+====+===========+=======================================================
 303ec1fe|ERR |       0B/s|/var/lib/pacman/sync/core.db.sig.part
 31<br>
 32状态标识:
 33(ERR):发生错误。
 34<br>
 35重新启动aria2,自动继续下载文件
 36如果发生任何错误,请参阅日志文件。要了解详细信息,请在 help/man 页面中参阅“-l”选项。
 37<br>
 3812/15 07:53:28 [NOTICE] Downloading 1 item(s)
 39[#58174d 1.7MiB/1.8MiB(95%) CN:1 DL:1.0MiB]
 4012/15 07:53:30 [NOTICE] 下载已完成:/var/lib/pacman/sync/extra.db.part
 41<br>
 42下载结果:
 43gid   |stat|avg speed  |path/URI
 44======+====+===========+=======================================================
 4558174d|OK  |   1.0MiB/s|/var/lib/pacman/sync/extra.db.part
 46<br>
 47状态标识:
 48(OK):下载已完成。
 49<br>
 5012/15 07:53:30 [NOTICE] Downloading 1 item(s)
 51<br>
 5212/15 07:53:31 [ERROR] CUID#7 - Download aborted. URI=https://mirrors.ustc.edu.cn/manjaro/stable/extra/x86_64/extra.db.sig
 53Exception: [AbstractCommand.cc:351] errorCode=3 URI=https://mirrors.ustc.edu.cn/manjaro/stable/extra/x86_64/extra.db.sig
 54  -> [HttpSkipResponseCommand.cc:219] errorCode=3 未找到资源
 55<br>
 5612/15 07:53:31 [NOTICE] GID 为 5da8892ce4724c98 的下载项未完成:/var/lib/pacman/sync/extra.db.sig.part
 57<br>
 58下载结果:
 59gid   |stat|avg speed  |path/URI
 60======+====+===========+=======================================================
 615da889|ERR |       0B/s|/var/lib/pacman/sync/extra.db.sig.part
 62<br>
 63状态标识:
 64(ERR):发生错误。
 65<br>
 66重新启动aria2,自动继续下载文件
 67如果发生任何错误,请参阅日志文件。要了解详细信息,请在 help/man 页面中参阅“-l”选项。
 68<br>
 6912/15 07:53:33 [NOTICE] Downloading 1 item(s)
 70[#d66d80 4.5MiB/5.0MiB(90%) CN:1 DL:0.9MiB]
 7112/15 07:53:38 [NOTICE] 下载已完成:/var/lib/pacman/sync/community.db.part
 72<br>
 73下载结果:
 74gid   |stat|avg speed  |path/URI
 75======+====+===========+=======================================================
 76d66d80|OK  |   1.0MiB/s|/var/lib/pacman/sync/community.db.part
 77<br>
 78状态标识:
 79(OK):下载已完成。
 80<br>
 8112/15 07:53:38 [NOTICE] Downloading 1 item(s)
 82<br>
 8312/15 07:53:38 [ERROR] CUID#7 - Download aborted. URI=https://mirrors.ustc.edu.cn/manjaro/stable/community/x86_64/community.db.sig
 84Exception: [AbstractCommand.cc:351] errorCode=3 URI=https://mirrors.ustc.edu.cn/manjaro/stable/community/x86_64/community.db.sig
 85  -> [HttpSkipResponseCommand.cc:219] errorCode=3 未找到资源
 86<br>
 8712/15 07:53:38 [NOTICE] GID 为 44b66925e8f1286f 的下载项未完成:/var/lib/pacman/sync/community.db.sig.part
 88<br>
 89下载结果:
 90gid   |stat|avg speed  |path/URI
 91======+====+===========+=======================================================
 9244b669|ERR |       0B/s|/var/lib/pacman/sync/community.db.sig.part
 93<br>
 94状态标识:
 95(ERR):发生错误。
 96<br>
 97重新启动aria2,自动继续下载文件
 98如果发生任何错误,请参阅日志文件。要了解详细信息,请在 help/man 页面中参阅“-l”选项。
 99<br>
10012/15 07:53:40 [NOTICE] Downloading 1 item(s)
101<br>
10212/15 07:53:41 [NOTICE] 下载已完成:/var/lib/pacman/sync/multilib.db.part
103<br>
104下载结果:
105gid   |stat|avg speed  |path/URI
106======+====+===========+=======================================================
107a00c29|OK  |   722KiB/s|/var/lib/pacman/sync/multilib.db.part
108<br>
109状态标识:
110(OK):下载已完成。
111<br>
11212/15 07:53:41 [NOTICE] Downloading 1 item(s)
113<br>
11412/15 07:53:41 [ERROR] CUID#7 - Download aborted. URI=https://mirrors.ustc.edu.cn/manjaro/stable/multilib/x86_64/multilib.db.sig
115Exception: [AbstractCommand.cc:351] errorCode=3 URI=https://mirrors.ustc.edu.cn/manjaro/stable/multilib/x86_64/multilib.db.sig
116  -> [HttpSkipResponseCommand.cc:219] errorCode=3 未找到资源
117<br>
11812/15 07:53:41 [NOTICE] GID 为 96eb7b68d9be8b5d 的下载项未完成:/var/lib/pacman/sync/multilib.db.sig.part
119<br>
120下载结果:
121gid   |stat|avg speed  |path/URI
122======+====+===========+=======================================================
12396eb7b|ERR |       0B/s|/var/lib/pacman/sync/multilib.db.sig.part
124<br>
125状态标识:
126(ERR):发生错误。
127<br>
128重新启动aria2,自动继续下载文件
129如果发生任何错误,请参阅日志文件。要了解详细信息,请在 help/man 页面中参阅“-l”选项。
130<br>
131
13.3.1 解决办法
xxx.db.sig 缺失是 database 的签名缺失,这是正常的,现在都只验证 package 的签名,database 都不签名了。
在官方仓库和archlinuxcn中文社区库里已经没有xxx.db.sig文件了,所以当然下载不到。
13.4 错误:无法注册 ‘archlinuxcn’ 数据库 (数据库已登记)
1......
2error: could not register 'archlinuxcn' database (database already registered)
3error: could not register 'archlinuxcn' database (database already registered)
4error: could not register 'archlinuxcn' database (database already registered)
5could not register 'archlinuxcn' database (database already registered)
6错误:无法注册 'archlinuxcn' 数据库 (数据库已登记)
7错误:无法注册 'archlinuxcn' 数据库 (数据库已登记)
8错误:无法注册 'archlinuxcn' 数据库 (数据库已登记)
9......
该问题一般出现在添加archlinuxcn中文社区库的时候添加错文件了,应该是在这个文件“==/etc/pacman.conf==”后面添加archlinuxcn中文社区库,而不是在这个“/etc/pacman.d/mirrorlist”文件后添加。
附录I:/etc/pacman.conf
点击查看/etc/pacman.conf的详细内容
   1
  2#
  3# /etc/pacman.conf
  4#
  5# See the pacman.conf(5) manpage for option and repository directives
  6<br>
  7#
  8# GENERAL OPTIONS
  9#
 10[options]
 11# The following paths are commented out with their default values listed.
 12# If you wish to use different paths, uncomment and update the paths.
 13#RootDir     = /
 14#DBPath      = /var/lib/pacman/
 15CacheDir = /var/cache/pacman/pkg/
 16#LogFile     = /var/log/pacman.log
 17#GPGDir      = /etc/pacman.d/gnupg/
 18#HookDir     = /etc/pacman.d/hooks/
 19HoldPkg      = pacman glibc manjaro-system
 20# If upgrades are available for these packages they will be asked for first
 21SyncFirst    = manjaro-system archlinux-keyring manjaro-keyring
 22#XferCommand = /usr/bin/curl -C - -f %u > %o
 23#XferCommand = /usr/bin/wget --passive-ftp -c -O %o %u
 24# aria2c 多线程多链接
 25#XferCommand = /usr/bin/aria2c --allow-overwrite=true --log-level=error -l aria2c-error.log -c -m2 -x 8 -s 8 -j 8 -d $(dirname %o) -o $(basename %o) %u
 26#CleanMethod = KeepInstalled
 27#UseDelta    = 0.7
 28Architecture = auto
 29# 下载进度条吃豆子方式
 30ILoveCandy
 31<br>
 32# Pacman won't upgrade packages listed in IgnorePkg and members of IgnoreGroup
 33#IgnorePkg   =
 34#IgnoreGroup =
 35<br>
 36#NoUpgrade   =
 37#NoExtract   =
 38<br>
 39# Misc options
 40#UseSyslog
 41# 彩色输出
 42Color
 43#TotalDownload
 44# We cannot check disk space from within a chroot environment
 45CheckSpace
 46# 升级前对比版本
 47VerbosePkgLists
 48<br>
 49# By default, pacman accepts packages signed by keys that its local keyring
 50# trusts (see pacman-key and its man page), as well as unsigned packages.
 51SigLevel    = Required DatabaseOptional
 52LocalFileSigLevel = Optional
 53#RemoteFileSigLevel = Required
 54<br>
 55# NOTE: You must run `pacman-key --init` before first using pacman; the local
 56# keyring can then be populated with the keys of all official Manjaro Linux
 57# packagers with `pacman-key --populate archlinux manjaro`.
 58<br>
 59#
 60# REPOSITORIES
 61#   - can be defined here or included from another file
 62#   - pacman will search repositories in the order defined here
 63#   - local/custom mirrors can be added here or in separate files
 64#   - repositories listed first will take precedence when packages
 65#     have identical names, regardless of version number
 66#   - URLs will have $repo replaced by the name of the current repo
 67#   - URLs will have $arch replaced by the name of the architecture
 68#
 69# Repository entries are of the format:
 70#       [repo-name]
 71#       Server = ServerName
 72#       Include = IncludePath
 73#
 74# The header [repo-name] is crucial - it must be present and
 75# uncommented to enable the repo.
 76#
 77<br>
 78# The testing repositories are disabled by default. To enable, uncomment the
 79# repo name header and Include lines. You can add preferred servers immediately
 80# after the header, and they will be used before the default mirrors.
 81<br>
 82[core]
 83SigLevel = PackageRequired
 84Include = /etc/pacman.d/mirrorlist
 85<br>
 86[extra]
 87SigLevel = PackageRequired
 88Include = /etc/pacman.d/mirrorlist
 89<br>
 90[community]
 91SigLevel = PackageRequired
 92Include = /etc/pacman.d/mirrorlist
 93<br>
 94# If you want to run 32 bit applications on your x86_64 system,
 95# enable the multilib repositories as required here.
 96<br>
 97[multilib]
 98SigLevel = PackageRequired
 99Include = /etc/pacman.d/mirrorlist
100<br>
101# An example of a custom package repository.  See the pacman manpage for
102# tips on creating your own repositories.
103#[custom]
104#SigLevel = Optional TrustAll
105#Server = file:///home/custompkgs
106<br>
107# archlinuxcn中文社区库清华大学镜像
108[archlinuxcn]
109Server = https://mirrors.tuna.tsinghua.edu.cn/archlinuxcn/$arch
110<br>
111
附录II:/etc/makepkg.conf
点击查看/etc/makepkg.conf的详细内容
   1
  2#
  3# /etc/makepkg.conf
  4#
  5<br>
  6#########################################################################
  7# SOURCE ACQUISITION
  8#########################################################################
  9#
 10#-- The download utilities that makepkg should use to acquire sources
 11#  Format: 'protocol::agent'
 12#DLAGENTS=('file::/usr/bin/curl -gqC - -o %o %u'
 13#          'ftp::/usr/bin/curl -gqfC - --ftp-pasv --retry 3 --retry-delay 3 -o %o %u'
 14#          'http::/usr/bin/curl -gqb "" -fLC - --retry 3 --retry-delay 3 -o %o %u'
 15#          'https::/usr/bin/curl -gqb "" -fLC - --retry 3 --retry-delay 3 -o %o %u'
 16#          'rsync::/usr/bin/rsync --no-motd -z %u %o'
 17#          'scp::/usr/bin/scp -C %u %o')
 18<br>
 19# axel 单线程多链接
 20#DLAGENTS=('file::/usr/bin/axel -a -n 16 %u -o %o'
 21#        'ftp::/usr/bin/axel -a -n 16 %u -o %o'
 22#        'http::/usr/bin/axel -a -n 16 %u -o %o'
 23#        'https::/usr/bin/axel -a -n 16 %u -o %o'
 24#        'rsync::/usr/bin/rsync --no-motd -z %u %o'
 25#        'scp::/usr/bin/scp -C %u %o')
 26<br>
 27# aria2c 多线程多链接
 28DLAGENTS=('file::/usr/bin/aria2c --allow-overwrite=true --log-level=error -l aria2c-error.log -c -m2 -x 8 -s 8 -j 8 %u -o %o'
 29        'ftp::/usr/bin/aria2c --allow-overwrite=true --log-level=error -l aria2c-error.log -c -m2 -x 8 -s 8 -j 8 %u -o %o'
 30        'http::/usr/bin/aria2c --allow-overwrite=true --log-level=error -l aria2c-error.log -c -m2 -x 8 -s 8 -j 8 %u -o %o'
 31        'https::/usr/bin/aria2c --allow-overwrite=true --log-level=error -l aria2c-error.log -c -m2 -x 8 -s 8 -j 8 %u -o %o'
 32        'rsync::/usr/bin/rsync --no-motd -z %u %o'
 33        'scp::/usr/bin/scp -C %u %o')
 34<br>
 35# Other common tools:
 36# /usr/bin/snarf
 37# /usr/bin/lftpget -c
 38# /usr/bin/wget
 39<br>
 40#-- The package required by makepkg to download VCS sources
 41#  Format: 'protocol::package'
 42VCSCLIENTS=('bzr::bzr'
 43            'git::git'
 44            'hg::mercurial'
 45            'svn::subversion')
 46<br>
 47#########################################################################
 48# ARCHITECTURE, COMPILE FLAGS
 49#########################################################################
 50#
 51CARCH="x86_64"
 52CHOST="x86_64-pc-linux-gnu"
 53<br>
 54#-- Compiler and Linker Flags
 55# -march (or -mcpu) builds exclusively for an architecture
 56# -mtune optimizes for an architecture, but builds for whole processor family
 57CPPFLAGS="-D_FORTIFY_SOURCE=2"
 58CFLAGS="-march=x86-64 -mtune=generic -O2 -pipe -fstack-protector-strong -fno-plt"
 59CXXFLAGS="-march=x86-64 -mtune=generic -O2 -pipe -fstack-protector-strong -fno-plt"
 60LDFLAGS="-Wl,-O1,--sort-common,--as-needed,-z,relro,-z,now"
 61#-- Make Flags: change this for DistCC/SMP systems
 62#MAKEFLAGS="-j2"
 63#-- Debugging flags
 64DEBUG_CFLAGS="-g -fvar-tracking-assignments"
 65DEBUG_CXXFLAGS="-g -fvar-tracking-assignments"
 66<br>
 67#########################################################################
 68# BUILD ENVIRONMENT
 69#########################################################################
 70#
 71# Defaults: BUILDENV=(!distcc color !ccache check !sign)
 72#  A negated environment option will do the opposite of the comments below.
 73#
 74#-- distcc:   Use the Distributed C/C++/ObjC compiler
 75#-- color:    Colorize output messages
 76#-- ccache:   Use ccache to cache compilation
 77#-- check:    Run the check() function if present in the PKGBUILD
 78#-- sign:     Generate PGP signature file
 79#
 80BUILDENV=(!distcc color !ccache check !sign)
 81#
 82#-- If using DistCC, your MAKEFLAGS will also need modification. In addition,
 83#-- specify a space-delimited list of hosts running in the DistCC cluster.
 84#DISTCC_HOSTS=""
 85#
 86#-- Specify a directory for package building.
 87#BUILDDIR=/tmp/makepkg
 88<br>
 89#########################################################################
 90# GLOBAL PACKAGE OPTIONS
 91#   These are default values for the options=() settings
 92#########################################################################
 93#
 94# Default: OPTIONS=(!strip docs libtool staticlibs emptydirs !zipman !purge !debug)
 95#  A negated option will do the opposite of the comments below.
 96#
 97#-- strip:      Strip symbols from binaries/libraries
 98#-- docs:       Save doc directories specified by DOC_DIRS
 99#-- libtool:    Leave libtool (.la) files in packages
100#-- staticlibs: Leave static library (.a) files in packages
101#-- emptydirs:  Leave empty directories in packages
102#-- zipman:     Compress manual (man and info) pages in MAN_DIRS with gzip
103#-- purge:      Remove files specified by PURGE_TARGETS
104#-- debug:      Add debugging flags as specified in DEBUG_* variables
105#
106OPTIONS=(strip docs !libtool !staticlibs emptydirs zipman purge !debug)
107<br>
108#-- File integrity checks to use. Valid: md5, sha1, sha256, sha384, sha512
109INTEGRITY_CHECK=(md5)
110#-- Options to be used when stripping binaries. See `man strip' for details.
111STRIP_BINARIES="--strip-all"
112#-- Options to be used when stripping shared libraries. See `man strip' for details.
113STRIP_SHARED="--strip-unneeded"
114#-- Options to be used when stripping static libraries. See `man strip' for details.
115STRIP_STATIC="--strip-debug"
116#-- Manual (man and info) directories to compress (if zipman is specified)
117MAN_DIRS=({usr{,/local}{,/share},opt/*}/{man,info})
118#-- Doc directories to remove (if !docs is specified)
119DOC_DIRS=(usr/{,local/}{,share/}{doc,gtk-doc} opt/*/{doc,gtk-doc})
120#-- Files to be removed from all packages (if purge is specified)
121PURGE_TARGETS=(usr/{,share}/info/dir .packlist *.pod)
122#-- Directory to store source code in for debug packages
123DBGSRCDIR="/usr/src/debug"
124<br>
125#########################################################################
126# PACKAGE OUTPUT
127#########################################################################
128#
129# Default: put built package and cached source in build directory
130#
131#-- Destination: specify a fixed directory where all packages will be placed
132#PKGDEST=/home/packages
133#-- Source cache: specify a fixed directory where source files will be cached
134#SRCDEST=/home/sources
135#-- Source packages: specify a fixed directory where all src packages will be placed
136#SRCPKGDEST=/home/srcpackages
137#-- Log files: specify a fixed directory where all log files will be placed
138#LOGDEST=/home/makepkglogs
139#-- Packager: name/email of the person or organization building packages
140#PACKAGER="John Doe <john@doe.com>"
141#-- Specify a key to use for package signing
142#GPGKEY=""
143<br>
144#########################################################################
145# COMPRESSION DEFAULTS
146#########################################################################
147#
148COMPRESSGZ=(gzip -c -f -n)
149COMPRESSBZ2=(bzip2 -c -f)
150COMPRESSXZ=(xz -c -z -)
151COMPRESSLRZ=(lrzip -q)
152COMPRESSLZO=(lzop -q)
153COMPRESSZ=(compress -c -f)
154<br>
155#########################################################################
156# EXTENSION DEFAULTS
157#########################################################################
158#
159# WARNING: Do NOT modify these variables unless you know what you are
160#          doing.
161#
162PKGEXT='.pkg.tar.xz'
163SRCEXT='.src.tar.gz'
164<br>
165
附录III:/etc/pacman.d/mirrorlist
点击查看/etc/pacman.d/mirrorlist的详细内容
  1
 2##
 3## Manjaro Linux custom mirrorlist
 4## Generated on 2018-12-15 07:14
 5##
 6## Please use 'pacman-mirrors -id' to reset custom mirrorlist
 7## Please use 'pacman-mirrors -c all' to reset custom mirrorlist
 8## To remove custom config run  'pacman-mirrors -c all'
 9##
10<br>
11## Country : China
12Server = https://mirrors.tuna.tsinghua.edu.cn/manjaro/stable/$repo/$arch
13<br>
14## Country : China
15#Server = https://mirrors.ustc.edu.cn/manjaro/stable/$repo/$arch
16<br>
17## Country : China
18#Server = https://mirrors.sjtug.sjtu.edu.cn/manjaro/stable/$repo/$arch
19<br>
20## Country : China
21#Server = https://mirrors.zju.edu.cn/manjaro/stable/$repo/$arch
22<br>
23
附录IV:.zshrc
点击查看.zshrc的详细内容
   1
  2# If you come from bash you might have to change your $PATH.
  3# export PATH=$HOME/bin:/usr/local/bin:$PATH
  4<br>
  5# Path to your oh-my-zsh installation.
  6  export ZSH="/home/elinuxboy/.oh-my-zsh"
  7<br>
  8# Set name of the theme to load --- if set to "random", it will
  9# load a random theme each time oh-my-zsh is loaded, in which case,
 10# to know which specific one was loaded, run: echo $RANDOM_THEME
 11# See https://github.com/robbyrussell/oh-my-zsh/wiki/Themes
 12ZSH_THEME="ys"
 13<br>
 14# Set list of themes to pick from when loading at random
 15# Setting this variable when ZSH_THEME=random will cause zsh to load
 16# a theme from this variable instead of looking in ~/.oh-my-zsh/themes/
 17# If set to an empty array, this variable will have no effect.
 18# ZSH_THEME_RANDOM_CANDIDATES=( "robbyrussell" "agnoster" )
 19<br>
 20# Uncomment the following line to use case-sensitive completion.
 21# CASE_SENSITIVE="true"
 22<br>
 23# Uncomment the following line to use hyphen-insensitive completion.
 24# Case-sensitive completion must be off. _ and - will be interchangeable.
 25# HYPHEN_INSENSITIVE="true"
 26<br>
 27# Uncomment the following line to disable bi-weekly auto-update checks.
 28# DISABLE_AUTO_UPDATE="true"
 29<br>
 30# Uncomment the following line to change how often to auto-update (in days).
 31# export UPDATE_ZSH_DAYS=13
 32<br>
 33# Uncomment the following line to disable colors in ls.
 34# DISABLE_LS_COLORS="true"
 35<br>
 36# Uncomment the following line to disable auto-setting terminal title.
 37# DISABLE_AUTO_TITLE="true"
 38<br>
 39# Uncomment the following line to enable command auto-correction.
 40# ENABLE_CORRECTION="true"
 41<br>
 42# Uncomment the following line to display red dots whilst waiting for completion.
 43# COMPLETION_WAITING_DOTS="true"
 44<br>
 45# Uncomment the following line if you want to disable marking untracked files
 46# under VCS as dirty. This makes repository status check for large repositories
 47# much, much faster.
 48# DISABLE_UNTRACKED_FILES_DIRTY="true"
 49<br>
 50# Uncomment the following line if you want to change the command execution time
 51# stamp shown in the history command output.
 52# You can set one of the optional three formats:
 53# "mm/dd/yyyy"|"dd.mm.yyyy"|"yyyy-mm-dd"
 54# or set a custom format using the strftime function format specifications,
 55# see 'man strftime' for details.
 56# HIST_STAMPS="mm/dd/yyyy"
 57# 历史命令日期显示格式
 58HIST_STAMPS="yyyy-mm-dd"
 59<br>
 60# Would you like to use another custom folder than $ZSH/custom?
 61# ZSH_CUSTOM=/path/to/new-custom-folder
 62<br>
 63# Which plugins would you like to load?
 64# Standard plugins can be found in ~/.oh-my-zsh/plugins/*
 65# Custom plugins may be added to ~/.oh-my-zsh/custom/plugins/
 66# Example format: plugins=(rails git textmate ruby lighthouse)
 67# Add wisely, as too many plugins slow down shell startup.
 68# z命令快速跳转目录     x命令解压一切文件         命令行可以直接google
 69plugins=(
 70  git z zsh-autosuggestions extract web-search zsh-syntax-highlighting
 71)
 72<br>
 73source $ZSH/oh-my-zsh.sh
 74<br>
 75# User configuration
 76<br>
 77# export MANPATH="/usr/local/man:$MANPATH"
 78<br>
 79# You may need to manually set your language environment
 80# export LANG=en_US.UTF-8
 81<br>
 82# Preferred editor for local and remote sessions
 83# if [[ -n $SSH_CONNECTION ]]; then
 84#   export EDITOR='vim'
 85# else
 86#   export EDITOR='mvim'
 87# fi
 88<br>
 89# Compilation flags
 90# export ARCHFLAGS="-arch x86_64"
 91<br>
 92# ssh
 93# export SSH_KEY_PATH="~/.ssh/rsa_id"
 94<br>
 95# Set personal aliases, overriding those provided by oh-my-zsh libs,
 96# plugins, and themes. Aliases can be placed here, though oh-my-zsh
 97# users are encouraged to define aliases within the ZSH_CUSTOM folder.
 98# For a full list of active aliases, run `alias`.
 99#
100# Example aliases
101# alias zshconfig="mate ~/.zshrc"
102# alias ohmyzsh="mate ~/.oh-my-zsh"
103# autojump自动跳转插件
104. /usr/share/autojump/autojump.zsh
105<br>
106#自动补全插件
107#source ~/.oh-my-zsh/plugins/incr/incr-0.2.zsh
108<br>
109# 自动更新的时间间隔,单位是天,这里设置 30 天更新一次
110export UPDATE_ZSH_DAYS=1
111<br>
112# zsh-syntax-highlighting语法高亮插件
113source ${ZSH}/plugins/zsh-syntax-highlighting/zsh-syntax-highlighting.zsh
114<br>
115# 设置 gcc/g++ 别名
116alias gcc='gcc -fdiagnostics-color=auto'
117alias g++='g++ -fdiagnostics-color=auto'
118<br>
119# 设置 git 命令自动补全 ,如:git co+敲两次tab键
120#if [ -f ~/.git-completion.bash ]; then
121#    . ~/.git-completion.bash
122#fi
123<br>
124# 加载vgz驱动和utf8支持
125alias zhcon='zhcon --utf8'
126<br>
127alias cat='bat'
128<br>
129# 设置环境变量LFS
130#export LFS=/mnt/lfs
131<br>
132
