

本文基于 Android 9.0 , 代码仓库地址 : android_9.0.0_r45
文中源码链接:
首先来回顾一下上篇文章 Java 世界的盘古和女娲 —— Zygote ,主要介绍了 Android 世界中的第一个 Java 进程 Zygote,它的主要工作流程如下:
registerServerSocketFromEnv(), 注册服务端 socket,用于和客户端进程通信preload(),预加载一系列资源,提高应用启动速度forkSystemServer(),创建system_server进程- 功成身退,调用
runSelectLoop()等待响应客户端请求,创建应用进程
本篇文章的主角 system_server 进程是 Zygote 进程 fork 出的第一个进程,它负责管理和启动整个 Framework 层。
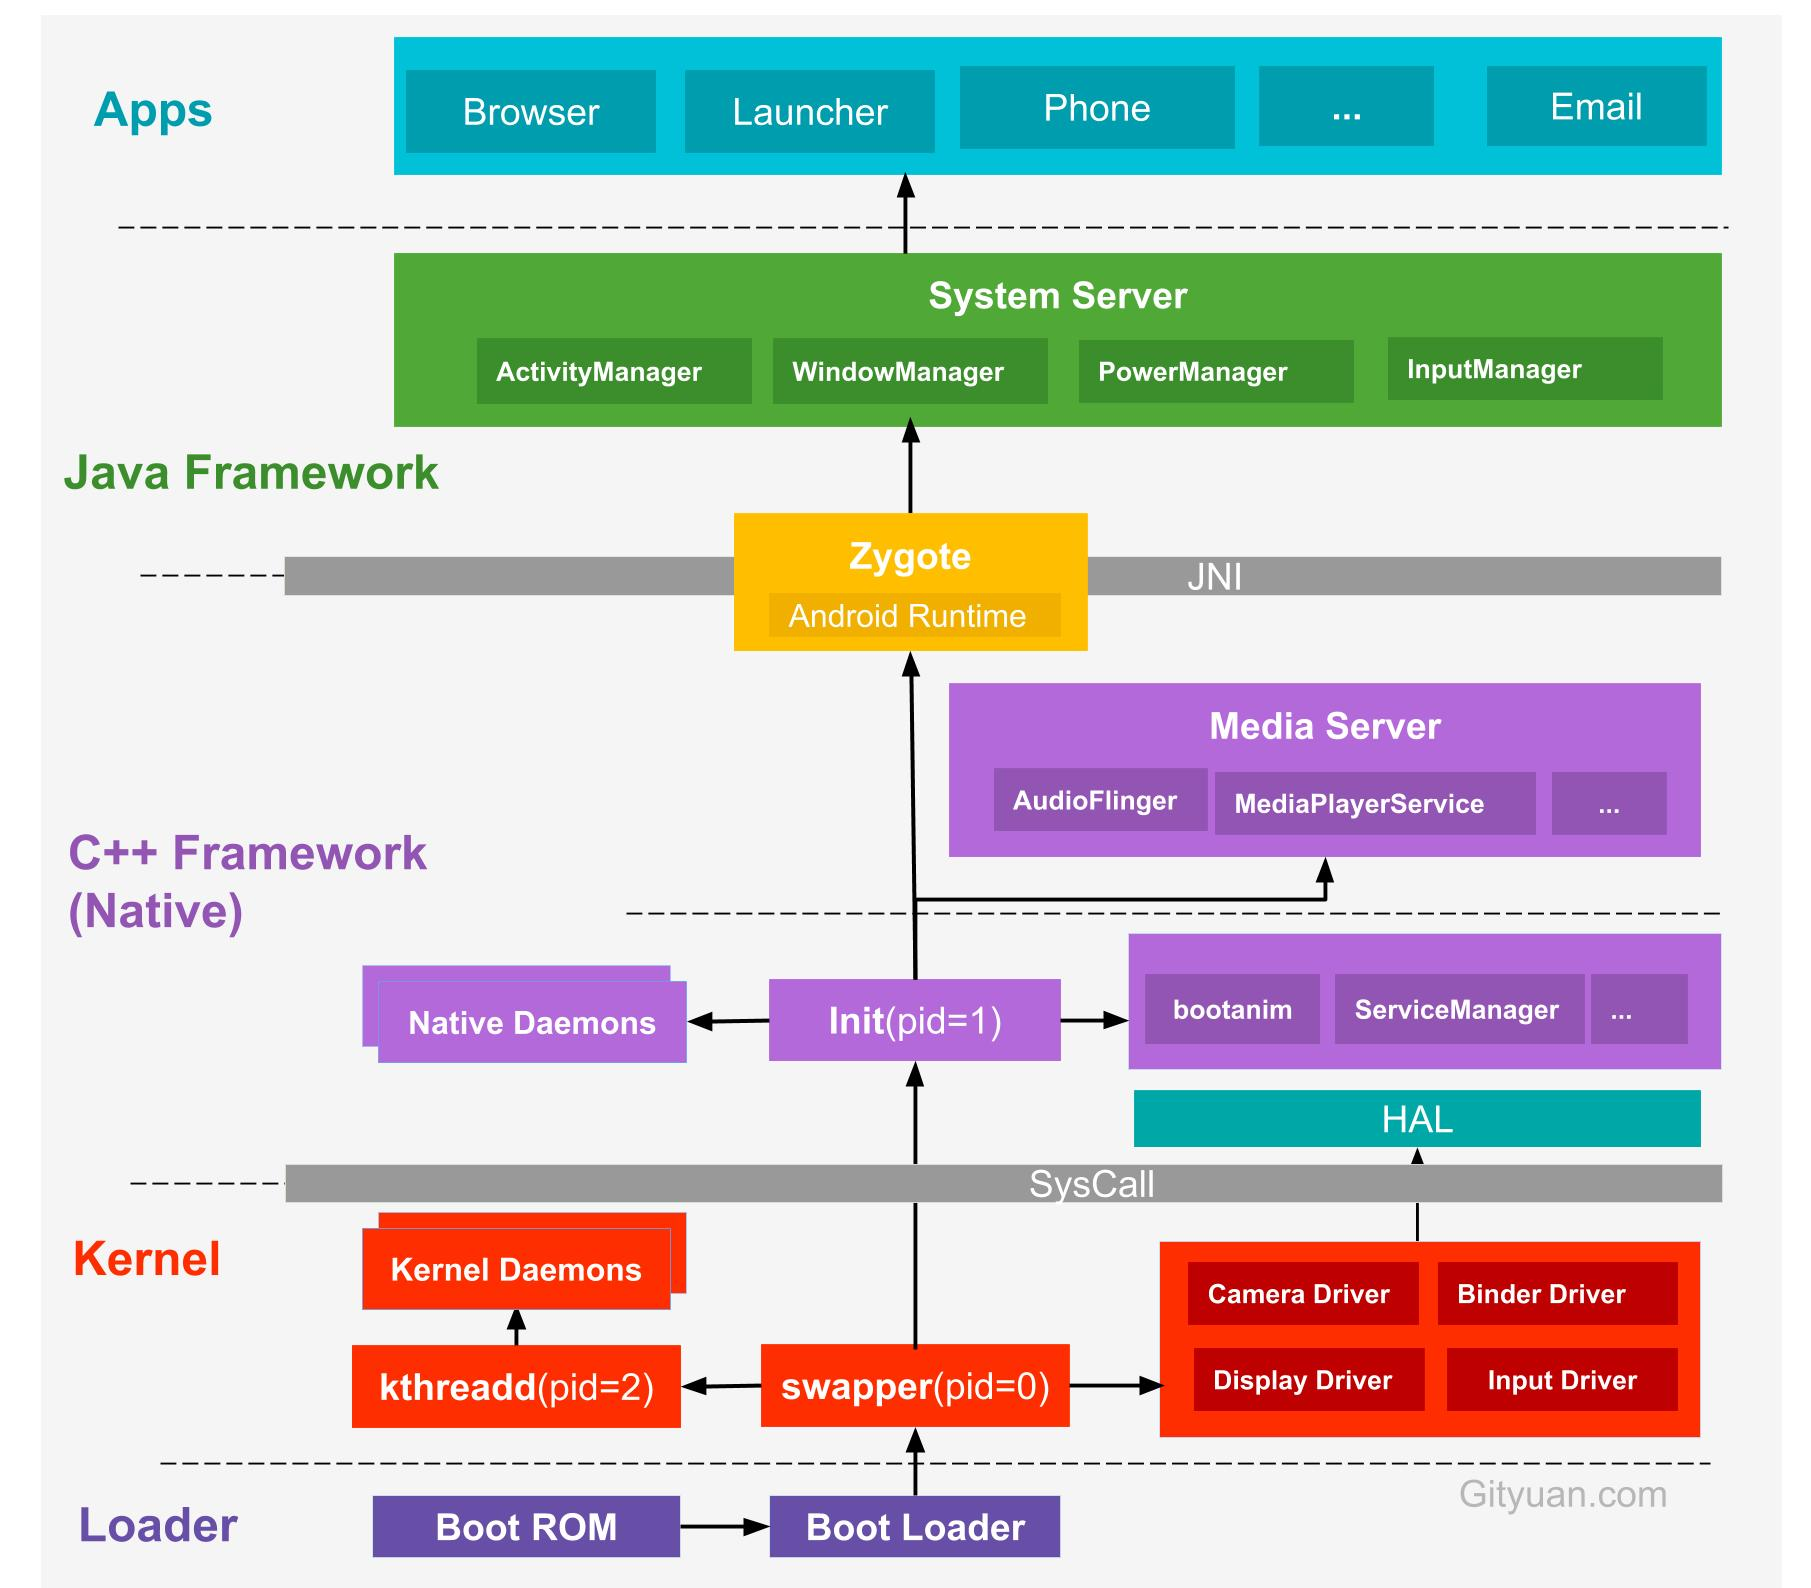
再来看看 Gityuan 的这张图片,找一下 System Server 的位置,它承载了各类系统服务的创建和启动。关于 system_server 进程的创建流程,上篇文章中已经做了详细介绍,这里再简单看一下流程图:
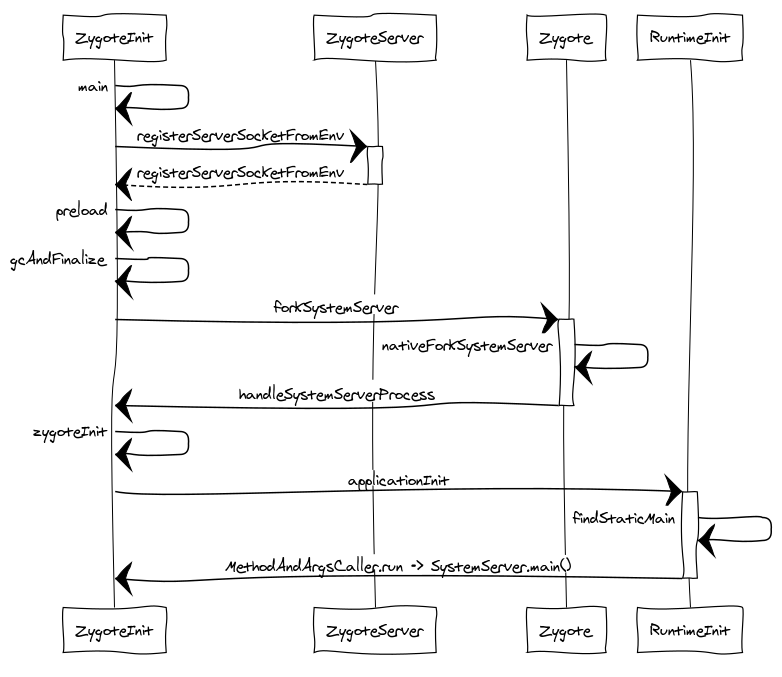
最终会调用到 SystemServer.main() 方法。下面就以此为起点,来具体分析 SystemServer 都做了些什么。
SystemServer 启动流程
public static void main(String[] args) {
    new SystemServer().run();
}
接着看 run() 方法。
private void run() {
    try {
        ......
        // 如果设备时间早于 1970 年,很多 API 处理负数时会 crash。所以直接设置为 1970 年 1 月 1 日
        if (System.currentTimeMillis() < EARLIEST_SUPPORTED_TIME) {
            Slog.w(TAG, "System clock is before 1970; setting to 1970.");
            SystemClock.setCurrentTimeMillis(EARLIEST_SUPPORTED_TIME);
        }

        // 未设置时区的话默认设为 GMT
        String timezoneProperty =  SystemProperties.get("persist.sys.timezone");
        if (timezoneProperty == null || timezoneProperty.isEmpty()) {
            Slog.w(TAG, "Timezone not set; setting to GMT.");
            SystemProperties.set("persist.sys.timezone", "GMT");
        }

        // 语言地区设置
        if (!SystemProperties.get("persist.sys.language").isEmpty()) {
            final String languageTag = Locale.getDefault().toLanguageTag();

            SystemProperties.set("persist.sys.locale", languageTag);
            SystemProperties.set("persist.sys.language", "");
            SystemProperties.set("persist.sys.country", "");
            SystemProperties.set("persist.sys.localevar", "");
        }

        // The system server should never make non-oneway calls
        Binder.setWarnOnBlocking(true);
        // The system server should always load safe labels
        PackageItemInfo.setForceSafeLabels(true);

        // Default to FULL within the system server.
        SQLiteGlobal.sDefaultSyncMode = SQLiteGlobal.SYNC_MODE_FULL;

        // Deactivate SQLiteCompatibilityWalFlags until settings provider is initialized
        SQLiteCompatibilityWalFlags.init(null);

        // Here we go!
        Slog.i(TAG, "Entered the Android system server!");
        int uptimeMillis = (int) SystemClock.elapsedRealtime();
        EventLog.writeEvent(EventLogTags.BOOT_PROGRESS_SYSTEM_RUN, uptimeMillis);
        if (!mRuntimeRestart) {
            MetricsLogger.histogram(null, "boot_system_server_init", uptimeMillis);
        }

        // 设置虚拟机运行库路径
        SystemProperties.set("persist.sys.dalvik.vm.lib.2", VMRuntime.getRuntime().vmLibrary());

        // Mmmmmm... more memory!
        // 清除虚拟机内存增长限制,允许应用申请更多内存
        VMRuntime.getRuntime().clearGrowthLimit();

        // 设置堆内存的有效利用率为 0.8,(可能被忽略)
        VMRuntime.getRuntime().setTargetHeapUtilization(0.8f);

        // 确保指纹信息已经定义
        Build.ensureFingerprintProperty();

        // Within the system server, it is an error to access Environment paths without
        // explicitly specifying a user.
        Environment.setUserRequired(true);

        // Within the system server, any incoming Bundles should be defused
        // to avoid throwing BadParcelableException.
        BaseBundle.setShouldDefuse(true);

        // Within the system server, when parceling exceptions, include the stack trace
        Parcel.setStackTraceParceling(true);

        // 确保系统的 Binder 调用总是运行在前台优先级
        BinderInternal.disableBackgroundScheduling(true);

        // Increase the number of binder threads in system_server
        BinderInternal.setMaxThreads(sMaxBinderThreads);

        // Prepare the main looper thread (this thread).
        android.os.Process.setThreadPriority(
            android.os.Process.THREAD_PRIORITY_FOREGROUND);
            android.os.Process.setCanSelfBackground(false);
        // 1. 创建主线程 Looper
        Looper.prepareMainLooper();
        Looper.getMainLooper().setSlowLogThresholdMs(
                SLOW_DISPATCH_THRESHOLD_MS, SLOW_DELIVERY_THRESHOLD_MS);

        // 初始化 native 服务,加载 libandroid_servers.so
        System.loadLibrary("android_servers");

        // 检查上次关机是否失败,可能不会有返回值
        performPendingShutdown();

        // 2. 初始化系统上下文
        createSystemContext();

        // 3. 创建系统服务管理 SystemServiceManager
        // 并将 mSystemServiceManager 注册到 sLocalServiceObjects 中
        mSystemServiceManager = new SystemServiceManager(mSystemContext);
        mSystemServiceManager.setStartInfo(mRuntimeRestart,
                mRuntimeStartElapsedTime, mRuntimeStartUptime);
        LocalServices.addService(SystemServiceManager.class, mSystemServiceManager);
        // Prepare the thread pool for init tasks that can be parallelized
        SystemServerInitThreadPool.get();
    } finally {
        traceEnd();  // InitBeforeStartServices
    }

    // Start services.
    try {
        traceBeginAndSlog("StartServices");
        startBootstrapServices(); // 4. 启动系统引导服务
        startCoreServices();      // 5. 启动系统核心服务
        startOtherServices();     // 6. 启动其他服务
        SystemServerInitThreadPool.shutdown();
    } catch (Throwable ex) {
        Slog.e("System", "******************************************");
        Slog.e("System", "************ Failure starting system services", ex);
        throw ex;
    } finally {
        traceEnd();
    }

    StrictMode.initVmDefaults(null);

    if (!mRuntimeRestart && !isFirstBootOrUpgrade()) {
        int uptimeMillis = (int) SystemClock.elapsedRealtime();
        MetricsLogger.histogram(null, "boot_system_server_ready", uptimeMillis);
        final int MAX_UPTIME_MILLIS = 60 * 1000;
        if (uptimeMillis > MAX_UPTIME_MILLIS) {
            Slog.wtf(SYSTEM_SERVER_TIMING_TAG,
                    "SystemServer init took too long. uptimeMillis=" + uptimeMillis);
        }
    }

    // 7. Loop forever.
    Looper.loop();
    throw new RuntimeException("Main thread loop unexpectedly exited");
}
代码虽然比较长,但是逻辑很清晰。我在注释里标记了比较重要的 7 个步骤,逐一分析。
Looper.prepareMainLooper()
初始化 Looper。关于 Handler 消息机制,可以阅读我的另一篇文章 深入理解 Handler 消息机制 。最后会调用 Looper.loop() 开启消息循环,开始处理消息。
createSystemContext()
private void createSystemContext() {
    // 创建 system_server 上下文信息
    ActivityThread activityThread = ActivityThread.systemMain();
    mSystemContext = activityThread.getSystemContext();
    mSystemContext.setTheme(DEFAULT_SYSTEM_THEME);

    final Context systemUiContext = activityThread.getSystemUiContext();
    // 设置主题,用于系统 dialog 等
    systemUiContext.setTheme(DEFAULT_SYSTEM_THEME);
}
创建系统上下文。首先调用 ActivityThread.systemMain() 方法获取 ActivityThread 对象,然后再获取上下文。
public static ActivityThread systemMain() {
    // 判断是否是大内存设备,在低内存设备上不启用硬件加速
    if (!ActivityManager.isHighEndGfx()) {
        ThreadedRenderer.disable(true);
    } else {
        ThreadedRenderer.enableForegroundTrimming();
    }
    ActivityThread thread = new ActivityThread();
    thread.attach(true, 0);
    return thread;
}
关于 ActivityThread.attach() 方法这里不做具体分析了,后面文章说到应用启动时再来详细解析。
创建完系统上下文,接下来就是启动各种系统服务了。源码中把服务大致分为了三类,再来回顾一下:
startBootstrapServices(); // 4. 启动系统引导服务
startCoreServices();      // 5. 启动系统核心服务
startOtherServices();     // 6. 启动其他服务
逐一进行分析。
startBootstrapServices()
private void startBootstrapServices() {
    final String TAG_SYSTEM_CONFIG = "ReadingSystemConfig";
    SystemServerInitThreadPool.get().submit(SystemConfig::getInstance, TAG_SYSTEM_CONFIG);

    // 阻塞等待与 installd 建立 socket 通道
    Installer installer = mSystemServiceManager.startService(Installer.class);

    // 启动 DeviceIdentifiersPolicyService,在 ActivityManagerService 之前
    mSystemServiceManager.startService(DeviceIdentifiersPolicyService.class);

    // 启动服务 ActivityManagerService
    mActivityManagerService = mSystemServiceManager.startService(
            ActivityManagerService.Lifecycle.class).getService();
    mActivityManagerService.setSystemServiceManager(mSystemServiceManager);
    mActivityManagerService.setInstaller(installer);

    // 启动服务 PowerManagerService
    mPowerManagerService = mSystemServiceManager.startService(PowerManagerService.class);

    // Now that the power manager has been started, let the activity manager
    // initialize power management features.
    mActivityManagerService.initPowerManagement();

    // 启动服务 RecoverySystemService
    mSystemServiceManager.startService(RecoverySystemService.class);

    // Now that we have the bare essentials of the OS up and running, take
    // note that we just booted, which might send out a rescue party if
    // we're stuck in a runtime restart loop.
    RescueParty.noteBoot(mSystemContext);

    // 启动服务 LightsService
    mSystemServiceManager.startService(LightsService.class);

    // Package manager isn't started yet; need to use SysProp not hardware feature
    if (SystemProperties.getBoolean("config.enable_sidekick_graphics", false)) {
        mSystemServiceManager.startService(WEAR_SIDEKICK_SERVICE_CLASS);
    }

    // 启动 DisplayManagerService,在 PackageManagerService 之前
    mDisplayManagerService = mSystemServiceManager.startService(DisplayManagerService.class);

    // We need the default display before we can initialize the package manager.
    mSystemServiceManager.startBootPhase(SystemService.PHASE_WAIT_FOR_DEFAULT_DISPLAY);

    // 正在加密设备时只运行核心 app
    String cryptState = SystemProperties.get("vold.decrypt");
    if (ENCRYPTING_STATE.equals(cryptState)) {
        Slog.w(TAG, "Detected encryption in progress - only parsing core apps");
        mOnlyCore = true;
    } else if (ENCRYPTED_STATE.equals(cryptState)) {
        Slog.w(TAG, "Device encrypted - only parsing core apps");
        mOnlyCore = true;
    }

    // 启动服务 PackageManagerService
    if (!mRuntimeRestart) {
        MetricsLogger.histogram(null, "boot_package_manager_init_start",
                (int) SystemClock.elapsedRealtime());
    }
    mPackageManagerService = PackageManagerService.main(mSystemContext, installer,
            mFactoryTestMode != FactoryTest.FACTORY_TEST_OFF, mOnlyCore);
    mFirstBoot = mPackageManagerService.isFirstBoot();
    mPackageManager = mSystemContext.getPackageManager();
    if (!mRuntimeRestart && !isFirstBootOrUpgrade()) {
        MetricsLogger.histogram(null, "boot_package_manager_init_ready",
                (int) SystemClock.elapsedRealtime());
    }
    if (!mOnlyCore) {
        boolean disableOtaDexopt = SystemProperties.getBoolean("config.disable_otadexopt",
                false);
        if (!disableOtaDexopt) {
            traceBeginAndSlog("StartOtaDexOptService");
            try {
                OtaDexoptService.main(mSystemContext, mPackageManagerService);
            } catch (Throwable e) {
                reportWtf("starting OtaDexOptService", e);
            } finally {
                traceEnd();
            }
        }
    }

    // 启动服务 UserManagerService
    mSystemServiceManager.startService(UserManagerService.LifeCycle.class);

    // 初始化属性 cache 以缓存包资源
    AttributeCache.init(mSystemContext);

    // 设置 AMS
    mActivityManagerService.setSystemProcess();

    // DisplayManagerService needs to setup android.display scheduling related policies
    // since setSystemProcess() would have overridden policies due to setProcessGroup
    mDisplayManagerService.setupSchedulerPolicies();

    // 启动服务 OverlayManagerService
    OverlayManagerService overlayManagerService = new OverlayManagerService(
            mSystemContext, installer);
    mSystemServiceManager.startService(overlayManagerService);

    if (SystemProperties.getInt("persist.sys.displayinset.top", 0) > 0) {
        // DisplayManager needs the overlay immediately.
        overlayManagerService.updateSystemUiContext();
        LocalServices.getService(DisplayManagerInternal.class).onOverlayChanged();
    }

    // 在单独的线程中启动 SensorService
    mSensorServiceStart = SystemServerInitThreadPool.get().submit(() -> {
        TimingsTraceLog traceLog = new TimingsTraceLog(
                SYSTEM_SERVER_TIMING_ASYNC_TAG, Trace.TRACE_TAG_SYSTEM_SERVER);
        startSensorService();
    }, START_SENSOR_SERVICE);
}
startBootstrapServices() 方法中的都是系统启动过程中的关键服务,且相互依赖,主要下列服务 :
InstallerDeviceIdentifiersPolicyServiceActivityManagerServicePowerManagerServiceRecoverySystemServiceLightsServiceStartSidekickServiceDisplayManagerServiceSystemService.PHASE_WAIT_FOR_DEFAULT_DISPLAY (100)
PackageManagerServiceUserManagerServiceOverlayManagerServiceSensorService
一共启动了十二个核心服务。注意中间的 SystemService.PHASE_WAIT_FOR_DEFAULT_DISPLAY,它并不是代表什么系统服务,而是一个 int 值 100,类似的 int 值还有一些,定义在 SystemService 类中,它的作用是给服务启动过程划分阶段,每个阶段都有特定的含义,可以做不同的事情。这里先混个脸熟,等介绍完所有的服务,再回过头来总结一下有哪些阶段。
startCoreServices()
private void startCoreServices() {
    // 启动服务 BatteryService,需要 LightService
    mSystemServiceManager.startService(BatteryService.class);

    // 启动服务 UsageStatsService,统计应用使用情况
    mSystemServiceManager.startService(UsageStatsService.class);
    mActivityManagerService.setUsageStatsManager(
            LocalServices.getService(UsageStatsManagerInternal.class));

    // 检查是否存在可更新的 WebView。存在就启动服务 WebViewUpdateService
    if (mPackageManager.hasSystemFeature(PackageManager.FEATURE_WEBVIEW)) {
        mWebViewUpdateService = mSystemServiceManager.startService(WebViewUpdateService.class);
    }

    // 启动服务 BinderCallsStatsService,跟踪 Binder 调用的 cpu 时间消耗
    BinderCallsStatsService.start();
}
启动了四个服务,BatteryService UsageStatsService WebViewUpdateService 和 BinderCallsStatsService 。
startOtherServices()
startOtherServices() 源码有一千多行,就像一个杂货铺,启动了一系列的服务。下面尽量精简一下代码:
KeyAttestationApplicationIdProviderService/KeyChainSystemService
SchedulingPolicyService/TelecomLoaderService/TelephonyRegistry

mContentResolver = context.getContentResolver();

AccountManagerService/ContentService

mActivityManagerService.installSystemProviders();

DropBoxManagerService/VibratorService/ConsumerIrService/AlarmManagerService

final Watchdog watchdog = Watchdog.getInstance();
watchdog.init(context, mActivityManagerService);

InputManagerService/WindowManagerService/VrManagerService/BluetoothService
IpConnectivityMetrics/NetworkWatchlistService/PinnerService
InputMethodManagerService/AccessibilityManagerService/StorageManagerService
StorageStatsService/UiModeManagerService/LockSettingsService
PersistentDataBlockService/OemLockService/DeviceIdleController
DevicePolicyManagerService/StatusBarManagerService/ClipboardService
NetworkManagementService/IpSecService/TextServicesManagerService
TextClassificationManagerService/NetworkScoreService/NetworkStatsService
NetworkPolicyManagerService/WifiScanningService/RttService
WifiAware/WifiP2P/Lowpan/Ethernet/ConnectivityService/NsdService
SystemUpdateManagerService/UpdateLockService/NotificationManagerService
DeviceStorageMonitorService/LocationManagerService/CountryDetectorService
SearchManagerService/WallpaperManagerService/AudioService/BroadcastRadioService
DockObserver/ThermalObserver/WiredAccessoryManager/MidiManager/UsbService
SerialService/HardwarePropertiesManagerService/TwilightService
ColorDisplayService/JobSchedulerService/SoundTriggerService/TrustManagerService
BackupManager/AppWidgerService/VoiceRecognitionManager/GestureLauncherService
SensorNotificationService/ContextHubSystemService/DiskStatsService
TimeZoneRulesManagerService/NetworkTimeUpdateService/CommonTimeManagementService
CertBlacklister/EmergencyAffordanceService/DreamManagerService/GraphicsStatsService
CoverageService/PrintManager/CompanionDeviceManager/RestrictionsManagerService
MediaSessionService/MediaUpdateService/HdmiControlService/TvInputManagerService
MediaResourceMonitorService/TvRemoteService/MediaRouterService/FingerprintService
BackgroundDexOptService/PruneInstantAppsJobService/ShortcutService
LauncherAppsService/CrossProfileAppsService/MediaProjectionManagerService
WearConfigService/WearConnectivityService/WearTimeService/WearLeftyService
WearGlobalActionsService/SliceManagerService/CameraServiceProxy/IoTSystemService
MmsServiceBroker/AutoFillService

// It is now time to start up the app processes...
vibrator.systemReady();
lockSettings.systemReady();

// 480
mSystemServiceManager.startBootPhase(SystemService.PHASE_LOCK_SETTINGS_READY);
// 500
mSystemServiceManager.startBootPhase(SystemService.PHASE_SYSTEM_SERVICES_READY);

wm.systemReady();
mPowerManagerService.systemReady(mActivityManagerService.getAppOpsService());
mPackageManagerService.systemReady();
mDisplayManagerService.systemReady(safeMode, mOnlyCore);

// Start device specific services
final String[] classes = mSystemContext.getResources().getStringArray(
        R.array.config_deviceSpecificSystemServices);
for (final String className : classes) {
    try {
        mSystemServiceManager.startService(className);
    } catch (Throwable e) {
        reportWtf("starting " + className, e);
    }
}

// 520
mSystemServiceManager.startBootPhase(SystemService.PHASE_DEVICE_SPECIFIC_SERVICES_READY);

mActivityManagerService.systemReady(() -> {
    // 550
    mSystemServiceManager.startBootPhase(SystemService.PHASE_ACTIVITY_MANAGER_READY);

    startSystemUi(context, windowManagerF);

    networkManagementF.systemReady();
    ipSecServiceF.systemReady();
    networkStatsF.systemReady();
    connectivityF.systemReady();

    Watchdog.getInstance().start
    mPackageManagerService.waitForAppDataPrepared();

    // 600
    mSystemServiceManager.startBootPhase(SystemService.PHASE_THIRD_PARTY_APPS_CAN_START);

    locationF.systemRunning();
    countryDetectorF.systemRunning();
    networkTimeUpdaterF.systemRunning();
    commonTimeMgmtServiceF.systemRunning();
    inputManagerF.systemRunning();
    telephonyRegistryF.systemRunning();
    mediaRouterF.systemRunning();
    mmsServiceF.systemRunning();
    incident.systemRunning();
}
通过上面的代码可以看到启动了相当多的系统服务。startOtherServices() 方法共经历了五个启动阶段,如下所示:
SystemService.PHASE_LOCK_SETTINGS_READY             // 480
SystemService.PHASE_SYSTEM_SERVICES_READY           // 500
SystemService.PHASE_DEVICE_SPECIFIC_SERVICES_READY  // 520
SystemService.PHASE_ACTIVITY_MANAGER_READY          // 550
SystemService.PHASE_THIRD_PARTY_APPS_CAN_START      // 600
最后调用的 mActivityManagerService.systemReady() 方法。该方法中会调用 startHomeActivityLocked 来启动桌面 Activity,这样桌面应用就启动了。
Looper.loop()
至此,system_server 进程的主要工作就算完成了,进入 Looper.loop() 状态,等待其他线程通过 Handler 发送消息到主线程并处理。
SystemServer 启动阶段分类
回过头再来看看前面提到的启动阶段分类,定义在 com.android.server.SystemService 类中:
/*
 * Boot Phases
 *
 * 启动阶段
 */
public static final int PHASE_WAIT_FOR_DEFAULT_DISPLAY = 100; // maybe should be a dependency?

/**
 * After receiving this boot phase, services can obtain lock settings data.
 */
public static final int PHASE_LOCK_SETTINGS_READY = 480;

/**
 * After receiving this boot phase, services can safely call into core system services
 * such as the PowerManager or PackageManager.
 *
 * 在这个阶段之后,可以安全的调用系统核心服务,如 PowerManager 和 PackageManager
 */
public static final int PHASE_SYSTEM_SERVICES_READY = 500;

/**
 * After receiving this boot phase, services can safely call into device specific services.
 *
 * 在这个阶段之后,可以安全调用设备特定的服务
 */
public static final int PHASE_DEVICE_SPECIFIC_SERVICES_READY = 520;

/**
 * After receiving this boot phase, services can broadcast Intents.
 *
 * 在这个阶段之后,服务可以广播
 */
public static final int PHASE_ACTIVITY_MANAGER_READY = 550;

/**
 * After receiving this boot phase, services can start/bind to third party apps.
 * Apps will be able to make Binder calls into services at this point.
 *
 * 在这个阶段之后,服务可以启动/绑定第三方应用
 * 应用此时可以进行 Binder 调用
 */
public static final int PHASE_THIRD_PARTY_APPS_CAN_START = 600;

/**
 * After receiving this boot phase, services can allow user interaction with the device.
 * This phase occurs when boot has completed and the home application has started.
 * System services may prefer to listen to this phase rather than registering a
 * broadcast receiver for ACTION_BOOT_COMPLETED to reduce overall latency.
 *
 * 在这个阶段之后,允许用户和设备交互。
 * 这个阶段发生在启动完成,home 应用已经开始。
 * 系统服务更倾向于监听这个阶段,而不是监听启动广播 ACTION_BOOT_COMPLETED,以降低延迟
 */
public static final int PHASE_BOOT_COMPLETED = 1000;
在 system_server 启动过程中各个阶段的位置大致如下:
private void startBootstrapServices() {
    ...
    // 100
    mSystemServiceManager.startBootPhase(SystemService.PHASE_WAIT_FOR_DEFAULT_DISPLAY);
    ...
}

private void startOtherServices() {
    ...
    // 480
    mSystemServiceManager.startBootPhase(SystemService.PHASE_LOCK_SETTINGS_READY);
    // 500
    mSystemServiceManager.startBootPhase(SystemService.PHASE_SYSTEM_SERVICES_READY);

    ...
    // 520
    mSystemServiceManager.startBootPhase(SystemService.PHASE_DEVICE_SPECIFIC_SERVICES_READY);

    mActivityManagerService.systemReady(() -> {
        mSystemServiceManager.startBootPhase(
                    SystemService.PHASE_ACTIVITY_MANAGER_READY); // 550

        ...
        mSystemServiceManager.startBootPhase(
                    SystemService.PHASE_THIRD_PARTY_APPS_CAN_START); // 600
    }
}
最后的 SystemService.PHASE_BOOT_COMPLETED(1000) 在 AMS 的 finishBooting() 方法中调用。另外注意 480 和 500 两个阶段是连在一起的,中间没有发生任何事情。
那么,划分阶段的具体作用是什么呢?答案就在 startBootPhase() 方法中:
public void startBootPhase(final int phase) {
    if (phase <= mCurrentPhase) {
        throw new IllegalArgumentException("Next phase must be larger than previous");
    }
    mCurrentPhase = phase;

    try {
        final int serviceLen = mServices.size();
        for (int i = 0; i < serviceLen; i++) {
            final SystemService service = mServices.get(i);
            long time = SystemClock.elapsedRealtime();
            try {
                // 回调系统服务的 onBootPhase() 方法
                service.onBootPhase(mCurrentPhase);
            } catch (Exception ex) {
                throw new RuntimeException("Failed to boot service "
                        + service.getClass().getName()
                        + ": onBootPhase threw an exception during phase "
                        + mCurrentPhase, ex);
            }
            warnIfTooLong(SystemClock.elapsedRealtime() - time, service, "onBootPhase");
        }
    } finally {
        Trace.traceEnd(Trace.TRACE_TAG_SYSTEM_SERVER);
    }
}
核心就在于 service.onBootPhase(mCurrentPhase);。所有系统服务都是继承于 SystemService 的,startBootPhase() 方法会回调当前阶段已经加入 mServices 的所有系统服务的 onBootPhase() 方法,在合适的阶段做一些合适的事情。以 AMS 为例:
@Override
public void onBootPhase(int phase) {
    mService.mBootPhase = phase;
    if (phase == PHASE_SYSTEM_SERVICES_READY) {
        mService.mBatteryStatsService.systemServicesReady();
        mService.mServices.systemServicesReady();
    }
}
SystemServer 是如何启动服务的 ?
看完 SystemServer 的源码,它最重要的工作就是创建和启动各种系统服务。那么服务一般是如何创建的呢?下面以 startBootstrapServices() 中创建的第一个服务 Installer 为例来看一下:
Installer installer = mSystemServiceManager.startService(Installer.class);
进入 SystemServiceManager 的 startService() 方法:
public <T extends SystemService> T startService(Class<T> serviceClass) {
    try {
        // 获取服务名称
        final String name = serviceClass.getName();

        // Create the service.
        if (!SystemService.class.isAssignableFrom(serviceClass)) {
            throw new RuntimeException("Failed to create " + name
                    + ": service must extend " + SystemService.class.getName());
        }
        final T service;
        try {
            // 获取服务类的构造器
            Constructor<T> constructor = serviceClass.getConstructor(Context.class);
            // 反射创建 service
            service = constructor.newInstance(mContext);
        } catch (InstantiationException ex) {
            throw new RuntimeException("Failed to create service " + name
                    + ": service could not be instantiated", ex);
        } catch (IllegalAccessException ex) {
            throw new RuntimeException("Failed to create service " + name
                    + ": service must have a public constructor with a Context argument", ex);
        } catch (NoSuchMethodException ex) {
            throw new RuntimeException("Failed to create service " + name
                    + ": service must have a public constructor with a Context argument", ex);
        } catch (InvocationTargetException ex) {
            throw new RuntimeException("Failed to create service " + name
                    + ": service constructor threw an exception", ex);
        }

        startService(service);
        return service;
    } finally {
        Trace.traceEnd(Trace.TRACE_TAG_SYSTEM_SERVER);
    }
}
创建并启动一个系统服务。这个系统服务必须是 com.android.server.SystemService 的子类。根据参数传入的 Class 对象反射创建其实例,再调用重载方法 startService() :
public void startService(@NonNull final SystemService service) {
    // Register it.
    mServices.add(service);
    // Start it.
    long time = SystemClock.elapsedRealtime();
    try {
        // 回调系统服务的 onStart() 方法
        service.onStart();
    } catch (RuntimeException ex) {
        throw new RuntimeException("Failed to start service " + service.getClass().getName()
            + ": onStart threw an exception", ex);
    }
    warnIfTooLong(SystemClock.elapsedRealtime() - time, service, "onStart");
}
就两步。第一步,注册服务,mServices 是一个 ArrayList<SystemService> 对象,用来保存已经创建的系统服务。第二步,回调服务的 onStart() 方法,还是以 Installer 为例:
@Override
public void onStart() {
    if (mIsolated) {
        mInstalld = null;
    } else {
        connect();
    }
}
这样一个服务就启动完成了。这是一种比较普遍的启动方式,当然还有一些系统服务具有不一样的启动方式,这里就不一一分析了,后面有机会解析具体服务的时候再来分析。
总结
SystemServer 的启动流程比较耿直,没有那么多弯弯绕,下面简单总结一下:
- 语言、时区、地区等设置
- 虚拟机内存设置
- 指纹信息,Binder 调用设置
Looper.prepareMainLooper(),创建主线程 Looper- 初始化 native 服务,加载
libandroid_servers.so createSystemContext(),初始化系统上下文- 创建系统服务管理
SystemServiceManager startBootstrapServices,启动系统引导服务startCoreServices,启动系统核心服务startOtherServices,启动其他服务Looper.loop(),开启消息循环
另外,在 startOtherServices 的最后会调用 AMS 的 onSystemReady() 方法启动桌面 Activity。
预告
还记得 Zygote 进程的 runSelectLoop() 方法吗?Zygote 在创建完 system_server 进程之后,就开始默默的等待客户端请求创建应用进程。下一篇,我们将从源码角度来捋一遍客户端是如何发送请求,Zygote 是如何处理请求,应用进程是如何创建的,敬请期待!
文章首发微信公众号:
秉心说TM, 专注 Java 、 Android 原创知识分享,LeetCode 题解。更多最新原创文章,扫码关注我吧!

