上一篇文章我分享了OKHttp的连接过程。今天,我们来细致的研究一下关于隧道建立连接相关的细节。
隧道
在 RealConnection 的 connect 方法中, 会建立 Socket 连接。在建立 Socket 连接的时候,会分情况判断,如果需要建立隧道,那么就建立隧道链接。如果不需要,就直接进行 Socket 连接。
if (route.requiresTunnel()) {
	connectTunnel(connectTimeout, readTimeout, writeTimeout, call, eventListener);
	if (rawSocket == null) {
		// We were unable to connect the tunnel but properly closed down our resources.
		break;
	}
} else {
	connectSocket(connectTimeout, readTimeout, call, eventListener);
}
进一步查看 requiresTunnel :
public boolean requiresTunnel() {
	return address.sslSocketFactory != null && proxy.type() == Proxy.Type.HTTP;
}
这个方法有如下的注释:
/**
 * Returns true if this route tunnels HTTPS through an HTTP proxy. See <a
 * href="http://www.ietf.org/rfc/rfc2817.txt">RFC 2817, Section 5.2</a>.
*/
我们查看 rfc2817 的 5.2 章节:
Requesting a Tunnel with CONNECT
A CONNECT method requests that a proxy establish a tunnel connection
   on its behalf. The Request-URI portion of the Request-Line is always
   an 'authority' as defined by URI Generic Syntax [2], which is to say
   the host name and port number destination of the requested connection
   separated by a colon:

      CONNECT server.example.com:80 HTTP/1.1
      Host: server.example.com:80


Khare & Lawrence            Standards Track                     [Page 6]

RFC 2817                  HTTP Upgrade to TLS                   May 2000


   Other HTTP mechanisms can be used normally with the CONNECT method --
   except end-to-end protocol Upgrade requests, of course, since the
   tunnel must be established first.

   For example, proxy authentication might be used to establish the
   authority to create a tunnel:

      CONNECT server.example.com:80 HTTP/1.1
      Host: server.example.com:80
      Proxy-Authorization: basic aGVsbG86d29ybGQ=

   Like any other pipelined HTTP/1.1 request, data to be tunneled may be
   sent immediately after the blank line. The usual caveats also apply:
   data may be discarded if the eventual response is negative, and the
   connection may be reset with no response if more than one TCP segment
   is outstanding.
这里会发现,当满足如下 2 个条件的时候,会通过 CONNECT 这个method来建立隧道连接
- https 协议
- 使用了 HTTP 代理
那么到底隧道和使用了 CONNECT 分别是怎么回事,又有什么区别呢?
隧道的定义
参考 《HTTP权威指南》, 隧道(tunnel)是建立起来后,就会在两条连接之间对原始数据进行盲转发的 HTTP 应用程序。HTTP 隧道通常用来在一条或者多条 HTTP 连接上转发非 HTTP 数据,转发时不会窥探数据。
**
隧道建立可以直接建立,也可以通过 CONNECT 来建立。
- 不使用CONNECT 的隧道
不使用 CONNECT 的隧道,实现了数据包的重组和转发。在代理收到客户端的请求后,会重新创建请求,并发送到目标服务器。当目标服务器返回了数据之后,代理会对 response 进行解析,并且重新组装 response, 发送给客户端。所以,这种方式下建立的隧道,代理可以对客户端和目标服务器之间的通信数据进行窥探和篡改。
- 使用 CONNECT 的隧道
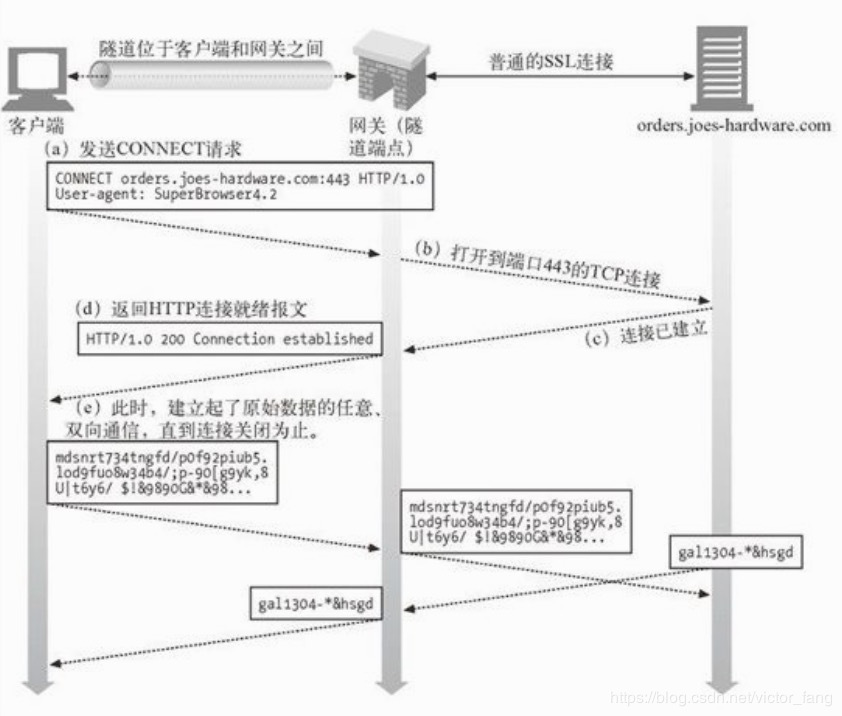
当客户端发起 CONNECT 请求的时候,就是在告诉代理,先在代理服务器和目标服务器之间建立连接,这个连接建立起来之后,目标服务器会给代理一个回复,代理会把这个回复返回给客户端,表示隧道建立的状态。这种情况下,代理只负责转发,无法窥探和篡改数据。
到这里,我们就能理解为什么 HTTPS 在有 HTTP 代理的情况下为什么要通过 CONNECT 来建立 SSL 隧道,因为 HTTPS 的数据是加密后的数据,代理在正常情况下无法对加密后的数据进行解密。保证了它的安全性。
OKHttp的隧道建立
下面我们来看看 OKHttp 是如何进行隧道的建立的。查看 connectTunnel 方法:
for (int i = 0; i < MAX_TUNNEL_ATTEMPTS; i++) {
	connectSocket(connectTimeout, readTimeout, call, eventListener);
	tunnelRequest = createTunnel(readTimeout, writeTimeout, tunnelRequest, url);
    if (tunnelRequest == null) break; // Tunnel successfully created.
}
在 21 次重试范围内,进行 socket 和 tunnel 的连接。如果 createTunnel 返回是 null ,说明隧道建立成功。
查看 createTunnel 方法:
private Request createTunnel(int readTimeout, int writeTimeout, Request tunnelRequest,
      HttpUrl url) throws IOException {

    // 1. CONNECT method 发出的内容
    String requestLine = "CONNECT " + Util.hostHeader(url, true) + " HTTP/1.1";

    while (true) {

        //2. 使用 http 1.1的方式发送 CONNECT 的数据
		Http1Codec tunnelConnection = new Http1Codec(null, null, source, sink);
        tunnelConnection.writeRequest(tunnelRequest.headers(), requestLine);
      	tunnelConnection.finishRequest();

        Response response = tunnelConnection.readResponseHeaders(false)
          .request(tunnelRequest)
          .build();

        Source body = tunnelConnection.newFixedLengthSource(contentLength);
      	Util.skipAll(body, Integer.MAX_VALUE, TimeUnit.MILLISECONDS);
      	body.close();

        // 3. 查看 code,根据code 的返回值做处理

        switch (response.code()) {
			case HTTP_OK:
				if (!source.buffer().exhausted() || !sink.buffer().exhausted()) {
            		throw new IOException("TLS tunnel buffered too many bytes!");
          		}
          		return null;
            case HTTP_PROXY_AUTH:
                tunnelRequest = route.address().proxyAuthenticator().authenticate(route, response);
                if (tunnelRequest == null) throw new IOException("Failed to authenticate with proxy");

          		if ("close".equalsIgnoreCase(response.header("Connection"))) {
            		return tunnelRequest;
          		}
          		break;
            default:
                throw new IOException(
              "Unexpected response code for CONNECT: " + response.code());
        }

    }
}
这里我们可以结合 rfc 来看到隧道建立的方式:
- 发送一个
CONNECT请求,请求内容是
请求行:
CONNECT [host]:[port] HTTP/1.1

请求头:
Host: host:port
Proxy-Connection:Keep-Alive
User-Agent:okhttp/3.10.0 (已此3.10.0版本为例)
- 隧道连接的结果根据
CONNECT请求的 response code来判断:
- 200
如果意外发送了其他数据,会抛出 IO 异常之外,隧道被认为连接成功
- 407
如果是 407 ,则说明建立隧道的代理服务器需要身份验证。OKHttp 如果没在 OKHttpClient 设置 ProxyAuthenticator 的具体实现,就会返回 null 抛出 Failed to authenticate with proxy 的异常信息。如果提供了具体实现通过了验证,还回去判断 response header里面的 Connection ,如果值是 close ,那么会返回具体的连接。然后重新请求进行连接,直到隧道建立成功。
通过上面 2 个步骤,就建立起来了 OKHttp 的 http 隧道。
这里,我们引用一张《HTTP权威指南》的图来说明这一过程:
请关注我的微信公众号 【半行代码】