

Harbor简介
Harbor是一个用于存储和分发Docker镜像的企业级Registry服务器,通过添加一些企业必需的功能特性,例如安全、标识和管理等,扩展了开源Docker Distribution。作为一个企业级私有Registry服务器,Harbor提供了更好的性能和安全。提升用户使用Registry构建和运行环境传输镜像的效率。Harbor支持安装在多个Registry节点的镜像资源复制,镜像全部保存在私有Registry中, 确保数据和知识产权在公司内部网络中管控。另外,Harbor也提供了高级的安全特性,诸如用户管理,访问控制和活动审计等。
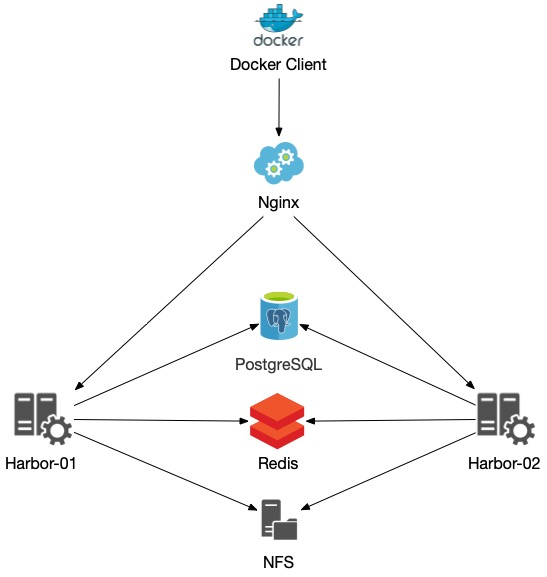
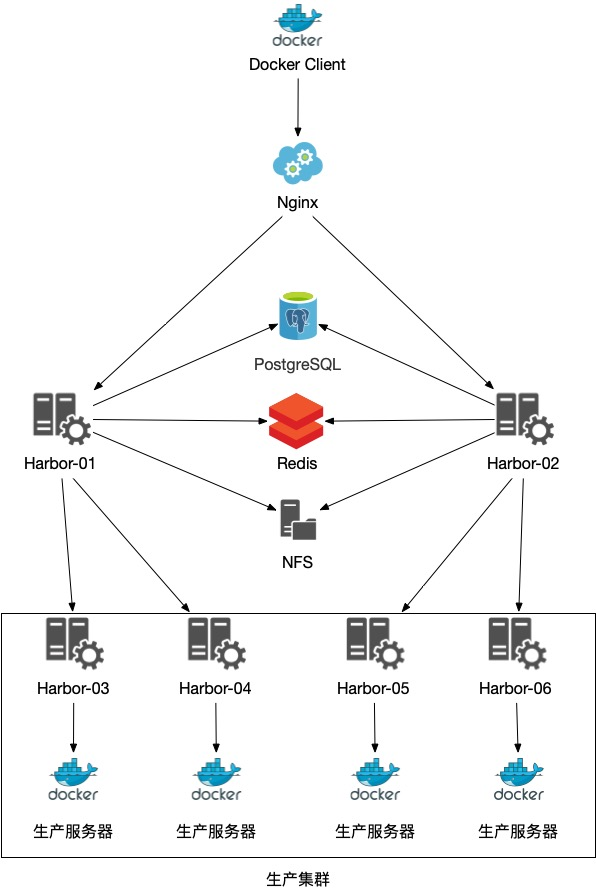
架构说明
本次搭建以NFS作为共享存储存放Harbor相关data,并分离PostgreSQL与Redis为多个Harbor共同连接使用,使用Nginx做负载均衡。
环境说明
- 操作系统:CentOS 7 (Minimal Install)
# cat /etc/redhat-release
CentOS Linux release 7.6.1810 (Core)
- 演示环境软件版本
| 软件 | 版本 |
|---|---|
| Docker | 18.06.3-ce |
| docker-compose | 1.25.0-rc2 |
| Harbor | 1.9.0 |
| Nginx | 1.16.1 |
| PostgreSQL | 9.6.14 |
| Redis | 4.0.10 |
- 演示环境网络
这里主要做Harbor高可用演示,真实生产环境请按需分离NFS与DB单独部署。
| IP | 主机名 |
|---|---|
| 10.10.1.10 | Nginx+NFS+DB |
| 10.10.1.11 | Harbor-01 |
| 10.10.1.12 | Harbor-02 |
部署
签发私有证书
生成私钥
正式生产环境建议使用商业证书!
使用openssl工具生成一个RSA私钥
# openssl genrsa -des3 -out harbor.key 2048
Generating RSA private key, 2048 bit long modulus
.......................+++
......+++
e is 65537 (0x10001)
Enter pass phrase for harbor.key:                   # 输入一个至少4位的密码
Verifying - Enter pass phrase for harbor.key:       # 重复输入密码
删除harbor.key中的密码
# openssl rsa -in harbor.key -out harbor.key
Enter pass phrase for harbor.key:                 # 输入刚才创建时的密码
writing RSA key
生成CSR(证书签名请求)
# openssl req -new -key harbor.key -out harbor.csr
You are about to be asked to enter information that will be incorporated
into your certificate request.
What you are about to enter is what is called a Distinguished Name or a DN.
There are quite a few fields but you can leave some blank
For some fields there will be a default value,
If you enter '.', the field will be left blank.
-----
Country Name (2 letter code) [XX]:cn             # 国家
State or Province Name (full name) []:Sichuan    # 地区
Locality Name (eg, city) [Default City]:Chengdu  # 城市
Organization Name (eg, company) [Default Company Ltd]:akiya  # 组织
Organizational Unit Name (eg, section) []:akiya  # 组织单位
Common Name (eg, your name or your server's hostname) []:akiya    # 常用名可填自己名字或域名
Email Address []:a@b.com                         # 邮件地址

Please enter the following 'extra' attributes
to be sent with your certificate request
A challenge password []:       # 可留空
An optional company name []:   # 可留空
生成自签名证书
注意:在使用自签名的临时证书时,浏览器会提示证书的颁发机构是未知的。
# echo subjectAltName = IP:10.10.1.10 > extfile.cnf
# openssl x509 -req -days 365 -in harbor.csr -signkey harbor.key -out harbor.crt -extfile extfile.cnf
Signature ok
subject=/C=cn/ST=Sichuan/L=Chengdu/O=akiya/OU=akiya/CN=akiya/emailAddress=a@b.com
Getting Private key
存放证书
复制证书到/www/certs待用
# mkdir -p /www/certs && cp harbor.crt harbor.key /www/certs
Docker
官方一键脚本安装
# curl -sSL https://get.docker.com/ | sh
使用阿里云源安装
- 先安装必要的依赖环境
# yum -y install yum-utils device-mapper-persistent-data lvm2
- 添加软件源信息
# yum-config-manager --add-repo http://mirrors.aliyun.com/docker-ce/linux/centos/docker-ce.repo
- 更新缓存
# yum makecache fast
- 查询库中Docker版本
# yum list docker-ce --showduplicates | sort -r
已加载插件:fastestmirror
可安装的软件包
 * updates: mirrors.aliyun.com
Loading mirror speeds from cached hostfile
 * extras: mirrors.aliyun.com
docker-ce.x86_64            3:19.03.2-3.el7                     docker-ce-stable
docker-ce.x86_64            3:19.03.1-3.el7                     docker-ce-stable
docker-ce.x86_64            3:19.03.0-3.el7                     docker-ce-stable
docker-ce.x86_64            3:18.09.9-3.el7                     docker-ce-stable
docker-ce.x86_64            3:18.09.8-3.el7                     docker-ce-stable
docker-ce.x86_64            3:18.09.7-3.el7                     docker-ce-stable
docker-ce.x86_64            3:18.09.6-3.el7                     docker-ce-stable
docker-ce.x86_64            3:18.09.5-3.el7                     docker-ce-stable
docker-ce.x86_64            3:18.09.4-3.el7                     docker-ce-stable
docker-ce.x86_64            3:18.09.3-3.el7                     docker-ce-stable
docker-ce.x86_64            3:18.09.2-3.el7                     docker-ce-stable
docker-ce.x86_64            3:18.09.1-3.el7                     docker-ce-stable
docker-ce.x86_64            3:18.09.0-3.el7                     docker-ce-stable
docker-ce.x86_64            18.06.3.ce-3.el7                    docker-ce-stable
docker-ce.x86_64            18.06.2.ce-3.el7                    docker-ce-stable
docker-ce.x86_64            18.06.1.ce-3.el7                    docker-ce-stable
docker-ce.x86_64            18.06.0.ce-3.el7                    docker-ce-stable
docker-ce.x86_64            18.03.1.ce-1.el7.centos             docker-ce-stable
docker-ce.x86_64            18.03.0.ce-1.el7.centos             docker-ce-stable
docker-ce.x86_64            17.12.1.ce-1.el7.centos             docker-ce-stable
docker-ce.x86_64            17.12.0.ce-1.el7.centos             docker-ce-stable
docker-ce.x86_64            17.09.1.ce-1.el7.centos             docker-ce-stable
docker-ce.x86_64            17.09.0.ce-1.el7.centos             docker-ce-stable
docker-ce.x86_64            17.06.2.ce-1.el7.centos             docker-ce-stable
docker-ce.x86_64            17.06.1.ce-1.el7.centos             docker-ce-stable
docker-ce.x86_64            17.06.0.ce-1.el7.centos             docker-ce-stable
docker-ce.x86_64            17.03.3.ce-1.el7                    docker-ce-stable
docker-ce.x86_64            17.03.2.ce-1.el7.centos             docker-ce-stable
docker-ce.x86_64            17.03.1.ce-1.el7.centos             docker-ce-stable
docker-ce.x86_64            17.03.0.ce-1.el7.centos             docker-ce-stable
 * base: mirrors.aliyun.com
- 安装Docker或安装指定版本Docker
# yum -y install docker
# yum -y install docker-ce-18.06.3.ce-3.el7
- 查看Docker版本
# docker --version
Docker version 18.06.3-ce, build d7080c1
- 修改Docker仓库为国内镜像站
# curl -sSL https://get.daocloud.io/daotools/set_mirror.sh | sh -s http://f1361db2.m.daocloud.io
- 启动Docker服务并添加至开机自启
# systemctl start docker
# systemctl enable docker
Compose
compose是Docker提供的一个命令行工具,用来定义和运行由多个容器组成的应用。使用compose,我们可以通过YAML文件声明式的定义应用程序的各个服务,并由单个命令完成应用的创建和启动。
由于国内政策原因,可能在海外网站上下载文件速度较慢,建议下载本地后上传至服务器
下载docker-compose并赋予可执行权限
# curl -L https://github.com/docker/compose/releases/download/1.25.0-rc2/docker-compose-`uname -s`-`uname -m` -o /usr/local/bin/docker-compose
# chmod +x /usr/local/bin/docker-compose
查看compose本地版本
# docker-compose -v
docker-compose version 1.25.0-rc2, build 661ac20e
DB
由于Harbor v1.9.0使用的是PostgreSQL,我们也同样独立部署一套PostgreSQL与Redis,此次演示使用Docker部署,实际生产环境按需要选择是否部署至宿主机。
PostgreSQL
通过查看已安装的Harbor v1.9.0单机版中运行的harbor-db容器可得知此次运行的PostgreSQL版本为9.6.14
# docker exec -it harbor-db /bin/bash
postgres [ / ]$ psql
psql (9.6.14)
Type "help" for help.

postgres=# select version();
                                    version
-------------------------------------------------------------------------------
 PostgreSQL 9.6.14 on x86_64-pc-linux-gnu, compiled by gcc (GCC) 6.3.0, 64-bit
(1 row)
Redis
根据官方文档描述,使用Redis需要4.0.10-1.ph2版本。同样,此次我们为了演示使用也使用docker-compose来部署。
yaml脚本
那么我们使用同一版本的PostgreSQL与Redis,编写docker-compose.yml 内容如下:
# author:akiya
version: "3"

networks:
  harbor:
    driver: bridge

services:
  registry:
    image: postgres:9.6.14
    container_name: harbor-registry
    restart: always
    environment:
      POSTGRES_DB: registry
      POSTGRES_PASSWORD: root123
    volumes:
      - $PWD/postgres/registry:/var/lib/postgresql/data
    networks:
      - harbor
    ports:
      - 20010:5432
  clair:
    image: postgres:9.6.14
    container_name: harbor-clair
    restart: always
    environment:
      POSTGRES_DB: clair
      POSTGRES_PASSWORD: root123
    volumes:
      - $PWD/postgres/clair:/var/lib/postgresql/data
    networks:
      - harbor
    ports:
      - 20011:5432
  notarysigner:
    image: postgres:9.6.14
    container_name: harbor-notarysigner
    restart: always
    environment:
      POSTGRES_DB: notarysigner
      POSTGRES_PASSWORD: root123
    volumes:
      - $PWD/postgres/notarysigner:/var/lib/postgresql/data
    networks:
      - harbor
    ports:
      - 20012:5432
  notaryserver:
    image: postgres:9.6.14
    container_name: harbor-notaryserver
    restart: always
    environment:
      POSTGRES_DB: notaryserver
      POSTGRES_PASSWORD: root123
    volumes:
      - $PWD/postgres/notaryserver:/var/lib/postgresql/data
    networks:
      - harbor
    ports:
      - 20013:5432
  Redis:
    image: redis:4.0.10
    container_name: harbor-redis
    command: redis-server /usr/local/etc/redis/redis.conf
    restart: always
    volumes:
      - $PWD/redis/data:/data
      - $PWD/redis/redis.conf:/usr/local/etc/redis/redis.conf
    networks:
      - harbor
    ports:
      - 20000:6379
保存后我们用docker-compose up -d命令启动相应的容器,并在防火墙中开放对应的端口
# docker-compose up -d
# firewall-cmd --zone=public --permanent --add-port=20000/tcp
# firewall-cmd --zone=public --permanent --add-port=20010/tcp
# firewall-cmd --zone=public --permanent --add-port=20011/tcp
# firewall-cmd --zone=public --permanent --add-port=20012/tcp
# firewall-cmd --zone=public --permanent --add-port=20013/tcp
# firewall-cmd --reload
NFS
服务端
创建NFS共享文件路径
# mkdir -p /data/nfs
安装NFS(在安装完nfs-utils后,rpcbind默认是启动了的)
# yum -y install nfs-utils rpcbind
启动NFS相关服务并设置开机启动
# systemctl start rpcbind
# systemctl enable rpcbind
# systemctl start nfs-server
# systemctl enable nfs-server
# systemctl start nfs-lock
# systemctl enable nfs-lock
# systemctl start nfs-idmap
# systemctl enable nfs-idmap
使用如下命令像/etc/exports中添加配置
# echo '/data/nfs  10.0.0.0/8(rw,sync,no_root_squash)' >> /etc/exports
# exportfs -a      # 使exports的修改生效
检查NFS共享目录是否正确
# showmount -e localhost
Export list for localhost:
/data/nfs 10.0.0.0/8
放行防火墙相应服务
# firewall-cmd --add-service=nfs --permanent --zone=public
# firewall-cmd --add-service=mountd --permanent --zone=public
# firewall-cmd --add-service=rpc-bind --permanent --zone=public
# firewall-cmd --reload
客户端
创建NFS挂载文件路径
# mkdir /data
安装NFS
# yum -y install nfs-utils
检查NFS远程共享目录是否存在
# showmount -e 10.10.1.10
Export list for 10.10.1.10:
/data/nfs 10.0.0.0/8
挂载远程NFS共享文件路径
# mount -t nfs 10.10.1.10:/data/nfs /data
添加到系统开机自动挂载
# echo '10.10.1.10:/data/nfs /data nfs defaults 0 0' >> /etc/fstab
测试
在客户端上挂载完NFS后创建一个测试文件
# touch /data/test
然后切换到服务器查看是否存在
# ls /data/nfs/
test
Harbor
下载
下载Harbor离线安装包,离线安装包文件较大(约为:590M),建议在本地使用多线程工具下载后上传服务器使用。
# curl -O https://storage.googleapis.com/harbor-releases/release-1.9.0/harbor-offline-installer-v1.9.0.tgz
也可以在服务器上安装axel多线程下载工具加速下载(可以自己找源码编译)
# curl -O http://download-ib01.fedoraproject.org/pub/epel/7/x86_64/Packages/a/axel-2.4-9.el7.x86_64.rpm
# rpm -ivh axel-2.4-9.el7.x86_64.rpm
# axel -n 20 https://storage.googleapis.com/harbor-releases/release-1.9.0/harbor-offline-installer-v1.9.0.tgz
解压安装包
# tar -zxvf harbor-offline-installer-v1.9.0.tgz && cd harbor
修改配置文件
修改harbor.yml配置文件
# vim harbor.yml
主要配置参数如下,由于我们这里使用外置PostgreSQL与Redis所以直接注释掉database相关配置改用external_database与external_redis
# 修改为当前服务器内网IP地址即可
hostname: reg.mydomain.com
# HTTP相关配置
http:
  port: 80
# HTTPS相关配置,这里由于我们会在前端加一个Nginx
# 所以我们直接使用HTTP,而在Nginx上做SSL
#https:
#  # HTTPS端口
#  port: 443
#  # TLS证书
#  certificate: /www/certs/harbor.crt
#  # TLS私钥
#  private_key: /www/certs/harbor.key
# 默认管理员密码
harbor_admin_password: Harbor12345
# Harbor DB配置,由于使用外部数据库,所以这里我们注释掉
# database:
#   password: root123
#   max_idle_conns: 50
#   max_open_conns: 100
...
# 外部PostgreSQL,由于Harbor使用了4个数据库,这里我们也需要对相应数据库地址进行配置
external_database:
  harbor:
    host: 10.10.1.10
    port: 20010
    db_name: registry
    username: postgres
    password: root123
    ssl_mode: disable
    max_idle_conns: 2
    max_open_conns: 0
  clair:
    host: 10.10.1.10
    port: 20011
    db_name: clair
    username: postgres
    password: root123
    ssl_mode: disable
  notary_signer:
    host: 10.10.1.10
    port: 20012
    db_name: notarysigner
    username: postgres
    password: root123
    ssl_mode: disable
  notary_server:
    host: 10.10.1.10
    port: 20013
    db_name: notaryserver
    username: postgres
    password: root123
    ssl_mode: disable
# 使用外部Redis,取消相应注释即可
external_redis:
  host: 10.10.1.10
  port: 20000
  password:
  registry_db_index: 1
  jobservice_db_index: 2
  chartmuseum_db_index: 3
...
生成harbor运行的必要文件(环境)以及docker-compose.yml文件;执行后会通过网络获取Docker Image,建议提前修改好国内镜像站加速。
# ./prepare
安装Harbor
# ./install.sh
开放Harbor端口
# firewall-cmd --zone=public --permanent --add-port=80/tcp
# firewall-cmd --reload
Nginx
安装
添加Nginx源
# rpm -ivh http://nginx.org/packages/centos/7/noarch/RPMS/nginx-release-centos-7-0.el7.ngx.noarch.rpm
yum安装Nginx
# yum -y install nginx
启动Nginx
# systemctl start nginx
# systemctl enable nginx
编写配置
创建/etc/nginx/conf.d/harbor.conf文件,并写入如下内容
upstream harbor {
    ip_hash;
    server 10.10.1.11:80;
    server 10.10.1.12:80;
}
server {
   listen       80;
   # 提供访问的域名或者IP
   server_name  harbor.yourdomain.com;
   return      308 https://$host$request_uri;
}
server {
    listen  443 ssl;
    server_name harbor.yourdomain.com;

    # SSL 证书
    ssl_certificate ./certs/harbor.crt;
    # SSL 私钥
    ssl_certificate_key ./certs/harbor.key;
    client_max_body_size 0;
    chunked_transfer_encoding on;

    location / {
        proxy_set_header X-Forwarded-For $proxy_add_x_forwarded_for;
        proxy_set_header Host $host;
        proxy_set_header X-Forwarded-Proto https;
        proxy_redirect off;
        proxy_ssl_verify off;
        proxy_ssl_session_reuse on;
        proxy_pass http://harbor;
        proxy_http_version 1.1;
}
    location /v2/ {
        proxy_pass http://harbor/v2/;
        proxy_set_header Host $host;
        proxy_set_header X-Real-IP $remote_addr;
        proxy_set_header X-Forwarded-For $proxy_add_x_forwarded_for;
        proxy_set_header X-Forwarded-Proto $scheme;
        proxy_ssl_verify off;
        proxy_ssl_session_reuse on;
        proxy_buffering off;
        proxy_request_buffering off;
    }
}
启动Nginx
验证Nginx配置正确性
# nginx -t
平滑重启Nginx
# nginx -s reload
开放防火墙80/443端口
# firewall-cmd --zone=public --permanent --add-port=80/tcp
# firewall-cmd --zone=public --permanent --add-port=443/tcp
# firewall-cmd --reload
问题处理
Nginx
问题:使用自签证书时报错
emerg] 31815#31815: cannot load certificate "/www/certs/harbor.crt": BIO_new_file() failed (SSL: error:0200100D:system library:fopen:Permission denied:fopen('/www/certs/harbor.crt','r') error:2006D002:BIO routines:BIO_new_file:system lib)
解决方法:创建/etc/nginx/certs路径,并复制证书到此路径
mkdir -p /etc/nginx/certs && cp /www/certs/ ./certs
修改harbor.conf中证书相关路径
# 刚才我们自己签发的证书
ssl_certificate ./certs/harbor.crt;
# 证书对应的私钥
ssl_certificate_key ./certs/harbor.key;
