

v8学习高级进阶之后的实战.md 继翻译了[译文]V8学习的高级进阶之后,相信肯定有很多人看得云里雾里的,这个时候就需要这篇针对高级进阶的实战之作,来帮助大家融会贯通。
接下去高级进阶中提到的概念都可以在下面的三个小部分中体现出来。在讲述概念之前,我们依然会有一个v8-demo来帮助我们理解一些东西。
1、环境准备
下载v8-demo到本地之后,我们需要先编译一份可用的v8库。
1.1、编译v8
如果有读过深入学习nodejs之前需要掌握的知识点这篇文章的童鞋应该对v8编译不陌生,我们使用第二种编译方式,但是略微不同的是我们直接将所有的动态库链接起来,直接生成一个目标文件v8_monolith,操作命令如下:
$ alias v8gen=/path/to/v8/tools/dev/v8gen.py // 这一步第一次编译v8的时候已经设置过了,没有设置的可以再整一次
$ v8gen x64.release.sample
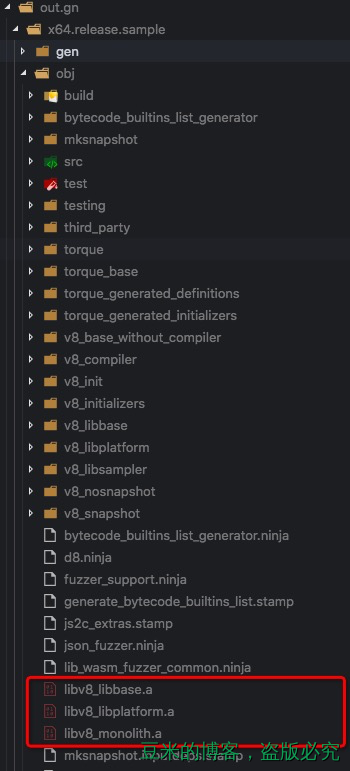
$ ninja -C out.gn/x64.release.sample v8_monolith
于是你可以在out.gn/x64.release.sample目录下看到有这么一个文件libv8_monolith.a:
然后我们使用CLion新建一个C++工程,目录如下:
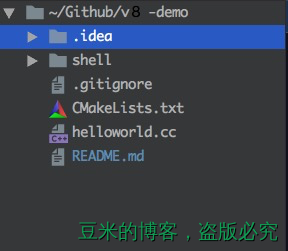
我们新建的CMakeLists.txt内容如下:
cmake_minimum_required(VERSION 3.2)
project(V8Demo)

include_directories(/Users/linxiaowu/Github/v8/include)
include_directories(/Users/linxiaowu/Github/v8)

link_directories(
        /Users/linxiaowu/Github/v8/out.gn/x64.release.sample/obj
)
link_libraries(
        v8_monolith
)

set(CMAKE_CXX_FLAGS "${CMAKE_CXX_FLAGS} -std=c++0x -pthread")

set(SOURCE_FILES
        ./helloworld.cc)
set(CALC_SOURCE
        ./shell/shell.cpp
        ./shell/interceptor.cpp
        ./shell/exposeToJsFuncs.cpp
        ./shell/exposeToJsVar.cpp
        ./shell/shell_util.cpp)
add_executable(HelloWorld ${SOURCE_FILES})
add_executable(Shell ${CALC_SOURCE})
CMake的语法不是我们关注的重点,想学习的可以参考:CMake tutorial
接着我们在CLion下按两次Shift键,就可以唤出命令行窗口,如下图:
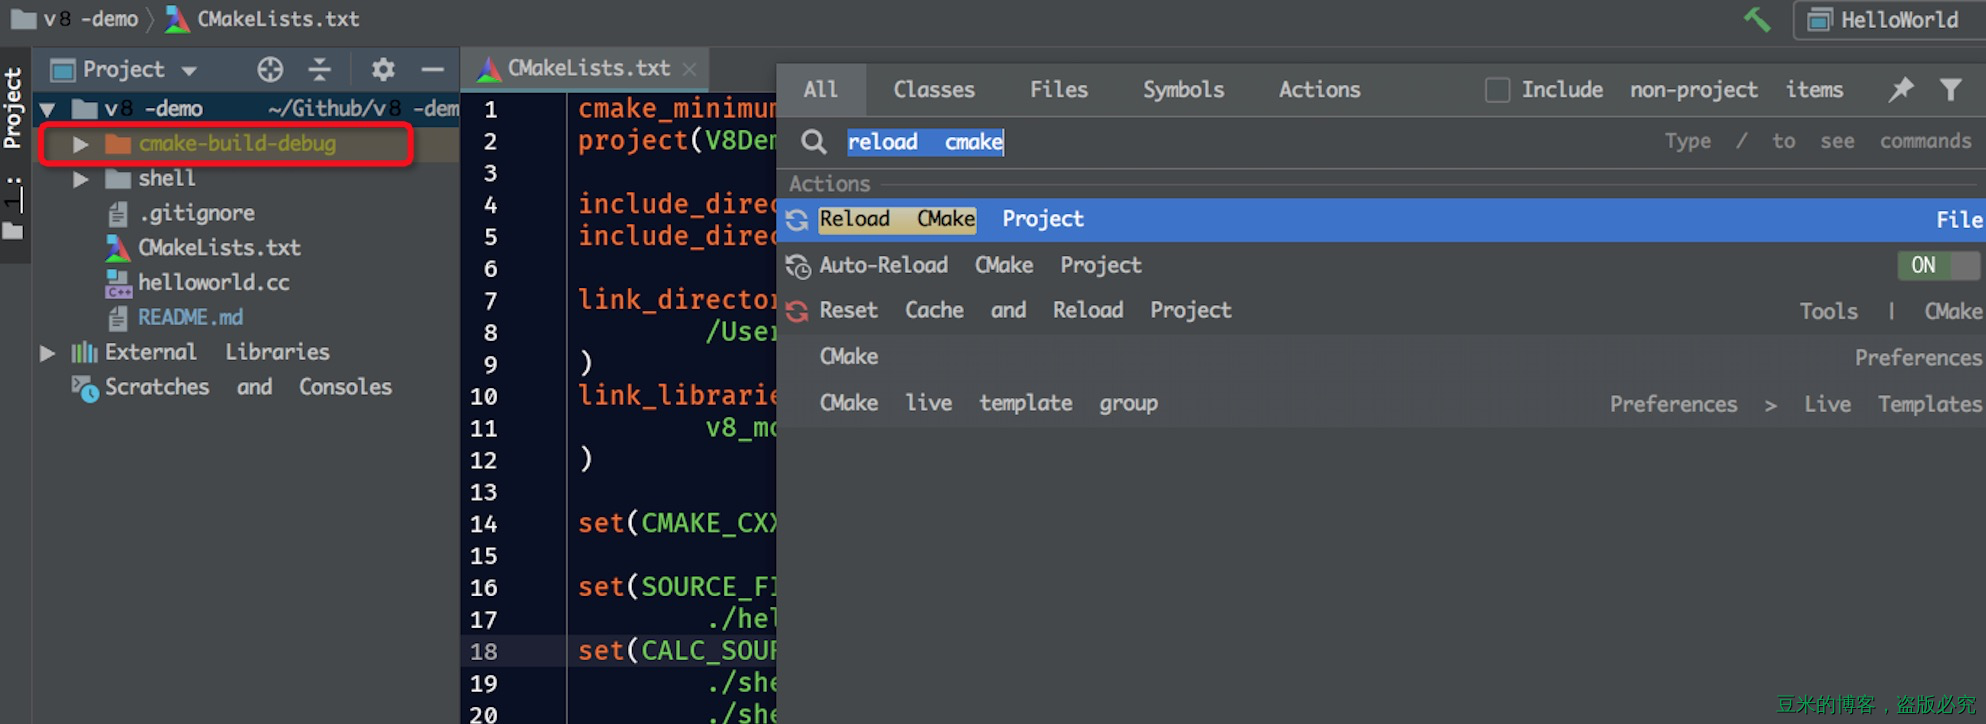
reload cmake命令可以生成Makefile文件以及一些附属文件。这样我们就可以Build这个工程。编译生成的文件放在cmake-build-debug下:
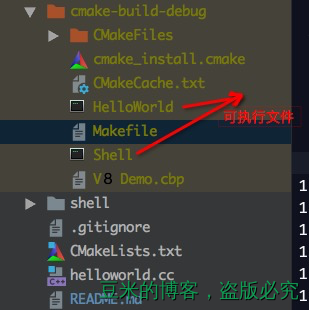
执行对应可执行文件,结果如下:

熟悉了上面的整套流程之后,我们开始来说说如何利用v8引擎和Js脚本做些事情。
2、v8引擎基本概念简述
在[译文]V8学习的高级进阶完整详细地介绍了很多概念,这里只是再把这些概念简化掉,让大家的记忆更加深刻。
2.1、isolate
这个概念在[译文]V8学习的高级进阶没有提及到,它表示的一个独立的V8虚拟机,拥有自己的堆栈。所以才取名isolate,意为“隔离”。在v8中使用以下语法进行初始化:
Isolate* isolate = Isolate::New(create_params);
2.2、handle
handle是指向对象的指针,在V8中,所有的对象都通过handle来引用,handle主要用于V8的垃圾回收机制。在 V8 中,handle 分为两种:持久化 (Persistent)handle 和本地 (Local)handle,持久化 handle 存放在堆上,而本地 handle 存放在栈上。比如我要使用本地句柄,句柄指向的内容是一个string,那么你要这么定义:
Local<String> source = String::NewFromUtf8(isolate, "'Hello' + ', World'", NewStringType::kNormal).ToLocalChecked();
鉴于一个个释放Handle比较麻烦,v8又提供了HandleScope来批量处理,你可以在handle之前声明好:
HandleScope handle_scope(isolate);
2.3、context
context 是一个执行器环境,使用 context 可以将相互分离的 JavaScript 脚本在同一个 V8 实例中运行,而互不干涉。在运行 JavaScript 脚本是,需要显式的指定 context 对象。创建上下文,需要这样:
// 创建一个上下文
Local<Context> context = Context::New(isolate);

// 进入上下文编译和运行脚本
Context::Scope context_scope(context);
2.4、V8的数据类型
由于 C++ 原生数据类型与 JavaScript 中数据类型有很大差异,因此 V8 提供了 Data 类,从 JavaScript 到 C++,从 C++ 到 JavaScrpt 都会用到这个类及其子类,比如:
String::NewFromUtf8(info.GetIsolate(), "version").ToLocalChecked()
这里的String便是V8的数据类型。再比如:
v8::Integer::New(info.GetIsolate(), 10);
2.5、对象模板和函数模板
这两个模板类用以定义 JavaScript 对象和 JavaScript 函数。我们在后续的小节部分将会接触到模板类的实例。通过使用 ObjectTemplate,可以将 C++ 中的对象暴露给脚本环境,类似的,FunctionTemplate 用以将 C++ 函数暴露给脚本环境,以供脚本使用。
3、如何使用v8引擎?
以官方提供的Hello world为例子,我们将其注释helloworld.cc,并写上对应的步骤:
1、初始化V8
2、创建一个新的隔离区,并将这个隔离区置为当前使用
3、创建一个栈分配的句柄范围
4、创建一个上下文
5、进入上下文编译和运行脚本
6、销毁isolate以及使用过的buffer,并关掉进程
其对应的代码如下:
int main(int argc, char * argv[]) {
  // 1、初始化V8
  V8::InitializeICUDefaultLocation(argv[0]);
  V8::InitializeExternalStartupData(argv[0]);
  unique_ptr<v8::Platform> platform = v8::platform::NewDefaultPlatform();
  V8::InitializePlatform(platform.get());
  V8::Initialize();

  // 2、创建一个新的隔离区,并将这个隔离区置为当前使用
  Isolate::CreateParams create_params;
  create_params.array_buffer_allocator = ArrayBuffer::Allocator::NewDefaultAllocator();
  Isolate* isolate = Isolate::New(create_params);
  {
    Isolate::Scope isolate_scope(isolate);

    // 3、创建一个栈分配的句柄范围
    HandleScope handle_scope(isolate);

    // 4、创建一个上下文
    Local<Context> context = Context::New(isolate);

    // 5、进入上下文编译和运行脚本
    Context::Scope context_scope(context);
    {
      Local<String> source = String::NewFromUtf8(isolate, "'Hello' + ', World'", NewStringType::kNormal).ToLocalChecked();

      Local<Script> script = Script::Compile(context, source).ToLocalChecked();

      Local<Value> result = script->Run(context).ToLocalChecked();

      String::Utf8Value utf8(isolate, result);

      printf("%s\n", *utf8);
    }
  }

  // 6、销毁isolate以及使用过的buffer,并关掉进程
  isolate->Dispose();
  V8::Dispose();
  V8::ShutdownPlatform();
  delete create_params.array_buffer_allocator;
  return 0;
}
有了上面的基础,看懂这些代码应该不在话下了。那么接下去,我们要探讨的是如何利用v8和js脚本做些事情呢?我们以官网的shell.cc为例,将其改造后拆分文件并放到v8-demo的shell目录下:
.
├── exposeToJsFuncs.cpp => 存放那些暴露给Js脚本使用的函数原型
├── exposeToJsVar.cpp => 存放那些暴露给Js脚本使用的变量访问器
├── interceptor.cpp => 拦截器存放的地方
├── load.js => 演示在js中加载的脚本文件
├── shell.cpp => 主文件
├── shell.h => 头文件
└── shell_util.cpp => 其他有用的函数存放的地方
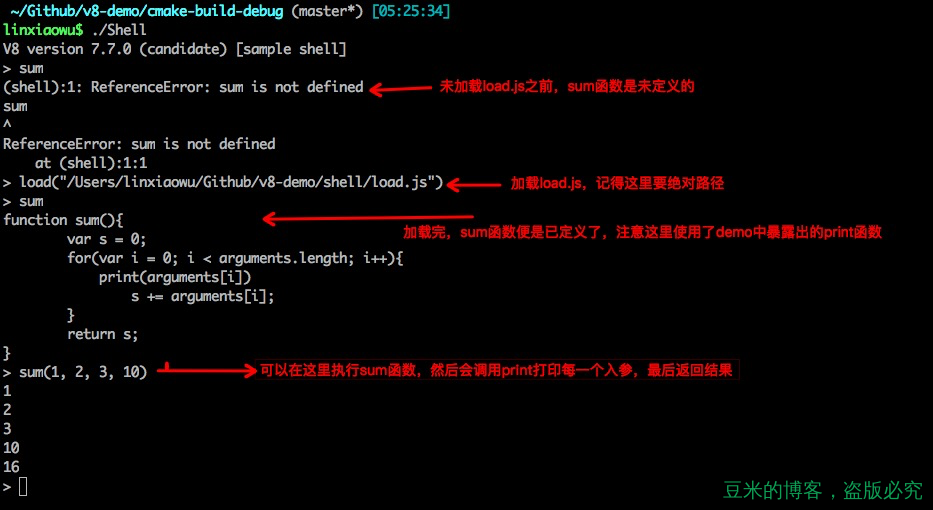
shell.cc提供了一个简易版本的CLI,在该CLI中可以执行js脚本并输出结果,也可以加载js文件进去供CLI执行,比如demo中提供了load.js文件,我们可以这样加载该文件并打印结果:
对shell.cc有了个大致了解之后我们开始从demo中抽出模板来说下面的三部分。
4、使用 C++ 变量
C++和Js之间共享模板比较容易,在[译文]V8学习的高级进阶中的第三节访问器中便提到了C++变量的访问。其中区分了静态全局变量和动态变量,我们在v8-demo中实现了二者。
4.1、使用全局静态变量
这个的使用在[译文]V8学习的高级进阶讲得比较清楚,其流程应该是:
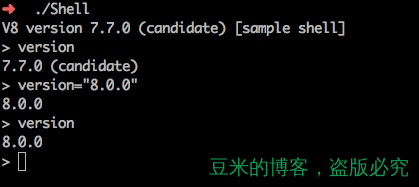
1、定义全局静态变量,demo中我们定义了version这个变量:char version[100];
2、定义全局静态变量的Getter/Setter方法,方法定义在文件exposeToJsVar:
void VersionGetter(Local<String> property,
                 const PropertyCallbackInfo<Value> &info) {
  info.GetReturnValue().Set(String::NewFromUtf8(info.GetIsolate(), version).ToLocalChecked());
}

void VersionSetter(Local<String> property, Local<Value> value, const PropertyCallbackInfo<void> &info) {
  String::Utf8Value str(info.GetIsolate(), value);
  const char *result = ToCString(str);
  strncpy(version, result, sizeof(version));
}
记得其通用的函数签名:(Local<String> property, const PropertyCallbackInfo<Value> &info)和(Local<String> property, Local<Value> value, const PropertyCallbackInfo<void> &info)
3、声明一个全局对象:Local<ObjectTemplate> global = ObjectTemplate::New(isolate);
4、挂载version的Getter方法和Setter方法到全局对象上,并以version这个名字暴露给Js使用:
global->SetAccessor(String::NewFromUtf8(isolate, "version").ToLocalChecked(), VersionGetter, VersionSetter);
直接运行我们的实例,操作如下:
4.2、使用动态变量
使用动态变量的也就是我们第三小节要讲的东西。
2、调用 C++ 函数
在 JavaScript 中调用 C++ 函数是脚本化最常见的方式,通过使用 C++ 函数,可以极大程度的增强 JavaScript 脚本的能力,如文件读写,网络 / 数据库访问,图形 / 图像处理等等,而在 V8 中,调用 C++ 函数也非常的方便。
首先在C++中定义原型函数Print:
void Print(const FunctionCallbackInfo <Value> &args) {
  bool first = true;
  for (int i = 0; i < args.Length(); i++) {
    HandleScope handle_scope(args.GetIsolate());
    if (first) {
      first = false;
    } else {
      printf(" ");
    }
    String::Utf8Value str(args.GetIsolate(), args[i]);
    const char *cstr = ToCString(str);
    printf("%s", cstr);
  }
  printf("\n");
  fflush(stdout);
}
这一类函数都有同样的函数签名:(const FunctionCallbackInfo &args)。
然后将其暴露到Js环境下:
Local<ObjectTemplate> global = ObjectTemplate::New(isolate);
global->Set(
      String::NewFromUtf8(isolate, "print", NewStringType::kNormal)
          .ToLocalChecked(),
      FunctionTemplate::New(isolate, Print));
于是我们就可以在Js环境下调用print函数了,在之前的图五中已经有展示过print函数的使用了:
function sum(){
	var s = 0;
	for(var i = 0; i < arguments.length; i++){
    print(arguments[i])
		s += arguments[i];
	}
	return s;
}
3、使用 C++ 类(动态变量)
这个使用在[译文]V8学习的高级进阶讲得也还算清楚,唯一让人混淆的是原文并没有提供出如何访问定义的C++类,而且文章的示例也是不够“动态”,因为只支持在C++中定义好,不支持在js脚本中动态创建。于是我们将其改造了一番。
在说改造之前,我们先清楚如果使用动态变量,在我们的v8-demo中,shell.cpp有定义一个宏,里面的代码便是原文的示例:
Local<ObjectTemplate> point_templ = ObjectTemplate::New(isolate);
point_templ->SetInternalFieldCount(1);
point_templ->SetAccessor(String::NewFromUtf8(isolate, "x").ToLocalChecked(), GetPointX, SetPointX);
point_templ->SetAccessor(String::NewFromUtf8(isolate, "y").ToLocalChecked(), GetPointY, SetPointY);
Point* p = new Point(11, 22);
Local<Object> obj = point_templ->NewInstance(context).ToLocalChecked();
obj->SetInternalField(0, External::New(isolate, p));
context->Global()->Set(context, String::NewFromUtf8(isolate, "p").ToLocalChecked(), obj).ToChecked();
完整流程便是:
- 新建对象模板
- 对象模板设置内部字段个数
- 挂载对象模板的成员变量的访问器
- 新建一个实例对象
- 对象模板实例化
- 设置实例化后的模板的内部字段索引为0的指向实例对象
- 暴露变量p到js空间下供访问
那么如果我们想要在Js空间下动态创建Point对象呢?那么便是我们下面的另外一套流程:
3.1、动态创建Point对象
首先我们在shell.h中定义好Point的类:
class Point {
public:
  Point(int x, int y) : x_(x), y_(y) { }
  int x_, y_;


  int multi() {
    return this->x_ * this->y_;
  }
};
类有两个成员变量和一个成员函数。接着我们对Point的构造器进行包装:
void constructPoint(const FunctionCallbackInfo <Value> &args) {
  Isolate* isolate = Isolate::GetCurrent();

  //get an x and y
  double x = args[0]->NumberValue(isolate->GetCurrentContext()).ToChecked();
  double y = args[1]->NumberValue(isolate->GetCurrentContext()).ToChecked();

  //generate a new point
  Point *point = new Point(x, y);

  args.This()->SetInternalField(0, External::New(isolate, point));
}
从函数原型上可以看出,构造器的包装与上一小节中函数的包装是一致的,因为构造函数在 V8 看来,也是一个函数。需要注意的是,从 args 中获取参数并转换为合适的类型之后,我们根据此参数来调用 Point 类实际的构造函数,并将其设置在 object 的内部字段中。紧接着,我们需要包装 Point 类的 getter/setter:
void GetPointX(Local<String> property,
                   const PropertyCallbackInfo<Value> &info) {
  printf("GetPointX is calling\n");

  Local<Object> self = info.Holder();
  Local<External> wrap = Local<External>::Cast(self->GetInternalField(0));
  void* ptr = wrap->Value();
  int value = static_cast<Point*>(ptr)->x_;
  info.GetReturnValue().Set(value);
}
void SetPointX(Local<String> property, Local<Value> value, const PropertyCallbackInfo<void> &info) {
  printf("SetPointX is calling\n");

  Local<Object> self = info.Holder();
  Local<External> wrap = Local<External>::Cast(self->GetInternalField(0));
  void* ptr = wrap->Value();
  static_cast<Point*>(ptr)->x_ = value->Int32Value(info.GetIsolate()->GetCurrentContext()).ToChecked();
}
以及对Point类成员方法的包装:
void PointMulti(const FunctionCallbackInfo <Value> &args) {
  Isolate* isolate = Isolate::GetCurrent();
  //start a handle scope
  HandleScope handle_scope(isolate);


  Local<Object> self = args.Holder();
  Local<External> wrap = Local<External>::Cast(self->GetInternalField(0));
  void* ptr = wrap->Value();

  // 这里直接调用已经实例化的Point类的成员方法multi,并拿到结果
  int value = static_cast<Point*>(ptr)->multi();

  args.GetReturnValue().Set(value);
}
在对函数包装完成之后,需要将 Point 类暴露给脚本环境:
Handle<FunctionTemplate> point_templ = FunctionTemplate::New(isolate, constructPoint);
point_templ->SetClassName(String::NewFromUtf8(isolate, "Point").ToLocalChecked());
// 挂载Point类到全局对象中,保证可用
  global->Set(String::NewFromUtf8(
      isolate, "Point", NewStringType::kNormal).ToLocalChecked(), point_templ);
然后定义原型模板:
//初始化原型模板
Handle<ObjectTemplate> point_proto = point_templ->PrototypeTemplate();

// 原型模板上挂载multi方法
point_proto->Set(String::NewFromUtf8(
    isolate, "multi", NewStringType::kNormal).ToLocalChecked(), FunctionTemplate::New(isolate, PointMulti));
接着实例化模板:
// 初始化实例模板
Handle<ObjectTemplate> point_inst = point_templ->InstanceTemplate();

//set the internal fields of the class as we have the Point class internally
point_inst->SetInternalFieldCount(1);

//associates the name "x"/"y" with its Get/Set functions
point_inst->SetAccessor(String::NewFromUtf8(isolate, "x").ToLocalChecked(), GetPointX, SetPointX);
point_inst->SetAccessor(String::NewFromUtf8(isolate, "y").ToLocalChecked(), GetPointY, SetPointY);
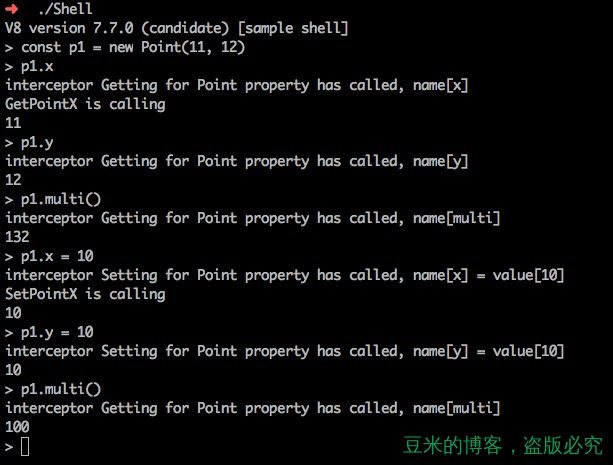
于是我们可以轻松地在Js环境下使用Point类,而不用去关注Point类的定义:
在这个实例我们用到了[译文]V8学习的高级进阶第7节提及到的继承功能: PrototypeTemplate。另外还有InstanceTemplate。二者的用途是这样的:
- PrototypeTemplate用于在原型上定义函数或者访问器
- InstanceTemplate用于在一个已经调用构造器函数实例化后的类实例添加函数或者访问器
4、使用拦截器
最后一个要说的是拦截器,正如原文所说的,拦截器是针对所有属性的,而访问器是针对个别属性的,于是我们在上面的示例中添加一个拦截器,注意:原文中拦截器的方法已经废弃!!请使用下文中的示例
// 给访问x设置一个拦截器吧
point_inst->SetHandler(NamedPropertyHandlerConfiguration(PointInterceptorGetter, PointInterceptorSetter));
拦截器的定义如下:(在interceptor.cpp文件中)
void PointInterceptorGetter(
    Local<Name> name, const PropertyCallbackInfo<Value>& info) {
  if (name->IsSymbol()) return;

  // Fetch the map wrapped by this object.
  map<string, string>* obj = UnwrapMap(info.Holder());

  // Convert the JavaScript string to a std::string.
  string key = ObjectToString(info.GetIsolate(), Local<String>::Cast(name));

  printf("interceptor Getting for Point property has called, name[%s]\n", key.c_str());

  // 如果调用这个设置return,那么就不会再执行后面的Getter
  //  info.GetReturnValue().Set(11);
}
在上图中,我们看到当访问p1.x的时候,都会打印拦截器的printf函数。这表明拦截器生效了。另外需要注意的是:
如果你再拦截器中调用info.GetReturnValue()的话,那么访问器就不会再继续执行,而是在拦截器中直接放回了,你可以去掉上述代码的注释试试看哦~
