介绍
大哥,帮我P个图呗
忙着呢,没空
很简单的,你看就是这个图他宽了点,放到页面上人都挤扁了,帮稍微P窄一点点就好了
那你把图片裁掉一点不就行了
裁掉人就看不全了
好吧,发我邮箱有空帮你弄下
为了更好的显示效果,我们经常需要调整一下图片尺寸,而PS技术又不熟练,看完这篇文章,你就不用求着设计师帮你P图了
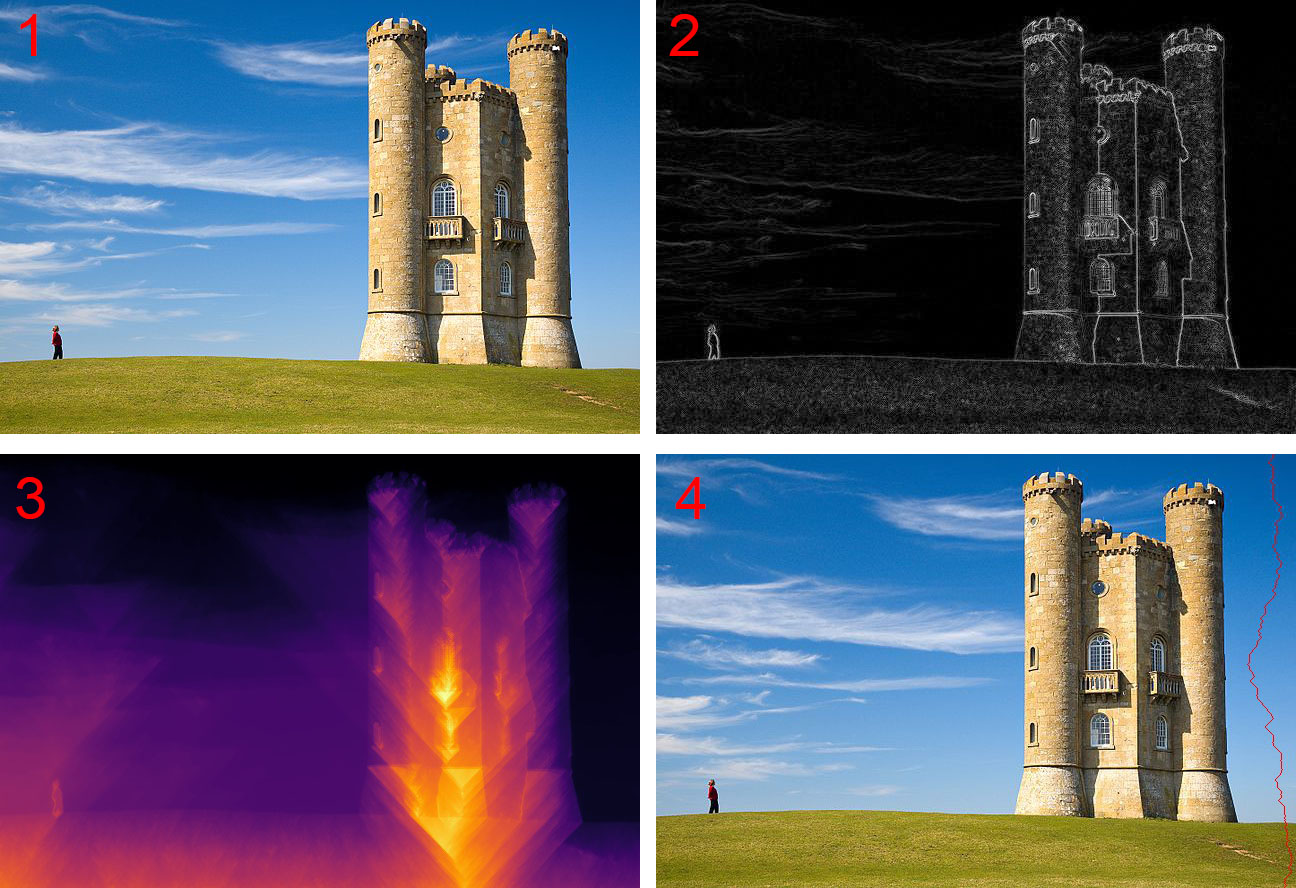
Seam carving算法是一种有趣的图像缩放算法,和常见的外框裁剪或者几何拉伸不同,算法能感知到图片内容,区分出主要的物体,避开这些主体的基础上进行变形的,例如:
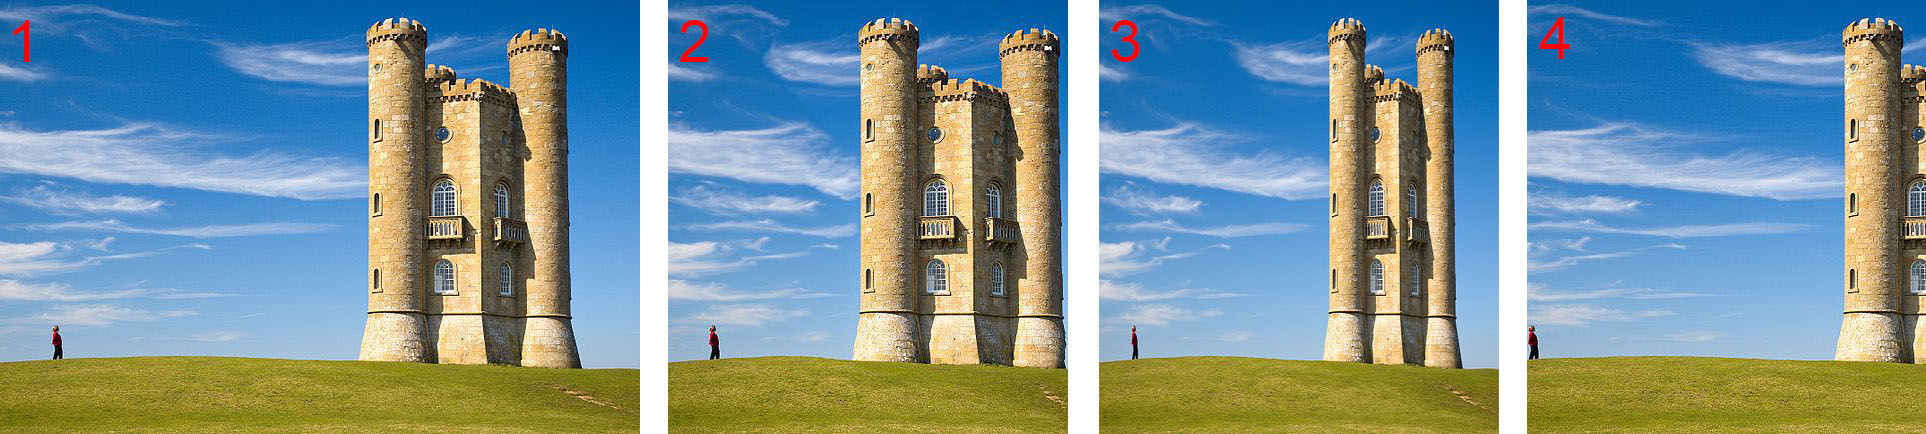
可以看到图2虽然宽度缩小了,但是其中的人和建筑并没有明显的变形,而3中的人和建筑已经被压扁了,4中建筑已经不完整了。人和建筑作为图片中主要元素,被算法感知到,并在处理时被尽量的保留了下来。
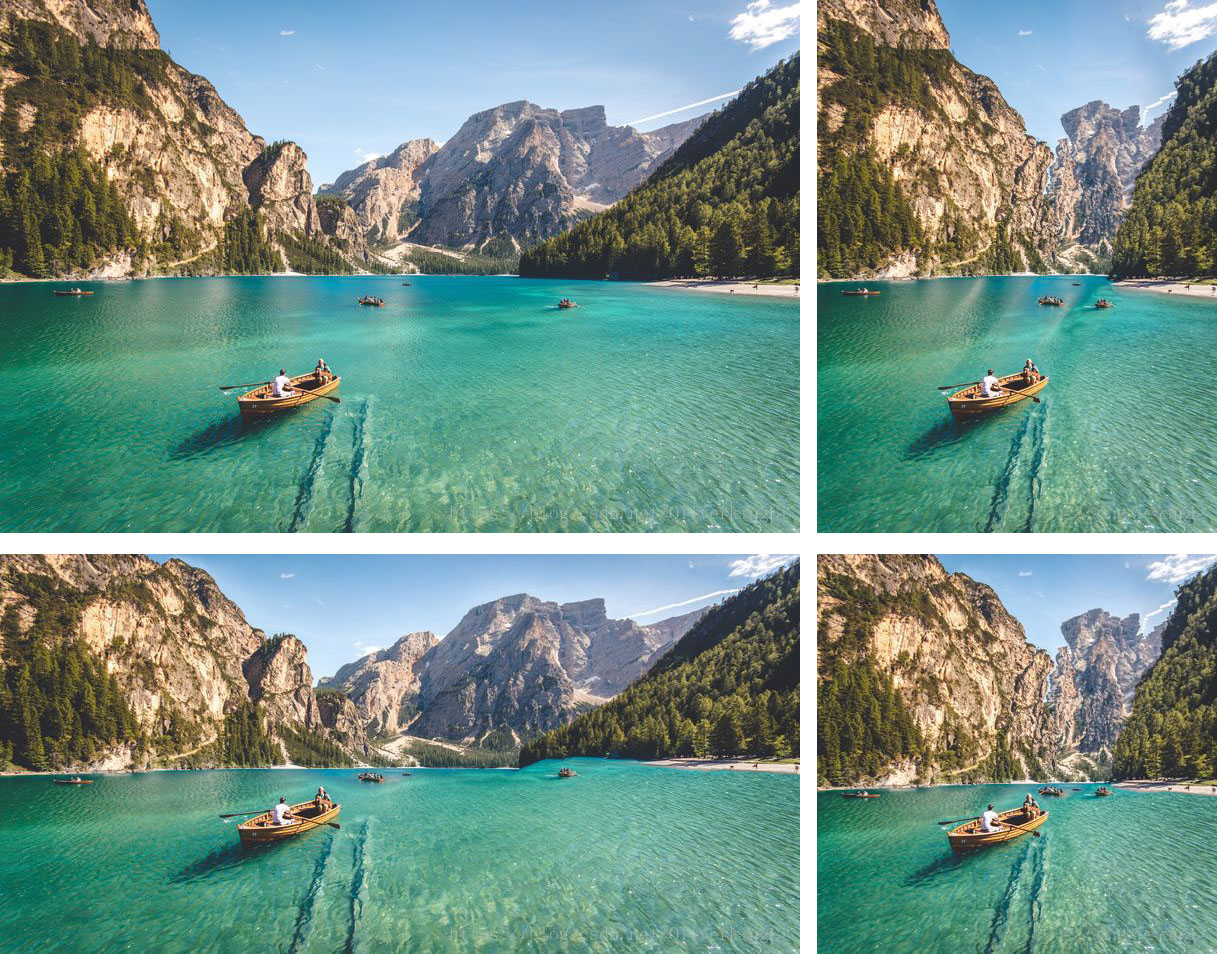
当然,算法也可以应用到垂直方向上,或者同时应用到水平和垂直两个方向,例如:
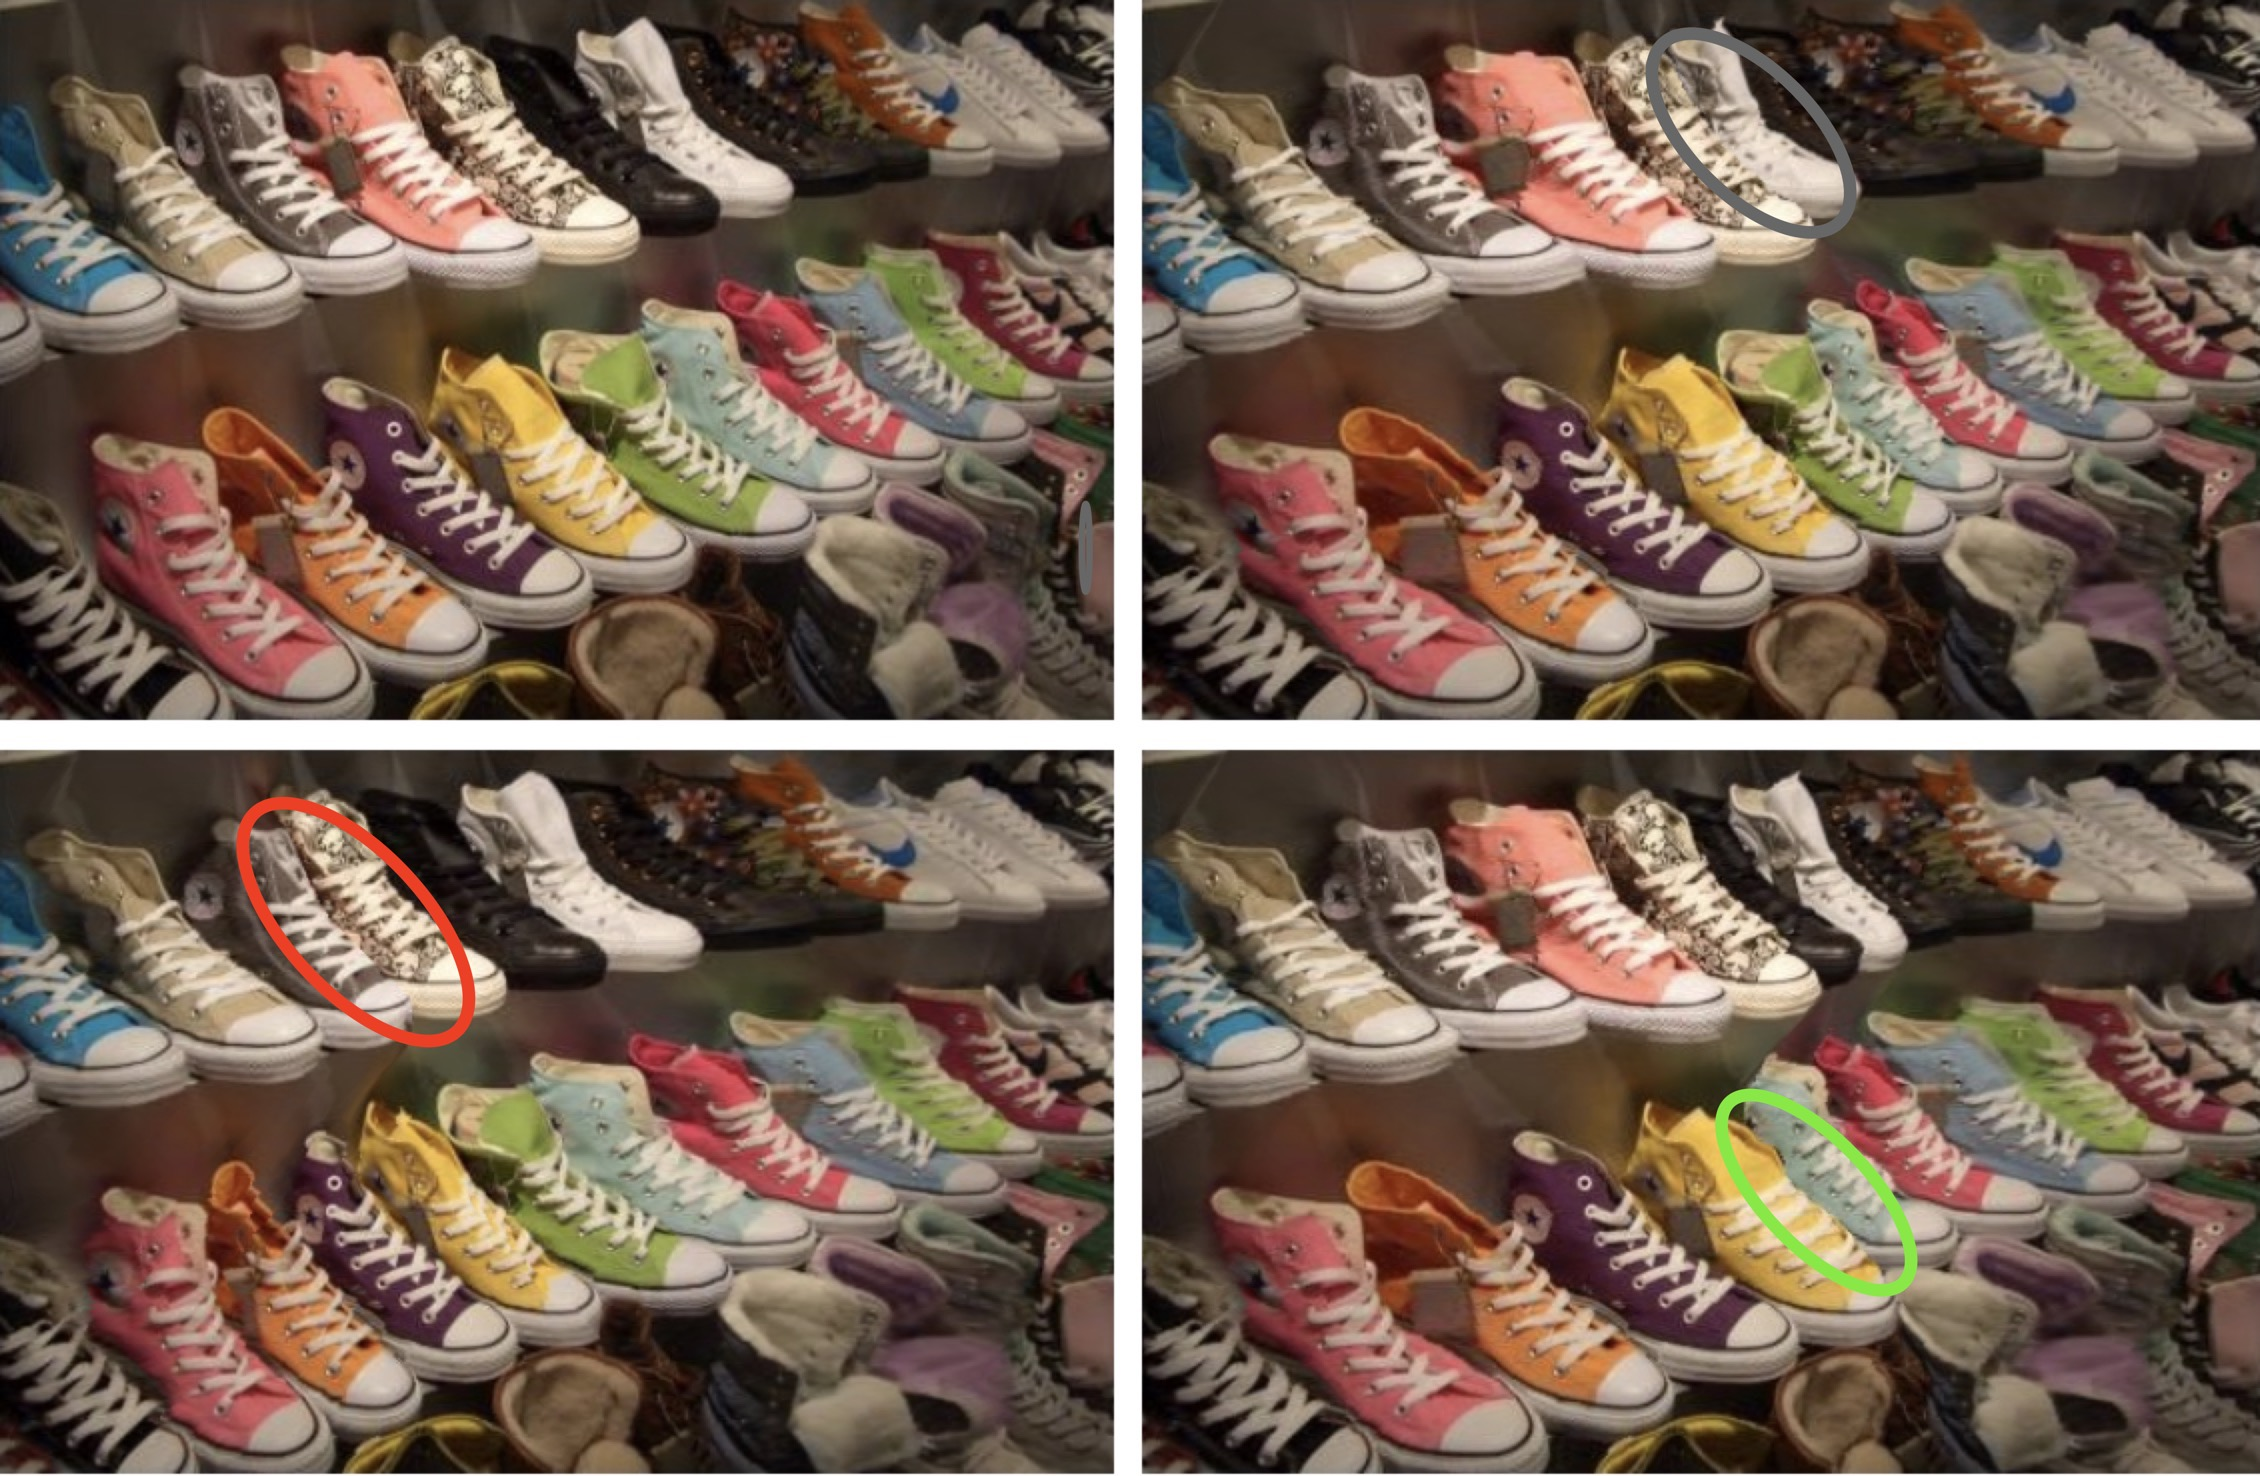
甚至,可以将图片中某个物体标记出来,定向的移除这个物体,效果几乎可以媲美专业的PS。找找看,下面哪只鞋子不见了
如果没找到,没关系,文章最后提供了参考答案
原理
背景介绍
2007年,Shai Avidan和Ariel Shamir发表的《Seam Carving for Content-Aware Image Resizing》中首次提出Seam carving算法,文中提到,图片的排版布局形式多样,同一张图片往往需要很多不同的尺寸来适应不同的场景和设备,而仅仅是外框裁剪亦或是简单的几何缩放效果都不是很好,所以需要一种优雅的方式来动态的调整图片的尺寸,而这种尺寸的变换又需要能很好的保留图片想要表达的信息,这就是Seam carving算法。
理论
为了使变换结果尽可能的自然,需要找出图片中不重要的,包含信息量少的像素,论文中用的描述是unnoticeable pixels that blend with their surroundings。
这里定义了一个能量函数的概念,文中给出了能量函数如下:
能量越大,意味着包含的信息越多,对图片进行变换时需要尽可能避开能量大的像素
算法的逻辑是这样的,假设需要将图片的宽度从600裁剪到400。先找出一条竖直方向上的夹缝,从图片中移除这条夹缝,宽度从600减为599,重复200次,即可到一张宽度400的新图。
上面提到的一条竖直方向上的夹缝,有如下要求,
- 在图片每行有且仅有一个像素点
- 相邻的两行之间的像素坐标
.
为了找到一条最小能量的夹缝(Seam),从最上方第一行开始,向下列出所有可能的夹缝路线,最后找到能量损失最小的那条,其中位于(i, j)坐标处的能量损失定义如下:
找出夹缝后,将夹缝移除,图片宽度-=1;
然后继续计算新的图片中的能量和能量损失,找出下一条损失最小的夹缝,一直减少图片宽度,直到图片宽度满足要求
示例
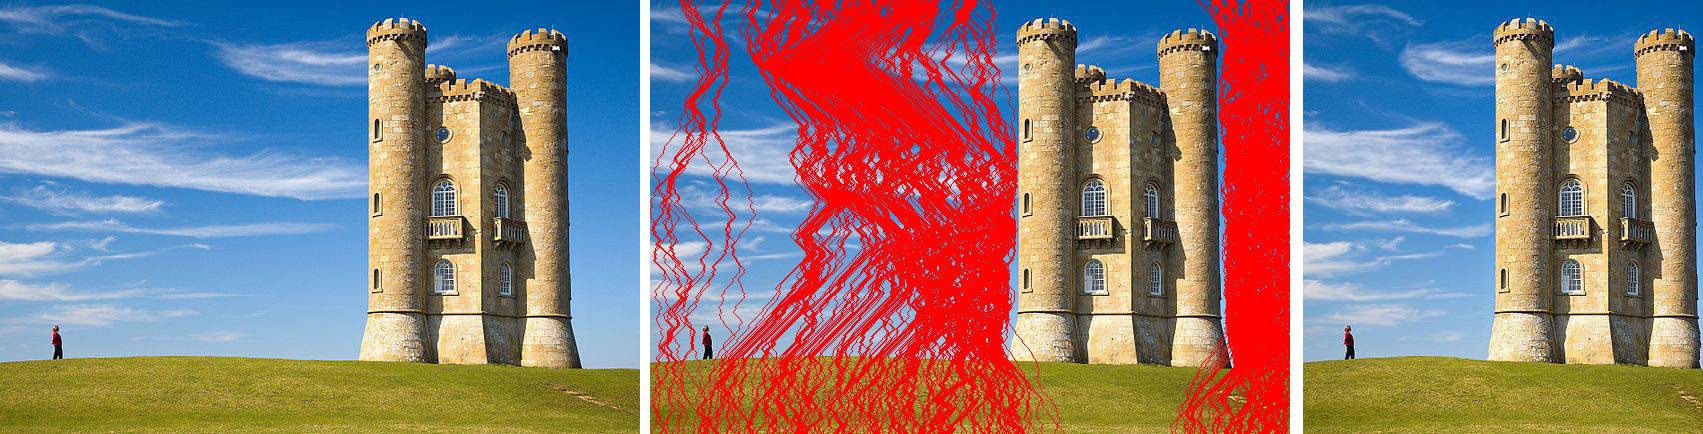
下面展示下裁剪图片的具体流程:
- 下方图1为待处理图片
- 根据
计算能量,得到图2
- 从上往下计算能量损失,得到结果如图3所示
- 找到一条能量损失最小的夹缝,夹缝路径如图4中红线所示
- 移除夹缝后,回到步骤2,继续寻找下一条夹缝
拉伸
与裁剪类似,图片拉伸也是在能量最小的像素上对图片进行操作,找出能量损失最小的夹缝,将夹缝复制插入原先位置,循环往复,即可实现图片的拉伸。
需要注意的是,与裁剪操作每次循环操作一条夹缝不同,拉伸操作需要一次性找出所有待插入的夹缝(取能量损失从小到大前size条),批量整体插入夹缝,否则每次循环将会找到同一条夹缝,并不断的重复插入。
物体移除
为了定向的移除图片中的物体,只需在energy_function计算后将物体对应的像素的能量值手动调小,这样一来找到的夹缝自然会经过定向的物体,循环数次之后,待移除的物体就从图片中被移除了。这时再使用拉伸操作将图片拉回原始尺寸,物体的移除操作就完成了
能量函数
这里还有一个问题,能量函数为什么是梯度的距离。
贴心的作者在文中给出了解释:
We have tested both and
of the gradient, saliency measure [Itti et al. 1999], and Harris-corners measure [Harris and Stephens 1988]. We also used eye gaze measurement [DeCarlo and Santella 2002], and the output of face detectors.
在比对了一番后,得出结论,没有哪一个能适合所有场景,但是总的来说, 和
这两个表现的不错,其中
定义如下:
3、实现
优化
因为每一条夹缝都需要重新计算能量和能量损失,这个算法的计算量还是比较大的,上面图片从640裁剪到400,在我的笔记本上平均执行6s左右。
考虑到夹缝移除后,其他部分的能量是不会变化的,其实仅需更新移除附近的能量值,按照这个思路,优化后大概减伤了0.5s的计算时间,但是整个计算时间还是偏长。
因为平时java用的比较顺手,就用java重新撸了一遍,处理同一张图片时间减少到了1s左右,效率上也不是很理想,希望后面能想办法再优化一下效率。
代码
最后,附上完整的python代码,其中:
reduce(image, size)方法提供了图片的裁剪
enlarge(image, size)方法提供了图片的拉伸
remove_object(image, mask)方法提供了物体移除
energy_function(image)实现的是,有兴趣的朋友可以尝试下其他能量函数
python 3.7.3
import numpy as np
import matplotlib.pyplot as plt
from skimage import color, io, util
from time import time

def energy_function(image):
    gray_image = color.rgb2gray(image)
    gradient = np.gradient(gray_image)
    return np.absolute(gradient[0]) + np.absolute(gradient[1])

def compute_cost(image, energy, axis=1):
    energy = energy.copy()

    if axis == 0:
        energy = np.transpose(energy, (1, 0))

    H, W = energy.shape

    cost = np.zeros((H, W))
    paths = np.zeros((H, W), dtype=np.int)

    # Initialization
    cost[0] = energy[0]
    paths[0] = 0

    for row in range(1, H):
        upL = np.insert(cost[row - 1, 0:W - 1], 0, 1e10, axis=0)
        upM = cost[row - 1, :]
        upR = np.insert(cost[row - 1, 1:W], W - 1, 1e10, axis=0)
        upchoices = np.concatenate((upL, upM, upR), axis=0).reshape(3, -1)

        # M(i, j) = e(i, j) + min(M(i -1 , j - 1), M(i - 1, j), M(i - 1, j + 1))
        cost[row] = energy[row] + np.min(upchoices, axis=0)

        # left = -1
        # middle = 0
        # right = 1
        paths[row] = np.argmin(upchoices, axis=0) - 1

    if axis == 0:
        cost = np.transpose(cost, (1, 0))
        paths = np.transpose(paths, (1, 0))

    return cost, paths

def backtrack_seam(paths, end):
    H, W = paths.shape
    seam = - np.ones(H, dtype=np.int)

    seam[H - 1] = end

    for h in range(H - 1, 0, -1):
        seam[h - 1] = seam[h] + paths[h, end]
        end += paths[h, end]

    return seam

def remove_seam(image, seam):
    if len(image.shape) == 2:
        image = np.expand_dims(image, axis=2)

    H, W, C = image.shape

    mask = np.ones_like(image, bool)
    for h in range(H):
        mask[h, seam[h]] = False
    out = image[mask].reshape(H, W - 1, C)
    out = np.squeeze(out)

    return out

def reduce(image, size, axis=1, efunc=energy_function, cfunc=compute_cost):
    out = np.copy(image)
    if axis == 0:
        out = np.transpose(out, (1, 0, 2))

    while out.shape[1] > size:
        energy = efunc(out)
        costs, paths = cfunc(out, energy)
        end = np.argmin(costs[-1])
        seam = backtrack_seam(paths, end)
        out = remove_seam(out, seam)

    if axis == 0:
        out = np.transpose(out, (1, 0, 2))

    return out

def duplicate_seam(image, seam):
    if len(image.shape) == 2:
        image = np.expand_dims(image, axis=2)

    H, W, C = image.shape
    out = np.zeros((H, W + 1, C))

    for h in range(H):
        out[h] = np.vstack((image[h, :seam[h]], image[h, seam[h]], image[h, seam[h]:]))

    return out

def find_seams(image, k, axis=1, efunc=energy_function, cfunc=compute_cost):
    image = np.copy(image)
    if axis == 0:
        image = np.transpose(image, (1, 0, 2))

    H, W, C = image.shape
    indices = np.tile(range(W), (H, 1))
    seams = np.zeros((H, W), dtype=np.int)

    for i in range(k):
        # Get the current optimal seam
        energy = efunc(image)
        cost, paths = cfunc(image, energy)
        end = np.argmin(cost[H - 1])
        seam = backtrack_seam(paths, end)

        # Remove that seam from the image
        image = remove_seam(image, seam)

        # Store the new seam with value i+1 in the image
        seams[np.arange(H), indices[np.arange(H), seam]] = i + 1

        # Remove the indices used by the seam, so that `indices` keep the same shape as `image`
        indices = remove_seam(indices, seam)

    if axis == 0:
        seams = np.transpose(seams, (1, 0))

    return seams

def enlarge(image, size, axis=1, efunc=energy_function, cfunc=compute_cost):
    out = np.copy(image)
    if axis == 0:
        out = np.transpose(out, (1, 0, 2))

    H, W, C = out.shape

    seams = find_seams(out, size - W)
    for i in range(size - W):
        seam = np.where(seams == i + 1)[1]
        out = duplicate_seam(out, seam)

    if axis == 0:
        out = np.transpose(out, (1, 0, 2))

    return out

def remove_object(image, mask):
    assert image.shape[:2] == mask.shape

    H, W, _ = image.shape
    out = np.copy(image)

    H,W,C = out.shape
    while not np.all(mask == 0):
        energy = energy_function(out)
        weighted_energy = energy + mask * (-100)
        cost, paths = compute_cost(out, weighted_energy)
        end = np.argmin(cost[-1])

        seam = backtrack_seam(paths, end)
        out = remove_seam(out, seam)
        mask = remove_seam(mask,seam)

    return enlarge(out, W, axis=1)


tower = io.imread('imgs/tower_original.jpg')
tower = util.img_as_float(tower)
plt.subplot(1, 2, 1)
plt.imshow(tower)

out = reduce(tower, 400)
plt.subplot(1, 2, 2)
plt.imshow(out)

plt.show()
参考
最后参考答案,左上角的是原图,其他三张图分别移除了一只鞋子