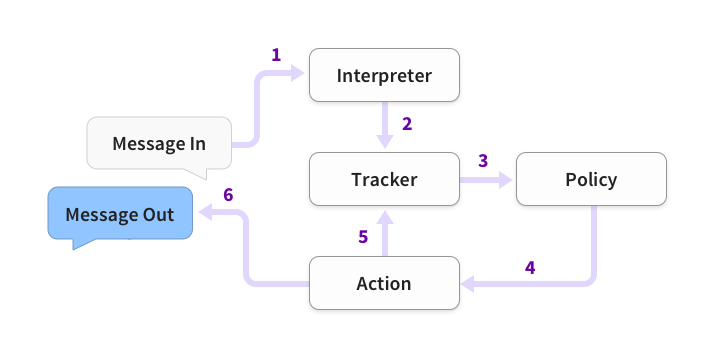
1. RASA整体结构

- 一句话输入,经过Interpreter处理,使用NLU,将这句话进行解析,结果就是一组字典,包括:原始句子,意图,识别的实体等。
- 将上一步的结果传入Tracker来追踪对话状态。
- Policy接收上一步的状态,然后决定下一步要采取的Action
- 这个Action再依据Tracker来生成最终的回复。
2. Rasa NLU
2.1 Pileine
在Rasa NLU中,一句话需要经过一系列的组件(Component)来处理,这个处理过程是组件依次执行,并且下一个组件会使用上一个组件的结果,这个过程就被称之为Pipeline. 通常一个pipeline会包含的组件有:预处理,实体抽取,意图分类等。 下面是由一系列组件得到的结果,比如,实体(entities)是有实体抽取组件得到的。
{
"text": "I am looking for Chinese food",
"entities": [
    {"start": 8, "end": 15, "value": "chinese", "entity": "cuisine", "extractor": "CRFEntityExtractor", "confidence": 0.864}
],
"intent": {"confidence": 0.6485910906220309, "name": "restaurant_search"},
"intent_ranking": [
    {"confidence": 0.6485910906220309, "name": "restaurant_search"},
    {"confidence": 0.1416153159565678, "name": "affirm"}
]
}
看一下初始化nlu模型中创造pipeline的代码:
    def _build_pipeline(
    cfg: RasaNLUModelConfig, component_builder: ComponentBuilder
) -> List[Component]:
    """Transform the passed names of the pipeline components into classes"""
    pipeline = []
    # Transform the passed names of the pipeline components into classes
    for i in range(len(cfg.pipeline)):
        component_cfg = cfg.for_component(i)
        component = component_builder.create_component(component_cfg, cfg)
        pipeline.append(component)
    return pipeline


传入RasaNLUModelConfig和ComponentBuilder类,然后创造config中定义的所有Component类,放进pipeline中,pipeline其实就是一个list啦。
###2.3 Component
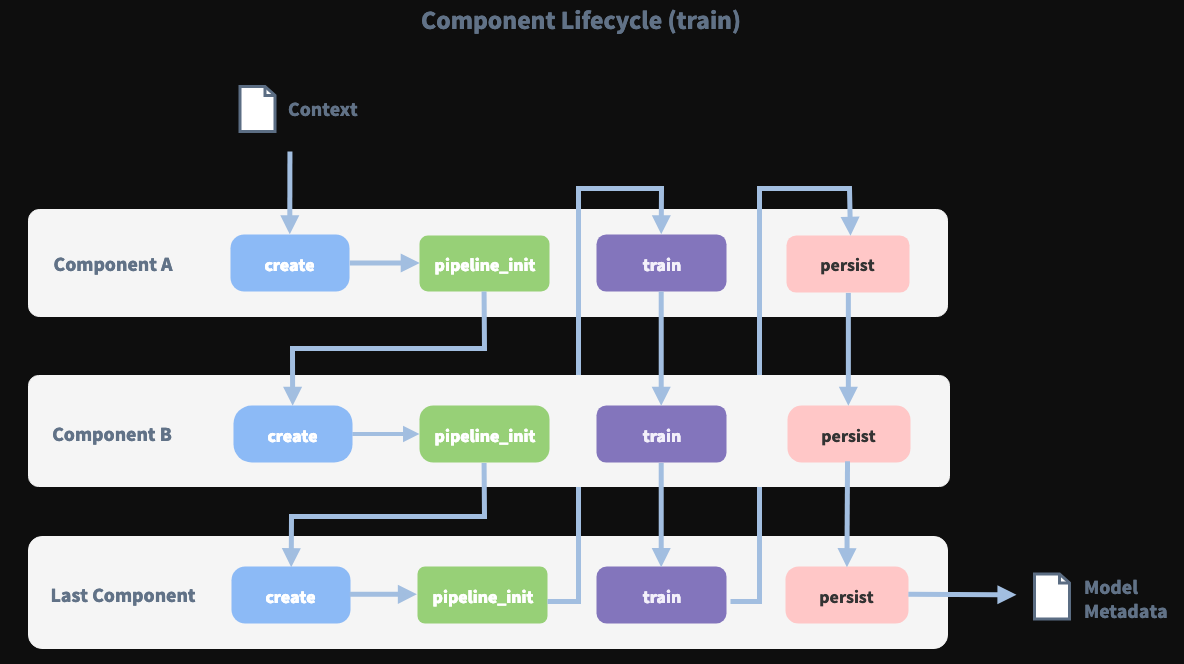
每一个组件实例都可以执行几个特定的方法,而在一个pipeline中,这些方法会以固定的顺序依次执行。 假设我们的pipeline中定义了三个组件:"pipeline": ["Component A", "Component B", "Last Component"],下图中显示了在训练过程各组建方法的调用顺序以及组建的生存周期:

Component类包含的方法有: create(),train(),persis(),process(),load()等。 Component是所有独立组件的父类,每个独立组建需要具体实现父类的每个方法。 当用create()方法创造一个Component实例,一个context就别生成了(其实就是python里面的一个dict),然后我们就使用这个context在组建之间传递信息。 所以,当所有的组件训练完成并且持久化了,最终的context字典就用来持久化最终这个模型的元数据(metadata)。
介绍几个Component:
2.2.1 词向量
2.2.2 特征提取器
列出一些可供选择的Featurizers: MitieFeaturizer,SpacyFeaturizer,NGramFeaturizer,RegexFeaturizer,CountVectorsFeaturizer,具体介绍可以到官网教程上看。
2.2.3 意图分类器
- KeywordIntentClassifier,只使用关键字来进行意图识别。
- MitieIntentClassifier, 是MITIE中提供的分类器,使用SVM,输入需要分词Tokenizers和featurizer。
- SklearnIntentClassifier, 是sklearn中提供的一个svm分类器,另外会使用grid search进行参数优化搜索。输入需要featurizer。
- EmbeddingIntentClassifier, 这个分类器的实现是基于StarSpace,就是将输入和对应的label映射到相同空间,然后最大化他们之间的相似度。具体的实现中另外增加了一层隐层并使用dropout。输入需要featurizer。
StarSpace模型
-
模型解释:StarSpace模在于学习entities,而每一个entity是由一组离散的特征(features)组成,这些特征构成一个特征字典。比如,当把一篇document或者一个sentence看作一个entity,组成他的特征就是词代或者n-grams。或者,当把一个人看作entity,他就能通过一组文章、电影、喜欢的东西等来描述。 StarSpace将不同类别的entity通过embedding映射到相同空间,这样,就可以比较任何不同类别的entity。 令特征字典
有特征
,他是一个
维的矩阵,其中
表示第i个特征(一行),就是一个d维的向量。然后,我们embed一个实体a的表示为:
-
模型初始化:首先给特征字段中的每个特征分配一个d维的向量。然后一个实体有一组特征组成,也就是由一组上述d维向量。 训练模型:需要学习如何取比较实体。然后最小化下面的loss function:

- positive entity pairs(a, b)是从正例集合
中生成,而这个数据集不同任务不同。
- negetive entiies b是从负例集合
中生成。k-negative sampling的策略可以是每次从batch中任意选取k个label。
- 相似度函数
可以使用cosine similarity或者inner product,对于小数量label(比如分类任务),两者效果相似。但是,一般来讲,cosine similarity更适用于大数据label(比如句子和文档相似度)。
- L is the loss function that compares the positive pair (a, b) with the negative pairs.
-
模型的使用: 我们可以直接使用学习到的函数
来计算entity之间的相似度。比如,对于分类任务,对于输入a,直接计算
,
表示所有可能的label。对于ranking任务,可以直接使用相似度进行排序。
-
各任务的使用(构造
和
)
- text classification
- multilabel classification
- information retrieval and document embeddings
如果有现成监督学习数据集,a是搜索关键词,b是相关的文档,而
是不相关的文档。如果只有非监督数据集,a表示文档中任选的关键词,而b表示文档中剩下的词语。
- Learning Word Embeddings 一个window的词语作为a,中间的一个词语看作b。
- Learning Sentence Embeddings
相同文档中选取sentence pair看作a, b。而
来自其他文档中。
- Rasa中的实现
_create_tf_embed_nn()用来创建encoder部分,a和b的encoder是相同的网络。其实Rasa中就是使用多层的神经网络。
    def _create_tf_embed_nn(
        self, x_in: "Tensor", is_training: "Tensor", layer_sizes: List[int], name: Text
    ) -> "Tensor":
        """Create nn with hidden layers and name"""

        reg = tf.contrib.layers.l2_regularizer(self.C2)
        x = x_in
        for i, layer_size in enumerate(layer_sizes):
            x = tf.layers.dense(
                inputs=x,
                units=layer_size,
                activation=tf.nn.relu,
                kernel_regularizer=reg,
                name="hidden_layer_{}_{}".format(name, i),
            )
            x = tf.layers.dropout(x, rate=self.droprate, training=is_training)

        x = tf.layers.dense(
            inputs=x,
            units=self.embed_dim,
            kernel_regularizer=reg,
            name="embed_layer_{}".format(name),
        )
        return x
_tf_loss()d用来定义网络的loss。主要包括三个部分:1. positive similarity, 2. negtive similarity, 3. similarity between intent. 网络的默认超惨设置
- mu_pos=0.8,这个参数表示对于正例对(a,b),你要尽量让a,b之间的相似度等于mu_pos,这个值在0.0-1.0之间。
- mu_neg=-0.4,表示负例对最大相似度,值在-1.0-1.0之间。
另外loss还包括意图embedding之间相似度,意思是要让相同意图的编码尽量相似。
    def _tf_loss(self, sim: "Tensor", sim_emb: "Tensor") -> "Tensor":
        """Define loss"""

        # loss for maximizing similarity with correct action
        loss = tf.maximum(0.0, self.mu_pos - sim[:, 0])

        if self.use_max_sim_neg:
            # minimize only maximum similarity over incorrect actions
            max_sim_neg = tf.reduce_max(sim[:, 1:], -1)
            loss += tf.maximum(0.0, self.mu_neg + max_sim_neg)
        else:
            # minimize all similarities with incorrect actions
            max_margin = tf.maximum(0.0, self.mu_neg + sim[:, 1:])
            loss += tf.reduce_sum(max_margin, -1)

        # penalize max similarity between intent embeddings
        max_sim_emb = tf.maximum(0.0, tf.reduce_max(sim_emb, -1))
        loss += max_sim_emb * self.C_emb

        # average the loss over the batch and add regularization losses
        loss = tf.reduce_mean(loss) + tf.losses.get_regularization_loss()
        return loss
2.2.4 selector
先看一个例子:
{
    "text": "What is the recommend python version to install?",
    "entities": [],
    "intent": {"confidence": 0.6485910906220309, "name": "faq"},
    "intent_ranking": [
        {"confidence": 0.6485910906220309, "name": "faq"},
        {"confidence": 0.1416153159565678, "name": "greet"}
    ],
    "response_selector": {
      "faq": {
        "response": {"confidence": 0.7356462617, "name": "Supports 3.5, 3.6 and 3.7, recommended version is 3.6"},
        "ranking": [
            {"confidence": 0.7356462617, "name": "Supports 3.5, 3.6 and 3.7, recommended version is 3.6"},
            {"confidence": 0.2134543431, "name": "You can ask me about how to get started"}
        ]
      }
    }
}
使用与意图识别相同的模型 EmbeddingIntentClassifier,将用户输入与回答的内容嵌入到相同的空间进行比较。只是训练意图识别模型的时候label是意图分布,而训练response selector 模型的时候,label就是所有答案分布。
可以直接用于构建一个答案检索模型,从一组答案中直接预测答案。
另外,此组件可以通过配置retrieval_intent,从而只在指定意图上训练response selector 模型。