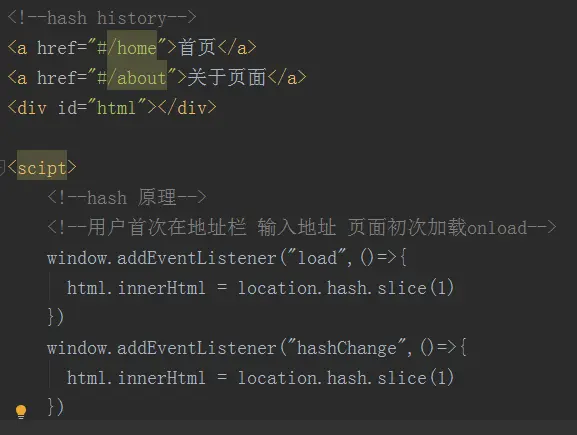
hash模式简单实现
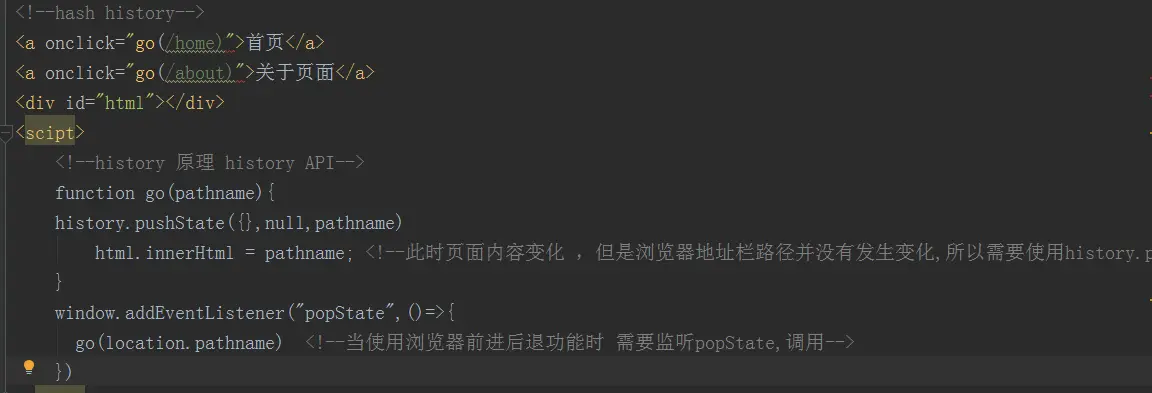
history模式实现
两种模式之间的区别:
- 使用hash模式 主要是浏览器地址栏会自动进行url跳转,从而触发 hashChange事件 我们需要在该方法的回调函数中做页面内容虽路由动态展示
- history模式 主要是有路径信息 可以在函数中对页面内容进行相应处理,但是浏览器地址栏并不会自动变化,所以需要使用history.pushState() API进行手动更新地址栏地址,,并且这个时候 由于该路由是不存在的,(是通过pushState手动更改的地址栏)所以会出现页面刷新 出现404的情况 这个时候需要后端配合 把所有的请求都重定向到首页路由,另外还有一个问题就是浏览器的前进后退此时也是失效的,可以监听popState事件 更改浏览器地址栏
VueRouter比较核心的:
- mode----路由模式: hash history
- routes---路由信息对象 (需要使用createRouter映射成routerMap 方便根据history对象中保存的current当前路由对象 去取相应的component)
- 全局组件
- 使用路由之前需要注册 Vue.use(VueRouter) vue安装注册一个插件 都需要采用该方式 use()方法执行时 会手动调用所安装插件的install方法 ,在该方法中会使用Vue.minxin方法 混入生命周期,使得每一个组件 也即Vue实例都可以拿到
 route对象
class HistoryRoute{
// 产生一个history对象,current属性保存当前路由(写成一个类 方便之后扩展hsitory对象
constructor(){
this.current = null
}
}
class VueRouter {
constructor(options){
this.mode = options.mode || "hash";
this.routes = options.routes ||[]; // 路由信息 是一个数组[{path: '/home' ,component: Home}]
this.routesMap = this.createMap(this.routes); // 路由信息映射表 {'/home':Home}
this.history = new HistoryRoute() // history对象的current属性保存当前的路由对象
this.init() // 初始化
}
init(){
// 负责把当前路径添加到history对象的current属性上,然后对路径进行监听,hash-->hashChange;history->popState
if(this.mode==="hash"){
// 先判断用户打开时 有没有hash,如果没有 需要默认跳转到
loation.hash?"":location.hash = '/'
// 需要把当前路径存到history对象的current对象上
window.addEventListener("load",()=>{
this.history.current = location.hash.slice(1);
})
window.addEventListener("hashChange",()=>{
this.history.current = location.hash.slice(1)
})
}else {
location.pathname?"":location.pathname = '/';
window.addEventListener("load",()=>{
this.history.current = location.pathname
})
window.addEventListener("popState",()=>{
this.history.current = location.pathname
})
}
}
go(){
}
back(){}
forward(){}
createMap(routes){
// 方便根据当前路由对象 history.current借助路由映射对象找到对应的Component
routes.reduce((memo,current,index,arr)=>{
memo[current.path] = current.component;
return memo
},[])
}
}
// 使用Vue.use()方法 调用时 会直接调用所注册插件的install方法
VueRouter.install = function (Vue){
console.log(Vue) // Vue 就是Vue构造函数
// 每个组件(Vue的实例)都有$router $route对象,这里用Vue.mixin方法 混入
Vue.mixin({
// 使用Vue.mixin()方法 混入一些方法比如beforeCreate 这样每个组件在实例化的过程中 都会在beforeCreate钩子函数中执行下面的方法
beforeCreate() {
// 主要是给每一个vue实例 设置 两个对象 注册两个全局组件
console.log(this.$options.name) // 每个组件都会把beforeCreate方法 混合成一个 在该钩子函数中执行打印组件name
// 需要在所有的组件 vue实例中都绑定同一个路由对象
if(this.$options && this.$options.router){ // 定位根组件
this._root = this; // 把当前实例挂载到_root上
this._router = this.$options.router; // 把根组件的option中穿的router对象挂载到_router上
Vue.util.defineReactive(this,"xxx",this._router.history) // 需要对router对象的history对象监听
}else {
this._root = this.$parent._root; // Vue组件渲染顺序 父--子---孙
// 想在子组件中拿到_router对象 可以直接this._root._router
}
// 使用Object.defineProperty给vue的每一个实例--组件都会设置一个$router $route对象
// $router 其实就是VueRouter实例 $route其实就是路由信息对象
Object.defineProperty(this, "$router", {
get(){
return this._root._router; // 取到路由实例router
}
})
Object.defineProperty(this, "$route", {
get(){
return this._root._router.history.current; // 取到路由实例的history对象的current 当前路由对象
}
})
Vue.component("router-link", {
render(h) {// h====react CreateElement
let mode = this._self._root._router.mode;
return <a href={mode === "hash"?`
}
})
Vue.component("router-view", {
// 根据当前的状态 即当前路由this.$route(==this._root._router.history.current)以及路由映射表 routesMap找出需要渲染的组件
render(h) {
console.log(this._self) // 在render方法中的this其实是一个Proxy对象 this._self才是当前的vue实例
// 需要把history对象的current属性 动态变化 监听 然后更新视图 双向绑定
let current = this._self._root._router.history.current; // 此时这个current其实为null 因为是先注册组件(执行install方法 然后才会init方法 执行onload事件 给history对象的current赋值
let routesMap = this._self._root._router.routesMap;
return h(routesMap[current])
}
})
}
})
}
export default VueRouter


