

官方文档
简介
Feign是一个声明性web服务客户端。它使编写web服务客户端变得更容易。使用feign创建一个接口并对其进行注释。它有可插入的注释支持,包括外部注释和jax-rs注释。feign还支持可插入的编码器和解码器。spring cloud增加了对spring mvc注释的支持,以及对使用spring web中默认使用的httpMessageConverter的支持。spring cloud集成了ribbon和eureka,在使用feign时提供了一个负载平衡的http客户端-----来自官方翻译。
其实Feign框架就是,上一章第五节服务消费者使用的一个工具,主要做的事情就是帮助服务消费者查找和调用服务。
下面我分三步走
- 创建一个服务消费者,增加OpenFeign框架,调用服务服务提供者的服务。
- 构建两个相同的服务提供者,在一个服务消费者使用OpenFeign框架,返回接口查看效果。
- OpenFeign的相关配置案例实现
一.集成OpenFeign框架,走通http请求
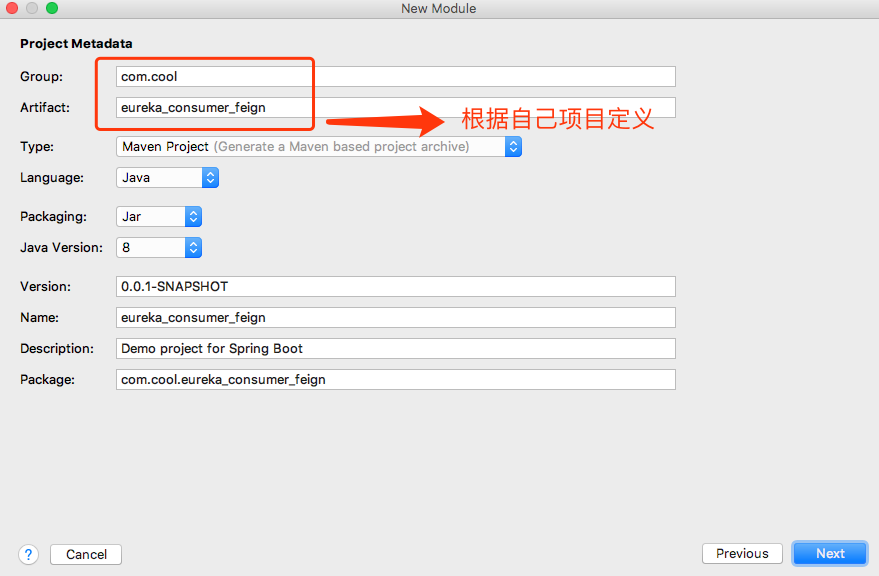
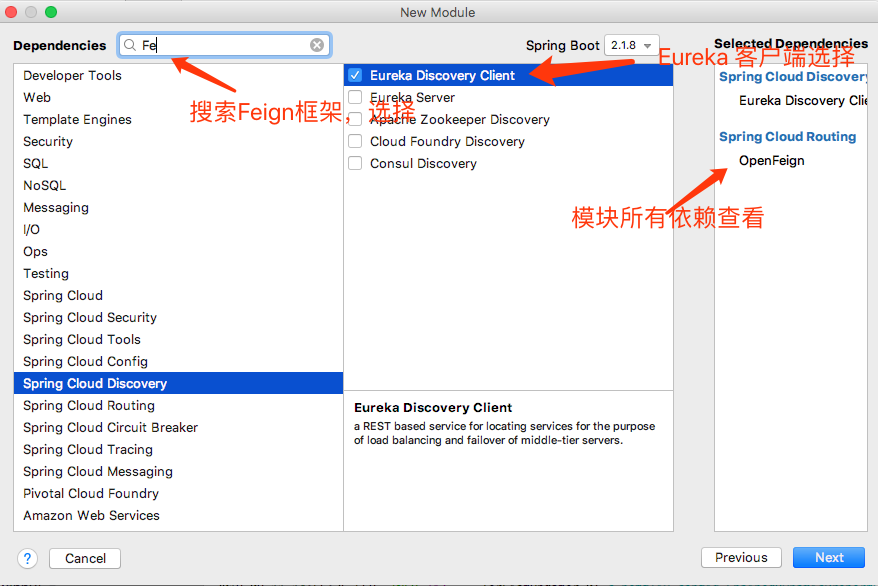
我们在上一章基础上创建一个服务消费者,步骤和上一章第五节类似,就是多了OpenFeign框架依赖。
选中scloud项目,右击 New - Module - Spring Initializr

next
next
修改模块的pom文件
<?xml version="1.0" encoding="UTF-8"?>
<project xmlns="http://maven.apache.org/POM/4.0.0" xmlns:xsi="http://www.w3.org/2001/XMLSchema-instance"
         xsi:schemaLocation="http://maven.apache.org/POM/4.0.0 https://maven.apache.org/xsd/maven-4.0.0.xsd">
    <modelVersion>4.0.0</modelVersion>
    <!--继承自主工程-->
    <parent>
        <artifactId>scloud</artifactId>
        <groupId>com.cool</groupId>
        <version>1.0-SNAPSHOT</version>
    </parent>
    <groupId>com.cool</groupId>
    <artifactId>eureka_consumer_openfeign</artifactId>
    <version>0.0.1-SNAPSHOT</version>
    <name>eureka_consumer_openfeign</name>
    <description>Demo project for Spring Boot</description>

    <dependencies>
        <dependency>
            <groupId>org.springframework.cloud</groupId>
            <artifactId>spring-cloud-starter-netflix-eureka-client</artifactId>
        </dependency>
        <dependency>
            <groupId>org.springframework.cloud</groupId>
            <artifactId>spring-cloud-starter-openfeign</artifactId>
        </dependency>
        <dependency>
            <groupId>org.springframework.boot</groupId>
            <artifactId>spring-boot-starter-test</artifactId>
            <scope>test</scope>
        </dependency>
    </dependencies>
    <dependencyManagement>
        <dependencies>
            <dependency>
                <groupId>org.springframework.cloud</groupId>
                <artifactId>spring-cloud-dependencies</artifactId>
                <version>${spring-cloud.version}</version>
                <type>pom</type>
                <scope>import</scope>
            </dependency>
        </dependencies>
    </dependencyManagement>
    <build>
        <plugins>
            <plugin>
                <groupId>org.springframework.boot</groupId>
                <artifactId>spring-boot-maven-plugin</artifactId>
            </plugin>
        </plugins>
    </build>
</project>
在启动文件中增加 @EnableFeignClients 和 @EnableEurekaClient 注解
@SpringBootApplication
@EnableFeignClients
@EnableEurekaClient
public class EurekaConsumerOpenfeignApplication {

    public static void main(String[] args) {
        SpringApplication.run(EurekaConsumerOpenfeignApplication.class, args);
    }
}
修改 application.properties 文件
#端口号
server.port=8669
# 需要指明spring.application.name 这个很重要
# 这在以后的服务与服务之间相互调用一般都是根据这个
spring.application.name=eureka-openfeign
#服务注册中心实例的主机名
eureka.instance.hostname=localhost
#服务注册中心端口号
eureka.port=8666
#在此指定服务注册中心地址
eureka.client.service-url.defaultZone=http://${eureka.instance.hostname}:${eureka.port}/eureka/
至此配置已经完成,下面我们根据上面介绍,创建一个接口和一个Restful api进行测试下吧。
创建一个接口
@Component
@FeignClient(value = "eureka-client") // 这里eureka-client 即是服务提供者spring.application.name
public interface TestServer {
    @GetMapping(value = "/hello")
    public String sayHello(@RequestParam(value = "name", defaultValue = "gdl") String name);
}
创建一个Restful Api
@RestController
@RequestMapping("/test")
public class TestController {
    @Autowired
    TestServer testServer;

    @GetMapping("/sayHello/{name}")
    public String sayHello(@PathVariable("name") String name){
        return testServer.sayHello(name);
    }
}
现在可以和第一章一样,先启动 eureka_server 模块服务,在启动eureka_client 模块提供服务,最后启动我们现在配置的服务 访问 http://localhost:8666 查看下服务提供者
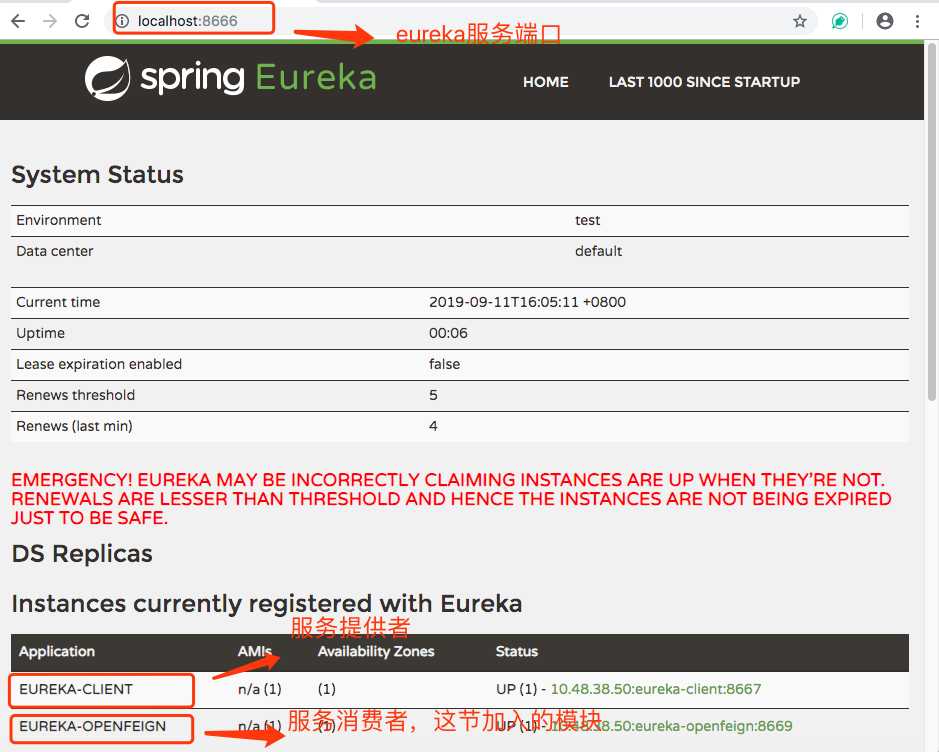
访问下 本模块配置Restful 接口 http://localhost:8669/test/sayHello/world 哇!通了~

由此看出Feign扮演的角色,就是查找和调用服务提供者服务。
二.构建两个相同的服务提供者
那我就仿照第一章第四节的内容,在创建一个服务提供者就命名eureka_client1吧,下面会给出源码,eureka_client1和eureka_client的代码没什么区别,这里我就不贴了。
不一样的是 eureka_client1 的 application.properties 文件修改 server.port =8670
然后我们启动 eureka_server 模块服务,在启动eureka_client1 和 eureka_client 两个服务提供模块,最后启动我们现在配置的服务,访问下 http://localhost:8666 查看下已注册的服务
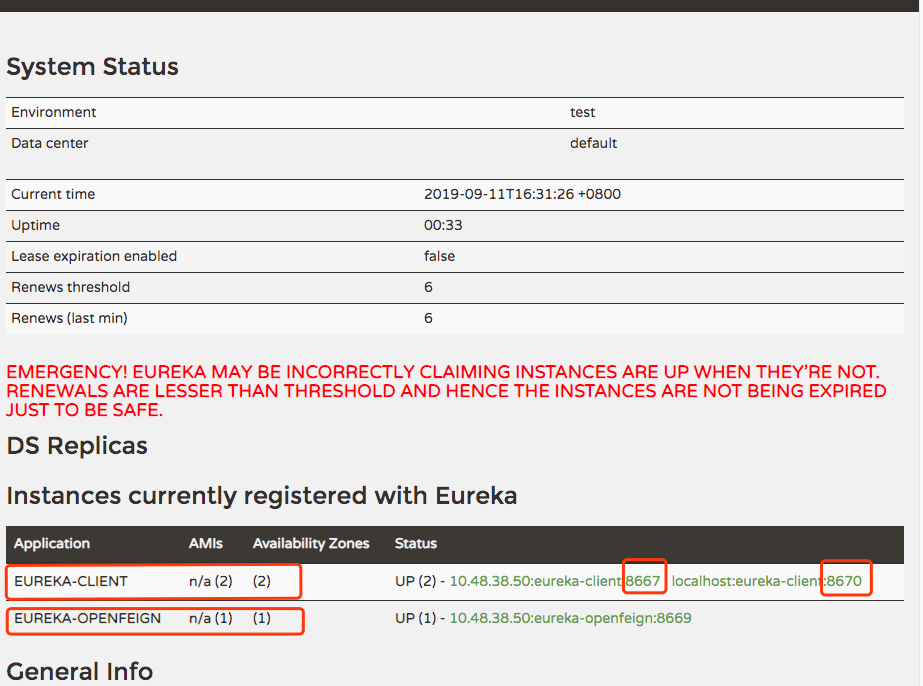
最后启动本模块配置的Restful 接口 http://localhost:8669/test/sayHello/world 多刷几下,是不是出现了下面结果。


是不是so easy !
三.声明性web服务客户端有哪些配置
配置这边暂时留白了,集成项目的时候一个个列出常用的配置,时间宝贵,赶紧研究下一个技术之Gateway,因为有些配置网关会处理掉,就不重复叙述了。
切换到 f_openfeign 分支!!!
