前言
关于 FlutterGo 或许不用太多介绍了。
如果有第一次听说的小伙伴,可以移步FlutterGo官网查看下简单介绍.

FlutterGo 在这次迭代中有了不少的更新,笔者在此次的更新中,负责开发后端以及对应的客户端部分。这里简单介绍下关于 FlutterGo 后端代码中几个功能模块的实现。
总体来说,FlutterGo 后端并不复杂。此文中大概介绍以下几点功能(接口)的实现:
- FlutterGo 登陆功能
- 组件获取功能
- 收藏功能
- 建议反馈功能
环境信息
阿里云 ECS 云服务器
Linux iz2ze3gw3ipdpbha0mstybz 3.10.0-957.21.3.el7.x86_64 #1 SMP Tue Jun 18 16:35:19 UTC 2019 x86_64 x86_64 x86_64 GNU/Linux
mysql :mysql Ver 8.0.16 for Linux on x86_64 (MySQL Community Server - GPL)
node:v12.5.0
开发语言:midway + typescript + mysql
代码结构:
src
├─ app
│    ├─ class 定义表结构
│    │    ├─ app_config.ts
│    │    ├─ cat.ts
│    │    ├─ collection.ts
│    │    ├─ user.ts
│    │    ├─ user_collection.ts
│    │    └─ widget.ts
│    ├─ constants 常量
│    │    └─ index.ts
│    ├─ controller
│    │    ├─ app_config.ts
│    │    ├─ auth.ts
│    │    ├─ auth_collection.ts
│    │    ├─ cat_widget.ts
│    │    ├─ home.ts
│    │    ├─ user.ts
│    │    └─ user_setting.ts
│    ├─ middleware 中间件
│    │    └─ auth_middleware.ts
│    ├─ model
│    │    ├─ app_config.ts
│    │    ├─ cat.ts
│    │    ├─ collection.ts
│    │    ├─ db.ts
│    │    ├─ user.ts
│    │    ├─ user_collection.ts
│    │    └─ widget.ts
│    ├─ public
│    │    └─ README.md
│    ├─ service
│    │    ├─ app_config.ts
│    │    ├─ cat.ts
│    │    ├─ collection.ts
│    │    ├─ user.ts
│    │    ├─ user_collection.ts
│    │    ├─ user_setting.ts
│    │    └─ widget.ts
│    └─ util 工具集
│           └─ index.ts
├─ config 应用的配置信息
│    ├─ config.default.ts
│    ├─ config.local.ts
│    ├─ config.prod.ts
│    └─ plugin.ts
└─ interface.ts
登陆功能
首先在class/user.ts中定义一个 user 表结构,大概需要的字段以及在 interface.ts 中声明相关接口。这里是 midway 和 ts 的基础配置,就不展开介绍了。
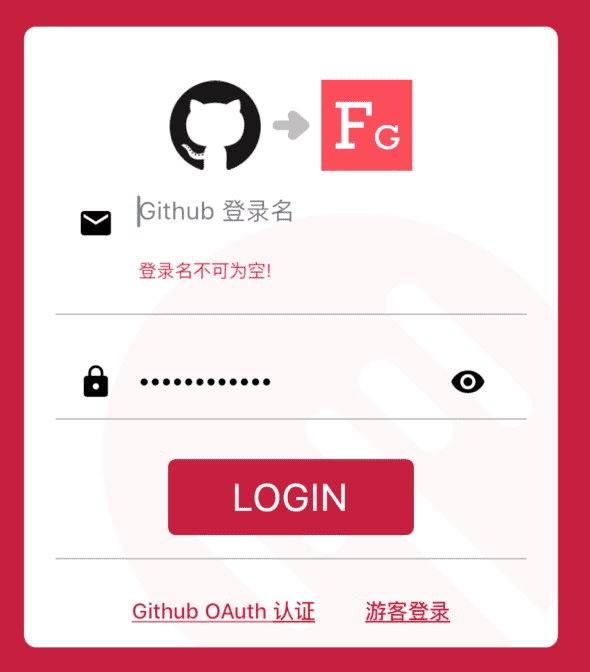
FlutterGo 提供了两种登陆方式:
- 用户名、密码登陆
GitHubOAuth认证
因为是手机客户端的 GitHubOauth 认证,所以这里其实是有一些坑的,后面再说。这里我们先从简单的开始说起
用户名/密码登陆
因为我们使用 github 的用户名/密码登陆方式,所以这里需要罗列下 github 的 api:developer.github.com/v3/auth/,
文档中的核心部分:curl -u username https://api.github.com/user (大家可以自行在 terminal 上测试),回车输入密码即可。所以这里我们完全可以在拿到用户输入的用户名和密码后进行 githu 的认证。
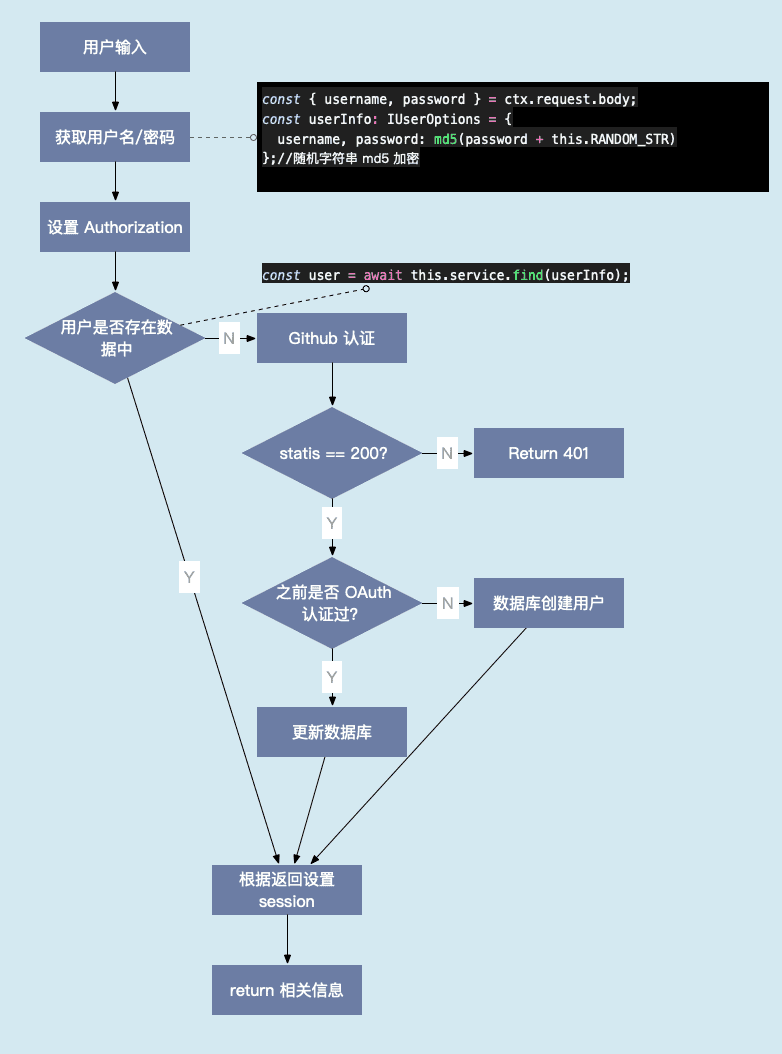
关于 midway 的基本用法,这里也不再赘述了。整个过程还是非常简单清晰的,如下图:
相关代码实现(相关信息已脱敏:xxx):
service部分
    //获取 userModel
    @inject()
    userModel

    // 获取 github 配置信息
    @config('githubConfig')
    GITHUB_CONFIG;

    //获取请求上下文
    @inject()
    ctx;
    //githubAuth 认证
    async githubAuth(username: string, password: string, ctx): Promise<any> {
        return await ctx.curl(GITHUB_OAUTH_API, {
            type: 'GET',
            dataType: 'json',
            url: GITHUB_OAUTH_API,
            headers: {
                'Authorization': ctx.session.xxx
            }
        });
    }
    // 查找用户
    async find(options: IUserOptions): Promise<IUserResult> {
        const result = await this.userModel.findOne(
            {
                attributes: ['xx', 'xx', 'xx', 'xx', 'xx', "xx"],//相关信息脱敏
                where: { username: options.username, password: options.password }
            })
            .then(userModel => {
                if (userModel) {
                    return userModel.get({ plain: true });
                }
                return userModel;
            });
        return result;
    }
    // 通过 URLName 查找用户
    async findByUrlName(urlName: string): Promise<IUserResult> {
        return await this.userModel.findOne(
            {
                attributes: ['xxx', 'xxx', 'xxx', 'xxx', 'xxx', "xxx"],
                where: { url_name: urlName }
            }
        ).then(userModel => {
            if (userModel) {
                return userModel.get({ plain: true });
            }
            return userModel;
        });
    }
    // 创建用户
    async create(options: IUser): Promise<any> {
        const result = await this.userModel.create(options);
        return result;
    }

    // 更新用户信息
    async update(id: number, options: IUserOptions): Promise<any> {
        return await this.userModel.update(
            {
                username: options.username,
                password: options.password
            },
            {
                where: { id },
                plain: true
            }
        ).then(([result]) => {
            return result;
        });
    }
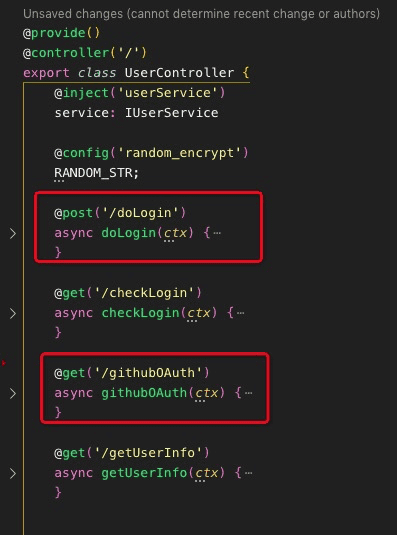
controller
    // inject 获取 service 和加密字符串
    @inject('userService')
    service: IUserService

    @config('random_encrypt')
    RANDOM_STR;
流程图中逻辑的代码实现
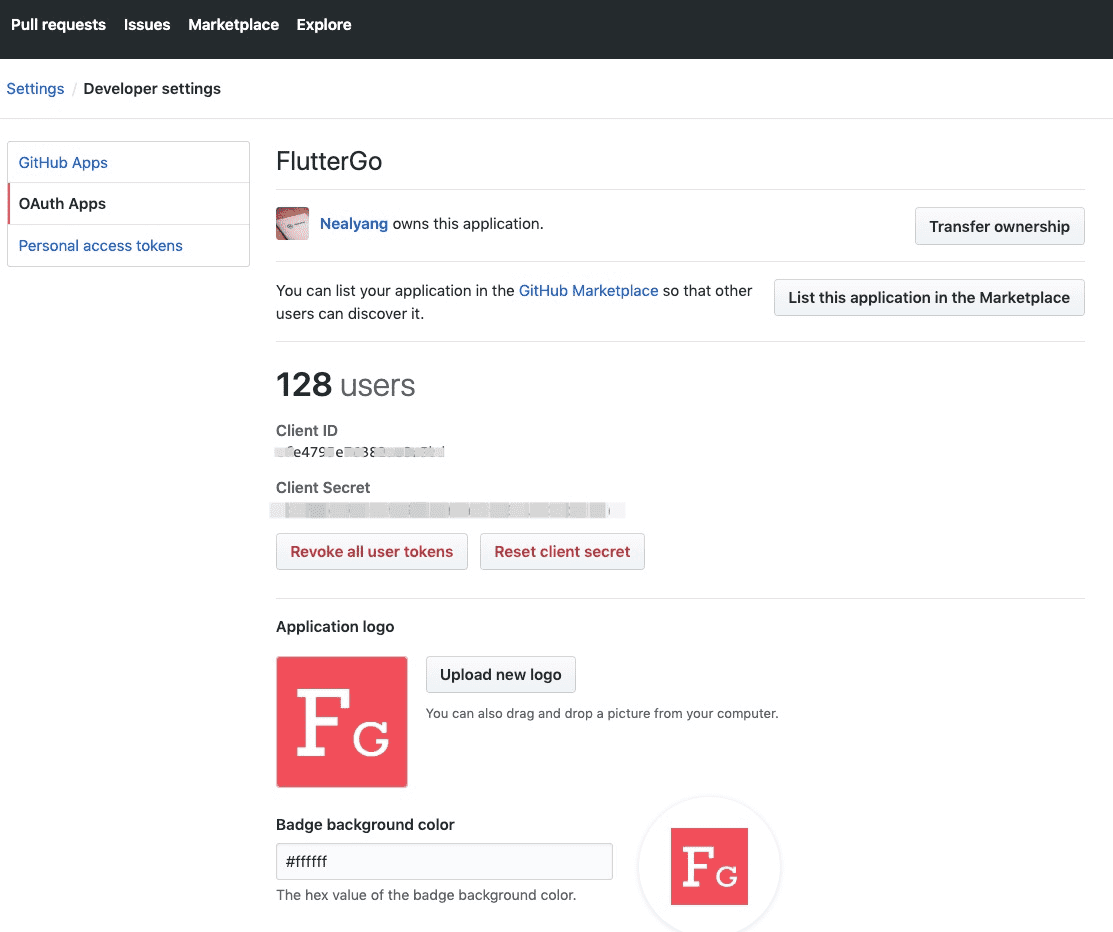
GitHubOAuth 认证
这里有坑!我回头介绍
githubOAuth 认证就是我们常说的 github app 了,这里我直接了当的丢文档:creating-a-github-app
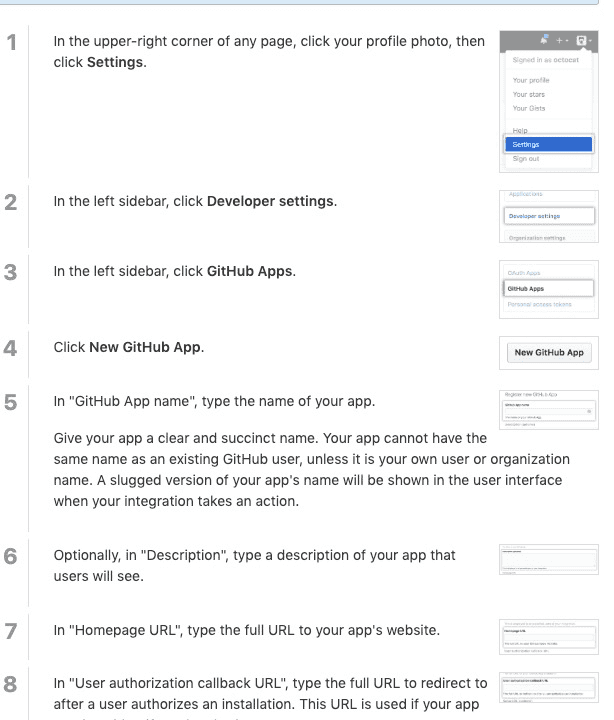
笔者还是觉得文档类的无需介绍
当然,我这里肯定都建好了,然后把一些基本信息都写到 server 端的配置中
还是按照上面的套路,咱们先介绍流程。然后在说坑在哪。
客户端部分
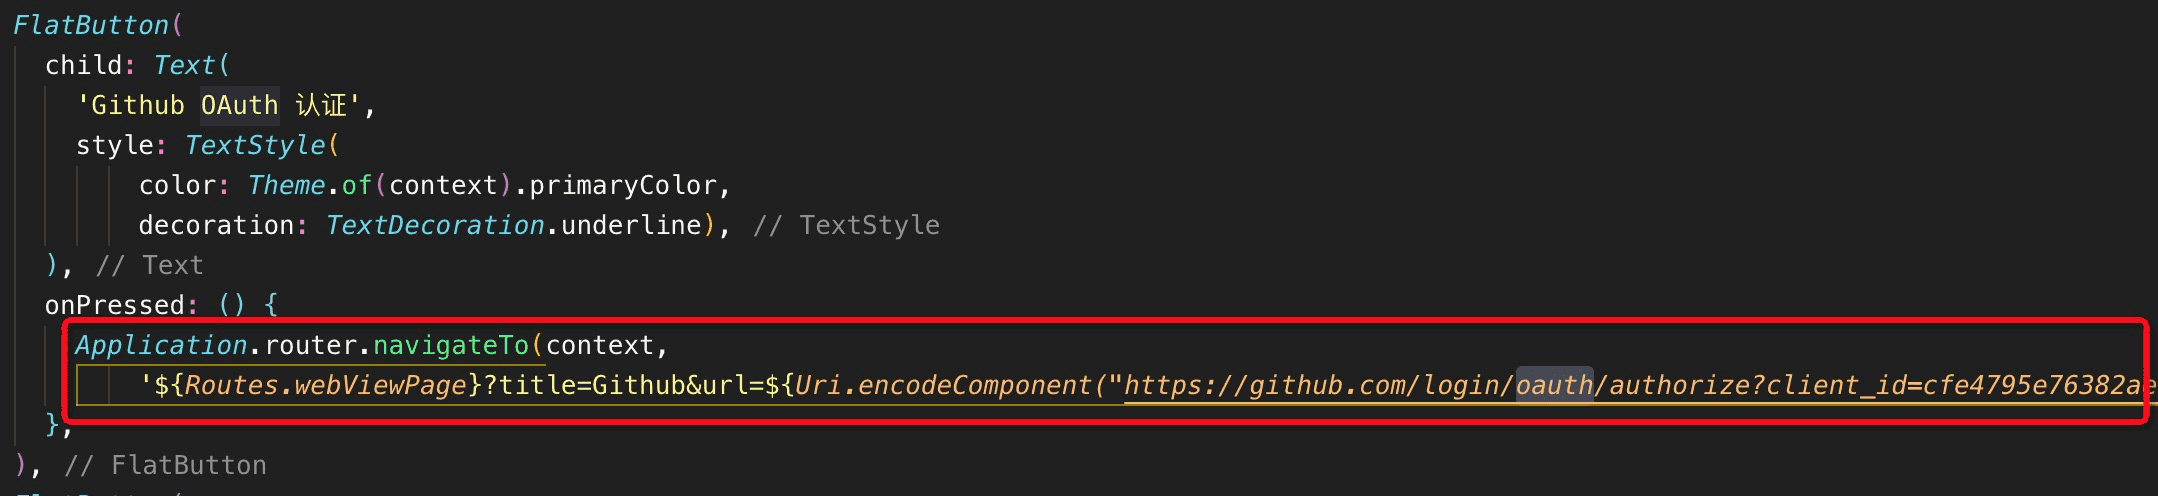
客户端部分的代码就相当简单了,新开 webView ,直接跳转到 github.com/login/oauth/authorize 带上 client_id即可。
server 端
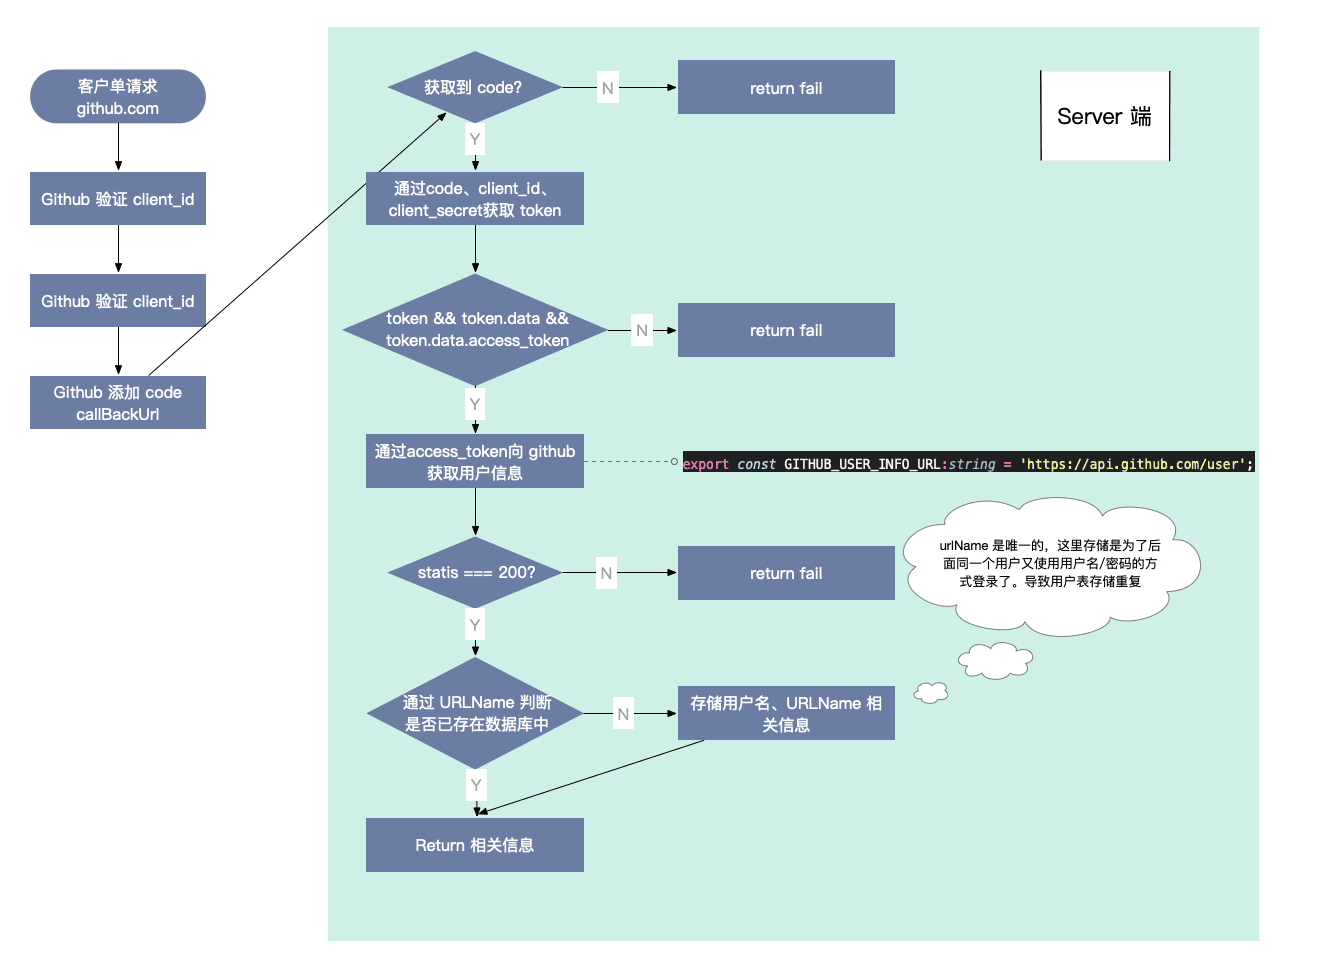
整体流程如上,部分代码展示:
service
    //获取 github access_token
    async getOAuthToken(code: string): Promise<any> {
        return await this.ctx.curl(GITHUB_TOKEN_URL, {
            type: "POST",
            dataType: "json",
            data: {
                code,
                client_id: this.GITHUB_CONFIG.client_id,
                client_secret: this.GITHUB_CONFIG.client_secret
            }
        });
    }
controller代码逻辑就是调用 service 中的数据来走上面流程图中的信息。
OAuth 中的坑
其实,github app 的认证方式非常适用于浏览器环境下,但是在 flutter 中,由于我们是新开启的 webView 来请求的 github 登陆地址。当我们后端成功返回的时候,无法通知到 Flutter 层。就导致我自己的 Flutter 中 dart 写的代码,无法拿到接口的返回。

中间脑暴了很多解决办法,最终在查阅 flutter_webview_plugin 的 API 里面找了个好的方法:onUrlChanged
简而言之就是,Flutter 客户端部分新开一个 webView去请求 github.com/login,github.com/login检查 client_id 后会带着code 等乱七八糟的东西来到后端,后端校验成功后,redirect Flutter 新开的 webView,然后flutter_webview_plugin去监听页面 url 的变化。发送相关 event ,让Flutter 去 destroy 当前 webVIew,处理剩余逻辑。
Flutter 部分代码
//定义相关 OAuth event
class UserGithubOAuthEvent{
  final String loginName;
  final String token;
  final bool isSuccess;
  UserGithubOAuthEvent(this.loginName,this.token,this.isSuccess);
}
webView page:
    //在 initState 中监听 url 变化,并emit event
    flutterWebviewPlugin.onUrlChanged.listen((String url) {
      if (url.indexOf('loginSuccess') > -1) {
        String urlQuery = url.substring(url.indexOf('?') + 1);
        String loginName, token;
        List<String> queryList = urlQuery.split('&');
        for (int i = 0; i < queryList.length; i++) {
          String queryNote = queryList[i];
          int eqIndex = queryNote.indexOf('=');
          if (queryNote.substring(0, eqIndex) == 'loginName') {
            loginName = queryNote.substring(eqIndex + 1);
          }
          if (queryNote.substring(0, eqIndex) == 'accessToken') {
            token = queryNote.substring(eqIndex + 1);
          }
        }
        if (ApplicationEvent.event != null) {
          ApplicationEvent.event
              .fire(UserGithubOAuthEvent(loginName, token, true));
        }
        print('ready close');

        flutterWebviewPlugin.close();
        // 验证成功
      } else if (url.indexOf('${Api.BASE_URL}loginFail') == 0) {
        // 验证失败
        if (ApplicationEvent.event != null) {
          ApplicationEvent.event.fire(UserGithubOAuthEvent('', '', true));
        }
        flutterWebviewPlugin.close();
      }
    });
login page:
    //event 的监听、页面跳转以及提醒信息的处理
    ApplicationEvent.event.on<UserGithubOAuthEvent>().listen((event) {
      if (event.isSuccess == true) {
        //  oAuth 认证成功
        if (this.mounted) {
          setState(() {
            isLoading = true;
          });
        }
        DataUtils.getUserInfo(
                {'loginName': event.loginName, 'token': event.token})
            .then((result) {
          setState(() {
            isLoading = false;
          });
          Navigator.of(context).pushAndRemoveUntil(
              MaterialPageRoute(builder: (context) => AppPage(result)),
              (route) => route == null);
        }).catchError((onError) {
          print('获取身份信息 error:::$onError');
          setState(() {
            isLoading = false;
          });
        });
      } else {
        Fluttertoast.showToast(
            msg: '验证失败',
            toastLength: Toast.LENGTH_SHORT,
            gravity: ToastGravity.CENTER,
            timeInSecForIos: 1,
            backgroundColor: Theme.of(context).primaryColor,
            textColor: Colors.white,
            fontSize: 16.0);
      }
    });
组件树获取
表结构
在聊接口实现的之前,我们先了解下,关于组件,我们的表机构设计大概是什么样子的。
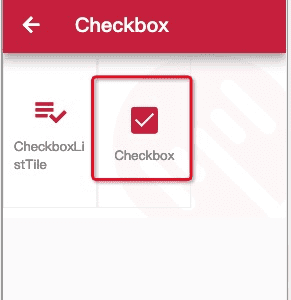
FlutterGO 下面 widget tab很多分类,分类点进去还是分类,再点击去是组件,组件点进去是详情页。

上图模块点进去就是组件 widget
上图是 widget,点进去是详情页
所以这里我们需要两张表来记录他们的关系:cat(category)和 widget 表。
cat 表中我们每行数据会有一个 parent_id 字段,所以表内存在父子关系,而 widget 表中的每一行数据的 parent_id 字段的值必然是 cat 表中的最后一层。比如 Checkbox widget 的 parent_id 的值就是 cat 表中 Button 的 id。
需求实现
在登陆的时候,我们希望能获取所有的组件树,需求方要求结构如下:
[
   {
    "name": "Element",
      "type": "root",
      "child": [
        {
          "name": "Form",
            "type": "group",
            "child": [
              {
                "name": "input",
                  "type": "page",
                  "display": "old",
                  "extends": {},
                  "router": "/components/Tab/Tab"
               },
               {
                "name": "input",
                  "type": "page",
                  "display": "standard",
                  "extends": {},
                  "pageId": "page1_hanxu_172ba42f_0520_401e_b568_ba7f7f6835e4"
               }
            ]
         }
      ],
   }
]
因为现在存在三方共建组件,而且我们详情页也较FlutterGo 1.0 版本有了很大改动,如今组件的详情页只有一个,内容全部靠 md 渲染,在 md 中写组件的 demo 实现。所以为了兼容旧版本的 widget,我们有 display 来区分,新旧 widget 分别通过 pageId 和 router 来跳转页面。
新建 widget 的 pageId 是通过FlutterGo 脚手架 goCli生成的
目前实现实际返回为:
{
    "success": true,
    "data": [
        {
            "id": "3",
            "name": "Element",
            "parentId": 0,
            "type": "root",
            "children": [
                {
                    "id": "6",
                    "name": "Form",
                    "parentId": 3,
                    "type": "category",
                    "children": [
                        {
                            "id": "9",
                            "name": "Input",
                            "parentId": 6,
                            "type": "category",
                            "children": [
                                {
                                    "id": "2",
                                    "name": "TextField",
                                    "parentId": "9",
                                    "type": "widget",
                                    "display": "old",
                                    "path": "/Element/Form/Input/TextField"
                                }
                            ]
                        },
                        {
                            "id": "12",
                            "name": "Text",
                            "parentId": 6,
                            "type": "category",
                            "children": [
                                {
                                    "id": "3",
                                    "name": "Text",
                                    "parentId": "12",
                                    "type": "widget",
                                    "display": "old",
                                    "path": "/Element/Form/Text/Text"
                                },
                                {
                                    "id": "4",
                                    "name": "RichText",
                                    "parentId": "12",
                                    "type": "widget",
                                    "display": "old",
                                    "path": "/Element/Form/Text/RichText"
                                }
                            ]
                        },
                        {
                            "id": "13",
                            "name": "Radio",
                            "parentId": 6,
                            "type": "category",
                            "children": [
                                {
                                    "id": "5",
                                    "name": "TestNealya",
                                    "parentId": "13",
                                    "type": "widget",
                                    "display": "standard",
                                    "pageId": "page1_hanxu_172ba42f_0520_401e_b568_ba7f7f6835e4"
                                }
                            ]
                        }
                    ]
                }
            ]
        }
        {
            "id": "5",
            "name": "Themes",
            "parentId": 0,
            "type": "root",
            "children": []
        }
    ]
}
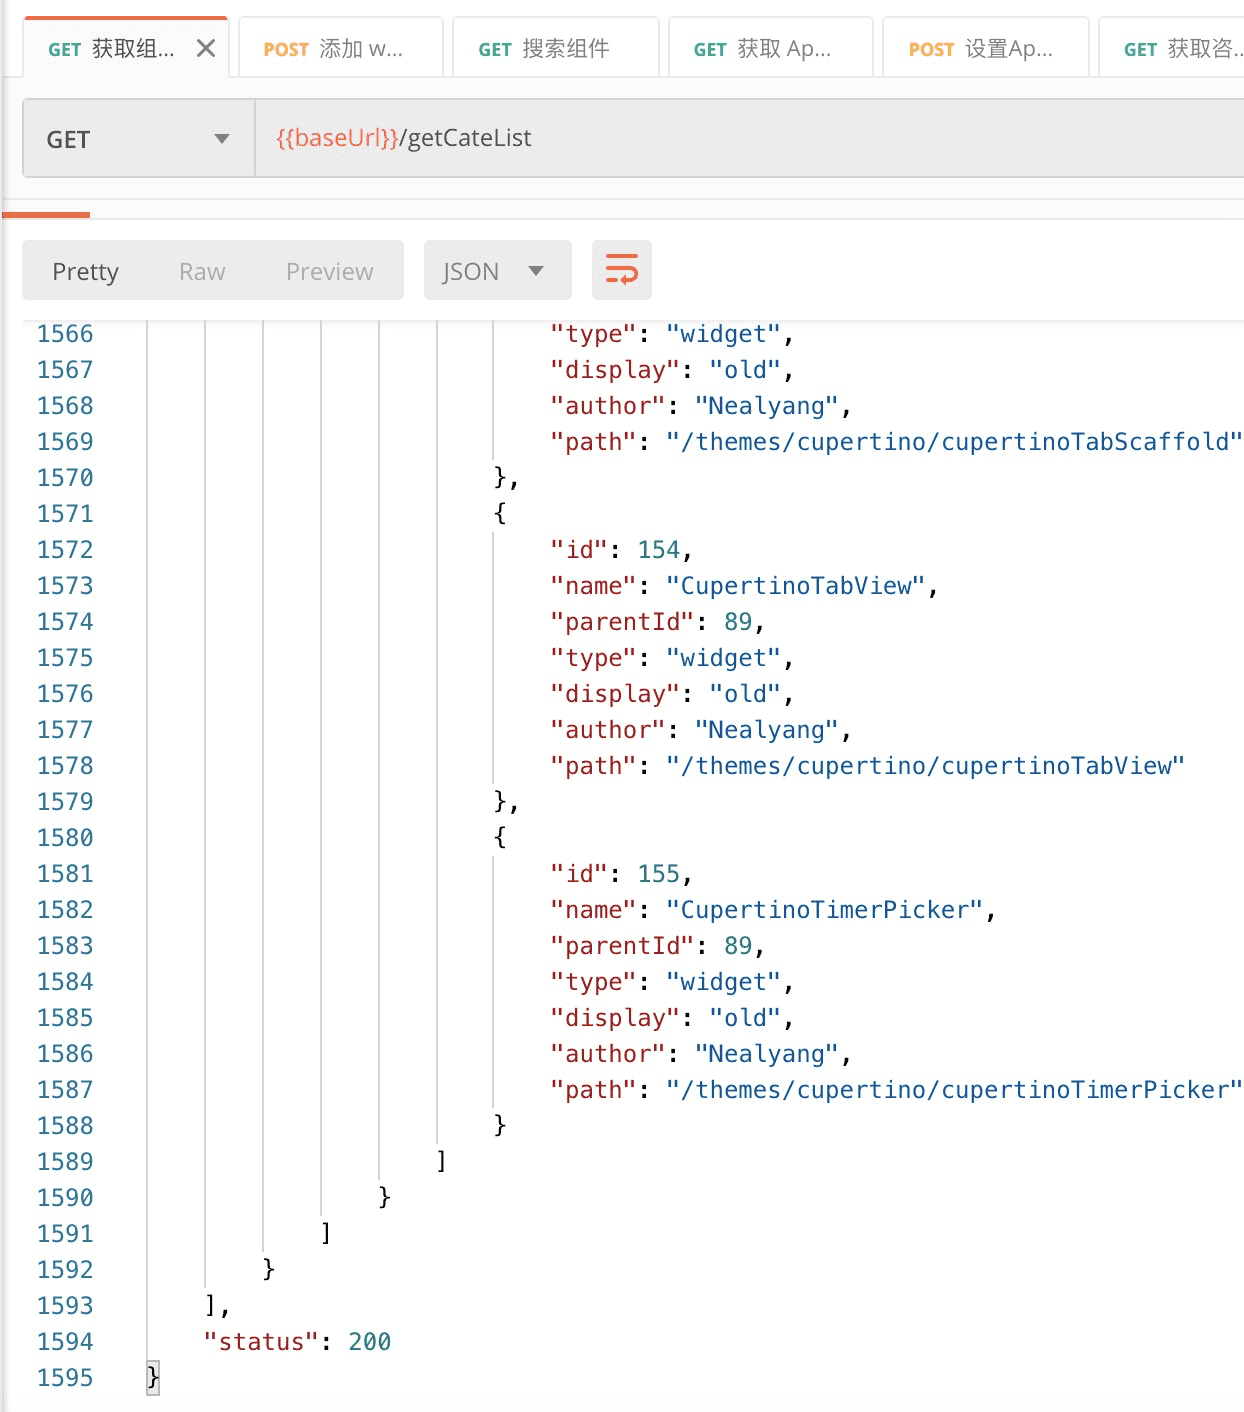
简单示例,省去 99%数据
代码实现
其实这个接口也是非常简单的,就是个双循环遍历嘛,准确的说,有点类似深度优先遍历。直接看代码吧
获取所有 parentId 相同的 category (后面简称为 cat)
async getAllNodeByParentIds(parentId?: number) {
    if (!!!parentId) {
        parentId = 0;
    }

    return await this.catService.getCategoryByPId(parentId);
}
首字母转小写
firstLowerCase(str){
    return str[0].toLowerCase()+str.slice(1);
}
我们只要自己外部维护一个组件树,然后cat表中的读取到的每一个parent_id都是一个节点。当前 id 没有别的 cat 对应的 parent_id就说明它的下一级是“叶子” widget了,所以就从 widget 中查询即可。easy~
    //删除部分不用代码
   @get('/xxx')
    async getCateList(ctx) {
        const resultList: IReturnCateNode[] = [];
        let buidList = async (parentId: number, containerList: Partial<IReturnCateNode>[] | Partial<IReturnWidgetNode>[], path: string) => {
            let list: IReturnCateNode[] = await this.getAllNodeByParentIds(parentId);
            if (list.length > 0) {
                for (let i = 0; i < list.length; i++) {
                    let catNode: IReturnCateNode;
                    catNode = {
                        xxx:xxx
                    }
                    containerList.push(catNode);
                    await buidList(list[i].id, containerList[i].children, `${path}/${this.firstLowerCase(containerList[i].name)}`);
                }
            } else {
                // 没有 cat 表下 children,判断是否存在 widget
                const widgetResult = await this.widgetService.getWidgetByPId(parentId);
                if (widgetResult.length > 0) {
                    widgetResult.map((instance) => {
                        let tempWidgetNode: Partial<IReturnWidgetNode> = {};
                        tempWidgetNode.xxx = instance.xxx;
                        if (instance.display === 'old') {
                            tempWidgetNode.path = `${path}/${this.firstLowerCase(instance.name)}`;
                        } else {
                            tempWidgetNode.pageId = instance.pageId;
                        }
                        containerList.push(tempWidgetNode);
                    });
                } else {
                    return null;
                }

            }
        }
        await buidList(0, resultList, '');
        ctx.body = { success: true, data: resultList, status: 200 };
    }
彩蛋
FlutterGo 中有一个组件搜索功能,因为我们存储 widget 的时候,并没有强制带上该 widget的路由,这样也不合理(针对于旧组件),所以在widget表中搜索出来,还要像上述过程那样逆向搜索获取“旧”widget的router字段
我的个人代码实现大致如下:
    @get('/xxx')
    async searchWidget(ctx){
        let {name} = ctx.query;
        name = name.trim();
        if(name){
            let resultWidgetList = await this.widgetService.searchWidgetByStr(name);
            if(xxx){
                for(xxx){
                    if(xxx){
                        let flag = true;
                        xxx
                        while(xxx){
                            let catResult = xxx;
                            if(xxx){
                               xxx
                                if(xxx){
                                    flag = false;
                                }
                            }else{
                                flag = false;
                            }
                        }
                        resultWidgetList[i].path = path;
                    }
                }
                ctx.body={success:true,data:resultWidgetList,message:'查询成功'};
            }else{
                ctx.body={success:true,data:[],message:'查询成功'};
            }
        }else{
            ctx.body={success:false,data:[],message:'查询字段不能为空'};
        }

    }
求大神指教最简实现~🤓
收藏功能
收藏功能,必然是跟用户挂钩的。然后收藏的组件该如何跟用户挂钩呢?组件跟用户是多对多的关系。
这里我新建一个collection表来用作所有收藏过的组件。为什么不直接使用widget表呢,因为我个人不希望表太过于复杂,无用的字段太多,且功能不单一。
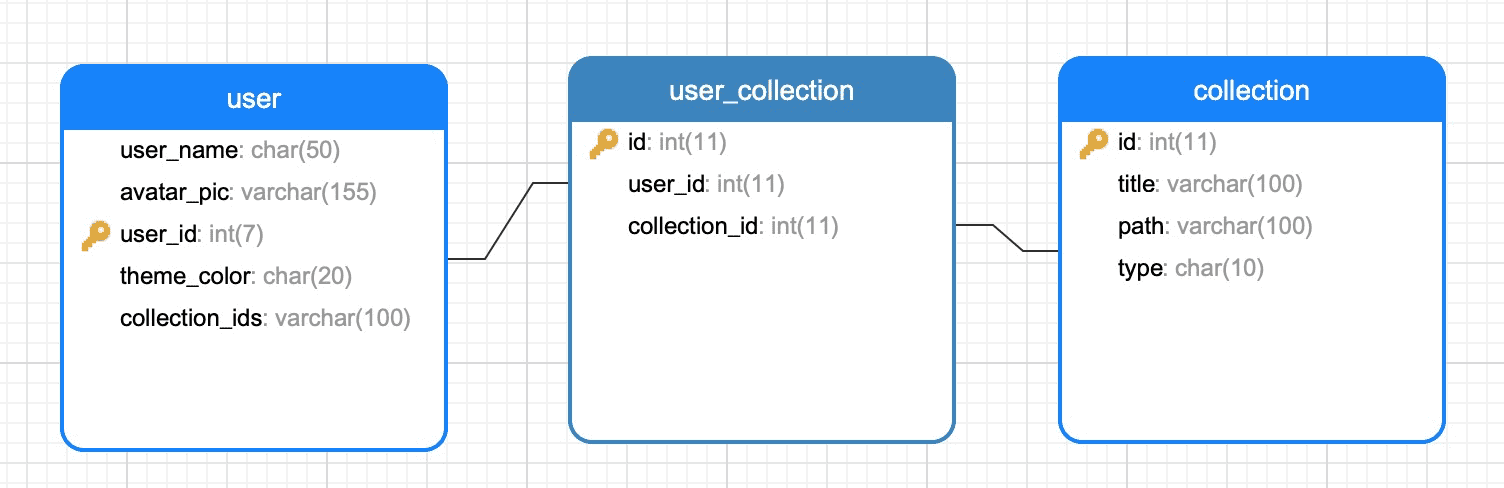
由于是收藏的组件和用户是多对多的关系,所以这里我们需要一个中间表user_collection来维护他两的关系,三者关系如下:
功能实现思路
-
校验收藏
- 从
collection表中检查用户传入的组件信息,没有则为收藏、有则取出其在collection表中的 id - 从
session中获取用户的 id - 用
collection_id和user_id来检索user_collection表中是否有这个字段
- 从
-
添加收藏
- 获取用户传来的组件信息
findOrCrate的检索collection表,并且返回一个collection_id- 然后将
user_id和collection_id存入到user_collection表中(互不信任原则,校验下存在性)
-
移除收藏
- 步骤如上,拿到
collection表中的collection_id - 删除
user_collection对应字段即可
- 步骤如上,拿到
-
获取全部收藏
- 检索
collection表中所有user_id为当前用户的所有collection_id - 通过拿到的
collection_ids 来获取收藏的组件列表
- 检索
部分代码实现
整体来说,思路还是非常清晰的。所以这里我们仅仅拿收藏和校验来展示下部分代码:
service层代码实现
    @inject()
    userCollectionModel;
        async add(params: IuserCollection): Promise<IuserCollection> {
        return await this.userCollectionModel.findOrCreate({
            where: {
                user_id: params.user_id, collection_id: params.collection_id
            }
        }).then(([model, created]) => {
            return model.get({ plain: true })
        })
    }

    async checkCollected(params: IuserCollection): Promise<boolean> {
        return await this.userCollectionModel.findAll({
            where: { user_id: params.user_id, collection_id: params.collection_id }
        }).then(instanceList => instanceList.length > 0);
    }
controller层代码实现
    @inject('collectionService')
    collectionService: ICollectionService;

    @inject()
    userCollectionService: IuserCollectionService

    @inject()
    ctx;

    // 校验组件是否收藏
    @post('/xxx')
    async checkCollected(ctx) {
        if (ctx.session.userInfo) {
            // 已登录
            const collectionId = await this.getCollectionId(ctx.request.body);
            const userCollection: IuserCollection = {
                user_id: this.ctx.session.userInfo.id,
                collection_id: collectionId
            }
            const hasCollected = await this.userCollectionService.checkCollected(userCollection);
            ctx.body={status:200,success:true,hasCollected};

        } else {
            ctx.body={status:200,success:true,hasCollected:false};
        }
    }

    async addCollection(requestBody): Promise<IuserCollection> {

        const collectionId = await this.getCollectionId(requestBody);

        const userCollection: IuserCollection = {
            user_id: this.ctx.session.userInfo.id,
            collection_id: collectionId
        }

        return await this.userCollectionService.add(userCollection);
    }
因为常要获取 collection 表中的 collection_id 字段,所以这里抽离出来作为公共方法
    async getCollectionId(requestBody): Promise<number> {
        const { url, type, name } = requestBody;
        const collectionOptions: ICollectionOptions = {
            url, type, name
        };
        const collectionResult: ICollection = await this.collectionService.findOrCreate(collectionOptions);
        return collectionResult.id;
    }
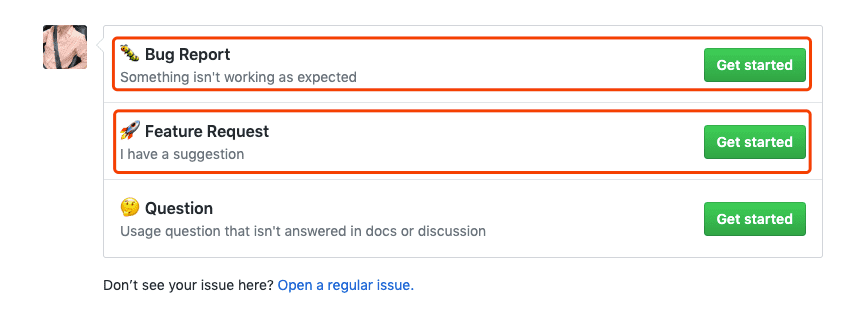
feedback 功能
feedback 功能就是直接可以在 FlutterGo 的个人设置中,发送 issue 到 Alibaba/flutter-go 下。这里主要也是调用 github 的提 issue 接口 api issues API。
后端的代码实现非常简单,就是拿到数据,调用 github 的 api 即可
service层
    @inject()
    ctx;

    async feedback(title: string, body: string): Promise<any> {
        return await this.ctx.curl(GIHTUB_ADD_ISSUE, {
            type: "POST",
            dataType: "json",
            headers: {
                'Authorization': this.ctx.session.headerAuth,
            },
            data: JSON.stringify({
                title,
                body,
            })
        });
    }
controller层
    @inject('userSettingService')
    settingService: IUserSettingService;

    @inject()
    ctx;

    async feedback(title: string, body: string): Promise<any> {
        return await this.settingService.feedback(title, body);
    }
彩蛋
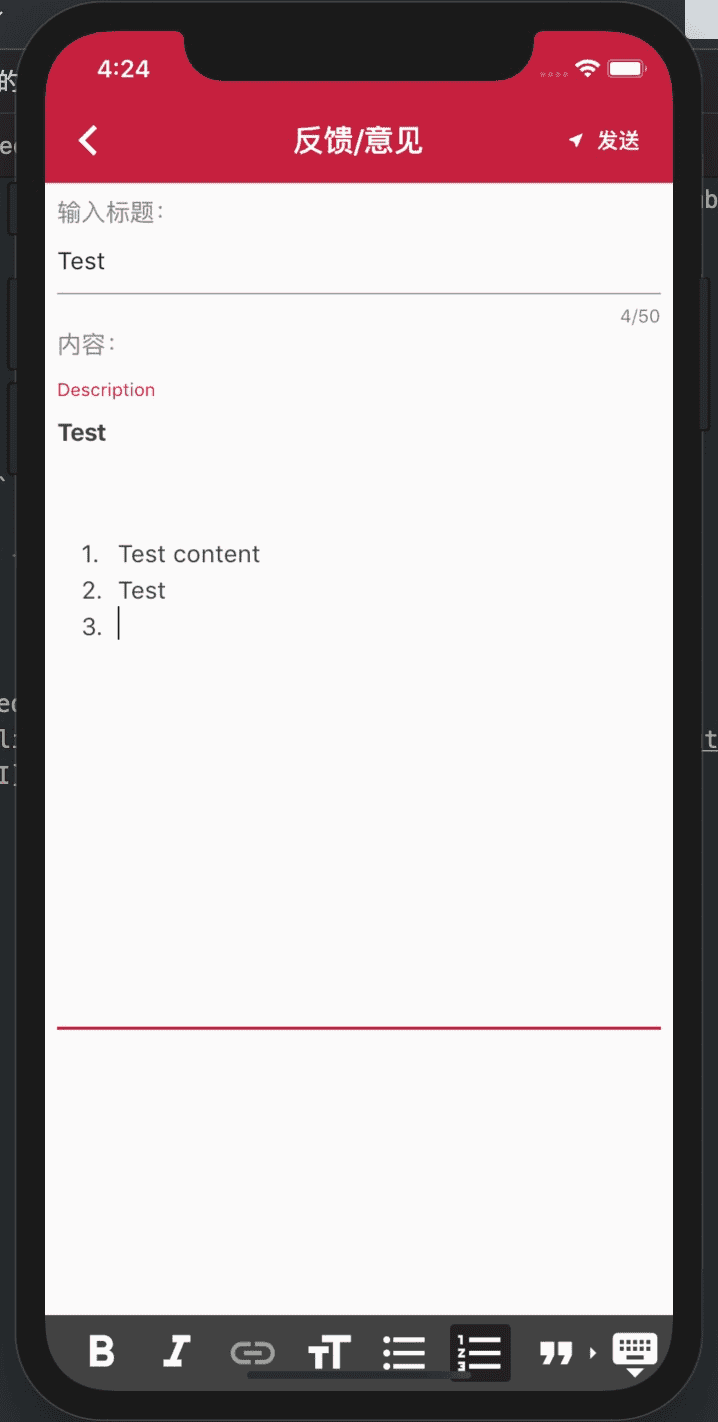
猜测可能会有人 FlutterGo 里面这个 feedback 是用的哪一个组件~这里介绍下
pubspec.yaml
  zefyr:
    path: ./zefyr
因为在开发的时候,flutter 更新了,导致zefyr 运行报错。当时也是提了 issue:chould not Launch FIle (写这篇文章的时候才看到回复)
但是当时由于功能开发要发布,等了好久没有zefyr作者的回复。就在本地修复了这个 bug,然后包就直接引入本地的包了。
共建计划

咳咳,敲黑板啦~~
Flutter 依旧在不断地更新,但仅凭我们几个 Flutter 爱好者在工作之余维护 FlutterGo 还是非常吃力的。所以这里,诚邀业界所有 Flutter 爱好者一起参与共建 FlutterGo!
此处再次感谢所有已经提交 pr 的小伙伴

共建说明
由于 Flutter 版本迭代速度较快,产生的内容较多, 而我们人力有限无法更加全面快速的支持Flutter Go的日常维护迭代, 如果您对flutter go的共建感兴趣, 欢迎您来参与本项目的共建.
凡是参与共建的成员. 我们会将您的头像与github个人地址收纳进我们的官方网站中.
共建方式
- 共建组件
-
本次更新, 开放了 Widget 内容收录 的功能, 您需要通过 goCli 工具, 创建标准化组件,编写markdown代码。
-
为了更好记录您的改动目的, 内容信息, 交流过程, 每一条PR都需要对应一条 Issue, 提交你发现的
BUG或者想增加的新功能, 或者想要增加新的共建组件, -
首先选择你的
issue在类型,然后通过 Pull Request 的形式将文章内容, api描述, 组件使用方法等加入进我们的Widget界面。
- 提交文章和修改bug
- 您也可以将例如日常bug. 未来feature等的功能性PR, 申请提交到我们的的主仓库。
参与共建
关于如何提PR请先阅读以下文档
贡献指南
此项目遵循贡献者行为准则。参与此项目即表示您同意遵守其条款.

FlutterGo 期待你我共建~
具体 pr 细节和流程可参看 FlutterGo README 或 直接钉钉扫码入群

学习交流
关注公众号: 【全栈前端精选】 每日获取好文推荐。还可以入群,一起学习交流呀~~