

如果您已经看过我的Becoming a Master Window Fitter谈话,您就会知道处理窗口插件可能很复杂。 最近,我一直在改进几个应用程序中的系统栏处理,使他们能够在状态和导航栏后面绘制。 我想我已经提出了一些方法,可以使处理插入更容易(希望如此)。原文
在导航栏后面绘制
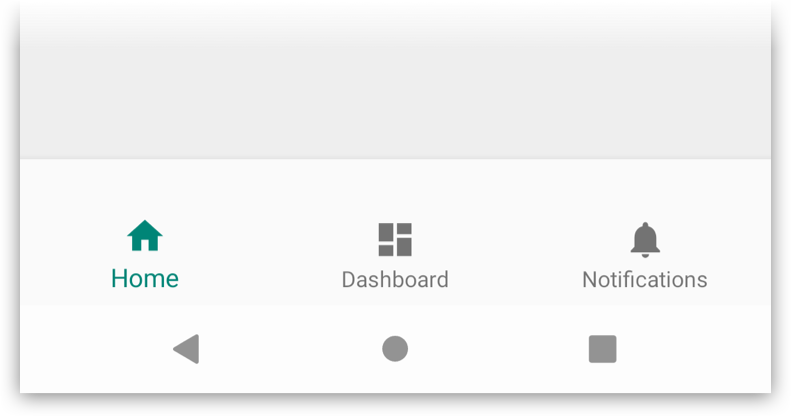
对于本文的其余部分,我们将使用BottomNavigationView进行一个简单的示例,该示例位于屏幕底部。 它的实现非常简单:
<BottomNavigationView
    android:layout_height="wrap_content"
    android:layout_width="match_parent" />
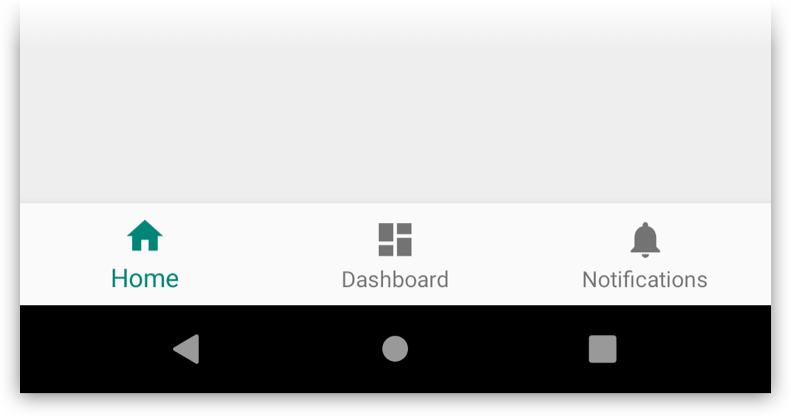
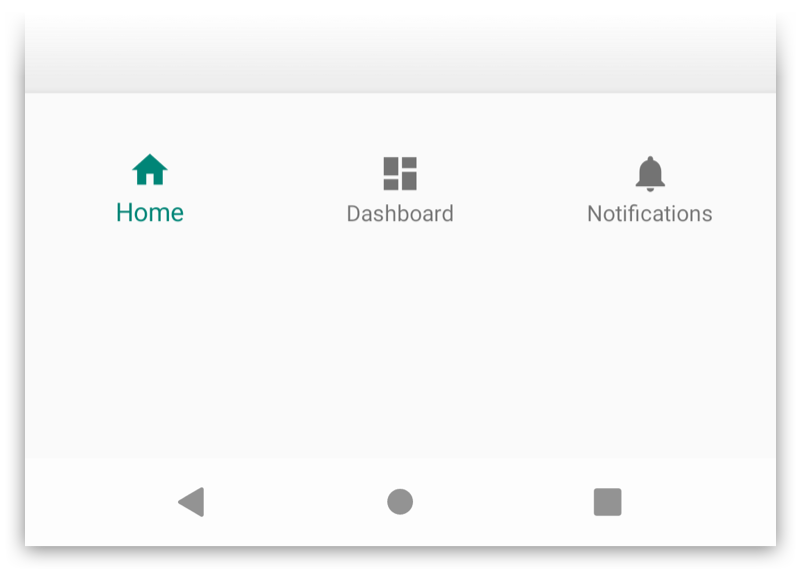
默认情况下,您的Activity的内容将在系统提供的UI(导航栏等)中进行布局,因此我们的视图与导航栏齐平。 我们的设计师决定他们希望应用程序开始在导航栏后面绘制。 要做到这一点,我们将使用适当的标志调用setSystemUiVisibility():
rootView.systemUiVisibility = View.SYSTEM_UI_FLAG_LAYOUT_STABLE or
        View.SYSTEM_UI_FLAG_LAYOUT_HIDE_NAVIGATION
最后我们将更新我们的主题,以便我们有一个半透明的导航栏,带有黑色图标:
<style name="AppTheme" parent="Theme.MaterialComponents.Light">
    <!-- Set the navigation bar to 50% translucent white -->
    <item name="android:navigationBarColor">#80FFFFFF</item>
    <!-- Since the nav bar is white, we will use dark icons -->
    <item name="android:windowLightNavigationBar">true</item>
</style>
如您所见,这只是我们需要做的事情的开始。 由于活动现在正在导航栏后面,我们的BottomNavigationView也是如此。 这意味着用户无法实际点击任何导航项。 为了解决这个问题,我们需要处理系统调度的任何WindowInsets,并使用这些值对视图应用适当的填充或边距。
Handling通过填充进行插入
处理WindowInsets的常用方法之一是为视图添加填充,以便它们的内容不会显示在system-ui后面。 为此,我们可以设置OnApplyWindowInsetsListener,为视图添加必要的底部填充,确保其内容不被遮挡。
bottomNav.setOnApplyWindowInsetsListener { view, insets ->
    view.updatePadding(bottom = insets.systemWindowInsetBottom)
    insets
}
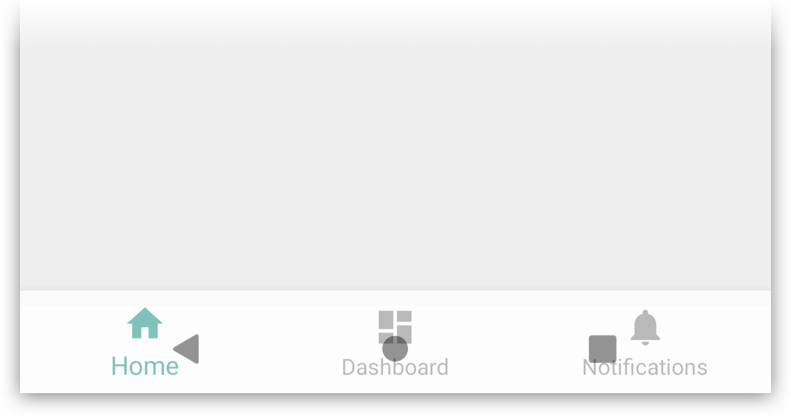
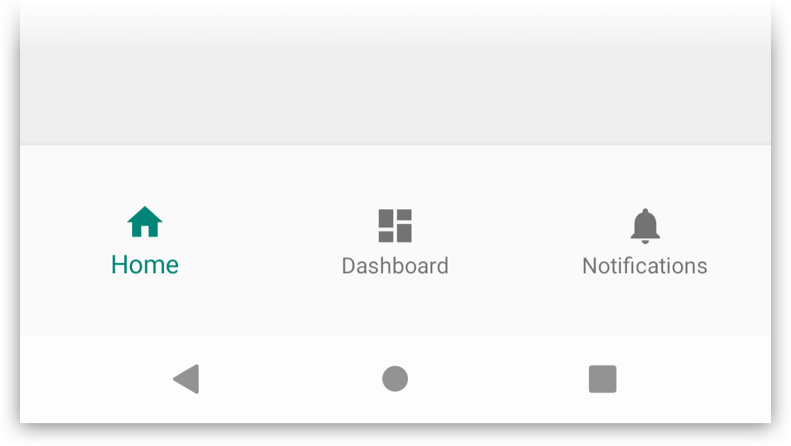
好的,我们现在已经正确处理了底部系统窗口的插入。 但后来我们决定在布局中添加一些填充,可能是出于审美原因:
<BottomNavigationView
    android:layout_height="wrap_content"
    android:layout_width="match_parent"
    android:paddingVertical="24dp" />
Note: I’m not recommending using 24dp of vertical padding on a BottomNavigationView, I am using a large value here just to make the effect obvious.
嗯,那不对。 你能看到问题吗? 我们从OnApplyWindowInsetsListener调用updatePadding()现在将从布局中消除预期的底部填充。
啊哈! 让我们一起添加当前填充和插入:
bottomNav.setOnApplyWindowInsetsListener { view, insets ->
    view.updatePadding(
        bottom = view.paddingBottom + insets.systemWindowInsetsBottom
    )
    insets
}
我们现在有一个新问题。 WindowInsets可以在_any_时调度,_multiple_可以在视图的生命周期中调度。 这意味着我们的新逻辑将在第一次运行时运行良好,但是对于每个后续调度,我们将添加越来越多的底部填充。 不是我们想要的。🤦
我想出的解决方案是在通胀后记录视图的填充值,然后再参考这些值。 例:
// Keep a record of the intended bottom padding of the view
val bottomNavBottomPadding = bottomNav.paddingBottom

bottomNav.setOnApplyWindowInsetsListener { view, insets ->
    // We've got some insets, set the bottom padding to be the
    // original value + the inset value
    view.updatePadding(
        bottom = bottomNavBottomPadding + insets.systemWindowInsetBottom
    )
    insets
}
这很好用,意味着我们从布局中保持填充的意图,我们仍然根据需要插入视图。 保持每个填充值的对象级属性是非常混乱的,我们可以做得更好......🤔
doOnApplyWindowInsets
输入doOnApplyWindowInsets()扩展名方法。 这是[setOnApplyWindowInsetsListener()](developer.android.com/reference/a…
fun View.doOnApplyWindowInsets(f: (View, WindowInsets, InitialPadding) -> Unit) {
    // Create a snapshot of the view's padding state
    val initialPadding = recordInitialPaddingForView(this)
    // Set an actual OnApplyWindowInsetsListener which proxies to the given
    // lambda, also passing in the original padding state
    setOnApplyWindowInsetsListener { v, insets ->
        f(v, insets, initialPadding)
        // Always return the insets, so that children can also use them
        insets
    }
    // request some insets
    requestApplyInsetsWhenAttached()
}

data class InitialPadding(val left: Int, val top: Int,
    val right: Int, val bottom: Int)

private fun recordInitialPaddingForView(view: View) = InitialPadding(
    view.paddingLeft, view.paddingTop, view.paddingRight, view.paddingBottom)
当我们需要一个视图来处理insets时,我们现在可以执行以下操作:
bottomNav.doOnApplyWindowInsets { view, insets, padding ->
    // padding contains the original padding values after inflation
    view.updatePadding(
        bottom = padding.bottom + insets.systemWindowInsetBottom
    )
}
好多了!😏
requestApplyInsetsWhenAttached()
您可能已经注意到上面的requestApplyInsetsWhenAttached()。 这不是绝对必要的,但确实可以解决WindowInsets的分派方式。 如果视图在未附加到视图层次结构时调用requestApplyInsets(),则会将调用放在地板上并忽略。
这是在[Fragment.onCreateView()](developer.android.com/reference/a… 修复方法是确保简单地调用[onStart()](developer.android.com/reference/a… 以下扩展函数处理两种情况:
fun View.requestApplyInsetsWhenAttached() {
    if (isAttachedToWindow) {
        // We're already attached, just request as normal
        requestApplyInsets()
    } else {
        // We're not attached to the hierarchy, add a listener to
        // request when we are
        addOnAttachStateChangeListener(object : OnAttachStateChangeListener {
            override fun onViewAttachedToWindow(v: View) {
                v.removeOnAttachStateChangeListener(this)
                v.requestApplyInsets()
            }

            override fun onViewDetachedFromWindow(v: View) = Unit
        })
    }
}
在绑定中包装它
在这一点上,我们已经大大简化了如何处理窗口插入。 我们实际上在一些即将推出的应用程序中使用此功能,包括即将举行的会议apps。 它仍然有一些缺点。 首先,逻辑远离我们的布局,这意味着它很容易被遗忘。 其次,我们可能需要在许多地方使用它,导致大量的near-identical副本在整个应用程序中传播。 我知道我们可以做得更好。
到目前为止,整个帖子只关注代码,并通过设置监听器来处理insets。 我们在这里讨论的是视图,所以在理想的世界中我们会声明我们打算在布局文件中处理插图。
输入data binding adapters! 如果您以前从未使用它们,它们会让我们将代码映射到布局属性(当您使用数据绑定时)。 因此,让我们为我们创建一个属性:
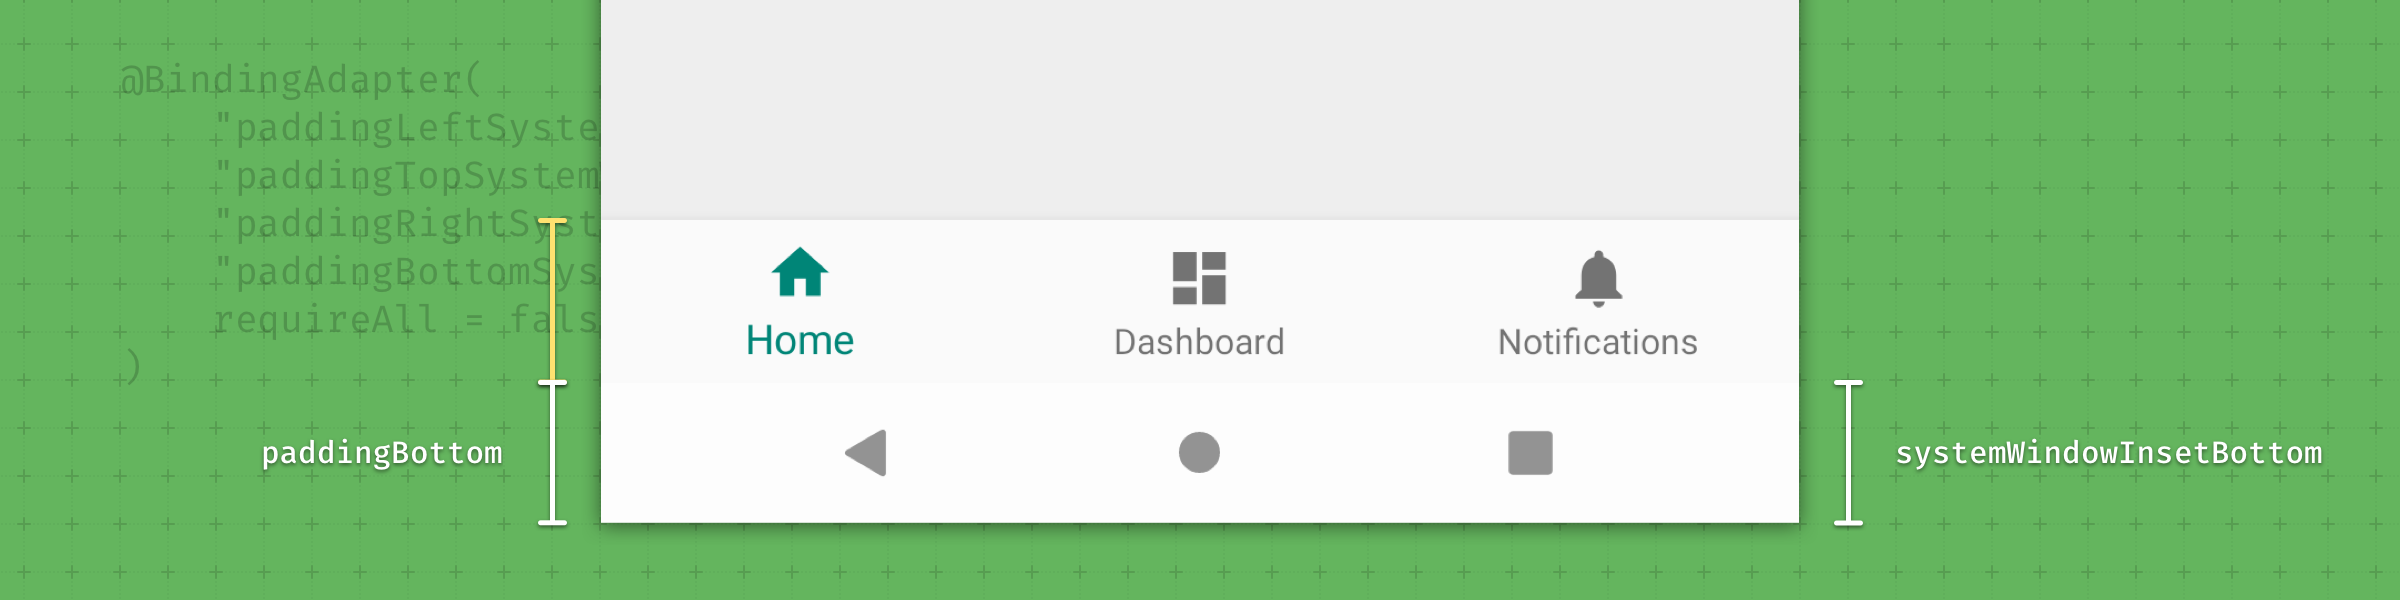
@BindingAdapter("paddingBottomSystemWindowInsets")
fun applySystemWindowBottomInset(view: View, applyBottomInset: Boolean) {
    view.doOnApplyWindowInsets { view, insets, padding ->
        val bottom = if (applyBottomInset) insets.systemWindowInsetBottom else 0
        view.updatePadding(bottom = padding.bottom + insets.systemWindowInsetBottom)
    }
}
在我们的布局中,我们可以简单地使用我们新的paddingBottomSystemWindowInsets属性,该属性将自动更新任何插入。
<BottomNavigationView
    android:layout_height="wrap_content"
    android:layout_width="match_parent"
    android:paddingVertical="24dp"
    app:paddingBottomSystemWindowInsets="@{ true }" />
希望您能够看到与单独使用OnApplyWindowListener相比,它是如何符合人体工程学且易于使用的。🌠
但等等,绑定适配器硬编码只设置底部尺寸。 如果我们还需要处理顶部插图怎么办? 还是左边? 还是对吗? 幸运的是,绑定适配器让我们可以很好地概括所有维度的模式:
@BindingAdapter(
    "paddingLeftSystemWindowInsets",
    "paddingTopSystemWindowInsets",
    "paddingRightSystemWindowInsets",
    "paddingBottomSystemWindowInsets",
    requireAll = false
)
fun applySystemWindows(
    view: View,
    applyLeft: Boolean,
    applyTop: Boolean,
    applyRight: Boolean,
    applyBottom: Boolean
) {
    view.doOnApplyWindowInsets { view, insets, padding ->
        val left = if (applyLeft) insets.systemWindowInsetLeft else 0
        val top = if (applyTop) insets.systemWindowInsetTop else 0
        val right = if (applyRight) insets.systemWindowInsetRight else 0
        val bottom = if (applyBottom) insets.systemWindowInsetBottom else 0

        view.setPadding(
            padding.left + left,
            padding.top + top,
            padding.right + right,
            padding.bottom + bottom
        )
    }
}
这里我们已经声明了一个具有多个属性的适配器,每个属性都映射到相关的方法参数。 需要注意的一点是使用requireAll = false,这意味着适配器可以处理所设置属性的任意组合。 这意味着我们可以执行以下操作,例如设置左侧和底部:
<BottomNavigationView
    android:layout_height="wrap_content"
    android:layout_width="match_parent"
    android:paddingVertical="24dp"
    app:paddingBottomSystemWindowInsets="@{ true }"
    app:paddingLeftSystemWindowInsets="@{ true }" />
易用性等级:💯
android:fitSystemWindows
你可能已经阅读过这篇文章,并想到了_“Why hasn’t he mentioned the fitSystemWindows attribute?"_。 原因是因为属性带来的功能通常不是我们想要的。
如果您正在使用AppBarLayout,CoordinatorLayout,DrawerLayout和朋友,那么按照指示使用。 构建这些视图是为了识别属性,并以与这些视图相关的固定方式应用窗口插入。
android:fitSystemWindows的默认View实现意味着使用insets填充每个维度,但不适用于上面的示例。 有关更多信息,请参阅此blog post,它仍然非常相关。
