

上一篇:iOS组件化 - 基础
笔记相关Git仓库
前一篇主要记录如何通过CocoaPod实现组件化。这里则准备对Demo进行具体的组件化实现:创建一个登录模块的组件:DYDemoLogin666。登录的逻辑、界面及用户信息等都在这个组件。方便以后其他功能模块的开发。
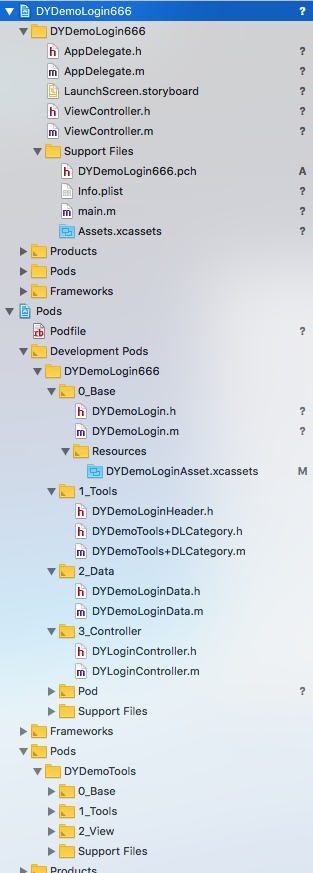
1、与创建DYDemoTools一样,创建DYDemoLogin666,完整的目录如下
2、Example工程里PodFile
use_frameworks!

platform :ios, '10.0'

source 'https://github.com/CocoaPods/Specs.git'  # 官方库
source 'http://github.com/liyunxin/DYDemoSpecs.git' # 私有库

target 'DYDemoLogin666' do
  pod 'DYDemoTools'
  pod 'DYDemoLogin666', :path => '../'
end
3、podspec文件
Pod::Spec.new do |s|
  s.name             = 'DYDemoLogin666'
  s.version          = '0.0.1'
  s.summary          = 'A short description of DYDemoLogin666.'

  s.description      = <<-DESC
  TODO: Add long description of the pod here.
  DESC

  s.homepage         = 'https://github.com/liyunxin/DYDemoLogin666'
  s.license          = { :type => 'MIT', :file => 'LICENSE' }
  s.author           = { 'liyunxin' => '447674668@qq.com' }
  s.source           = { :git => 'https://github.com/liyunxin/DYDemoLogin666.git', :tag => s.version.to_s }

  s.platform   = :ios, "10.0"
  s.frameworks = 'UIKit'

  s.dependency "DYDemoTools"

  s.subspec '0_Base' do |sb|
    sb.source_files = "DYDemoLogin666/Base/**/*.{h,m}"
    sb.resource_bundles = {
      'DYDemoLogin666' => ['DYDemoLogin666/Base/*.xcassets']
    }
  end

  s.subspec '1_Tools' do |st|
    st.source_files = "DYDemoLogin666/Tools/**/*.{h,m}"
  end

  s.subspec '2_Data' do |st|
    st.source_files = "DYDemoLogin666/Data/**/*.{h,m}"
  end

  s.subspec '3_Controller' do |sv|
    sv.source_files = "DYDemoLogin666/Controller/**/*.{h,m}"
  end

end
4、DYDemoLogin666组件
具体实现请查看:DYDemoLogin666
4.1、DYDemoLoginHeader
这是在组件内部使用的头文件,导入了依赖的库跟全局使用的分类等。它只会出现在组件的.m文件里,绝不能暴露在.h文件中。
#ifndef DYDemoLoginHeader_h
#define DYDemoLoginHeader_h

#import "DYDemoTools/DYDemoToolsHeader.h"
#import "DYDemoTools+DLCategory.h"

#endif /* DYDemoLoginHeader_h */
4.2、DYDemoLoginData
这是存放用户数据的单例。单例的好处是可以在其他组件中使用。
4.3、DYDemoLogin
这是组件对外的入口,其他项目使用DYDemoLogin666组件时只允许DYDemoLogin作为入口,这种做法是为了降低耦合。做法不唯一,这里也可以采用Casa Taloyum的组件化解藕方案:CTMediator
5、组件导入主工程
模块组件与基础组件差别在于:模块组件不需要分版本。 所以这里选择另一种导入方案:不提交至私有Repo而直接导入。
5.1、DYDemo666的Podfile修改如下,并对工程进行pod update
use_frameworks!

platform :ios, '10.0'

source 'https://github.com/CocoaPods/Specs.git'  # 官方库
source 'http://github.com/liyunxin/DYDemoSpecs.git' # 私有库

target 'DYDemo666' do
  pod 'DYDemoTools'
  pod 'DYDemoLogin666', :git => 'https://github.com/liyunxin/DYDemoLogin666.git'
end
5.2、添加PCH文件,并导入组件
#ifndef DYDemo666_pch
#define DYDemo666_pch

#import "DYDemoTools/DYDemoToolsHeader.h"
#import "DYDemoLogin666/DYDemoLogin.h"

#endif /* DYDemo666_pch */
5.3、接下来就可以在主项目里面使用DYDemo666组件的功能了,效果如下:
6、CTMediator的具体运用
CTMediator实现解藕的原理请查看原文
6.1、在DYDemoTools中添加CTMediator文件,并重新打Tag提交到Repo
6.2、在DYDemoLogin666添加个人信息界面
6.3、实现CTMediator相关逻辑文件
添加CTMediator的分类:CTMediator+DYDemoLogin
此分类名字可随意
#import "DYDemoTools/CTMediator.h"

@interface CTMediator (DYDemoLogin)

- (UIViewController *)ingoVC;

@end
#import "CTMediator+DYDemoLogin.h"

@implementation CTMediator (DYDemoLogin)

- (UIViewController *)ingoVC {
    return [self performTarget:@"DYDemoLogin"
                        action:@"InfoVC"
                        params:@{}
             shouldCacheTarget:NO];
}

@end
添加Target_DYDemoLogin类:
该类名称格式固定,成员方法的名称格式也固定
#import <Foundation/Foundation.h>

@interface Target_DYDemoLogin : NSObject

- (UIViewController *)Action_InfoVC:(NSDictionary *)param;
- (UIViewController *)Action_AboutVC:(NSDictionary *)param;

@end
#import "Target_DYDemoLogin.h"
#import "DYInfoController.h"

@implementation Target_DYDemoLogin

- (UIViewController *)Action_InfoVC:(NSDictionary *)param {
    return [[DYInfoController alloc] init];
}

- (UIViewController *)Action_AboutVC:(NSDictionary *)param {
    UIViewController *vc = [[UIViewController alloc] init];
    vc.view.backgroundColor = [UIColor whiteColor];
    vc.navigationItem.title = [NSString stringWithFormat:@"关于我们-%@", param[@"name"]];
    return vc;
}

@end
7、主项目中通过CTMediator
在进行使用之前给主项目配置一个Scheme:dydemo666
//可通过以下方法进行页面跳转
UIViewController *vc1 = [[CTMediator sharedInstance] ingoVC];
[self.navigationController pushViewController:vc1 animated:YES];

NSURL *url2 = [NSURL URLWithString:@"dydemo666://DYDemoLogin/InfoVC];
UIViewController *vc2 = [[CTMediator sharedInstance] performActionWithUrl:url2 completion:nil];
[self.navigationController pushViewController:vc2 animated:YES];

NSURL *url3 = [NSURL URLWithString:@"dydemo666://DYDemoLogin/AboutVC?name=heiheihei"];
UIViewController *vc3 = [[CTMediator sharedInstance] performActionWithUrl:url3 completion:nil];
[self.navigationController pushViewController:vc3 animated:YES];具体请查看DYDemo666
