设计模式系列专题(更新中)
一、定义
用原型实例指定创建对象的种类,并且通过拷贝这些原型创建新的对象。(来源:百度百科)
原型模式可以说是最简单的设计模式之一了,从定义就可以知道它的全部内容。通过从“原型实例”中拷贝出新的对象。拷贝出新的对象,所以也可以认为原型模式就是创建对象的另一种方式。 Java中Object已经为我们提供了clone方法,此方法是一个native方法(C、或C++实现的),用来帮我们拷贝对象,不过这种拷贝是浅拷贝。
二、拷贝
浅拷贝
被复制对象(一个新的对象实例)的所有变量都含有与原来的对象相同的值,对于基本数据类型的属性复制一份给新产生的对象,对于非基本数据类型的属性仅仅复制一份引用给新产生的对象。即对于对象类型的实例变量,新拷贝出来的对象里面的变量指向的对象与原来对象是同一个对象。
深拷贝
被复制对象(一个新的对象实例)的所有变量都含有与原来的对象相同的值,而那些引用其他对象的变量将指向被复制过的新对象(新内存空间),而不再是原有的那些被引用的对象。
从这两个定义不知你是否知道了浅拷贝,深拷贝的区别,文字说明可能不太好理解,接下来看个小例子,可能就能一目了然。
package com.prototype;
/**
*父亲类
*/
public class Father {
    private String name;
    private int age;
    //省略get、set方法
}

/**
*学生类,java中实现拷贝的类必须实现Cloneable接口,其实这只是一个标记接口,
*接口并没有实际内容,否则调Object的clone方法会抛出异常
*/
public class Student implements Cloneable{

    private int stuNum;
    private String name;

    private Father father;

    public Student Clone(){
        Student stu = null;
        try {
            //调用Object提供的clone方法来拷贝
            stu = (Student) super.clone();
        } catch (CloneNotSupportedException e) {
            e.printStackTrace();
        }
        return  stu;
    }

    public  void showStuMsg(){
        System.out.println("学生名称:"+name+",学号:"+stuNum+",父亲名称:"+ father.getName()+",父亲年龄:"+ father.getAge());
    }
    //省略get、set方法
}

/**
测试代码
*/
package com.prototype;

public class TestMain {

    public static void main(String[] args) {

        //创建学生zhangsan
        Student zhangsan = new Student();
        zhangsan.setName("张三");
        zhangsan.setStuNum(14);
        Father fatherzhangsan = new Father();
        fatherzhangsan.setName("张三的老爸");
        fatherzhangsan.setAge(47);
        zhangsan.setFather(fatherzhangsan);
        //从zhangsan中拷贝出李四
        Student lisi = zhangsan.Clone();
        //设置李四名字,学号
        lisi.setName("李四");
        lisi.setStuNum(15);
        //改变李四的父亲名称,年龄
        lisi.getFather().setName("李四的老爸");
        lisi.getFather().setAge(48);
        //展示学生信息
        zhangsan.showStuMsg();
        lisi.showStuMsg();
    }
}
执行结果

可以看到,我们改了李四的父亲的名称,年龄,结果张三的父亲也跟着改变了,这其实是因为张三、李四指向同一个父亲对象了。而改变学号,并没有同步改变了张三的学号。这就是浅拷贝,对基本类型变量会创建新变量;对对象类型变量,变量同被拷贝者指向一样的对象。
深拷贝
那么怎么实现深拷贝呢?有两种方式:
方式一
//让父亲类提供克隆方法
package com.prototype;

public class Father implements Cloneable{
    private String name;
    private int age;
    //省略get、set方法
    public Father clone(){
        Father father = null;
        try {
            father = (Father) super.clone();
        } catch (CloneNotSupportedException e) {
            e.printStackTrace();
        }
        return father;
    }
}
//学生类clone时,克隆父亲类
package com.prototype;

public class Student implements Cloneable{
    private int stuNum;
    private String name;
    private Father father;

    public Student Clone(){
        Student stu = null;
        try {
            stu = (Student) super.clone();
            //克隆父类,并设置到拷贝出来的学生类里
            stu.setFather(father.clone());
        } catch (CloneNotSupportedException e) {
            e.printStackTrace();
        }
        return  stu;
    }

    //省略get、set方法
    public  void showStuMsg(){
        System.out.println("学生名称:"+name+",学号:"+stuNum+",父亲名称:"+ father.getName()+",父亲年龄:"+ father.getAge());
    }
}
//测试代码同上...
执行结果,可以看到张三、李四各有自己父亲了。

方式二
不需要实现Cloneable接口了,父亲类和学生类都实现Serializable,通过对象流来拷贝
//父类
package com.prototype;

import java.io.Serializable;

public class Father implements Serializable{
    private String name;
    private int age;
    //省略get、set方法
}

//学生类
package com.prototype;

import java.io.*;

public class Student implements Serializable{

    private int stuNum;
    private String name;
    private Father father;
    //通过Object流来拷贝
    public Student deepClone(){
        ByteArrayOutputStream bo = new ByteArrayOutputStream();
        ObjectOutputStream oo = null;
        try {
            oo = new ObjectOutputStream(bo);
            //将当前对象写入到流里面
            oo.writeObject(this);
            ByteArrayInputStream bi = new ByteArrayInputStream(bo.toByteArray());
            ObjectInputStream oi = new ObjectInputStream(bi);
            //从流里面对出对象,即位拷贝出来的对象
            return (Student) oi.readObject();
        } catch (IOException e) {
            e.printStackTrace();
        }catch (ClassNotFoundException e){
            e.printStackTrace();
        }
        return null;
    }
    //省略get、set方法
    public  void showStuMsg(){
        System.out.println("学生名称:"+name+",学号:"+stuNum+",父亲名称:"+ father.getName()+",父亲年龄:"+ father.getAge());
    }
}
//测试代码同上,只修改调用的拷贝方法名

Student lisi = zhangsan.deepClone();
执行结果同方式一。
三、UML图
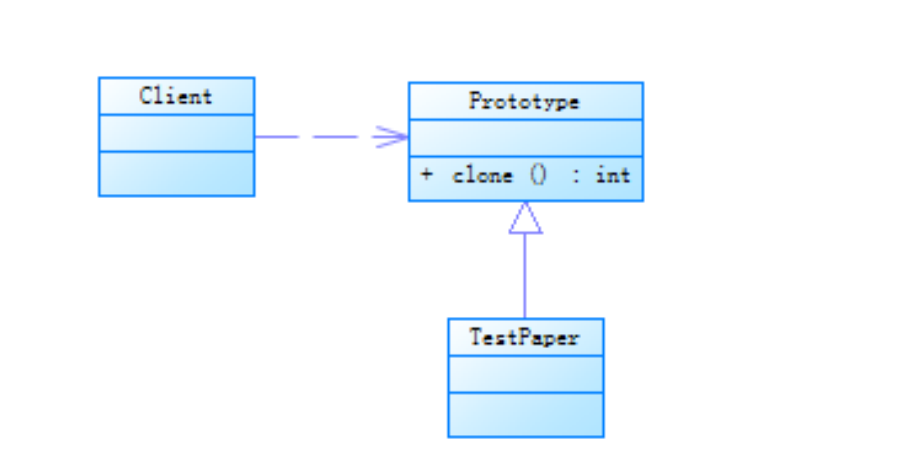
照例,我们依然通过例子来了解这个“原型模式”这个设计模式。场景:我们有一份试卷的原型,希望通过这份试卷拷贝出多份,供考试使用。看看原型模式的UML图
Prototype抽象类(原型抽象类)定义了一个clone方法。
TestPaper具体的原型类,实现clone方法。

四、代码实现
看过了上面的浅、深拷贝,代码实现也很简单了,只需按照UML图编写对应的几个类即可。这里我们增加一个阅读题类,通过深拷贝来复制试卷。
//原型抽象类
package com.prototype;

public abstract class Prototype {
    public abstract Prototype Clone();
}

//阅读题类************************************************************************
package com.prototype;
/**
 * 阅读题
 */
public class ReadingTopics extends Prototype implements Cloneable{
    private String topicTitle;
    private String topicContent;

    public ReadingTopics(String topicTitle, String topicContent) {
        this.topicTitle = topicTitle;
        this.topicContent = topicContent;
    }
    //省略get、set方法
    @Override
    public Prototype Clone() {
        ReadingTopics readingTopics = null;
        try {
            readingTopics = (ReadingTopics) super.clone();
        } catch (CloneNotSupportedException e) {
            e.printStackTrace();
        }
        return readingTopics;
    }

}

//试卷类*************************************************************************
package com.prototype;

public class TestPager extends Prototype implements Cloneable{

    private String paperTitle;//试卷标题
    private ReadingTopics readingTopics;//阅读理解

    public  void showPagerContent(){
        System.out.println("*******试卷内容*******");
        System.out.println("试卷:"+paperTitle);
        System.out.println("阅读题:"+readingTopics.getTopicTitle()+","+readingTopics.getTopicContent());
        System.out.println("********结束*********");
    }
    //省略get、set方法
    @Override
    public Prototype Clone() {
        TestPager testPager = null;
        try {
            testPager = (TestPager) super.clone();
            testPager.setReadingTopics((ReadingTopics) readingTopics.Clone());
        } catch (CloneNotSupportedException e) {
            e.printStackTrace();
        }
        return testPager;
    }
}
//测试类**************************************************************************
package com.prototype;

public class TestMain {

    public static void main(String[] args) {
        TestPager testPager = new TestPager();
        testPager.setPaperTitle("高二语文试卷");
        testPager.setReadingTopics(new ReadingTopics("水浒传选读","武松打虎片段!!"));

        TestPager cloneObj = (TestPager) testPager.Clone();
        cloneObj.getReadingTopics().setTopicTitle("三过演义");
        cloneObj.getReadingTopics().setTopicContent("草船借箭片段!!");
        testPager.showPagerContent();
        cloneObj.showPagerContent();

    }
}
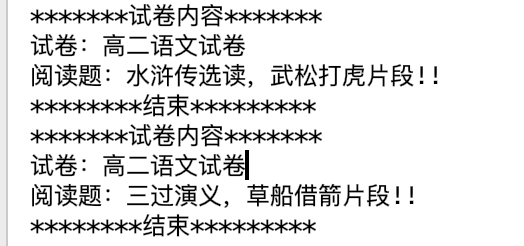
执行结果,可以看到我们成功拷贝出一份新的试卷。

五、结论总结
很明显,原型模式就是从已有对象拷贝出一个状态与已有对象一摸一样的新对象。主要的应用场景:构造函数执行时间很长,执行效率低,即可采用拷贝(克隆,并不走构造方法)。
参考:《大话设计模式》